JRC JMA-9832-SA User manual

MARINE RADAR
EQUIPMENT
INSTRUCTION
MANUAL


– i –
PREFACE
Thank you very much for purchasing the JRC marine radar equipment, JMA-9800 ARPA series.
This equipment is a marine radar equipment designed to obtain safe operation of marine ships.
This equipment consists of a radar signal transmitter-receiver unit, a CRT display unit and a scanner
unit as its main units.
●Before operating the equipment, be sure to read this instruction manual carefully for correct
operation.
●Maintain this instruction manual so that operators can refer to it at anytime.
●Refer to this manual when any inconvenience or diffect occur.

–ii –
●Before Operation●
Pictorial Indication
Various pictorial indications are included in this manual and are shown on these equipment so that you
can operate them safely and correctly and prevent any danger to you and/or to other persons and any
damage to your property during operation. Such indications and their meanings are as follows.
Please understand them before you read this manual:
Examples of Pictorial Indication
The mark represents CAUTION (including DANGER and
WARNING).
Datailed contents of CAUTION (“Electric Shock” in the example on
the left.) is shown in the mark.
The mark represents prohibition.
Datailed contents of the prohibited action (“Disassembling
Prohibited” in the example on the left.) is shown in the mark.
The ●mark represents instruction.
Datailed contents of the instruction (“Disconnect the power plug”in
the example on the left.) is shown in the mark.
Warning Label
There is a warning label on the top cover of the equipment.
Do not try to remove, break or modify the label.
WARNING
This indication is shown where any person is supposed to be in danger
of being killed or seriously injured if this indication is neglected and
these equipment are not operated correctly.
This indication is shown where any person is supposed to be injured or
any property damage is supposed to occur if this indication is
neglected and these equipment are not operated correctly.
CAUTION

–iii –
●Cautions to be Used during Operation●
Do not touch the insides of the scanner, transmitter-
receiver and display unit.
Touching any high voltage area, you will get an electric shock. For maintenance,
inspection and adjustment of internal parts of these equipment, consult with our
sales office or distributor in your district.
Since the scanner radiator rotates, do not approach it.
The scanner may start rotating suddenly, and consequently any person may be
struck and be injured. We recommend you to install the scanner radiator on the
roof of the wheel house, flying bridge, trestle, radar mast or any other high position
so that no person can approach it. When servicing the scanner, set the scanner
safety switch to the “OFF”position.
SCANNER RADIATION HAZARD
Never look up the antenna from which radiation is being
output from a distance less than the following.
Injury may result from exposure to radiation produced by the antenna (particularly
effects to the eyes) at a distance from the central front face of the antenna less than:
0.6 meter for NKE-1059/1052 (Radiation power density of 10 W/m2)
1.1 meter for NKE-1079/1075 (Radiation power density of 10 W/m2)
25 cm for NKE-1079/1075 (Radiation power density of 100 W/m2)
Install the scanner at any place higher than any person.
If being exposed directly to electric wave at close range, you may suffer adverse
influence.
When approaching the scanner for maintenance or
inspection, set the power switch of the display unit to the
“OFF”or “STBY”position.
If being exposed directly to electric wave to close range, you may suffer adverse
influence.
WARNING

–iv –
Use these radar only as assisting devices for navigation.
Also, the officer should make the final decision for
maneuvering by himself.
Use ARPA only as assisting device for navigation. Also,
the officer should make the final decision for maneuvering
by himself.
ARPA’s information such as vector, target value data, alarm, etc. may contain
some errors. Also, targets which cannot be detected with these radar cannot be
tracked at their acquisition points.
CAUTION

– v –
◆◆◆◆PRECAUTIONS BEFORE OPERATION◆◆◆◆
■Cautions for high voltage
High voltages from hundreds volts to tens of thousands volts are to be applied to the electronic
equipment such radio and radar devices. You do not face any danger during normal operation, but
sufficient cares are required for maintenance, inspection and adjustment of their internal
components. (Maintenance, check-up and adjustment of the inside of the equipment are prohibited
except by maintenance specialists.)
High voltages of tens of thousands volts are so dangerous as to bring an instantaneous death from
electric shock, but even voltages of hundred volts may sometimes lead to a death from electric
shock. To prevent such an accident, make it a rule to turn off the power switch, discharge capacitors
with a wire surely earthed on an end and make sure that internal parts are no longer charged before
you touch any parts inside these devices. At the time, wearing dry cotton gloves ensures you further
to prevent such danger. It is also a necessary caution to put one of your hands in the pocket and not
to use your both hands at the same time.
It is also important to select a stable foothold always to prevent additional injuries once you were
shocked by electricity. If you were injured from electric shock, disinfect the burn sufficiently and
get it taken care of promptly.
■What to do in case of electric shock
When finding a victim of electric shock, turn off the power source and earth the circuit immediately.
If it is impossible to turn off the circuit, move the victim away promptly using insulators such as dry
wood plate and cloth without touching the victim directly.
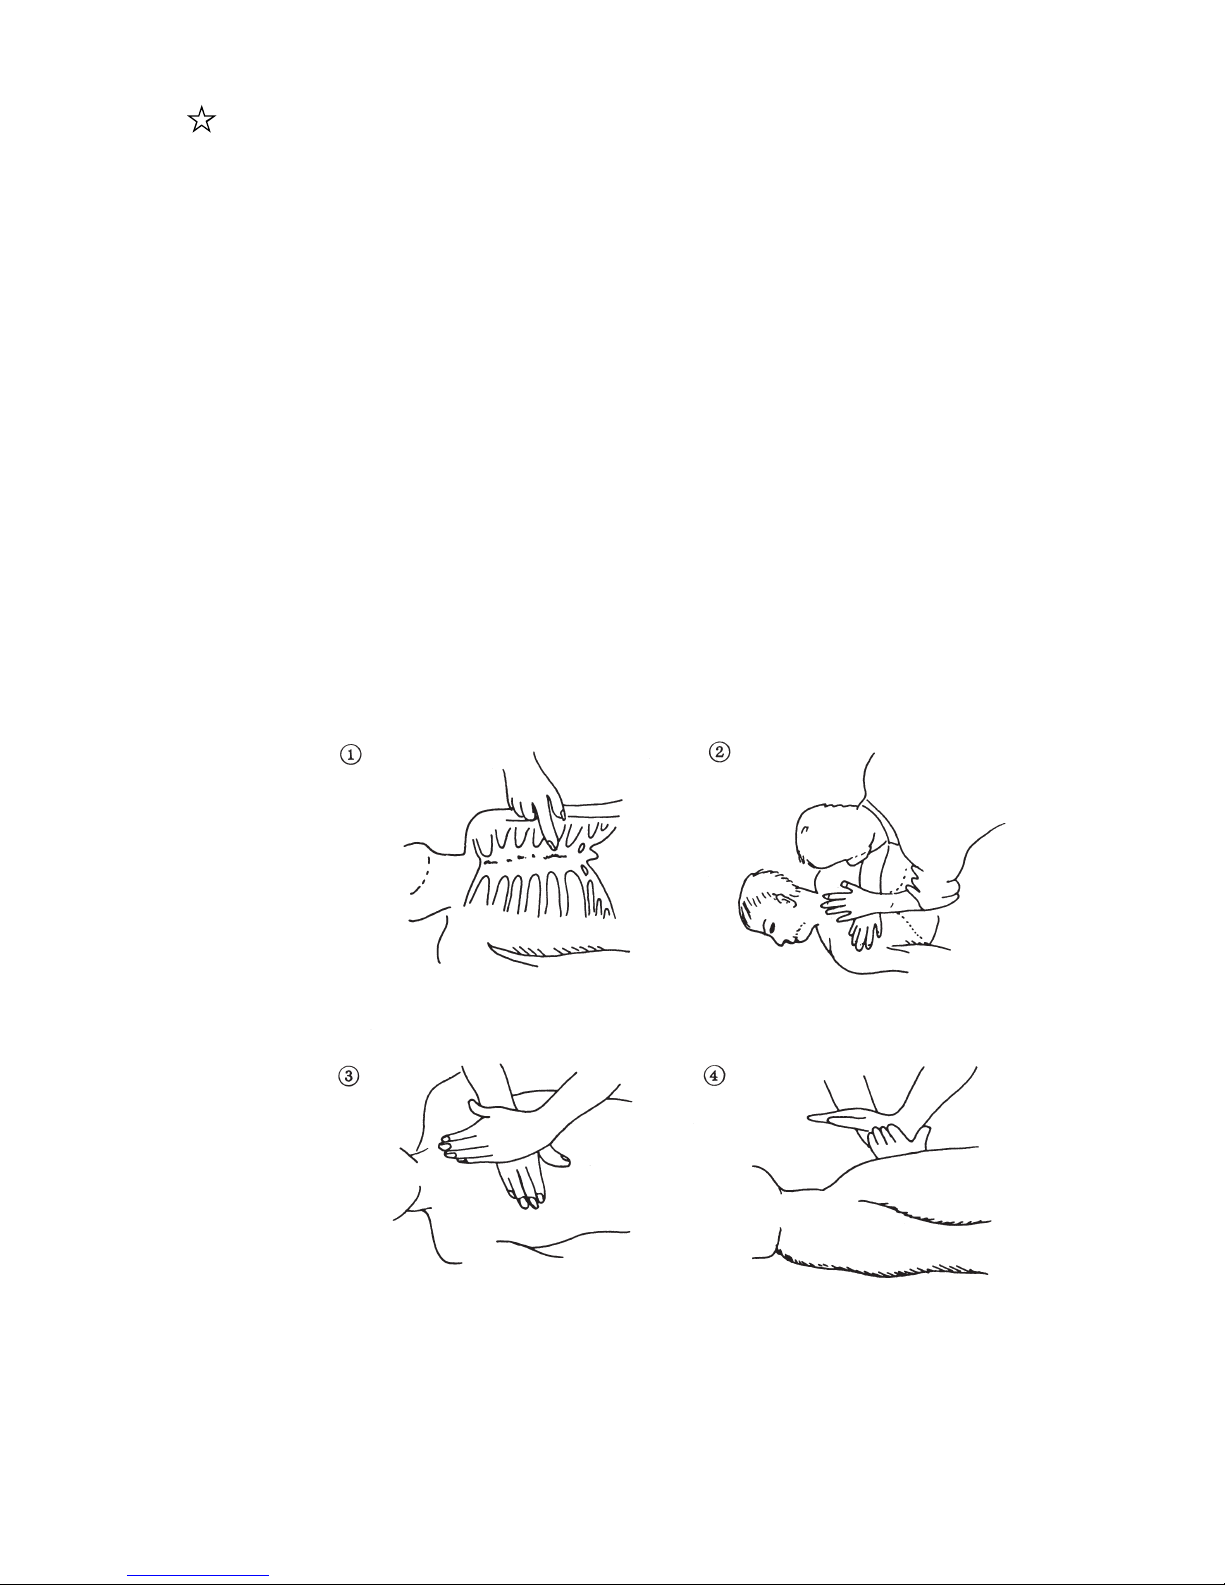
In case of electric shock, breathing may stop suddenly if current flows to the respiration center in
the brain. If the shock is not so strong, artificial respiration may recover breathing. When shocked
by electricity, the victim will come to look very bad with weak pulse or without beating, resulting in
unconsciousness and rigidity.

–vi –
◆◆◆◆◆◆◆◆◆FIRST-AID TREATMENTS◆◆◆◆◆◆◆◆◆
First-aid treatments
As far as the victim of electric shock is not in dangerous condition, do not move him and practice
artificial respiration on him immediately. Once started, it should be continued rhythmically.
(1) Do not touch the victim confusedly as a result of the accident, but the rescuer may also get an
electric shock.
(2) Turn off the power source calmly and move the victim away quietly from the electric line.
(3) Call a physician or ambulance immediately or ask someone to call a doctor.
(4) Lay the victim on his back and loosen his necktie, clothes, belt, etc.
(5) a. Examine the victim’s pulse.
b. Examine his heartbeat bringing your ear close to his heart.
c. Examine his breathing bringing the back of your hand or your face close to his face.
d. Check the size of the pupils of his eyes.
(6) Open the victim’s mouth and take out artificial teeth, cigarette or chewing gum if any. Keep
his mouth open, stretch his tongue and insert a towel or the like in his mouth to prevent the
tongue from suffocating. (If it is hard to open his mouth due to set teeth, open it with a
screwdriver and insert a towel in this mouth.)
(7) Then, close his mouth so that foaming mucus does not accumulate inside.

–vii –
When pulse is beating but breathing has stopped
(Mouth-to-mouth respiration) Fig.1
(1) Tilt the victim’s head back as far as this face looks back. (A pillow may be inserted his neck.)
(2) Push his jaw upward to open his throat wide (to spread his airway).
(3) Pinch the victim’s nostrils and take a deep breath, block his mouth completely with yours and
blow into his mouth strongly. Take a deep breath again and blow into his mouth. Continue
this 10 to 15 times a minute (blocking his nostrils).
(4) Carefully watch that he has recovered his natural breathing and stop practicing artificial
respiration.
(5) If it is difficult to open the victim’s mouth, insert a rubber or vinyl tube into one of his
nostrils and blow into it blocking the other nostril and his mouth completely.
(6) When the victim recovers consciousness, he may try to stand up suddenly, but let him lie
calmly and serve him with a cup of hot coffee or tea and keep him warm and quiet. (Never
give him alcoholic drinks.)
Method of mouth-to-mouth respiration by raising head
(1) Raise the victim’s head. Support
his forehead with one of your
hand and his neck with the other
hand. /q
When you tilt his head
backward, the victim, in most
cases, opens his mouth to the
air. This makes mouth-to-mouth
respiration easy.
(2) Cover his mouth as widely as
possible with yours and press
your cheek against his nose /
w
or, pinch his nostrils with your
fingers to prevent air from
leaking. /e
(3) Blow into his lungs. Continue
blowing into his mouth until his
breast swells. Blow into his
mouth as quickly as possible for
the first 10 times.
Fig.1 Mouth-to-mouth respiration

–viii –
When both pulse and breathing have stopped
Perform the (Cardiac massage) Fig.2 and (Mouth-to-mouth respiration) Fig.1
When no pulse has come not to be felt, his pupils are open and no heartbeat is heard, cardiac arrest
is supposed to have occurred and artificial respiration must be performed.
(1) Place your both hands, one hand on the other, on the lower one third area of his breastbone
and compress his breast with your elbows applying your weight on his breast so that it is
dented about 2 cm (Repeat compressing his breast 50 times or so a minute). (Cardiac
massage)
(2) In case of one rescuer,
Repeat cardiac massages about 15 times and blow into his mouth 2 times quickly, and repeat
this combination.
In case of two rescuers,
One person repeats cardiac massages 5 times while the other person blow into his mouth
once, and they shall repeat this combination. (Perform the cardiac massage and mouth-to-
mouth respiration)
(3) Examine his pupils and his pulse sometimes. When the both have returned to normal, stop
the artificial respiration, serve him with a cup of hot coffee or tea and keep him warm and
calm while watching him carefully. Commit the victim to a medical specialist depending on
his condition. (Never give him alcoholic drinks.) To let him recover from the mental shock, it
is necessary for persons concerned to understand his situations and the necessary treatments.
Fig.2 Cardiac massage

– ix –
EQUIPMENT APPEARANCE
Scanner Unit Type NKE-1079 (12 feet)
Transmitter-receiver Unit Type NTG-3037

–x –
Scanner Unit Type NKE-1075 (12 feet)

–xi –
Transmitter-receiver Unit Type NTG-3027
Scanner Unit Type NKE-1059-9 (9 feet)
Scanner Unit Type NKE-1059-7 (7 feet)

–xii –
Scanner Unit Type NKE-1052-9 (9 feet)
Scanner Unit Type NKE-1052-6 (6 feet)

–xiii –
Display Unit Type NCD-4111 (Self-standing Type)

–xiv –
Display Unit Type NCD-4111-T (Desktop Type) (Option)
Monitor Unit Type NWU-228 (Desktop Type) (Option)
Control Unit Type NDC-1097 (Desktop Type) (Option)
Keyboard Unit Type NCE-7292 (Desktop Type) (Option)

– xv –
PREFACE .....................................................................................i
Before Operation........................................................................ii
Cautions to be Used during Operation...................................iii
PRECAUTIONS BEFORE OPERATION
■Cautions for high voltage ................................................................................................v
■What to do in case of electric shock................................................................................v
FIRST-AID TREATMENTS
First-aid treatments.........................................................................................................vi
When pulse is beating but breathing has stopped .........................................................vii
When both pulse and breathing have stopped..............................................................viii
EQUIPMENT APPEARANCE ....................................................ix
GLOSSARY.............................................................................xxii
1. GENERAL AND EQUIPMENT
COMPOSITION
1.1 FUNCTIONS ..................................................................................1-1
1.2 FEATURES ....................................................................................1-3
1.3 CONFIGURATION .........................................................................1-5
1.4 EXTERIOR DRAWING...................................................................1-7
1.5 GENERAL SYSTEM DIAGRAM ..................................................1-20
1.6 COLLISION AVOIDANCE ............................................................1-27
2. NAME AND FUNCTION OF
CONTROL PANEL SWITCHES
AND FUNCTION OF
SOFTWARE BUTTONS
2.1 NAME AND FUNCTION OF CONTROL PANEL SWITCHES........2-1
2.2 FUNCTION OF SOFTWARE BUTTONS .......................................2-6
CONTENTS

–xvi –
3. BASIC OPERATION
3.1 FLOW OF OPERATION
■Power ON and Start the System...................................................................................3-2
■Observe and Adjust Video ...........................................................................................3-4
■Tuning Operations........................................................................................................3-6
■Acquire and Measurement Data...................................................................................3-7
■End the Operation and Stop the System.......................................................................3-7
3.2 MENU COMPOSITION..................................................................3-8
3.3 PREPARATION
■Tuning ........................................................................................................................3-11
■Sensitivity Control .....................................................................................................3-11
■Display Brilliance Control .........................................................................................3-11
■Contrast Control.........................................................................................................3-12
■Sea Clutter Suppresion...............................................................................................3-12
■Rain/Snow Clutter Suppression .................................................................................3-13
■Brilliance Control.......................................................................................................3-13
■Day/Night Mode Selection.........................................................................................3-19
■Color Setting ..............................................................................................................3-20
■Degaussing.................................................................................................................3-31
■Radar Interference Rejection......................................................................................3-31
3.4 BASIC OPERATIONS
■Move Cross Cursor Mark [ + ] by Trackball ............................................................3-33
■Methods for Setting Menu Item with the Trackball...................................................3-34
■Use EBLs (Electronic Bearing Lines)........................................................................3-40
■Set Floating EBL........................................................................................................3-43
■Select Range...............................................................................................................3-45
■Set Maximum Range..................................................................................................3-45
■Select Pulse Length....................................................................................................3-46
■Select Bearing Display Mode.....................................................................................3-46
■Cancel Ship’s Heading Line.......................................................................................3-47
■Cancel All Display Items Except HL and Cross Cursor Mark [ + ] ..........................3-47
■Display PI (Parallel Index Lines)...............................................................................3-48
■Select True/Relative Motion Display Mode .............................................................3-50
■Move Own Ship’s Display Position...........................................................................3-51
■Display Other Ships’Trails........................................................................................3-52
■Display Own Ship’s Track.........................................................................................3-53
■Marking......................................................................................................................3-56
■Display Range Rings..................................................................................................3-57
■Display Variable Range Markers ..............................................................................3-57
■Set Guard Zones.........................................................................................................3-59
■Reset Alarm Buzzer ...................................................................................................3-61
■Set Alarm Sound Level ..............................................................................................3-62
■Check Operational Status...........................................................................................3-63
■FUNCTION ...............................................................................................................3-72
■Expand Targets...........................................................................................................3-73
■Display Processed Videos..........................................................................................3-74
■Reduce Radar Interference.........................................................................................3-75
■Personal Information..................................................................................................3-76
■Display of Navigational Information .........................................................................3-79
■Function of OPTION Switch .....................................................................................3-96

–xvii –
■Operation of Performance Monitor............................................................................3-97
■EBL Maneuvering....................................................................................................3-103
4. MEASUREMENT OF RANGE
AND BEARING
■Measurement by Trackball...........................................................................................4-1
■Measurement by Range Rings .....................................................................................4-2
■Measurement by EBLs and VRMs ..............................................................................4-2
■Measurement between Two Optional Points ...............................................................4-4
5. OPERATION OF ARPA
5.1 INITIAL SETTING
■Setting Collision Decision Criteria ..............................................................................5-2
■Automatic Setting Mode (System Start) ......................................................................5-4
■Setting Range Scale......................................................................................................5-4
■Setting Own Ship’s Speed............................................................................................5-5
5.2 DISPLAY MODE SETTING
■Setting Motion Display Mode......................................................................................5-7
■Setting Bearing Display Mode.....................................................................................5-7
5.3 TARGET ID No. DISPLAY ..............................................................5-8
5.4 TARGET ACQUISITION
■Automatic Acquisition .................................................................................................5-9
■Manual Acquisition....................................................................................................5-11
■Use of Automatic and Manual Acquisition Modes....................................................5-13
5.5 ARPA DATA DISPLAY
■Display of Vectors......................................................................................................5-14
■Display of Past Positions............................................................................................5-17
5.6 DATA DISPLAY
■Types of Data Display................................................................................................5-20
■Method of Displaying Target Data ............................................................................5-20
■Clearing Data Display................................................................................................5-22
5.7 ALARM DISPLAY
■Dangerous Target Alarm............................................................................................5-23
■Guard Zone Alarm .....................................................................................................5-24
■Lost Target Alarm......................................................................................................5-25
■System Function Alarm .............................................................................................5-26
■Gyro Set Alarm ..........................................................................................................5-26
5.8 TRIAL MANEUVERING
■Trial Maneuvering in the True Vector Mode.............................................................5-27
■Trial Maneuvering in the Relative Vector Mode .......................................................5-28
■Executing the TRIAL Function..................................................................................5-29

–xviii –
5.9 DELETING UNWANTED TARGETS
■Deleting Targets.........................................................................................................5-30
5.10 ARPA SETTING
■Simulation ..................................................................................................................5-33
■Gate Size ....................................................................................................................5-35
■Test Video..................................................................................................................5-37
6. TRUE AND FALSE ECHOES ON
DISPLAY
■Radar Wave with the Holizon......................................................................................6-1
■Strength of Reflection from the Targets.......................................................................6-3
■Sea Clutters ..................................................................................................................6-3
■False Echoes.................................................................................................................6-3
■Display of Radar Transponder (SART) .......................................................................6-6
7. MAINTENANCE
7.1 ROUTINE MAINTENANCE............................................................7-1
7.2 MAINTENANCE ON EACH UNIT
■Scanner NKE-1079/1075/1059/1052...........................................................................7-2
■Transmitter-receiver Unit NTG-3037/3027 .................................................................7-4
■Display Unit NCD-4111 ..............................................................................................7-5
■Coaxial Cable (JMA-9833-SA)....................................................................................7-5
■Wave Guide (JMA-9823-7XA/9XA)...........................................................................7-6
8. COUNTERMEASURES FOR
TROUBLE AND ADJUSTMENT
8.1 FUNCTION CHECK.......................................................................8-1
8.2 TROUBLESHOOTING .................................................................8-16
8.3 COUNTERMEASURES TO TROUBLE .......................................8-17
8.4 REPLACEMENT OF MAJOR PARTS
■Replacement of Magnetron (V1/V101/V201) ...........................................................8-24
■Replacement of TRHPL (A202/A303) (JMA-9833-SA/9832-SA) ...........................8-24
■Replacement of Diode Limiter (A203/A303)
(JMA-9823-7XA/9XA, JMA-9822-6XA/9XA) ........................................................8-24
■Replacement of PIN Attenuator (A302)
(JMA-9823-7XA/9XA, JMA-9822-6XA/9XA) ........................................................8-24
■Replacement of CRT (V1) .........................................................................................8-25
This manual suits for next models
5
Table of contents
Other JRC Marine Radar manuals

JRC
JRC JMR-5404-X User manual

JRC
JRC JMR-7230-S3 User manual

JRC
JRC JMR-5406-X User manual

JRC
JRC JMR-92 Series Quick start guide

JRC
JRC JMA-2253 Quick start guide

JRC
JRC JMA-9172-SA User manual

JRC
JRC JMA-5200MK2 - User manual

JRC
JRC JMA-7110-6XA User manual

JRC
JRC JMA-3300 Series User manual

JRC
JRC JMA-5300 Series User manual