Julius Marine S145 LED User manual

Version 07 / 2023
User Manual
LED LOCK AND BRIDGE
SIGNAL LANTERN
S145 LED

FOREWORD
With these operating instructions, we would like to give the user
useful instructions for the safe and proper operation of the signal
lantern S145 LED and enable professional maintenance.
Contents
Foreword . . . . . . . . . . . . . . . . . . . . . . . . . . . . . . . . . . . . . . . . . . . . . 3
Limitation of liability ................................... 4
Terms ................................................ 4
Safety ................................................ 5
Safety instructions..................................... 5
Technical data ........................................ 6
Set up and function .................................... 7
Composition .......................................... 8
Assembly ............................................ 11
Installation............................................ 14
Maintenance .......................................... 14
Troubleshooting ..................................... 14
Appendix ............................................. 15
Every person who is commissioned with the commissioning,
operation, maintenance and repair of the signal lantern must
have read and understood the operating instructions.
32

SAFETY
Safety instructions for maintenance,
assembly and repair work
Before cleaning, maintenance and repair
work, switch off the units and secure them
against unintentional restarting.
Regularly check loose cables for damage.
Have damaged cables replaced immediately.
Connecting cables must be laid in such a way
that they are protected against mechanical,
chemical and thermal inuences.
Selection of personnel and qualification
The personnel for operation and maintenance
must have the appropriate qualications for
this work.
The area of responsibility, competence
and supervision of the personnel must be
regulated by the supervision of the operators.
Connection and repair work may only be
carried out by qualied personnel.
SAFETY
INSTRUCTIONS
Safety instructions classify situations as
well as their type and severity of
consequences if the measures to avoid the
danger are not followed.
LIMITATION OF
LIABILITY
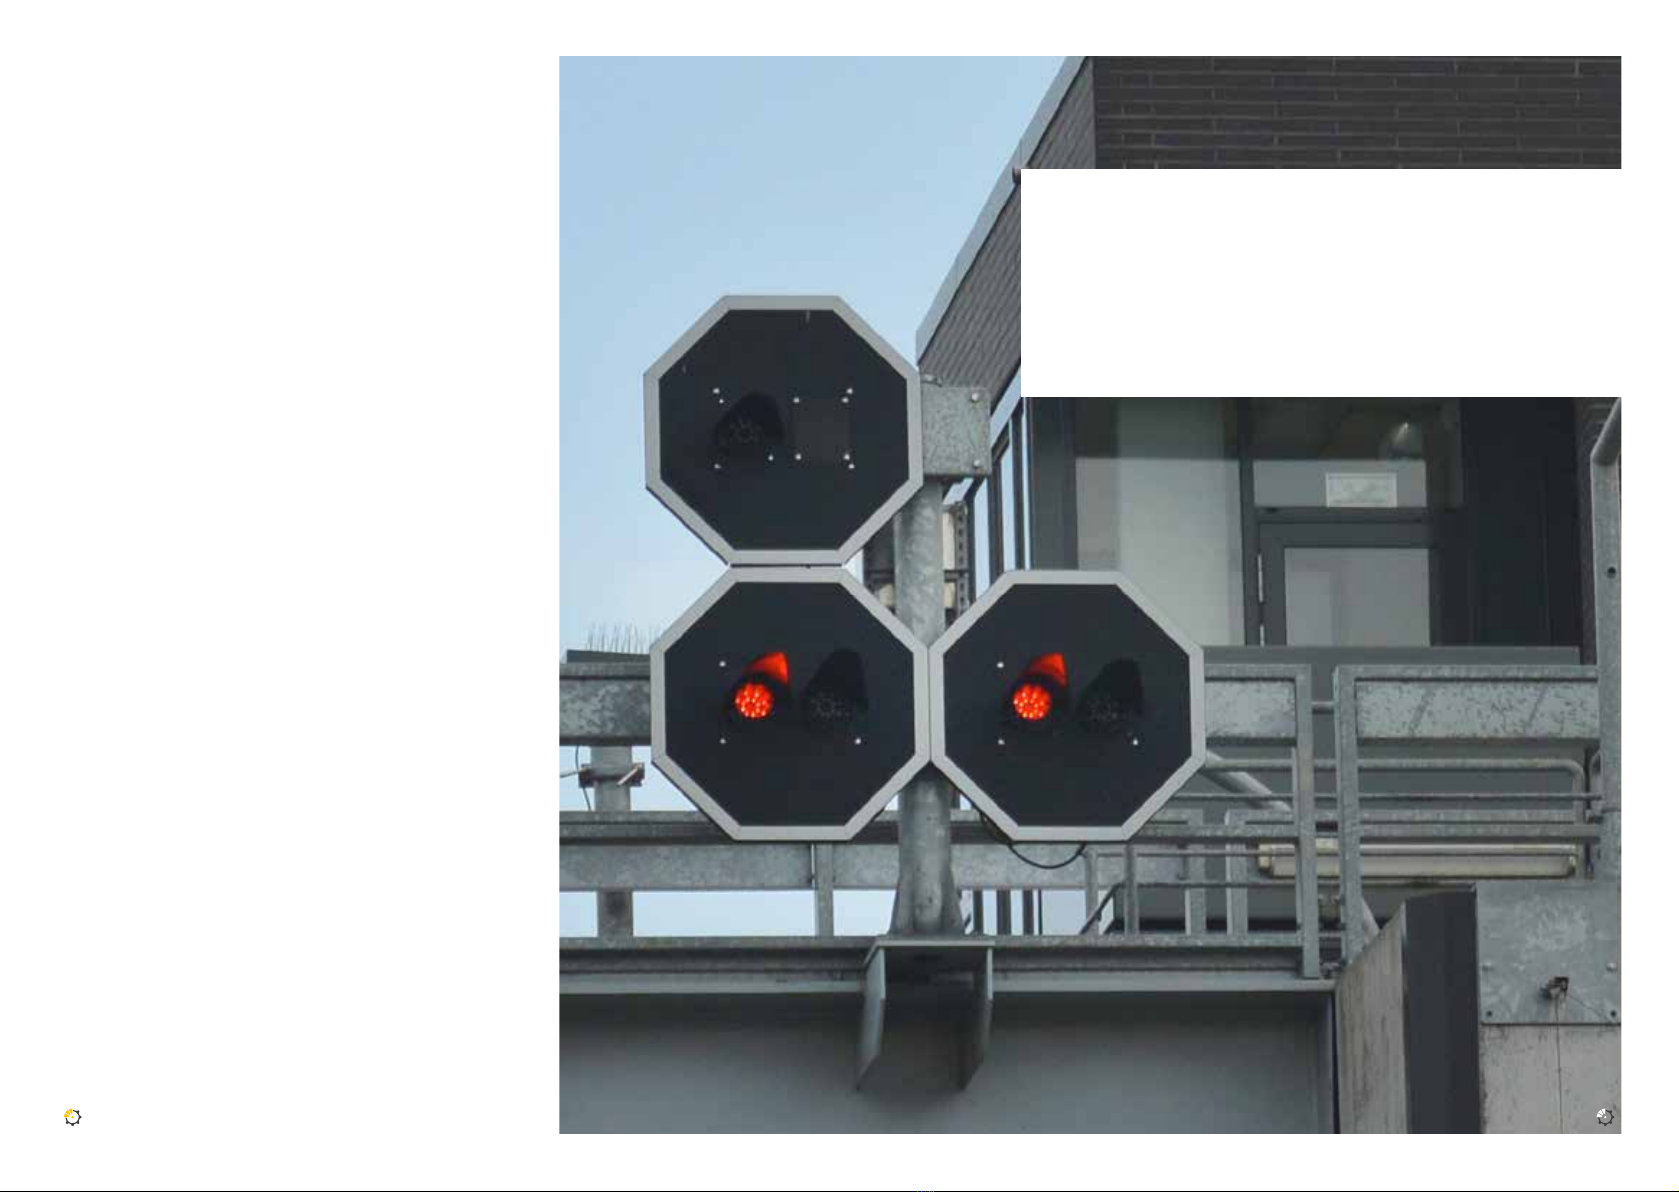
All technical information, data and
instructions for the operation and
maintenance of the signal lantern contained
in these user manual are correct at the
time of printing and are given to the best
of our knowledge, taking into account our
experience and knowledge to date.
We reserve the right to make technical
changes as part of the further development
of the signal lantern covered in this
user manual.
Therefore, no claims can be derived from the
information, illustrations and descriptions.
We accept no liability for damage and
malfunctions caused by operating errors,
non-observance of this user manual or
improper repairs. We strictly point out that
spare parts and accessories not supplied by
us have not been tested and approved. Any
liability for damage resulting from the use of
non-original spare parts and accessories is
excluded.
Opening sealed surfaces will invalidate
the warranty / guarantee claims against
the manufacturer. Furthermore, any
unauthorised conversions and modications
to the signal lantern are not permitted for
safety reasons and exclude any liability for
resulting damage.
Claims for damages, regardless of the legal
grounds on which such claims are derived,
are excluded.
TERMS
Operator
The term "operator" refers to anyone who
owns or is entrusted by the operator of the
signal lantern with specic tasks relating to
operation, running, maintenance, repair and
other tasks.
Skilled person (specialist)
A "specialist" is dened as someone who,
due to his technical training, has expert
knowledge and experience as well as
knowledge of the relevant regulations,
accident prevention regulations and operating
conditions and who can assess the work
assigned to him and recognise and avoid
possible hazards.
Warning
Warnings signal immediate
hazards that may result in serious
injury or death.
Caution
Cautions signal potential hazards that
may result in minor injury or damage
to the product.
Note
Notes provide relevant instructions
for better and easier handling of the
product. Furthermore, supplementary
information on the product may be
explained here.
54

SETUP AND
FUNCTION
Functional description
The signal lantern uses the latest LED
technology to generate light. The individual
high-performance LEDs are thermally and
electronically monitored during operation.
monitors to ensure optimal function.
When developing the signal, attention was
paid to easy integration into control systems.
Digital inputs are available for direct control,
which can be used to switch on or off the
lantern and can be used for dimming the
light at night.
The failure of the lantern can be reported via
an output, a broken cable can be detected by
the system.
The lantern can be powered directly with 12-
30 VDC. Expensive current monitoring relays
can be omitted.
The intensity of the signal and thus also the
power consumption can be adjusted. This
allows the signal to be optimally adapted
to the task to be performed. The optionally
available power resistor, which simulates a
higher power of the signal and thus allows
evaluation in existing systems, is used for
integration into existing systems.
The night reduction of the signal is activated
as soon as the supply voltage falls below
≈14.5 VDC. Until then, the intensity of the
day mode will be used. The intensity in night
mode can be adjusted in four stages. The
signal switches back from night mode to
day mode when the supply voltage exceeds
≈16.5 VDC.
Day setback
The daytime reduction can be selected
in three stages in order to meet the
respective requirements of the location
of the lock signal.
Night reduction
The night reduction can be selected in
four stages in order to meet the
requirements for the surrounding scattered
light. The night reduction refers to the value
of the day reduction, i. H. with a day and
night reduction of 50 % each, the intensity
of the signal is then reduced to 25 % in
nighttime operation.
Digital inputs / outputs
Two digital inputs can be used for control
by a PLC. A digital output can be evaluated
via a PLC. All I / Os are designed with
safety in mind, so that cable breaks can be
detected immediately.
Flashing operation - direction indicator
The lantern can be operated ashing via the
ON / OFF input signal. It must be noted that
with switch-on times < 1s, the LED error
detection can no longer work correctly. In
this case, defective LEDs may no longer be
correctly identied. In ashing mode, the
TECHNICAL DATA
DIMENSIONS, WEIGHT AND ENVIROMENT
Dimension without lens hood 220 mm x 281 mm
Operating temperature -25 °C – +50 °C
Storage temperature -30 °C – +70 °C
Relative humidity max. 98 %
Degree of protection IP54 (according to DIN EN 60529)
Housing seawater resistant
Weight 8 kg
LIGHT / ELECTRICAL DATA
Operating voltage
12-30 V
DC
Power consumption 4-20 W depending on the color
and intensity
Standby current 1 mA
Light colour red, green white
(IALA optimum according to
IALA Rec. E-200-1)
Electromagnetic compatibility DIN EN 60945
DIN EN 50293-200
ELECTRICAL DATA
(Stationary luminous intensity for white light)
Light colour
IALA
Rec E-200-1
Luminous intensity
I0(cd)
scattering angle
at 50 % of I0
Horizontal /
Vertical
(°) / (°)
scattering
angle
at 10 % of I0
Horizontal /
Vertical
(°) / (°)
Red 8.000 8 / 8 20 / 20
Green 8.000 9 / 9 21 / 21
White 7.000 8 / 8 19 / 19
76

monitoring switches off the signal after
approx. 5.5 minutes in the event of an error.
In the de-energized state, error states are
not saved.
Diagnosis
A microcontroller manage the internal
control of the signal and the complete
diagnosis of the individual functions. The
controller itself is monitored internally by
special circuit parts so that an error can be
detected.
COMPOSITION
View of the lock signal lantern
1
cable entry
2
LED insert
3
signal lantern
4
cover glass
5
housing cover
6
pressure compensation element
Front view of LED insert
View of LED insert inside
1
DIP switch
2
Terminal strip for connecting the supply
and control voltages
1
2
Für die Darstellung in der Bedienungsanleitung
Damit du die Zahlen richtig zuordnen kannst
A
A
B
B
1 (Kabeleinführung)
2 (LED Einsatz)
3 (Signallaterne)
4 (Abschlussglas / -scheibe
5 (Gehäusedeckel)
6 (Druckausgleichselement)
62 5
1
4
3
SETTING FUNCTION
1 1 lock signal
2 0 Signal shutdown on LED error → disabled
1Signal shutdown in case of LED error → activated
3 0 Lantern input ON / OFF inverted
(input active → signal OFF)
1 Lantern input ON / OFF inverted
(input active → signal ON)
4,5 0,0 Night mode 1 – 25 %
1,0 Night mode 2 – 50 %
0,1 Night mode 3 – 10 %
1,1 Night mode 4 – 3 %
6,7 0,0 Day mode 1 – 100 %
1,0 Day mode 2 – 70 %
0,1 Day mode 3 – 50 %
1.1 n. b.
8 0 4 strings
1 8 strings
Assignment of DIP switches
(standard version S145-LED)
Switch 2 activates or deactivates the signal
shutdown if one or more LEDs fail. If the
signal switch-off is activated, if one or more
LED strings fail, the signal would switch off
and the error output would be activated
(behaviour as with a signal with a light bulb).
If the signal is deactivated and one or more
LED strings fail, the signal would continue to
light up and the error output would be set.
Switch 3 is used to set whether the control
input signal ON / OFF is operated
non-inverting or inverting. Night mode is
selected with switches 4 and 5. In night
mode 1, the intensity is reduced to a level
of 25 % of the day value, mode 2 to 50 %,
mode 3 to 10 % and mode 4 to 3 %. Day
mode is selected with switches 6 and 7. In
day mode 2, the intensity is reduced to a
level of 70 % and mode 3 to 50 %. In mode
1 there is no reduction. Switch 8 is used to
set the number of power sources used. The
setting depends on the conguration of the
LED circuit board.
1
8
98

Assignment of DIP switches
(special variant S145-LED SW-1.0.5)
ASSEMBLY
In order to fasten the lock signal lantern
(1) to the lock signal group (2), the three
supporting bolts (3) must rst be mounted
in the pre-punched holes in the lock signal
group (2). Mount the support bolts (3) on the
lock signal group (2) as shown in the sketch.
The signal lanterns (1) are inserted from the
back of the lock signal group (2) through the
openings of the lock signal group (2) and
screwed to the three supporting bolts (3).
The barge is fastened to the front of the
lantern. The lantern can be moved in the
desired direction with the three supporting
bolts (3) and xed.
Electrical connection of the lock
signal lantern
The connecting cable must be wired
according to the assignment below.
Electrical connection
The supply and control cable is inserted
through the screw connection into the lock
lantern. The electrical connection is made
at the terminal strip. The terminal strip
is designed as a spring contact terminal.
With a suitable tool, the terminal is opened
by pressing from behind, the cable can be
inserted from below.
1
2
3
SETTING FUNCTION
1 1 lock signal
2,3 0,0 1 string defective
1,0 2 strings defective
0,1 3 strings defective
1,1 4 strings defective
4,5 0,0 Night mode 1 – 25 %
1,0 Night mode 2 – 50 %
0,1 Night mode 3 – 10 %
1,1 Night mode 4 – 3 %
6,7 0,0 Day mode 1 – 100 %
1,0 Day mode 2 – 70 %
0,1 Day mode 3 – 50 %
1,1 n. b.
8 0 4 strings
1 8 strings
Switches 2 and 3 are used to set the
number of defective diode strings at which
an error in the lantern is reported and the
lantern switches itself off. Depending on
the conguration of the signal, one or two
diodes are operated by one string.
Night mode is selected with switches 4 and
5. In night mode 1, the intensity is reduced to
a level of 25 % of the day value, mode 2 to
50 %, mode 3 to 10 % and mode 4 to 3 %.
Day mode is selected with switches 6 and 7.
In day mode 2, the intensity is reduced to a
level of 70 % and mode 3 to 50 %. In mode
1 there is no reduction. Switch 8 is used to
set the number of power sources used. The
setting depends on the conguration of the
LED circuit board.
Note
In the S145-LED SW-LB variant, the
signal activation can be inverted via
the "Signal ON / OFF" input.
Warning
The electrical connection may only
be carried out by a trained specialist!
The regulations of the local energy
supplier must be observed.
1
1110

The load resistance output is activated at
the same time as the LEDs of the S145-LED
signal, i. H. this signal can also be connected
to a PLC for evaluation purposes. there is
• Terminal 10 plus (power supply +)
• Terminal 11 minus (–)
In order to measure a correct signal, terminal
10 and terminal 11 must be terminated. To do
this, a resistor of 10-50k ohms must be tted
between terminals 10 and 11.
ASSIGNMENT OF THE CONNECTING CABLE
Service number Function
1Ubat operating voltage +24 VDC
2U0operating voltage 0 VDC
GN / YE (3) Equipotential bonding
4 Plus signal voltage Lantern On
5 Minus signal voltage lantern on
6 Plus signal voltage night reduction
7 Minus signal voltage night reduction
8 Output error collector
9 Output error emitter
10 load resistor (optional)
11 load resistor (optional)
Electrical connection
1312

error states are not saved when the power
is off. If the supply of the lock signal lantern
is only switched on for a short time, then the
switch-on time may be too short for the fault
detection to intervene.
Solution 2
Increase the duty cycle (>2.5 or 5 minutes). Or:
Apply the supply permanently and switch the
lock signal lantern on and off via the "Signal
voltage lantern on" input.
Problem 3
DIP switch S2 not set correctly.
Solution 3
Set DIP switch S2 to 1, remove the power
supply for at least 5 minutes and then switch
on the signal again.
APPENDIX
Site of installation
The signal system mast for mounting
the lock signal lantern must be rmly
mounted on a foundation that is designed
for these needs. Depending on the
requirements, the lock signal groups are
fastened to the mast with the clamp groups
at the top of the mast. The fastening screws
for the clamp group are pre-assembled in the
lock signal group.
INSTALLATION
The lock signal lantern is put into operation
by switching on the supply voltage.
MAINTENANCE
The lock signal is based on the latest LED
technology. The electronics are therefore
completely maintenance-free.
Maintenance refers to regular cleaning of the
cover lens. Standard cleaning agents should
be used for this. It must be ensured that
the protective coating of the housing is not
attacked by the cleaning agent.
TROUBLE
SHOOTING
The lock signal lantern is inactive
despite correct wiring.
Caused
If the electronics detect more defective
strands than specied (DIP switches),
it switches the LEDs off. The following
measures can then be used to restart:
•
Remove power supply for at least
5 minutes and then switch on again.
•
Give an OFF signal to "Signal voltage
lantern ON" (terminals 4 and 5) for
> 5 seconds.
The lock signal lantern does not
switch off the lantern despite
defective LEDs.
Problem 1
The electronics only switch off the S145 LED
when more defective strands than specied
(DIP switches) have been detected.
Solution 1
Check DIP switch position.
Problem 2
In ashing mode, in the event of an error, the
electronics switch off the lantern after approx.
5.5 minutes. In continuous light operation, the
electronics switch off the lantern after approx.
2.5 minutes in the event of an error. The
2.000
1.000 1.000
2.000
1.000 1.000
Lock signal group 1-part
shroud group
S145
Lock signal group
2-part
Clamp group
Ø 179
310 310
SPARE PARTS
Support bolt group 4-S145LED-MSet
Barge with strap 4-S145LED-SS
Warning
The foundation of the signal mast
must have sufcient strength.
Note
A simple soapy solution
is recommended.
1514

Julius Marine GmbH
Industriestraße 15 • 18069 Rostock • Germany
T+49 381 25295140 • ver[email protected]
Member of the
International Association of
Lighthouse Authorities
ISO 9001
certied
Table of contents