JVC EverioR GZ-RY980 Operating and maintenance manual

CAMCORDER
C8C_RY980_EU_EN
Detailed User Guide
GZ-RY980

Table of Contents
Getting Started
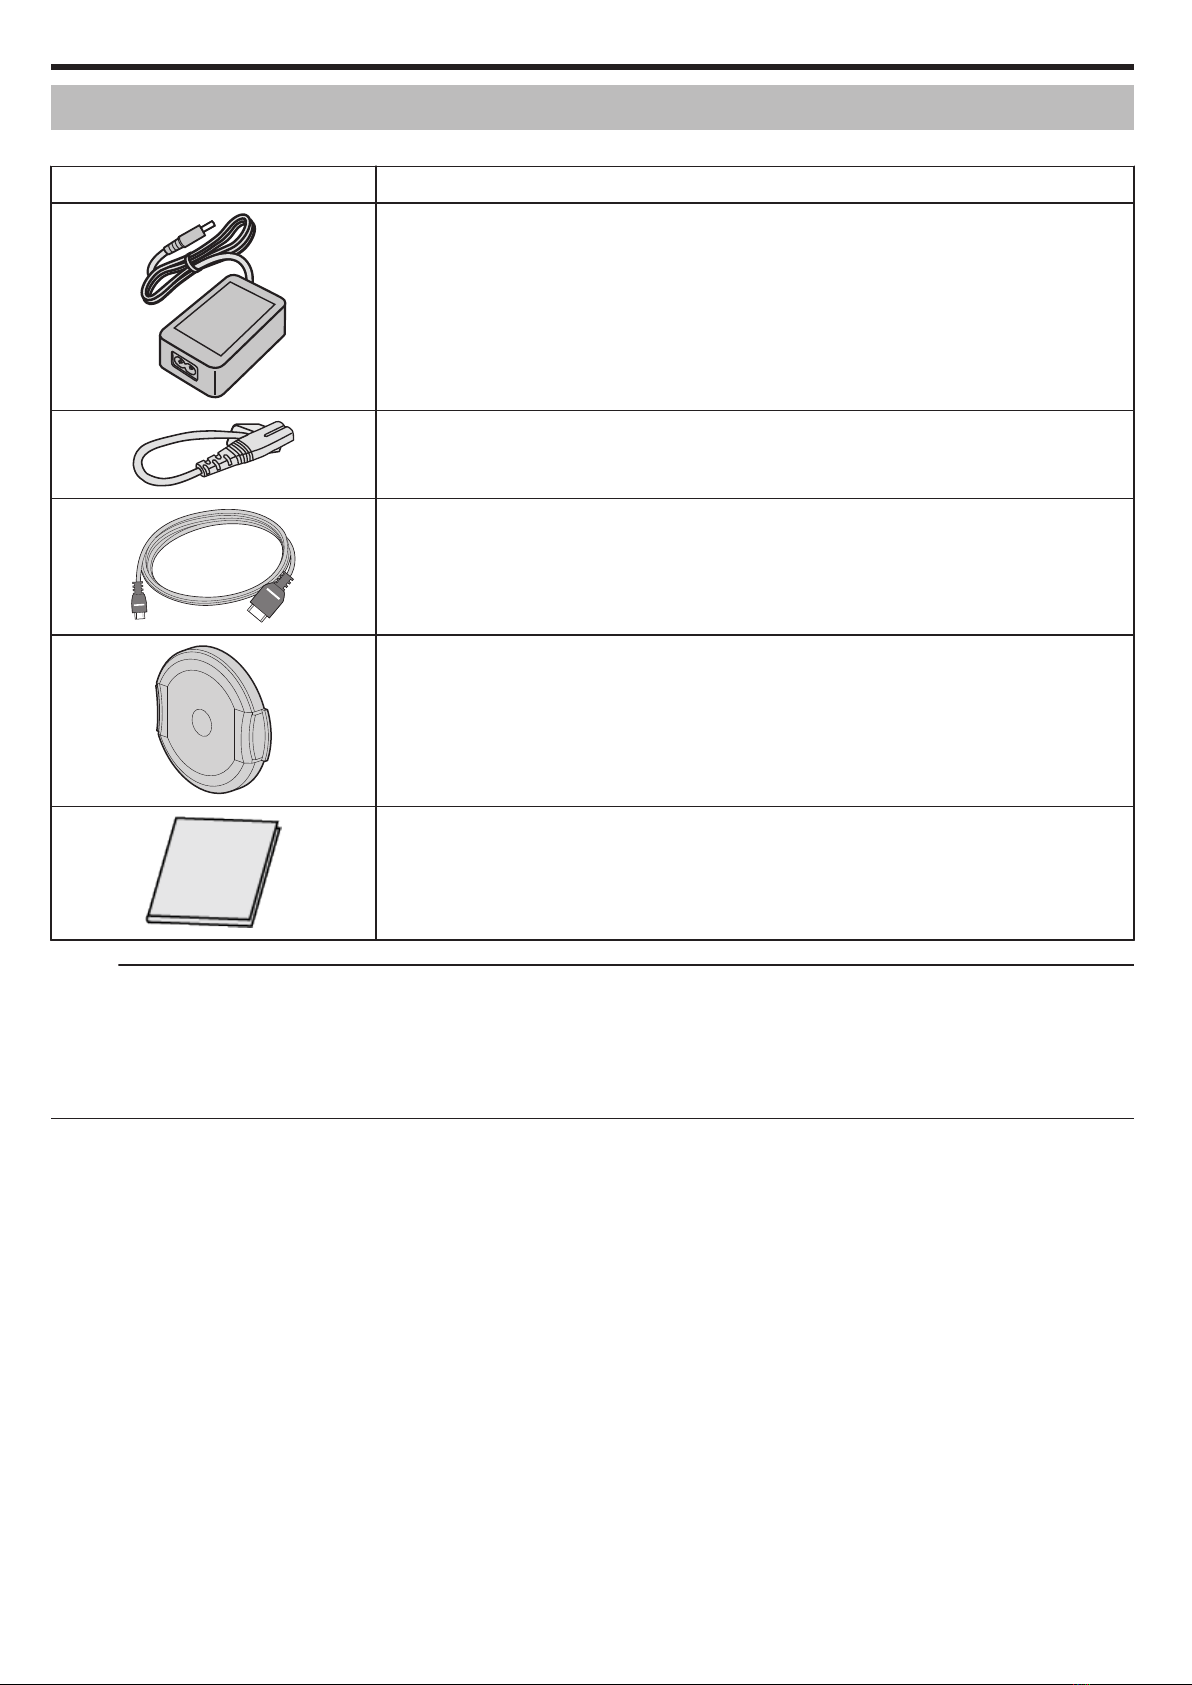
Verifying the Accessories ........................................................ 4
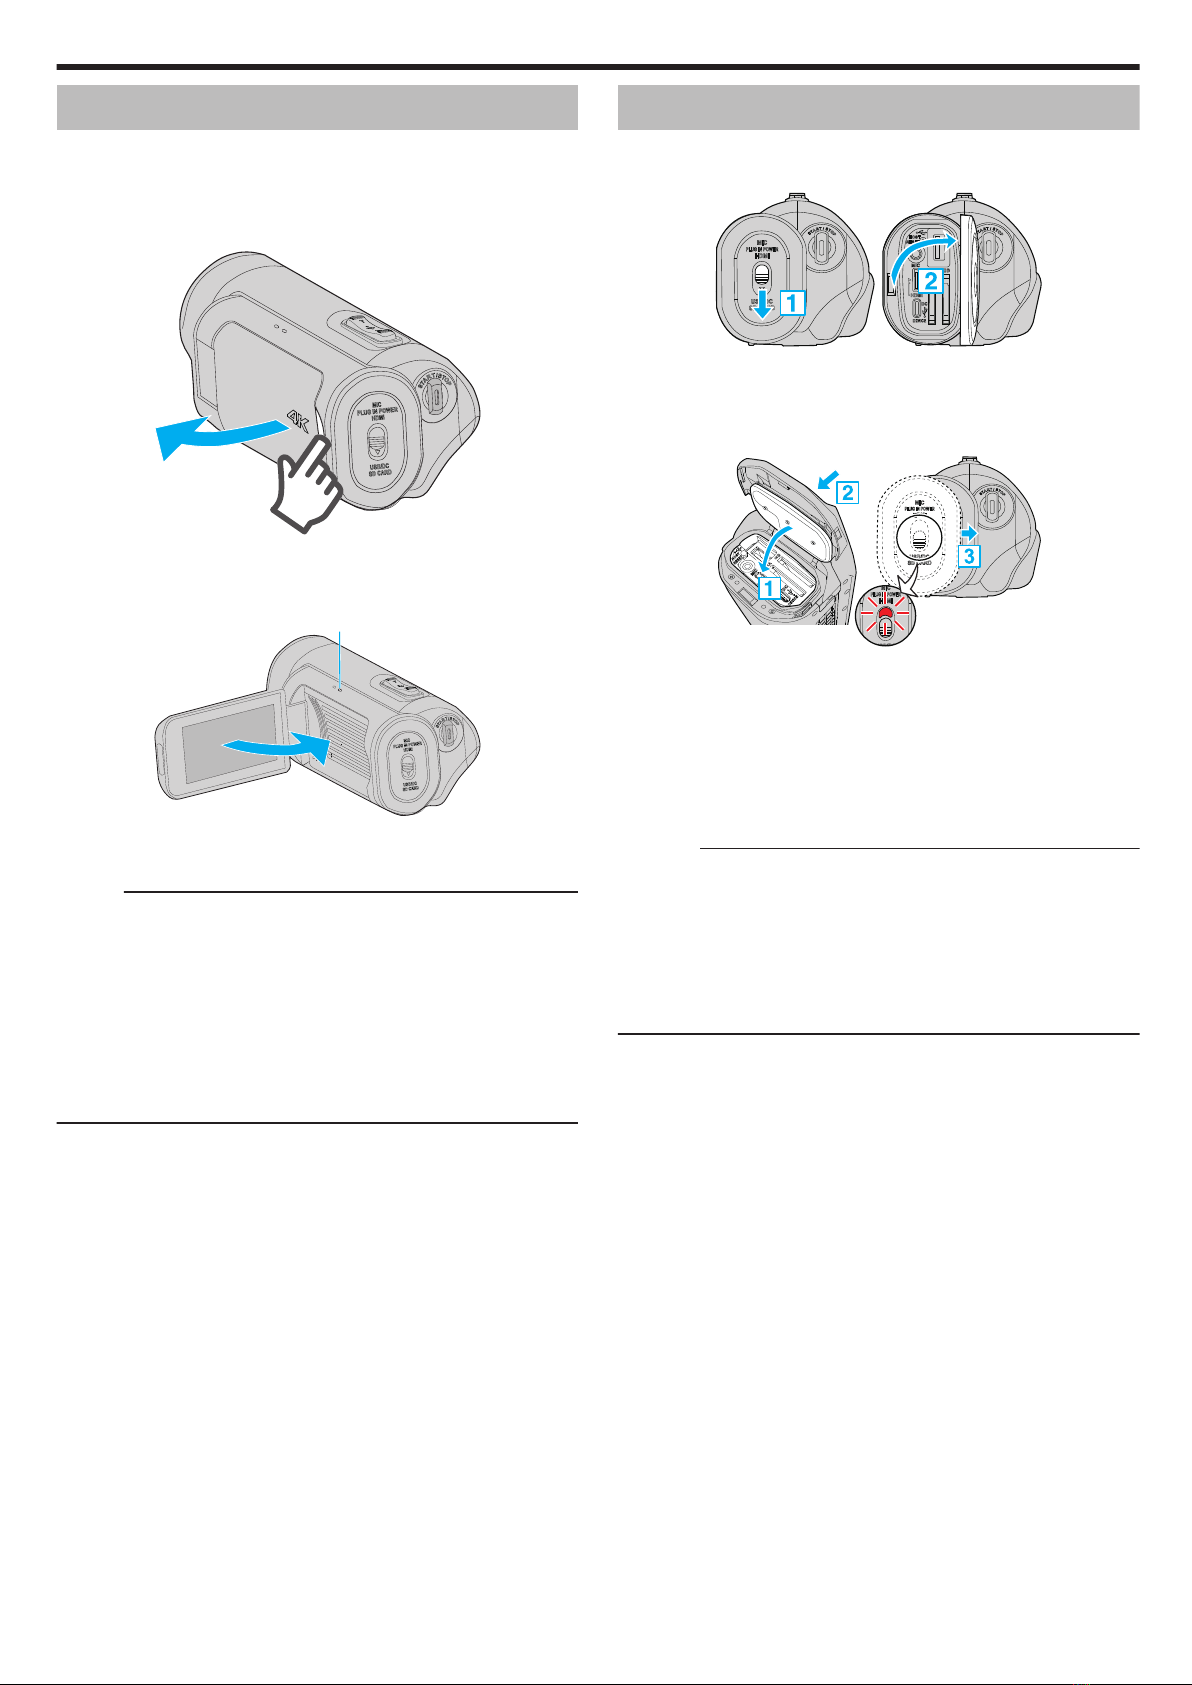
Turning on this Unit .................................................................. 5
Opening the Terminal Cover (SD Card Cover) ........................ 5
Charging .................................................................................. 6
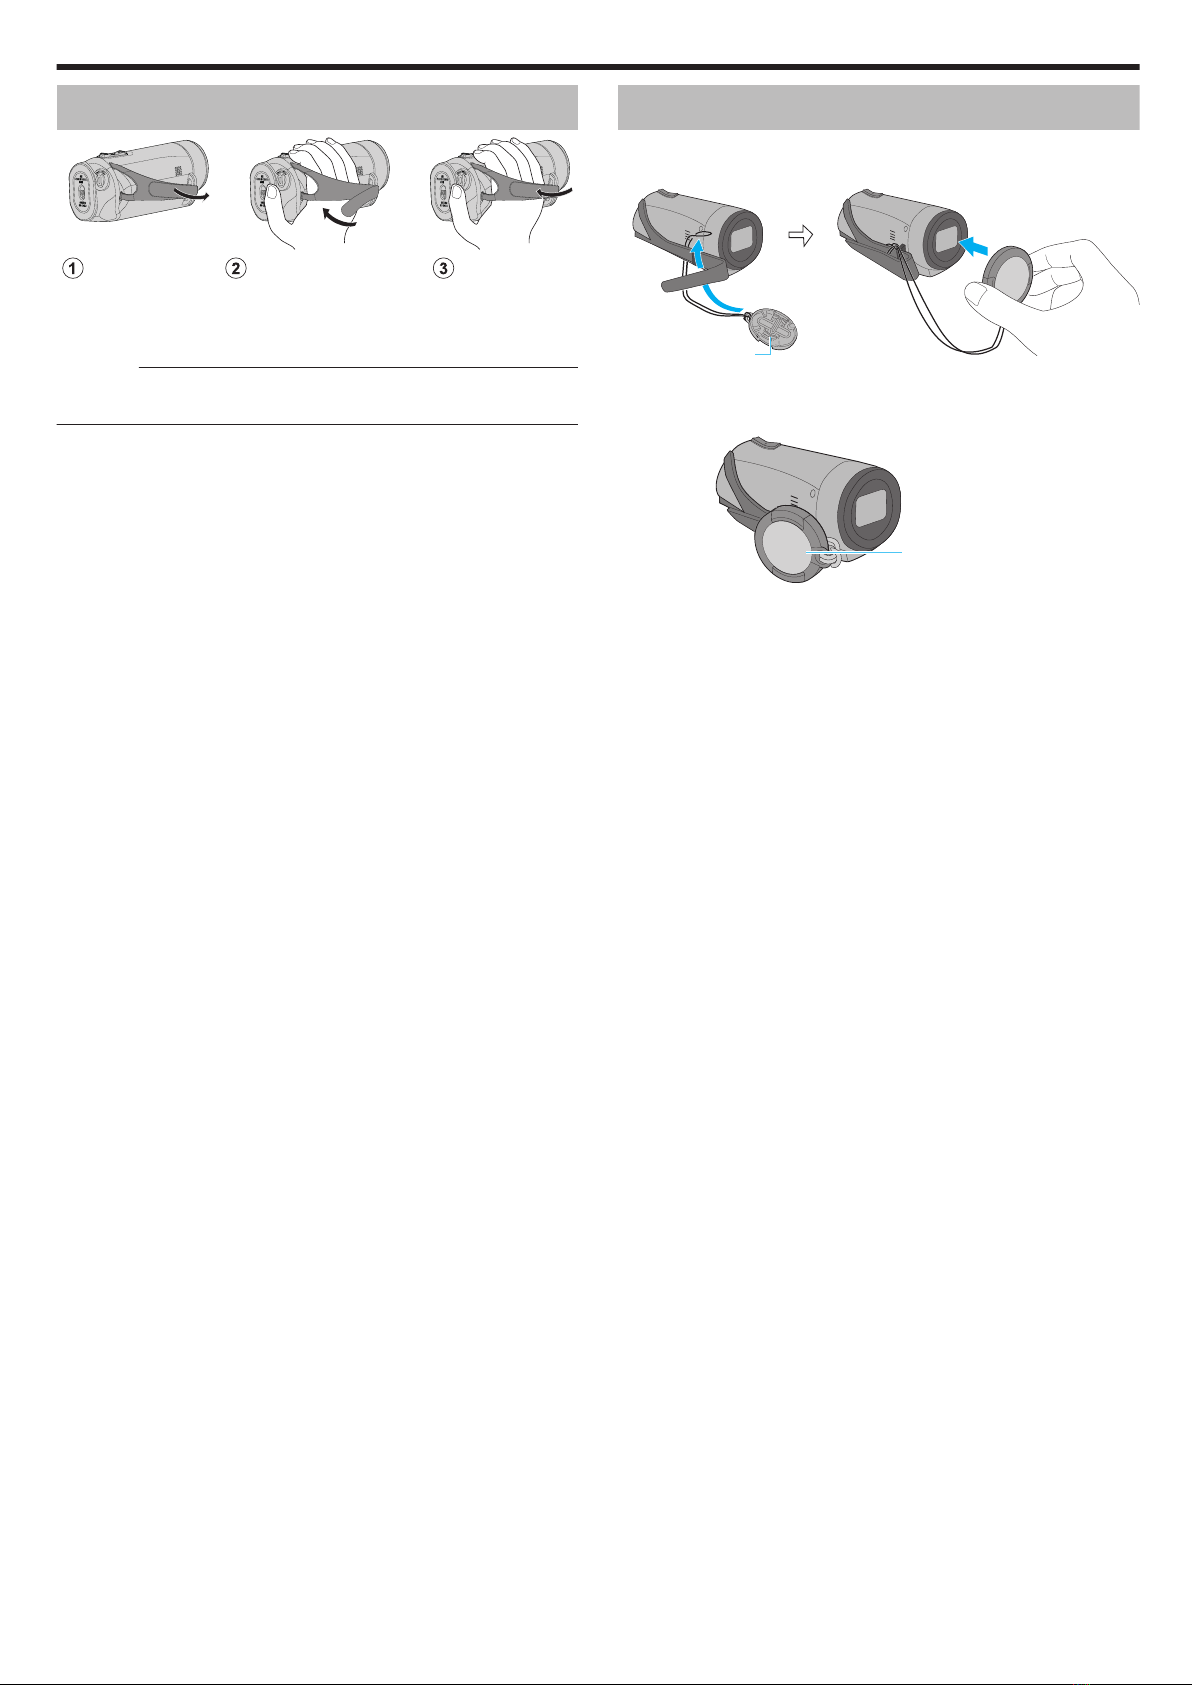
Grip Adjustment ....................................................................... 7
Attaching the Lens Cap ........................................................... 7
Inserting an SD Card ............................................................... 8
Types of Usable SD Card ..................................................... 8
Using the Touch Screen .......................................................... 9
Locking the Screen (when Shooting Underwater) ................ 9
Adjusting the Touch Screen ............................................... 10
Names of Buttons and Functions on the LCD Monitor ....... 11
Configuring the Initial Settings ............................................... 13
Readjusting the Clock after Initial Settings are Configured .... 14
Changing the Display Language after Initial Settings are
Configured ......................................................................... 14
Holding this Unit .................................................................... 15
Tripod Mounting .................................................................... 15
Using this Unit Overseas ....................................................... 16
Charging the Battery Pack Overseas ................................. 16
Setting the Clock to Local Time when Traveling ................. 16
Before Using Underwater or under Low Temperature ........... 18
Cautions on Using Underwater .......................................... 18
Maintenance after Use ....................................................... 18
Cautions on Using under Low Temperature ....................... 18
Other Precautions .............................................................. 18
Recording
Taking Videos in Auto Mode .................................................. 19
Capturing Still Images ............................................................ 21
Zooming ................................................................................ 21
Manual Recording ................................................................. 22
Adjusting Focus Manually (FOCUS) .................................. 23
Using the Focus Assist Function ........................................ 24
Enlarging the Image (EXPANDED) for Focus Adjustment .. 25
Adjusting Brightness .......................................................... 26
Setting Shutter Speed ........................................................ 27
Setting Aperture ................................................................. 28
Increasing the Light Sensitivity Level ................................. 29
Setting Backlight Compensation ........................................ 30
Setting White Balance ........................................................ 31
Recording Data to Both Slot A and Slot B .............................. 33
Slow-motion (High-speed) Recording .................................... 34
Shooting under Water ............................................................ 36
Capturing Subjects Clearly (TOUCH PRIORITY AE/AF) ....... 38
Reducing Camera Shake ....................................................... 39
Taking Close-up Shots (TELE MACRO) ................................ 40
Special Effect Recording ....................................................... 41
Time-lapse Recording (Time-Lapse Rec) .......................... 41
Pre Rec .............................................................................. 43
Scene Continuous .............................................................. 44
Using the Self-timer ............................................................... 45
Changing the Mode of Time Code (TC) Recording ................ 47
Checking the Remaining Battery Level and Recording Time . 48
Playback
Playing Back Videos .............................................................. 51
Normal Playback ................................................................ 51
Checking the Recording Date and Other Information ......... 54
Playing Back Still Images ....................................................... 55
Slideshow Playback ........................................................... 56
Connecting to and Viewing on TV .......................................... 57
Connecting via the HDMI Mini Connector .......................... 57
Editing
Deleting Unwanted Files ........................................................ 59
Deleting One Scene ........................................................... 59
Selecting and Deleting Multiple Scenes ............................. 60
Deleting All Scenes ............................................................ 62
Protecting Video Images ........................................................ 63
Protecting/Canceling Protection of the Displayed (Playback)
Scene ............................................................................. 63
Protecting/Releasing Protection of Selected Files .............. 63
Protecting/Canceling Protection of All Scenes ................... 65
Trimming Recorded Videos ................................................... 66
Capturing a Still Image from One Scene in a Video ............... 67
Copying
Backing up Data on a Computer ............................................ 68
When Using Windows 10 or Windows 8.1 ......................... 68
When Using Windows 7 ..................................................... 70
Using CyberLink PowerDirector ............................................. 72
Installing PowerDirector ..................................................... 72
Using PowerDirector .......................................................... 73
Verifying System Requirements (Guideline) ....................... 74
Dubbing Files to a Disc by Connecting to a Blu-ray Recorder 76
Using Wi-Fi
Wi-Fi Capabilities ................................................................... 77
Precautions on Using Wi-Fi ................................................... 77
How to Establish a Wi-Fi Connection ..................................... 78
Ways of Wi-Fi Connection .................................................. 78
Preparing for Connection ................................................... 79
Connecting ......................................................................... 79
Still Image Transfer ................................................................ 86
View Remote ......................................................................... 90
Registering/Deleting Preset Zoom ..................................... 91
Changing the Settings via a Web Browser ............................. 93
Live Streaming ....................................................................... 95
Settings Menu
Operating the Menu ............................................................... 97
Operating the Menu ........................................................... 97
Main Menu ............................................................................. 98
Camera Function Menu ......................................................... 99
Camera Process Menu ........................................................ 101
Detail Adjust Menu ........................................................... 104
White Balance Adjust Menu ............................................. 105
TC Menu .............................................................................. 106
Monitor Menu ....................................................................... 107
Shooting Assist Menu ...................................................... 109
Display Settings Menu ..................................................... 110
A/V Set Menu ....................................................................... 112
Video Set Menu ............................................................... 112
Audio Set Menu ............................................................... 112
System Menu ....................................................................... 114
Record Set Menu ............................................................. 117
Network Settings Menu .................................................... 120
Names of Parts ........................................................... 125
Indications on the LCD monitor ............................... 128
Troubleshooting ......................................................... 131
When the unit is not working properly .................................. 131
Charging .............................................................................. 131
Power supply ....................................................................... 132
Recording ............................................................................ 132
SD Card ............................................................................... 133
Playback .............................................................................. 133
Editing/Copying ................................................................... 134
Computer ............................................................................. 134
Screen/Image ...................................................................... 135
Other Problems ................................................................... 135
Error Message ..................................................................... 136
2

Verifying the Accessories
If any of the items are missing or defective, consult your JVC dealer or the nearest JVC service center.
Illustration Description
.
AC Adapter
UNI318-0530
0Charges this unit.
It can also be used when recording or playing back videos indoors.
.
Power Cord
0Connect the power cord to the AC adapter.
.
HDMI Mini Cable
0Connects this unit to a TV to play back recorded images on the TV in a better quality.
.
Lens Cap
0Attach the lens cap when this camera is not used or during transportation.
.
Basic User Guide
0Read well and keep in a safe place where it can be accessed easily when necessary.
Memo :
0Application software programs can be downloaded from CyberLink’s website.
“Using CyberLink PowerDirector” (A p. 72)
0SD cards are sold separately.
“Types of Usable SD Card” (A p. 8)
0When using the AC adapter overseas, please prepare a commercially available converter plug for the country or region of visit.
“Charging the Battery Pack Overseas” (A p. 16)
Getting Started
4

Turning on this Unit
Open the LCD monitor to turn on this unit.
To turn off the power, close the LCD monitor.
oTo turn on the power
Open the LCD monitor.
(Open carefully.)
.
oTo turn off the power
Close the LCD monitor.
(Close carefully.)
.
POWER/ACCESS Lamp
The POWER/ACCESS lamp goes off and the power is turned off.
The power can also be turned off from the menu.
“Operating the Menu” (A p. 97)
Memo :
0Set Demo mode to “Off” before using.
“ Demo Mode ” (A p. 115)
0When “Auto Power Off” is set to “On”, this unit turns itself off automatically
to conserve power when it is not operated for 5 minutes. (When using the
AC adapter, this unit goes into standby mode.)
“ Auto Power Off ” (A p. 115)
0If “LCD Closed Recording” is enabled, this unit does not turn off when the
LCD monitor is closed during recording or while it is connected to Wi-Fi.
(The power turns off when Wi-Fi is disconnected.)
“ LCD Closed Recording ” (A p. 115)
Opening the Terminal Cover (SD Card Cover)
oTo open
.
(Back of the camera)
ASlide the cover lock downward.
0The cover slides to the left automatically.
BLift the cover slowly.
oTo close
.
Not properly closed if the red mark
is visible.
AFlip down the cover slowly while making sure the gray waterproof seal
fits into the opening at the terminals.
BPress the entire cover against the camera with equal force and firmly
attach the cover completely.
CSlide the cover until it clicks into place.
(The cover is not properly closed if the red mark on the cover lock is
visible.)
Caution :
0Ensure that the terminal cover and the gray waterproof seal are not
damaged and that there are no foreign materials (such as hair, lint, sand
or dust) adhered on the cover.
0Stop using the unit underwater if there are damages to the cover, etc. and
consult your JVC dealer or the nearest JVC service center.
0Do not apply excessive force when opening/closing the terminal cover.
0Read the “Cautions on Using Underwater” (A p. 18) before using the
camera underwater or in places exposed to water droplets.
Getting Started
5

Charging
This unit is equipped with a built-in battery.
Open the connector cover, and connect the cable as shown in the figure.
.
CHARGE POWER/ACCE
S
Connect Power
Cord to Outlet
(AC 100 V to 240 V)
Power Cord (Provided)
AC Adapter (Provided)
To DC/USB Device Terminal (Type-C)
CHARGE Lamp
Lights up: Charging in
progress
Goes out: Charging
finished
Blinking: See below
Caution :
0The built-in battery is not charged at the time of purchase.
0At the time of purchase or in case of the battery is not used for a long period
of time, the charging time will be longer than usual.
0Charging time: Approx. 5 hours (when charging at 25°C)
0The battery cannot be charged outside the room temperature range of
10°C to 35°C. The CHARGE lamp blinks slowly as a notification if charging
does not start. If the temperature increases or decreases during charging,
the CHARGE lamp will blink slowly and charging will stop. When this
occurs, charge the camera again within the above room temperature
range.
0Using the supplied AC adapter allows charging to be performed
concurrently during recording or playback. (Charging time may be longer
than usual or charging may not be successful in some cases.) If the internal
temperature rises when using the unit, stop the charging temporarily. (The
CHARGE lamp blinks slowly when this occurs.)
0If malfunctions (such as overvoltage) occur, charging will stop. In these
cases, CHARGE lamp blinks quickly as a notification.
0During charging, the P icon on the screen changes to O to indicate that
charging is in progress. (when the provided AC adapter is used)
0When the recording time becomes extremely short even when the battery
is fully charged, the battery needs to be replaced. For details on replacing
the built-in battery (subject to a fee), consult the nearest JVC service
center.
Using a Power Bank
Connecting to a power bank charges the built-in battery of this unit and
supplies the power during recording.
0Usable power bank
– Output rating: 5 V, 3 A or higher
– Battery capacity: 10000 mAh or more (recommended)
– Power bank that comes with a USB Type-C terminal or a cable with a
USB Type-C plug on one end
* This unit is not guaranteed to operate with all power banks that meet the
above requirements.
Similar to the AC adapter, connect the cable of the power bank to the
DC/USB device terminal (Type-C).
Caution :
0Refer to “Caution” under the “Charging” section. The charging time is
about the same as the AC adapter.
0This camera may not be fully charged if the power bank used for charging
it has a small capacity.
0Do not apply strong force to the DC/USB terminal when recording with the
power bank connected. In addition, take note that the Waterproof, Dust-
proof, Drop-proof and Freeze-proof functions do not function when the
terminal cover is opened.
Memo :
0For details on using the power bank, refer to the instruction manual of the
power bank.
0For questions on the power bank, please consult the dealer or
manufacturer of the power bank.
Getting Started
6

Grip Adjustment
.
Fasten the belt
Adjust the length of the belt
Open the belt
AOpen the belt
BAdjust the length of the belt
CFasten the belt
Caution :
0Be sure to fasten the grip belt properly.
If the belt is loose, this unit may drop and result in injuries or damages.
Attaching the Lens Cap
Attach the cap to protect the lens when not shooting.
.
Lens Cap
oDuring recording
.
Fix to the grip belt
Getting Started
7

Inserting an SD Card
Before shooting, insert a commercially available SD card (4 GB to 512 GB)
into Slot A, Slot B or both slots.
“Types of Usable SD Card” (A p. 8)
“Approximate Video Recording Time” (A p. 50)
1Close the LCD monitor to turn off this unit.
.
2Open the terminal cover.
.
3Insert an SD card.
.
Label
Warning
0Make sure not to insert the SD card in the wrong direction.
It may cause damage to the unit and SD card.
0Before inserting or removing the SD card, close the LCD monitor and
ensure that the POWER/ACCESS lamp goes off.
0Do not touch the metal contact area when inserting the SD card.
Caution :
0When “System” is set to “HD”, videos with “Frame Rate” at 60p/60i and
50p/50i cannot be mixed on the same card.
0Before inserting a new SD card, check if the “Frame Rate” has been set
to the frame rate for shooting. (A p. 128)
To change the “Frame Rate”, do so before inserting a new card.
Memo :
0To use a new SD card or SD card used on other devices, it is necessary
to format (initialize) the SD card using “Format SD Card” from the “System”
menu.
“ Format SD Card ” (A p. 114)
Removing the Card
Push the SD card inward once, then pull it out straight.
.
Types of Usable SD Card
The following SD cards can be used on this unit.
Operations are confirmed on the SD cards from the following manufacturers.
0Panasonic
0TOSHIBA
0SanDisk
SDHC Card
.
0For HD recording, use an SDHC card (4 GB to 32 GB) that is of Class 4
(K) or higher.
0During 4K or High-Speed recording, use an SDHC card (4 GB to 32 GB)
that is of Class 10 (M) or higher.
SDXC Card
.
0For HD recording, use an SDXC card (up to 512 GB) that is of Class 4
(K) or higher.
0During 4K or High-Speed recording, use an SDXC card (up to 512 GB)
that is of Class 10 (M) or higher.
Getting Started
8

Memo :
0This unit is not guaranteed to operate with all SD cards.
0Do not use a miniSD card or microSD card (even if the card is inserted in
an adapter). It may cause malfunction.
0To protect the data, do not touch the terminals of the SD card.
0UHS-I SDHC/SDXC cards can be used in the same manner as standard
SDHC/SDXC cards.
UHS Speed Class is not supported.
0SD card that is used for recording or edited using this unit cannot be played
back or edited on other camcorder units.
0When “4 GB Spanning” is set to “Off (SDXC)” using an SDXC card, it is
possible to record long videos without splitting the file into units of 4 GB.
0Both videos and still images can be recorded on one SD card.
0A maximum of 600 video scenes can be recorded on one SD card.
When the upper limit is reached, the remaining recording time is displayed
as “0min” and no further recordings can be made regardless of
“Approximate Video Recording Time” (A p. 50) .
A maximum of 4000 still images can also be recorded on one SD card.
When your computer cannot recognize the SDXC card
Confirm and update the OS of your computer.
Windows 7 Download and install the updating program (KB976422)
from the following URL.
32 bit version
http://www.microsoft.com/downloads/details.aspx?
displaylang=ja&FamilyID=3ee91fc2-a9bc-4ee1-
aca3-2a9aff5915ea
http://www.microsoft.com/downloads/en/details.aspx?
FamilyID=3ee91fc2-a9bc-4ee1-aca3-2a9aff5915ea
64 bit version
http://www.microsoft.com/downloads/details.aspx?
displaylang=ja&FamilyID=73f766dd-7127-4445-
b860-47084587155f
http://www.microsoft.com/downloads/en/details.aspx?
FamilyID=73f766dd-7127-4445-b860-47084587155f
Mac OS X
10.4 Tiger /
Mac OS X
10.5
Leopard
Not compatible.
Mac OS X
10.6 Snow
Leopard
Update the OS version to 10.6.5 or later.
Using the Touch Screen
The LCD monitor of this unit is a touch panel which enables operations by
touching the screen with your finger.
The operation buttons, thumbnails, and menu items are displayed on the
screen according to each mode (recording/playback/setting).
Tap the button (icon) or scene (file) on screen A to make a selection.
.
MENUREC
PLAY
SLOT
54min
---min
A
B
REC
MENU
ACTION
SLOT
000G0000 2018-01-01
1/8
STBY
00 : 00 : 00 . 00
2018 - 01 - 01
02 : 23 : 01
TC
100%
Index screen (thumbnail display)
Playback Screen
Recording Screen
Memo :
0The touch screen of this unit is pressure-sensitive. When the touch screen
does not respond smoothly, apply slightly more force to your fingertip.
0Do not press or rub with excessive force.
0Do not operate the touch screen using an object with a sharp tip.
0Only one point on the screen can be tapped at any one time.
0Perform “Touch Screen Adjust” if the reactive area of the screen is
misaligned with the touched area.
“Adjusting the Touch Screen” (A p. 10)
0You cannot operate the touch screen under water. Lock the screen to
prevent operation errors.
“Shooting under Water” (A p. 36)
Locking the Screen (when Shooting Underwater)
Lock the screen before using this unit underwater to prevent operation errors
on the touch screen due to water pressure.
0Once the screen is locked, operations on the touch screen except L are
disabled.
0The START/STOP (recording) button and the zoom lever can be used
while the screen is locked.
oSetting “Screen Lock”
ACheck that the unit is in the recording mode.
BTap “MENU”.
CSelect “System” and tap “SET”.
DSelect “Screen Lock” and tap “SET”.
0The L button appears on the screen.
.
oTo Cancel “Screen Lock”
Tap the L button.
Memo :
0“Screen Lock” cannot be set for the following cases:
- During recording
- When connected to Wi-Fi
- When “System” is set to “High-Speed”
- When “Rec Mode” is set to “Time-Lapse Rec”
Getting Started
9

Adjusting the Touch Screen
Adjust the response position when the touch screen is touched.
1Tap “MENU”.
.
MENUREC
PLAY
SLOT
STBY
00 : 00 : 00 . 00
2018 - 01 - 01
02 : 23 : 01
TC
2Select “System” with 3 or 2, followed by tapping “SET”.
.
System...
3Select “Touch Screen Adjust” with 3 or 2, followed by tapping “SET”.
.
Touch Screen Adjust
0The touch screen adjustment screen appears.
4Tap “+”. (3 times in total)
.
1/3
Press The + Mark
0Keep tapping “+” as its position changes with every tap.
0If areas other than the “+” mark are tapped, errors will occur. Make
sure to tap the “+” mark.
5Tap “+” again to confirm the adjusted positions. (3 times in total)
.
1/3
Press + Mark Again
Confirm The Adjustment
0Keep tapping “+” as its position changes with every tap.
6Tap the screen.
.
Complete
0Setting ends and returns to the menu screen.
Caution :
0Do not tap areas other than the “+” mark during touch screen adjustment
(steps 4 - 5). Doing so may cause the touch screen to malfunction.
Memo :
0Adjust by lightly tapping with a corner of an SD card, etc.
0Do not press with an object with a sharp tip or do not press hard.
Getting Started
10

Names of Buttons and Functions on the LCD Monitor
Recording Screen
.
MENUREC
PLAY
SLOT
1Auto/Manual Selection Button
0Switches between the Auto and Manual modes.
2Card Slot Selection Button
0Switches the card slot to use between Slot A and Slot B when SD
cards are inserted into both slots.
3Still Image Recording Button
0Records still images while in the recording standby mode.
“Capturing Still Images” (A p. 21)
4Playback Mode Button
0Switches to the playback mode.
5Recording Start/Stop Button
“Recording Start/Stop Button” (A p. 20)
0E (black dot): Video Recording Start Button
0E (red dot): Video Recording Stop Button
6Menu Button
“Operating the Menu” (A p. 97)
7Display Button
Switches the display between full (m) and simple (n) with every tap of
the button.
0Simple display: Some displays disappear automatically when the
screen is not operated.
0Full display: Displays everything. The display button changes from n
to m.
Playback Screen (Video)
.
REC
1Video Scene Capture Button
0Displayed when playback is paused.
0Saves one scene of the video being played back as a still image.
2Recording Mode Button
0Switches to the recording mode.
3Index Screen (Thumbnail Display) Button
0Returns to the index screen (thumbnail display).
4Select Button
By turning on the “Select” button to select the video that is currently
playing, operations such as protect and delete can be performed easily.
Tapping the button each time toggles between the selected and
deselected state.
5Protect Button
6Operation Buttons
“Operation Buttons for Video Playback” (A p. 52)
7Display Button
Switches the display between full (m) and simple (n) with every tap of
the button.
0Simple display: Some displays disappear automatically when the
screen is not operated.
0Full display: Displays everything. The display button changes from n
to m.
Getting Started
11

Playback Screen (Still Image)
.
REC
1Enlarge Display Button
0Enlarges the still image that is being played back.
2Recording Mode Button
0Switches to the recording mode.
3Index Screen (Thumbnail Display) Button
0Returns to the index screen (thumbnail display).
4Select Button
By turning on the “Select” button to select the still image that is currently
playing, operations such as protect and delete can be performed easily.
Tapping the button each time toggles between the selected and
deselected state.
5Protect Button
6Operation Buttons
“Operation Buttons for Still Image Playback” (A p. 55)
7Display Button
Switches the display between full (m) and simple (n) with every tap of
the button.
0Simple display: Some displays disappear automatically when the
screen is not operated.
0Full display: Displays everything. The display button changes from n
to m.
Index Screen (Thumbnail Display) Display
.
MENU
ACTION
REC
SLOT
000G0000 2018-01-01
1/8
3
65 7 8
a
0
9
1
2
4
1Still Image Playback Mode Selection Button
0Switches to the Still Image Playback Mode screen.
2Video Playback Mode Selection Button
0Switches to the Video Playback Mode screen.
3Left/Right Arrow Keys
0Moves the cursor to the left or right.
4Playback Button
5Recording Mode Button
0Switches to the recording mode.
6Action Menu Button
““ACTION” Menu (Video)” (A p. 53)
““ACTION” Menu (Still Image)” (A p. 56)
7Select Button
For selecting the scene (file) to protect or delete.
Tapping the button each time toggles between the selected and
deselected state.
8Detailed Information Screen Selection Button
0For viewing the recording information.
9Menu Button
0Displays the menu.
10 Up/Down Arrow Keys
0Moves the cursor upward or downward.
11 Slot Selection Button
0Switches the card slot to Slot A or Slot B.
Getting Started
12

Menu Screen (Recording Mode)
.
2
3
6
5
4
1
1Up/Down Arrow Keys
0Moves the cursor upward or downward.
2Set Button
0Confirms the selected item.
3Previous Button
0Returns to the previous screen.
4Power Off Button
0Pressing the button for approximately 2 seconds or longer turns off
the power.
5STATUS Screen Display Button
0Displays the screen for check the current settings.
6Close Button
0Exit the menu.
Configuring the Initial Settings
When the power of this unit is turned on for the first time, it is necessary to
select a display language and configure the internal clock for the initial
settings. All operations are disabled until initial settings are configured.
1Open the LCD monitor.
.
0The power turns on, and a language selection screen appears.
2Configure the language to use.
.
Language
Language
English
Français
Deutsch
Español
Italiano
Nederlands
0Tap 3 or 2 to select the language to use, followed by tapping “SET”.
Memo :
0The Language screen appears when the power of this unit is turned on for
the first time, or when “System”F“FACTORY PRESET” is executed from
the menu.
0The menus and messages on the LCD screen are displayed in the
selected language.
3Set the time zone and date/time.
.
UTC -
--
:
Initial Setting
0Move the cursor with 0 1 to select an item.
0Use 32 to change the setting.
Memo :
0The Initial Settings screen appears when the power of this unit is turned
on for the first time, or when the unit is powered on again about a month
after the battery ran out.
0Even when the power is turned off, the configured date/time data is stored
using the built-in battery.
4After the settings are configured, tap “SET” according to the time signal.
0The clock is set to 0 seconds of the date and time entered.
Memo :
0The configured date/time data can be displayed on the LCD screen or
recorded to an SD card.
0The value of the year can be set in the range of “2000” to “2099”.
Getting Started
13

Readjusting the Clock after Initial Settings
are Configured
Setting the Date/Time
1Tap “MENU”.
.
MENUREC
PLAY
SLOT
STBY
00 : 00 : 00 . 00
2018 - 01 - 01
02 : 23 : 01
TC
2Select “System” with 3 or 2, followed by tapping “SET”.
.
System...
3Select “Date/Time” with 3 or 2, followed by tapping “SET”.
.
Date/Time
4Set the date and time.
.
-
--:
0Move the cursor with 0 1 to select an item.
0Use 32 to change the setting.
5After the settings are configured, tap “SET” according to the time signal.
0The clock is set to 0 seconds of the date and time entered.
Changing the Display Style
Changes the date/time display style.
oDate Display (Date Format) Setting
The date display can be changed in “Monitor”F“Display Settings”F“Date
Style”.
oTime Display (Time Format) Setting
The time display can be changed in “Monitor”F“Display Settings”F“Time
Style”.
Changing the Display Language after Initial
Settings are Configured
The language on the display can be changed.
Change the language in the “Language” item of the menu.
1Tap “MENU”.
.
MENUREC
PLAY
SLOT
STBY
00 : 00 : 00 . 00
2018 - 01 - 01
02 : 23 : 01
TC
2Select “System” with 3 or 2, followed by tapping “SET”.
.
System...
3Select “Language” with 3 or 2, followed by tapping “SET”.
.
English
Language
4Select the desired language and tap “SET”.
.
English
Français
Deutsch
Español
Italiano
Nederlands
Getting Started
14

Holding this Unit
When holding this unit, keep your elbows close to your sides to prevent
camera shake.
.
0Hold the LCD monitor with your left hand and adjust the angle accordingly.
Holding the LCD monitor with your left hand helps to stabilize the camera
for recording.
Caution :
0The photographer should pay attention to the surroundings during
shooting, making sure that he/she is in no danger of falling or collision with
another person or vehicle.
0Be careful not to drop this unit during transportation.
0Guardians should pay close attention when this unit is used by children.
Tripod Mounting
This unit can be mounted on a tripod (or monopod). This is useful for
preventing camera shake and recording from the fixed position.
.
0To prevent this unit from falling off, check the tripod mounting screw holes
and positioning holes on the unit carefully before mounting, and turn the
screws until they are fastened firmly.
Caution :
0To prevent injuries or damages which may result if this unit falls off, read
the instruction manual of the tripod (or monopod) to be used and make
sure that it is securely attached.
0In strong wind conditions and when placed at an unstable location, there
is a risk of the tripod toppling and falling.
0Please check beforehand if the use of a tripod is allowed as it may be
prohibited depending on the shooting location.
Memo :
0It is recommended to use a tripod or monopod when recording in
conditions prone to camera shake (such as in dark places or when zoomed
to the telephoto end).
0When a tripod is used for recording, set “DIS” to “Off”.
“Reducing Camera Shake” (A p. 39)
Getting Started
15

Using this Unit Overseas
The shape of the power outlet varies according to countries and regions.
To charge the battery pack, you need a converter plug that matches the
shape of the outlet.
“Charging the Battery Pack Overseas” (A p. 16)
Charging the Battery Pack Overseas
The shape of the power outlet varies according to countries and regions.
To charge the battery pack, you need a converter plug that matches the
shape of the outlet.
.
ABBFCO
Morocco
Mozambique
Republic of South
Africa
Tanzania
Zambia
Kenya
Guinea
Egypt
Algeria
Africa
Jordan
Kuwait
Iran
Israel
Middle East
Peru
Venezuela
Brazil
Puerto Rico
Bahamas
Panama
Haiti
Chile
Jamaica
Colombia
Argentina
Latin
Fiji
New Zealand
To n g a
Tahiti
Guam
Australia
Oceania
Romania
Portugal
Poland
Belgium
France
Finland
Hungary
Norway
Germany
Denmark
Spain
Sweden
Switzerland
Greece
Canary Islands
Netherlands
Austria
Italy
United Kingdom
Ireland
Iceland
Europe
Asia
Mexico
Japan
United States
North America
Canada
Malaysia
Macau Special
Administrative Region
Hong Kong Special
Administrative Region
Vietnam
Philippines
Bangladesh
Pakistan
Nepal
China
South Korea
Thailand
Sri Lanka
Singapore
Indonesia
India
Setting the Clock to Local Time when Traveling
Configure the date and time in “Date/Time” according to the local time.
(A p. 14)
Also, configure the time zone as and when necessary.
1Tap “MENU”.
.
MENUREC
PLAY
SLOT
STBY
00 : 00 : 00 . 00
2018 - 01 - 01
02 : 23 : 01
TC
2Select “System” with 3 or 2, followed by tapping “SET”.
.
System...
3Select “Time Zone” with 3 or 2, followed by tapping “SET”.
.
UTC+xx:xx
Time Zone
4Select the time zone according to the location you are in, followed by
tapping “SET”.
.
UTC+09:30
UTC+10:00
UTC+10:30
UTC+11:00
UTC+11:30
UTC+09:00
Getting Started
16

oTime Zone of Major Cities
-11:00 MIDWAY ATOLL
-10:00 HAWAIIAN
ISLANDS HONOLULU TAHITI
- 9:00 ALASKA ANCHORAGE
- 8:00 VANCOUVER SEATTLE LOS ANGELES
- 7:00 DENVER PHOENIX CALGARY
- 6:00 CHICAGO HOUSTON MEXICO CITY
- 5:00 TORONTO NEW YORK BOGOTA
- 4:00 MANAUS SANTIAGO
- 3:30 NEWFOUNDLAND
- 3:00 RIO DE JANEIRO SAO PAULO BUENOS
AIRES
- 2:00 FERNANDO DE
NORONHA
- 1:00 AZORES
0:00 LONDON CASABLANCA LISBON
+ 1:00 BERLIN PARIS WARSAW
+ 2:00 HELSINKI ISTANBUL CAIRO
+ 3:00 MOSCOW RIYADH NAIROBI
+ 3:30 TEHRAN
+ 4:00 DUBAI ABU DHABI
+ 4:30 KABUL
+ 5:00 ISLAMABAD KARACHI MALE
+ 5:30 DELHI CALCUTTA BOMBAY
+ 6:00 DHAKA
+ 6:30 YANGON
+ 7:00 BANGKOK JAKARTA
+ 8:00 BEIJING HONG KONG SINGAPORE
+ 9:00 TOKYO SEOUL
+ 9:30 ADELAIDE DARWIN
+10:00 GUAM SYDNEY
+11:00 SOLOMON
ISLANDS NEW CALEDONIA
+12:00 FIJI AUCKLAND WELLINGTON
+13:00 SAMOA
Getting Started
17

Before Using Underwater or under Low
Temperature
This section describes the precautions and methods of maintenance when
using the unit underwater or under low temperature conditions.
“Cautions on Using Underwater” (A p. 18)
“Maintenance after Use” (A p. 18)
“Cautions on Using under Low Temperature” (A p. 18)
“Other Precautions” (A p. 18)
Cautions on Using Underwater
Please take note of the followings when using this unit near water or
underwater.
0Ensure that the cover is closed tightly.
“Opening the Terminal Cover (SD Card Cover)” (A p. 5)
0Ensure that the terminal cover and the gray waterproof seal are not
damaged and that there are no foreign materials (such as hair, lint, sand
or dust) adhered on the cover.
0Stop using the unit underwater if there are damages to the cover, etc.
and consult your JVC dealer or the nearest service center.
0Use the camera within a water depth of 5 m and a duration not longer than
1 hour.
.
Within 1 hour
Within Water
Depth of 5 m
0Do not open/close the cover or insert/remove an SD card or any cables
while using underwater or on the beach, or if your hands contain water
droplets or sands. Doing so may cause water to enter into the camera or
malfunction.
0Do not subject the camera to high pressure or vibration resulted from swift
current, waterfall or diving into water.
0The waterproof performance is not guaranteed if the camera is dropped
or subjected to other impact shock. If the camera has been subjected to
impact shock, consult your nearest service center.
0While shooting underwater, noise generated inside of the camera
(zooming sounds, etc) may be picked up. This is not a malfunction.
0Do not immerse into hot spring, or hot water above 40°C. Doing so
deteriorates waterproof performance.
0Keep away from hands with sun oil or sun screen. Doing so may cause
discoloration or deterioration of material.
0This unit sinks underwater. Fasten the grip belt firmly to prevent losing the
camera underwater.
0The accessories are not waterproof.
0Wi-Fi function is not available underwater.
0Do not use the lens filter or conversion lens underwater or at locations
where there is water.
Maintenance after Use
After using underwater or in dusty places, rinse the camera with water
immediately and dry it completely.
1Ensure that the terminal cover is closed.
2Rinse with clean water.
Soak the camera in a container filled with enough water to immerse the
camera completely, and rinse it gently.
.
0After using the camera under the sea or on the beach, immerse the
camera in fresh water for about 10 minutes to remove salt particles,
replace the water and rinse the camera.
0Open and close the LCD screen, and operate the buttons or zoom
operations to get rid of sands or dusts in the gap.
3Dry the camera.
Wipe the camera completely with a soft dry cloth and allow it to dry in a
well-ventilated and shady location.
0Place the camera with the lens facing downward while the LCD
monitor is closed, and leave it for approximately 10 minutes. (By doing
so, microphone and LCD part are dried out easily.) Place the camera
in a up right position on a dry cloth afterward Close the terminal cover
after the camera is dried out completely.
0Wipe off any foreign materials or water droplets inside the cover.
* If you leave the camera immersed in salt water or allow water droplets from
the salt water to remain on the camera, this may cause corrosion,
discoloration or deterioration of waterproof performance.
* If you wipe or dry the camera with sand particles adhered, this may cause
scratches on the camera.
* Do not wash with chemicals, soap, neutral detergents, or alcohol.
* Do not dry the camera with a hair dryer or other heat sources. This could
impair its waterproof performance.
Cautions on Using under Low Temperature
0The performance of the battery will drop temporarily when the temperature
is -10°C to 0°C, this will cause the remaining recording time to shorten.
0Charging cannot be performed when the surrounding temperature is
below 10 °C.
0Turning on the camera while it is still cold will deteriorate the performance
of the LCD monitor. Problems such as the screen becoming dark
momentarily or residual image can occur.
0If snow or water droplets adhere to the camera under sub-zero
temperature environment, ice can formed between the gaps around the
buttons, speaker or microphone. This will cause difficulty in operating the
buttons as well as decrease in the volume level.
0Direct contact with exposed metal part under cold temperature can cause
the skin to stick on the metal part resulting in injuries such as frostbite. Do
not touch with bare hands.
Other Precautions
0Do not leave the camera under low temperature in cold climates or under
high temperature above 40 °C (such as under direct sunlight, inside a
vehicle in the hot sun, or near a heater). This will cause deterioration of
the waterproof performance.
0Malfunction due to mishandling will void the warranty.
0We are not responsible for any loss of data due to water entering into inside
of the camera. Please be forewarned.
0It is recommended to replace the waterproof packing once a year to
maintain the waterproof performance. Consult your nearest service
center. (Subject to a fee)
Getting Started
18

Taking Videos in Auto Mode
During Auto recording, the camera automatically adjusts the settings such
as brightness and focus to suit the shooting conditions.
0Before recording an important scene, it is recommended to conduct a trial
recording.
1Open the LCD monitor.
.
T
2Check if the recording mode is set to n.
.
MENUREC
PLAY
SLOT
STBY
00 : 00 : 00 . 00
2018 - 01 - 01
02 : 23 : 01
TC
0If the mode is H Manual, tap H on the recording screen to display
the mode switching screen.
Tap n to switch the recording mode.
.
3Press the START/STOP button to start recording.
.
0Press again to stop.
0Some displays disappear after approximately 3 seconds.
Use the n button to change the displays.
Indications for Video Recording
.
MENUREC
PLAY
SLOT
54min
100%
- - - min
A
B
REC
00 : 00 : 00 . 00
2018 - 01 - 01
02 : 23 : 01
TC
1920x1080
60i 18M
Display Icon Description
ABattery Indicator Displays the approximate remaining battery
power during use.
“Checking the Remaining Battery Level and
Recording Time” (A p. 48)
BRecording Media Displays the SD card icon and recordable time.
“Checking the Remaining Battery Level and
Recording Time” (A p. 48)
CRecording Mode Displays the current recording mode as n (Auto)
or H (Manual).
Current shooting mode is displayed.
DRecording Appears when recording is in progress. (“STBY”
appears when recording is stopped.)
ETime Code Displays the time code that is recorded to a video.
“TC Menu” (A p. 106)
FDate Display Displays the date (year, month and day).
GTime Displays the current time.
“Configuring the Initial Settings” (A p. 13)
HDIS Displays the image stabilizer settings.
“Reducing Camera Shake” (A p. 39)
IWind Cut Displays the wind cut settings.
“ Wind Cut ” (A p. 113)
JBit Rate Displays the bit rate settings.
KFrame Rate Displays the frame rate settings.
LResolution Displays the resolution that is determined
according to the “System” of the recording format.
Recording
19

Operation Buttons for Video Recording
.
MENUREC
PLAY
SLOT
54min
-- - min
A
B
REC
00 : 00 : 00 . 00
2018 - 01 - 01
02 : 23 : 01
TC
Operation
Buttons
Description
AAuto/Manual
Selection Button
Switches between the Auto and Manual
recording modes.
BCard Slot
Selection Button
Switches the card slot to use between Slot
A and Slot B.
CStill Image
Recording Button
Tap this button to record a still image during
recording standby.
“Capturing Still Images” (A p. 21)
DPlayback Mode
Button
Switches to the playback mode.
E/ FRecording Start/
Stop Button
Functions as the START/STOP button.
GMenu Button Displays the main menu.
“Operating the Menu” (A p. 97)
HDisplay Button Switches the display between full (m) and
simple (n) with every tap of the button.
0Simple display: Some displays
disappear automatically when the
screen is not operated.
0Full display: Displays everything. The
display button changes from n to m.
0When the power is turned off, the display
setting will revert to simple display (n).
Caution :
0Do not expose the lens to direct sunlight.
0While this unit can be used with the LCD monitor reversed or the LCD
monitor closed with “LCD CLOSED RECORDING” activated, the
temperature of this unit rises more easily. Leave the LCD monitor open
when using this unit for long periods of time, or in places exposed to direct
sunlight or high temperatures.
0The power may turn off to protect the circuit if the temperature of this unit
rises too much.
0This unit is a microcomputer-controlled device. Electrostatic discharge,
external noise and interference (from a TV, a radio, etc.) might prevent it
from functioning properly. In such a case, close the monitor screen to turn
off the power and remove the AC adapter, then press the Reset button to
reset this unit.
“Resetting this Unit” (A p. 131)
0Disclaimer
– We shall not be liable for any loss of recorded contents when videos or
audio cannot be recorded or played back properly due to malfunction
of this unit and accessories that come with it or the SD card.
– Recorded contents (data) that are lost, including loss due to malfunction
of this unit, cannot be restored. Please be forewarned.
– JVC will not be responsible for any lost data.
Memo :
0Check that the remaining recording time in the media is sufficient before
you start recording. “Checking the Remaining Battery Level and
Recording Time” (A p. 48)
If the remaining recording time is not sufficient, save the files on a PC or
disc before deleting the files from the unit. “Deleting Unwanted Files”
(A p. 59)
0Due to the specifications of this unit, continuous recording for a duration
of 12 hours or longer is not possible when recording is performed with
“System” set to “HD”. Recording stops automatically 12 hours after it is
started.
(It may take some time to resume recording.)
0Up to 4GB per video file can be recorded. File recorded using long
recordings that exceeds 4GB is split and recorded into several video files.
However, recording up to 64 GB or 4 hours is possible when “4 GB
Spanning” is set to “Off (SDXC)” (This is configurable only when “System”
is set to “4K” or “High-Speed”, and when an SDXC card is used.)
0Depending on the shooting conditions, the four corners of the screen may
appear dark, but this is not a malfunction. In this case, change the shooting
conditions by moving the zoom lever, etc.
Recording
20
Table of contents
Other JVC Camcorder manuals

JVC
JVC Everio GZ-MG680 User manual

JVC
JVC Procision GC-PX100 User manual

JVC
JVC GR-SXM460A User manual

JVC
JVC GR-AXM225 User manual

JVC
JVC GR-DVA1 User manual

JVC
JVC GR-D54 User manual

JVC
JVC GR-AX275 User manual

JVC
JVC GR-DVF31UM User manual

JVC
JVC GC-PX100BE Operating and maintenance manual

JVC
JVC GZ HD10 - Everio Camcorder - 1080p Manual

JVC
JVC GR-DVM75 User manual

JVC
JVC D-9 DY-70 User manual

JVC
JVC GR-DVL109 User manual

JVC
JVC GR-D74U User manual

JVC
JVC GR-AX460 User manual

JVC
JVC GR-D750AH User manual

JVC
JVC LYT0261-001B User manual

JVC
JVC GZ-MG130UA User manual

JVC
JVC GY-HM700U - Prohd Compact Shoulder Solid State... User manual

JVC
JVC GR-D238 User manual