JVC EXAD KW-AVX810 User manual

..lye
DVD RECEIVER WITH MONITOR
RECEPTOR DVD CON MONITOR
RECEPTEUR DVD ET MONITEUR
~hab@
~
t@~~fli~e
D
RADI
READY
Em
[Pl~
80
-0
UL.TRI=l
0 0
[][]
lDOLBYI
R%?
000
DIGITAL
00,0
VIDEO
000
~dti
(illD§~
.s~
000
OJVCO
Digital
Out
IDIGITAL
VIDEO)
00
\
KW-AVX810
KW-AVX810
KW-AVX810
\
~
OJVCO
c=J
I I
CJ
For
canceling
the
display
demonstration,
see
page
10.
Para
cancelar
la
demonstraci6n
en
pantalla,
consulte
la
pagina
10.
Pour
annuler
la
demonstration
des
affichages,
referez-vous
a
la
page
10.
For
installation
and
connections,
refer
to
the
separate
manual.
Para
la
instalaci6n
y
las
conexiones,
refierase
al
manual
separado.
Pour
I'installation
et
les
raccordements,
se
referer
au
manuel
separe.
INSTRUCTIONS
MANUAL
DE
INSTRUCCIONES
MANUEL D'INSTRUCTIONS
For
customer
Use:
Enter
below
the
Model
No.
and
Serial
No.
which
are
located
on
the
top
or
bottom
of
the
cabinet.
Retain
this
information
for
future
reference.
Model
No.
Serial
No.
LVT1791-001 A
[J]

This
product
has
a
fluorescent
lamp
that
contains
mercury.
Disposal
of
these
materials
may
be
regulated
in
your
community
due
to
environmental
considerations.
For
disposal
or
recycling
information,
please
contact
your
local
authorities
or
for
USA,
the
Electronic
Industries
Alliance:
http://www
.eiae.org.
•
DO
NOT
install
any
unit
or
wire
any
cable
in
a
location
where;
-
it
may
obstruct
the
steering
wheel
and
gearshift
lever
operations.
-
it
may
obstruct
the
operation
of
safety
devices
such
as
air
bags.
-
it
may
obstruct
visibility.
•
DO
NOT
operate
the
unit
while
driving.
If
you
need
to
operate
the
unit
while
driving,
be
sure
to
look
around
carefully.
•
The
driver
must
not
watch
the
monitor
while
driving.
INFORMATION
(For
U.S.A.)
This
equipment
has
been
tested
and
found
to
comply
with
the
limits
for
a
Class
B
digital
device,
pursuant
to
Part
15
of
the
FCC
Rules.
These
limits
are
designed
to
proVide
reasonable
protection
against
harmful
interference
in
a
residential
installation.
This
equipment
generates,
uses,
and
can
radiate
radio
frequency
energy
and,
if
not
installed
and
used
in
accordance
with
the
instructions,
may
cause
harmful
interference
to
radio
communications.
However,
there
is
no
guarantee
that
interference
will
not
occur
in
a
particular
installation.
If
this
equipment
does
cause
harmful
interference
to
radio
or
television
reception,
which
can
be
determined
by
turning
the
equipment
off
and
on,
the
user
is
encouraged
to
try
to
correct
the
interference
by
one
or
more
of
the
following
measures:
-
Reorient
or
relocate
the
receiving
antenna.
-
Increase
the
separation
between
the
equipment
and
receiver.
-
Connect
the
equipment
into
an
outlet
on
a
circuit
different
from
that
to
which
the
receiver
is
connected.
-
Consult
the
dealer
or
an
experienced
radiolTV
technician
for
help.
Caution
Changes
or
modifications
not
approved
by
JVC
could
void
the
user's
authority
to
operate
the
equipment.
~
[European
Union
only]
-
Thank
you
for
purchasing
a
JVC
product.
Please
read
all
instructions
carefully
before
operation,
to
ensure
your
complete
understanding
and
to
obtain
the
best
possible
performance
from
the
unit.
IMPORTANT
FOR
LASER
PRODUCTS
1.
CLASS
1
LASER
PRODUCT
2.
CAUTION:
Do
not
open
the
top
cover.
There
are
no
user
serviceable
parts
inside
the
unit;
leave
all
servicing
to
qualified
service
personnel.
3.
CAUTION:
(For
U.S.A.)
Visible
and/or
invisible
class
II
laser
radiation
when
open.
Do
not
stare
into
beam.
(For
Canada)
Visible
and/or
invisible
class
1M
laser
radiation
when
open.
Do
not
view
directly
with
optical
instruments.
4.
REPRODUCTION
OF
LABEL:
CAUTION
LABEL,
PLACED
OUTSIDE
THE
UNIT.
CAUTION
ATTENTION
AVISO
VARNING
~.
CAUTION
VISIBLE
AND/OR
RAYONNEMENT
LASER
RADIACION
LASER
smUG
OCH/EUER
::il(
1:iiJI
VISIBLE
AND/OR
INVISIBLE
CLASS
1M
VISIBLE
ET
IOU
DE
CLASE
1M
OSVNUG
lltl/tt:li:fiiJl
INVISIBLE
CLASS
n
LASER
RADIATION
INVISIBLE
DE
CLASSE
VISIBLE
VIO
INVISIBLE
LASERSTRALNING,
gj'J:;
AI M
LASER
RADIATION
WHEN
OPEN.
DO
NOT
1M
UNE
FOIS
OUVERT.
CUANDO
ESTA
KLASS
1M,
NAR
D~
\r-"f-UIJI
WHEN
OPEN,
VIEW
DIRECTLY
WITH
NE
PAS
REGARDER
ABIERTO.
NO
MIRAR
DEL
AR
OPPNAD.
/Ut.
DO
NOT
STARE
OPTICALINSTRUMENTS.
DIRECTEMENT
AVEC
DIRECTAMENTE
BETRAKTA
EJ
jIt"Ii!11t
INTO
BEAM,
IEC60825-1:2001
DES
INSTRUMENTS
CON
INSTRUMENTAL
STRALEN
MED
OPTISKA
It.l\Ii!(t"t!\I.
FDA
21
CAl
(ENG)
(ENG)
OPTIQUES.
(FAA)
OPTlCO.
(ESP)
INSTRUMENT.
(SWE)
(JPN)
LV44603-003A
2
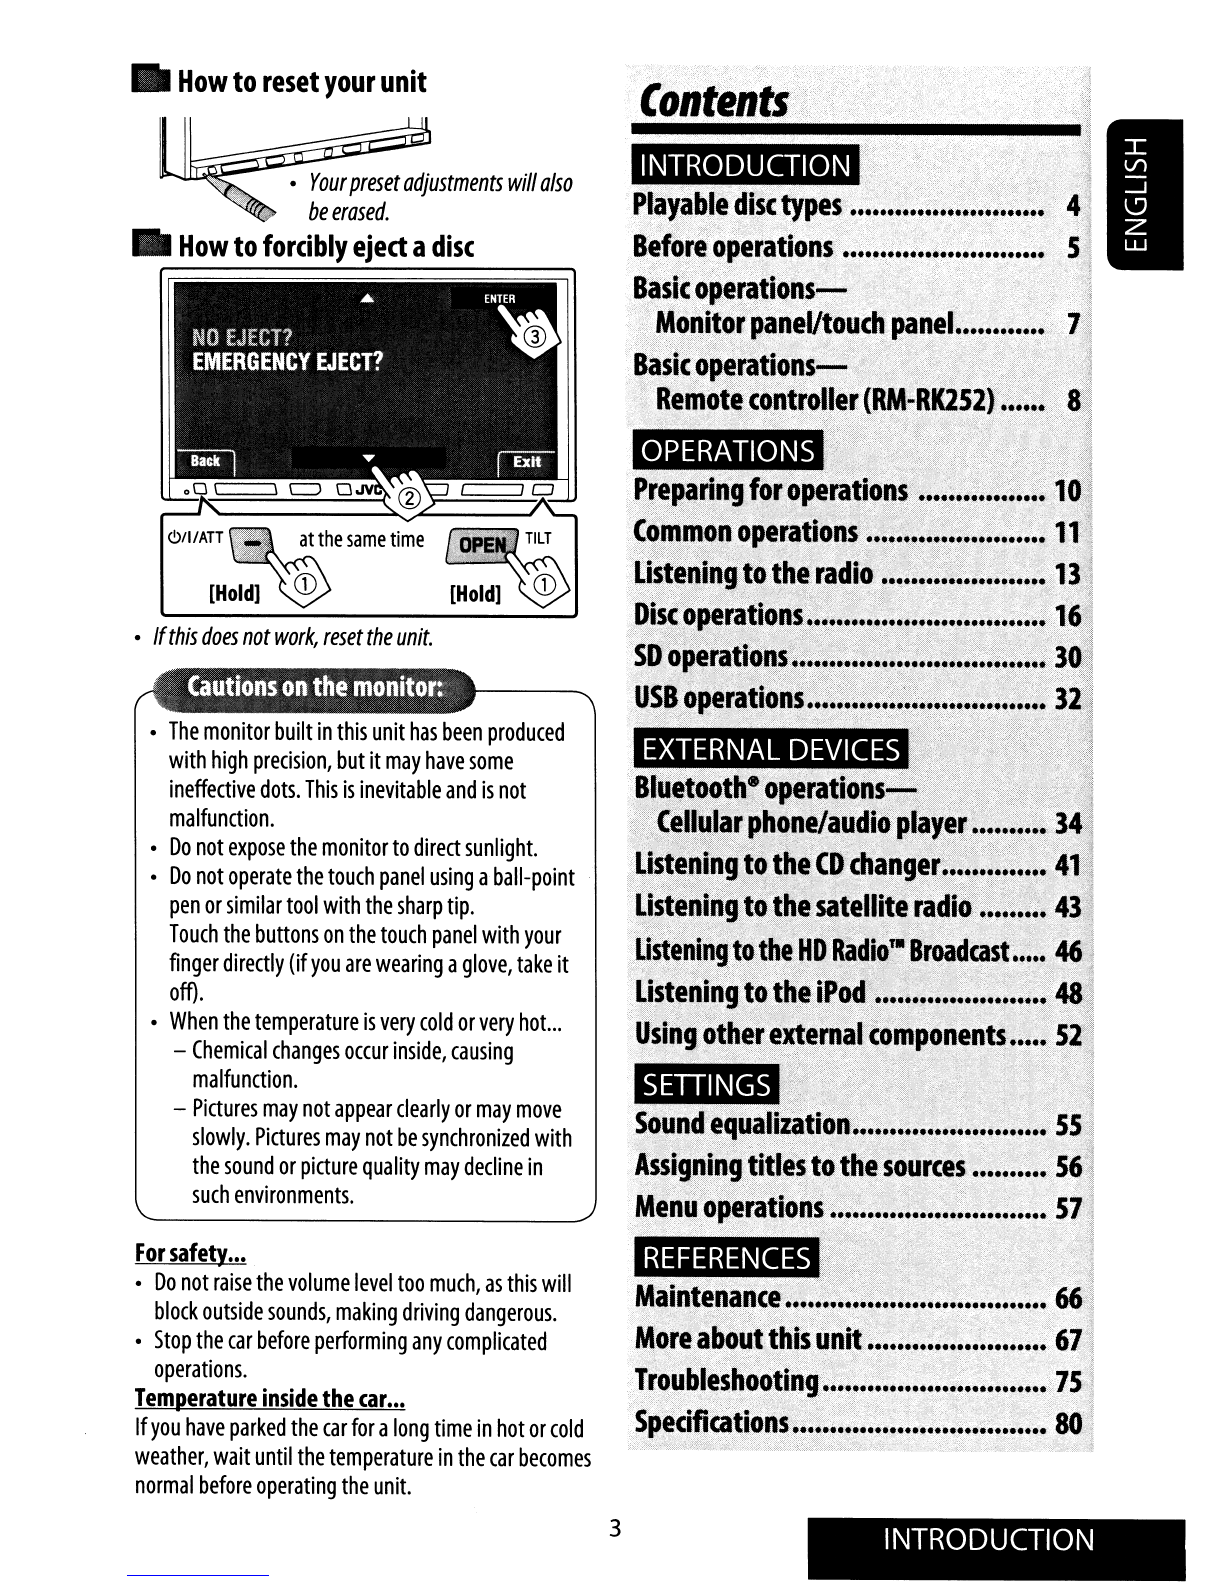
•
If
this
does
not
work,
reset
the
unit.
REFERENCES
INTRODUCTION
. .
ContentS(.\
.
'J
~
j
1
Maintenance
•.•.•
~
~
~
~
..•.•.•
66"
;'?i.,
.
..
. . > .
':.
Moreabo~~
this
unit
~
~.:
•.
~~~,~
67';
Troubl's"ooting.,
..........
..•
:.:~
:7
5.!
<)ii)
/:".
. •
......~iJ;.
.Y
Sp6!cifj@~ion~
:
~!
:
~
~
••••
80<.!
.;,;::>v:
.<;:,:,;.<:,:;~<:Ll:',:_~,',
:-:
<~j,:,:;",
.:;:~,;.,"~~>,~
,",
::::J:,',>.,::
':
':"'~~
•
The
monitor
built
in
this
unit
has
been
produced
with
high
precision,
but
it
may
have
some
ineffective
dots.
This
is
inevitable
and
is
not
malfunction.
•
Do
not
expose
the
monitor
to
direct
sunlight.
•
Do
not
operate
the
touch
panel
using
a
ball-point
pen
or
similar
tool
with
the
sharp
tip.
Touch
the
buttons
on
the
touch
panel
with
your
finger
directly
(if
you
are
wearing
a
glove,
take
it
off).
•
When
the
temperature
is
very
cold
or
very
hot...
-
Chemical
changes
occur
inside,
causing
malfunction.
-
Pictures
may
not
appear
clearly
or
may
move
slowly.
Pictures
may
not
be
synchronized
with
the
sound
or
picture
quality
may
decline
in
such
environments.
For
safety
...
•
Do
not
raise
the
volume
level
too
much,
as
this
will
block
outside
sounds,
making
driving
dangerous.
•
Stop
the
car
before
performing
any
complicated
operations.
Temperature
inside
the
car
...
If
you
have
parked
the
car
for
a
long
time
in
hot
or
cold
weather,
wait
until
the
temperature
in
the
car
becomes
normal
before
operating
the
unit.
•
Your
preset
adjustments
will
also
be
erased
.
•
How
to
forcibly
eject
a
disc
•
How
to
reset
your
unit
3
INTRODUCTION

~OK
Playable
Recording
format,
file
type,
etc.
DVD
Video
(Region
Code:
1
)*1
CDIVCD
CD
Recordable/Rewritable
(CD-R/-RW)
•
ISO
9660
levell,
level
2,
Romeo,
I-------------------t
~OK
Joliet
Dual
Disc
DVD
DVD
Recordable/Rewritable
(DVD-R/-RW*2,
+R/+RW*3)
•
DVD
Video:
UDF
bridge
•
DVD-VR
•
DivX/MPEG1/MPEG2/JPEG/MP31
I-------------------t
WMA/WAV/AAC:
ISO
9660
level
1,
level
2,
Romeo,
Joliet
Disc
type
Playable
disc
types
*1
If
you
insert
a
DVD
Video
disc
of
an
incorrect
Region
Code,
"Region
code
error"
appears
on
the
screen.
*2
DVD-R
recorded
in
multi-border
format
is
also
playable
(except
for
dual
layer
discs).
DVD-RW
dual
layer
discs
are
not
playable.
*3
It
is
possible
to
play
back
finalized
+RI+RW
(Video
format
only)
discs.
+RW
double
layer
discs
are
not
playable.
*4
This
unit
can
play
back
AAC
files
encoded
using
iT
unes.
*5
To
reproduce
DTS
sound,
use
the
digital
connection.
(If$'
Installation/Connection
Manual)
Caution
for
DualDisc
playback
The
Non-DVD
side
of
a
"DualDisc"
does
not
comply
with
the
"Compact
Disc
Digital
Audio"
standard.
Therefore,
the
use
of
Non-DVD
side
of
a
DualDisc
on
this
product
may
not
be
recommended.
4

Before
operations
Touch
panel
--++
Monitor
panel
-
·'''~G
\ -
d!!!S:
...
\
~
_:
Buttons
on
the
touch
panel
In
the
explanation,
they
are
indicated
inside
[
].
For
details
on
the
touch
panel
operations,
see
each
source
operation
section.
Features
of
the
illumination
_
Monitor
panel
buttons
The
lights
ofthe
monitor
panel
buttons
are
turned
off
when
no
operation
is
done
for
about
10
seconds.
Screen
While
the
unit
is
turned
on,
you
can
also
turn
off
the
screen
by
holding
DISP
on
the
monitor
panel.
They
are
turned
on
again
in
the
following
cases:
-
When
you
touch
the
touch
panel
or
move
your
hand
nearby*
-
When
you
use
the
remote
controller
-
When
a
calllT
ext
Message
comes
in
(for
Bluetooth
cellular
phone)
l~.o
\\I::::J
O.NO
0
CJ
c===J
CJ
YJ
r
*
Depending
on
the
<Illumination>
setting.
(I@"
page
62)
The
lights
of
the
monitor
panel
buttons
are
always
turned
on
in
the
folloWing
cases:
-
While
AV
menu
screen
is
displayed.
-
While
<Source
Menu>
screen
is
displayed.
-
While
<OpenlTilt>
menu
is
displayed.
-
When
<Illumination>
is
set
to
<Normal>.
(I@"
page
62)
5
The
screen
is
turned
on
again
in
the
following
cases:
-
When
you
touch
the
touch
panel
-
When
you
press
MENU,
DISP,
DETACH,
orOPEN
on
the
monitor
panel
-
When
a
call1Text
Message
comes
in
(for
Bluetooth
cellular
phone)
-
When
the
signal
from
the
rear
view
camera
comes
in
INTRODUCTION
I

Detaching/attaching
the
monitor
panel
_
Detaching
1
While
the
unit
is
turned
on:
*
You
can
also
use
OPEN
on
the
monitor
panel.
Then
press
[
Detach].
2
The
monitor
panel
is
released.
3
~/
Softcase
AT
(supplied)
Attaching
6
The
monitor
panel
opens
by
about
50°.
•
It
closes
automatically
when
no
operation
is
done
for
about
a
minute.
Attaching
plate
•
The
attaching
plate
closes
automatically
about
10
seconds
after
the
monitor
panel
is
released.
Remove
the
monitor
panel
before
this
happens.
•
Hold
the
monitor
panel
securely
so
as
not
to
drop
it
accidentally.
•
Fit
the
monitor
panel
onto
the
attaching
plate
until
it
is
firmly
locked.

Basic
operations
-
Monitor
paneVtouch
panel
Displays
<AV
Menu>
screen.
1&
page
57
Displays
<Source
Menu>
screen.
1&
page
11
~
__I
Displays
and
erases
Short
Cut
icons
....
page
12
LjDISP
L::::::::::l
llET
1
H
]
~nLT
IJ
To
detach
the
monitor
panel.
Changes
the
display
information.
~IIATTG
C=:=fVOL\=::±]
~
0
JVC
0
~
~l\
0
Itt
Changes
the
sources.
Remote
sensor
1&
page
11
Adjusts
the
volume.*
•
Turns
on
the
power.
•
Turns
off
the
power.
[Hold]
•
Attenuates
the
sound
(if
the
power
is
on).
Resets
the
unit.
•
Use
only
when
the
internal
system
malfunctions.
~fYpuca
....
,.
.
dJust:
.
thev()lijroeny::.::·
,.
!noviogypijr:flnger
on
the:touch'panel
as
illustrated.
•
Displays
and
erases
<AV
Menu>
screen
.
1&
page
57
•
Displays
<OpenlTilt>
menu.
1&
below
•
Ejects
the
disc
and
displays
<OpenlTilt>
menu.
[Hold]
•
Closes
the
monitor
panel.
<OpenlTilt>
menu
[Open]
[Eject]
[Close]
[Tilt
+/-]
[Detach]
[Exit]
Opens
the
monitor
panel.
Ejects
the
disc.
Closes
the
monitor
panel.
Tilts
the
monitor
panel.
To
detach
the
monitor
panel.
Erases
this
screen
.
•
Shaded
items
cannot
be
used.
7INTRODUCTION
-+-+---1[1]
H-+-[g]
1'-----'
,------:-+-----113
++--[HJ
~-----1[j]]
~-----1ITill
'-------119
wr--i-+-'-'-
...
/+-+--I
ATT
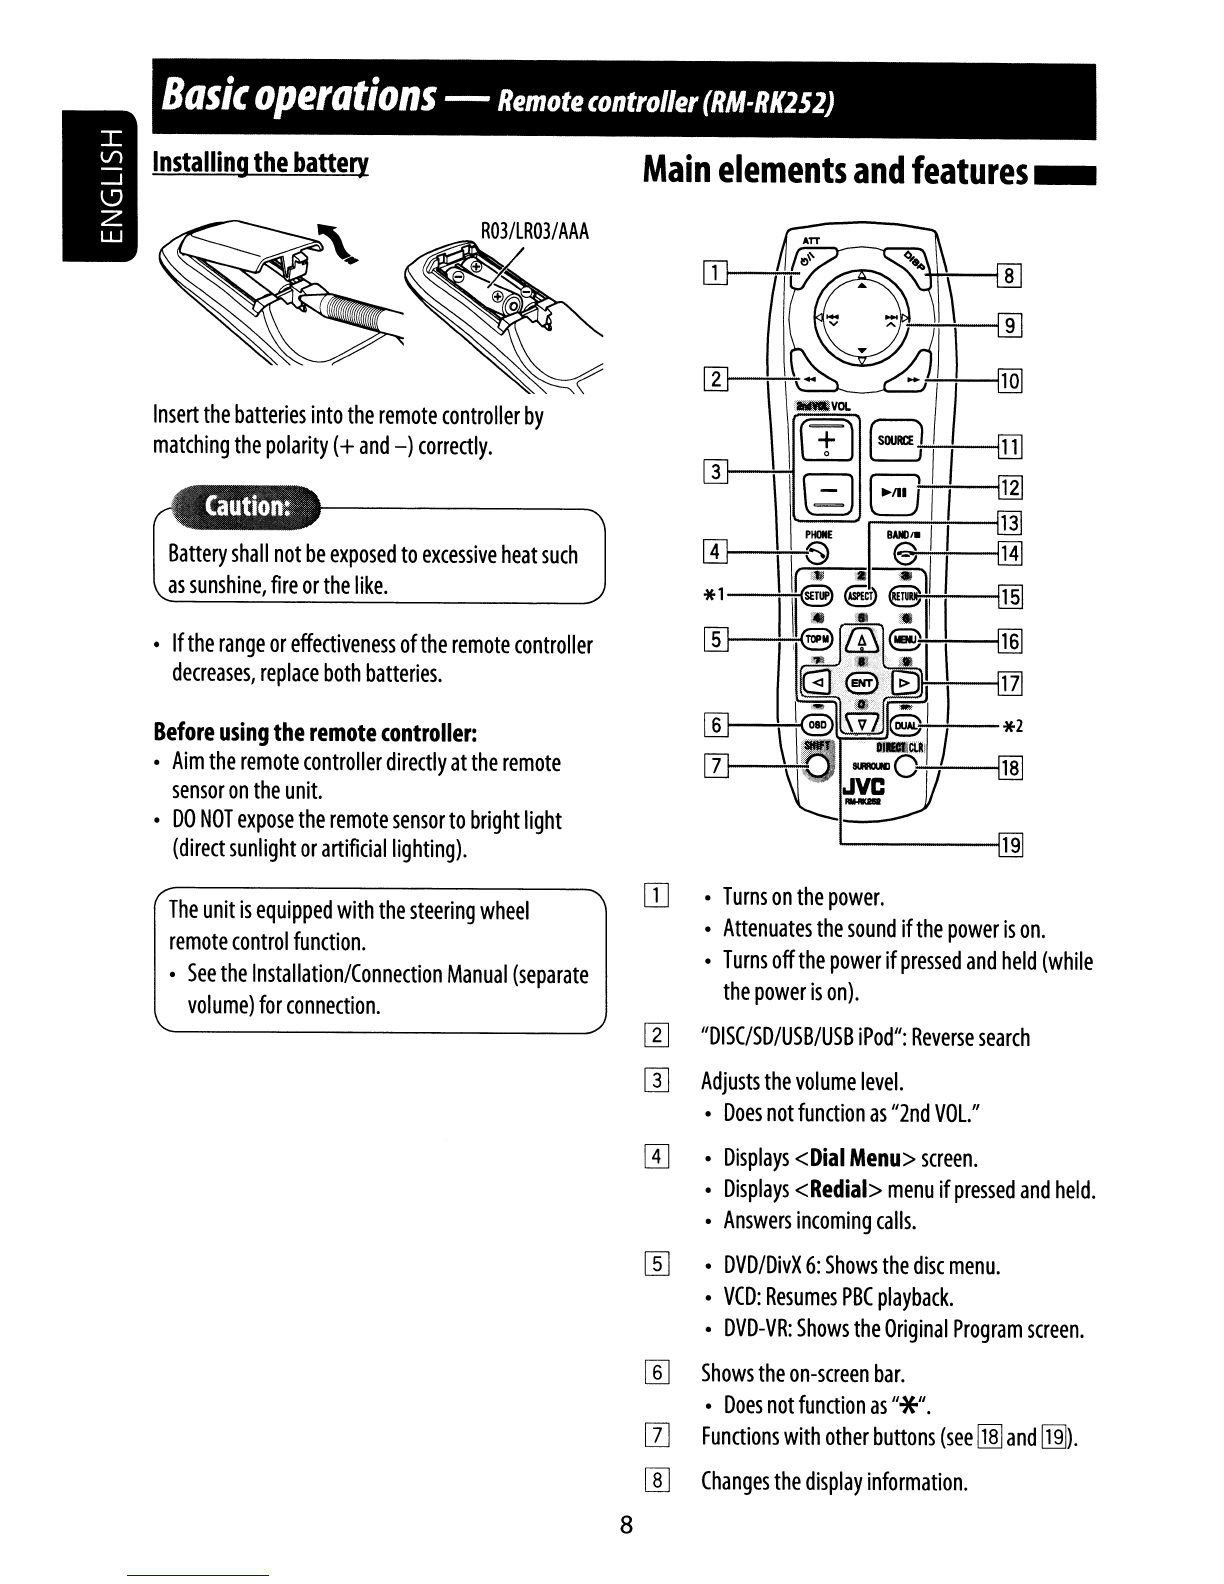
Main
elements
and
features
_
Battery
shall
not
be
exposed
to
excessive
heat
such
as
sunshine,
fire
or
the
like.
Basic
operations
-
Remote
controller
(RM-RK2S2)
Before
using
the
remote
controller:
•
Aim
the
remote
controller
directly
at
the
remote
sensor
on
the
unit.
•
DO
NOT
expose
the
remote
sensor
to
bright
light
(direct
sunlight
or
artificial
lighting).
•
If
the
range
or
effectiveness
of
the
remote
controller
decreases,
replace
both
batteries.
Insert
the
batteries
into
the
remote
controller
by
matching
the
polarity
(+
and
-)
correctly.
Installing
the
battery
The
unit
is
equipped
with
the
steering
wheel
remote
control
function.
•
See
the
Installation/Connection
Manual
(separate
volume)
for
connection.
OJ
•
Turns
on
the
power.
•
Attenuates
the
sound
if
the
power
is
on.
•
Turns
off
the
power
if
pressed
and
held
(while
the
power
is
on).
W
IIDISC/SD/USB/USB
iPod":
Reverse
search
[]]
Adjusts
the
volume
level.
•
Does
not
function
as
112nd
VOL.
II
!3J
•
Displays
<Dial
Menu>
screen.
•
Displays
<Redial>
menu
if
pressed
and
held.
•
Answers
incoming
calls.
[[]
•
DVD/DivX
6:
Shows
the
disc
menu.
•
VCO:
Resumes
PBC
playback.
•
DVD-VR:
Shows
the
Original
Program
screen.
[]]
Shows
the
on-screen
bar.
•
Does
not
function
as
11*11.
[l]
Functions
with
other
buttons
(see
[lID
and
[ill).
W
Changes
the
display
information.
8

[ill
For
disc/SD/USB
operations:
·
..
/~:
DVD:
Selects
the
title.
DVD-VR:
Selects
the
program/Playlist.
SD/USB/other
discs
(except
VCD/CD):
Selects
the
folders.
.
~/~:
-
Press
briefly:
reverse
skip/forward
skip
-
Press
and
hold:
reverse
search/forward
search
For
FM/AM
and
HD
Radio
operations:
·
..
/~:
FM/
AM:
Selects
the
preset
stations.
HD
Radio:
Selects
a
multicast
channel.
•
~
/~:
Functions
to
search
for
stations.
-
Press
briefly:
Auto
Search
-
Press
and
hold:
Manual
Search
For
satellite
tuner
operations:
•
..
/
~:
Selects
the
categories
.
.
~/~:
-
Press
briefly:
Selects
a
channel.
-
Press
and
hold:
Selects
a
channel
rapidly.
For
Apple
iPod
operations:
"USB
iPod":
•
..
/
~:
Selects
previous/next
item
.~/~:
-
Press
briefly:
reverse
skip/forward
skip
-
Press
and
hold:
reverse
search/forward
search
"iPod":
•
~:
Starts
playback/pauses.
•
..
:
Enters
the
main
menu
(then
..
/
~
/
~
/
~
work
as
menu
selecting
buttons).
.
~/~:
-
Press
briefly:
reverse
skip/forward
skip
-
Press
and
hold:
reverse
search/forward
search
-
In
menu
selecting
mode:
•
~:
Confirms
the
selection.
•
..
:
Returns
to
the
previous
menu
.
.
~/~:
-
Press
briefly:
Selects
an
item.
-
Press
and
hold:
Skips
ten
items
at
a
time.
9
For
Bluetooth
operations:
•
~
/
~:
reverse
skip/forward
skip
(for
audio
player
operation)
[ill
"DISC/SO/USB/USB
iPod":
Forward
search
[TI]
Selects
the
source
.
[g]
"DISC/SO/USB/USB
iPod":
Starts
playback/pauses.
"Bluetooth
PHONE":
Answers
incoming
calls.
"Bluetooth
AUDIO":
Starts
playback.
[j]
Changes
the
aspect
ratio
of
the
playback
pictures.
[H]
"TUNER/HD
Radio/SAT":
Selects
the
bands.
"DISC/SO/USB":
Stops
playback.
"USB
iPod":
Enters
<Search
Mode>
menu.
"Bluetooth
PHONE":
Ends
the
call.
"Bluetooth
AUOIO":
Pauses.
[ill
VCO:
Returns
to
the
PBC
menu.
IT§]
•
DVO
Video/DivX
6:
Shows
the
disc
menu.
•
VCD:
Resumes
PBC
playback.
•
DVD-VR:
Shows
the
Playlist
screen.
ITZI
•
Makes
selection/settings.
•
<]
/t>:
Skips
back
or
forward
by
5
minutes
for
DivX/MPEG1/MPEG2.
•
6.
/\7:
Changes
discs
for
"CD-CH."
[lID*3
•
"DlSC/SD/USB":
Switches
number
entry
mode.
•
Erases
the
misentry
after
entering
a
wrong
number.
•
Does
not
function
as
"SURROUND."
[ill*3
Number
buttons
•
Enters
numbers
.
•
"TUNER/HD
Radio/SAT":
Selects
the
preset
station
directly.
*1
Functions
as
a
number
button
only
(see
[ill).
*2
Not
used
for
this
unit.
*3
Functions
when
pressed
with
SHIFT
.
INTRODUCTION
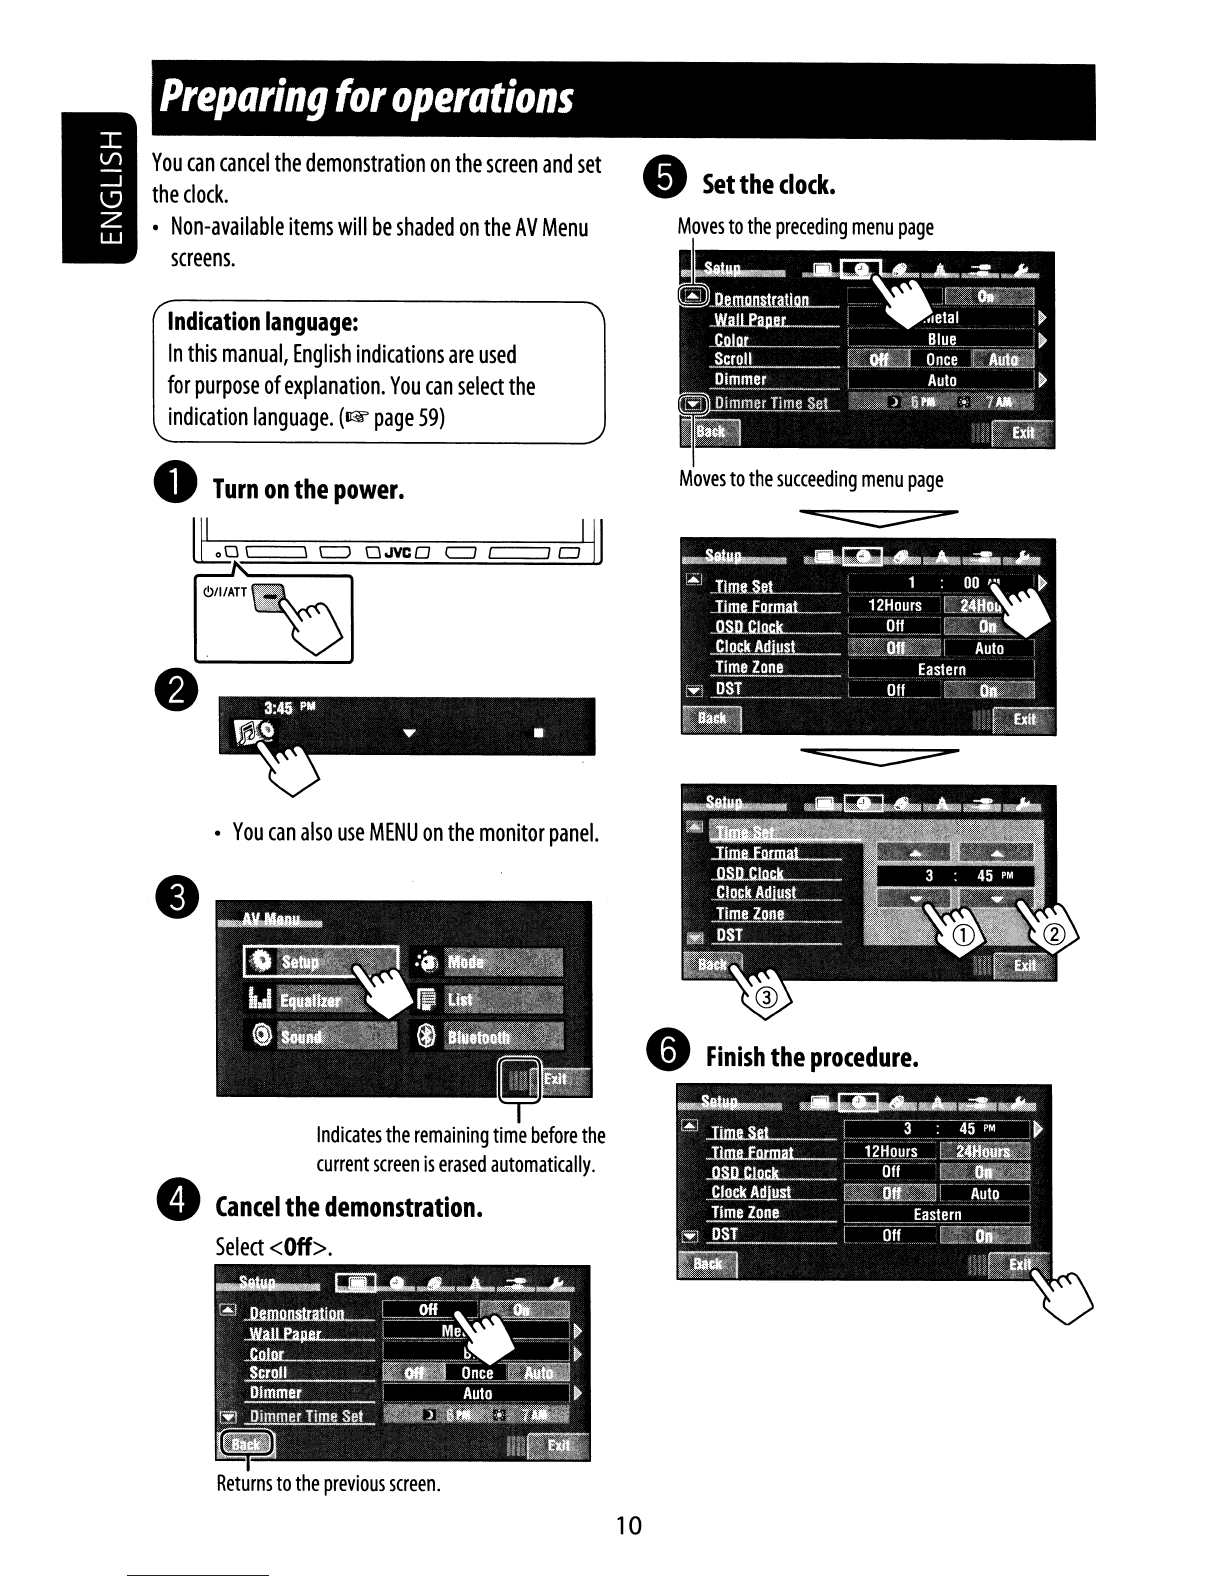
Moves
to
the
succeeding
menu
page
•
Finish
the
procedure.
•
Set
the
clock.
Moves
to
the
preceding
menu
page
Indication
language:
In
this
manual,
English
indications
are
used
for
purpose
of
explanation.
You
can
select
the
indication
language.
(1&
page
59)
•
You
can
also
use
MENU
on
the
monitor
panel.
Indicates
the
remaining
time
before
the
current
screen
is
erased
automatically.
•
Cancel
the
demonstration.
Select
<Off>.
Preparing
for
operations
o
Turn
on
the
power.
~o
c:=:=\
c:J
0JVC0
c::J
c==:::J
CJ
YJ
You
can
cancel
the
demonstration
on
the
screen
and
set
the
clock.
•
Non-available
items
will
be
shaded
on
the
AV
Menu
screens.
•
10

Common
operations
Selecting
the
playback
source
_
•
Available
sources
depend
on
the
external
components
you
have
connected,
media
you
have
attached,
and
the
<Input>
settings
you
have
made
(~
pages
61
and
62).
Changing
the
display
information
_
•
Available
display
information
varies
among
the
playback
sources.
•
You
cannot
select
these
sources
if
they
are
not
ready.
Navigation
screen*
Playback
picture
and
clock
time
in
large
numbers
Source
information
screen
oc:::::::::::::
Back
to
the
beginning
Ex.:
When
the
playback
source
is
a
DVD
video
disc.
Playback
picture
screen
(only
for
video
sources)
•
Each
time
you
press
DISP,
the
display
changes
to
show
the
various
information.
On
the
monitor
panel
only:
l~
00
c===-=\
c:J
0JVC 0
c=J
~
0
~
Exit
~
00
\ \
c:J
OJVCO
c=J
~
oYJ
Current
source
"TUNER"
or
"HD
Radio"
.....
"SAT"
.....
"DISC"(DVDI
VCD/CD)
.....
"SD"
.....
"USB"
or
"USB
iPod"
.....
"CD-CH",
"iPod",
or
"EXT-IN"
.....
"Bluetooth
PHONE"
.....
"Bluetooth
AUDIO"
.....
"AV-IN"
.....
(back
to
the
beginning)
On
the
monitor
panel:
On
the
touch
panel:
*
When
<Navigation>
is
selected
for
<AV
Input>
(~page61)
11
OPERATIONS

Displays
<Sirius
ID>
screen.
1&
page
61
Displays
<Blend
Hold>
menu.
1&
page
47
Displays
<Redial>
menu.
1&
page
38
Activates
<Voice
Dialing>
function.
1&
page
37
Displays
<Asped>
menu.
1&
page
59
Turns
on
or
off
Track/Chapter
Repeat.
1&
pages21,31,33,42,and50
Changes
the
sound
mode.
1&
page
55
Displays
<Illumination>
menu.
1&
page
62
Short
Cut
window
appears.
•
To
erase
the
window,
press
the
button
again.
3
2
Press
a
Short
Cut
icon.
Using
Short
Cut
Icons
_
You
can
easily
access
some
frequently
used
functions
by
using
Short
Cut
icons.
1
Short
Cut
icons:
Available
icons
vary
among
the
sources.
The
corresponding
screen
is
displayed.
12

Listening
to
the
radio
Preset
no.
Band
Sound
mode
(~page
55)
Tuner
indicator
Assigned
station
name
(~
page
56).
If
no
name
is
assigned,
"No
Name"
appears.
o
•
•
Press
[SOURCE],
then
press
[TUNER].
(~page
11)
•
You
can
also
use
SOURCE
on
the
monitor
panel.
Press
it
repeatedly
.
Press
[BAND].
LFM1"FM2
..
FM3
..
AMJ
Press
["v]
or
[.A]
to
search
for
astation-Auto
Search.
•
Manual
Search:
Hold
either
[v]or
[.A]
until"Manual
Search"
appears
on
the
screen,
then
press
it
repeatedly.
•
The
ST
indicator
lights
up
when
receiving
an
FM
stereo
broadcast
with
sufficient
signal
strength.
13
OPERATIONS

Local
FM
stations
with
the
strongest
signals
are
searched
and
stored
automatically
in
the
FM
band.
3
o
You
can
also
use
MENU
on
the
monitor
panel.
2
FM
station
automatic
presetting
-SSM
(Strong-station
Sequential
Memory)
_
This
function
works
only
for
FM
bands.
You
can
preset
six
stations
for
each
band.
1
3
Reception
improves,
but
stereo
effect
will
be
lost.
o
The
MONO
indicator
lights
up.
o
You
can
also
use
MENU
on
the
monitor
panel.
2
When
an
FM
stereo
broadcast
is
hard
to
receive
_
1
To
restore
stereo
effect,
select
<Off>.
14
•
You
can
also
use
MENU
on
the
monitor
panel.
-=:::::::::::::
2
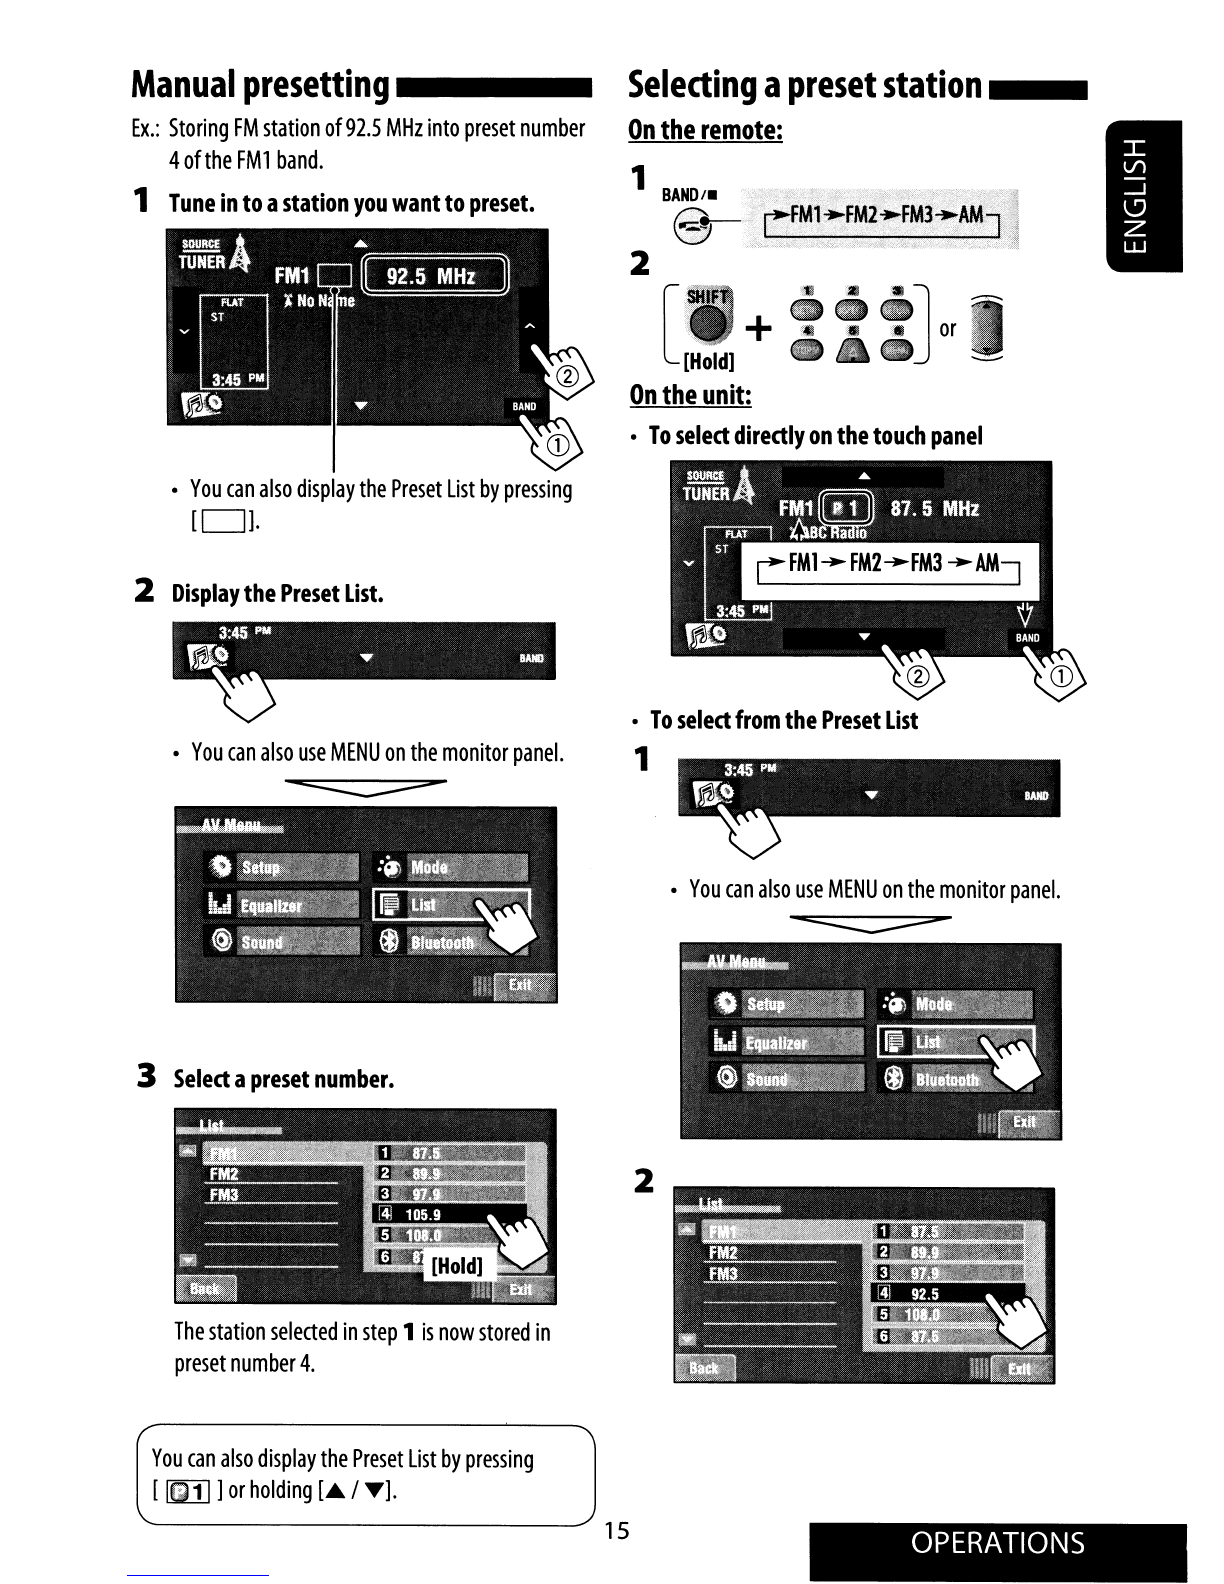
1
BAND/.
(§)
2
[HOldl
+
On
the
unit:
•
To
select
directly
on
the
touch
panel
Selecting
a
preset
station
__
On
the
remote:
The
station
selected
in
step
1
is
now
stored
in
preset
number
4.
•
To
select
from
the
Preset
List
•
You
can
also
use
MENU
on
the
monitor
panel.
1
-=:::::::::::::
3
Select
a
preset
number.
•
You
can
also
display
the
Preset
List
by
pressing
[0].
2
Display
the
Preset
List.
Manual
presetting
_
Ex.:
Storing
FM
station
of92.5
MHz
into
preset
number
4
of
the
FMl
band.
1
Tune
in
to
a
station
you
want
to
preset.
You
can
also
display
the
Preset
List
by
pressing
[
[m::1J
]
or
holding
[A /
T].
15
OPERATIONS

Disc
operations
The
disc
type
is
automatically
detected,
then
playback
starts
(for
some
discs,
the
top
menu
of
the
disc
appears).
If
a
disc
does
not
have
any
disc
menu,
all
tracks
on
it
will
be
played
repeatedly
until
you
change
the
source
or
eject
the
disc.
o
Open
the
monitor
panel.
l~
00
c::::::J
c::J
O.NC
0
c:J
~
JJ
~-
<OpenlTilt>
menu
is
displayed.
•
By
pressing
and
holding
the
button,
you
can
open
the
monitor
panel
and
eject
the
disc.
e_
•
Insert
a
disc.
Label
side
Monitor
panel
closes
automatically.
If
not,
press
[Close].
Do
not
place
your
finger
behind
the
monitor
panel.
Discs
produce
very
little
noise
compared
with
other
sources.
Lower
the
volume
before
playing
a
disc
to
avoid
damaging
the
speakers
by
the
sudden
increase
of
the
output
level.
When
playing
back
a
multi-channel
encoded
disc,
the
multi-channel
signals
are
downmixed
.
•
You
can
fully
enjoy
multi-channel
sound
by
connecting
an
amplifier
or
a
decoder
compatible
with
these
multi-
channel
sources.
(1&
also
page
72)
16

While
playing
the
following
discs,
press
[DIll!'".
•
Each
time
you
press
the
button,
the
display
changes
to
show
the
different
information.
(1&
page
11)
DVD
Video:
Title
no./Chapter
no./Playing
time
r-----
DV_D_-I
Program
no.
{or
Playli'!
no.j/Chapter
noJPlaying
tim.
Disc
type
Audio
format
Sound
mode
(1&
page
55)
Playback
mode
[AT]
Starts
playback/pauses
Stops
playback
Press:
Selects
chapter
Hold:
Reverse/forward
search*3
Selects
title/program/playlist
*1
DVD-
VR
also
indicates
either
VR-PRG
(program)
or
VR-PLA
Y
(playlist)
playback.
*2
Indicates
the
button
pressed.
*3
Search
speed:
x2
¢
x10
_
Buttons
on
the
touch
paneL
In
the
explanation,
they
are
indicated
inside
[
].
These
buttons
also
work
when
they
are
not
shown
on
the
touch
panel
(while
watching
the
playback
pictures
on
the
screen).
17
OPERATIONS

While
playing
the
following
discs,
press
I
~·.l.
•
Each
time
you
press
the
button,
the
display
changes
to
show
the
different
information
(~
page
11).
For
DivX/MPEG1/MPEG2:
Folder
no.lTrack
no./Playing
time
For
JPEG:
Folder
no./Track
no.
Disc
type
Sound
mode
(1&
page
55)
_.'
,
Starts
playback/pauses
Stops
playback
Press:
Selects
track
Hold:
Reverse/forward
search
for
DivX/
MPEG1/MPEG2
*1
[A
'Y]
Press:
Selects
folder
Hold:
Displays
FolderlTrack
Lists
WM011
mTI]:
Displays
FolderlTrack
Lists
Sound
mode
(1&
page
55)
Track
no./Playing
time
Starts
playback/pauses
Stops
playback
Press:
Selects
track
Hold:
Reverse/forward
search*3
*1
Search
speed:
~
7
~
~
2
*2
Indicates
the
button
pressed.
*3
Search
speed:
x2
~
x70
18

Sound
mode
(1Gi'
page
55)
Only
for
CD
Text
*5*6
Starts
playback/pauses
Stops
playback
Press:
Selects
track
Hold:
Reverse/forward
search*7
MP3IWMAJ
Audio
format
(MP3/WMA/W
AV
/
AAC)
Sound
mode
(1Gi'
page
55)
Folder
nO.lTrack
no./Playing
time
Tag
data
appears
only
when
it
is
recorded.*5*6
Starts
playback/pauses
Stops
playback
Press:
Selects
track
Hold:
Reverse/forward
search*7
[.&
~l
Press:
Selects
folder
Hold:
Displays
FolderlTrack
Lists
[if_lOll
[l]Ljl:
Displays
FolderlTrack
Lists
*4
Indicates
the
button
pressed.
*5
"No
Name"
appears
for
conventional
CDs
or
if
not
recorded.
*6
Touching
an
information
bar
scrolls
the
text
if
all
the
text
is
not
shown.
*7
Search
speed:
x2
~
xl0
19
OPERATIONS

Operation
buttons
on
the
screen
_
You
can
display
the
following
operation
buttons
while
watching
the
playback
pictures
on
the
screen
.
•
If
no
operation
is
done
for
about
5
seconds,
the
operation
buttons
disappear
(except
when
a
disc
menu
is
displayed).
1&
pages
23
to
27
on
how
the
operation
buttons
particularly
work
for
a
variety
of
the
discs
©
For
entering
the
numbers
[0]-[9]
-+
[ENTER]
Enters
numbers
[DirectlCLR]
•
Switches
between
chapter/track
entry
and
title/folder
entry
•
Erases
the
last
entry
when
you
enter
a
wrong
number
Ex.:
To
enter
1/105,1/
press
[1],
[0],
[5],
then
[ENTER]
Displays
<Source
Menu>
screen
Selects
folders
Starts
playback/pause
Press:
Sel
ects
tracks
Hold:
Reverse/forward
search
[0]
(*2)
Displays
Short
Cut
icons.
[~]
Displays
<AV
Menu>
screen
[_]
Stops
playback
•
The
above
buttons
also
work
when
they
are
not
shown
on
the
screen
(while
watching
the
playback
picture).
*1
While
a
disc
menu
is
played
back
for
DVD,
[KEY]
is
automatically
displayed.
On
the
disc
menu,
you
can
select
a
menu
item
directly
by
touching
it
on
the
screen
®
For
DVD/vCD/DivX
menu
operation
playback
[.
~
~
~]
Selects
the
menu
items
[ENTER]
Confirms
the
selection
[TOP
MENU]
Displays
the
disc
menu
[MENU]
Displays
the
disc
menu
[RETURN]
Returns
to
the
previous
menu
or
displays
the
menu
(only
for
VCD
with
PBC)
®
[SOURCE]
[.~]
[~
/11]
[~~]
a
ED
a
..
0:01:20
Touch
[KEY].
Touch
[KEY].
Touch
[KEY].
Touch
the
screen
(center
portion).
*1
-=:::::::::::::
*®
To
erase
the
operations,
touch
the
screen
again.
20
Other manuals for EXAD KW-AVX810
7
Table of contents
Other JVC Car Receiver manuals


