JVC KD-SR72 User manual

Data Size: B6L (182 mm x 128 mm)
Book Size: B6L (182 mm x 128 mm)
ENGLISH
FRANÇAIS
ESPAÑOL
B5A-1265-00 [K]
KD-SR72
CD RECEIVER
INSTRUCTION MANUAL
RÉCEPTEUR CD
MANUEL D’INSTRUCTIONS
RECEPTOR CON CD
MANUAL DE INSTRUCCIONES
For customer Use:
Enter below the Model No. and Serial No. which are
located on the top or bottom of the cabinet. Retain this
information for future reference.
Model No.
Serial No.
JS_JVC_KD_SR72_K_C.indd 1JS_JVC_KD_SR72_K_C.indd 1 5/1/2016 2:14:58 PM5/1/2016 2:14:58 PM

Data Size: B6L (182 mm x 128 mm)
Book Size: B6L (182 mm x 128 mm)
2
CONTENTS BEFORE USE
IMPORTANT
• To ensure proper use, please read through this manual before using this product. It is especially important
that you read and observe Warning and Caution in this manual.
• Please keep the manual in a safe and accessible place for future reference.
Warning
Do not operate any function that takes your attention away from safe driving.
Caution
Volume setting:
• Adjust the volume so that you can hear sounds outside the car to prevent accidents.
• Lower the volume before playing digital sources to avoid damaging the speakers by the sudden increase of
the output level.
General:
• Avoid using the external device if it might hinder safe driving.
• Make sure all important data has been backed up. We shall bear no responsibility for any loss of recorded
data.
• Never put or leave any metallic objects (such as coins or metal tools) inside the unit, to prevent a short
circuit.
• If a disc error occurs due to condensation on the laser lens, eject the disc and wait for the moisture to
evaporate.
Remote control (RM-RK52):
• Do not leave the remote control in hot places such as on the dashboard.
• The Lithium battery is in danger of explosion if replaced incorrectly. Replace it only with the same or
equivalent type.
• The battery pack or batteries shall not be exposed to excessive heat such as sunshine, fire or the like.
• Keep the battery out of reach of children and in its original packaging when not in used. Dispose of used
batteries promptly. If swallowed, contact a physician immediately.
BEFORE USE 2
BASICS 3
GETTING STARTED 4
1
Cancel the demonstration
2 Set the clock
3 Set the basic settings
RADIO 5
AUX 6
CD / USB / iPod / ANDROID 7
Pandora® 9
iHeartRadio® 10
AUDIO SETTINGS 11
DISPLAY SETTINGS 13
REFERENCES 14
Maintenance
More information
TROUBLESHOOTING 16
SPECIFICATIONS 18
INSTALLATION /
CONNECTION 20
How to read this manual
• Operations are explained mainly using buttons on the faceplate.
• English indications are used for the purpose of explanation. You can select the display language from the
menu. (
4
)
•
[XX]
indicates the selected items.
• (
XX
) indicates references are available on the stated page.
JS_JVC_KD_SR72_K_EN_2.indd 2JS_JVC_KD_SR72_K_EN_2.indd 2 26/1/2016 2:39:26 PM26/1/2016 2:39:26 PM

Data Size: B6L (182 mm x 128 mm)
Book Size: B6L (182 mm x 128 mm)
3
ENGLISH
BASICS
To On the faceplate On the remote control
Turn on the power Press .
• Press and hold to turn off the power. ( Not available )
Adjust the volume Turn the volume knob. Press or .
Press the volume knob to mute the sound or pause playback.
• Press again to cancel. Press to mute the sound or pause playback.
• Press again to cancel.
Select a source • Press repeatedly.
• Press , then turn the volume knob within 2 seconds.
Press SOURCE repeatedly.
Change the display
information
Press repeatedly.
( 16)
( Not available )
Attach
How to reset
Detach
Your preset adjustments
will be erased except
stored radio stations.
Remote control (RM-RK52)Faceplate
Volume knob Loading slot
Detach button Display window
ST
How to replace the battery
Pull out the insulation
sheet when using for
the first time.
Remote sensor (Do not expose
to bright sunlight.)
JS_JVC_KD_SR72_K_EN_1.indd 3JS_JVC_KD_SR72_K_EN_1.indd 3 5/1/2016 2:13:10 PM5/1/2016 2:13:10 PM

4
Data Size: B6L (182 mm x 128 mm)
Book Size: B6L (182 mm x 128 mm)
GETTING STARTED
Cancel the demonstration
When you turn on the power (or after you reset the unit), the
display shows: “CANCEL DEMO” “PRESS” “VOLUME KNOB”
1 Press the volume knob.
[
YES
] is selected for the initial setup.
2 Press the volume knob again.
“DEMO OFF” appears.
Set the clock
1 Press and hold .
2 Turn the volume knob to select [
CLOCK
], then press the knob.
3 Turn the volume knob to select [
CLOCK SET
], then press the
knob.
4 Turn the volume knob to make the settings, then press the
knob.
Day Hour Minute
5 Turn the volume knob to select [
24H/ 12H
], then press the
knob.
6 Turn the volume knob to select [
12 HOUR
] or [
24 HOUR
], then
press the knob.
7 Press to exit.
To return to the previous setting item, press .
1
2
Set the basic settings
1 Press and hold .
2 Turn the volume knob to select an item (see the following table), then
press the knob.
3 Repeat step 2until the desired item is selected or activated.
4 Press to exit.
To return to the previous setting item, press .
Default:
XX
SETTINGS
BEEP ON
:Activates the keypress tone.;
OFF
:Deactivates.
SRC SELECT
AM
*
ON
:Enables AM in source selection.;
OFF
:Disables.
PANDORA
*
ON
:Enables PANDORA in source selection.;
OFF
:Disables.
IHEART
*
ON
:Enables IHEARTRADIO in source selection.;
OFF
:Disables.
AUX
*
BT ADAPTER
:Selects when the KS-BTA100 Bluetooth adapter is connected to the AUX
jack. (
6
);
ON
:Enables AUX in source selection.;
OFF
:Disables.
F/W UPDATE
SYSTEM
F/W xxxx YES
:Starts upgrading the firmware.;
NO
:Cancels (upgrading is not activated).
For details on how to update the firmware, see: <http://www.jvc.net/cs/car/>.
CLOCK
CLOCK SYNC AUTO
:The clock time is automatically set using the Clock Time (CT) data in FM Radio
Broadcast Data System signal.;
OFF
:Cancels.
CLOCK DISP ON
:The clock time is shown on the display even when the unit is turned off.;
OFF
:Cancels.
ENGLISH
Select the display language for menu and music information if applicable.
By default,
ENGLISH
is selected.
ESPANOL
* Not displayed when the corresponding source is selected.
3
JS_JVC_KD_SR72_K_EN_1.indd 4JS_JVC_KD_SR72_K_EN_1.indd 4 5/1/2016 2:13:11 PM5/1/2016 2:13:11 PM

ENGLISH 5
Data Size: B6L (182 mm x 128 mm)
Book Size: B6L (182 mm x 128 mm)
RADIO
“ST” lights up when receiving an FM stereo broadcast with sufficient
signal strength.
Search for a station
1 Press repeatedly to select FM or AM.
2 Press (or press on RM-RK52) to search for a station
automatically.
(or)
Press and hold (or press and hold on RM-RK52) until
“M” flashes, then press repeatedly to search for a station manually.
Settings in memory
You can store up to 18 stations for FM and 6 stations for AM.
Store a station
While listening to a station....
Press and hold one of the number buttons (1to 6).
(or)
1 Press and hold the volume knob until “PRESETMODE” flashes.
2 Turn the volume knob to select a preset number, then press the
knob.
The preset number flashes and “MEMORY” appears.
Select a stored station
Press one of the number buttons (1to6).
(or)
1 Press .
2 Turn the volume knob to select a preset number, then press the
knob to confirm.
Other settings
1 Press and hold .
2 Turn the volume knob to select [
TUNER
], then press the knob.
3 Turn the volume knob to select an item
(
see the following table
)
,
then press the knob.
4 Repeat step 3until the desired item is selected/activated or follow
the instructions stated on the selected item.
5 Press to exit.
To return to the previous setting item, press .
Default:
XX
RADIO TIMER
Turns on the radio at a specific time regardless of the current source.
1
ONCE
/
DAILY
/
WEEKLY
/
OFF
:Select how often the timer will be
turned on.
2
FM
/
AM
:Select the source.
3
01
to
18
(for FM)/
01
to
06
(for AM):Select the preset station.
4
Set the activation day*
1
and time.
“
M
” lights up when complete.
Radio Timer will not activate for the following cases.
• The unit is turned off.
• [
OFF
] is selected for [
AM
] in [
SRC SELECT
]
after Radio Timer for AM is
selected.
( 4)
*1
Selectable only when [
ONCE
] or [
WEEKLY
] is selected in step
1
.
JS_JVC_KD_SR72_K_EN_1.indd 5JS_JVC_KD_SR72_K_EN_1.indd 5 5/1/2016 2:13:12 PM5/1/2016 2:13:12 PM

6
Data Size: B6L (182 mm x 128 mm)
Book Size: B6L (182 mm x 128 mm)
RADIO
Default:
XX
SSM SSM 01 – 06
/
SSM 07 – 12
/
SSM 13 – 18
:Automatically presets up
to 18 stations for FM. “SSM” stops flashing when the first 6 stations are
stored. Select
SSM 07 – 12
/
SSM 13 – 18
to store the following 12
stations.
IF BAND AUTO
:Increases the tuner selectivity to reduce interference noises from
adjacent FM stations. (Stereo effect may be lost.);
WIDE
:Subjects to
interference noises from adjacent FM stations, but sound quality will not
be degraded and the stereo effect will remain.
MONO
*2
ON
:Improves the FM reception, but the stereo effect will be lost.;
OFF
:Cancels.
AREA AREA US
: For North/Central/South America, AM/FM intervals:
10kHz/200kHz.;
AREA SA
:For some South American countries, AM/
FM intervals: 10kHz/50kHz.;
AREA EU
:For any other areas, AM/FM
intervals: 9kHz/50kHz.
PTY SEARCH
*2
Select a PTY code (see below).
If there is a station broadcasting a program of the same PTY code as you
have selected, that station is tuned in.
PTY code
:
NEWS
,
INFORM
(information),
SPORTS
,
TALK
,
ROCK
,
CLS ROCK
(classic
rock),
ADLT HIT
(adult hits),
SOFT RCK
(softrock),
TOP 40
,
COUNTRY
,
OLDIES
,
SOFT
,
NOSTALGA
(nostalgia),
JAZZ
,
CLASSICL
(classical),
R & B
(rhythm and blues),
SOFT R&B
(soft rhythm and blues),
LANGUAGE
,
REL MUSC
(religious music),
REL TALK
(religious talk),
PERSNLTY
(personality),
PUBLIC
,
COLLEGE
,
HABL ESP
(Spanish talk),
MUSC ESP
(Spanish music),
HIP HOP
,
WEATHER
*2
Only for FM source.
Use a portable audio player
1 Connect a portable audio player (commercially available).
2 Select [
ON
] for [
AUX
] in [
SRC SELECT
]. (
4
)
3 Press repeatedly to select AUX.
4 Turn on the portable audio player and start playback.
Use a 3-core plug head stereo mini plug for optimum audio
output.
Use a Bluetooth® device
1 Connect the Bluetooth adapter, KS-BTA100 (separately purchased).
2 Register (pair) the Bluetooth device with KS-BTA100.
3 Select [
BT ADAPTER
] for [
AUX
] in [
SRC SELECT
]. (
4
)
4 Press repeatedly to select BT AUDIO.
5 Start using the Bluetooth device.
For details, refer to the instruction manual of KS-BTA100.
3.5mm (1/8") stereo mini plug with “L” shaped connector
(commercially available)
Portable audio player
Auxiliary input jack
AUX
Auxiliary input jack
Blue/white Blue/white: Remote
Black Black: Ground
Brown Brown: Tel muting
Wiring harness of the unit
(
21
)
JS_JVC_KD_SR72_K_EN_1.indd 6JS_JVC_KD_SR72_K_EN_1.indd 6 5/1/2016 2:13:12 PM5/1/2016 2:13:12 PM

ENGLISH 7
Data Size: B6L (182 mm x 128 mm)
Book Size: B6L (182 mm x 128 mm)
CD / USB / iPod / ANDROID
To directly select USB/ USB-IPOD/ ANDROID source, press .
To On the faceplate On the remote control
Reverse / Fast-forward*3Press and hold . Press and hold .
Select a track/file Press .Press .
Select a folder*4Press . Press .
Repeat play*5Press repeatedly.
TRACK RPT
/
ALL RPT
: Audio CD
TRACK RPT
/
FOLDER RPT
/
ALL RPT
: MP3/WMA/WAV/FLAC file
ONE RPT
/
ALL RPT
/
RPT OFF
: iPod or ANDROID
Random play*5Press repeatedly.
ALL RND
/
RND OFF
: Audio CD
FOLDER RND
/
ALL RND
/
RND OFF
: MP3/WMA/WAV/FLAC file
SONG RND
/
ALL RND
/
RND OFF
: iPod or ANDROID
*1
Do not leave the cable inside the car when not using.
*2
When connecting an Android device, “Press [VIEW] to install JVC MUSIC PLAY APP” is shown. Follow the instructions to install
the application. You can also install the latest version of JVC MUSIC PLAY application on your Android device before connecting.
(
14
)
*3
For ANDROID: Applicable only when [
AUTO MODE
] is selected.
(
8
)
*4
For CD: Only for MP3/WMA files. This does not work for iPod/ ANDROID.
*5
For iPod/ ANDROID: Applicable only when [
HEAD MODE
]/ [
AUTO MODE
] is selected.
(
8
)
Start playback
The source changes automatically and
playback starts.
CD
Eject disc Label side
USB input terminal
USB 2.0 cable
*1
(commercially available)
Micro USB 2.0 cable
*1
(commercially available)
(Accessory of the
iPod/iPhone)*
1
USB
iPod/iPhone
ANDROID*2
JS_JVC_KD_SR72_K_EN_1.indd 7JS_JVC_KD_SR72_K_EN_1.indd 7 5/1/2016 2:13:12 PM5/1/2016 2:13:12 PM

8
Data Size: B6L (182 mm x 128 mm)
Book Size: B6L (182 mm x 128 mm)
Select control mode
While in USB-IPOD source, press repeatedly.
HEAD MODE
: Control iPod from this unit.
IPHONE MODE
: Control iPod using the iPod itself. However, you can still play/
pause or file skip from this unit.
While in ANDROID source, press repeatedly.
AUTO MODE
: Control Android device from this unit via JVC MUSIC PLAY
application installed in the Android device.
AUDIO MODE
: Control Android device using the Android device itself via
other media player applications installed in the Android device.
However, you can still play/pause or file skip from this unit.
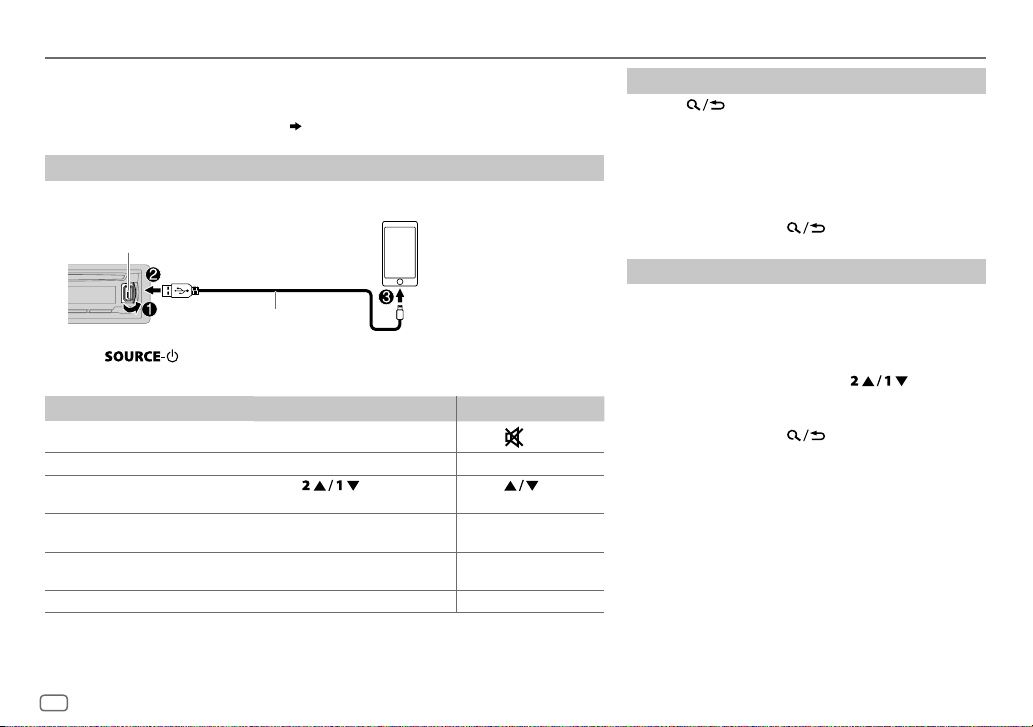
Select music drive
Press repeatedly.
Stored songs in the following drive will be played back.
• Selected internal or external memory of a smartphone (Mass Storage Class).
• Selected drive of a multiple drives device.
Change the playback speed of the Audiobook
While listening to the iPod and [
HEAD MODE
] is selected....
1 Press and hold .
2 Turn the volume knob to select [
IPOD
], then press the knob.
3 Press the volume knob to select [
AUDIOBOOKS
].
4 Turn the volume knob to select an item, then press the knob.
0.5× SPEED
/
1× SPEED
/
2× SPEED
: Select the desired playback speed of the
Audiobooks sound file in your iPod/iPhone.
(Default: Depends on your iPod/iPhone setting.)
5 Press to exit.
To return to the previous setting item, press .
Select a file from a folder/list
1 Press .
2 Turn the volume knob to select a folder/list, then press the
knob.
3 Turn the volume knob to select a file, then press the knob.
Quick Search
If you have many files, you can search through them quickly.
Turn the volume knob quickly to browse through the list
quickly.
– Not applicable for iPod.
Alphabet search
(applicable only for iPod):
You can search for a file according to the first character.
Press or turn the volume knob quickly to select the
desired character (A to Z/ 0to9/ OTHERS).
– Select “OTHERS” if the first character is other than Ato Z, 0 to 9.
• To return to the previous setting item, press .
• To cancel, press and hold .
• For iPod, applicable only when [
HEAD MODE
] is selected.
• For ANDROID, applicable only when [
AUTO MODE
] is selected.
CD / USB / iPod / ANDROID
JS_JVC_KD_SR72_K_EN_1.indd 8JS_JVC_KD_SR72_K_EN_1.indd 8 5/1/2016 2:13:13 PM5/1/2016 2:13:13 PM

ENGLISH 9
Data Size: B6L (182 mm x 128 mm)
Book Size: B6L (182 mm x 128 mm)
Pandora®
Preparation:
Install the latest version of the Pandora application on your device
(iPhone/ iPod touch), then create an account and log in to Pandora.
• Select [
ON
] for [
PANDORA
] in [
SRC SELECT
].
( 4)
Start listening
1 Open the Pandora application on your device.
2 Connect your device to the USB input terminal.
The source changes to PANDORA and broadcast starts.
To On the faceplate On the remote control
Playback / pause Press the volume knob. Press .
Skip a track Press T. Press I.
Thumbs up or
thumbs down*2
Press . Press .
*1
Do not leave the cable inside the car when not using.
*2
If thumbs down is selected, the current track is skipped.
Create and save a new station
1 Press .
2 Turn the volume knob to select [
NEW STATION
], then press the knob.
3 Turn the volume knob to select [
FROM TRACK
] or [
FROM ARTIST
], then
press the knob.
A new station is created based on the current song or artist.
4 Press and hold number button 3, 4, 5or 6to store.
To select a stored station, press number button 3, 4, 5or 6.
Search for a registered station
1 Press .
2 Turn the volume knob to select an item, then press the knob.
[
BY DATE
]:
According to the registered date.
[
A-Z
]:
Alphabetical order.
3 Turn the volume knob to select the desired station, then press the
knob.
To cancel, press and hold .
Bookmark current song information
Press and hold the volume knob.
“BOOKMARKED” appears and the information is stored to your device.
The bookmark is available on your Pandora account but not on this unit.
USB input terminal
(Accessory of the iPod/iPhone)
*1
JS_JVC_KD_SR72_K_EN_1.indd 9JS_JVC_KD_SR72_K_EN_1.indd 9 5/1/2016 2:13:14 PM5/1/2016 2:13:14 PM

10
Data Size: B6L (182 mm x 128 mm)
Book Size: B6L (182 mm x 128 mm)
iHeartRadio®
Preparation:
Install the latest version of iHeart Link for JVC application on your device (iPhone/ iPod
touch), then create an account and log in to iHeartRadio.
• Select [
ON
] for [
IHEART
] in [
SRC SELECT
].
( 4)
Start listening
1 Open the iHeart Link application on your device.
2 Connect your device to the USB input terminal.
3 Press repeatedly to select IHEARTRADIO.
Broadcast starts automatically
To On the faceplate On the remote control
Playback / pause Press the volume knob. Press .
Skip a track for custom station Press T. Press I.
Thumbs up or thumbs down
for custom station*2
Press . Press .
Create a new/custom station Press and hold the volume
knob. ( Not available )
Add to favorite stations for live
station
Press 3.( Not available )
Scan for live station Press 4.( Not available )
*1
Do not leave the cable inside the car when not using.
*2
If thumbs down is selected, the current track is skipped.
Search for a station
1 Press .
2 Turn the volume knob to select a category, then
press the knob.
3 Turn the volume knob to select the desired station,
then press the knob.
When a city list appears, you can skip cities in
alphabetical order.
To cancel, press and hold .
Skip cities by alphabetical order
While a city list appears during search...
1 Turn the volume knob quickly to enter character
search.
You can search through the list quickly according to
the first character (A to Z).
2 Turn the volume knob or press to select
the character to be searched for.
3 Press the volume knob to start searching.
To cancel, press and hold .
USB input terminal
(Accessory of the iPod/iPhone)
*1
JS_JVC_KD_SR72_K_EN_1.indd 10JS_JVC_KD_SR72_K_EN_1.indd 10 5/1/2016 2:13:14 PM5/1/2016 2:13:14 PM

ENGLISH 11
Data Size: B6L (182 mm x 128 mm)
Book Size: B6L (182 mm x 128 mm)
AUDIO SETTINGS
Select a preset equalizer
Press repeatedly.
(or)
Press , then turn the volume knob within 5seconds.
Preset equalizer
:
FLAT
(default),
HARD ROCK
,
HIP HOP
,
JAZZ
,
POP
,
R&B
,
TALK
,
USER
,
VOCAL BOOST
,
BASS BOOST
,
CLASSICAL
,
DANCE
Store your own sound settings
1 Press and hold to enter EASY EQ setting.
2 Turn the volume knob to select an item, then press the knob.
Refer to [
EASY EQ
] for setting and the result is stored to [
USER
].
• To return to the previous setting item, press .
• To exit, press .
Other settings
1 Press and hold .
2 Turn the volume knob to select an item (see the following table),
then press the knob.
3 Repeat step 2until the desired item is selected/activated or follow
the instructions stated on the selected item.
4 Press to exit.
To return to the previous setting item, press .
Default:
XX
EQ SETTING
EQ PRESET
Select a preset equalizer suitable to the music genre. (Select [
USER
] to use the
settings made in [
EASY EQ
].)
FLAT
(
Default) /
HARD ROCK
/
HIP HOP
/
JAZZ
/
POP
/
R&B
/
TALK
/
USER
/
VOCAL BOOST
/
BASS BOOST
/
CLASSICAL
/
DANCE
EASY EQ
Adjust your own sound settings. The settings are stored to [
USER
].
SUB.W SP
*1*2
:
00
to
+06
(Default:
03
SUB.W
*1*3
:
–08
to
+08
00
BASS
LVL
:
–06
to
+06
00
MID
LVL
:
–06
to
+06
00
TRE
LVL
:
–06
to
+06
00
)
PRO EQ
1
BASS
/
MIDDLE
/
TREBLE
:Select a sound tone.
2
Adjust the sound elements of the selected sound tone.
BASS
Frequency:
60
/
80
/
100
/
200 HZ
(
Default:
80 HZ
Level:
–06
to
+06
00
Q:
Q1.0
/
Q1.25
/
Q1.5
/
Q2.0
Q1.0
)
MIDDLE
Frequency:
0.5
/
1.0
/
1.5
/
2.5 KHZ
(Default:
1.0 KHZ
Level:
–06
to
+06
00
Q:
Q0.75
/
Q1.0
/
Q1.25
Q1.25
)
TREBLE
Frequency:
10.0
/
12.5
/
15.0
/
17.5 KHZ
(Default:
10.0 KHZ
Level:
–06
to
+06
00
Q:
Q FIX
Q FIX
)
*1
Displayed only when [
SUB.W
] is set to [
ON
].
*2
Displayed only when [
SPK/PRE
OUT
] is set to [
SUB.W/SUB.W
]. (
12
)
*3
Displayed only when [
SPK/PRE
OUT
] is set to [
REAR/SUB.W
] or [
SUB.W/SUB.W
]. (
12
)
JS_JVC_KD_SR72_K_EN_1.indd 11JS_JVC_KD_SR72_K_EN_1.indd 11 5/1/2016 2:13:14 PM5/1/2016 2:13:14 PM

12
Data Size: B6L (182 mm x 128 mm)
Book Size: B6L (182 mm x 128 mm)
AUDIO
BASS BOOST +01
—
+05
(
+01
): Selects your preferred bass boost level.;
OFF
:Cancels.
LOUD 01
/
02
:Boosts low or high frequencies to produce a well-balanced
sound at low volume.;
OFF
:Cancels.
SUB.W LEVEL
*4
SPK-OUT
*5
00
to
+06
(
+03
):Adjusts the output level of the
subwoofer connected via speaker lead. (
21
)
PRE-OUT
*6
–08
to
+08
(
00
):Adjusts the output level of the
subwoofer connected to the lineout terminals (REAR/
SW) through an external amplifier. (
21
)
SUB.W
*6
ON
/
OFF
: Turns on or off the subwoofer output.
SUB.W
LPF
*4
THROUGH
:All signals are sent to the subwoofer. ;
LOW
55HZ
/
MID
85HZ
/
HIGH 120HZ
:Audio signals with frequencies lower than
55Hz/ 85Hz/ 120Hz are sent to the subwoofer.
SUB.W PHASE
*4
REVERSE
(180°)/
NORMAL
(0°):Selects the phase of the subwoofer
output to be in line with the speaker output for optimum performance.
(Selectable only if a setting other than [
THROUGH
] is selected for
[
SUB.W
LPF
].)
FADER R06
—
F06
(
00
):Adjusts the front and rear speaker output balance.
BALANCE
*7
L06
—
R06
(
00
):Adjusts the left and right speaker output balance.
VOL
ADJUST –15
—
+06
(
00
):Preset the initial volume level of each source
(compared to the FM volume level). Before adjustment, select the
source you want to adjust. (“VOLADJFIX” appears if FM is selected.)
AMP
GAIN LOW
POWER
:Limits the maximum volume level to 25. (Select if
the maximum power of each speaker is less than 50W to prevent
damaging the speakers.);
HIGH POWER
:The maximum volume level
is 35.
AUDIO SETTINGS
D.T.EXP
(Digital Track
Expander)
ON
:Creates realistic sound by compensating the high-frequency
components and restoring the rise-time of the waveform that are lost in
audio data compression.;
OFF
:Cancels.
TEL
MUTING
*8
ON
:Mutes the sounds while using the cellular phone (not connected
through KS-BTA100).;
OFF
:Cancels.
SPK/PRE
OUT
Depending on the speaker connection method, select the appropriate
setting to get the desired output. (
13, Speaker output settings
)
*4
Displayed only when [
SUB.W
] is set to [
ON
].
*5
Displayed only when [
SPK/PRE
OUT
] is set to [
SUB.W/SUB.W
].
*6
Displayed only when [
SPK/PRE
OUT
] is set to [
REAR/SUB.W
] or [
SUB.W/SUB.W
].
*7
This adjustment will not affect the subwoofer output.
*8
Does not work if [
BT
ADAPTER
] is selected for [
AUX
] in [
SRC
SELECT
]. (
4
)
JS_JVC_KD_SR72_K_EN_1.indd 12JS_JVC_KD_SR72_K_EN_1.indd 12 5/1/2016 2:52:52 PM5/1/2016 2:52:52 PM

ENGLISH 13
Data Size: B6L (182 mm x 128 mm)
Book Size: B6L (182 mm x 128 mm)
Speaker output settings
Select the output setting for the speakers [
SPK/PRE OUT],
base on the
speaker connection method.
Connection via lineout terminals
For connections through an external amplifier. (
21
)
Setting on
[
SPK/PRE OUT]
Audio signal through lineout terminal
FRONT REAR/SW
REAR/REAR
Front speakers output Rear speakers output
REAR/SUB.W
Front speakers output Subwoofer output
SUB.W/SUB.W
Front speakers output Subwoofer output
Connection via speaker leads
For connections without using an external amplifier. However, with this
settings you can also enjoy the subwoofer output. (
21
)
Setting on
[
SPK/PRE OUT]
Audio signal through rear speaker lead
L (left) R (right)
REAR/REAR
Rear speakers output Rear speakers output
REAR/SUB.W
Rear speakers output Rear speakers output
SUB.W/SUB.W
Subwoofer output (Mute)
If [
SUB.W/SUB.W
] is selected:
– [
HIGH 120HZ
] is selected in [
SUB.W
LPF
] and [
THROUGH
] is not available.
– [
R01
] is selected in [
FADER
] and selectable range is [
R06
]to [
00
]
AUDIO SETTINGS DISPLAY SETTINGS
1 Press and hold .
2 Turn the volume knob to select an item (see the following table),
then press the knob.
3 Repeat step 2until the desired item is selected/activated or follow
the instructions stated on the selected item.
4 Press to exit.
To return to the previous setting item, press .
Default:
XX
DISPLAY
DIMMER
Dim the display and buttons illumination.
OFF
:Dimmer is turned off.
ON
:Dimmer is turned on. Brightness changes to [
NIGHT
] setting.
(
[
BRIGHTNESS
]
)
DIMMER TIME
:Set the dimmer on and off time.
1
Turn the volume knob to adjust the [
ON
] time, then press the knob.
2
Turn the volume knob to adjust the [
OFF
] time, then press the knob.
(Default: [
ON
]: 18:00 or 6:00 PM
[
OFF
]:6:00 or 6:00 AM)
AUTO
:Dimmer turns on and off automatically when you turn off or on the car
headlights.*
1
BRIGHTNESS
Set the button, display and USB input terminal brightness for day and night
separately.
1
DAY
/
NIGHT
:Select day or night.
2
Select a zone.
3
Set the brightness level (
00
to
31
). (Default:
DAY
:
31
;
NIGHT
:
15
)
*1
The illumination control wire connection is required.
( 21)
JS_JVC_KD_SR72_K_EN_1.indd 13JS_JVC_KD_SR72_K_EN_1.indd 13 5/1/2016 2:13:15 PM5/1/2016 2:13:15 PM

14
Data Size: B6L (182 mm x 128 mm)
Book Size: B6L (182 mm x 128 mm)
SCROLL
* 2
ONCE
:Scrolls the display information once.;
AUTO
:Repeats scrolling at
5-second intervals.;
OFF
:Cancels.
COLOR
PRESET
Select color for display and button illumination separately.
Default color:
ALL ZONE
: [
COLOR 08
],
DISP ZONE
: [
COLOR 01
],
ZONE 1
: [
COLOR 08
],
ZONE 2
: [
COLOR 46
]
1
Select a zone.
2
Select a color for the selected zone.
•
COLOR 01
to
COLOR 49
•
USER
: The color you have created for [
DAY COLOR
] or
[
NIGHT COLOR
] is shown.
•
COLOR FLOW01
to
COLOR FLOW03
: Color changes at different
speeds.
•
GROOVE
/
TECHNO
/
EMOTION
/
RELAX
/
SPECTRUM
/
SWEEP
/
POP
: The selected color pattern is shown.*
3
(Selectable only when
[
ALL ZONE
] is selected in step
1
.)
DAY COLOR
Store your own day and night colors for different zone.
1
Select a zone.
2
RED
/
GREEN
/
BLUE
:Select a primary color.
3
00
to
31
:Select the level.
Repeat steps
2
and
3
for all the primary colors.
• Your setting is stored to [
USER
] in [
PRESET
].
• If [
00
] is selected for all primary colors for [
DISP ZONE
], nothing
appears on the display.
NIGHT COLOR
COLOR GUIDE ON
:Changes the button, display, and auxiliary input jack illumination
when settings are performed on menu and list search. Display zone will
automatically change depending on volume level.;
OFF
:Cancels.
[
NIGHT COLOR
] or [
DAY COLOR
] is changed by turning on or off your car’s
headlight.
*2
Some characters or symbols will not be shown correctly (or will be blanked).
*3
If one of these color pattern is selected, the [
ZONE 1
], [
DISP ZONE
], [
ZONE 2
] illumination
color will change to the default color.
Maintenance
Cleaning the unit
Wipe off dirt on the faceplate with a dry silicone or soft cloth.
Cleaning the connector
Detach the faceplate and clean the connector
gently with a cotton swab, being careful not to
damage the connector.
Handling discs:
• Do not touch the recording surface of the disc.
• Do not stick tape etc. on the disc, or use a disc with tape stuck on it.
• Do not use any accessories for the disc.
• Clean from the center of the disc and move outward.
• Clean the disc with a dry silicone or soft cloth. Do not use any solvents.
• When removing discs from this unit, pull them out horizontally.
• Remove burrs from the center hole and disc edge before inserting a disc.
More information
Visit also the following website <http://www.jvc.net/cs/car/> for:
– Latest firmware updates and latest compatible item list
– Android™ application JVC MUSIC PLAY
– Any other latest information
About discs and audio files
• This unit can only play the following CDs:
• This unit can play back multi-session discs; however, unclosed sessions will be skipped
during playback.
•
Unplayable discs:
- Discs that are not round.
- Discs with coloring on the recording surface or discs that are dirty.
- Recordable/ReWritable discs that have not been finalized.
- 8 cm CD. Attempting to insert using an adapter may cause malfunction.
REFERENCES
Connector (on the reverse
side of the faceplate)
DISPLAY SETTINGS
JS_JVC_KD_SR72_K_EN_1.indd 14JS_JVC_KD_SR72_K_EN_1.indd 14 5/1/2016 2:13:15 PM5/1/2016 2:13:15 PM

ENGLISH 15
Data Size: B6L (182 mm x 128 mm)
Book Size: B6L (182 mm x 128 mm)
•
DualDisc playback:
The Non-DVD side of a “DualDisc” does not comply with the “Compact
Disc Digital Audio” standard. Therefore, the use of Non-DVD side of a DualDisc on this product
cannot be recommended.
•
Playable files:
- File extensions: MP3(.mp3), WMA(.wma)
- Bit rate: MP3: 8kbps — 320kbps
WMA: 32kbps — 192kbps
- Sampling frequency:
MP3: 48kHz, 44.1kHz, 32kHz, 24kHz, 22.05kHz, 16kHz, 12kHz, 11.025kHz, 8kHz
WMA: 8kHz — 48kHz
- Variable bit rate (VBR) files.
•
Maximum number of characters for file/folder name:
It depends on the disc format used (includes 4 extension characters—<.mp3> or <.wma>.
- ISO 9660 Level 1 and 2: 32 characters
- Romeo: 32 characters
- Joliet: 32 characters
- Windows long file name: 32 characters
About USB devices
• This unit can play MP3/WMA/WAV/FLAC files stored on a USB mass storage class device.
• You cannot connect a USB device via a USB hub.
• Connecting a cable whose total length is longer than 5m may result in abnormal playback.
• The maximum number of characters for:
- Folder names: 64 characters
- File names: 64 characters
- MP3 Tag: 64 characters
- WMA Tag: 64 characters
- WAV Tag: 64 characters
- FLAC Tag: 64 characters
• This unit can recognize a total of 15 000 files, 500 folders (999 files per folder including folder
without unsupported files), and of 8 hierarchies.
• This unit cannot recognize a USB device whose rating is other than 5V and exceeds 1A.
About iPod/iPhone
Made for
- iPod touch (2nd, 3rd, 4th, and 5th generation)
- iPod classic
- iPod nano (3rd, 4th, 5th, 6th, and 7th generation)
- iPhone 3G, 3GS, 4, 4S, 5, 5S, 5C, 6, 6 Plus
• It is not possible to browse video files on the “Videos” menu in
[HEAD MODE]
.
• The song order displayed on the selection menu of this unit may differ from that of the iPod/
iPhone.
About Android device
• This unit supports Android OS 4.1 and above.
• Some Android devices (with OS4.1 and above) may not fully support Android Open Accessory
(AOA)2.0.
• If the Android device supports both mass storage class device and AOA2.0, this unit always
playback via AOA2.0 as priority.
About Pandora
• Pandora is only available in certain countries.
Please visit <http://www.pandora.com/legal> for more information.
• Because Pandora is a third-party service, the specifications are subject to change without
prior notice. Accordingly, compatibility may be impaired, or some or all of the services may
become unavailable.
• Some functions of Pandora cannot be operated from this unit.
About iHeartRadio
• iHeartRadio® is a third-party service, therefore the specifications are subject to change
without prior notice. Accordingly, compatibility may be impaired or some or all of the
services may become unavailable.
• Some iHeartRadio® functionality cannot be operated from this unit.
REFERENCES
JS_JVC_KD_SR72_K_EN_1.indd 15JS_JVC_KD_SR72_K_EN_1.indd 15 5/1/2016 2:13:15 PM5/1/2016 2:13:15 PM

16
Data Size: B6L (182 mm x 128 mm)
Book Size: B6L (182 mm x 128 mm)
Symptom Remedy
General
Sound cannot be heard. • Adjust the volume to the optimum level.
• Check the cords and connections.
“MISWIRING CHECK
WIRING THEN PWR ON”
appears.
Turn the power off, then check to be sure the terminals
of the speaker wires are insulated properly. Turn the
power on again.
“PROTECTING SEND
SERVICE” appears.
Send the unit to the nearest service center.
Source cannot be selected. Check the [
SRC SELECT
] setting.
( 4)
Radio
• Radio reception is poor.
• Static noise while
listening to the radio.
Connect the antenna firmly.
CD / USB / iPod
Disc cannot be ejected. Press and hold to forcibly eject the disc. Be careful not
to drop the disc when it is ejected.
“IN DISC” appears. Make sure nothing is blocking the loading slot when you
eject the disc.
“PLEASE” and “EJECT”
appear alternately.
Press , then insert the disc correctly.
Playback order is not as
intended.
The playback order is determined by the file name (USB)
or the order in which files were recorded (disc).
Elapsed playing time is not
correct.
This depends on the recording process earlier.
“NOT SUPPORT” appears
and track skips.
Check whether the track is a playable format.
( 14
,
15)
“READING” keeps flashing. • Do not use too many hierarchical levels and folders.
• Reload the disc or reattach the USB device.
TROUBLESHOOTING
Change the display information
Each time you press , the display information changes.
• If the information is unavailable or not recorded, “NO TEXT”, “NO NAME”, or other
information (eg. station name) appears.
FM
or
AM
Frequency Day/Clock
(For FM Radio Broadcast Data System stations only)
Station name (PS) Frequency Program type (PTY)
Radiotext+
Day/Clock (back to the beginning)
CD
or
USB (For CD-DA)
Playing time Day/Clock Disc name
Track title
(backtothebeginning)
(For MP3/WMA/WAV/FLAC files)
Playing time Day/Clock Album title/Artist Track title
Folder/file name (back to the beginning)
USB-IPOD
or
ANDROID
Playing time Day/Clock Album title/Artist Track title
(back to the beginning)
PANDORA
Station name
Shared/Radio
Album title
Artist Track title
Playing time Day/Clock (back to the beginning)
IHEARTRADIO
Station name Track title Track Artist Day/Clock
(backtothebeginning)
AUX
AUX Day/Clock
BT AUDIO
BT AUDIO Day/Clock
REFERENCES
JS_JVC_KD_SR72_K_EN_1.indd 16JS_JVC_KD_SR72_K_EN_1.indd 16 5/1/2016 2:13:15 PM5/1/2016 2:13:15 PM

ENGLISH 17
Data Size: B6L (182 mm x 128 mm)
Book Size: B6L (182 mm x 128 mm)
Symptom
Remedy
CD / USB / iPod
“CANNOT PLAY” flashes and/
or connected device cannot
be detected.
• Check whether the connected device is compatible with this unit
and ensure the files are in supported formats. (
14
,
15
)
• Reattach the device.
The iPod/iPhone does not
turn on or does not work.
• Check the connection between this unit and iPod/iPhone.
• Detach and reset the iPod/iPhone using hard reset.
Correct characters are not
displayed.
• This unit can only display uppercase letters, numbers, and a
limited number of symbols.
• Depending on the display language you have selected (
4
),
some characters may not be displayed correctly.
ANDROID
• Sound cannot be heard
during playback.
• Sound output only from
the Android device.
• Reconnect the Android device.
• If in [
AUDIO MODE
], launch any media player application on
the Android device and start playback.
• If in [
AUDIO MODE
], relaunch the current media player
application or use another media player application.
• Restart the Android device.
• If this does not solve the problem, the connected Android device
is unable to route the audio signal to unit. (
15
)
Cannot playback at [
AUTO
MODE
].
• Make sure JVC MUSIC PLAY APP is installed on the Android
device. (
7
)
• Reconnect the Android device and select the appropriate control
mode. (
8
)
• If this does not solve the problem, the connected Android device
does not support [
AUTO MODE
]. (
15
)
“NO DEVICE” or “READING”
keeps flashing.
• Switch off the developer options on the Android device.
• Reconnect the Android device.
• If this does not solve the problem, the connected Android device
does not support [
AUTO MODE
]. (
15
)
Playback is intermittent or
sound skips.
Turn off the power saving mode on the Android device.
“CANNOT PLAY” • Make sure Android device contains playable audio files.
• Reconnect the Android device.
• Restart the Android device.
TROUBLESHOOTING
Symptom Remedy
Pandora
“ADDERROR” New station creation is unsuccessful.
“CHKDEVICE” Check the Pandora application on your device.
“NOSKIPS” The skip limit has been reached.
“NOSTATIONS” No stations are found.
“STATIONLMT” The number of registered stations has reached
its limit. Retry after deleting unnecessary
stations from your device.
“UPGRADEAPP” Make sure you have installed the latest version
of the Pandora application on your device.
“CONNECT ERR” Communication is unstable.
“RATING ERR” Registration of thumbs up/thumbs down has
failed due to insufficient network connectivity.
“THUMBS N/A” Registration of thumbs up/thumbs down is not
allowed.
“LICENSE ERR” You try to access from a country which Pandora
is not deliverable.
iHeartRadio
Station cannot be selected. If “Explicit Content” in [Account Settings] is
checked in the web version of iHeartRADIO,
custom stations become unavailable.
“CREATE ERR” Custom station name creation is unsuccessful.
“SAVE ERROR” Addition to the favorite category failed.
“DISCONNCTED” Check the connection to the device.
“NOSKIPS” The skip limit has been reached. Retry later.
“NOSTATIONS” No stations are found.
“NOT CONNCTD” Link to the application is impossible.
JS_JVC_KD_SR72_K_EN_2.indd 17JS_JVC_KD_SR72_K_EN_2.indd 17 26/1/2016 2:38:59 PM26/1/2016 2:38:59 PM

18
Data Size: B6L (182 mm x 128 mm)
Book Size: B6L (182 mm x 128 mm)
SPECIFICATIONS
Tuner
FM Frequency Range 87.9MHz — 107.9MHz (200kHz step)
87.5MHz — 108.0MHz (50kHz step)
Channel Space Selection 50kHz/200kHz
Usable Sensitivity (S/N=26dB) 8.2dBf (0.71μV/75Ω)
Quieting Sensitivity (DINS/N=46dB) 17.2dBf (2.0μV/75Ω)
Frequency Response (±3dB) 30Hz — 15kHz
Signal-to-Noise Ratio (MONO) 64dB
Stereo Separation (1kHz) 40dB
AM Frequency Range 530kHz — 1700kHz (10kHz step)
531kHz — 1611kHz (9kHz step)
Channel Space Selection 9kHz/10kHz
Usable Sensitivity (S/N=20dB) 29dBμ (28.2μV)
CD player
Laser Diode GaAIAs
Digital Filter (D/A) 8 times over sampling
Spindle Speed 500 rpm — 200 rpm (CLV)
Wow & Flutter Below measurable limit
Frequency Response (±1dB) 20 Hz — 20 kHz
Total Harmonic Distortion (1 kHz) 0.01 %
Signal-to-Noise Ratio (1 kHz) 105 dB
Dynamic Range 90 dB
Channel Separation 85 dB
MP3 Decode Compliant with MPEG-1/2 Audio Layer-3
WMA Decode Compliant with Windows Media Audio
Symptom Remedy
iHeartRadio
“UPDATE APP” Make sure you have installed the latest version of the
iHeart Link for JVC application on your device.
“PLS LOGIN” You haven’t log in. Log in again.
“STATION NOT AVAILABLE” Broadcast from the station is over.
“STATION NOT SELECTED” No station is selected.
“STREAM ERR” Broadcast data is interrupted.
“THUMBS ERR” Registration of Thumbs Up/Down has failed.
“TIMED OUT” The request has resulted in time-out.
If you have any troubles, try the following:
1 Check TROUBLESHOOTING
2 Reset the unit ( 3)
3 Contact (USA only)
Call: 1-800-252-5722 ( or ) visit: http://www.jvc.com
TROUBLESHOOTING
JS_JVC_KD_SR72_K_EN_1.indd 18JS_JVC_KD_SR72_K_EN_1.indd 18 5/1/2016 2:13:16 PM5/1/2016 2:13:16 PM

ENGLISH 19
Data Size: B6L (182 mm x 128 mm)
Book Size: B6L (182 mm x 128 mm)
USB
USB Standard USB1.1, USB2.0 (Full speed)
Compatible Devices Mass storage class
File System FAT12/16/32
Maximum Supply Current DC5V 1A
MP3 Decode Compliant with MPEG-1/2 Audio Layer-3
WMA Decode Compliant with Windows Media Audio
WAV Decode Linear-PCM
FLAC Decode FLAC files
Auxiliary
Frequency Response (±3dB) 20Hz—20kHz
Input Maximum Voltage 1000mV
Input Impedance 30kΩ
Audio
Maximum Output Power 50W×4 or
50W×2 + 50W×1 (Subwoofer = 4Ω)
Full Bandwidth Power
(at less than 1% THD)
22W×4
Speaker Impedance 4Ω—8Ω
Preout Level/Load CD/USB: 2500mV/10kΩ load
Preout Impedance ≤600Ω
General
Operating Voltage
(10.5V—16V allowable)
14.4V
Maximum Current Consumption 10A
Operating Temperature Range –10°C — +60°C
Installation Size (W×H×D) 182mm×53mm×158mm
(7-3/16"×2-1/8"×6-1/4")
Weight 1.1k
g
(2.43lbs)
Subject to change without notice.
SPECIFICATIONS
JS_JVC_KD_SR72_K_EN_1.indd 19JS_JVC_KD_SR72_K_EN_1.indd 19 5/1/2016 2:13:17 PM5/1/2016 2:13:17 PM

20
Data Size: B6L (182 mm x 128 mm)
Book Size: B6L (182 mm x 128 mm)
Warning
• The unit can only be used with a 12V DC power supply, negative ground.
• Disconnect the battery’s negative terminal before wiring and mounting.
• Do not connect Battery wire (yellow) and Ignition wire (red) to the car
chassis or Ground wire (black) to prevent a short circuit.
• Insulate unconnected wires with vinyl tape to prevent a short circuit.
• Be sure to ground this unit to the car’s chassis again after installation.
Caution
• For safety’s sake, leave wiring and mounting to professionals. Consult the
car audio dealer.
• Install this unit in the console of your vehicle. Do not touch the metal
parts of this unit during and shortly after use of the unit. Metal parts such
as the heat sink and enclosure become hot.
• Do not connect the wires of speakers to the car chassis or Ground wire
(black), or connect them in parallel.
• Connect speakers with a maximum power of more than 50W. If the
maximum power of the speakers is lower than 50W, change the
[AMP GAIN]
setting to avoid damaging the speakers.
(
12)
• Mount the unit at an angle of less than 30º.
• If your vehicle wiring harness does not have the ignition terminal,
connect Ignition wire (red) to the terminal on the vehicle’s fuse box
which provides 12 V DC power supply and is turned on and off by the
ignition key.
• Keep all cables away from heat dissipate metal parts.
• After the unit is installed, check whether the brake lamps, blinkers,
wipers, etc. on the car are working properly.
• If the fuse blows, first make sure the wires are not touching car’s chassis,
then replace the old fuse with one that has the same rating.
Basic procedure
1 Remove the key from the ignition switch, then
disconnect the terminal of the car battery.
2 Connect the wires properly.
See Wiring connection.
(
21)
3 Install the unit to your car.
See Installing the unit (in-dash mounting).
4 Connect the terminal of the car battery.
5 Reset the unit.
(
3)
How to remove the unit
When installing without the mounting sleeve
1 Remove the mounting sleeve and trim plate
from the unit.
2 Align the holes in the unit (on both sides) with
the vehicle mounting bracket and secure the
unit with screws (commercially available).
Use only the specified screws. Using wrong screws might damage
the unit.
Installing the unit (in-dash mounting)
Do the required wiring.
(
2
1)
Bend the appropriate tabs to
hold the sleeve firmly in place.
Hook on the top side
Orientate the trim plate as
illustrated before fitting.
Dashboard of
your car
INSTALLATION / CONNECTION
JS_JVC_KD_SR72_K_EN_1.indd 20JS_JVC_KD_SR72_K_EN_1.indd 20 5/1/2016 2:13:17 PM5/1/2016 2:13:17 PM
Table of contents
Languages:
Other JVC Car Receiver manuals

JVC
JVC KD-G511 User manual

JVC
JVC KD-R740BT User manual

JVC
JVC KD-R406 Guide

JVC
JVC KV-M700 - 6.4 TFT MONITOR Guide

JVC
JVC KS-FX490 - Radio / Cassette Player User manual

JVC
JVC KD-R907 User manual

JVC
JVC KD-LX330R User manual

JVC
JVC KD-S641 Quick start guide

JVC
JVC KD-HDR60 User manual

JVC
JVC KDG430 - Radio / CD User manual

JVC
JVC KS-FX850R User manual

JVC
JVC GET0655-001B Guide

JVC
JVC KD-AR770J User manual

JVC
JVC KD-R890BT User manual

JVC
JVC KDS-S35 User manual

JVC
JVC KD-AVX40 - DVD Player With LCD monitor User manual

JVC
JVC KD-AHD69J User manual

JVC
JVC KW-XG56TU User manual

JVC
JVC KW-M960BW User manual

JVC
JVC KS-FX850R User manual