JVC KD-SX838/S737 User manual

ENGLISH
INSTRUCTIONS
MANUAL DE INSTRUCCIONES
MANUEL D’INSTRUCTIONS
FSUN3037-631S
[J]
ESPAÑOL
FRANÇAIS
CD RECEIVER KD-SX838/S737
RECEPTOR CON CD KD-SX838/S737
RECEPTEUR CD KD-SX838/S737
For customer Use:
Enter below the Model No. and
Serial No. which are located on
the top or bottom of the cabinet.
Retainthisinformationforfuture
reference.
Model No.
Serial No.
For installation and connections, refer to the separate manual.
Para la instalación y las conexiones, refiérase al manual separado.
Pour l’installation et les raccordements, se référer au manuel séparé.
COMPACT
DIGITAL AUDIO
KD-SX838
MO
RND
RPT
SCAN
INT
SOUND
LOUD
DISP
CD CHANGER CONTROL
SSM
78 9101112
123456
40W
X
4
/I/ATT
CD-
CH
TUNER
CD
KD-SX838
BAND
SEL
KD-S737
MO
RND
RPT
SCAN
INT
SOUND
LOUD
DISP
DIRECT TRACK ACCESS
SSM
78 9101112
123456
40W
X
4
/I/ATT
F MA M
CD
KD-S737
SEL
00.KD-SX838/S737 97.12.26, 10:54 AM3

2
INFORMATION (For U.S.A.)
This equipment has been tested and found to comply with the limits for a Class B digital
device, pursuant to Part 15 of the FCC Rules. These limits are designed to provide
reasonable protection against harmful interference in a residential installation. This
equipment generates, uses, and can radiate radio frequency energy and, if not installed
and used in accordance with the instructions, may cause harmful interference to radio
communications. However, there is no guarantee that interference will not occur in a
particularinstallation.Ifthisequipmentdoescauseharmfulinterference toradioor television
reception, which can be determined by turning the equipment off and on, the user is
encouraged to try to correct the interference by one or more of the following measures:
– Reorient or relocate the receiving antenna.
– Increase the separation between the equipment and receiver.
– Connect theequipment into anoutlet on acircuit different fromthat to whichthe receiver
is connected.
– Consult the dealer or an experienced radio/TV technician for help.
Identification and
Certification labels IMPORTANT FOR LASER
PRODUCTS (For U.S.A. only)
Precautions:
1. CLASS 1 LASER PRODUCT
2. DANGER: Invisible laser radiation when
openandinterlockfailed or defeated.Avoid
direct exposure to beam.
3. CAUTION: Do not open the top cover.
Thereare no user-serviceable parts inside.
Leave all servicing to qualified service
personnel.
4. CAUTION: This CD player uses invisible
laser radiation, however, is equipped with
safety switches to prevent radiation
emission when unloading CDs. It is
dangerous to defeat the safety switches.
5. CAUTION:Useof controls, adjustments or
performance of procedures other than
those specified herein may result in
hazardous radiation exposure.
BEFORE USE
* For safety....
• Do not raise the volume level too much, as this
will block outside sounds, making driving
dangerous.
• Stop the car before performing any complicated
operations.
* Temperature inside the car....
If you have parked the car for a long time in hot
or cold weather, wait until the temperature in the
car becomes normal before operating the unit.
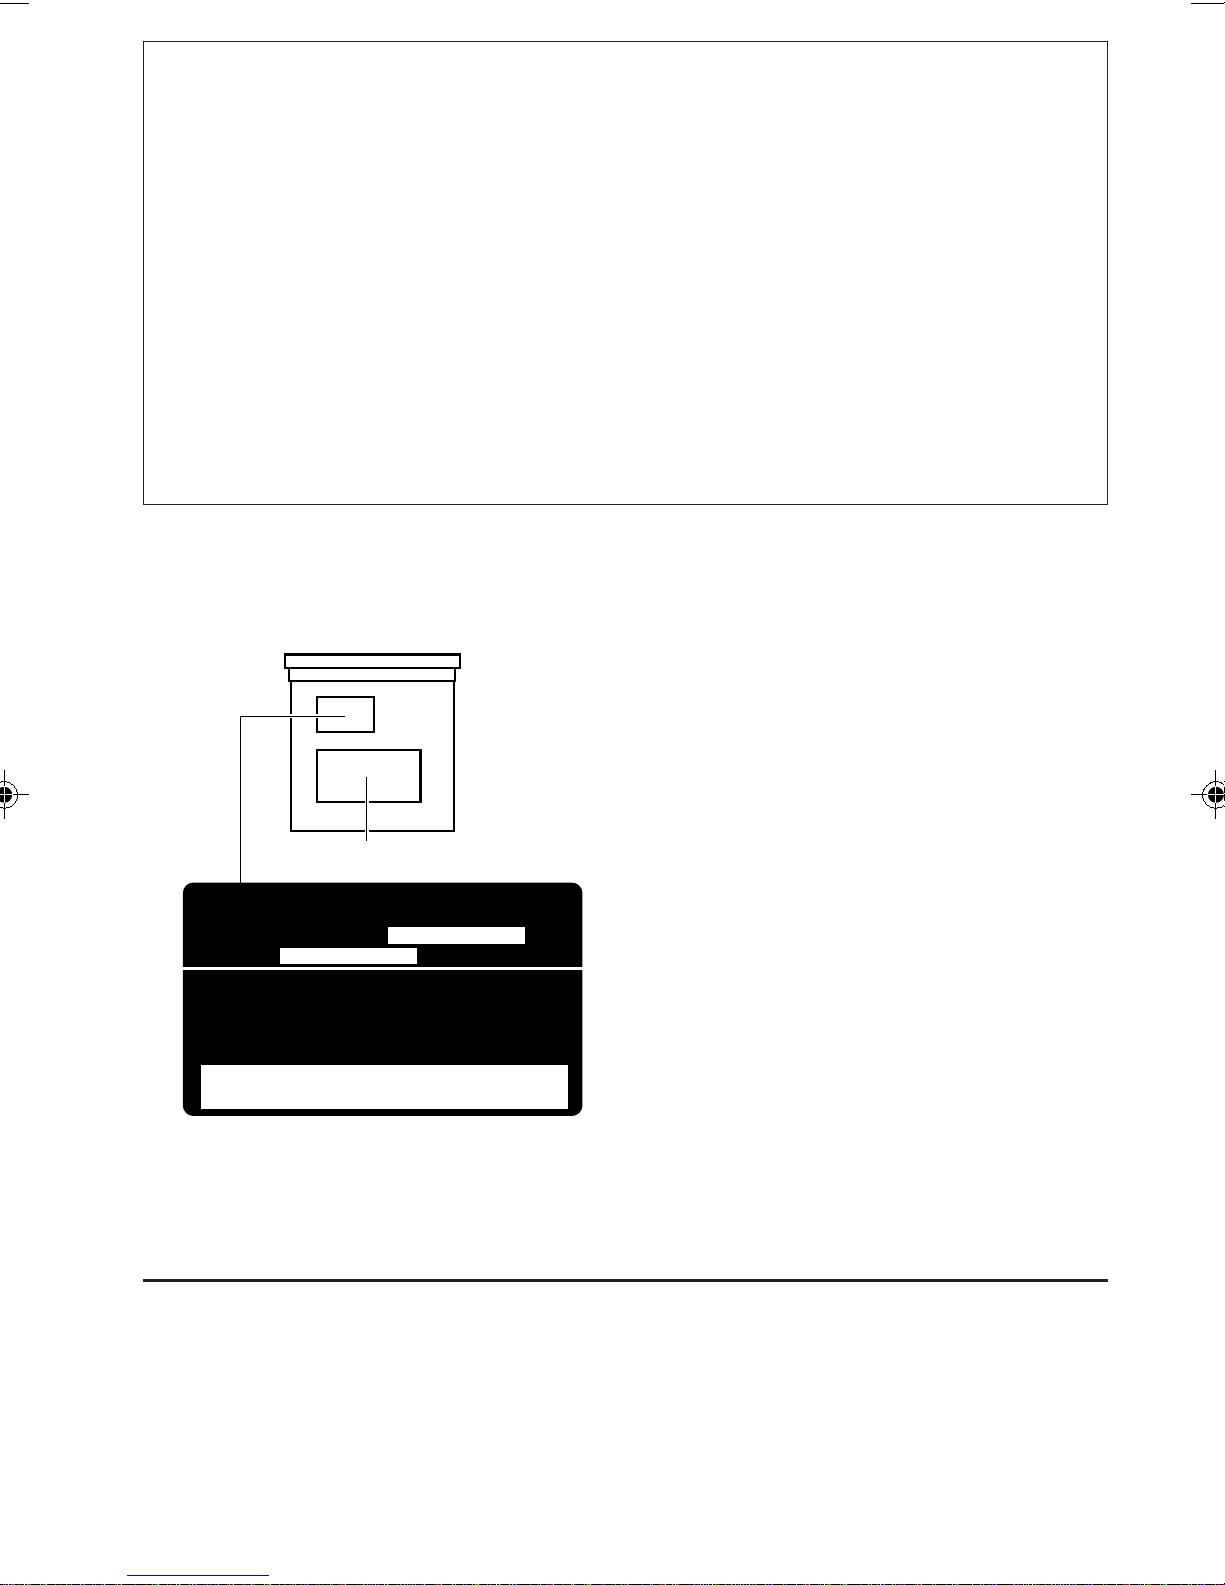
Bottom of the main unit
Notes:
*1 The date of manufacture.
*2 The ID code of manufacturing plant.
*3 Marking of country origin.
NAME/RATING PLATE
US JVC CORP.41 SLATER DRIVE
ELMWOOD PARK, N.J. 07407
MANUFACTURED AT
MADE IN
Product complies with DHHS Rules 21
CFR Subchapter J in effect at date of
manufacture.
MANUFACTURED
*2
*3
*1
02-04.KD-SX838/S737 97.12.26, 0:12 PM2

ENGLISH
3
Thank you for purchasing a JVC product. Please read all instructions carefully before operation, to
ensure your complete understanding and to obtain the best possible performance from the unit.
CONTENTS
BASIC OPERATIONS .................................................... 4
RADIO OPERATIONS ...................................................5
Listening to the radio ..................................................................... 5
Storing stations in memory ............................................................6
FM station automatic preset: SSM...............................................6
Manual preset.............................................................................. 7
Tuning into a preset station ........................................................... 8
Other convenient tuner functions ................................................. 9
Scanning broadcast stations ........................................................9
Selecting FM reception sound......................................................9
Changing the AM/FM channel intervals ....................................... 9
CD OPERATIONS.......................................................10
Playing a CD .................................................................................10
Locating a track or a particular portion on a CD ..................... 11
Selecting CD playback modes......................................................12
Other convenient CD functions ................................................... 13
Prohibiting CD ejection.............................................................. 13
SOUND ADJUSTMENTS .............................................14
Turning on/off the loudness function ..........................................14
Selecting preset sound modes ......................................................14
Adjusting the sound......................................................................15
Storing your own sound adjustments .........................................16
OTHER MAIN FUNCTIONS .........................................17
Setting the clock ............................................................................17
Turning on/off the key-touch tone...............................................18
Detaching the control panel ......................................................... 19
CD CHANGER OPERATIONS ......................................20
(ONLY FOR KD-SX838)
Playing CDs ................................................................................... 20
Selecting CD playback modes......................................................22
MAINTENANCE .........................................................23
Handling CDs ................................................................................23
TROUBLESHOOTING .................................................24
SPECIFICATIONS .......................................................25
02-04.KD-SX838/S737 97.12.26, 0:12 PM3

4
1
Turn on the power.
2
Select the source.
To operate the tuner, see pages 5 – 9.
To operate the CD player, see pages 10 – 13.
ONLY FOR KD-SX838:
To operate the CD changer, see pages 20 – 22.
3
Adjust the volume.
4
Adjust the sound as you want (see pages 14 – 16).
To drop the volume in a moment
Press briefly while listening to any source.“ATT” starts flashing on the display, and
the volume level will drop in a moment.
To resume the previous volume level, press the button briefly again.
To turn off the power
Press for more than 1 second.
BASIC OPERATIONS
Note:
Whenyouusethisunitforthe
firsttime,setthebuilt-inclock
correctly, see page 17.
Note on One-Touch Operation:
When you select a source in step 2 below, the power automatically comes on.
You do not have to press this button to turn on the power.
KD-SX838
KD-S737
/ I /ATT
BAND
TUNER C DCD-
CH
F MA M C D
Volume level appears.
2
1
23
LOUD
02-04.KD-SX838/S737 97.12.26, 10:58 AM4

ENGLISH
5
RADIO OPERATIONS
Listening to the radio
1
Select the band (FM1, FM2, FM3 or AM).
You can select any one of FM1, FM2, and FM3 to listen to an
FM station.
KD-SX838 BAND
TUNER
KD-S737
To search stations
of higher
frequencies.
To search stations
of lower
frequencies.
2
Start searching a station.
When a station is received, searching stops.
To stop searching before a station is received, press the same button you have pressed
for searching.
To tune in a particular frequency without searching:
1Select the band (FM or AM).
For KD-SX838: Press TUNER/BAND repeatedly.
For KD-S737: Press FM or AM.
2Press and hold SSM ¢or SSM 4until “M” starts flashing on the display.
Now you can manually change the frequency while “M” is flashing.
3Press SSM ¢or SSM 4repeatedly until the frequency you want is reached.
• If you hold down the button, the frequency keeps changing until you release the button.
FM1 FM2 FM3 AM
F MA M
FM1
AM FM2
FM3
KD-S737
KD-SX838
12
1
SS
Audio level indicator
05-09.KD-SX838/S737 97.12.26, 11:01 AM5

6
Storing stations in memory
You can use one of the following two methods to store broadcasting stations in memory.
• Automatic preset of FM stations: SSM (Strong-station Sequential Memory)
• Manual preset of both FM and AM stations
FM station automatic preset: SSM
You can preset 6 local FM stations in each FM band (FM1, FM2, and FM3).
1
Select the FM band number (FM1, FM2 or
FM3) you want to store FM stations into.
2
Press and hold both buttons for more than 3
seconds.
Local FM stations with the strongest signals are searched and stored automatically in the
band number you have selected (FM1, FM2 or FM3).These stations are preset in the number
buttons — No. 1 (lowest frequency) to No. 6 (highest frequency).
When automatic preset is over, the station stored in number button 1 will be automatically
tuned in.
BAND
TUNER
KD-S737
KD-SX838
“SSM” appears, then disappears when
automatic preset is over.
F M
12
FM1 FM2 FM3 AM
FM1 FM2 FM3
SS
05-09.KD-SX838/S737 97.12.26, 11:02 AM6

ENGLISH
7
Manual preset
You can preset up to 6 stations in each band (FM1, FM2, FM3 and AM) manually.
EXAMPLE: Storing an FM station of 88.3 MHz into the preset number 1 of the FM1 band
1
Select the FM1 band.
2
Tune into a station of 88.3 MHz.
See page 5 to tune into a station.
3
Press and hold the button for more than 1
second.
4
Repeat the above procedure to store other stations into other
preset numbers.
Notes:
• A previously preset station is erased when a new station is stored in the same preset number.
• Preset stations are erased when the power supply to the memory circuit is interrupted (for example,
during battery replacement). If this occurs, preset the stations again.
BAND
TUNER F M
Preset number “1” starts flashing for a while.
KD-SX838 KD-S737
132
SS
12
05-09.KD-SX838/S737 97.12.26, 11:02 AM7

8
1
Select the band (FM1, FM2, FM3 or AM) you
want.
2
Selectthenumber(1– 6)forthepreset station
you want.
BAND
TUNER
123456
Tuning into a preset station
You can easily tune into a preset station.
Remember that you must store stations first. If you have not stored them yet, see pages 6
and 7.
KD-SX838 KD-S737
KD-SX838
F MA M
FM1
AM FM2
FM3
KD-S737
1
12
FM1 FM2 FM3 AM
05-09.KD-SX838/S737 97.12.26, 11:02 AM8

ENGLISH
9
Other convenient tuner functions
Scanning broadcast stations
When you press SCAN/INT (Scan/Intro) while listening to the radio, station scanning starts.
Each time a broadcast is tuned in, scanning stops for about 5 seconds (tuned frequency
number flashes on the display), and you can check what program is now being broadcast.
If you want to listen to that program, press the same button again to stop scanning.
Selecting FM reception sound
When an FM stereo broadcast is hard to receive:
Press MO/RND (Mono/Random) while listening to an FM stereo broadcast. The sound you
hear becomes monaural but reception will be improved.
To restore the stereo effect, press the same button again.
Changing the AM/FM channel intervals
When using this unit in an area other than North or South America:
When this unit is shipped from the factory, the channel intervals are set to 10 kHz for AM and
200 kHz for FM.You can change the channel intervals by following the procedure below.
1Press SEL (select) for more than 2 seconds.
“CLOCK H,” “CLOCK M,” “BEEP” or “AREA” appears on the display.
2If “AREA” does not appear, press SSM ¢or SSM 4until it appears.
3Rotate the control dial clockwise.
“AREA EU” appears and the channel intervals are set to 9 kHz for AM and 50 kHz (for
manual tuning) / 100 kHz (for searching) for FM.
To reset to the factory setting, follow the above step 1 and 2, then rotate the control dial
counterclockwise in step 3 (“AREA US” appears on the display.)
AREA EU: Select this when used in an area other than North and South America.
AREA US: Select this when used in North or South America.
SEL
SCAN
INT
ST MO
SSM ¢
SSM 4MO
RND
Control dial
Lights up when receiving an FM broadcast in stereo.
05-09.KD-SX838/S737 97.12.26, 11:02 AM9

10
CD OPERATIONS
Playing a CD
1
Insert a disc into the loading slot.
The unit turns on, draws a CD and starts playback
automatically.
• When a CD is inserted upside down, “EJECT” appears on
the display and the CD automatically ejects.
To stop play and eject the CD
Press 0.
CD play stops and the CD automatically ejects from the loading slot.The source changes to
the tuner (you will hear the last received station).
If you change the source to AM/FM (or CD changer for KD-SX838 only), the CD play also
stops (without ejecting the CD this time).
• If the ejected disc is not removed for about 15 seconds , the disc is automatically inserted again into
the loading slot to protect it from dust. (CD play will not start this time.)
• You can eject the CD even when the unit is turned off.
Total track number
of the inserted disc
Total playing time of
the inserted disc Elapsed playing
time Current track
CAUTION on Volume Setting
CDs produce very little noise compared with other sources. If the volume level is adjusted
for the tuner, for example, the speakers may be damaged by the sudden increase in the
output level. Therefore, lower the volume before playing a CD and adjust it as required
during playback.
Note on One-Touch Operation:
When a CD is already in the loading slot, pressing CD turns on the unit and starts playback
automatically.
1
10-13.KD-SX838/S737 97.12.26, 11:03 AM10

ENGLISH
11
Locating a track or a particular portion on a CD
To fast forward or reverse the track
Press and hold SSM ¢, while playing a CD, to fast forward the track.
Press and hold SSM 4, while playing a CD, to reverse the track.
To go to the next track or the previous track
PressSSM¢briefly, whileplayingaCD,togoaheadto the beginning
ofthe nexttrack.Eachtime youpress thebuttonconsecutively,thebeginning
of the next track is located and played back.
Press SSM 4briefly, while playing a CD, to go back to the beginning
of the current track. Each time you press the button consecutively, the
beginning of the previous track is located and played back.
To go to a particular track directly
Press the number button corresponding to the track number to start its
playback.
• To select a track number from 1 – 6:
Press 1 (7) – 6 (12) briefly.
• To select a track number from 7 – 12:
Press and hold 1 (7) – 6 (12) for more than 1 second.
78 9101112
123456
SSM ¢
SSM 4
Number buttons
SS
SS
10-13.KD-SX838/S737 97.12.26, 11:03 AM11

12
Selecting CD playback modes
To play back tracks at random (Random Play)
You can play back all tracks on the CD at random.
Eachtime you press MO/RND (Mono/Random)whileplayingaCD,Random
Play mode turns on and off alternatively.
When Random Play is turned on, the RND indicator lights up on the display
and a track randomly selected starts playing.
To play back tracks repeatedly (Repeat Play)
You can play back the current track repeatedly.
Each time you press RPT (Repeat) while playing a CD, Repeat Play mode
turns on and off alternatively.
When Repeat Play is turned on, the RPT indicator lights up on the display.
To play back the beginning of each track (Intro Play)
You can play back the first 15 seconds of each track in sequence. So you
can check what tunes are in the CD.
WhenyoupressSCAN/INT (Scan/Intro) whileplayingaCD, IntroPlay starts.
During Intro Play, the track number of the current playing track flashes on
the display.
To stop Intro Play and start playing the current track, press SCAN/INT
again.
RPT MO
RND
SCAN
INT
RPT
Track number of the currently playing track
RPT
MO
RND
SCAN
INT
Track number of the currently playing track
RND
10-13.KD-SX838/S737 97.12.26, 11:04 AM12

ENGLISH
13
Other convenient CD functions
Prohibiting CD ejection
You can prohibit CD ejection and “lock” a CD in the loading slot.
Press and hold CD and 0for more than 2 seconds.“EJECT”flashes on the display for about
5 seconds, and the CD is “locked.”
To cancel the prohibition and “unlock” the CD, press and hold CD and 0for more than 2
seconds again.“EJECT” appears on the display, and the CD ejects from the loading slot.
0
CD
10-13.KD-SX838/S737 97.12.26, 11:04 AM13

14
SOUND ADJUSTMENTS
Turning on/off the loudness function
The human ear is less sensitive to low and high frequencies at low volumes.
The loudness function can boost these frequencies to produce a well-balanced sound at low
volume levels.
Each time you press LOUD, the loudness function turns on and off alternatively.
Selecting preset sound modes
You can select a preset sound adjustment suitable to the music genre:
Each time you press SOUND, the sound mode changes as follows.
Indication For: Preset values
Bass Treble Loudness
SCM OFF (Flat sound) 00 00 On
BEAT Rock or disco music +2 00 On
SOFT Quiet background music +1 –3 Off
POP Light music +4 +1 Off
Notes:
• You can adjust the preset sound mode to your preference, and store it in memory.
If you want to adjust and store your original sound mode,see “Storing your own sound adjustments”
on page 16.
• To adjust only the bass and treble reinforcement levels to your preference, see “Adjusting the sound”
on page 15.
LOUD
SOUND
LOUD
14-16.KD-SX838/S737 97.12.26, 11:06 AM14

ENGLISH
15
Adjusting the sound
You can adjust the treble/bass sound and the speaker balance.
1
Select the item you want to adjust.
Indication To do: Range
BAS Adjust the bass –6 (min.) — +6 (max.)
(bass)
TRE Adjust the treble –6 (min.) — +6 (max.)
(treble)
FAD Adjust the front and rear speaker R6 (rear only) — F6 (front only)
(Fader)* balance
BAL Adjust the left and right speaker L6 (left only) — R6 (right only)
(Balance) balance
VOL Adjust the volume 00 (min.) — 50 (max.)
(Volume)
Note:
*If you are using a two-speaker system, set the fader level to “00” (center).
2
Adjust the level.
Note:
Normally the control dial work as the volume control. So you do
not have to select “VOL” to adjust the volume level.
21
SEL
14-16.KD-SX838/S737 97.12.26, 11:07 AM15

16
1
Call up the sound mode you want to adjust.
See page 14 for details.
2
To adjust the bass or treble sound level
Select “BAS” or “TRE.”
To turn on or off the loudness function
Each time you press LOUD, the loudness function turns on
and off alternatively.(=go to step 4)
3
Adjust the bass or treble level.
See page 15 for details.
4
Pressandhold SOUNDuntilthe soundmode
you have selected in step 1 flashes on the
display.
Your setting is stored in memory.
5
Repeat the same procedure to store other settings.
To reset to the factory settings
Repeat the same procedure and reassign the preset values listed in the table on page 14.
Storing your own sound adjustments
You can adjust the sound modes (BEAT, SOFT, POP: see page 14) to your preference and
store your own adjustments in memory.
Within
5 seconds
LOUD
Within
5 seconds
Within
5 seconds
322 1, 4
SEL
SOUND
SOUND
14-16.KD-SX838/S737 97.12.26, 11:07 AM16

ENGLISH
17
OTHER MAIN FUNCTIONS
Setting the clock
1
Press and hold the button for more than 2
seconds.
“CLOCK H,” “CLOCK M,” “BEEP” or “AREA” appears on the
display.
2
Set the hour.
1. Select “CLOCK H” if not shown on the
display.
2. Adjust the hour.
3
Set the minute.
1. Select “CLOCK M.”
2. Adjust the minute.
4
Start the clock.
1.
2.
1.
2.
DISP
42, 31
SEL
SS
SS
17-19.KD-SX838/S737 97.12.26, 11:10 AM17

18
During tuner operation:
To check the current clock time (changing the display mode)
PressDISP repeatedly.Each time you pressthe button,the displaymode changes as follows.
• If the unit is not in use when you press DISP, the power turns on, the clock time is shown for
5 seconds, then the power turns off.
Turning on/off the key-touch tone
You can deactivate the key-touch tone if you do not want to make it beep when you press a
button.(When shipped from the factory, the key-touch tone is activated.)
1
Press and hold the button for more than 2
seconds.
“CLOCK H,” “CLOCK M,” “BEEP” or “AREA” appears on the
display.
2
Select “BEEP” if not shown on the display.
3
To deactivate the key-touch tone (OFF).
To activate the key-touch tone (ON).
Clock
Frequency
During CD operation:
Clock
Elapsed
playing time
SEL
SS
3
12
17-19.KD-SX838/S737 97.12.26, 11:10 AM18

ENGLISH
19
How to detach the control
panel
Before detaching the control panel, be sure
to turn off the power.
1
Unlock the control panel.
2
Liftandpullthecontrolpanel
out of the unit.
3
Put the detached control
panelinto thecaseprovided.
How to attach the control
panel
1
Insert the left side of the
controlpanelinto thegroove
on the panel holder.
2
Press the right side of the
control panel to fix it to the
panel holder.
Detaching the control panel
You can detach the control panel when leaving the car.
When detaching or attaching the control panel, be careful not to damage the connectors on
the back of the control panel and on the panel holder.
Note on cleaning the connectors:
If you frequently detach the control panel,the
connectors will deteriorate.
To minimize this possibility, periodically wipe
the connectors with a cotton swab or cloth
moistened with alcohol, being careful not to
damage the connectors.
Connectors
17-19.KD-SX838/S737 97.12.26, 11:10 AM19

20
CD CHANGER OPERATIONS
This section is ONLY FOR KD-SX838, when used with a JVC CD automatic changer
(separately purchased).
We recommend that you use one of the CH-X series with your KD-SX838.
Ifyouhaveanother CD automatic changer,consultyourJVC caraudiodealerfor connections.
• For example, if your CD automatic changer is one of the KD-MK series, you need a cord (KS-
U15K) for connecting it to this unit.
Before operating your CD automatic changer:
• Refer also to the Instructions supplied with your CD changer.
• If no discs are in the magazine of the CD changer or the discs are inserted upside
down, “NO CD” or “NO DISC” will appear on the display. If this happens, remove the
magazine and set the discs correctly.
• If“RESET 1–RESET 8”appearsonthe display,something iswrongwith theconnection
between this unit and the CD changer.If this happens, check the connection, connect
theconnectingcord(s)firmlyifnecessary, thenpressthe resetbutton oftheCD changer.
Playing CDs
1
Select the CD automatic changer.
Playback starts from the first track of the first disc.
All tracks of all discs are played back.
Number buttons
SSM ¢
SSM 4
Note on One-Touch Operation:
When you press CD-CH, the power automatically comes on. You do not have to press
to turn on the power.
CD-
CH
Track numberDisc number Elapsed playing time
(The clock time is shown if you have pressed
DISP to see the clock time. See page 18.)
1
20-22.KD-SX838/S737 97.12.26, 11:37 AM20
This manual suits for next models
4
Table of contents
Other JVC Car Receiver manuals