JVC LVT1055-001A User manual

ENGLISH
LVT1055-001A
[U]
INSTRUCTIONS
!"
!" !"
!" !"
!"
§”·π–π”
DVD/CD RECEIVER
!"=DVD/CD
DVD/CD
‡§√◊ËÕ߇≈Ëπ DVD/CD
KD-DV5000
For installation and connections, refer to the separate manual.
!"#$%&'()*+,-./0
==== = == != != !K
°√ÿ≥“¥Ÿ§ŸË¡◊Õ∑’Ë·¬°µË“ßÀ“° „π°“√µ‘¥µ—Èß·≈–°“√‡™◊ËÕ¡µËÕ
This unit is equipped with the display demonstration. To cancel it, see page 9.
!"#$%$&'()*+,&'-./0V
= = !"== = !K= = !V != !"#K
‡§√◊ËÕßπ’ȉ¥È√—∫°“√µ‘¥µ—Èß°“√ “∏‘µ¿“æª√–°Õ∫ À“°µÈÕß°“√¬°‡≈‘° ‚ª√¥¥Ÿ ÀπÈ“ 9
Detachable
COMPACT
DIGITAL VIDEO
KD-DV5000
50Wx4
3456 EQ21 D
SRC
DISP
ATT
SEL
MODE
M
+
TOP
MENU
REPEAT
RETURN
INTRORANDOM
OSD
EQS
ZOOM
SETUP
SEL
CH
AM
FM
DVD
–
RI
SUBTITLEAUDIO ANGLE
+10
010
897
2ndVOL
2ndVOL 564
23
1
DISC
ENTER
MENU
FOLDER
PRESET
DAB
ATT
SHIFT
DUAL
ZONE
+
DISC –
∑¬
COVER DV-5000 20/5/03, 3:38 PM3

2
ENGLISH
How to reset your unit
After detaching the control panel, press the reset button on the panel holder using a ball-point pen
or similar tool. This will reset the built-in microcomputer.
NOTE:
If you reset the unit during play, the playback mode selections
(e.g. repeat play mode setting), you have selected for the
current disc will be reset to the initial settings.
• During DVD playback, the disc menu selection will also be
reset to the initial disc settings.
Position And Reproduction Of Labels
Name/Rating plate
Bottom panel of the main unit
IMPORTANT FOR LASER PRODUCTS
Precautions:
1.CLASS 1 LASER PRODUCT
2.CAUTION: Invisible laser radiation when open and
interlock failed or defeated. Avoid direct exposure to
beam.
3.CAUTION: Do not open the top cover. There are no
user-serviceable parts inside. Leave all servicing to
qualified service personnel.
4.CAUTION: This DVD/CD player uses invisible laser
radiation and is equipped with safety switches to
prevent radiation emission when unloading discs. It is
dangerous to defeat the safety switches.
5.CAUTION: Use of controls, adjustments or performance
of procedures other than those specified herein may
result in hazardous radiation exposure.
Caution:
This product contains a laser component
of higher laser class than Class 1.
CLASS
LASER
1
PRODUCT
CAUTION: Invisible laser
radiation when open and
interlock failedor defeated.
AVOID DIRECT EXPOSURE
TO BEAM. (e)
ADVARSEL: Usynlig laser-
stråling ved åbning, når
sikkerhedsafbrydere er ude
af funktion. Undgåudsæt-
telse for stråling. (d)
VARNING: Osynlig laser-
strålning när denna del är
öppnad och spärren är
urkopplad. Betrakta ej
strålen. (s)
VARO: Avattaessa ja
suojalukitus ohitettaessa
olet alttiina näkymättö-
mälle lasersäteilylle.
Älä katso säteeseen. (f)
EN02-04DV5000[U]f.p65 03.5.15, 14:212

3
ENGLISH
WARNINGS
• DO NOT install any unit in locations where;
– it may obstruct the steering wheel and
gearshift lever operations, as this may result
in a traffic accident.
– it may obstruct the operation of safety
devices such as air bags, as this may result
in a fatal accident.
– it may obstruct visibility.
• DO NOT operate any unit while manipulating
the steering wheel, as this may result in a
traffic accident.
• The driver must not watch the monitor while
driving.
If the driver watches the monitor while driving,
it may lead to carelessness and cause an
accident.
• The driver must not put on the headphones
while driving. It is dangerous to shut off the
outside sounds while driving.
• If you need to operate the unit while driving,
be sure to look ahead carefully or you may be
involved in a traffic accident.
• If the parking brake is not engaged, “DRIVER
MUST NOT WATCH THE MONITOR WHILE
DRIVING.” appears on the monitor, and no
playback picture will be shown.
– This warning appears only when the parking
brake wire is connected to the parking brake
system built in the car (refer to the
Installation/Connection Manual).
CAUTION: DO NOT insert a disc while the
disc loading lamp is flashing or is not lit.
(See page 18.)
BEFORE USE
* For safety....
•Do not raise the volume level too much, as this
will block outside sounds, making driving
dangerous.
•Stop the car before performing any complicated
operations.
* Temperature inside the car....
If you have parked the car for a long time in hot
or cold weather, wait until the temperature in the
car becomes normal before operating the unit.
Caution:
If the temperature inside the car is below 0°C, the
movement of animation and text scroll will be
halted on the display to prevent the display from
being blurred. (LOW TEMP.) indicator
appears on the display.
When the temperature increases, and the operating
temperature is resumed, these functions will start
working again.
CAUTION on Volume Setting:
Discs produce very little noise compared with
other sources. If the volume level is adjusted for
the tuner, for example, the speakers may be
damaged by the sudden increase in the output
level. Therefore, lower the volume before playing a
disc and adjust it as required during playback.
Thank you for purchasing a JVC product. Please read all instructions carefully before operation,
to ensure your complete understanding and to obtain the best possible performance from the unit.
This product incorporates copyright protection
technology that is protected by method claims
of certain U.S. patents and other intellectual
property rights owned by Macrovision
Corporation and other rights owners. Use of
this copyright protection technology must be
authorized by Macrovision Corporation, and is
intended for home and other limited viewing
use only unless otherwise authorized by
Macrovision Corporation. Reverse
engineering or disassembly is prohibited.
EN02-04DV5000[U]f.p65 03.5.15, 14:213

4
ENGLISH
CONTENTS
How to reset your unit ............................... 2
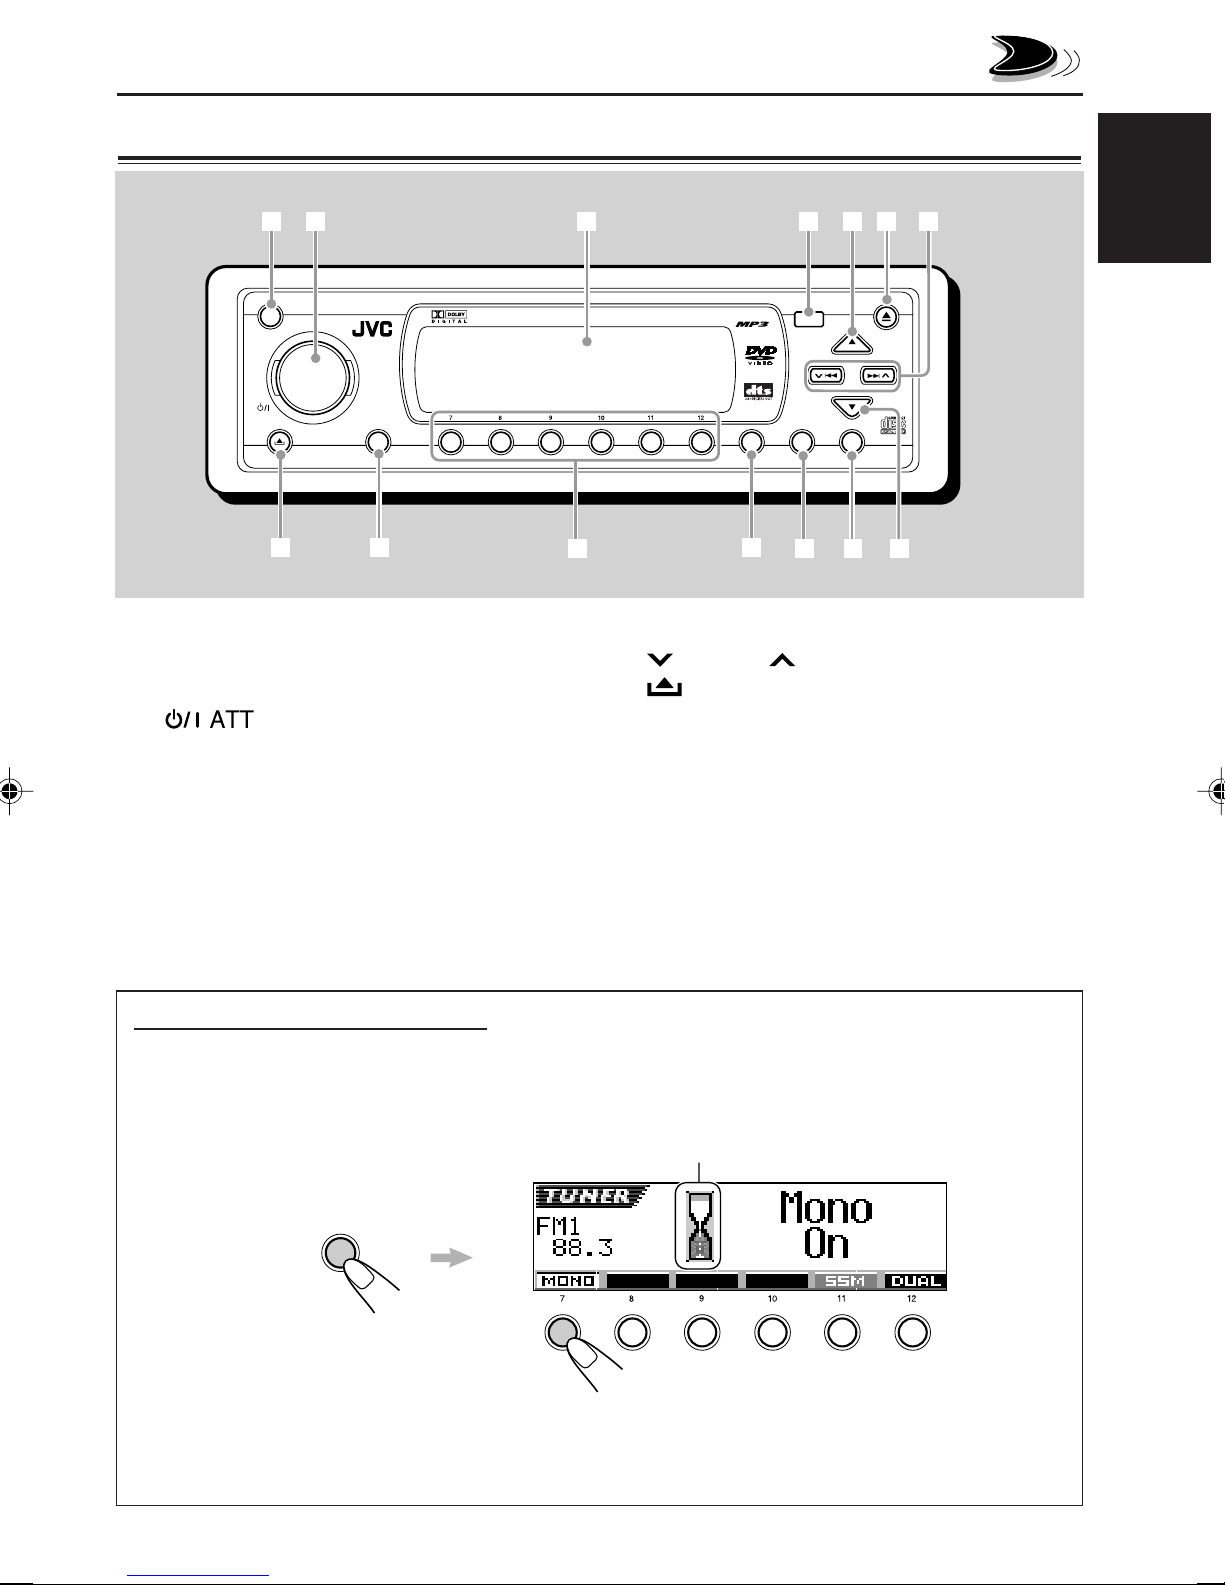
LOCATION OF THE BUTTONS ............ 5
Control panel ............................................. 5
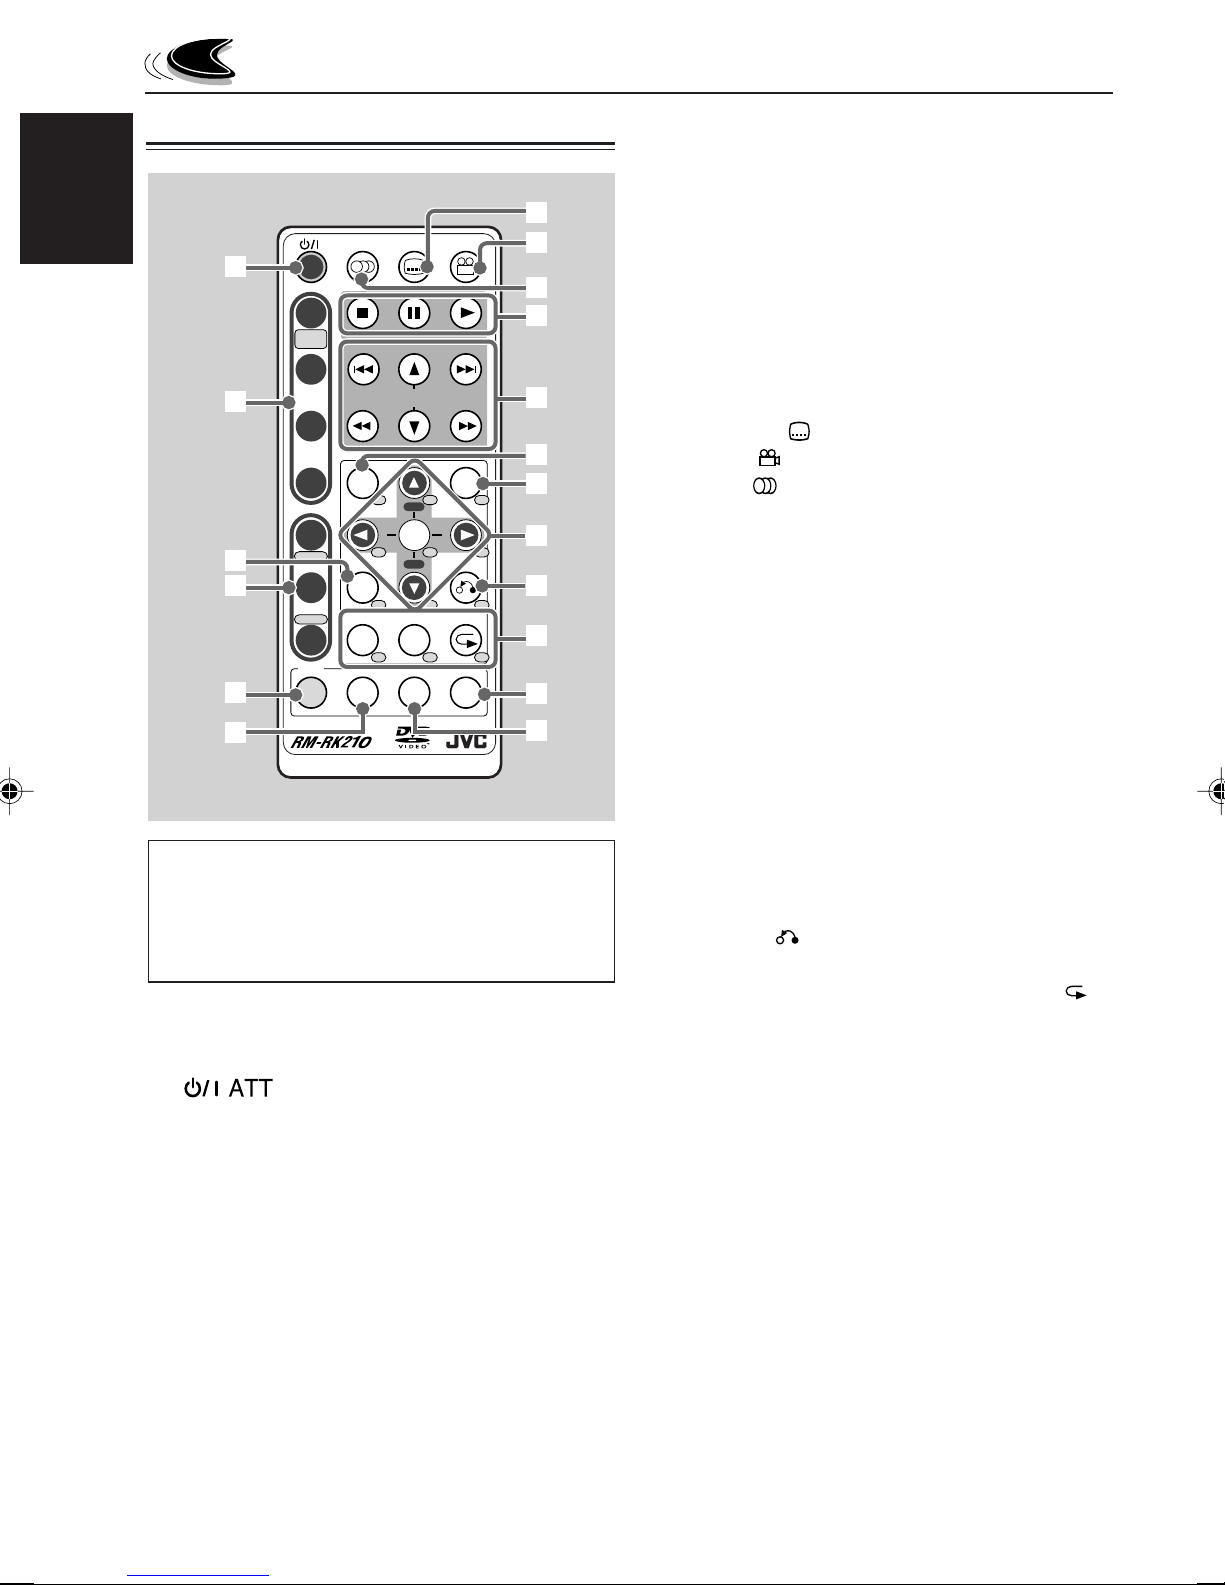
Remote controller ...................................... 6
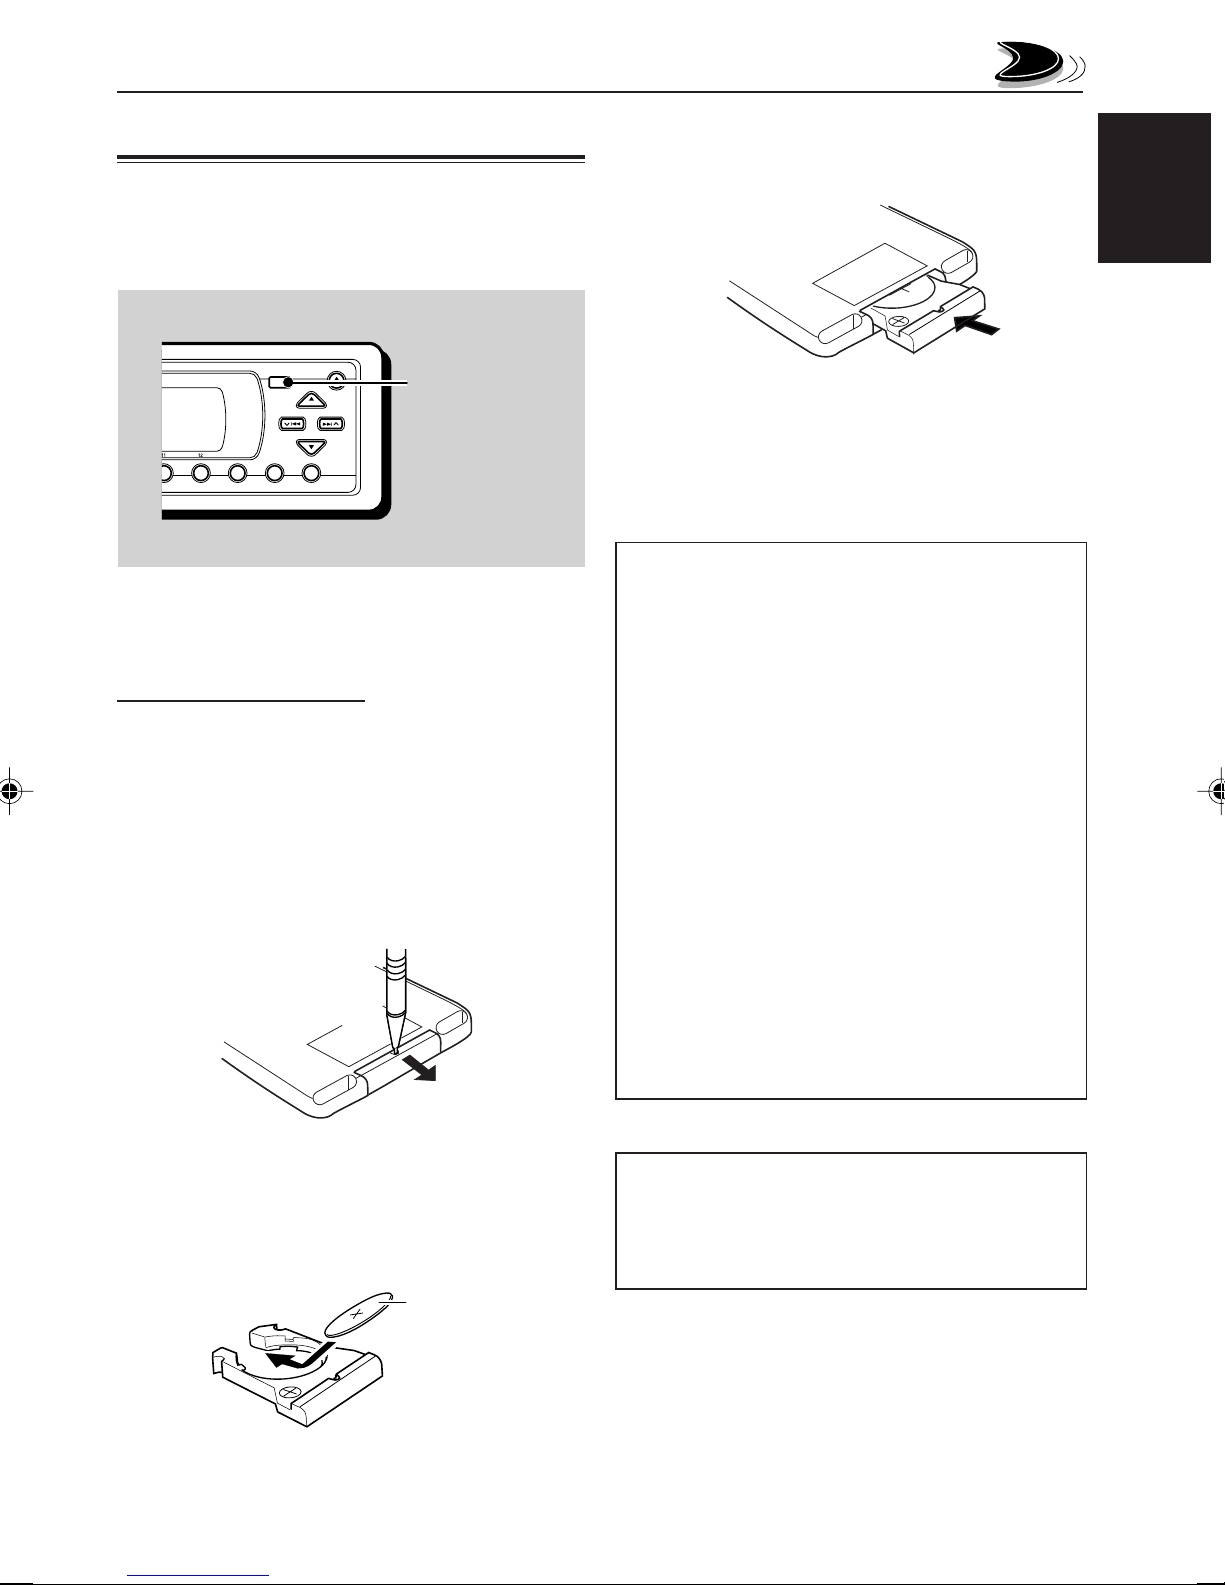
Preparing the remote controller ................ 7
BASIC OPERATIONS ....................... 8
Turning on the power ................................ 8
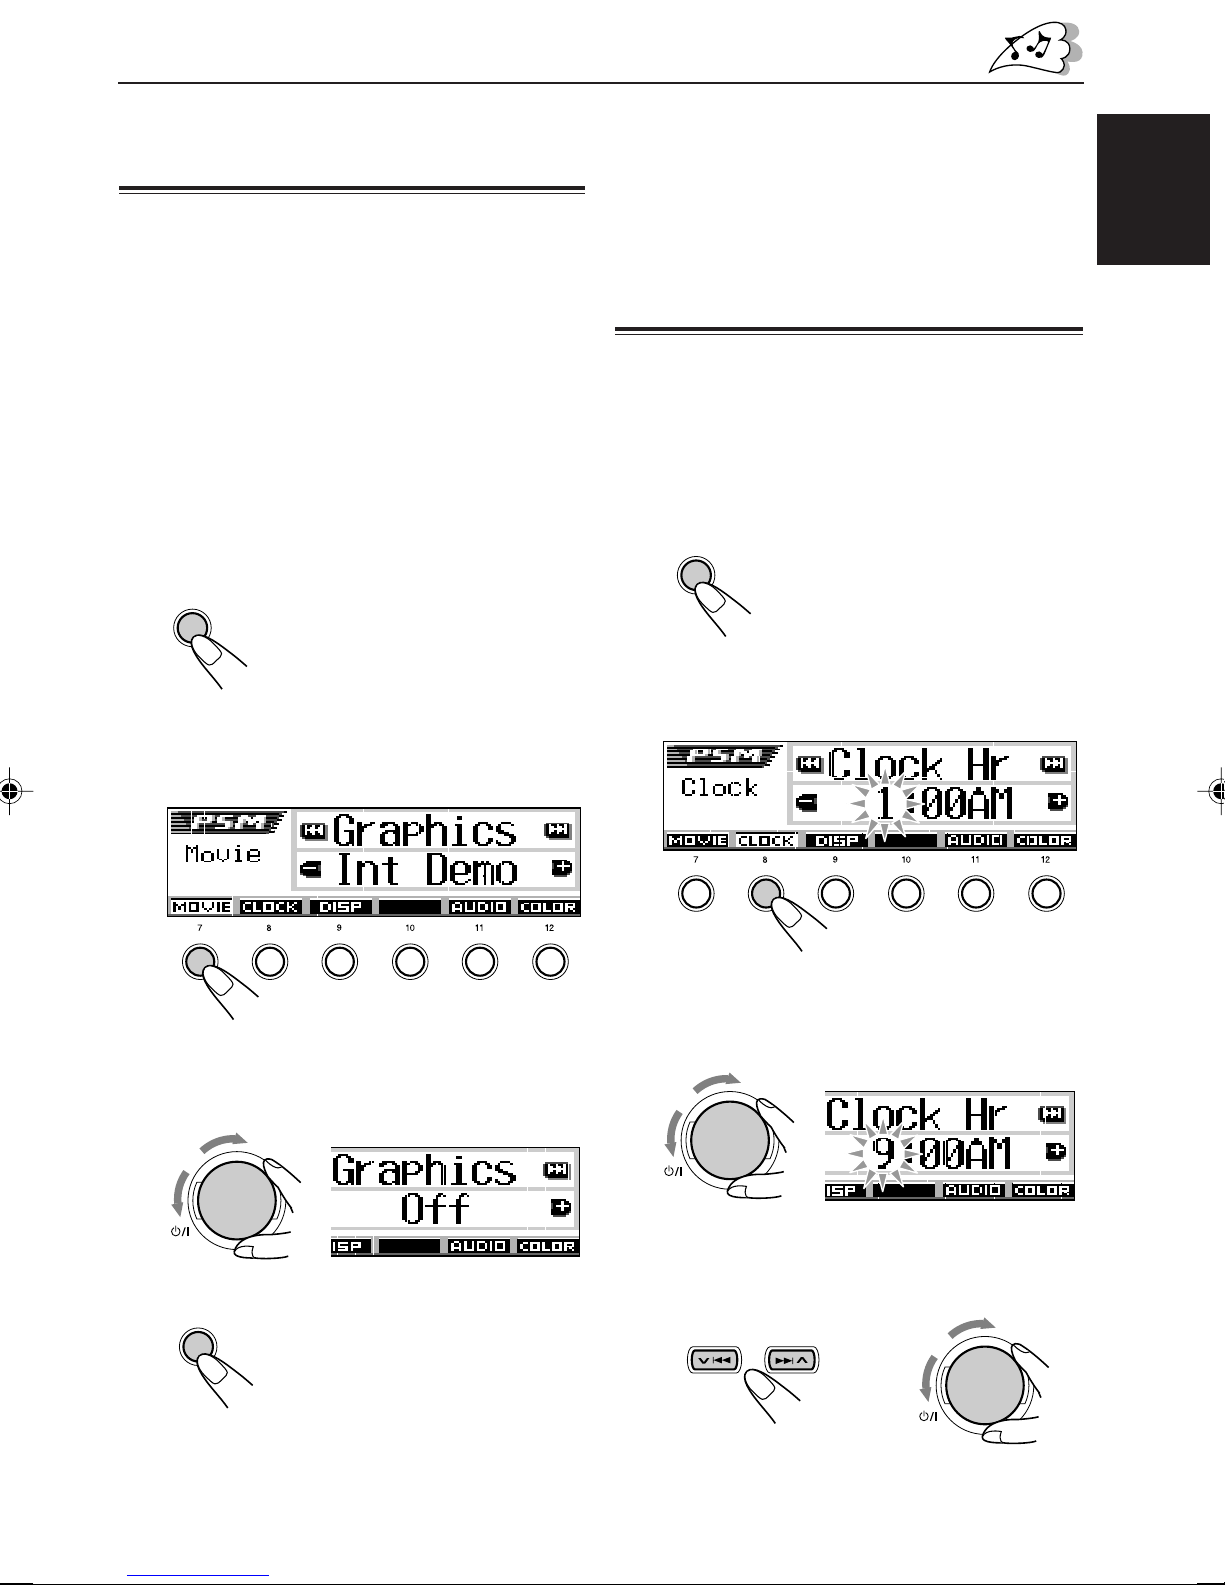
Canceling the display demonstration ........ 9
Setting the clock ........................................ 9
Activating the level meter .......................... 10
RADIO OPERATIONS ...................... 11
Listening to the radio ................................. 11
Storing stations in memory ....................... 13
Tuning in to a preset station ...................... 14
Changing the display pattern .................... 15
PLAYABLE DISCS .......................... 16
BASIC DISC PLAYBACK ................... 18
Starting playback ...................................... 18
Locating a particular title/chapter/track ..... 20
Locating a particular folder ........................ 21
DVD/VCD SPECIAL FUNCTIONS ......... 22
Selecting subtitles ..................................... 22
Selecting audio languages ........................ 23
Selecting multi-angle views ....................... 23
Menu operations ....................................... 24
Zoom in ..................................................... 25
ADVANCED DISC OPERATIONS .......... 26
Searching for a particular point ................. 26
Playing in various play modes .................. 28
DUAL ZONE OPERATIONS ................ 30
Listening with headphones ....................... 30
OSD DISC OPERATIONS .................. 32
Operations on the monitor screen ............. 32
OTHER DISC OPERATIONS ............... 35
Basic disc playback ................................... 35
Locating a title/chapter/track on a disc ...... 36
Selecting a folder/track to play
using the lists .......................................... 37
Selecting playback modes ........................ 38
Prohibiting disc ejection ............................ 41
Changing the display pattern .................... 41
DVD SETUP MENU ......................... 43
Basic setting procedure ............................ 43
SOUND ADJUSTMENTS ................... 47
Adjusting the sound .................................. 47
Selecting preset sound modes
(iEQ: intelligent equalizer) ...................... 48
Storing your own sound adjustments ........ 49
OTHER MAIN FUNCTIONS ................ 50
Changing the general settings (PSM) ....... 50
Selecting the dimmer mode ...................... 54
Changing the display color ........................ 55
Assigning names to the sources ............... 57
Detaching the control panel ...................... 58
CD CHANGER OPERATIONS .............. 59
Playing discs ............................................. 59
Selecting the playback modes .................. 63
EXTERNAL COMPONENT OPERATIONS .... 65
Playing an external component ................. 65
ADDITIONAL INFORMATION ............. 66
LANGUAGE CODES ........................ 67
GLOSSARY.................................. 68
TROUBLESHOOTING ...................... 69
MAINTENANCE ............................. 72
Handling discs ........................................... 72
SPECIFICATIONS ........................... 73
EN02-04DV5000[U]f.p65 03.5.15, 14:214

5
ENGLISH
LOCATION OF THE BUTTONS
Control panel
Refer to the pages in parentheses for details.
1SRC (source) button (8, 57, 59, 65)
2•(standby/on/attenuator)
button (8)
•Control dial
3Display window
4Remote sensor
55(up) button
•Functions as the Play button for DVDs and
VCDs.
60(eject) button (20, 35)
74/¢buttons
8(control panel release) button (58)
9SEL (select) button
pNumber buttons
qMODE (M) button
wDISP (D) (display) button (10, 15, 41, 60, 65)
eEQ (equalizer) button (10, 48)
r∞(down) button
•Functions as the Stop button for DVDs and
VCDs.
How to use the MODE (M) button
If you press MODE (M), the unit goes into functions mode. While in functions mode, the number
buttons work as different function buttons.
•The 5/∞buttons also work as +10/–10 buttons after pressing MODE (M).
Ex.: When the source is the tuner
To use these buttons for original functions again after pressing MODE (M), wait for 5 seconds
without pressing any of these buttons until the functions mode is cleared.
•Pressing MODE (M) again also clears the functions mode.
Time countdown indicator
M
MODE
345621
KD-DV5000
50Wx4
3456 EQ21 D
SRC
DISP
ATT
SEL
MODE
M
12 4 5 6
3
89w
q
p
7
e r
EN05-07DV5000[U]f.p65 03.5.15, 14:245

6
ENGLISH
Remote controller 3*SETUP button (43)
4Basic sound setting buttons
SEL, +, and –
•The +/–buttons normally function as the
volume adjustment buttons.
•The +/–buttons also function as the
2ndVOL +/–buttons when pressed with
SHIFT (S) button. (31)
5SHIFT (S) button
6EQ (equalizer) button (48)
•This button does not work for selecting the
level meter.
7SUBTITLE button (22)
8ANGLE button (23)
9AUDIO button (23)
pDisc basic operation buttons (20)
7(stop), 8(pause), 3(play)
qDisc advanced operation buttons
4/ ¢(reverse search/forward search)
•The 4/ ¢buttons also work for
searching for stations.
1/ ¡(reverse/fast forward)
•These buttons do not work for CD changer
operations.
FOLDER PRESET 5/ ∞
•The FOLDER PRESET 5/ ∞buttons also
work for selecting the preset stations.
w*TOP MENU button (24)
e*MENU button (24)
r*Menu operation buttons
Cursor (5/ ∞/ 2/ 3), and ENTER
t*RETURN button (24)
y*Play mode buttons (28, 29, 63, 64)
RANDOM (R), INTRO (I), and REPEAT ( )
uOSD button (32)
iZOOM button (25)
*These buttons function as the number buttons
when pressed with SHIFT (S) button.
+
TOP
MENU
RETURN
REPEATINTRORANDOM
OSD
EQS
ZOOM
SETUP
SEL
CH
AM
FM
DVD
–
RI
SUBTITLEAUDIO ANGLE
2ndVOL
2ndVOL 564
23
1
DISC
ENTER
MENU
FOLDER
PRESET
DAB
ATT
SHIFT
DUAL
ZONE
+
DISC –
+10
010
897
1
2
3
4
5
6
7
8
9
p
q
w
e
r
t
y
u
i
IMPORTANT:
If “Dual Zone”is turned on (see page 30), the
remote controller only functions for operating
the DVD/CD player.
Refer to the pages in parentheses for details.
1(standby/on/attenuator) button
2Source selection button
DVD, FM, AM, and CH
•DVD button also functions as the DUAL
ZONE button while pressed with SHIFT (S)
button. (30)
•FM button also functions to change the FM
bands. Each time you press the button, FM
band changes to FM1, FM2, and FM3 in
sequence.
•FM button does not function as the DAB
button for this model.
•CH button does not function if no CD
changer is connected.
EN05-07DV5000[U]f.p65 03.5.15, 14:246

7
ENGLISH
Preparing the remote controller
Before using the remote controller:
•Aim the remote controller directly at the remote
sensor on the main unit. Make sure there is no
obstacle in between.
•Do not expose the remote sensor to strong light
(direct sunlight or artificial lighting).
Installing the battery
When the controllable range or effectiveness of the
remote controller decreases, replace the battery.
1. Remove the battery holder.
1) Push out the battery holder in the direction
indicated by the arrow using a ball-point
pen or a similar tool.
2) Remove the battery holder.
2. Place the battery.
Slide the battery into the holder with the + side
facing upwards so that the battery is fixed in
the holder.
3. Return the battery holder.
Insert again the battery holder pushing it until
you hear a clicking sound.
(back side)
Lithium coin battery
(product number:
CR2025)
(back side)
Remote sensor
WARNING:
• Store the battery in a place where children cannot
reach.
If a child accidentally swallows the battery,
consult a doctor immediately.
• Do not recharge, short, disassemble or heat the
battery or dispose of it in a fire.
Doing any of these things may cause the battery
to give off heat, crack or start a fire.
• Do not leave the battery with other metallic
materials.
Doing this may cause the battery to give off heat,
crack or start a fire.
• When throwing away or saving the battery, wrap
it in tape and insulate; otherwise, the battery may
start to give off heat, crack or start a fire.
• Do not poke the battery with tweezers or similar
tools.
Doing this may cause the battery to give off heat,
crack or start a fire.
CAUTION:
DO NOT leave the remote controller in a place
(such as dashboards) exposed to direct sunlight
for a long time. Otherwise, it may be damaged.
1)
2)
5
6EQ
D
DISP
MODE
M
EN05-07DV5000[U]f.p65 03.5.15, 14:247

8
ENGLISH
BASIC OPERATIONS
Turning on the power
1
Turn on the power.
Note on One-Touch Operation:
When you select a source in step
2
below, the
power automatically comes on. You do not have
to press this button to turn on the power.
2
Select the source.
Each time you press the button,
the source changes as follows.
To operate the tuner (FM or AM),
see pages 11 – 15.
To play a disc,
see pages 16 – 46.
To operate the CD changer,
see pages 59 – 64.
To operate the external component
(LINE IN), see page 65.
*1If a disc is not in the loading slot, you cannot
select “DISC” as the source to play.
*2Without connecting a CD changer, you cannot
select it as the source to play.
*3To select “LINE IN,” select “Line In” for the
“Ext Input” setting on page 53.
3
Adjust the volume.
4
Adjust the sound as you want. (See
pages 47 – 49.)
Note:
While playing a source, you can also show the level
meter on the display. For details, see “Activating the
level meter” on page 10.
To drop the volume in a moment
Press briefly while listening to any
source. “ATT”starts flashing on the display, and
the volume level will drop in a moment.
To resume the previous volume level, press the
button briefly again.
•If you turn the control dial, you can also restore
the sound.
To turn off the power
Press for more than 1 second.
•If you turn off the power while listening to a
disc, playback will start from where playback
has been stopped previously, next time you
turn on the power.
SRC
Current sound (iEQ) mode (see page 48)
Volume level appears.
3456 EQ21 D
SRC
DISP
ATT
SEL
MODE
M
1, 3
2
*1*2*3
DISC
CD-CH or LINE IN
(CD changer)
TUNER
ATT
ATT
EN08-10DV5000[U]f.p65 03.5.15, 14:278

9
ENGLISH
Canceling the display
demonstration
When shipped from the factory, display
demonstration has been activated, and starts
automatically when no operations are done for
about 20 seconds.
•It is recommended to cancel the demonstration
before you use the unit for the first time.
To cancel the display demonstration, follow
the procedure below:
1
Press and hold SEL (select) for more
than 2 seconds so that one of the
PSM items appears on the display.
(PSM: see page 51.)
2
Press number button 1 to select
“MOVIE”—Movie category of the PSM
settings.
The “Graphics”setting screen appears on
the display.
3
Select “Off.”
4
Finish the setting.
SEL
To activate the display demonstration, repeat
the same procedure and select “All Demo”or
“Int Demo”in step
3
.
•For more details, see “To set the movie
demonstration—Graphics”on page 52.
Setting the clock
You can also set the clock system to 24 hours or
12 hours.
1
Press and hold SEL (select) for more
than 2 seconds so that one of the
PSM items appears on the display.
(PSM: see page 51.)
2
Press number button 2 to select
“CLOCK”—Clock category of the
PSM settings.
The “Clock Hr”setting screen appears on
the display.
3
Adjust the hour.
4
Set the minute.
1Select “Clock Min (minute).”
2Adjust the minute.
SEL
SEL
12
CONTINUED ON THE NEXT PAGE
345621
345621
ATT
ATT
ATT
EN08-10DV5000[U]f.p65 03.5.15, 14:279

10
ENGLISH
5
Set the clock system.
1Select “24H/12H.”
2Adjust “24Hours”or “12Hours.”
6
Finish the setting.
To check the current clock time when the unit
is turned off, press DISP (D).
The power turns on and the clock time is shown
for about 5 seconds, then the power turns off.
Activating the level meter
You can show the level meters on the display
while playing any source. This unit is equipped
with three level meter patterns.
•There is a time limit in doing the following
procedure. If the setting is canceled before you
finish, start from step
1
again.
1
Press EQ (equalizer) twice.
Last selected level meter
appears on the display.
•If you press the button only once, the
sound selection screen appears (see
page 48).
2
Select the level meter pattern you
want.
As you turn the control
dial, the level meters
change as follows:
12
SEL
Off 1
2
3
Meter 1:
The audio level meter fluctuates vertically.
Meter 2:
The speaker on the display vibrates as input
audio level changes.
Meter 3:
The left and right audio level meters appear.
•If the display pattern is changed, only one
audio level meter will be shown.
Off:
No level meter is shown. The source animation
appears.
NOTICE:
The illustrations of the display used in this manual
are mainly of the initial setting when shipped from
the factory. If you have changed the display
patterns or some PSM items, the actual displays
you see will be different.
EQ
ATT
ATT
EN08-10DV5000[U]f.p65 03.5.15, 14:2710

11
ENGLISH
RADIO OPERATIONS
Selected band appears.
Lights up when receiving an FM stereo
broadcast with sufficient signal strength.
FM1 FM2 FM3 AM
SRC
The operations of this section are mainly
explained using the buttons on the control panel.
When the remote controller can be used for the
same operations, it is then explained.
Listening to the radio
You can use either automatic searching or manual
searching to tune in to a particular station.
Searching for a station automatically:
Auto search
This operation is also possible from the remote
controller.
1
Select the band (FM1 – 3, AM).
1Press SRC (source)
repeatedly to select the tuner.
2Press and hold SRC.
Each time you press and hold
the button, the band changes.
Note:
This receiver has three FM bands (FM1, FM2,
FM3). You can use any one of them to listen to an
FM broadcast.
2
Start searching for a station.
When a station comes in, searching stops.
To stop searching before a station is received,
press the same button you have pressed for
searching.
When using the remote controller
1Press FM or AM.
• When selecting the FM bands,
press FM repeatedly until the
band you want is selected.
2Press ¢or 4to start
searching.
AM
FM
DAB
To search for stations of
higher frequencies
To search for stations of lower
frequencies
3456 EQ21 D
SRC
DISP
ATT
SEL
MODE
M
EN11-15DV5000[U]f.p65 03.5.15, 14:2811

12
ENGLISH
FM1 FM2 FM3 AM
SRC
M
MODE
Searching for a station manually:
Manual search
1
Select the band (FM1 –3, AM).
1Press SRC (source)
repeatedly to select the tuner.
2Press and hold SRC.
Each time you press and hold
the button, the band changes.
Note:
This receiver has three FM bands (FM1, FM2,
FM3). You can use any one of them to listen to
an FM broadcast.
2
Press and hold ¢or 4
until “Manual Search”starts flashing
on the display.
3
Tune in to a station you want while
“Manual Search”is flashing.
•If you release your finger from the button,
the manual mode automatically turns off
after 5 seconds.
•If you hold down the button, the frequency
keeps changing (in 50 kHz intervals for
FM and 9 kHz for AM) until you release
the button.
When an FM stereo broadcast
is hard to receive:
1Press MODE (M) to enter the
functions mode while listening to
an FM stereo broadcast.
“Mode”appears on the display.
2Press number button 1 to select “Mono On”
while “Mode”is still on the display.
Each time you press the button, “Mono On”
and “Mono Off”appears alternately.
When “Mono On”is selected, the MONO indicator
appears, and the sound you hear becomes monaural
but the reception will be improved.
After about
5 seconds
The display returns to the source indication
screen.
345621
See page 30 for this function.
To tune in to stations of
higher frequencies
To tune in to stations of
lower frequencies
EN11-15DV5000[U]f.p65 03.5.15, 14:2812

13
ENGLISH
2Press and hold number button 5 while
“Mode”is still on the display.
Local FM stations with the strongest signals are
searched and stored automatically in the band
number you have selected (FM1, FM2, or FM3).
These stations are preset in the number buttons
—No.1 (lowest frequency) to No.6 (highest
frequency).
Manual preset
You can preset up to 6 stations in each band
(FM1, FM2, FM3, and AM) manually.
Ex.: Storing an FM station of 92.5 MHz into the
preset number 1 of the FM1 band.
1
Select the band (FM1 –3, AM) you
want to store stations into (in this
example, FM1).
1Press SRC (source)
repeatedly to select the tuner.
2Press and hold SRC.
Each time you press and hold
the button, the band changes.
FM1 FM2 FM3 AM
“–SSM–” appears, then disappears when
automatic preset is over.
Storing stations in memory
You can use one of the following two methods to
store broadcasting stations in memory.
•Automatic preset of FM stations: SSM (Strong-
station Sequential Memory)
•Manual preset of both FM and AM stations
FM station automatic preset: SSM
You can preset 6 local FM stations in each FM
band (FM1, FM2, and FM3).
1
Select the FM band (FM1 –3) you
want to store FM stations into.
1Press SRC (source)
repeatedly to select the tuner.
2Press and hold SRC.
Each time you press and hold
the button, the band changes.
Note:
This receiver has three FM bands (FM1, FM2,
FM3). You can use any one of them to listen to
an FM broadcast.
2
Start automatic preset.
1Press MODE (M) to enter the functions
mode.
“Mode”appears on the display.
FM1 FM2 FM3 AM
M
MODE
SRC
SRC
CONTINUED ON THE NEXT PAGE
345621
Then
EN11-15DV5000[U]f.p65 03.5.15, 14:2813

14
ENGLISH
1
FM1 FM2 FM3 AM
Tuning in to a preset station
You can easily tune in to a preset station.
Remember that you must store stations first. If
you have not stored them yet, see “Storing
stations in memory”on pages 13 and 14.
Selecting a preset station directly
1
Select the band (FM1 –3, AM).
1Press SRC (source)
repeatedly to select the tuner.
2Press and hold SRC.
Each time you press and hold
the button, the band changes.
2
Select the number (1 –6) for the
preset station you want.
Note:
You can also use the 5(up) or ∞(down) button on
the unit to select the next or previous preset stations.
Each time you press the 5(up) or ∞(down) button,
the next or previous preset station is tuned in.
When using the remote controller
1Press FM or AM.
•When selecting the FM bands,
press FM repeatedly until the
band you want is selected.
2Press the number buttons (1 to 6) while
holding SHIFT (S).
Note:
You can also use the PRESET (FOLDER) 5/ ∞
buttons for selecting a preset station.
345621
SRC
AM
FM
DAB
2
Tune in to a station (in this example,
of 92.5 MHz).
3
Press and hold the number button
(in this example, 1) for more than
2 seconds.
4
Repeat the above procedure to store
other stations into other preset
numbers.
Notes:
• A previously preset station is erased when a new
station is stored in the same preset number.
• Preset stations are erased when the power supply to
the memory circuit is interrupted (for example,
during battery replacement). If this occurs, preset
the stations again.
S
SHIFT
TOP
MENU
564
23
1
DISC
ENTER
MENU
+
To tune in to stations of
higher frequencies
To tune in to stations of
lower frequencies
The display pattern automatically changes like the
above pattern (see page 15). The preset number
flashes for about 5 seconds, then the previous
display pattern resumes.
EN11-15DV5000[U]f.p65 03.5.15, 14:2814

15
ENGLISH
Changing the display pattern
By pressing DISP (D), you can change the
information shown on the display.
Each time you press the button,
the display patterns change as
follows:
If a name has been assigned
to a station, it will be shown
instead of “NO NAME.”
Selecting a preset station using the
preset station list
If you forget which stations are stored in which
preset numbers, you can check the preset
station list, then select your desired station.
1
Select the band (FM1 –3, AM).
1Press SRC (source)
repeatedly to select the tuner.
2Press and hold SRC.
Each time you press and hold
the button, the band changes.
2
Press and hold 5(up) or ∞(down)
until the preset station list for the
current band (FM1, FM2, FM3, or AM)
appears on the display.
Notes:
• You can show the other FM band preset
station lists (FM1, FM2, or FM3) by pressing
5(up) or ∞(down).
• If a name has been assigned to a station (see
page 57), it will be shown instead of the
station frequency.
3
Select the number (1 –6) for the
preset station you want.
FM1 FM2 FM3 AM
D
DISP
345621
SRC
Appears only when
selecting a preset station
number.
Clock time
EN11-15DV5000[U]f.p65 03.5.15, 14:2815

ENGLISH
16
PLAYABLE DISCS
• On some discs, the actual operations may be
different from what is explained in this manual.
• The following discs cannot be played back;
– DVD-Audio, DVD-ROM, DVD-RAM, DVD-R,
DVD-RW, CD-ROM, CD-I (CD-I Ready),
Photo CD, etc.
Playing back these discs will generate noise
and damage the speakers.
* Note on Region Code
DVD players and DVD Video discs have their own
Region Code numbers. This unit can only play back
DVD discs whose Region Code numbers include “3.”
If you insert a DVD Video disc of an incorrect Region
Code
“REGION CODE ERROR!” appears on the monitor,
and “Please Eject” flashes on the display. (If the
control panel is not yet closed, the disc ejects
automatically.)
Disc Type Mark (Logo) Video Format Region Code*
DVD Video
NTSC/PAL
3
ALL
Video CD
Audio CD
Discs you can play:
Examples:
MP3 disc
CD-Rs or CD-RWs including MP3 files with the file extension code <mp3>.
They must be recorded in the format compliant with ISO 9660 Level 1, ISO
9660 Level 2, Romeo, and Joliet.
COMPACT
DIGITAL VIDEO
Disc structure
DVD
A DVD disc consists of Titles, and each title may
be divided into Chapters.
For example, if a DVD disc contains some
movies, each movie may have its own title
number, and it may be further divided into
chapters.
Video CD (VCD) and Audio CD (CD)
On the other hand, a VCD or CD consists of
Tracks.
In general, each song has its own track number.
(On some discs, each track may also be divided
by Indexes.)
When playing back a VCD with the Playback
Control (PBC) function, you can select what to
view using the menu shown on the monitor.
(While operating a VCD using the menu, some of
the functions such as Repeat and Track Search
may not work.)
EN16_21DV5000[U]f.p65 03.5.15, 14:3216

ENGLISH
17
MP3 discs
MP3 is an abbreviation of Motion Picture Experts
Group 1 (or MPEG-1) Audio Layer 3. MP3 is
simply a file format with a data compression. By
using MP3 format, one CD-R or CD-RW can
contain 10 times as much data as a regular CD
can.
On an MP3 disc, files (also called “tracks”and
both words are used interchangeably in this
manual) are usually grouped into a folder.
Folders can also include other folders, creating
hierarchical layers of folders.
This unit can recognize up to 150 files per folder,
and up to 99 folders per disc (up to 14,850 files).
The unit ignores those exceeding the maximum
number and cannot play them back.
•All folders on the disc are counted in the total
number of 150, even a folder which does not
include any MP3 files.
Notes for MP3 disc
• MP3 discs require a longer readout time, which
differs due to the complexity of the folder/file
configuration.
• This unit supports “multi-session” discs.
• This unit cannot play “packet write” discs.
• The unit can play MP3 files with the correct
extension code—<.mp3> (case insensitive—any
combination of upper and/or lower is acceptable)
• It is recommended that MP3 files be recorded at a
sample rate of 44.1 kHz and at a data transfer rate
of 128 kbps.
• For more information about MP3 discs, see “A
Guide to MP3” (separate volume).
About sounds reproduced through the rear
terminals
• Through the analog terminals (Speaker
out/LINE OUT/2nd AUDIO OUT):
2-channel signal is emitted.
When playing a multi-channel encoded disc,
multi-channel signals are downmixed.
(AUDIO—ANALOG DOWN MIX: see page
46)
• Through DIGITAL OUT (optical):
Digital signals (Linear PCM, Dolby Digital*,
DTS**, MPEG Multichannel) are emitted
through this terminal. (For more details, see
page 71.)
To reproduce multi-channel sounds such as
Dolby Digital and DTS, connect an amplifier
or a decoder compatible with these multi-
channel sources to this terminal, and set
“DIGITAL AUDIO OUTPUT”to the correct
value. (See page 46.)
• About Dual Zone
While you are listening to the radio, CD
changer, or external component through the
speakers built into your car compartment,
you can listen to the playback sound of this
DVD/CD player using the headphones
connected to the 2nd AUDIO OUT plug at
the same time.
•For details, see “DUAL ZONE
OPERATIONS”on page 30.
*Manufactured under license from Dolby
Laboratories. “Dolby” and the double-D symbol
are trademarks of Dolby Laboratories.
** “DTS” and “DTS Digital Out” are trademarks of
Digital Theater Systems, Inc.
EN16_21DV5000[U]f.p65 03.5.15, 14:3217

ENGLISH
18
The following marks used in this manual indicate
the playable discs.
BASIC DISC PLAYBACK
Starting playback
1
Open the control panel.
2
Insert a disc into the loading slot.
The disc loading lamp start
flashing, and the unit draws in
the disc automatically.
DO NOT insert a disc while the disc loading
lamp is flashing* or is not lit**.
* Flashing: while loading or ejecting a disc
**Not lit: when a disc has been loaded.
3
Close the control panel by hand.
The disc type is automatically
detected, and playback starts
automatically. (If a disc is CD,
VCD without the PBC
function, or MP3, playback
will be repeated until you
stop it.)
•If a menu appears while playing a DVD or
VCD with PBC function, see “Menu
operations”on page 24.
Disc loading lamp
Video CD
with/without PBC
Audio CD
DVD Video
MP3 disc
Video CD
with PBC
Before performing any operations, make sure
the following....
•To watch the playback pictures, select the an
appropriate video system (NTSC or PAL) to
match it to the connected monitor. (See page
53.)
•Turn on the monitor for playing a DVD or VCD.
If you turn on the monitor, you can also control
the CD and MP3 playback by referring to the
monitor screen.
• For DVD playback, you can change the
Setup Menu setting to your preference.
(See pages 43 – 46.)
•When you want to operate the DVD/CD player
using the buttons on the control panel, see
“OTHER DISC OPERATIONS”on pages 35 to
42.
If “ ”appears on the monitor when
pressing a button, the disc cannot accept an
operation you have tried to do.
•In some cases, without showing “,”
operations will not be accepted.
3456 EQ21 D
SRC
DISP
ATT
SEL
MODE
M
All discs
listed here
EN16_21DV5000[U]f.p65 03.5.15, 14:3218

ENGLISH
19
• Display indications when inserting an
MP3 disc
1Total track number
2Total folder number
3MP3 indicator
4Elapsed playing time of the current track
5Current folder number and track number
• Display indications when inserting a
DVD:
1Total title number
2Elapsed playing time of the current title
3Current title number and chapter number
• Display indications when inserting a
VCD or CD:
1Total playback time of the disc
2Total track number
3VIDEO CD indicator: appears only when playing
back a Video CD.
4Elapsed playing time of the current track
5Current track number
Notes:
• When a disc is already in the loading slot, selecting “DISC” as the source starts disc play.
• This unit cannot read or play an MP3 file without the extension code <mp3>.
• When a disc is inserted upside down, the disc automatically ejects (if the control panel is open).
If the control panel is closed, the source changes to the previously selected source, “Please Eject” flashes on
the display.
1
23
12
45
3
12
45
3
Note:
When a new folder starts playing, its folder name is
shown on the display (the display pattern
automatically changes for a while—see page 42.)
Caution:
When you start playing a Mixed-CD, playback
will stop at the beginning of the first track (with
[00’00”] shown for the elapsed playing time). If
this happens, skipping to the second track or
higher will start playback from the newly
selected track.
• For details about the Mixed-CD, refer to “A
Guide to MP3” (separate volume).
EN16_21DV5000[U]f.p65 03.5.16, 13:1419

ENGLISH
20
Press ¢to go ahead to the
beginning of the next chapter/track.
Each time you press the button, the
beginning of the next chapter/track
is located (and played back).
Press 4to go back to the beginning of the
current chapter/track.
Each time you press the button, the beginning of
the previous chapter/track is located (and played
back).
Note:
Playback will not start automatically if you locate the
chapter/track while a disc is pausing or not playing.
To stop playback
Press 7on the remote controller.
•Except for MP3 discs: This unit can remember
the end point (until the disc is ejected), and
when you start playback again, playback
begins from where it has been stopped.
(Resume play)
•For MP3 discs: This unit can remember the last
playing track (until the disc is ejected), and
when you start playback again, playback
begins from the beginning of the same track.
To eject a disc
Press 0on the control panel.
Playback stops and the control panel flips down.
The disc comes out of the loading slot.
Locating a particular title/
chapter/track
To go to the next or previous
chapter/tracks
•For DVD: During play or pause
To stop playback temporarily
Press 8on the remote controller.
“Pause”flashes on the display.
•For DVD and VCD only: A still picture appears.
Frame by Frame Playback—You can advance
the still picture frame by frame by pressing the
8repeatedly.
To resume normal speed, press 3.
Slow Motion Playback—You can advance the
still picture in slow motion by pressing ¡or
1. Each time you press the button, the
search speed changes as follows:
1/32 \1/16 \1/8 \1/4 \1/2
To resume normal speed, press 3.
Notes:
• No sound comes out during Reverse Slow Motion
Playback
• When playing a VCD, Reverse Slow Motion
Playback is prohibited.
To replay the previous scenes
—One Touch Replay
Press 3on the remote controller (or 5(up) on
the control panel) during play.
The playback position moves back about 10
seconds before the current position.
Notes:
• This function works only within the same title.
• For some DVDs, this function does not work.
EN16_21DV5000[U]f.p65 03.5.15, 14:3220
This manual suits for next models
2
Table of contents
Other JVC Car Receiver manuals