JVC GGT0359-001A-H User manual

WIDE LCD PANEL TV
INSTRUCTIONS
LT - 42Z10
GGT0359-001A-H
Safety precautions................................... 2
Remote control buttons and functions..... 3
Set up and connections........................... 4
Initial settings........................................... 6
Registering / Editing channels................. 7
Channel Summary................................... 8
Operating the menus............................... 9
PREPARATION
Picture setting........................................ 10
Sound setting......................................... 12
Useful functions..................................... 14
Multi Media Input ................................... 16
Viewing Teletext..................................... 19
Viewing Closed Caption ........................ 19
Watching Video or DVDs....................... 20
Technical information............................. 20
Troubleshooting..................................... 22
CH/CC List............................................. 23
Specification .......................................... 24
FUNCTIONS
REFERENCE
Contents
ENGLISH
GGT0359-001A-H-EN.indd 1GGT0359-001A-H-EN.indd 1 19/07/2010 14:07:4719/07/2010 14:07:47

2
Thank you for buying this JVC LCD panel television.
To make sure you understand how to use your new TV, please read this manual thoroughly before you begin.
10 10
Plane
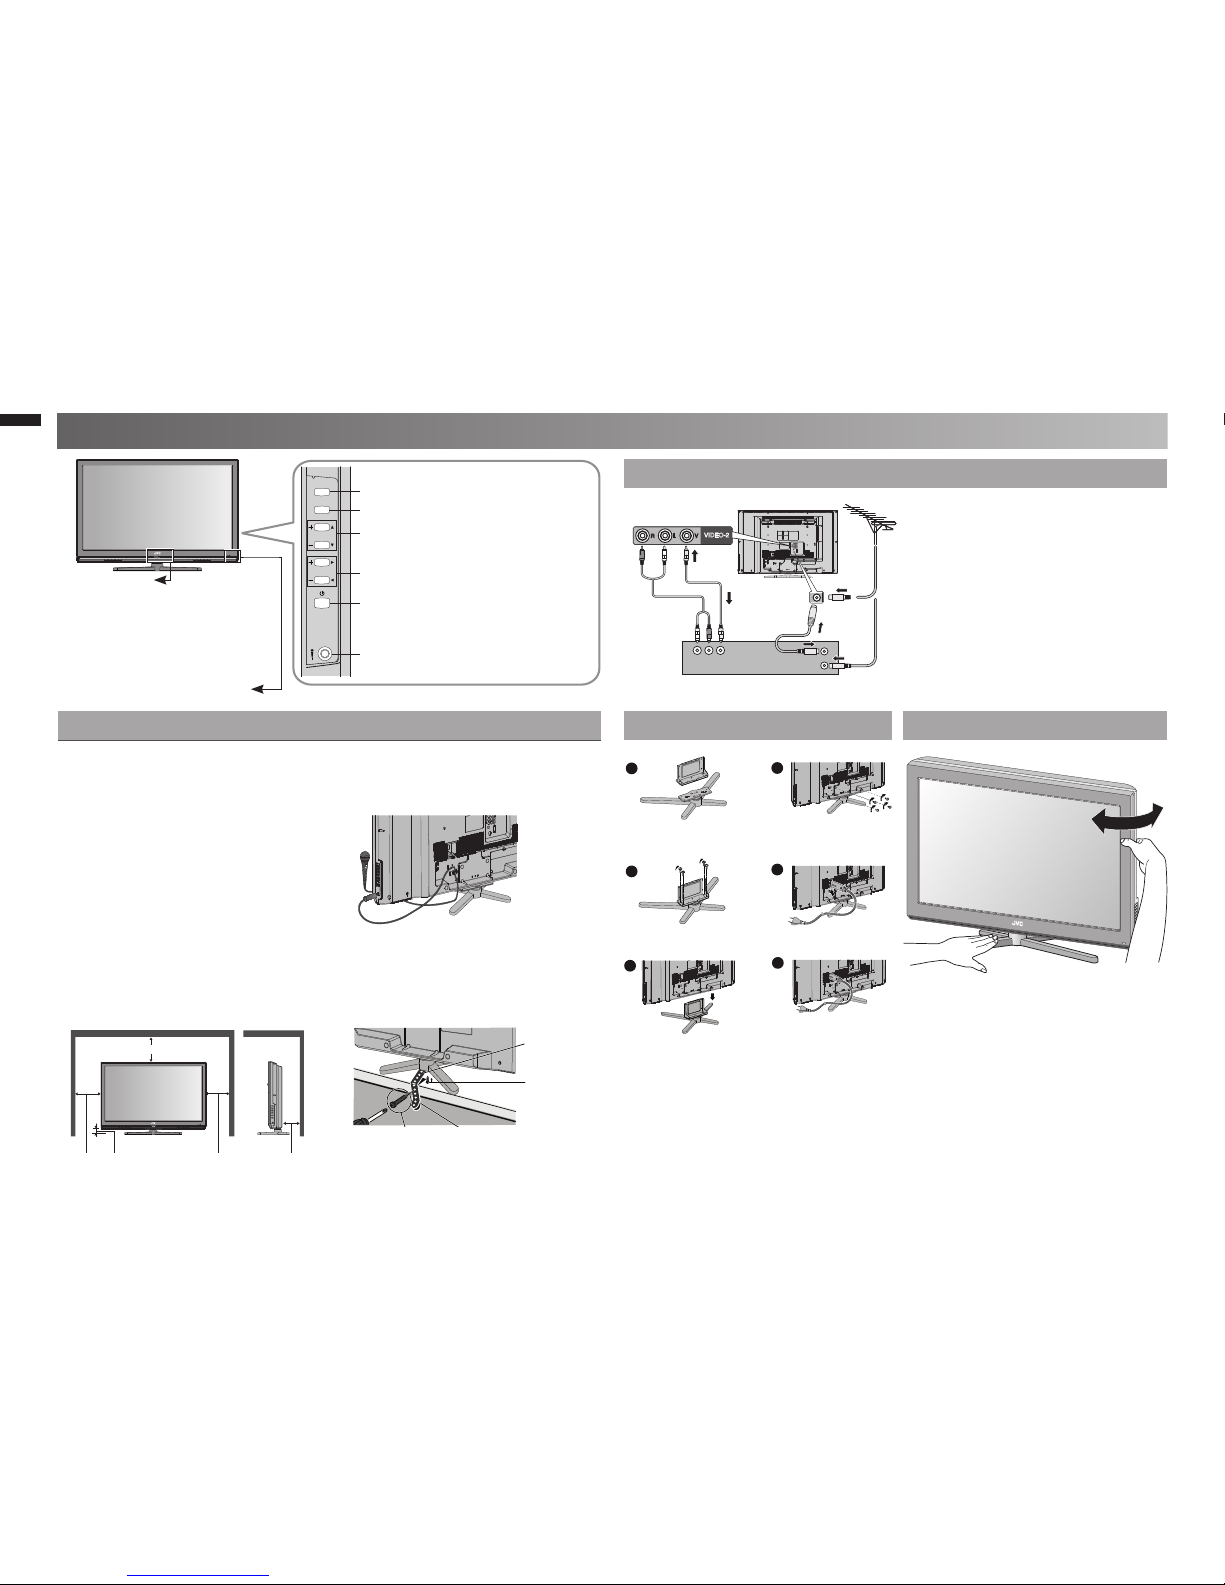
Follow this manual regarding setup!
•
Connect only to a 110-240 V, 50/60Hz AC outlet.
-
Make enough room for inserting and removing the power plug!
•
Place the TV as close to the outlet as possible!
•
The main power supply for this TV is controlled by inserting or removing the power plug.
-
Never cut or damage the power cord!
•
If the AC plug is not the right shape, or the power cord is not long enough, use an
-
appropriate plug adapter or extension cable. (Consult your retailer)
Unplug the power cord when going out!
•
The power buttons on the remote control and the TV unit cannot completely turn off the
-
TV. (Make appropriate arrangements for bedridden people.)
Do not allow the TV to fall!
•
Do not rest your elbows on, or allow children to hang from the TV.-
There is a risk that the TV will fall and cause injuries.
-
Make use of the hole on the back of the stand to prevent the TV from falling easily.
-
If the TV is damaged or behaving strangely, stop using it at once!
•
Unplug the power cord and contact your retailer.
-
Never place anything on the TV!
•
Placing liquid, naked flames, cloths, paper, etc. on the TV may cause a fire.
-
Never expose to rain or moisture!
•
To prevent fire or electric shock, never allow liquids to enter the unit.
-
Never insert objects into the cabinet openings!
•
It may cause a fatal electric shock.
-
Take care when children are near.
-
Hold the TV so as not to scratch the screen!
•
Do not touch the screen when carrying the TV.
-
Do not carry the TV on your own!
•
In order to prevent accidents, ensure that the TV is carried by
-
two or more people.
Never insert the power cord by wet hand!
•
It may cause a fatal electric shock.
-
Keep the TV set away from direct sunlight!
•
TV set can be damaged.
-
Place the TV set in a neat and dry place. Do not place the product close to
•
source of steam, heat, moisture or oil. Because it may cause a fire hazard
or electric shock hazard!
Don’t touch an external metal part of the TV set!
•
It may cause an electrocuted.
-
For keep a distance from potential ignition sources to the
•
components or part in side TV set, customer should install
TV set with a stand within ± 10 perpendicularly degree.
Never dismantle the rear panel!
•
It may cause an electric shock.
-
Never obstruct the ventilation holes!
•
It may cause overheating or a fire.
-
Handle LCD panel with care!
•
Use a soft, dry cloth when cleaning.
-
Never try repair the TV yourself!
•
If the problem cannot be solved in "Troubleshooting" unplug the power cord and contact
-
your retailer.
If a television is not positioned in a sufficiently stable location, it can be
•
potentially hazardous due to falling. Many injuries, particularly to children,
can be avoided by talking simple precautions such as:
Using cabinets or stands recommended by the manufacturer of the television.
-
Only using furniture that can safely support the television.
-
Ensuring the television is not overhanging the edge of the supporting furniture.
-
Not placing the television on tall furniture (for example, cupboards or bookcases) without
-
anchoring both the furniture and the television to a suitable support.
Not standing the television on cloth or other materials placed between the television and
-
supporting furniture.
Educating children about the dangers of climbing on furniture to reach the television or
-
its controls.
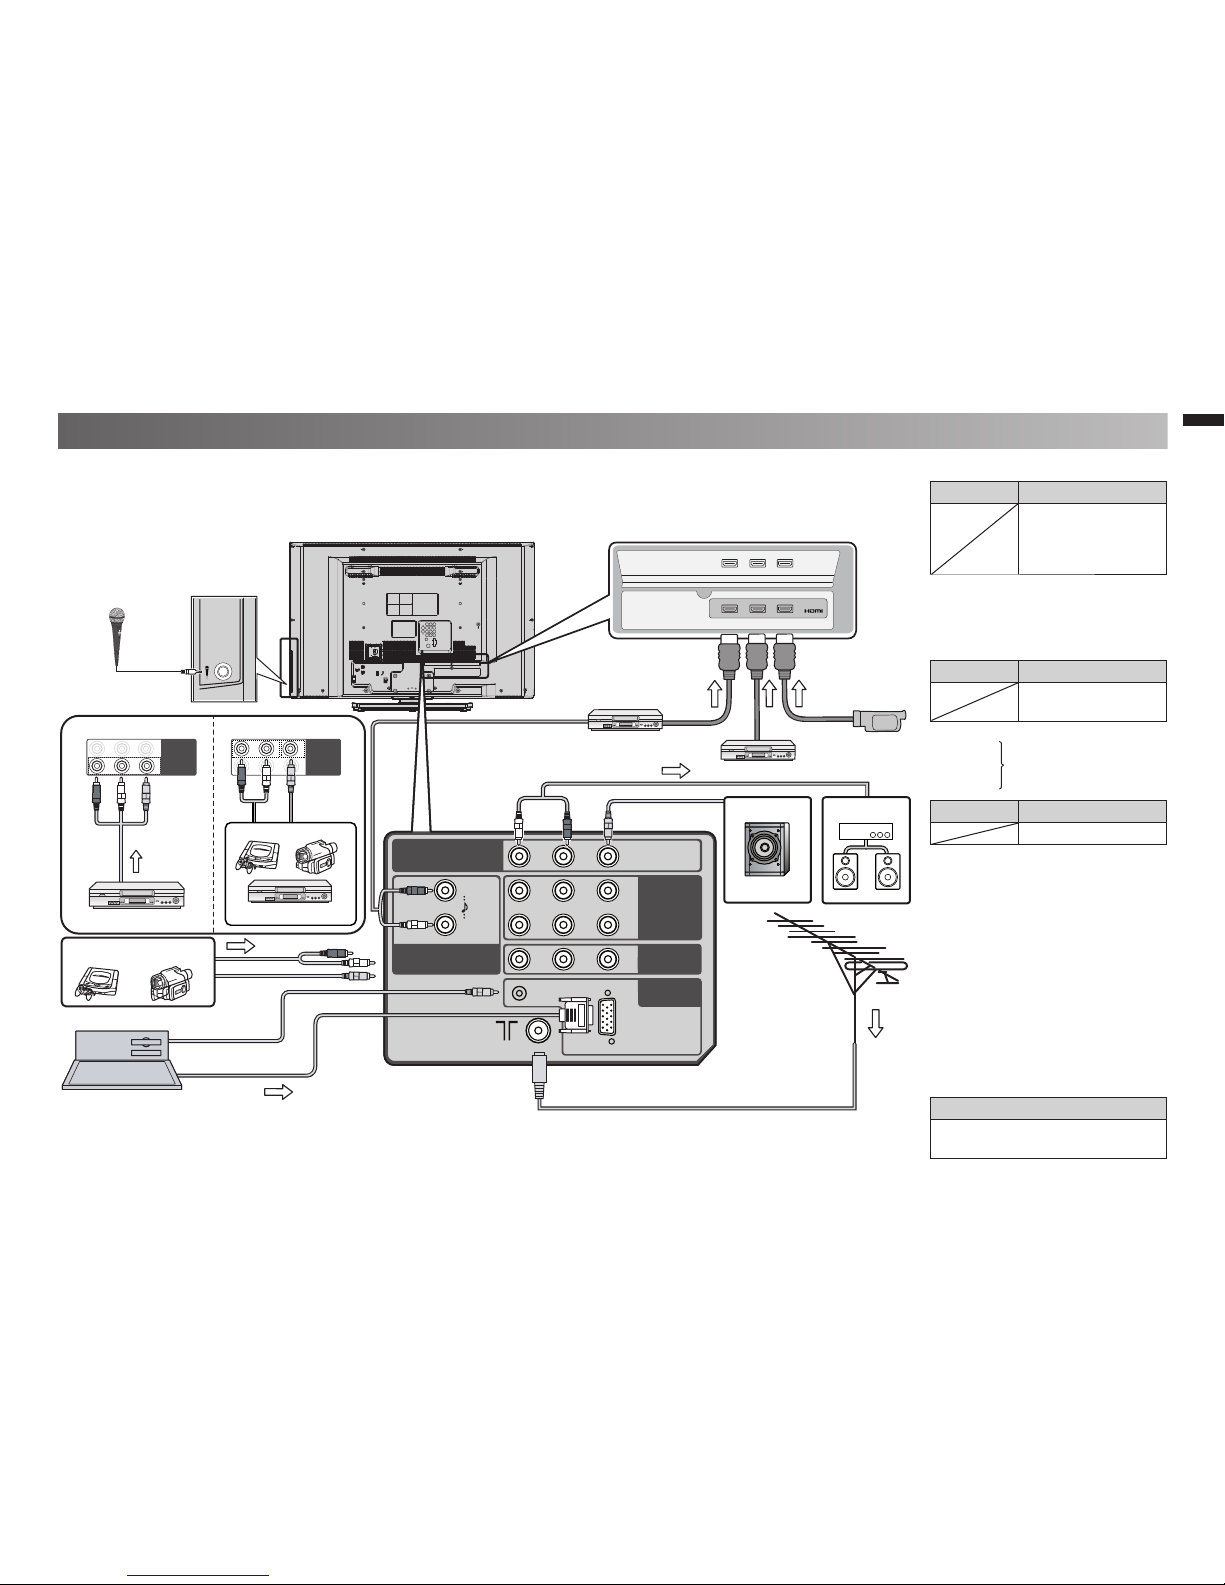
To prevent accidents, firmly attach the TV stands to the TV shelf before•
using microphone.
Make sure that the subwoofer is in good condition before installing it on•
the TV.
If the subwoofer has leakage current, it may damage the TV or cause electric shock.-
For more details on installation, usage and safety• Consult your retailer.
WARNING:
To prevent the spread of fire, keep candles or other open flames away from this
product at all times.
Safety precautions
GGT0359-001A-H-EN.indd 2GGT0359-001A-H-EN.indd 2 19/07/2010 14:07:5319/07/2010 14:07:53

3
RM-C2023
LCD
DISPLAY BACK
CH
VOL
MODE
ZOOM
ECO
MENU
TV/VIDEO
RETURN+
Clear SD
13
2
465
79
8
KARAOKE
S
OK
0
20
19
18
17
21
16
15
14
1
2
3
4
5
6
7
8
9
10
11
12
13
DISPLAY
Zoom
Auto Panoramic
Regular
Panoramic
14:9 Zoom
16:9 Zoom
16:9 Zoom Subtitle
Full
16:9 Zoom
OK
1. Select
2. Set
Jan 2010
09 : 08
Su Mo Tu We Th Fr Sa
12
3456789
10 11 12 13 14 15 16
17 18 19 20 21 22 23
24 25 26 27 28 29 30
31
PR List
AV
01
02 – – – – – –
03 – – – – – –
04 – – – – – –
05 – – – – – –
06 – – – – – –
07 – – – – – –
08 – – – – – –
09 – – – – – –
01
Remote control buttons and functions
1Power On / Off 9Operate the menu 15 Change channel / Page / Hyper Scan
2Colour buttons 10 To previous screen 16 Channel information
3Turn on "Clear SD" 11 Turn on "Sound Meister" 17 Select the input Source (P.20)
4Turn on "Zoom" 12 Volume control / Turn off muting 18 Return Plus / Return function
5Turn on "Eco Sensor" 13 Function for viewing Teletext and
"Multi Media Input"
19 Change channel / Page
6Turn on "Karaoke" 20 Turn the volume off / on
7Favourite channel setting 14 To Teletext 21 Turn on "Freeze" / Setup data
8Display on-screen menu
Zoom : Change the aspect ratio.
Return Plus : Return to the frequently viewed channel
Return : Return to the previously viewed channel.
Favourite channel setting.
1. Register the favourite channel 2. Recall the favourite channel
Press
number
button
(1-4 only)
Press
number
button
(1-4 only)
Press and hold Press
WARNING:
Batteries shall not be exposed to excessive
heat such as direct sunshine, fire or the like.
If this symbol is shown, it is only
valid in the European Union.
"AAA/R03" Batteries
If the favourite channel has not been registed
•
then "No memory" will be displayed.
Return Plus Programmed by select the frequently viewed channel then
press and hold
RETURN+
.
Return Plus Canceled by press and hold
RETURN+
.
Press and hold
CH
. PR changes without changing the picture screen.
Once you release the button, the picture of the selected PR will appear.
Move the picture with or
while this bar is displayed.
V-Scroll
Hyper Scan :
Set 1-4 ? Favourite 1-4 ?
Programmed! will be displayed.
Insert the batteries
•
Use two "AAA/R03" dry cell batteries.
Insert the batteries from the end,
making sure the and polarities are
correct.
Channel information
No Indication
PR List Calendar
GGT0359-001A-H-EN.indd 3GGT0359-001A-H-EN.indd 3 19/07/2010 14:07:5619/07/2010 14:07:56

4
VIDEO-2
RLV
CHANNEL
VOLUME
MENU/OK
TV/VIDEO
2
3
4
5
6
1
Set up and connections
Care when setting
Connect an aerial and VCR / DVD Player
Hole for belt
(under the stand)
Screw for
attach the belt
to the stand
(provided)
200 mm
150 mm150 mm 50 mm 50 mm
Screw
(not provided)
Belt
(provided)
Select the input Source (P. 20)
Display on-screen menu / set
Change channel / Page /
Hyper Scan Function (P. 3)
Volume / Adjust
Power On / Off
Microphone
Power requirements
■
Connect the power cord only to a•
110-240V, 50/60Hz AC outlet.
When attaching the TV to the
■
wall, use the optional JVC wall
mounting unit
Consult a qualified technician.•
JVC assumes no responsibility for•
damage due to improper mounting.
400 mm x 200 mm mount which•
conforms to VESA standards.
Installation requirements
■
To avoid overheating, ensure the•
unit has ample room.
After all the connections have•
been made, insert the plug into
an AC outlet.
AERIAL
OR
VCR (DVD Player)
To prevent the TV from falling
•
thread the belt through the hole
on the back of the stand and
secure it to the TV rack.
If the microphone is installed,
•
should be lock it’s cable follow
picture.
Power lamp
ON : Lit (Blue)
OFF : Unlit
Power lamp lights while
the TV is on.
"Power Lamp" (P. 15)
•
Remote control sensor /
Eco Sensor
Stand Assembly
Change the direction of TV
GGT0359-001A-H-EN.indd 4GGT0359-001A-H-EN.indd 4 19/07/2010 14:08:0019/07/2010 14:08:00

5
HDMI-1
DVI ANALOG AUDIO
VIDEO-1
SUBWOOFER
OUTPUT
VIDEO-2
PC
V
L
R
L
R
V
L
R
PC AUDIO
(
(
PC IN
D-SUB
(
(
Pb Y
Pr
L
R
JVC
VIDEO-1
RLV
Pr Pb Y
VIDEO-1
RLV
Pr Pb Y
JVC
(L) (R)
HDMI-1 HDMI-3HDMI-2
DIGITALVIDEO/AUDIO
You can connect many different devices to the rear panel of the TV.
Please read the user manuals of each device before setup.
(Connecting cables are not supplied with this TV.)
Component input
Game
consoles
Video
camera
PC
VIDEO-1 Watching videos
Output Input
Composite signal /•
Component signal
(P. 24)
Sound L / R•
Use Component signal•
"Video - 1 Setting" (P. 20)
VIDEO-2 Watching videos
Output Input
Composite signal•
Sound L / R•
HDMI-1
HDMI-2
Connecting HDMI devices
HDMI-3
Output Input
HDMI signal (P. 24)•
"HDMI Setting" (P. 20)•
HDMI-2 and HDMI-3 inputs do not•
support analogue sound.
Connect a "DVI" device to•
"HDMI-1" (P. 20)
Please use a High Speed HDMI• TM
Cable. High Speed HDMITM Cables
are tested to carry an HD signal up
to 1080p and higher.
OUTPUT
Subwoofer and sound signal of a
TV channel you are viewing outputs
from this terminal
Output
Subwoofer signal•
Sound L / R•
Composite input
Game Video
VCR
PC input line in
HDMITM Connector.
DVD Player
Amplifier
Subwoofer
(not provided)
DVD player
(HDMI compatible)
Microphone
DVD player
(HDMI compatible)
HD Video camera
Set up and connections (continued)
To "HDMI-1" To "HDMI-3"
To "HDMI-2"
Check for PC compatibility.•
"PC signals that can be displayed" (P. 21)•
To Video-2
GGT0359-001A-H-EN.indd 5GGT0359-001A-H-EN.indd 5 19/07/2010 14:08:2619/07/2010 14:08:26

6
OK
OK
OK
OK
OK
OK
1. Select
2. Set
OK
1. Select
2. Set
OK
1. Select
2. Set
OK
Select
1
MENU
> Edit
PR ID CH/CC
01 CH 02
02 CH 03
03 CH 07
04 CH 76
05 CH 12
06 CH 09
07 CH 05
08 CH 02
09 CH 15
10 CH 28
Set Up > Channel Summary
CH/CC ID Skip
CH 02
CH 03
CH 04
CH 05
CH 06
CH 07
CH 08
CH 09
CH 10
CH 11
Set Up
Set Up
>> Auto Program
50%
CH 40
Set Up
> Teletext Language
Group-1
Group-2
Group-3
Group-4
Group-5
Group-6
Set Up
> Auto Program
Air
Cable
Set Up
> Country Area
Area - 1
Area - 2
> Language
English Укрaїнcькa
Castellano
Français Melayu
Pуccкий
Português
Tiếng Việt
Set Up
Set Up
> Auto Program
50%
CH 40
If you want to edit channel, see•
"Registering / Editing channels" (P. 7)
If you want to set undesired channels
•
to be skiped, see "Channel Summary"
(P. 8)
See "Language group for Teletext" (P. 21).•
Initial Settings
Show only when powering on for the first time.•
The power on the unit can also be used.•
The select the new Country Area after Initial Setting has completed.•
Area-1 : Asia, Middle East, Europe, Oceania, Africa
Area-2 : South America, Philippines
(While the cursor is pointing to Picture menu and hold
for 3 seconds.)
1Turn on the TV.
4Select the Teletext language group. 4Select Air or Cable.
2Select a language. 3Select Country Area.
5Automatically register channels (Auto Program). 5Searching for the channels (Auto Program).
6Check what was registered. 6Check what was registered.
JVC logo appears
If you select Country Area to "Area-1" If you select Country Area to "Area-2"
GGT0359-001A-H-EN.indd 6GGT0359-001A-H-EN.indd 6 19/07/2010 14:08:4219/07/2010 14:08:42

7
(Red)
(Green)
(Blue)
OK
1. Select the character
3. Set
2. Move to the next
column
> Edit
PR ID CH/CC
01 CH 02
02 CH 03
03 CH 07
04 CH 76
05 CH 12
06 CH 09
07 CH 05
08 CH 02
09 CH 15
10 CH 28
Set Up
> Edit
PR ID CH/CC
01 CH 02
02 CH 03
03 CH 07
04 CH 76
05 CH 12
06 CH 09
07 CH 05
08 CH 02
09 CH 15
10 CH 28
Set Up
> Edit
PR ID CH/CC
01 CH 02
02 CH 03
03 A CH 07
04 ABCDEF CH 76
05 CH 12
06 CH 09
07 CH 05
08 CH 02
09 CH 15
10 CH 28
Set Up
> Edit
PR ID CH/CC
01 CH 02
02 CH 03
03 CH **
04 ABCDEF CH 76
05 CH 12
06 CH 09
07 CH 05
08 CH 02
09 CH 15
10 CH 28
Set Up
> Manual
PR ID CH/CC
01 CH 02
02 CH 03
03 BBCABC CH 07 (B/G)
04 ABCDEF CH 76
05 CH 12
06 CH 09
07 CH 05
08 CH 02
09 CH 15
10 CH 28
Setup
OK
Select a channel
OK
1. Select a
CH/CC
OK
Finish
OK
1. Start
2. Move
OK
2. Set
2. Enter a
number 0-9
button then,
receives the
broadcast
signal.
This function is available when select Country Area to "Area-1" only.
You can edit the channel list or register new channel manually.
Channel fine tunning
• (Yellow) / (Blue)
If the picture or sound is unnatural• for select a system.
From high
frequencies
From low
frequencies
Insert / Delete
Manual
ID Edit a channel name
Insert / Delete a channel
Register a new channel
Move Move a channel position.
Delete a channel by press
• (Yellow) button.
1. Beginning channel search
"CH/CC List" (P. 23)•
Registering / Editing channels
(Red) (Green)
or
GGT0359-001A-H-EN.indd 7GGT0359-001A-H-EN.indd 7 19/07/2010 14:08:5419/07/2010 14:08:54

8
(Red)
(Green)
(Yellow)
OK
1. Select the character
3. Set
2. Move to the next column
OK
Select a channel
> Channel Summary
CH/CC ID Skip
CH 02 Yes
CH 03 Yes
CH 04 Yes
CH 05 Yes
CH 06 Yes
CH 07 Yes
CH 08 Yes
CH 09 Yes
CH 10 Yes
CH 11 Yes
Set Up
> Channel Summary
CH/CC ID Skip
CH 02
CH 03
CH 04
CH 05
CH 06
CH 07
CH 08
CH 09
CH 10
CH 11
Set Up
> Channel Summary
CH/CC ID Skip
CH 02
CH 03
CH 04 Yes
CH 05 Yes
CH 06 Yes
CH 07 Yes
CH 08 Yes
CH 09 Yes
CH 10 Yes
CH 11 Yes
Set Up
> Channel Summary
CH/CC ID Skip
CH 02 _ _ _ _ _ _
CH 03 _ _ _ _ _ _
CH 04 _ _ _ _ _ _ Ye s
CH 05 _ _ _ _ _ _ Ye s
CH 06 _ _ _ _ _ _ Ye s
CH 07 _ _ _ _ _ _ Ye s
CH 08 _ _ _ _ _ _ Ye s
CH 09 _ _ _ _ _ _ Ye s
CH 10 _ _ _ _ _ _ Ye s
CH 11 _ _ _ _ _ _ Ye s
Set Up
This function is available when select Country Area to "Area-2" only.
You can edit the channel list.
Skip
Cancel
ID
Skip the channel.
Cancel the skip channel.
Edit a channel name.
Channel Summary
Channels are to be skipped cannot be selected by the•
CHANNEL -/+ button.
The skip can be set to all channels of Air (CH02 - CH69)•
and Cable (CC01 - CC125)
GGT0359-001A-H-EN.indd 8GGT0359-001A-H-EN.indd 8 19/07/2010 14:09:0619/07/2010 14:09:06

9
Operating the menus
You can select the Country Area between Area-1 and Area-2. See in item 3 of "Initial setting" (P. 6)
See the menus location in the below table.
Set Country Area to "Area-1"
Top Menu 2nd Menu Page
Picture Picture Mode 10
Backlight 10
Contrast 10
Brightness 10
Sharpness 10
Colour 10
Tint 10
White Balance 10
Features 11
Sound Stereo / I▪II 12
--
Sound Meister 12
Treble 12
Bass 12
Surround 12
Balance 12
Voice Enhancer 12
AI Volume 12
Subwoofer Out 13
Subwoofer Level 13
Karaoke 13
Features On Timer 14
Sleep Timer 14
Calendar 14
Channel Guard 14
Blue Back 15
Child Lock 15
Auto Shutoff 15
Favorite Setting 15
Power Lamp 15
Eco Sensor 15
Set Up Auto Program 6
Edit / Manual 7
--
Language 6
Video-1 Setting 20
Rocket Start 15
Teletext Language 6
HDMI Setting 20
PC Setting 20
-
Set Country Area to "Area-2"
Top Menu 2nd Menu Page
Picture Picture Mode 10
Backlight 10
Picture 10
Brightness 10
Detail 10
Color 10
Tint 10
White Balance 10
Features 11
Sound --
MTS 12
Sound Meister 12
Treble 12
Bass 12
Surround 12
Balance 12
Voice Enhancer 12
AI Volume 12
Subwoofer Out 13
Subwoofer Level 13
Karaoke 13
Features On Timer 14
Sleep Timer 14
Calendar 14
Channel Guard 14
Blue Back 15
Child Lock 15
Auto Shutoff 15
Favorite Setting 15
Power Lamp 15
Eco Sensor 15
Set Up Auto Program 6
--
Channel Summary 7
Language 6
Video-1 Setting 20
Rocket Start 15
--
HDMI Setting 20
PC Setting 20
Closed Caption 19
GGT0359-001A-H-EN.indd 9GGT0359-001A-H-EN.indd 9 19/07/2010 14:09:1219/07/2010 14:09:12

10
MENU
OK
1. Select
3. Finish
2. Adjust
OK
1. Select
2. Enter
OK
Enter
Picture Mode Bright
Backlight
Contrast
Brightness
Sharpness
Colour
Tint
White Balance Warm
Features f
Picture
Picture Mode eBright f
Backlight
Contrast
Brightness
Sharpness
Colour
Tint
White Balance Warm
Features f
Picture
Picture Mode
You can select a preset picture setting according to your favour.
Bright : Hightens contrast and sharpness.
Game Mode : Adjust sharpness of the picture when play the game.
Soft : Softens contrast and sharpness.
Standard : Standardize picture adjustment.
Backlight You can change the backlight brightness.
Darker ↔Brighter
Contrast You can change the contrast of the picture.
Lower ↔Higher
Brightness You can change the brightness of the picture.
Darker ↔Brighter
Sharpness You can change the sharpness of the picture.
Softer ↔Sharper
Colour You can change the colour of the picture.
Lighter ↔Deeper
Tint You can change tint only in NTSC.
Reddish ↔Greenish
White Balance
You can change the white balance of the picture to better match the type of video being view.
Mid : Normal white colour.
Cool : Bluish white colour.
Warm : Reddish white colour.
Picture setting
1. Display "Picture" menu 2. Select item and setting or adjust To enter an items menu•
GGT0359-001A-H-EN.indd 10GGT0359-001A-H-EN.indd 10 19/07/2010 14:09:1319/07/2010 14:09:13

11
16 : 9
Panoramic
4 : 3
Regular/Slim
14 : 9
14:9 Zoom
Picture
> Features
Clear SD eOff f
Digital VNR Off
DigiPure Off
Pull Down Off
Colour Management Off
Picture Management Off
Smart Picture Off
Dynamic Backlight Off
MPEG Noise Reduction Off
Colour System f
Zoom f
Picture
>> Zoom
Auto ePanoramic f
Regular
Panoramic
14 : 9 Zoom
16 : 9 Zoom
16 : 9 Zoom Subtitle
Full
Features
When 720p or 1080i or 1080p signal is•
received, "Full", "Slim" and "Panoramic Zoom"
can be selected.
In PC mode, "Regular" and "Full" can be•
selected.
Finer Picture adjustment
Picture setting (continued)
Clear SD For clearly picture (Off / Mode-1 / Mode-2):
When Clear SD set to Mode-1 or Mode-2, then Digital VNR, DigiPure, Picture Management and
MPEG Noise Reduction cannot operate.
Digital VNR Reduce the amount of noise in original picture. (Off / On):
DigiPure For natural - looking outlines (Off / On):
Pull Down For smooth cinema film (Auto / Off / On):
Colour Management For natural - looking pictures (Off / On):
Picture Management Fix bright / dark pictures. (Off / On):
Smart Picture Make it easier to view white areas (Off / On):
Dynamic Backlight Reduce the brightness of the backlight when the screen is dark. (Off / On):
MPEG Noise Reduction
Reduce MPEG video noise. (Off / On):
Colour System
When there is no colour, change the colour system.
:
( Area-1 : PAL / SECAM / NTSC 3.58 / NTSC 4.43 / Auto, Area-2 : PAL-M / PAL-N / NTSC / Auto )
:
Zoom Change the aspect ratio.:
GGT0359-001A-H-EN.indd 11GGT0359-001A-H-EN.indd 11 19/07/2010 14:09:1619/07/2010 14:09:16

12
MENU
OK
Enter
OK
1. Select
2. Adjust
Stereo / I▪II O Mono
Sound Meister Dynamic
Treble
Bass
Surround
Balance
Voice Enhancer Off
AI Volume On
Subwoofer Out Off
Subwoofer Level
Karaoke f
Sound
MTS Stereo SAP Mono
On Air
Sound Meister Dynamic
Treble
Bass
Surround
Balance
Voice Enhancer Off
AI Volume On
Subwoofer Out Off
Subwoofer Level
Karaoke f
Sound
Stereo / I▪II e
III Mono
f
Sound Meister Dynamic
Treble
Bass
Surround
Balance
Voice Enhancer Off
AI Volume On
Subwoofer Out Off
Subwoofer Level
Karaoke f
Sound
Stereo/I■II Select the broadcast sound stereo, mono or bilingual language.
( : Mono / : Stereo / I: SUB1 / II : SUB2 / Mono)
MTS Select the stereo and SAP broadcasted programs.
(Stereo : Stereo sound / SAP : Second Audio Programs / Mono : mono sound)
Sound Meister Ambience (Off / Dynamic / Pure / Living)
Treble Compensates high frequencies to widen the frequency band. (Weaker ↔Stronger)
Bass Compensates low frequencies to widen the frequency band. (Weaker ↔Stronger)
Surround Expands the stereo sound naturally. (Narrow ↔Wide)
Balance Speaker balance (Left Stronger ↔Right Stronger)
Voice Enhancer Sound enhancement technology. (Off / On)
Al Volume Prevent sudden increase or decrease of sound when changing channels. (Off / On)
1. Display "Sound" menu. 2. Select item and setting or adjust.
Set Country Area to "Area-1"
• Set Country Area to "Area-2"•
Sound setting
GGT0359-001A-H-EN.indd 12GGT0359-001A-H-EN.indd 12 19/07/2010 14:09:2019/07/2010 14:09:20

13
KARAOKE
Karaoke
Karaoke eOff f
Main Volume
Microphone Volume
Subwoofer Out Chooses to connect subwoofer. (Off / On)
Subwoofer to be used must have a built-in amplifier.•
Subwoofer Level Adjusts sound level of your subwoofer. (Lower ↔Louder)
When Subwoofer Out set to On, you can adjust Subwoofer Level.
•
Karaoke
You can enjoy to reduce the vocals for your own karaoke.
Karaoke Chooses to reduce the vocals.
Off : Normal sound of song
Mode-1 : Only sound of music
Mode-2 : To sing, accompanying with sound of song.
Karaoke function works only for stereo sound system.
•
If using Karaoke disc, users must choose to remove the vocals from the player.•
Main Volume Adjusts volume level. (Lower ↔Louder)
Microphone Volume Adjusts volume level of microphone. (Lower ↔Louder)
Microphone Volume is available when plug in microphone.
•
Microphone to be used with the "• Karaoke" function of JVC must be of "HIGH GRADE LOW NOISE MICROPHONE
CABLE" type; otherwise, noise will result.
Sound setting (continued)
GGT0359-001A-H-EN.indd 13GGT0359-001A-H-EN.indd 13 19/07/2010 14:09:2419/07/2010 14:09:24

14
MENU
OK
1. Select
3. Finish
2. Adjust
OK
1. Select
2. Enter
OK
Enter
13
2
46
5
79
8
0
2. Select item
13
2
46
5
79
8
0
0
OK
1. Select a
number
3. Enter
2. To the next
column
(Blue)
OK
1. Select a
channel
OK
1. Adjust
2. Set
OK
Select PR channel
OK
2. Set
1. Select a time in
minutes
OK
3. Set
OK
1. Select "On
Timer"
OK
2. Set
On Timer f
Sleep Timer f
Calendar f
Channel Guard
Blue Back Off
Child Lock Off
Auto Shutoff Off
Favourite Setting f
Power Lamp On
Eco Sensor On
Features
On Timer f
Sleep Timer f
Calendar f
Channel Guard
Blue Back Off
Child Lock Off
Auto Shutoff Off
Favourite Setting f
Power Lamp On
Eco Sensor On
Features
1. Select item
> On Timer
PR e01 f
On Timer 00 : 00
Features
> Calendar
Calendar eOn f
Date / Time f
Position f
Features
> Set ID No.
Features
00 0 0
>> Channel Guard
PR ID CH/CC
01 SAT CH 02
02 GAME CH 03
03 BCC CH 07
04 IEEE CH 76
05 APL CH 12
06 DANY CH 09
07 CH 05
08 CH 02
09 CH 15
10 CH 28
Features
>> Date / Time
Time e8:08 f
Date 18/08/10
Features
0
Lock / Release
Jan 2010
09 : 12
Su Mo Tu We Th Fr Sa
14
567891011
12 13 14 15 16 17 18
19 20 21 22 23 24 25
26 27 28 29 30 31
> Sleep Timer
Features
Off
1200
On Timer
TV to turn on
automatically from
standby mode at
a set channel and
time.
Sleep Timer
TV to turn off
automatically to
standby mode after
a set time.
Calendar
Watch calendar,
date and time on
screen LCD TV.
Channel Guard
Stop children from
watching specific
channels.
1. Select PR channel that you want to watch. 2. Set the On time to your desired period at time.
Useful functions
• To enter an items menu
1. Display "Features" menu. 2. Select item and setting or adjust.
View a locked channel by use the numerical buttons to enter the channel number. When
• appears, press "DISPLAY"
button and enter your "ID No."
1. Select "Calendar" to On.
Note : Press
(Blue)
for reset time setting.
2. Set "Time" and "Date". 3. Set "Position" for adjust screen position.
Note : When the remaining elapse is one minute,
"Good Night!" appears on the screen.
Note : After unplugging the TV,
this function will be reset.
1. Select "Channel Guard". 2. Select a channel and lock it ( : locked ).
GGT0359-001A-H-EN.indd 14GGT0359-001A-H-EN.indd 14 19/07/2010 14:09:2519/07/2010 14:09:25

15
(Blue)
To Delete
OK
> Favourite Setting
1PR 32
2PR 05
3PR 07
4PR 09
Features
> Favourite Setting
1PR 01
2
3PR 02
4
Features
OK
1. Select
Blue Back Display a blue screen and mute the sound when the signal is weak or absent. (Off / On)
Child Lock Disables the side control buttons of the TV. (Off / On)
Auto Shutoff Set the power to turn off if no signal is received and no operation is performed for about 15 minute. (Off / On)
Favourite Setting Delete the favourite channel that you registered.
Power Lamp Power lamp lights while the TV is on. (Off / On) (P. 4)
Eco Sensor Automatically adjusts the picture contrast according to the brightness of your room to reduce power consumption.
Off : Deactivates the function
On : Activates the function.
Demo : Display the effect of the "Eco Sensor" on the screen.
MAX-Eco : Only sound is available, no picture (this is to save energy in such situation as when you want to listen to the
news while doing other house works at the same time).
After choosing Eco Sensor as Max-Eco, picture will go off in 3 seconds.
-
When you want the picture to appear again, press any button on the remote control then function will be-
reset back to "Off".
After unplugging the TV or press "Power off" button, this function will be reset back to "Off"-
Rocket Start TV can turn on quickly. ( Off / On )
When Rocket Start is On, power consumption at standby mode will more than normal standby mode.
Freeze
Take snapshots of the screen.
"Set up" Menu
Useful functions (continued)
You cannot save or export the snapshot.•
Freeze function is not available for HDMI, PC•
and Component signal.
■Cancel
Press " OK " again, or change the channel.
still picture
Freeze
GGT0359-001A-H-EN.indd 15GGT0359-001A-H-EN.indd 15 19/07/2010 14:09:3919/07/2010 14:09:39

16
TV/VIDEO
AV Select
011
1 SD / USB
2 HDMI I 1
3 HDMI I 2
4 HDMI I 3
5 Video - 1
6 Video - 2
7PC
OK
2. Set
1. Select
Home
SD/MMC USB SETTINGS
OK
2. Set
1. Select
Multi Media Input
1Insert an SD card / USB device into the SD card slot / USB terminal
on the side of the TV.
TV will auto detect and display signals in accordance with Article 3
automatically.
3Select "SD/MMC" or "USB"
2When you change the channel to see other signals. You want to view
files from USB or SD card again, you have to set the input to "1 SD /
USB".
Allows you to enjoy pictures, musics, movies and text files stored on your USB device or SD card you have connected to the terminal of the TV.
Cautions
Insert or remove SD cards and USB devices gently and in the right direction.
-
Otherwise, the devices or the TV may be damaged.
It is recommended to keep a backup of your files.
-
Do not connect a mouse, keyboard or the like.-
Do not use a USB hub or extension cable.-
Slide the SD card into the slot until it clicks into place.-
To remove the SD card, push it in until it clicks and then pull it out-
If you want to setting, select "SETTINGS"
Slideshow duration Select how long each picture is displayed for
during slide shows. (3S / 5S / 15S / 1mins /
15mins / 1hour )
Slideshow mode Select the format for displaying pictures in
slide show mode. (off / Bottom To Top / Top
To Bottom / Left To Right / Right To Left / Door
Close / Door Open / Hori Cross / Verti Cross /
Random / Fading)
Music repeat mode Select Repeat to play musics. (Repeat All /
Repeat One)
Movie repeat mode Select Repeat to play movies. (Repeat All /
Repeat One)
Default Return to the default.
The icon device in Home menu will be displayed according to the
device you have connected (SD/MMC or USB).
SD card
USB device
Side Panel
GGT0359-001A-H-EN.indd 16GGT0359-001A-H-EN.indd 16 19/07/2010 14:09:4219/07/2010 14:09:42

17
SELECT MEDIA
PHOTO MUSIC MOVIE TEXT FILE
OK
2. Set
1. Select
PHOTO
C:/
228086.jpg
MUSIC
D:/VIDEO_TS/
I love you.wma Title :
Artist :
Album :
Year :
Miss you.wav
Lot of love.mp3
0322
Multi Media Input (continued)
4
5.1 PHOTO
Some files may be displayed with bands around the edges.
-
To see the next / previous file, press- / .
To exit the full-screen display and show the folder index, press
-
.
The thumbnails of some files may not be shown.-
This TV can only display file names as alphabetical letters.-
Photographs with large file-sizes may take a while to be displayed.-
This TV can not play some files. Including files that are changed-
on the PC, even a file format is compatible. Depending on the
specifications of the file.
To listen to music during a slideshow, press- .
(Music file must exist in your USB or SD card)
If the image displayed within more than one full screen. Arrows are-
shown at the bottom of the screen to choose to display the next /
previous screen.
Press
- to display the control operation bar, select left or right
button for choose operations, then press .
MOVIE file ; Supported up to 720 x 576 x 24 or 800 x 600 x 30
-
compressed video resolution (SD mode)
Select a photograph to display, and press or . The selected
photograph is displayed full-screen.
PHOTO View picture from your USB device or SD card.
MUSIC Listen music from your USB device or SD card.
MOVIE Watch movie from your USB device or SD card.
TEXT View (*.txt) file from your USB device or SD card.
FILE Copy or delete your files in USB device or SD card.
SD card and USB can support files as
PHOTO : JPEG, PNG, BMP, GIF
MUSIC : MP3, WMA, WAV
MOVIE : MPEG1, MPEG2, MPEG4, RMVB
TEXT : Text
SSelect audio language in MOVIE
Play music while viewing PHOTO
Select previous /
next chapter
Rewind Stop
Play / Pause Zoom
Forward Menu bar to
control playback.
Rotate photo 90º
Buttons for Multi Media
5.2 MUSIC
Once the music is selected, It will be run automatically. The detail of-
that song will be shown inside the frame on the right. After finish that
song, the next will be played accordingly.
To play or pause the song, just press- or .
To control the sound volume, just use VOL +/- button or press
- to
silent mode.
Press
- or to stop the music.
To show the files in a folder, press- on the folder.
GGT0359-001A-H-EN.indd 17GGT0359-001A-H-EN.indd 17 19/07/2010 14:09:5619/07/2010 14:09:56

18
TEXT
D:/
DCIM File name : DCIM
JVC demo File type : Folder
New Folder (2)
FILE
D:/
DCIM File name : DCIM
JVC demo File type : Folder
New Folder (2)
MOVIE
D:/VIDEO_TS/
Abc File name : Abc
Xyz File size : 229MB
Pop File type : Div
Copy >
C: JOHN / NEW / DP
D: MARY
Delete >
FILE
D:/VIDEO_TS/
I love you.wma
FILE
I love you.wma
Copy >
Delete >
D:/VIDEO_TS/
FILE
D:/VIDEO_TS/
I love you.wma
5.3 MOVIE
5.4 TEXT
5.5 FILE
Copy (file)
When the movie file is selected the highlight bar, the detail of that
-
movie will be shown inside the frame on the right.
To play or pause the movie, press- or .
To control the sound volume, use the VOL +/- button or press-
to silent mode.
Press- to enlarge the picture with double, 4 times, 8 times and
16 times.
Press- to select audio language (if your file have many audio
languages)
Press
- to display the control operation bar, select left or right
button for choose operations, then press .
To show the file in a folder, press
- on the folder.
Use Up / Down button to move the highlight bar to the file to be-
opened, then, press to open.
Press
- or button to exit from the Text which being run and
back to the Text list.
To show the file in a folder, press
- on the folder.
Use Up / Down button to move the highlight bar.-
Press right arrow button or- , you can enter into the file you
chose.
Press the left arrow button, you can exit and back to previous-
status.
1. Move the highlight bar to the file
that you want to copy.
2. Press right arrow button, then
a remark will be showed on the
right of the file you selected.
3. To make another copy, just repeat
the step of No.2.
4. After file is selected, press .
Then, indication of [Copy] and
[Delete] to be seen.
Multi Media Input (continued)
5. Select [Copy] then press ,
you will enter to the next stage.
Select the drive C: or D: that
you want to copy the files stored.
Press right arrow button for copy
selection to inside folder.
6. After selection, press to start
the process when finished press
again.
1. Move the highlight bar to the file
you want to delete.
2. Press right arrow button, then
a remark will be showed on the
right of the file you selected.
3. To make another delete, just
repeat the step of No.2.
4. After file is selected, press .
Then, indication of [Copy] and
[Delete] to be seen.
5. Select [Delete] then press ,
you will enter to the next stage.
6. Select [ √] to Delete. (If you want
to cancel delete select [ X ] )
7. Press when finished press
again, The file that you delete is
disappear.
About SD cards and USB
devices.
When using miniSD cards or
-
microSD cards, put them in
an appropriate adapter before
inserting them into the TV.
Not all SD cards or USB devices-
are guaranteed to work on this TV.
Delete (file)
GGT0359-001A-H-EN.indd 18GGT0359-001A-H-EN.indd 18 19/07/2010 14:09:5819/07/2010 14:09:58

19
MENU
OK
1. Select item
3. Set
2. Setting
OK
Enter
OK
1. Select
2. Enter
> Closed Caption
Closed Caption Off
Caption eCC1 f
Text T1
Set Up
TEXT---
TEXT---
TEXT---
TEXT---
When watching TV TV TEXT TEXT
Auto Program f
Channel Summary f
Language f
Video-1 Setting Component
Rocket Sart On
HDMI Setting f
PC Setting f
Closed Caption f
Set Up
Auto Program f
Channel Summary f
Language f
Video-1 Setting Component
Rocket Sart On
HDMI Setting f
PC Setting f
Closed Caption f
Set Up
List Mode
Bookmark your favourite page.
to bookmark
Press number
button for enter the
number of page.
Save
(Red) (Green) (Yellow) (Blue)
MODE
Recall your favourite page by press the colour button.
•
Hold Hold the current page.
Cancel by press this button again.•
Reveal Display hidden information.
Example : answer to a quiz, etc.•
Size Double the size of the displayed text.
Index Returns to page "100" or a previously
designated page.
Cancel
Leave the current page open, while you
switch to watch TV.
Useful when running a page search.•
Sub-page Display the number of Sub-page.
Cancel by press this button again.•
Closed Caption : Select to view close caption or text information.
(Off / CC / Text)
Caption : Select the desired caption.
(CC1 / CC2 / CC3 / CC4)
Text : Select the desired text channel.
(T1 / T2 / T3 / T4)
2. Select "Closed Caption"
1. Select "Set Up".
3. Select the desired caption or text channel.
Viewing Teletext Viewing Closed Caption
This function is available when select Country Area to "Area-1" only.
This TV can display TV broadcasts and Teletext on the same channel in
two windows.
1.
2.Select a Teletext page by press number button (0-9).
• Move up or down a page by
CH
.
GGT0359-001A-H-EN.indd 19GGT0359-001A-H-EN.indd 19 19/07/2010 14:09:5919/07/2010 14:09:59

20
TV/VIDEO
MENU
AV Select
011
1 SD / USB
2 HDMI I 1
3 HDMI I 2
4 HDMI I 3
5 Video - 1
6 Video - 2
7PC
OK
1. Select
2. Set
OK
Enter
Auto Program f
Edit / Manual f
Language f
Video-1 Setting Component
Rocket Sart On
Teletext Language f
HDMI Setting f
PC Setting
Set Up
Select the input Source.
Operate the connected device and play video.
•
1. Select "Set Up".
2. Select item.
Watching Video or DVDs
Auto Program f
Edit / Manual f
Language f
Video-1 Setting Component
Rocket Sart On
Teletext Language f
HDMI Setting f
PC Setting
Set Up
OK
1. Select item
3. Set
2. Setting or Adjust
Video - 1 Setting Switch between video and component signal.
(Video / Component)
HDMI Setting Setting for HDMI input
> HDMI Setting
HDMI-1
Size eAuto f
Aduio Digital
Mode 1
HDMI-2
Size Auto
Mode 1
HDMI-3
Size Auto
Mode 1
Set Up
Size Normally set to "Auto." If wrong:
screen size appears in 480p (525p),
change to "1" or "2".
Audio Normally set to "Auto." If no sound,:
change to "Analogue" or "Digital.
Mode If no picture, change to "1" or "2".:
PC Setting Setting for PC input
> PC Setting
PC Position f
Phase
Pixel
Set Up
OK
1. Adjust
2. Set
OK
1. Select PC Position
2. Enter
PC Position : Adjust screen position.
Phase : Sets the focus of screen.
Pixel : Adjusts the horizontal feature of screen.
Connect "DVI" devices
What is "Full Native" ?
Full Full Native
Connect a "DVI" device to "HDMI" using "DVI-HDMI" conversion cable.
Connect analogue sound output of the DVI device to L and R terminals in
HDMI-1.
Set "Audio" in "HDMI Setting" to "Analogue" or "Auto".•
HDMI-2 and HDMI-3 input does not support analogue sound (IN HDMI-1).
•
HDMI-2 and HDMI-3 input does not support DVI devices.•
With the full HD LCD display and "Full Native", you can enjoy full native•
HD resolution of 1920 x 1080. It exposes flaws in the video that were
hidden when viewing on "Full".
The illustrations are emphasised to make clear differences between
•
"Full" and "Full Native".
Dark bar or noise may appear at the edges of the screen when viewing•
in "Full native" for some videos. This is resulted from the signal itself, not
due to TV malfunction.
Technical information
GGT0359-001A-H-EN.indd 20GGT0359-001A-H-EN.indd 20 19/07/2010 14:10:0819/07/2010 14:10:08
This manual suits for next models
1
Table of contents
Other JVC Flat Panel TV manuals

JVC
JVC LT-37DM6ZJ User manual

JVC
JVC 0706TNH-II-IM User manual

JVC
JVC LT-42E10 User manual

JVC
JVC 0705TNH-II-IM User manual

JVC
JVC LT-26A80SU User manual

JVC
JVC 0310SCT-NF-MT User manual

JVC
JVC LT-26DF7BK User manual

JVC
JVC LT-37DR7BJ User manual

JVC
JVC LT-42R10BU/PP User manual

JVC
JVC InteriArt LT-26A61BU User manual

JVC
JVC 0505TNH-II-IM User manual

JVC
JVC 0903-TN-II-VP User manual

JVC
JVC GGT0356-001A-H User manual

JVC
JVC LT-17X475 User manual

JVC
JVC LT-37X898 User manual

JVC
JVC InteriArt LT-26A60BU User manual

JVC
JVC 0805TNH-II-IM User manual

JVC
JVC DynaPix LT-37DM7BU User manual

JVC
JVC LT-26DF7BC User manual

JVC
JVC LT-32A1 User manual