JVC Super LoLux HD VN-H157WPU User manual

HD IP CAMERA
VN-H37U VN-H137U
VN-H137BU VN-H237U
VN-H237BU VN-H237VPU
VN-H57U VN-H257U
VN-H257VPBU VN-H157WPU
Contents
Precautions for using SD cards .................................................................................... 2
SD Cards...................................................................................................................... 3
zInserting and removing an SD card.......................................................................... 3
zSD cards usable with this camera ............................................................................ 4
Built-in Viewer Screen Configuration ............................................................................ 5
Basic Setting2 Page ..................................................................................................... 6
SD Card Record Page.................................................................................................. 8
SD Card Playback Screen.......................................................................................... 15
zVideo control menu ................................................................................................ 18
Approximate SD Card Recording Times..................................................................... 19
zRecording time table .............................................................................................. 19
SD Card Recoding Error Indicator.............................................................................. 19
Additional Cautions..................................................................................................... 20
zCautions for setting the detection function ............................................................. 20
zCautions for changing the encoding setting ........................................................... 20
Troubleshooting.......................................................................................................... 20
LST1392-001B
Instructions
(SD Card Function Settings)

2
This manual details the SD card recording and playback functions.
Windows and Internet Explorer are registered trademarks of Microsoft Corporation in the United States and
other countries.
Regarding the notation of product names
In the main text, product names are written without suffixes like B or C.
Precautions for using SD cards
zDo not insert anything into the camera.
•If anything other than an SD card is inserted into the SD card slot, it may cause a fire, electrical shock or
failure of the unit.
zBefore turning the camera off or removing the SD card, be sure to set the SD card setting to [Disable].
()Page 9)
If you turn the camera off or remove the SD card while data is being written to the SD card, data stored on
the SD card becomes corrupt.
zIf the data in an SD card becomes corrupt, it will be automatically repaired when the camera starts up. This
repair function enables the card to be written to again; it does not repair corrupted video data.
zIf recording is still not possible after a data repair operation, the data has been damaged excessively.
Format the SD card again. In such a case, the recorded data becomes unplayable.
zDo not use or store SD cards in a place where they may be affected by static electricity or electrical noise.
zInsert the SD card in the correct direction. If you insert the SD card in the incorrect orientation, the camera
or the card may be damaged. ()Page 3)
zOur company will not be liable for damages arising out of data loss due to an unexpected accident. (Please
save your data.) ()Page 17 “Export menu”)
zUse this unit under the stated conditions of use. Do not use this unit in the following locations.
A location exposed to direct sunlight, near a heated appliance, inside a closed car in a sunny environment,
in a humid place, or a corrosive environment, etc.
zDo not bend or drop this unit, and do not subject this unit to strong impact or vibration.
zDo not moisten this unit with water.
zDo not touch the card connectors.
zIf you format or delete data using the camera's functions, only the file management information is changed.
The data is not erased completely. If you wish to completely delete the data, use commercially available
data erasing software or physically destroy the SD card using a hammer or other device.
zIf the SD card degrades, you may be unable to write to it. By reformatting the SD card, you may be able to
continue using it temporarily.
zDo not disassemble or modify the SD card.
zDo not let dust, dirt, liquid, or other foreign objects come into contact with the connectors.
zDo not peel the label off of the SD card, or attach any other label or sticker to the SD card. This may result
in damage.
zDo not use a pencil or ballpoint pen when writing on the SD card. Be sure to use an oil-based pen.

3
SD Cards
This unit can record the images you shoot in an SD card (sold separately) inserted in the card slot.
z
Inserting and removing an SD card
If you insert the SD card in the incorrect direction, the camera or the card may be damaged. Always check
that the card has been inserted in the correct direction as shown in the illustration of the SD card slot.
Memo:
zIf the SD card's switch is set to “Lock”, recording and playback cannot be performed. Make sure there is no
critical data on the SD card before disengaging the lock.
When using VN-H257U/H237U/ H257VPU/H237VPU
Remove the dome cover and insert the SD card.
Insert the SD card into the slot until it clicks.
When using VN-H37U/H57U/H137U
Follow the steps below to insert an SD card.
1. Loosen the setscrew (1) by rotating it about 3 times, and then open the SD cover.
Note:
zRotating the setscrew 10 times or more may cause it to fall out.
①Lift the setscrew side of the SD cover slightly from the camera body.
※You can pull the setscrew up by its edge to keep it suspended.
②Slide the SD cover to the direction of the setscrew side.
③Lift and open the side with a slit of the SD cover from the camera body.
2. Insert the SD card into the slot until it clicks.
3. Close the SD cover, and retighten the setscrew.
SD mark
One (M1.4) setscrew
SD card slot SD card slot
①
②
③
SD card cove
r

4
When using VN-H157WPU
Follow the steps below to insert an SD card.
1. Loosen the screw at the bottom of the camera, and rotate the sunshade enough so that the SD card
can be inserted.
2. Perform insertion (or removal) of the SD card.
(If an SD card cover is attached, pull it off to remove it.)
Insert the SD card into the slot until it clicks.
3. Return the sunshade to its original position.
4. Fasten the screw after the adjustment.
Memo:
zIf the sunshade cannot be rotated because it is difficult to access, turn the camera before
performing this procedure. After finishing, return the camera to its original angle, verify the camera
image, and readjust settings if necessary.
z
SD cards usable with this camera
Use the following SD cards.
SDHC cards (4 to 32 GB) of Class 10 or above
Use SD cards with a guaranteed operation temperature of 85℃or higher.
The following SD cards are confirmed to function correctly with this camera:
•Panasonic : RP-SDW04GJ1K
•Toshiba : SD-FX004G
•SanDisk : SDSDX-004G-J95
zOperation of all SD cards that meet the above conditions is not guaranteed.
Memo:
zDo not leave the SD card cover, dome cover, or front cover open for a long period of time. Dust may enter
inside and cause malfunctions.
zMake sure to set [SD Card] on the [SD Card Record] page to [Disable] before removing an SD card or
turning off this camera. ()Page 9)
zWhen using an unsupported SD card, it can be set to record, but recording errors may occur.
zYou can easily remove the SD card by lightly pushing it inward to release the lock. The SD card may pop
out when you eject it. Exercise care not to lose it.
zSome SD cards on the market may be difficult to remove from the camera body. After the card has been
inserted and removed several times, it will be easier to remove.
zTurn off camera before inserting or changing the SD card.
SD card cover
SD card
(label side)
Sunshade rotation
setscrew
4
1
1・3
3

5
Built-in Viewer Screen Configuration
This camera includes a Built-in Viewer.
Start the Built-in Viewer by entering the IP address of the camera in the address bar of Internet Explorer.
You can access the SD card recording settings screen and SD card playback screen display from the Built-in
Viewer.
For operation steps not explained in this manual, refer to the "Instructions (Setting)" of the attached CD-ROM.
No. Item Description
① SD Card Move to the SD card playback screen. ()Page 15)
Memo:
zIf you log in with only user privileges, the [SD Card] button becomes
unselectable, and SD card playback cannot be performed.
② Details Move to the SD card recording settings screen. ()Page 8)
③ REC The REC icon is displayed while recording to an SD card.
①
③
②

6
Basic Setting2 Page
This page sets fundamental camera and encoding parameters.
This page is displayed by pressing the [Details] button in the Built-in Viewer.
Select the ④[Set in "SD Card Record" Page] and click [OK] to move to the SD card recording settings page
()Page 8).
This page can be used during access using "admin" or "operator".
Memo:
zIf you enter the following URL directly into the address bar of Internet Explorer, you can open the [Basic
Setting2] page without going through the Built-in Viewer.
http://192.168.0.2/cgi-bin/display.cgi?basicmenu2.html
When the camera IP address has been changed from the default settings, replace 192.168.0.2 with the
changed IP address.
zPress the [OK] button to enable the new settings.
zIf the [OK] button is pressed upon entering an invalid value, a warning message will appear and the entry
will be denied. Press the [Cancel] button to restore the invalid entry to the value before the change was
made.
z"H.264 High" indicates the H.264 High Profile standard.
Click [Basic Setting2].
①
②
③
④

7
No. Item Description
① Camera ID
② Scenefile
Refer to the "Instructions (Setting)" of the attached CD-ROM.
③ Lens Type Refer to the [Lens Type] description. ()"Instructions (Setting)" ─"Internet Explorer
Setting" ─"Advanced Settings" ─[Maintenance] Page) (VN-H37U/H57U only)
④ Encode Select the frame size for each screen of JPEG and H.264 from the following
seven patterns.
■Selectable distribution size
Set value Frame
Size
Frame
Rate
Commu-
nication
speed
Bit
rate
I Frame
Interval
1H.264 High
1920×1080 30 fps 1920x1080 30 fps 8 Mbps CBR 30 frames
2
H.264 High
1920x1080 5 fps
+ monitor output
1920x1080 5 fps 2 Mbps CBR 5 frames
3JPEG 1920x1080
+ monitor output 1920x1080 5 fps 200 KB AFS -
4 JPEG 1280x960 1280x960 5 fps 120 KB AFS -
5 JPEG 640x480 640x480 5 fps 30 KB AFS -
6Set in "SD Card Record"
Page Settings can be configured in the [SD Card Record] page.
7 Set in "Encoding" Page Multi-encoding and details can be set on [Encoding] page.
* The [Set values] in bold letters are factory defaults.

8
SD Card Record Page
This page sets SD card recording settings.
This is displayed when you press the [Details] button in the Built-in Viewer and click [SD Card Record], or
when you click [Set in "SD Card Record" Page] in the [Basic Setting2] page.
This page can be used during access using "admin" or "operator".
Memo:
zIf the ①[SD card] status is "Read only" or "No insert", nothing can be selected other than the [OK] button
or the [Cancel] button.
zWhen recording to FTP and you attempt to perform SD card recording settings, the display changes to a
dialog for interrupting FTP recording and starting SD card recording is displayed. When you press the [OK]
button, FTP recording stops and SD card recording starts.
zWhen recording to an SD card is enabled and you attempt to perform FTP recording settings, the dialog
"Set SD card recording to OFF." is displayed. Press the [OK] button, and set the SD card recording setting
③[Record] to "OFF".
Click [Advanced Settings] and [SD Card Record].
①
②
③
④
⑤
⑥

9
No. Item Description
① SD Card Sets whether or not to use the SD card.
[Set values :Use, Disable]
Check "Disable" and press the [OK] button to automatically set recording to OFF
and stop recording.
Check "Use" and press the [OK] button to enable all the SD card
recording-related check boxes.
Memo:
zVideo recorded to an SD card can be played via the SD card playback screen
that is displayed by clicking the [SD Card] button on the Built-in Viewer screen.
()Page 15)
zOnly H.264 video will be recorded to the SD card. Audio is not recorded.
zEncoding settings cannot be changed while recording to an SD card.
[Status :Disable, Use, Read only, No insert]
Disable :Displayed when "Disable" is selected.
Use :Displayed when "Use" is selected.
Read only :Displayed when the SD card's switch is set to "Lock". Remove the
SD card and disable the "Lock" in order to record and playback to
the SD card.
No insert :Displayed when the SD card is not inserted into the camera. Insert
an SD card.
* The [Set values] in bold letters are factory defaults.

10
No. Item Description
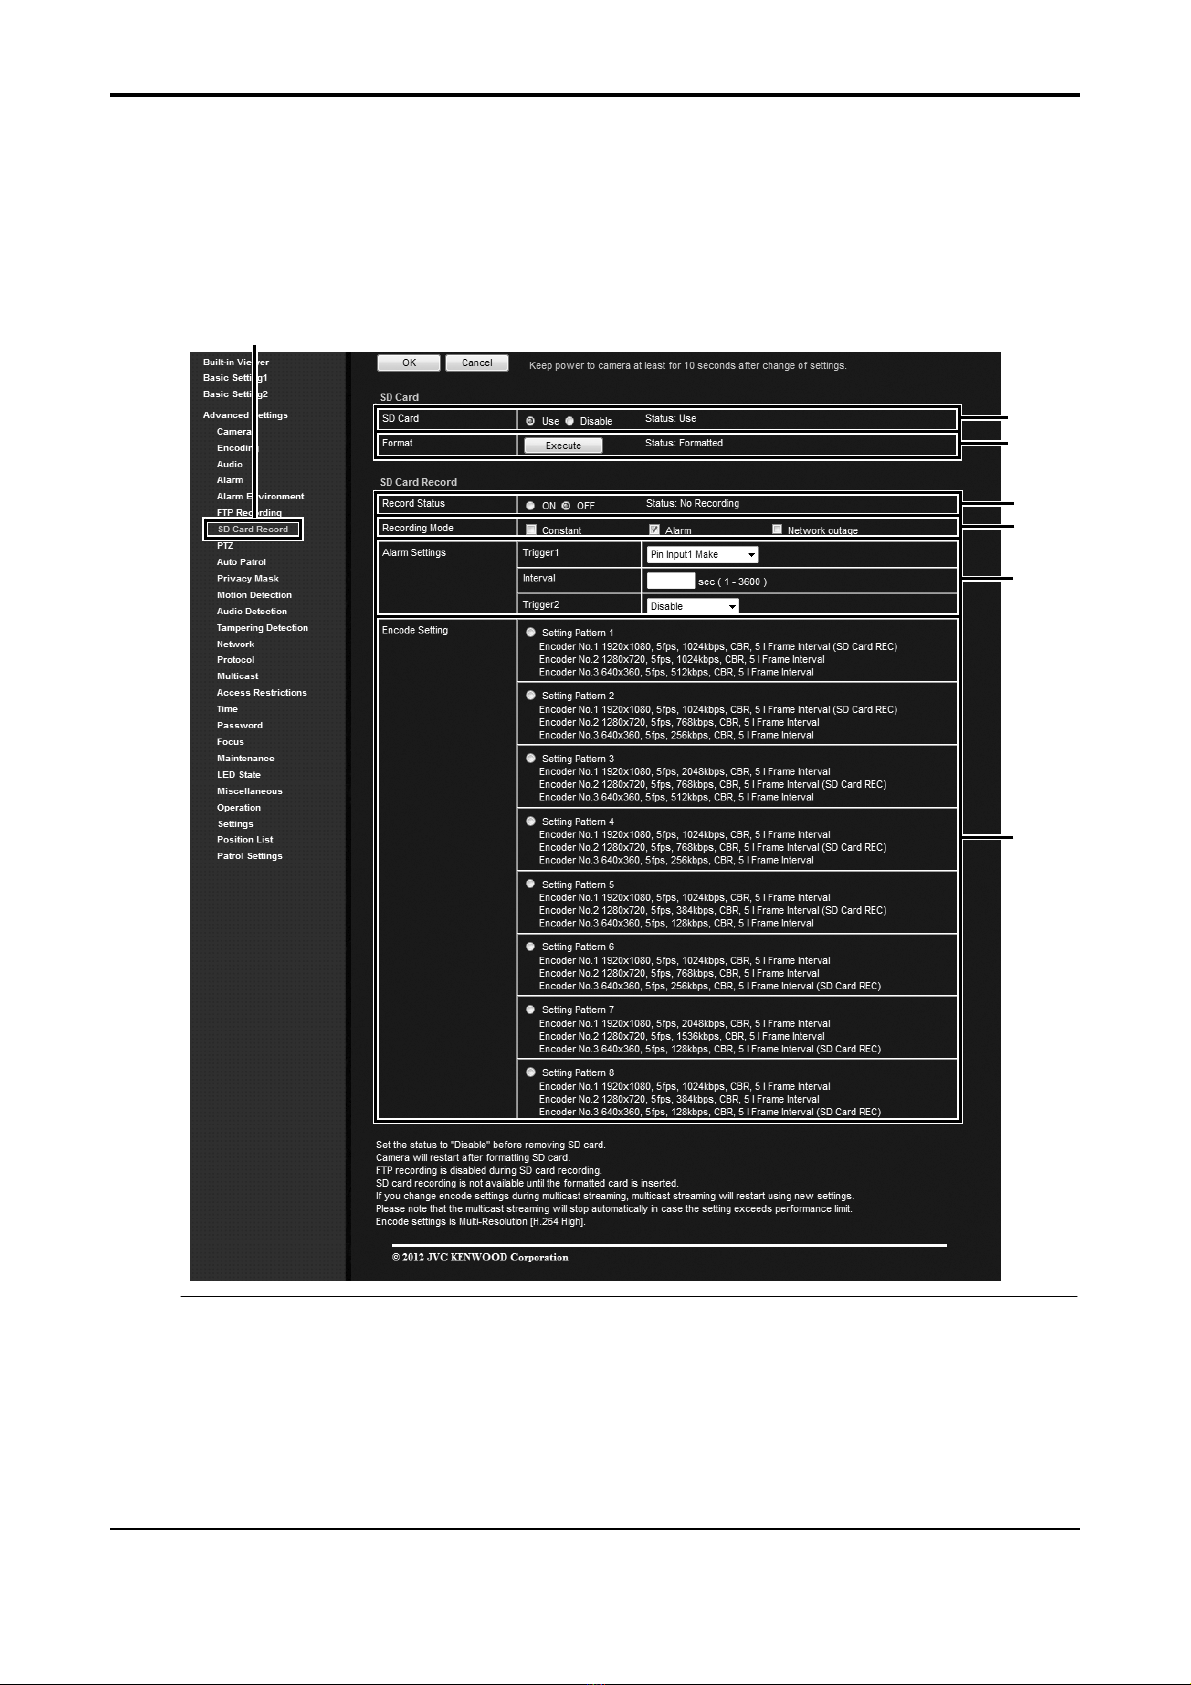
② Format The SD card format status display and the format execute button are located
here. The format type is unique to this camera.
[Status :Unformatted, Formatting, Formatted, ---]
"---" is displayed when the SD card status display is not "Use".
"Unformatted" is displayed when the SD card is not formatted, or when an
unsupported class of SD card that cannot be formatted is inserted.
The [Execute] button cannot be pressed (and becomes grayed out) when the SD
card status display is not "Use".
To enable the [Execute] button, select "Use" for the "SD Card" setting, click the
[OK] button, and confirm that "Use" is displayed for the SD card status.
When the [Execute] button is pressed, a confirmation window will appears. Press
the [OK] button to begin formatting the SD card. The status becomes
"Formatting" during formatting.
After formatting the card, the format complete dialog is displayed and the camera
restarts. The status becomes "Formatted".
Press the [OK] button to close the screen.
Memo:
zMake sure to format the SD card with the camera before using it.
Only SD cards formatted with the camera can be used.
zIt takes approximately 1 minute to format a 32 GB SD card. It takes
approximately 1 minute to format a 32 GB SD card. After the format, restarting
takes approximately 1.5 minutes.
zDo not remove the SD card during formatting.
zDo not turn off the power while the card is being formatted.
zYou cannot record to the SD card while it is being formatted.
zWhen you format the SD card, all recorded video on the SD card becomes
unplayable.
Note:
zWhen changing the time of the camera via the following operations, first make
sure to stop recording to the SD card. If times on the SD card for recorded
video overlap due to changes in the camera's time, the camera may become
unable to perform playback correctly.
-When changing the time via "Setting the PC Time to Camera" ()
"Instructions (Setting)" ─"Internet Explorer Setting" ─"Advanced
Settings" ─[Basic Setting1] Page)
-When changing the time via "Time" and " Setting the PC Time to Camera
" ()"Instructions (Setting)" ─"Internet Explorer Setting" ─"Advanced
Settings" ─[Time] Page)
-When changing the "Time Zone" setting ()"Instructions (Setting)" ─
"Internet Explorer Setting" ─"Advanced Settings" ─[Time] Page)
zPlayback search may not operate correctly for video with time that overlaps
due to the time changes to and from Daylight Saving Time. By shifting this
video via fast forward and fast reverse, video playback is possible.
* The [Set values] in bold letters are factory defaults.

11
No. Item Description
③ Record Status Starts and stops recording to an SD card.
[Set values : ON, OFF]
[Status : No Recording, Recording]
This is only enabled when the SD card status is "Use" and the format status is
"Format complete".
When recording, the status changes to [Recording]. When recording is stopped,
the status changes to [Stopped]. When only alarm recording is selected, the
status becomes [Recording] when the alarm is engaged, and [Stopped] when
nothing is detected.
After selecting one of the "Setting Pattern" items in "Encode Setting", select [ON]
and press [OK] to enable recording to the SD card.
If you push [OK] when the encoding setting has not been set, the "Select an
encoding setting." dialog is displayed and recording does not start.
Select "OFF" and click the [OK] button to stop recording.
Recording Mode For specifying the mode for recording to the SD card.
"Constant", "Alarm", and "Network outage" can be selected. Multiple options or all
of the options can be selected.
Select this by adding a check to the checkbox for the desired mode.
To change the Recording Mode, select "OFF" for ③Record Status, push the
[OK] button to stop recording, and then configure settings.
If no check is added to either box and you set recording to "ON" and press the
[OK] button, the "Set the recording mode." dialog is displayed and recording does
not start.
Note:
z"Constant", "Alarm", and "Network outage" for the SD card recording are not
theft or fire prevention functions.
zIt is not possible for "Network outage" to handle all network interruptions.
Our company will not be liable for damages or unexpected accidents.
Memo:
zWhen the record status is "ON", the setting for Recording Mode cannot be
changed.
zIf all the free space on the SD card is used, recording will continue by deleting
from the oldest recording data to allocate recording space.
④
Constant Constantly records to the SD card.
* The [Set values] in bold letters are factory defaults.

12
No. Item Description
Alarm SD card recording is performed when conditions set for the alarm setting items
are met. The alarm event recording interval for when an alarm is triggered is from
60 seconds before the trigger (pre-trigger) to 60 seconds after the trigger
(post-trigger), for a total of 120 seconds.
Alarm recording-related setting items are displayed when "Alarm" is selected.
Memo:
zEven if another trigger is detected within 60 seconds of the first trigger, it will
not register in the event list.
zIf another trigger is detected during alarm recording, recording is extended 60
seconds from the original end point.
zIf less than 60 seconds have passed since video recording was initially started,
the pre-trigger time will be less than 60 seconds.
④
Network
outage
When the link between the camera and the network is down, the camera image is
recorded to the SD card.
Memo:
zWhen the LAN cable is removed from the camera, the link with the network is
down, but when the camera is supplied with electricity by the PoE, as the
power is cut at the same time, the camera image will not be recorded to the SD
card.
⑤ Alarm Settings
Trigger1 Select the 1st trigger to start alarm recording.
When using VN-H57U/H257VPU/H157WPU
[Set values:Pin Input1 Make, Pin Input1 Break, Pin Input2 Make,
Pin Input2 Break, Audio Detection1, Audio Detection2, Position,
Motion Detection, Tampering Detection, Day/Night, Time]
When using VN-H37U/H137U/H237U/H237VPU
[Set values:Position, Motion Detection, Tampering Detection, Time, Day/Night
(VN-H37U and VN-H237VPU)]
Memo:
zThe "Motion Detection", "Audio Detection1", "Audio Detection2", or "Tampering
Detection" trigger for [Trigger1] must first be set to "ON" in the respective
[Advanced Settings] configuration page.
zIf you set the [Trigger2] to "Disable", an alarm recording will be performed
when only [Trigger1] is triggered. (VN-H57U/H257U/H257VPU/H157WPU
only)
zWhen “Audio Detection1”, ”Audio Detection2”, "Motion Detection",
"Position" ”Tampering Detection”, “Day/Night”, or ”Time” is selected for the
[Trigger1] trigger, [Interval] and [Trigger2] cannot be selected. (VN-H57U/
H257U/H257VPU/H157WPU only)
* The [Set values] in bold letters are factory defaults

13
No. Item Description
⑤ Interval
(VN-H57U/H2
57U/H257VP
U/H157WPU
only)
This is available when both [Trigger1] and [Trigger2] are set.
Specify the maximum interval between each trigger for [Trigger1] and [Trigger2].
An alarm recording will be performed if [Trigger2] occurs within the maximum
time interval after [Trigger1] occurs.
[Set values:1 – 3600 ] sec
Memo:
zIf you set an invalid value, the "Invalid value" dialog is displayed.
If you leave a value blank, the "Blank value" dialog is displayed.
Trigger2
(VN-H57U/H2
57U/H257VP
U/H157WPU
only)
Select the 2nd trigger to start alarm recording.
[Set values:Disable, Pin Input1 Make, Pin Input1 Break, Pin Input2 Make,
Pin Input2 Break]
Memo:
zIf you set the same items for [Trigger1] and [Trigger2], the "Trigger1 and
Trigger2 are the same." dialog is displayed and alarm recording is not started.
zIf you set "Day/Night" to [Trigger1], the options "Black and White" and "Color"
become selectable.
Position
Number
Enabled when "Position" is set for the trigger for [Trigger1].
Perform registration of position numbers via the Built-in Viewer's "PTZ setting".
()“Instructions(Setting)” ─"Operations" ─"Built-in Viewer Operations" ─"PTZ
Settings")
This position condition will also work if you manually move the PTZ, or if the PTZ
is automatically moved via auto patrolling.
[Set values: 0 – 19]
* The [Set values] in bold letters are factory defaults

14
No. Item Description
⑥ Encode Setting Sets the image quality for video recorded to an SD card, and the image quality for
video displayed in the Built-in Viewer.
If recording for ③[Record Status] is set to "ON", these radio buttons become
unchangeable.
To change the settings, select "OFF" for ③[Record Status], push the [OK]
button to stop recording, and then configure settings.
If you set ③[Record Status] to "ON" and push the [OK] button when the
encoding setting has not been set, the "Select an encoding setting." dialog is
displayed and recording does not start.
Select one of the items from Setting Patterns 1 through 8 in Encode Settings for
the recorded image.
[Encode Setting]
Setting
Pattern 1
Encoder No.1 1920x1080, 5fps, 1024kbps, CBR, 5 I Frame Interval (SD Card REC)*1
Encoder No.2 1280x720, 5fps, 1024kbps, CBR, 5 I Frame Interval
Encoder No.3 640x360, 5fps, 512kbps, CBR, 5 I Frame Interval
Setting
Pattern 2
Encoder No.1 1920x1080, 5fps, 1024kbps, CBR, 5 I Frame Interval (SD Card REC)*1
Encoder No.2 1280x720, 5fps, 768kbps, CBR, 5 I Frame Interval
Encoder No.3 640x360, 5fps, 256kbps, CBR, 5 I Frame Interval
Setting
Pattern 3
Encoder No.1 1920x1080, 5fps, 2048kbps, CBR, 5 I Frame Interval
Encoder No.2 1280x720, 5fps, 768kbps, CBR, I5 I Frame Interval (SD Card REC)*1
Encoder No.3 640x360, 5fps, 512kbps, CBR, 5 I Frame Interval
Setting
Pattern 4
Encoder No.1 1920x1080, 5fps, 1024kbps, CBR, 5 I Frame Interval
Encoder No.2 1280x720, 5fps, 768kbps, CBR, 5 I Frame Interval (SD Card REC)*1
Encoder No.3 640x360, 5fps, 256kbps, CBR, 5 I Frame Interval
Setting
Pattern 5
Encoder No.1 1920x1080, 5fps, 1024kbps, CBR, 5 I Frame Interval
Encoder No.2 1280x720, 5fps, 384kbps, CBR, 5 I Frame Interval (SD Card REC)*1
Encoder No.3 640x360, 5fps, 128kbps, CBR, 5 I Frame Interval
Setting
Pattern 6
Encoder No.1 1920x1080, 5fps, 1024kbps, CBR, 5 I Frame Interval
Encoder No.2 1280x720, 5fps, 768kbps, CBR, 5 I Frame Interval
Encoder No.3 640x360, 5fps, 256kbps, CBR, 5 I Frame Interval (SD Card REC)*1
Setting
Pattern 7
Encoder No.1 1920x1080, 5fps, 2048kbps, CBR, 5 I Frame Interval
Encoder No.2 1280x720, 5fps, 1536kbps, CBR, 5 I Frame Interval
Encoder No.3 640x360, 5fps, 128kbps, CBR, 5 I Frame Interval (SD Card REC)*1
Setting
Pattern 8
Encoder No.1 1920x1080, 5fps, 1024kbps, CBR, 5 I Frame Interval
Encoder No.2 1280x720, 5fps, 384kbps, CBR, 5 I Frame Interval
Encoder No.3 640x360, 5fps, 128kbps, CBR, 5 I Frame Interval (SD Card REC)*1
*1:Video from the encoder number with the designation "(SD Card REC)" is recorded to the SD card.
* The [Set values] in bold letters are factory defaults

15
SD Card Playback Screen
This can be used when accessed as an "admin" or as an "operator".
This is displayed when you click [SD Card] button on the Built-in Viewer screen.
You can play video files stored in the SD card.
Memo:
zVideo recorded to an SD card cannot be output from the camera's [MONITOR] terminal.
zSD card playback from 1 camera cannot be performed to multiple viewers.
No. Item Description
① MENU ON /
MENU OFF
Displays / hides the operation menu.
Click [MENU ON] to display the menu on the left side of the page.
② Video control
menu
Controls the video playback state.
For an explanation of each button, see "Video control menu". ()Page 18)
③ Specified Time
Playback menu
Specify the date and time before starting playback.
[Playback] button
Press the [Playback] button to play videos recorded at the specified date and time.
Memo:
zIf there is no video recorded for the specified date and time, video near that
date and time will be played.
zWhen playing video while recording, video recorded within 5 minutes of the
current time cannot be viewed.
①⑥⑦⑧⑨⑩
②
③
④
⑤
⑪
⑫

16
No. Item Description
④ Event List
Playback menu
Displays a list of search results for recorded videos filtered by time and event
trigger. Select the item from the displayed list that you want to play and begin
playback.
From/To
Displayed videos will be limited to those recorded between the 2 times that you
specify.
Event Type
Displayed videos will be limited to those of the event trigger* type that you
specify.
* Event Trigger:Pin Input1 Make, Pin Input2 Make, Motion Detection, Position,
Day/Night, Audio Detection1, Audio Detection2, Tampering Detection, Time,
Network outage
Memo:
zDepending on the camera model, you may be unable to select the event
trigger.
zA starting event for continuous recording cannot be specified.
zAfter opening the Playback Screen with the Built-in Viewer, results may not be
displayed if a search is immediately performed.
After opening the SD Card Playback Screen, wait at least one second before
performing a search.
[Search] button
A list of search results based on the search parameter that you add a check to is
displayed. If no search parameter is checked, all events are displayed.
Event List
Displays a list of recording start dates/times with the event type in chronological
order from the newest event.
[Prev] / [Next] buttons
A maximum of 100 results can be displayed on 1 page. Press [Prev] to move to
pages with newer recording start dates/times, and press [Next] to move to pages
with older recording start dates/times.
[Playback] button
Select an event from the list and press the [Playback] button to start playback.
Note:
zWhen an event is finished playing, the next event is automatically played back.
(The list marker in the list does not move to the next event displayed in the
list.)
zIf you record over the recording start date/time of a video, the event
disappears from the list. You can still play portions of the video that have not
been overwritten by using the [Specified Time Playback] menu.

17
No. Item Description
⑤ Export menu
Video from the specified [From] date/time to the [To] date/time is saved to your computer.
The save location can be specified in [Viewer Setup] - [Other] - [Video Export
Folder] via the Built-in Viewer screen.
Note:
zDepending on the camera's internal recordings, a saved video may be split up
as multiple files.
zFor using saved video files, refer to the following URL.
http://www3.jvckenwood.com/english/pro/vnetworks/index.html
[IN] button
Specifies the start time of the video being played.
[OUT] button
Specifies the end time of the video being played.
[Export] button
After pressing this button, the confirmation screen is displayed, and then the
video saving process begins.
While saving videos, this button changes to [Cancel].
Memo:
zWhile saving videos, the Built-in Viewer screen cannot be switched.
zSaving may take time depending on the date/time range that you specify.
Progress is displayed at the top of the screen.
[Cancel] button
After clicking the [Export] button, this cancels the save operation for the images
being output.
The file created contains the data written until the point when you press the
button.
Memo:
zWhen the export process is stopped, this button changes to [Export].
zWhen the time required for exporting video to a computer is less than 5
seconds, this button has no effect.
⑥ [Live] button Switches to the Built-in Viewer screen.
⑦
Playback indications
Displays playback conditions. ( )
⑧ Time Stamp Shows the recording date and time of the video currently playing.
⑨ Display Time You can enable/disable the display of the recording time during playback.
⑩ Display Size Sets the size of the video display area.
[Set values: Fixed, Variable]
Fixed : Displays at the set number of pixels.
Variable : Displays in relation to the window size.
⑪
Video display area
Displays the recorded video.
⑫ Time Stamp Shows the recording date and time of the video currently playing. ⑨[Display
Time] is used for setting whether or not to display this.
* The [Set values] in bold letters are factory defaults.

18
z
Video control menu
No. Item Description No. Item Description
① Returns to the previous frame,
and then pauses playback.
⑨Advances to the most recent
video, and then pauses playback.
② Starts reverse playback. ⑩Fast-reverses the playback position.
③ Pauses playback.
④ Starts playback.
⑪Selects the speed for ⑩and ⑫.
[Set values :
x1/2, x1, x3, x10,
x30, x60]
⑤ Advances to the next frame, and
then pauses playback.
⑫Fast-forwards the playback position.
⑥ Returns to the oldest video, and
then pauses playback.
⑬Returns by the specified length of
time, and then pauses playback.
⑦ Jumps to the previous alarm
event video.
⑭Selects the movement time for ⑬
and ⑮.
[Set values :
10s, 15s, 30s, 1m,
10m, 30m, 1h, 6h,
12h, 24h]
⑧ Jumps to the next alarm event
video.
⑮Advances by the specified length
of time, and then pauses playback.
* The [Set values] in bold letters are factory defaults.
Memo:
zFor playback from an SD card, use [Specified Time Playback] menu or [Event List Playback] menu
()Page 16) to select the recorded video to play.
zWhen playback of an event finishes, playback of the next event starts automatically.
zButtons other than button ④and button ⑤are only displayed for I-frame.
zButton ⑦and button ⑧are only used to jump to alarm event videos. You cannot jump to a continuous
recording event.
zA maximum of 1 second of calculation error from the specified time set via button ⑭may occur when
jumping using button ⑬and button ⑮.
①② ③ ④ ⑤
⑧
⑨
⑫
⑮
⑥
⑦
⑩
⑪
⑭
⑬

19
Approximate SD Card Recording Times
The following recording times are approximations. They may vary due to the recording environment or the SD
card that you use.
z
Recording time table
Available recording time for
each SD card size [in hours]
Setting Pattern Encoding details for SD card recording
4 GB 8 GB 16 GB 32 GB
Setting Pattern 1
Setting Pattern 2
1920x1080, 5 fps, 1024 kbps, CBR, 5 I Frame
Interval
5 12 25 52
Setting Pattern 3
Setting Pattern 4
1280x720, 5 fps, 768 kbps, CBR, 5 I Frame Interval
7 15 34 70
Setting Pattern 5
1280x720, 5 fps, 384 kbps, CBR, 5 I Frame Interval
12 27 58 120
Setting Pattern 6 640x360, 5 fps, 256 kbps, CBR, 5 I Frame Interval 19 42 92 189
Setting Pattern 7
Setting Pattern 8 640x360, 5 fps, 128 kbps, CBR, 5 I Frame Interval 34 78 169 384
SD Card Recoding Error Indicator
When the camera [STATUS] indicator lamp flashes orange, it may not be possible to record to the SD card.
Check the SD card condition and the camera settings.
[STATUS] indicator
The camera [STATUS] indicator
lamp is flashing. When the lamp
flashes orange twice and then
goes out for one second:
zThe inserted SD card has not been formatted. Format the card from the [SD Card
Record] page. ()Page 10)
zThe inserted SD card switch is locked and the SD card cannot be recorded on.
After cutting power to the camera, remove the SD card, undo the lock, and
reinsert the card. ()Page 3)
zThe camera is set to record on an SD card, but an SD card has not been inserted.
After cutting power to the camera, insert an SD card that can be recorded to.
The camera [STATUS] indicator
lamp is flashing. When the lamp
flashes orange three times and
then goes out for one second:
zA problem has occurred with the SD card in use. Replace the SD card.
Memo:
zWhen [LED State] under [Status LED] on the [LED State] page in "Instructions (Settings)" on the included
CD-ROM is set to [Disable], the [STATUS] indicator lamp does not flash.
zSet the SD card to [Disabled] on the [SD Card Record] page in order not to use the SD card recording
function. The [STATUS] indicator lamp will return to glowing solid green.
[STATUS]
indicator
[STATUS] indicator
VN-H37U/H57U/H137U
[STATUS]
indicator
VN-H237U/H257U VN-H157WPU VN-H257VPU
[STATUS]
indicator

Additional Cautions
z
Cautions for setting the detection function
You cannot set motion detection, audio detection, and tampering detection at the same time.
An error message is displayed when one detection function setting is already enabled and you try to select
another. Check the content of the error message, set the already-enabled detection function to "OFF", and
then reconfigure the detection function. ()"Instructions (Setting)" ─"Internet Explorer Setting" ─"Advanced
Settings" ─[Motion Detection] Page, [Audio Detection] Page, [Tampering Detection] Page)
z
Cautions for changing the encoding setting
When changing an already-configured encoding setting on the [Basic Settings2] page, [Encoding] page, or
[SD recording] page, PTZ and the auto patrol settings are cancelled.
In this case, set PTZ and the auto patrol settings again after setting the encoding setting. ()"Instructions
(Setting)" ─"Internet Explorer Setting" ─"Advanced Settings" ─[PTZ] Page, [Auto Patrol] Page)
Troubleshooting
Check the following items if you cannot record to an SD card.
zUse an SD card that is compatible with this camera. ()Page 4)
zFollow the instructions in [SD Card Record] Page ()Page 8) to enable SD card recording settings.
zRefer to "SD Card Recording Error Indicator" ()Page 19), when the camera [STATUS] indicator lamp
flashes orange.
You may become unable to update the screen if you frequently move between the SD card playback screen
and the advanced settings screen.
zPress the [Cancel] button, or press the refresh button of Internet Explorer.
Check the following items if the frame rate of images which are recorded to an SD card is lower than the set
value or variable.
zWhen the Sense Up functions activate, ()"Instructions (Setting)" ─"Internet Explorer Setting" ─
"Advanced Settings" ─[Camera] Page) the sensitivity is increased by decreasing the frame rate of
images recorded to the SD card. As a result, the number of playback frames may be lower and proper
playback may not be possible.
In some cases, the video output file may not be saved to the computer even when using [Export] (
)
Page 17
⑤
).
zWith Windows 7 or Windows Vista, run Internet Explorer as Administrator.
To do so, perform the following:
1. Right click the Internet Explorer icon.
2. Select [Run as Administrator].
© 2013 JVC KENWOOD Corporation LST1392-001B
Other manuals for Super LoLux HD VN-H157WPU
1
This manual suits for next models
9
Table of contents
Other JVC IP Camera manuals

JVC
JVC VN-H37U series User manual

JVC
JVC VN-H557U User manual

JVC
JVC VN-H57U Series User manual

JVC
JVC everio GZ-R450 User manual

JVC
JVC VN-T16 User manual

JVC
JVC VN-T16U User manual

JVC
JVC SuperLoLux TK-C8301RU User manual

JVC
JVC VN-X35U - Network Camera User manual

JVC
JVC VN-V686UAPI User manual

JVC
JVC GV-LS2 Instruction Manual