JVC VN-T216VPRU User manual

LST1370-001B
FIXED HD IP DOME CAMERA
VN-T216VPRU QUICK GUIDE
Thank you for purchasing this product.
Before operating this unit, please read the "INSTRUCTIONS", "QUICK GUIDE" and
"SAFETY PRECAUTIONS" carefully to ensure the best possible performance.
For Customer Use:
Enter below the Serial No. which is located on the
body. Retain this information for future reference.
Model No. VN-T216VPRU
SerialNo.

1
Contents
1Introduction.................................................................................................................................... 2
Unpack Everything........................................................................................................................... 2
Operating Precautions..................................................................................................................... 2
Preparation...................................................................................................................................... 3
Camera Installation.......................................................................................................................... 3
Disassembling the Camera....................................................................................................... 3
Connecting the Wiring............................................................................................................... 4
Waterproofing............................................................................................................................ 5
Adjusting the Camera Position.................................................................................................. 6
Mounting the Camera................................................................................................................ 7
Place silica gel(supplied)........................................................................................................... 9
Locking the Camera.................................................................................................................. 9
Network Configuration:Setting Network Camera Environment................................................... 10
Setting IP................................................................................................................................. 10
Connecting the Camera to a Personal Computer................................................................... 10
Using “IP Finder” to Search Camera’s IP Address ................................................................. 13
2Warnings ...................................................................................................................................... 14
3Dimensions .................................................................................................................................. 14
4Specifications .............................................................................................................................. 15
Contents of this manual
Windows and Internet Explorer are registered trademarks of
Microsoft Corporation in the U.S.
Pentium is a registered trademark of Intel Corporation in the U.S.
AMD is trademark of Advanced Micro Devices Inc. in the U.S.
Product names of other companies described in this manual are
trademarks or registered trademarks of the respective companies.
Symbols such as ™, ® and © are omitted in this manual.
Design, specifications and other contents described in this manual
are subject to change for improvements without prior notice.

2
1 Introduction
Thank you for purchasing the camera. Before installing it, read the guide carefully and check the model.
For more information, please refer to the INSTRUCTIONS on CD-ROM.
This manual is designed for administrators and users of the network camera. Please read it carefully before use. All
requirements should be followed before using this camera. Keep this document for future reference.
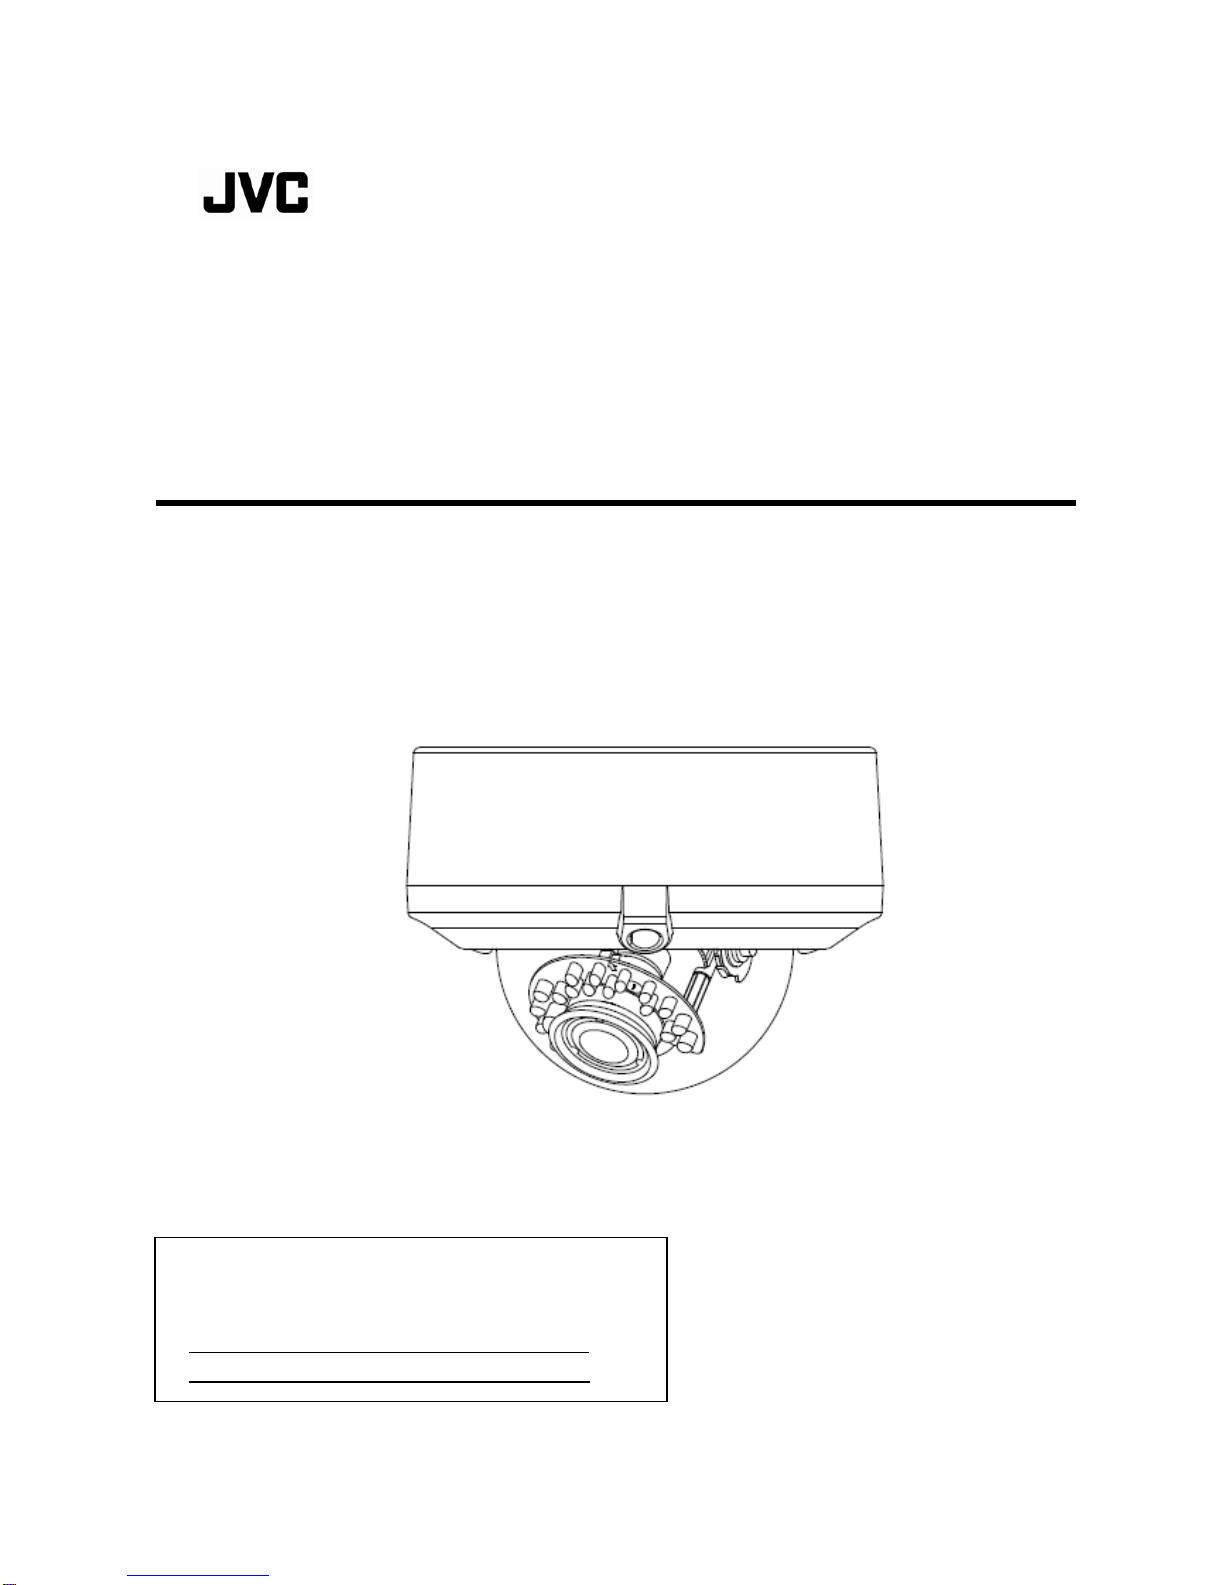
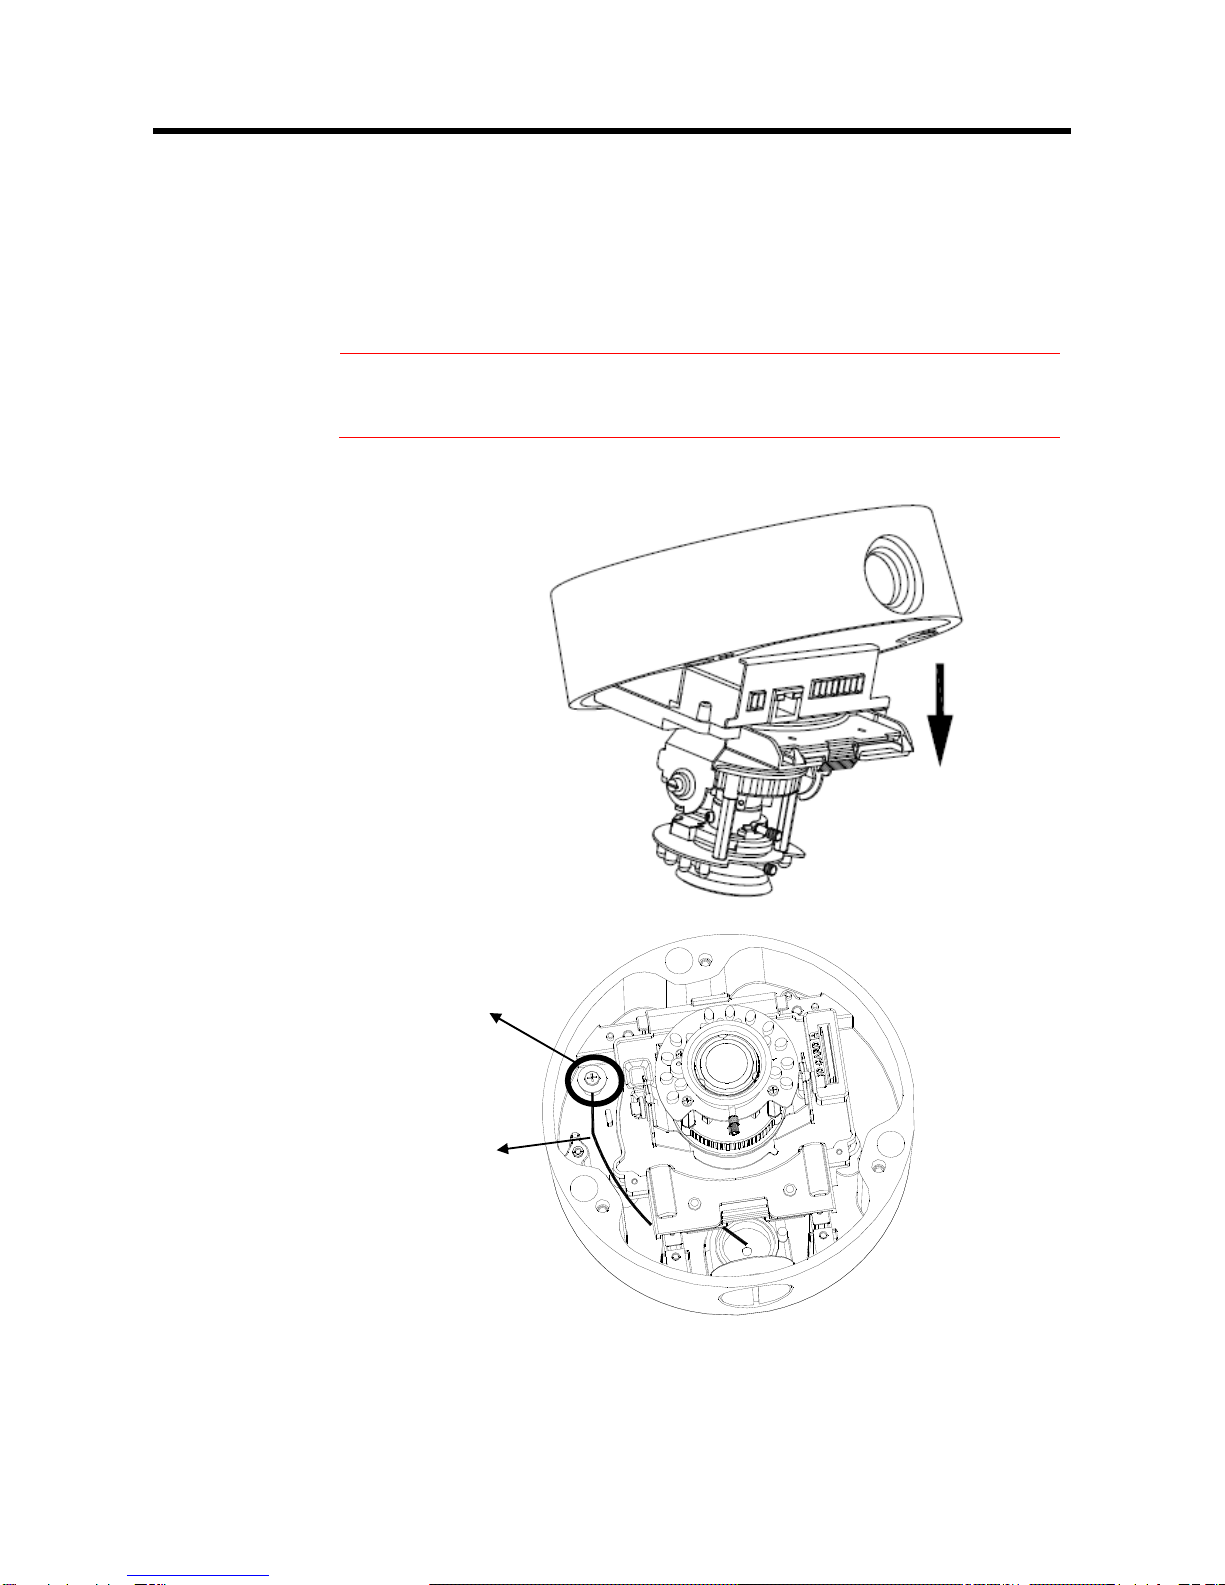
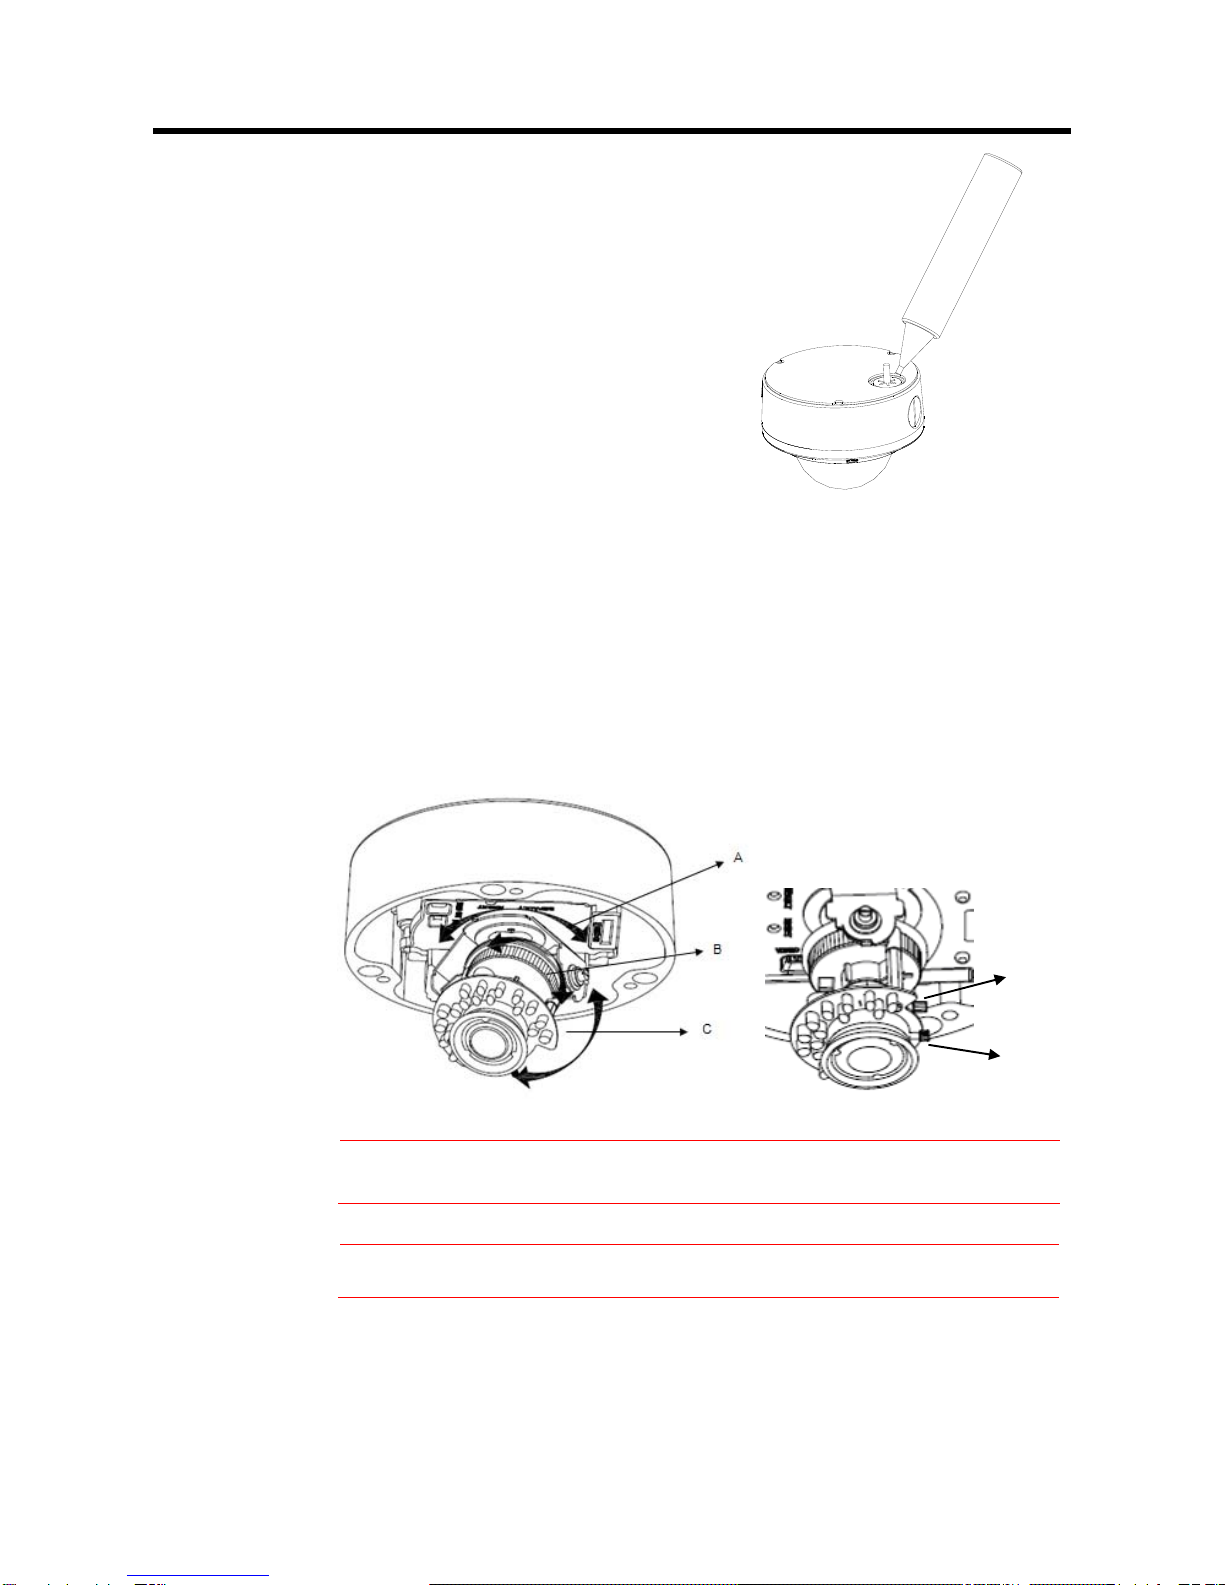
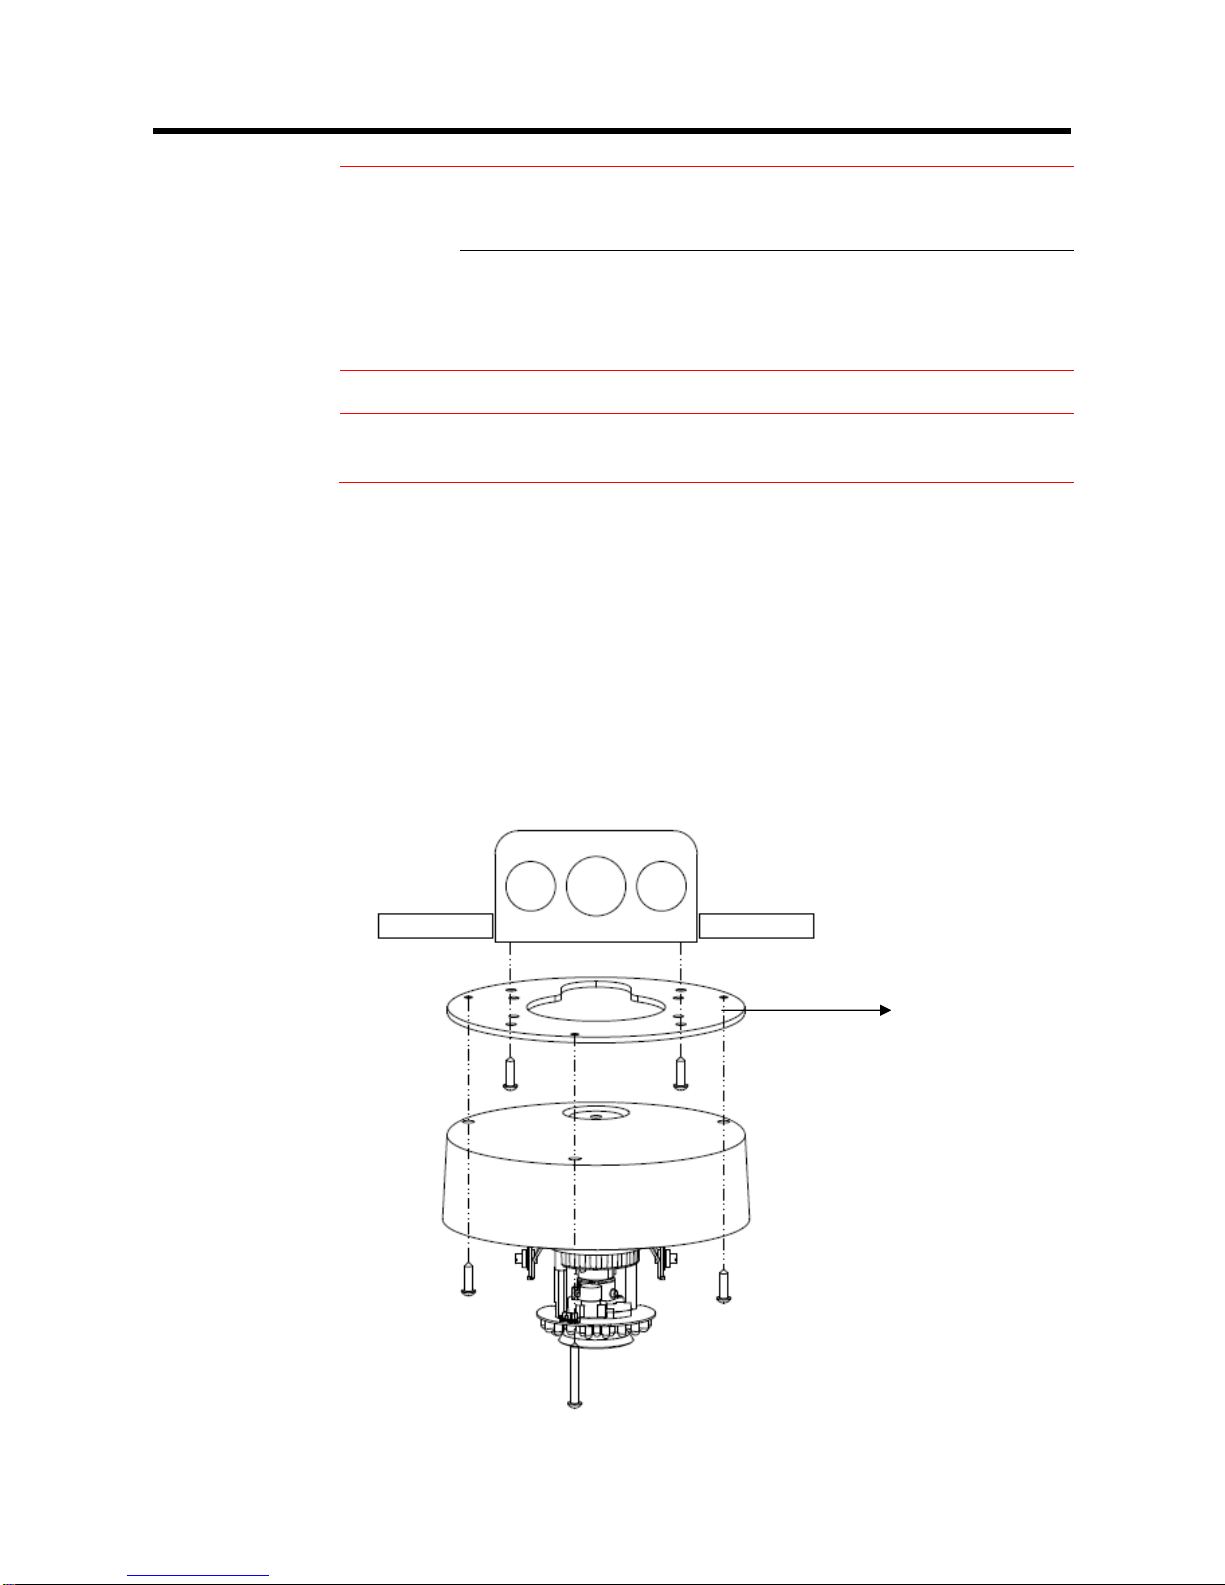
Unpack Everything
FIXED HD IP DOME CAMERA
WARRANTY CARD
SAFETY PRECAUTIONS
QUICK GUIDE
2-PIN TERMINAL BLOCK for power input, and 8-PIN TERMINAL
BLOCK for alarm input/output
CD-ROM containing INSTRUCTIONS and IP Finder software
TEMPLATE : mounting template
WRENCH : Hexagon screw driver
3 SCREW ANCHORs
3 SCREWs
SILICA GEL
SCREW (for WIRE)
WASHER (for WIRE)
Operating Precautions
■Storage and Operating Environment
Do not install the camera in following places
・When the ambient temperature rises above or falls
below the acceptable range (from -10℃to 50℃)
・In a place at which corrosive gases are emitted.
・Near a source of radiation, X-rays, strong radio waves
or magnetism.
・In a place subject to vibration.
■ Maintenance
Wipe the camera with a dry, soft cloth to remove any dirt.
Do not use benzene or thinner to wipe the camera. Doing
so may melt the surface or cause it to fog. For tough stains,
wipe with a neutral detergent diluted with water, followed
by wiping with a dry cloth.
■Power supply
Please make sure the power source is AC 24 V / PoE.
Only connect the camera to this power system.
The AC 24 V power supply shall conform to the following:
Class 2 only (For USA), Isolated power supply only (For
Europe).
When using AC 24 V power supply, do not connect the
power cable to commercial power supply. If it is connected
by mistake, the internal circuit may be damaged. Do not
use the camera and make sure to send it to the nearest
JVC dealer for inspection.
■Real Time Clock
The real time clock of the camera will be initialized by
power off over 3 days. In such case, please set data/time
manually, or set NTP server.
If the real time clock is initialized, event log, data in SD
card, and mail sent by the camera do not show correct
time.
■SD Card
SD card is fragile and not reliable for long term use. Our
company will not be liable for damages resulting from the
use of SD card. Frequent back up of data is
recommended. Data of SD card will be lost by troubles
below.
・Electrical or Mechanical Shock to SD card.
・Power off or ejecting of SD card during recording.
・Rewriting times exceeds upper limit of the SD card (The
upper limit depends on grade of the SD card.)

3
■Energy Conservation
When the camera is not in use for a long time, turn off the
power for safety and energy conservation reasons.
■Copyright Protection
With the exception of the user being the copyright holder
or when permission such as for duplication has been
granted by the copyright holder, permission is required in
principle for the duplication, modification, or transmission
of copyrighted material.
Unauthorized duplication, modification, or transmission of
copyrighted material may constitute a copyright
infringement, and the user may be liable to compensate
for any damages. When using copyrighted material, be
sure to check the license agreement of the copyrighted
material thoroughly.
When rights or rights holders are involved with regard to
the targeted duplicating subject, permission may be
required for shooting or using (processing) it. Be sure to
check the licensing conditions thoroughly.
■Disclaimer
We will not be responsible for any inconveniences or
disturbances caused in the event of privacy invasion as a
result of camera footages of this product.
■Others
Because the camera controls auto exposure by shutter
speed, flicker can be shown by fluorescent light. To
reduce the flicker, please select PAL mode if the power is
50Hz, or NTSC mode if the power is 60Hz. (Refer to
INSTRUCTIONS “4 Overview of Navigation and Controls”
- “Video Type”)
Preparation
The following tools might help you to complete the installation:
Drill
Screwdrivers
Wire cutters
Seal Tape
Waterproof seal material (GE silicon)
Camera Installation
Note All the installation and operations here should conform to your local electricity
safety rules.
Disassembling the Camera
Gently remove the screw to take off camera housing (4).
Set the camera housing (5) and liner aside.

4
Connecting the Wiring
Connect the power supply cable to the power connectors.
Select one of the following options.
Inset power cable for AC24V
Connect 24 V (~) cables to terminals ~AC24V.
PoE
Connect the network cable to the RJ45 terminal using a switch.
Note Connectors and field wiring terminals for external Class 2 circuits provided with
marking indicating minimum Class of wiring to be used. Class 2 shall be marked
adjacent to the field wiring terminals.
Connect the wiring then place the camera to a proper position by pushing the
button.
Washer (for Wire)
Screw (for Wire)
Safety Wire
(Fall Prevention Wire, not
supplied)

5
Waterproofing
■Using the duct hole on the side
Remove the plug for the duct hole using a flat-blade screwdriver.
Note
When you insert a pipe, do not insert it deeper than 12mm.
Inserting it further may damage the inside of the unit.
If you install the unit, using the duct hole on the bottom or
on the side, wrap seal tapes around the connecting
parts(the point where the thread of the duct hole and the
screw hole meet) of the duct at least twice (as figure
below).

6
■Waterproofing
Filling the duct hole with waterproof seal material (GE silicon) to
prevent water from entering.
Note
Before you fill the silicon gel in the location as figure below,
please insert the cables to proper location.
Correctly waterproof all the cables using waterproof tape
adhesive.
Adjusting the Camera Position
The dome camera has three axes for positioning the camera. Whilemonitoring the picture on the
monitor, adjust the camera position as follows:
Pan Adjustment (A) For Wall Mount and Tilted Ceilings Rotate the lens base
(maximum360°) until you are satisfied with the field of view.
Horizontal Rotation (B) Rotate 3D assembly in the base. Do not turn assembly more than
360°as this assembly may cause the internal cables to twist and disconnect or break.
Tilt Adjustment (C) After loosening the thumbnuts, position the camera as desired, then
finger –tighten the thumbnuts to set the position.
Caution Do not turn the lens more than 360° as this may cause internal cables to
disconnect or break.
Caution Retighten the locking screws to prevent loss of adjustment.
D
E

7
Adjusting Zoom and Focus
Loosen the zoom lever (D) / locking screw by turning it counter-clockwise.
Rotate the zoom ring to achieve the desired picture.
Loosen the focus lever (E) / locking screw by turning it counter-clockwise.
Rotate the focus ring to adjust the focus.
If re-adjustment is necessary, repeat the steps above.
Retighten the zoom lever (D) / locking screw and the focus lever (E) / locking screw.
Caution Retighten the locking screws to prevent loss of adjustment.
Mounting the Camera
Place the guide pattern sticker (supplied) on the mounting surface and
mark three holes according to the guide pattern sticker. Then fasten the
sticker to the mounting surface with screws.
Connect the Safety Wire (Fall Prevention Wire, not supplied) to the camera
and the ceiling.
Secure the camera bottom case (1) to the wall/ceiling with tapping screws,
supplied.
Adjust the view angle (zoom, focus, and Horizontal Rotation).
Safety Wire
(Fall Prevention Wire, not supplied)

8
Warning
To prevent the camera from falling off, ensure that it is connected to a firm place
(ceiling slab or channel) using a Safety Wire (Fall Prevention Wire is not
supplied).
Pay also careful attention to the length, strength, wiring, and material (insulating
properties) of the fall prevention wire to be used. The length should be as short
as possible within the permissible range of the mounting length. The wire
should be strong enough to withstand the total weight of this product. (Pay also
attention to the finishing at the end of the wire.)
Caution Must be isolated camera and the wall/ceiling which are connected by the Safety
Wire (Fall Prevention Wire).
4S Electrical junction box(Optional)
1. Secure the mounting kit (optional) to 4S Electrical box using 2 appropriate
screws.
2. Then secure the camera case to mounting kit using 2 appropriate screws.
3. Tuck the cables in the 4S Electrical box.
4. Adjust the view angle (zoom, focus, and Horizontal Rotation).
5. Attach the camera housing.
6. Turn the power on after you have installed the camera.
This mounting kit
is optional
accessory.

9
Note Depending on the material of your mounting surface, you may require different
screws and anchors than those supplied.
Note If tilt angle is less than 25 degrees from the horizontal, the image can flash by
reflection of IR-LED light. Keeping tilt angle over 20 degrees is recommended
when IR-LED light is used.
Place silica gel (supplied)
Please pick up and tear off the silica gel package from accessory.
After adjusting images, place the silica gel at the position shown in the diagram
below.
Fix the silica gel to the position so it will not fall off.
Locking the Camera
Use soft, lint -free cloth to wipe the dome cover clean and remove fingerprints.
Turn the power on after you have installed the camera.
Silica gel
Silica gel
Inserted space

10
Network Setup
Setting IP
This is a network-based camera and must be assigned an IP address first.
The camera’s default IP address is 192.168.0.2 and sub mask is 255.255.255.0. To change IP
address, open Network Settings page described later.
If your network uses a DHCP server, an IP address can be assigned automatically from the DHCP
server by enabling DHCP in the Network Settings page described later.
Connecting the Camera to a Personal Computer
1. Connect the network cable to the camera and then turn on the camera’s power.
2. Set the personal computer’s IP address. The camera’s default IP address is 192.168.0.2 and
sub mask is 255.255.255.0.
3. Check that the camera and computer are connected by pinging the IP address you have set. To
do this, start a command prompt (Windows: from the Start Menu, select Program. Then select
Accessories and choose Command Prompt.) Type: Ping 192.168.0.2. If the message “Reply
from…” appears, it means the connection is done.
4. Start Internet Explorer and enter IP address: 192.168.0.2. A login window will appear. Enter the
default user name: admin and password: jvc to log in.
5. Images of the camera can be viewed through Internet Explorer. Before viewing, follow these
steps to enable the display.
a. Enable Cookies as shown below:
In Internet Explorer, click Internet Options on the Tools menu.
On the Privacy tab, move the settings slider to Low or Accept All Cookies.
Click OK.
b. When a proxy server is used, click Internet Options on the Tools menu of
Internet Explorer, select Connect tab, click LAN button, and set proxy server.
c. Change Security in Internet options as shown below:
On tool menu, click Internet Option.
Press the Security tab.
If the camera operates inside the Intranet, click the Intranet icon. If the camera
operates on the Internet, click the Internet icon.
In Windows 7 only, Click【Tools】【Internet Options】【Security】
Enable Protected Mode (require restarting Internet Explorer) Unchecked

11
Click Custom Level. This will open the Security Settings – Internet Zone
screen.
Scroll down to the ActiveX controls and plug-ins radio buttons and set as
follows:
【Download signed ActiveX controls】Prompt (recommended)
【Download unsigned ActiveX controls】Prompt
【Initialize and script ActiveX not marked as safe for scripting】Prompt

12
【Automatic prompting for ActiveX controls】Enable
【Run ActiveX controls and plug-ins】Enable
【Script ActiveX controls marked safe for scripting*】Enable
Press OK to save the settings. Close all Internet Explorer windows and start a
new window. This will allow the new settings to take effect.

13
6. Type your setting IP address into the browser.
7. Then you should be able to see the camera image screen.
Using “IP Finder” to Search Camera’s IP Address
The IP Finder is a tool which helps users to find VN-T16/216 series network cameras in the LAN
which your computer is connected. Please note that IP Finder is only compatible with Windows 7,
windows Vista and Windows XP.
1. Insert the CD-ROM in the CD-ROM drive.
2. Copy the IP Finder’s folder to your computer.
3. Double click the IpFinder.exe in your computer’s IP Finder folder. An IP Camera Finder
window will pop out. The window will display a list of IP cameras which you are using
currently.
4. Press Search to search cameras.

14
2 Warnings
Installation and maintenance should be performed only by qualified and experienced technicians
to conform to all local codes and to maintain your warranty.
DANGER! AC24V models require the use of CSA Certified/UL Listed Class 2 power adapters to
ensure compliance with electrical safety standards. Power over Ethernet (PoE) should meet the
IEEE 802.3af PoE standard.
3 Dimensions

15
4 Specifications
Operational Specifications
Image device 1/2.7-type Mega-pixel CMOS sensor
Sensitivity Color: 0.6 lx, B/W: 0 lx (50%)
Day/Night True D/N
IR-LED Yes (IR Distance 15 m)
Auto Gain Control Off/On, selectable
Auto Iris Control AES (Automatic Electric Shutter)
White Balance ATW (2800K~8500K) and Manual
Electric Shutter PAL: 1/25~1/10000 sec
NTSC: 1/30~1/10000 sec
Noise Reduction Yes
3 Axis Gimbals Yes
Motion detection Yes
Lens Type 1/3-type 3-9 mm F:1.2 IR cut filter built-in
BLC Yes
Audio Line in/out
Alarm 1 in / 1 out (Alarm out spec: 0.5 A / AC 120 V max)
IP Specifications
Video Compression H.264 & MPEG4 & MJPEG
Video Streaming
Real time stream:
1080P H.264 or 720P H.264+D1 or D1+D1
Independent controllable frame rate and
bandwidth. Constant or variable bitrate control
Resolution
NTSC: 1080P(1920 x 1080), 720P(1280 x 720),
D1(720 x 480), 4CIF(704 x 480), VGA(640 x 480),
CIF(352 x 240), QVGA(320 x 240)
PAL: 1080P(1920 x 1080), 720P(1280 x 720), D1(720
x 576), 4CIF(704 x 576), VGA(640 x 480), CIF(352 x
288), QVGA(320 x 240)

16
Image Frame Rate PAL: Up to 25 fps
NTSC: Up to 30 fps
Security Multiple user access levels with password
protection
Users 1 Administrator, 5 Users
Video Access from Web
Browser Full control of all camera settings available to
administrator
Minimum Web Browsing
Requirements
Windows XP or Windows 7 as OS,
Internet Explorer Version 6.0-9.0,
CPU: Intel Pentium 4 2.4 GHz or equivalent AMD,
Memory: 1 GB or above
Supported Protocols IPv4, HTTP, TCP, RTSP, RTP, ICMP, UDP, IGMP,
RTCP, FTP, DNS, DHCP, ARP
Network interface RJ-45, 100BASE-TX/10BASE-T,
FULL/HALF/Auto negotiation
Surveillance Protocol ONVIF Compatible (pass compliance test tool)
Onboard Storage SDHC (suggest class 10)
Electrical
Power Supply PoE IEEE 802.3af Class 0, AC 24 V
Power Consumption PoE 0.15 A, AC 24 V 800 mA
Mechanical
Dimension Ø155 mm x 112.7 mm
Weight 1360 g
Connectors
Power Input: removable terminal block
Network: RJ45 connector
Audio In/out: removable terminal block
Alarm In/out: removable terminal block
Environmental
Operating Temperature -10 °C to 50 °C
Operating Humidity 20 % to 90 % (without condensation)
Storage Temperature -20 °C to 60 °C

17
© 2012 JVC KENWOOD Corporation
Other manuals for VN-T216VPRU
3
Table of contents
Other JVC IP Camera manuals

JVC
JVC GV-LS2 Instruction Manual

JVC
JVC VN-686BU User manual

JVC
JVC VN-X35U - Network Camera User manual

JVC
JVC GV-LS2 User manual

JVC
JVC VN-V686UAPI User manual

JVC
JVC VN-H37U series User manual

JVC
JVC VN-H137BU User manual

JVC
JVC VN-T16 User manual

JVC
JVC VN-T16U User manual

JVC
JVC VN-V25U VN-V26U User manual

JVC
JVC everio GZ-R450 User manual

JVC
JVC LST0886-001A User manual

JVC
JVC VN-T16U User manual

JVC
JVC SuperLoLux TK-C8301RU User manual

JVC
JVC VN-H37 User manual

JVC
JVC VN-H557U User manual

JVC
JVC Super LoLux HD VN-H157WPU User manual

JVC
JVC VN-T216U User manual

JVC
JVC VN-X35U - Network Camera User manual

JVC
JVC VN-H57U Series User manual