JVC LT-19K80ZU User manual

WIDE LCD PANEL TV
INSTRUCTIONS
16:9 LCD TV
BEDIENUNGSANLEITUNG
TELEVISEUR A ECRAN LCD PANORAMIQUE
MANUEL D’INSTRUCTIONS
BREEDBEELD LCD TV
GEBRUIKSAANWIJZING
TELEVISOR CON PANEL LCD PANORÁMICO
MANUAL DE INSTRUCCIONES
TV LCD WIDESCREEN
INSTRUZIONI
TELEVISOR COM ECRÃ PANORÂMICO DE
CRISTAL LÍQUIDO
INSTRUÇÕES
LT-19K80ZU
LT-19K80WU
ENGLISH
DEUTSCH
FRANÇAIS
NEDERLANDS
CASTELLANO
ITALIANO
PORTUGUÊS

1
ENGLISH
Guidelines for safe operation
This equipment has been designed and manufactured to comply with international safety
standards. However, as with any electrical appliance, care must be taken to ensure optimal results
and operational safety.
• Before attempting to use this equipment, read the operating instructions thoroughly.
• Ensure that all electrical connections (including the mains plug, extension leads, etc.) have
been made in accordance with the manufacturer’s instructions.
• If ever in doubt about the installation, operation or safety of this equipment, consult your dealer.
• Handle all glass panels or covers with care.
• Never operate this equipment if it appears damaged or operates abnormally. Turn the power
off, disconnect the main power plug and consult your dealer.
• Never remove any affixed panels or covers. Doing so may result in electrical shock.
• Never leave this equipment operating unattended unless otherwise specifically stated that it is
designed to do so or in standby mode. Only use the designated power switch to turn off the
power and ensure that all potential users are instructed how to do so. Make special
arrangements for infirm or handicapped persons.
• Never watch TV while operating a motor vehicle. It is illegal to watch TV while driving.
• Never listen to headphones at high volume. Doing so may damage your hearing.
• Never obstruct the ventilation of this equipment. Doing so may cause overheating and result in
a malfunction or damage.
• Never use makeshift stands or attempt to affix legs with wood screws. When using a
manufacturer’s approved stand or legs, use only the fixtures provided and follow the
installation instructions.
• Never allow this equipment to be exposed to rain or moisture.
• Never allow anyone, especially children, to insert anything into an opening in the case. Doing
so may result in a fatal electrical shock.
• Never guess or take chances with electrical equipment of any kind. It is better to be safe than sorry.

2
Thank you for buying this JVC LCD flat television.
To make sure you understand how to use your new TV, please read this manual thoroughly before you
begin. (“LCD” stands for Liquid Crystal Display.)
WARNING: TO PREVENT FIRE OR SHOCK HAZARD, DO NOT EXPOSE THIS
APPLIANCE TO RAIN OR MOISTURE.
WARNING: WHEN PUTTING THE TV DOWN, DO SO SLOWLY AND
CAREFULLY ONTO A FLAT SURFACE.
WARNING
• Fingers may be trapped under the TV causing injuries. Hold the TV
at the bottom in the middle, and do not allow it to tilt up or down.
WARNING
• The TV may fall causing injuries. Hold the bottom of the
stand with your hand and tilt the TV up and down.
• Do not allow children to hang from the TV, place their
elbows on the TV or lean against the TV. Doing so may
cause the TV to fall over and lead to injuries.
CAUTION
• The TV screen may be damaged if the TV is carried as shown in the
diagram.

3
ENGLISH
Failure to heed the following precautions may result in damage to the TV or
remote control.
DO NOT block the TV’s ventilation openings or holes.
(If the ventilation openings or holes are blocked by a newspaper or cloth, etc., the heat may not be
able to get out.)
DO NOT place anything on top of the TV.
(such as cosmetics or medicines, flower vases, potted plants, cups, etc.)
DO NOT allow objects or liquid into the cabinet openings.
(If water or liquid is allowed to enter this equipment, fire or electric shock may be caused.)
DO NOT place any naked flame sources, such as lighted candles, on the TV.
Handling the glossy finish of the TV
Be careful when handling the glossy finish of the TV
The glossy finish of the TV scratches easily.
• Protection films have been pasted onto the glossy finish
of the TV to prevent scratches. Peel off the films after
the TV has been placed properly.
• If the glossy finish gets dirty, clear the dust off the
glossy finish first. Then wipe softly with a soft cloth. If
you do not clear the dust first, or you wipe the glossy
finish too hard the glossy finish may be scratched.
CAUTION:
• Operate only from the power source specified (AC 220 – 240 V, 50/60 Hz) on the unit.
• Avoid damaging the AC plug and power cord.
• When you are not using this unit for a long period of time, it is recommended that you disconnect
the power cord from the main outlet.
Pixel defects
LCDs use collections of fine points (“pixels”) to display images. While there is no problem with
more than 99.99% of these pixels, please understand that a very small number of pixels may not
light, or may light all the time.
Distance recommendations
Avoid improper installation and never position the unit
where good ventilation is impossible.
When installing this TV, distance recommendations
must be maintained between the set and the wall, as well
as inside a tightly enclosed area or piece of furniture.
Keep to the minimum distance guidelines shown for
safe operation.
Make enough room for inserting and removing the power plug. Place the TV as close to the outlet
as possible. The main power supply for this TV is controlled by inserting or removing the power
plug.
The surface of the TV screen is easily damaged. Be very careful with it when handling the TV.
Should the TV screen become soiled, wipe it with a soft dry cloth. Never rub it forcefully.
Never use any cleaner or detergent on it.
In the event of a fault, unplug the unit and call a service technician. Do not attempt to repair it
yourself or remove the rear cover.
Glossy
finish

4
Cleaning the screen
The screen is coated with a special thin film to reduce reflection. If this film is damaged, uneven
colours, discolouration, scratches, and other problems that cannot be repaired may occur. Pay
attention to the following when handling the screen.
• Do not use glue or adhesive tape on the screen.
• Do not write on the screen.
• Do not allow the screen to come in contact with any hard objects.
• Do not allow condensation to form on the screen.
• Do not use alcohol, thinner, benzene or other solvents on the screen.
• Do not rub the screen hard.
Information for Users on Disposal of Old Equipment
NOTE:
Due to static electricity, the TV may be covered with dust.
If this happens, wipe the TV with a soft cloth being careful not to scratch the TV.
[European Union]
Attention:
This symbol is
only valid in the
European Union.
This symbol indicates that the electrical and electronic equipment should not be
disposed as general household waste at its end-of-life. Instead, the product should
be handed over to the applicable collection point for the recycling of electrical and
electronic equipment for proper treatment, recovery and recycling in accordance
with your national legislation.
By disposing of this product correctly, you will help to conserve natural resources
and will help prevent potential negative effects on the environment and human
health which could otherwise be caused by inappropriate waste handling of this
product. For more information about collection point and recycling of this
product, please contact your local municipal office, your household waste
disposal service or the shop where you purchased the product.
Penalties may be applicable for incorrect disposal of this waste, in accordance
with national legislation.
(Business users)
If you wish to dispose of this product, please visit our web page www.jvc-
europe.com to obtain information about the take-back of the product.
[Other Countries outside the European Union]
If you wish to dispose of this product, please do so in accordance with applicable
national legislation or other rules in your country for the treatment of old electrical
and electronic equipment.
Dear Customer,
This apparatus is in conformance with the valid European directives and standards regarding
electromagnetic compatibility and electrical safety.
European representative of Victor Company of Japan, Limited is:
JVC Technology Centre Europe GmbH
Company name changed in:
JVC Technical Services Europe GmbH
Postfach 10 05 52
61145 Friedberg
Germany

5
CONTENTS
Setting up your TV ...................................6
Installation.................................................. 6
Using the stand .......................................... 6
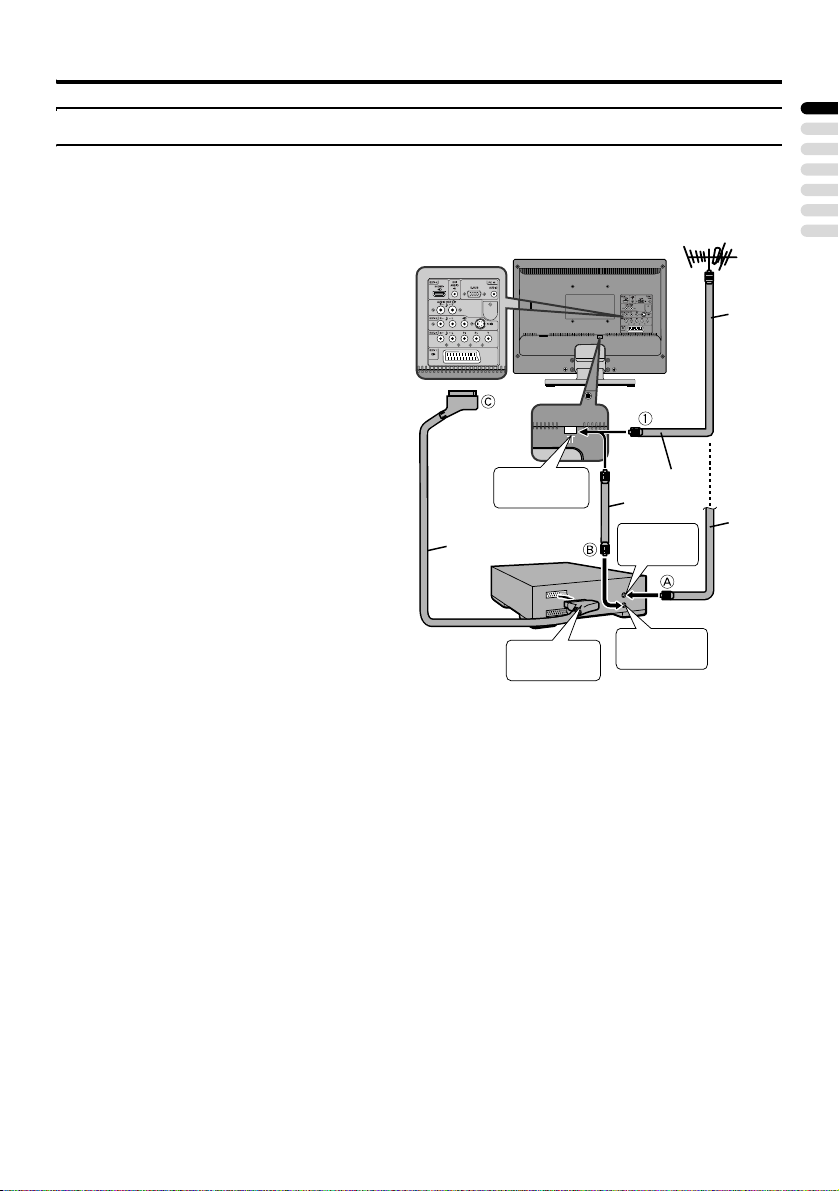
Using the Ferrite cores............................... 6
Connecting the aerial................................. 7
Connecting the power cord to the AC
outlet....................................................... 8
Putting the batteries into the remote
control..................................................... 8
Initial settings ............................................. 8
Basic operations (TV) ............................10
Turn the TV on from standby mode ......... 10
Choose a TV channel .............................. 10
Watching images from external devices .. 10
Adjust the volume .................................... 11
Using the Menu........................................ 11
Basic operations (Remote control) ......12
Turn the TV on or off from standby mode 13
Choose a TV channel and watch images
from external devices ........................... 13
Adjust the volume .................................... 13
Information function ................................. 14
ZOOM function......................................... 14
Sleep Timer function ................................ 15
Picture Mode function .............................. 15
Teletext function ....................................16
Basic operation ........................................ 16
Hold.......................................................... 16
Sub-page ................................................. 16
Reveal...................................................... 17
Size .......................................................... 17
Index ........................................................ 17
Cancel...................................................... 17
Setting the TV.........................................18
Basic operation ........................................ 18
Picture menu ..........................................19
Picture Mode............................................ 19
Bright-1 .................................................... 19
Contrast ................................................... 19
Colour ...................................................... 19
Sharpness................................................ 19
Picture Reset ........................................... 19
Picture Advanced Setting......................... 19
Sound menu ...........................................21
Bass ......................................................... 21
Treble....................................................... 21
Balance .................................................... 21
Sound Mode............................................. 21
Sound Reset ............................................ 21
Install menu ............................................22
Auto Program........................................... 22
Manual Program ...................................... 22
Program Edit ............................................ 23
Program List............................................. 24
Colour System.......................................... 24
Feature menu ......................................... 25
Language ................................................. 25
Aspect Ratio............................................. 25
Sleep Timer.............................................. 25
Child Lock ................................................ 25
Blue Back ................................................. 25
PC Setting menu .................................... 26
Auto.......................................................... 26
Dot Clock.................................................. 26
Clock Phase ............................................. 26
H. Position................................................ 26
V. Position ................................................ 26
Displaying a computer screen.............. 27
Connecting to the computer ..................... 27
Watching images from a computer .......... 27
Table of signals for each type of
computer............................................... 27
Additional preparation .......................... 29
Connecting external equipment ............... 29
Operating a JVC brand VCR or DVD
player.................................................... 32
Troubleshooting .................................... 33
Specifications ........................................ 35

6
Setting up your TV
• Only use a VESA 100 ×100 mm compatible mounting unit (optional) when installing this TV
on the wall.
• Make sure that the TV is installed on the wall by a skilled installer.
Installation
Cautions for installation
• Install the TV in a corner on a wall or on the floor so as to keep cords out of the way.
• The TV will generate a slight amount of heat during operation. Ensure that sufficient space is
available around the TV to allow satisfactory cooling. See “Distance recommendations” on
page 3.
Using the stand
This TV comes with a table top stand already attached.
This stand can be used to adjust the direction of the TV screen up and down.
Using the Ferrite cores
There are two Ferrite cores in your TV’s packaging. These cores are used to prevent possible
electromagnetic interferences through the audio cables.
Tilt the TV up and down:
While holding the bottom of the stand with one
hand, use your other hand to hold the middle of the
top of the TV and slowly tilt the TV up and down.
• As a safety measure, the stand needs to be
constructed so that it requires a certain amount of
force to tilt the TV.
Installing the Ferrite cores:
After the DVI audio or PC audio cable is connected,
clip the Ferrite core on the cable as shown, making
sure that the core is located near the TV side.

Setting up your TV
7
ENGLISH
Connecting the aerial
Caution
• Turn off all the equipment including the TV before connecting anything.
If you connect via a device with an
antenna terminal such as a VCR,
follow A→B→Cin the right
diagram.
If you connect the antenna
directly to the TV, follow 1.
• The connecting cables are not provided.
• To connect more equipment, see
“Connecting external equipment” on
page 29.
• To connect additional audio equipment,
see “Connecting speakers/amplifier” on
page 31.
• When connecting via a device with an
antenna terminal such as a VCR,
depending on the connection method, the
signal may be weakened. If this happens,
use a booster to increase the signal
strength.
• In areas with a lot of radio communication
such as near ports or airports, noise may
be introduced into the picture or sound. In
such cases, reception may be improved by
using a high-performance antenna.
• Read the instruction manual of the
devices which you connect to the TV.
75-ohm
Coaxial
Cable
21-pinSCART
Cable
75-ohm
Coaxial
Cable
AV IN/OUT
Terminal
To Aerial
Output
To Aerial
Input
VCR
Aerial
75-ohm
Coaxial
Cable
To aerial
socket

8
Setting up your TV
Connecting the power cord to
the AC outlet
Insert the AC plug on the power cord from
the TV into an AC outlet. The TV will enter
standby mode.
Caution
• Operate only from the power source
specified (AC 220 – 240 V, 50/60 Hz) on
the unit.
• Remove the AC plug from the outlet to
completely disconnect the TV from the
power supply.
Putting the batteries into the
remote control
Use two AA/R6 dry cell batteries.
Insert the batteries from the -end, making
sure the +and -polarities are correct.
• Follow the warnings printed on the
batteries.
• Battery life is about six months to one
year, depending on how much you use the
remote control.
• The batteries supplied are only for setting
up and testing your TV, please replace
them as soon as you need to.
• If the remote control does not work
properly, replace the batteries.
Initial settings
When the TV is first turned on, it goes into
the initial settings mode and the Quick Setup
menu will appear. Follow the instructions on
the screen display to make the initial settings.
1 Make sure to set the VCR/TV/DVD
switch on the remote control to the
TV position
• You cannot turn the TV on when the
VCR/TV/DVD switch is set to the
VCR or DVD position.
2 Press the (Standby) button on
the remote control
The TV turns on from standby mode and
the Quick Setup menu is displayed.
• Check that the AC plug on the power
cord from the TV is connected to AC
outlet.
MENU button
7/OK
buttons
button
VCR/TV/DVD
switch
Remote control
sensor
Power lamp

Setting up your TV
9
ENGLISH
• If the Quick Setup menu does not
appear this is because your TV has
already been turned on for the first
time. Use the “Language” and “Auto
Program” functions to make the initial
settings. For details, see “Language”
on page 25 and “Auto Program” on
page 22.
3 Press the 2and 3buttons to
choose the menu language. Then
press the 4button
4 Press the 2and 3buttons to
choose the country where you are.
Then press the 4button
When your country is selected, the Sound
System will change automatically to suit.
5 Press the 4button to choose
Search, then press the OK button
to start the TV channel Search
function
• To stop the Search function:
Press the MENU button.
The TV channels you receive are
automatically stored in the Programme
numbers (Pr.).
After the TV channels have been
registered in the Programme
numbers (Pr.), the first stored TV
channel will be displayed
• If you want to, you can now edit the
Programme numbers (Pr.) using the
Program Edit function. For details, see
“Program Edit” on page 23.
• If a TV channel you want to view is
not set to a Programme number (Pr.),
you can set it using the Manual
Program function. For details, see
“Manual Program” on page 22.
• The Search function does not set the
Programme number Pr. 0 for your
video cassette recorder. You will need
to set this using the Manual Program
function. For details, see “Manual
Program” on page 22.
Quick Setup
Language English
Country Germany
Sound System BG
Search > 100%
29 seconds to go.
BACK:
Quick Setup
Language English
Country Germany
Sound System BG
Search > 100%
25 seconds to go.
BACK:
Quick Setup
Language English
Country Germany
Sound System BG
Search > 15%
BACK:

10
Basic operations (TV)
1Remote control sensor
2Power lamp
3MENU button
4TV/AV/OK button
5Pbuttons
6(Volume) buttons
7(Standby) button
8Headphone jack (mini jack)
Turn the TV on from standby
mode
Press the (Standby) button to turn
the TV on from standby mode.
When the TV is turned on, the power lamp
lights green.
To turn the TV off:
Press the (Standby) button again. The
power lamp turns red.
• It takes approximately 5 to 8 seconds for
the TV to turn on or go into the standby
mode after the (Standby) button on
the remote control or the (Standby)
button on the TV is pressed.
Choose a TV channel
Press the P buttons to choose a
programme number (Pr.)
Watching images from
external devices
Press the TV/AV/OK button to choose
an EXT terminal.
EXT-2
Last
Programme
number
EXT-1
EXT-1
EXT-2
EXT-3
EXT-3 S-VIDEO
PC IN
EXT-3
EXT3-S
PC
HDMI
EXT-4
TV mode EXT modes

12
Basic operations (Remote control)
1(Muting) button
2Number buttons
3(Information) button
4ZOOM button
5(No function)
6(No function)
77buttons
8(Text) button
9P buttons
0VCR/DVD/Teletext control buttons
-(Standby) button
=VCR/TV/DVD switch
~AV button
!PICTURE button
@(Sleep Timer) button
#MENU button
$OK button
%BACK button
^(Volume) buttons

Basic operations (Remote control)
13
ENGLISH
Turn the TV on or off from
standby mode
Press the (Standby) button to
turn the TV on or off.
When the TV is turned on, the power lamp
turns from red to green.
• The power can also be turned on by
pressing the AV button, P buttons
or Number buttons.
• The TV will turn off automatically when
no TV input signal (not EXT input
signals) is detected for 5 minutes.
Caution
•The (Standby) button on the TV
does not fully isolate the TV from the
AC supply. If you are not going to use
the TV for a long period, be sure to
disconnect the AC plug from the AC
socket.
Choose a TV channel and
watch images from external
devices
Use the Number buttons:
Enter the programme number (Pr.)
of the channel using the number
buttons.
Example:
•Pr.6→press 0 and 6
• Pr. 12 →press 1and 2
Use the P buttons:
Press the P buttons to
choose the programme number
(Pr.) you want.
Use the AV button:
Press the AV button to choose an
EXT terminal.
• If you do not have a clear picture or no
colour appears, change the Colour System
manually. See “Colour System” on
page 24.
• If you cannot hear the normal sound even
if the picture of the TV channel appears
normally, follow the description “Manual
Program” on page 22 to use the Sound
System function to change the Sound
System setting.
To return to a TV channel:
Press the P buttons or the Number
buttons.
To use the programme number Pr. 0
(AV):
When the TV and VCR are connected only
by the aerial cable, choosing the programme
number Pr. 0 (AV) allows you to view
images from the VCR. Set the VCR RF
channel to the programme number Pr. 0 (AV)
manually. For details, see “Manual Program”
on page 22.
Adjust the volume
Press the (Volume) buttons
to adjust the volume.
The volume level indicator appears and the
volume changes as you press the
(Volume) buttons.
To turn the TV on or off, set the VCR/TV/
DVD switch on the remote control to the
TV position and press the (Standby)
button.
If the VCR/TV/DVD switch on the remote
control is set to a position other than TV,
the TV will not be turned on or off even if
the (Standby) button is pressed.
EXT-2
Last
Programme
number
EXT-1
EXT-1
EXT-2
EXT-3
EXT-3 S-VIDEO
PC IN
EXT-3
EXT3-S
PC
HDMI
EXT-4
TV mode EXT modes

14
Basic operations (Remote control)
Muting the sound
Press the (Muting) button to turn
off the sound.
Pressing the (Muting) button again
restores the previous volume level.
Information function
You can see the channel number of the
programme you are watching. The channel
number and channel name (when the channel
name is registered) of the programme you are
watching or the EXT terminal name is
displayed.
Press the (Information) button to
display the information you want to
see
ZOOM function
You can change the screen size according to
the picture aspect ratio. Choose the optimum
one from the following ZOOM modes.
• The ZOOM mode is fixed at Full when
1080i or 720p component video (HDMI)
signal is displayed.
• Only Full and Regular can be selected
when you are using the TV as a PC
screen.
Auto:
When a WSS (Wide Screen Signalling)
signal, which shows the aspect ratio of the
picture, is included in the broadcast signal or
the signal from an external device, the TV
automatically changes the ZOOM mode to
Zoom mode or Full mode according to the
WSS signal.
• When the AUTO (WSS) mode does not
function correctly due to poor WSS signal
quality or when you want to change the
ZOOM mode, press the ZOOM button
and change to another ZOOM mode.
Regular:
Use to view a normal picture (4:3 aspect
ratio) as this is its original shape.
Panoramic:
This stretches the left and right sides of a
normal picture (4:3 aspect ratio) to fill the
screen, without making the picture appear
unnatural.
This mode may result in information such as
headlines or rolling text at the very top or
bottom of the screen not being fully viewable
on some programmes.
Zoom:
This zooms up the wide picture (16:9 aspect
ratio) to the full screen.
Zoom Subtitle:
This zooms up the wide picture (16:9 aspect
ratio) with subtitles to the full screen.
Full:
This uniformly stretches the left and right
sides of a normal picture (4:3 aspect ratio) to
fill the wide TV screen.
• For 16:9 aspect ratio pictures that have
been squeezed into a normal picture (4:3
aspect ratio), use the Full mode to restore
the picture to its original shape.
Full Square:
This zooms up the wide picture (14:9 aspect
ratio) to the upper and lower limits of the
screen.
Choose the ZOOM mode
Press the ZOOM button to choose a
ZOOM mode
The picture expands and the chosen
ZOOM mode is displayed instantly. To
select other ZOOM modes, press the
button several times.

Basic operations (Remote control)
15
ENGLISH
• The Full Square mode cannot be
selected with the ZOOM button. It can
only be selected by changing the
Aspect Ratio setting in the Feature
menu.
• The ZOOM mode may be
automatically changed by the control
signal from an external device. When
you want to return to the previous
ZOOM mode, choose the ZOOM
mode again.
Sleep Timer function
You can set the TV to automatically turn off
after a set period of time.
Press the (Sleep Timer) button
several times to turn on the Sleep
Timer function and set the period of
time
You can set the period of time for up to
120 minutes (2 hours) in 10 minute steps.
To cancel the Sleep Timer function:
Press the (Sleep Timer) button to set
the period of time to “Off”.
• The Sleep Timer function cannot be used
to turn off the TV’s main power.
• When the Sleep Timer function is on, you
can press the (Sleep Timer) button to
display the remaining period of time of
the Sleep Timer function.
• You can also set the Sleep Timer function
with the “Feature menu” (see “Sleep
Timer” on page 25).
Picture Mode function
You can choose one of the Picture Modes to
adjust the picture settings automatically.
Press the PICTURE button several
times to select a suitable Picture
Mode
Bright:
Heightens contrast and sharpness.
Standard:
Standardizes picture adjustment.
Soft:
Softens contrast and sharpness.
Manual:
Your own customised picture mode.
• You can also choose a Picture Mode and
customise the Manual mode with the
“Picture menu” (see “Picture Mode” on
page 19).

16
Teletext function
Basic operation
1 Choose a TV channel with a
Teletext broadcast
2 Press (Text) button to display
the Teletext
Pressing (Text) button changes the
mode as follows:
3 Choose a Teletext page by
pressing the P buttons,
Number buttons or Colour buttons
To return to the TV mode:
Press the (Text) button.
• If you have trouble receiving Teletext
broadcasts, consult your local dealer or
the Teletext station.
• You cannot operate menus when
viewing a Teletext programme.
Hold
You can hold a Teletext page on the screen
for as long as you want, even while several
other Teletext pages are being received.
Press the (Hold) button
To cancel the Hold function:
Press (Hold) button again.
Sub-page
Some Teletext pages include sub-pages that
are automatically displayed.
1 Choose a Teletext page that
includes sub-pages
A Teletext page that includes sub-pages is
indicated by an “S” following the Teletext
page number on the top left corner of the
screen.
2 Press the (Subpage) button
3 Press the number buttons to enter
sub-page number
VCR/TV/
DVD switch
Number
buttons
Colour
buttons
7
buttons
TV mode Text mode
Hold indication

Teletext function
17
ENGLISH
Reveal
Some Teletext pages include hidden text
(such as answers to a quiz).
You can display the hidden text.
Each time you press the (Reveal)
button, text is hidden or revealed
Size
You can double the height of the Teletext
display.
Press the (Size) button
Index
You can return to the index page instantly.
Press the (Index) button
Returns to page 100 or a previously specified
page.
Cancel
You can search for a Teletext page while
watching TV.
1 Press the Number button to enter a
page number, or press a Colour
button
The TV searches for a Teletext page.
2 Press (Cancel) button
The TV programme appears. When the
TV finds the Teletext page, its page
number appears in the upper left of the
screen.
3 Press (Cancel) button to return
to a Teletext page when the page
number is on the screen
• The TV mode cannot be resumed by
pressing the (Cancel) button. To
return to the TV mode, press the
(Text) button.

18
Setting the TV
Call the menu and perform the settings for
the picture and sound.
Buttons used to operate the menus
Basic operation
1 Press the MENU button to display
the menu
2 Press the 1and 4buttons to
choose the menu you want to use
and then press the OK button
3 Press the 1and 4buttons to
choose the item to be set, press the
2and 3buttons to set the item, or
press the OK button to confirm
Items with a ‘>’ symbol behind their
names have submenus. Press the OK or 3
button to enter the submenu.
• Press the BACK button to return to the
previous menu.
• Press the MENU button to exit from
the menu.
• Some menu items may not be operated
or set depending on the TV status or
other menu item settings. Menu items
that cannot be operated or set are
displayed in grey in the menu and
cannot be chosen.
Types of menu
• The menu will disappear after about
one minute if no operation is
performed.
Operation with the buttons on the TV
You can also operate the menus using the
buttons on the TV.
MENU
OK
BACK
Picture
Picture Mode Manual
Bright-1 32
Contrast 44
Colour 33
Sharpness 0
Picture Advanced Setting >
Picture Reset
BACK: OK:
Sound
Bass 0
Treble 0
Balance 0
Sound Mode Stereo
Sound Reset
BACK: OK:
Chosen menu name
Chosen
menu
Picture menu
(see page 19)
Sound menu
(see page 21)
Install menu
(see page 22)
Feature menu
(see page 25)
PC Setting menu
(see page 26)
5buttons
6buttons
TV/AV/OK button
MENU button

19
ENGLISH
Picture menu
• In the Picture menu, the last setting made
for each item is memorised.
Picture Mode
You can choose one of the Picture Modes to
adjust the picture settings automatically or
customise your own Picture Mode by
adjusting the Picture settings.
Bright:
Heightens contrast and sharpness.
Standard:
Standardizes picture adjustment.
Soft:
Softens contrast and sharpness.
Manual:
Your own customised Picture Mode. When
this mode is chosen, you can change the
Bright-1, Contrast, Colour and Sharpness
settings to suit your preferences.
Bright-1
You can adjust the picture brightness.
2: darker
3: brighter
Contrast
You can adjust the picture contrast.
2:lower
3: higher
Colour
You can adjust the picture colour.
2: lighter
3: deeper
Sharpness
You can adjust the picture sharpness.
2: softer
3:sharper
Picture Reset
You can reset all settings in the Picture menu
using this function.
Press the OK or 3button to reset the
settings
• This function is only available when the
Picture Mode is set to Manual.
Picture Advanced Setting
Choose Picture Advanced Setting and press
the OK or 3button to display the sub-menu.
Hue
You can adjust the picture hue.
2: reddish
3 :greenish
• You can change the Hue setting (picture
hue) when the Colour System is
NTSC3.58, or NTSC4.43.
Colour Temperature
You can select one of three Colour
Temperature modes (three tones of white) to
adjust the white balance of the picture. Since
white is the colour which is used as a
reference for all the other colours, changing
the Colour Temperature mode affects the
appearance of all the other colours on the
screen.
Picture
Picture Mode Manual
Bright-1 32
Contrast 44
Colour 33
Sharpness 0
Picture Advanced Setting >
Picture Reset
BACK: OK:
Picture Advanced Setting
Hue 0
Colour Temperature Warm
Bright-2 Bright
BACK:
This manual suits for next models
1
Table of contents
Other JVC LCD TV manuals

JVC
JVC LT-46AM73 User manual

JVC
JVC LCT2403-002A-A User manual

JVC
JVC Wide LCD Panel TV LT-42DV8BG/N/T User manual

JVC
JVC LT-19LK3BJ User manual

JVC
JVC LCT2387-001B-A User manual

JVC
JVC LT-32HG25J User manual

JVC
JVC LT42P789 - 42" LCD TV User manual

JVC
JVC HDMI LT-42DS9BU User manual

JVC
JVC LT-Z32SX4B User manual

JVC
JVC LT-19EM74 User manual