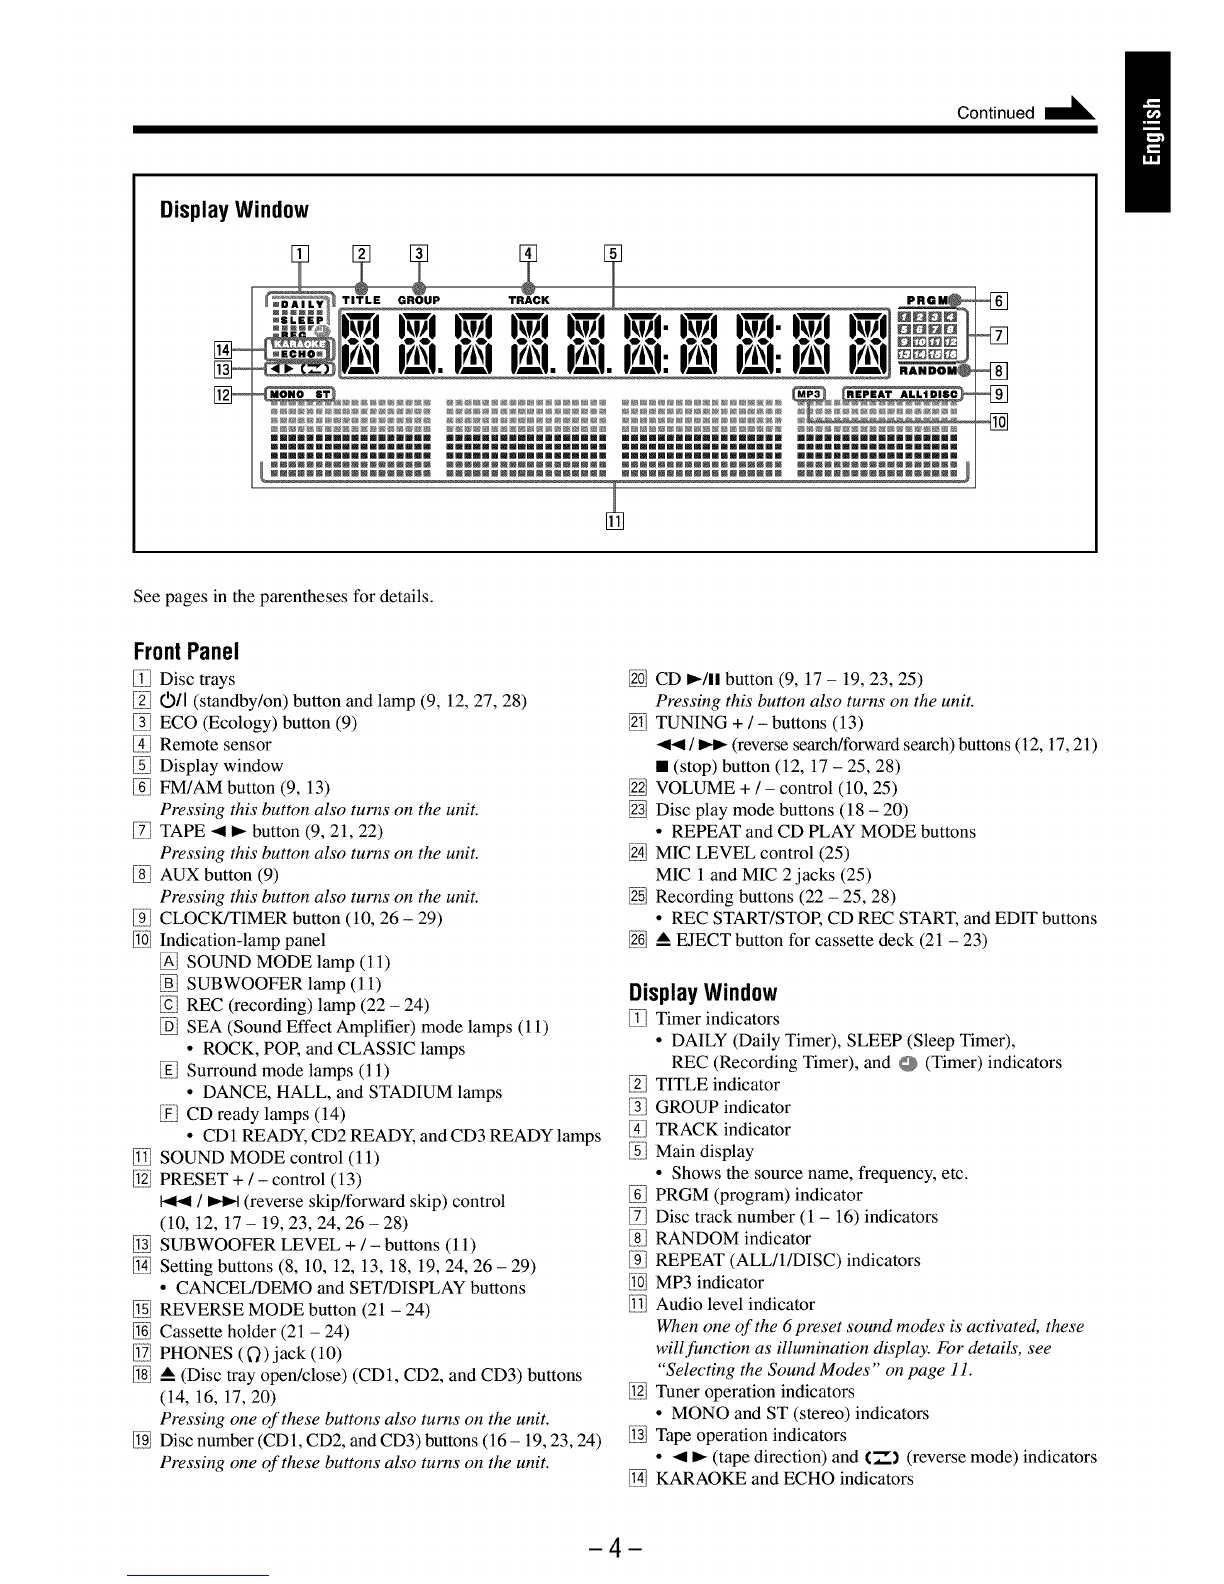
JVC CA-HXZ3 User manual

JVC
COMPACT COMPONENT SYSTEM
SISTEMAS DE COMPONENTES COMPACTOS
SISTEMA DE COMPONENTE COMPACTO
CA-HXZ3
m
QOQ_
QQQ_
Q©
,JVC
I I
I I
DIGITAL AUDIO
INSTRUCTIONS
MANUAL DE INSTRUCCIONES
INSTRU(_6ES For Customer Use:
Enter belowthe Model No. and Serial No.
which are located either on the rear, bot-
tom or side of the cabinet. Retain this
information for future reference.
Model No.
Serial No.
GVT0086-012A
[UW, UJ]

Warnings,CautionsandOthers
Avisos,precaucionesy otrasnotas
Advert_ncias,precau_Oese outrasnotas
Caution-- 0/I (standby/on) button!
Disconnect the mains plug to shut the power off
completely. The 0/I (standby/on) button in any position
does not disconnect the mains line. The power can be
remote controlled.
Precaucibn--lnterruptor O/I (encendido/apagado)!
Desconectar el cable de alimentaci6n para desactivar la
alimentaci6n totalmente. Cualquier que sea la posici6n de
ajuste del interruptor O/I (encendido/apagado), la
alimentaci6n no es cortada completamente. La
alimentaci6n puede ser controlada remotamente.
Precaug_o--lnterruptor 0/I (esperar/ligar)!
Desconectar o cabo de alimenta_&o para desligar a
alimenta_&o por completo. Qualquer que seja a posi_&o
de ajuste do interruptor 0/I (esperar/ligar), a alimenta_&o
n&o e completamente cortada. A alimenta_&o pode ser
controlada remotamente.
-G-1 -

CAUTION
To reduce the risk of electrical shocks, fire, etc.:
1. Do not remove screws, covers or cabinet.
2. Do not expose this appliance to rain or
moisture.
CAUTION
• Do not block the ventilation openings or holes.
(If the ventilation openings or holes are blocked by a
newspaper or cloth, etc., the heat may not be able to get out.)
• Do not place any naked flame sources, such as lighted
candles, on the apparatus.
• When discarding batteries, environmental problems must be
considered and local rules or laws governing the disposal of
these batteries must be followed strictly.
• Do not expose this apparatus to rain, moisture, dripping or
splashing and that no objects filled with liquids, such as
vases, shall be placed on the apparatus.
PRECAUClON
Para reducir riesgos de choques electricos,
incendio, etc.:
1. No extraiga los tornillos, los cubiertas ni la
caja.
2. No exponga este aparato a la Iluvia o a la
humedad.
PRECAUCION
• No obstruya las rendijas o los orificios de ventilaci6n.
(Si las rendijas o los orificios de ventilaci6n quedan tapados
con un peri6dico, un trozo de tela, etc., no se podrA disipar
el calor).
• No ponga sobre el aparato ninguna llama al descubierto,
como velas encendidas.
• Cuando tenga que descartar las pilas, tenga en cuenta los
problemas ambientales y observe estrictamente los
reglamentos o las leyes locales sobre disposici6n de las
pilas.
• No exponga este aparato a la Iluvia, humedad, goteos o
salpicaduras. Tampoco ponga recipientes conteniendo
liquidos, como floreros, encima del aparato.
PRECAUQ._O
Para reduzir riscos de choques eletricos,
inc6ndio, etc.:
1. NAo remova parafusos e tampas ou
desmonte a caixa.
2. NAo exponha este aparelho & chuva nem
& umidade.
AVISO
• N&o obstrua as aberturas e oriffcios de ventila£&o. (Se os
oriffcios ou aberturas de ventila£&o estiverem obstrufdos
por qualquer papel ou tecido, nAo haverA circula£&o do ar
quente.)
• N&o coloque nenhum objeto com chamas, como velas
acesas, sobre o aparelho.
• Ao descartar as baterias, leve em considera£&o os
problemas que possam ser causados ao meio ambiente e
os regulamentos e leis locals e governamentais sobre
recolhimento dessas baterias devem ser rigorosamente
seguidos.
• N_o exponha este aparelho & chuva, umidade, pingos ou
esguichos de Agua, nem coloque em cima do mesmo
qualquer tipo de recipiente que contenha Ifquidos, como por
exemplo vasos.
-G-2-

Caution: Proper Ventilation
To avoid risk of electric shock and fire, and to prevent damage, locate the apparatus as follows:
1 Front: No obstructions and open spacing.
2 Sides/Top/Back: No obstructions should be placed in the areas shown by the dimensions below.
3 Bottom: Place on the level surface. Maintain an adequate air path for ventilation by placing on a
stand with a height of 10 cm or more.
Precauci6n: El aparato debe estar bien ventilado
Para evitar posibles riesgos de descargas electricas e incendios y prevenir cualquier posible da_o, coloque
el aparato del modo siguiente:
1 Parte delantera: No ponga nada delante, deje el espacio libre.
2 Laterales/parte superior/parte trasera:
No se deberia colocar nada en las Areas y las distancias que se detallan a continuaci6n.
3 Parte inferior: Coloque el aparato sobre una superficie recta. Debe haber buena circulaci6n de
aire; para ello, coloque el aparato sobre una base a una altura minima de 10 cm.
Precau_o: Ventila_o adequada
Para evitar riscos de choques eletricos e inc_ndios, e prevenir avarias, instale o aparelho como segue:
1 Parte frontal: Sem obstru_Ses e espa_os abertos.
2 Partes laterais/ Tampa/ Posterior:
Nenhuma obstru_&o devera ser colocada entre as areas cujas dimensSes s&o indicadas
abaixo.
3 Parte inferior: Instale-o sobre uma superficie plana. Devera ser mantido espa_o suficiente para a
ventila_&o se este for instalado numa posi_&o que tenha uma altura de 10 cm ou mais.
Front view Side view
Vista frontal Vista lateral
]15cm 115cm
15 cm 1 15 cm
10 cm
15 cm
- G-3-

IMPORTANT FOR LASER PRODUCTS
IMPORTANTE PARA PRODUCTOS LASER
IMPOTANTE PARA PRODUTOS LASER
REPRODUCTION OF LABELS / REPRODUCCION DE ETIQUETAS / REPRODU(_.,40 DE ETIQUETAS
(_) CLASSIFICATION LABEL, PLACED ON EXTERIOR
SURFACE
(D ETIQUETA DE CLASIFICACION, PROVISTA
SOBRE LA SUPERFICIE EXTERIOR
(D ETIQUETA DE CLASSIFICA(_,_O LOCALIZADA NA
PARTE POSTERIOR DA CAIXA DO APARELHO
(_ WARNING LABEL, PLACED INSIDE THE UNIT
®
®
ETIQUETA DE ADVERTENCIA, PEGADA EN EL
INTERIOR DE LA UNIDAD
ETIQUETA DE ADVERTC:NCIA LOCALIZADA NA
PARTE INTERNA DA UNIDADE
DANGER:Invisiblelaser
radiationwhenopenand
I I interlockfailed0rdefeated.
AVOIDDIRECTEXPOSURE
CLASS 1 TOBEAM. (e)
LASER PRODUCT _WRSEL:..L_ligla_-
str;llingved_lJningnar
sikkerliedsafbrydere_rude
affunkti0n.Undg_uds_.t-
telseforstr&ling. (d)
V/WtlH6: 0synligaser-
strainingn_,roennaeel_r
Op,pnaq0cnsptirren_r
urK,0pplad,getraktaej
str_len. is)
VARO:Avattaessaja
suojalukitusohitettaessa
oletalttiinan_kym_tt_-
_lle lasers_teilylle,
A_ikats0s_teeseen.(f)
1. CLASS 1 LASER PRODUCT
2. DANGER: Invisible laser radiation when open and interlock
failed or defeated. Avoid direct exposure to beam.
3. CAUTION: Do not open the top cover. There are no user
serviceable parts inside the Unit; leave all servicing to
qualified service personnel.
1. PRODUCTO L,&SER CLASE 1
2. PELIGRO: En el interior hay radiaci6n laser invisible. Evite
el contacto directo con el haz.
3. PRECAUCION: No abra la tapa superior. En el interior de
la unidad no existen piezas reparables por el usuario; deje
todo servicio tecnico en manos de personal calificado.
1. PRODUTO LASER CLASSE 1
2. PERIGO: O laser emite uma redia£&o invis{vel que
perigosa, caso oaparelho esteja aberto e atrava inoperante
ou danificada. Evite exposi£&o direta ao feixe dos raios.
3. CUIDADO: NAo abra a caixa do aparelho. NAo existem
pe£as reparaveis pelo usuario na parte interna da unidade.
Solicite assist_ncia tecnica somente a pessoal tecnico
qualificado.
- G-4-

Introduction
We would like to thank you for purchasing one of our JVC products.
Before operating this unit, read this manual carefully and thoroughly to
obtain the best possible performance from your unit, and retain this manual
for future reference.
About This Manual
This manual is organized as follows:
•The manual mainly explains operations using the
buttons and controls on the unit. You can also use the
buttons on the remote control if they have the same or
similar names (or marks) as those on the unit.
If operation using the remote control is different from
that using the unit, it is then explained.
•Basic and common information that is the same for many
functions is grouped in one place, and is not repeated in
each procedure. For instance, we do not repeat the
information about turning on/off the unit, setting the
volume, changing the sound effects, and others, which are
explained in the section "Common Operations" on pages 9
to 12.
• The following marks are used in this manual:
Gives you warnings and cautions to prevent
from damage or risk of fire/electric shock.
Also gives you information which is not good
for obtaining the best possible performance
from the unit.
Gives you information and hints you had better
know.
Precautions
Installation
•Install in a place which is level, dry and neither too hot nor
too cold--between 5°C and 35°C.
• Install the unit in a location with adequate ventilation to
prevent internal heat buildup in the unit.
• Leave sufficient distance between the unit and the TV.
• Keep the speakers away from the TV to avoid interference
with TV.
DO NOT install the unit in a location near heat
._ sources, or a place subject to sunlight,
in direct
excessive dust or vibration.
Powersources
• When unplugging from the wall outlet, always pull the
plug, not the AC power cord.
li'_ DO NOT handle theAC cord with wet hands.
power I
Moisture condensation
Moisture may condense on the lens inside the unit in the
following cases:
• After heating starts in the room
• In a damp room
• If the unit is brought directly from a cold to a warm place
Should this occur, the unit may malfunction. In this case, leave
the unit turned on for a few hours until the moisture evaporates,
unplug the AC power cord, and then plug it in again.
Internalheat
A cooling fan is mounted on the rear panel to prevent heat
buildup inside the unit.
___ For safety, observe the following carefully:
•Make sure there is good ventilation around the
unit. Poor ventilation could overheat and damage
the unit.
•DO NOT block the cooling fan and the ventilation
openings or holes. Ifthey are blocked by a
newspaper or cloth, etc., the heat may not be
able to get out.
Others
• Should any metallic object or liquid fall into the unit,
unplug the unit and consult your dealer before operating
any further.
• If you are not going to operate the unit for an extended
period of time, unplug the AC power cord from the wall
outlet.
I_ DO NOT disassemble the unit since there are no I
I
I
user serviceable parts inside.
If anything goes wrong, unplug the AC power cord and
consult your dealer.

Contents
Location of the Buttons and Controls ....................... 3
Front Panel ................................................................. 3
Remote Control .......................................................... 5
Getting Started ....................................... 6
Supplied Accessories .................................................. 6
Putting the Batteries into the Remote Control ........... 6
Connecting Antennas ................................................. 6
Connecting Speakers .................................................. 7
Connecting Other Equipment ..................................... 8
Adjusting the Voltage Selector ................................... 8
Canceling the Demonstration ..................................... 8
Common Operations .................................................. 9
Turning On orOff the Power ..................................... 9
Turning On orOff the Key-touch Tone ...................... 9
Saving the Power Consumption while on Standby
--Ecology Mode .................................................. 9
Selecting the Sources ................................................... 9
Setting the Clock ...................................................... 10
Adjusting the Volume ............................................... 10
Reinforcing the Bass Sound ............................ 11
Selecting the Sound Modes ...................................... 11
Creating Your Own Sound Mode--User Mode ....... 12
Setting the AM Tuner Interval Spacing .................... 12
Listening to FM and AM Broadcasts ...................... 13
Tuning in to a Station ............................................... 13
Presetting Stations .................................................... 13
Tuning in to a Preset Station .................................... 13
Disc Play Introduction .............................................. 14
MP3 Introduction ..................................................... 14
Playing Back Discs .................................................... 16
Loading Discs ........................................................... 16
Playing Back the Entire Discs--Continuous Play ... 16
Basic Disc Operations .............................................. 17
Programming the Playing Order of the Tracks
--Program Play .................................................. 18
Playing at Random--Random Play ......................... 19
Repeating Tracks or Discs--Repeat Play ................ 20
Prohibiting Disc Ejection--Tray Lock .................... 20
Playing Back Tapes ................................................... 21
Playing Back aTape ................................................. 21
Locating the Beginning of aSong--Music Scan ..... 21
Recording .................................................................. 22
Recording on a Tape ................................................. 22
Synchronized Recording .......................................... 23
• Direct Recording ......................................... 23
•Auto Edit Recording (only for audio CDs) ..... 24
Using the Microphones ............................................. 25
Singing along--Karaoke .......................................... 25
• Vocal Masking ................................................ 25
• Microphone Mixing ........................................ 25
Using the Timers ....................................................... 26
Using Daily Timer ................................................ 26
Using Recording Timer ............................................ 28
Using Sleep Timer ................................................ 29
Timer Priority ........................................................... 29
Maintenance .............................................................. 30
Troubleshooting ........................................................ 31
Specifications ............................................................. 32
2

Locationofthe ButtonsandControls
Become familiar with the buttons and controls on your unit.
FrontPanel
FrontPanel
Topview ofIndication-lamppanel[!IQ1
SOUND MODE
REC
[]
[]
3

Continued I_L
Display Window
TITLE GROUP TRACK
i i. i i. i i. i i: i i:
@@@_@@@@_@@@@_@@@@ @@@@_@@@@NN@@@_@@@
@@@N@NNNN@NNNNNNN@ @@@@_@@@@NNN@@_@@@
@@@NNNN@_N@@@N@@@@ @@@@N@@@@@@@@@_@@@
@@@NNNNNN@@@@_@@@@ @@@@_@@@@NNNN@_@@@ _@@@@_@@@@N@@@@_@@
mmmmmmmmmmmmmmmmmm mmmmmmmmmmmmmmmmmm mmmmmmmmmmmmmmmmmm
@@@m@@@@m@@@@m@@@@ @@@@m@@@@m@@@@m@@@ m@@@@m@@@@m@@@@m@@
mmmmmmmmmmmmmmmmmm mmmmmmmmmmmmmmmmmm mmmmmmmmmmmmmmmmmm
@@@_@@@@m@@@@m@@@@ @@@@_@@@@_@@@@_@@@ _@@@@_@@@@_@@@@_@@ J
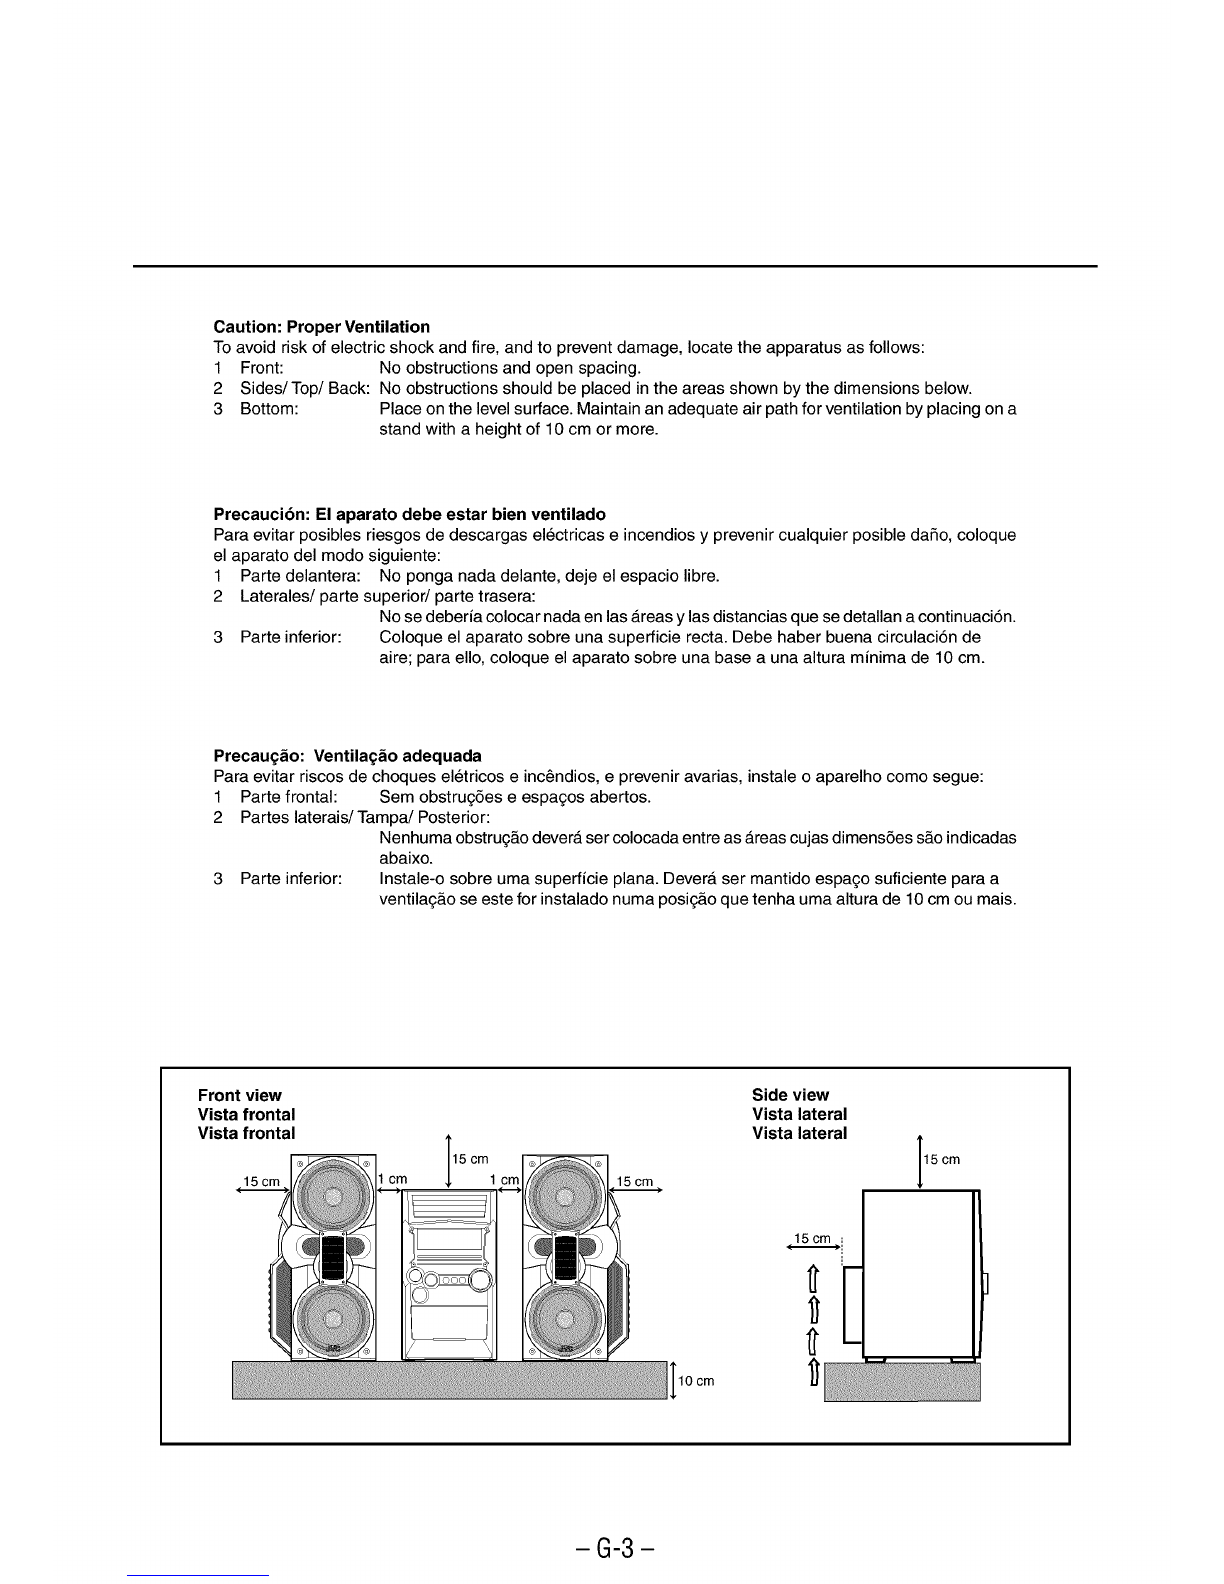
See pages in the parentheses for details.
FrontPanel
ill!illDisc trays
Iii_i]Oil (standby/on) button and lamp (9, 12, 27, 28)
% ECO (Ecology) button (9)
Iii_]Remote sensor
% Display window
% FM/AM button (9, 13)
Pressing this button also turns on the unit.
Ii_i]TAPE _ _ button (9, 21, 22)
Pressing this button also turns on the unit.
% AUX button (9)
Pressing this button also turns on the unit.
Ill}i]CLOCK/TIMER button (10, 26 - 29)
If!fillIndication-lamp panel
@ SOUND MODE lamp (11)
% SUBWOOFER lamp (11)
Ii_i]REC (recording) lamp (22 - 24)
IiiOl SEA (Sound Effect Amplifier) mode lamps (11)
• ROCK, POP, and CLASSIC lamps
Ill Surround mode lamps (11)
• DANCE, HALL, and STADIUM lamps
Iii_ilCD ready lamps (14)
• CD1 READY, CD2 READY, and CD3 READY lamps
I)iii_lSOUND MODE control (11)
Ii_)lPRESET + /- control (13)
/_ (reverse skip/forward skip) control
(10, 12, 17 - 19, 23, 24, 26 - 28)
If!fillSUBWOOFER LEVEL + /- buttons (11)
If!fillSetting buttons (8, 10, 12, 13, 18, 19, 24, 26 - 29)
• CANCEL/DEMO and SET/DISPLAY buttons
If!fillREVERSE MODE button (21 - 24)
If!fillCassette holder (21 - 24)
Ji!i_]PHONES (0) jack (10)
If!fill& (Disc tray open/close) (CD1, CD2, and CD3) buttons
(14, 16, 17, 20)
Pressing one o[these buttons also turns on the unit.
I)il}lDisc number (CD1, CD2, and CD3) buttons (16 - 19, 23, 24)
Pressing one o[these buttons also turns on the unit.
I_l CD _/11 button (9, 17 -19, 23, 25)
Pressing this button also turns on the unit.
I)i!]TUNING + /- buttons (13)
/ _ (reverse search/forward search) buttons (12, 17, 21)
• (stop) button (12, 17 - 25, 28)
I))] VOLUME + /- control (10, 25)
I_i_lDisc play mode buttons (18 - 20)
• REPEAT and CD PLAY MODE buttons
I_i_lMIC LEVEL control (25)
MIC 1 and MIC 2jacks (25)
I)_l Recording buttons (22 - 25, 28)
• REC START/STOP, CD REC START, and EDIT buttons
I)i_lA EJECT button for cassette deck (21 - 23)
Display Window
ill!ill]Timer indicators
• DAILY (Daily Timer), SLEEP (Sleep Timer),
REC (Recording Timer), and @ (Timer) indicators
Ii121]TITLE indicator
% GROUP indicator
Iii_]TRACK indicator
% Main display
• Shows the source name, frequency, etc.
% PRGM (program) indicator
Iii_i]Disc track number (1 - 16) indicators
% RANDOM indicator
Ill}i]REPEAT (ALL/I/DISC) indicators
Ii!ii_]MP3 indicator
I)iii_]Audio level indicator
When one of the 6preset sound modes is activated, these
will function as illumination display. For details, see
"Selecting the Sound Modes" on page 11.
Ii_)lTuner operation indicators
• MONO and ST (stereo) indicators
If!fillTape operation indicators
• _ _ (tape direction) and ('_) (reverse mode) indicators
Ii!ii_]KARAOKE and ECHO indicators
4

RemoteControl
JVC
When using the remote control, point it
at the remote sensor on the front panel.
RemoteControl
[]ii] Number buttons (13, 17, 18)
[12]_ (-_t._) (reverse skip/reverse search) button
(13, 17, 19, 21)
• (stop) button (17 - 19, 21 - 25, 28)
(IPq_) (forward skip/forward search) button
(13, 17, 19, 21)
% Disc number (CD1, CD2, and CD3) buttons (16 - 19)
Iii_i]Disc play mode buttons (18 - 20)
• REPEAT, RANDOM, and PROGRAM buttons
% REC START/STOP button (22, 24, 25, 28)
% SOUND MODE button (11)
[_?i]SUBWOOFER LEVEL + !- buttons (11)
% STANDBY/ON Oil button (9)
[i{] SLEEP button (29)
[!ii_]AUX button (9)
I)iii!]FM!AM button (9, 13)
[!i)]FM MODE button (13)
[!ii_]CD _/1! button (9, 17 - 19, 25)
I]ii_]PROGRAM CANCEL button (19)
I]ii_]TAPE -.q _ button (9, 21, 22)
I]ii_]ECHO button (25)
KARAOKE button (25)
[!ii_]BEEP ON/OFF button (8, 9)
[!ii_]VOLUME +/- button (10, 25)
I)il}]FADE MUTING button (10)
5

GettingStarted Continued I_
SuppliedAccessories
Make sure that you have all the following items.
The number in the parentheses indicates the quantity of the
pieces supplied.
• AM loop antenna (1)
• FM antenna (1)
• Remote control (1)
• Batteries (2)
• AC plug adaptor (1)
If anything is missing, consult your dealer immediately.
ConnectingAntennas
FMantenna
FM antenna (supplied)
Putting the Batteries into the Remote Control
Insert the batteries--R6(SUM-3)/AA(15F)--into the remote
control, by matching the polarity (+ and -) on the batteries
with the + and - markings on the battery compartment.
When the remote control can no longer operate the unit,
replace both batteries at the same time.
\
3
\
2R6(SUM-3)/AA(15F)
DO NOT use an old battery together with a new
one.
DO NOT use different types of batteries together.
DO NOT expose batteries to heat or flame.
DO NOT leave the batteries in the battery
compartment when you are not going to use the
remote control for an extended period of time.
Otherwise, it will be damaged from battery
leakage.
1Attach the FM antenna to the FM 75 £2
COAXIAL terminal.
2Extend the FM antenna.
3Fasten it up in the position which gives you
the best reception, then fix it on the wall, etc.
_About the supplied FM antenna
The FM antenna supplied with this unit can be used as temporary
measure. If reception is poor, you can connect an outdoor FM
antenna.
Toconnectan outdoorFMantenna
Before connecting it, disconnect the supplied FM antenna.
Outdoor FM antenna
(not supplied)
A 75 £_antenna with coaxial type connector should
be used.
6

AM antenna
p- 1
O
-ANTENNA_
m
AMLOOP
m
FM75
-COAXIAL
..J
_inyl-covered wire
(not supplied)
AM loop antenna
(supplied)
1If cords are covered with insulation, twist the
core of the cord at the end of each cord, then
remove the insulation.
2Connect the AM loop antenna to the AM LOOP
terminals as illustrated.
3Turn the AM loop antenna until you have the
best reception.
Toconnectan outdoorAM antenna
When reception is poor, connect a single vinyl-covered wire
to the AM EXT terminal and extend it horizontally. The AM
loop antenna must remain connected.
_For better reception of both FM and AM
•Make sure the antenna conductors do not touch any other terminals
and connecting cords.
• Keep the antennas away from metallic parts of the unit, connecting
cords, and the AC power cord.
ConnectingSpeakers
3
/Speaker cords
Speaker cords //_k/blue
(black/blue) %
CAUTION:SPE KER IMPED,_lC_
eaker cor_s_
black/red) ]
From right From left
subwoofer subwoofer
From main
right speaker From main
left speaker
2
If cords are covered with insulation, twist the
core of the cord at the end of each cord, then
remove the insulation.
Insert the end of the speaker cord into the
terminal as illustrated.
Match the same polarity: (+) to (+) and (-) to (-).
3Close the speaker terminals.
IMPORTANT: Use only speakers with the same speaker
impedance as indicated by the speaker terminals on the
rear of the unit.
DO NOT connect more than one speaker to each
speaker terminal.
DO NOT push or pull the speakers as this will
damage the foot spacers at the bottom of the
speakers.
7

ConnectingOtherEquipment
You can connect both analog and digital equipment.
AdjustingtheVoltageSelector
Before plugging in the unit, set the correct voltage for your
area with the voltage selector on the rear of the unit.
._• DO NOT connect any equipment while the power
is on.
• DO NOT plug in any equipment until all connections
are complete.
Toconnectan analogcomponent
Be sure that the plugs of the audio cords are colored: White
plugs and jacks are for left audio signals, and red ones for
right audio signals.
VOLTAGE
SELECTOR
110V_
[- Z2:.240Q._
fJ
Voltage mark
RIGHT LEFT
Audio equipment
RIGHT
To audio output ' '
For playing the other equipment through this unit,
connect between the audio outputjacks on the other
equipment andAUX jacks by using an audio cord (not
supplied).
Toconnectaudioequipmentwith an opticaldigital
input terminal
You can record audio CD sound onto the connected digital
equipment.
• If the disc played back is an MP3 disc, no sound can be
output from the unit to the connected digital equipment.
CDOPTICAL
rDIGITAL "_
OUTPUT |Protective
plug
Before connecting the
other equipment,
remove the protective
plug from the terminal.
To optical digital input
Audio equipment with
an optical digital input
i i i i
Connect an optical digital cord (not supplied) between the
optical digital input terminal on the other equipment and the
CD OPTICAL DIGITAL OUTPUT terminal.
Use a screwdriver to rotate the voltage selector so that the
voltage number and the voltage mark is pointing at the same
voltage as where you are plugging in the unit. (See the back
cover page.)
DO NOT plug in before setting the voltage selector
on the rear of the unit and all connection
procedures are complete.
Now, you can plug the AC power cord.
•If the wall outlet does not match the AC plug, use the
supplied AC plug adaptor.
I MPORTANT: Be sure to check all connections to be done
before plugging the AC power cord into a wall outlet.
Cancelingthe Demonstration
When connecting the AC power cord into a wall outlet, the
unit automatically starts the demonstration.
To cancel the demonstration, press and hold
CANCEL/DEMO until "DEMO OFF" appears
on the display.
• To cancel only beep sounds during the
demonstration, press BEEP ON/OFF on
the remote control.
BEEP
ON/OFF
_When you press other buttons
The demonstration stops temporarily. It will start automatically
again (if no operation is done for 2 minutes) unless you cancel it by
pressing CANCEL/DEMO.
Tostartthe demonstrationmanually
Press and hold CANCEL/DEMO again until "DEMO START"
appears on the display.
8

CommonOperations
TurningOnorOffthe Power
To turn on the unit, press O/I (or _/
STANDBY/ON Oil on the remote control)
so that the lamp on the button goes off.
Fl |--I I I !u.F '-'"
_ LI I_1
To turn off the unit (on standby), press Oil
(or STANDBY/ON Oil on the remote control)
again so that the lamp on the button lights up.
• A little power is always consumed even while
the unit is on standby.
To switch off the power supply completely, unplug the AC
power cord from the AC outlet.
When you unplug the AC power cord or if a power
failure occurs
The clock is reset to "0:00" right away, while the tunerpreset
stations (see page 13) will be erased in a few days.
TurningOnorOffthe Key-touchTone
If you do not want the key-touch tone to beep each time you
press abutton, you can deactivate it.
On the remote control ONLY:
Press BEEP ON/OFE
I'-I
,_',EEP FF
-- U
BEEP
ON/OFF
%
• Each time you press the button, the key-touch tone turns on
("BEEP ON") and off ("BEEP OFF") alternately.
BEEP OFF _ BEEP ON
SavingthePowerConsumptionwhileonStandby
--Ecology Mode
You can save the power consumption while the unit is turned
off (on standby).
• You can set Ecology Mode whether the unit is on or off.
On the unit ONLY:
To activate the Ecology Mode, press ECO.
"ECO" appears on the display for 2 seconds
(and the demonstration is canceled if you have
pressed the button while the unit is off).
To deactivate the Ecology Mode, press ECO again.
"NORMAL" appears (and the demonstration starts if the unit
is turned off).
It l I--I I--I Iul I--I I
I_ILII "_" !lr'iL
• Each time you press the button, "ECO" and "NORMAL"
appear alternately on the display.
_When you turn off the unit with Ecology Mode activated
"ECO" flashes on the display, and the clock time will not be shown
while the unit is turned off.
SelectingtheSources
To listen to the FM/AM broadcasts, press FM/AM.
(See page 13.)
To play back discs, press CD I_111. (See pages 14 - 20.)
To play back tapes, press TAPE -_ _. (See page 21 .)
To select the external equipment as the source, press AUX.
When you press the play button for a particular source
(FM/AM, CD _/ll, TAPE -,9 _, and AUX), the unit turns on
and the unit starts playing the source if it is ready.
-9-

Setting the Clock
You can set the clock whether the unit is on or off; however,
if Ecology Mode is activated, you cannot set the clock while
the unit is off (on standby).
If Ecology Mode is not in use while the unit is turned off (on
standby), "0:00" flashes on the display until you set the clock.
On the unit ONLY:
1Press CLOCK/TIMER. K::?=_P_°7_
The hour digits start flashing on the display.
...........,-,
.....U" I__II__I
2Turn _1< /_to adjust the
hour, then press SET/DISPLAY.
The minute digits start flashing on the
display.
,......
I ....... !__1
If you want to correct the hour °"° ...... o
after pressing SET/DISPLAY, _..'_
press CANCEL/DEMO. \"
The hour digits start flashing again.
SET /
DISPLAY
3Turn _1< /_to adjust the minute, then
press SET/DISPLAY.
F1 '-'uL- m
l l U
Tocheckthe clocktime while playingasource
Press and hold SET/DISPLAY.
• Each time you press and hold the button, the source
indication and the clock time alternate on the display.
Toadjust the clock again
If you have set the clock before, press CLOCK!TIMER
repeatedly until the clock setting mode is selected.
• Each time you press the button, the clock/timer setting
modes change as follows:
F DALLY "-_ TIMER "-"- REC j
(Daily Timer setting)
L_ Canceled-.,-- -.,'- TIMER
(Recording Timer setting)
(The hour digits start flashing.)
When you unplug the AC power cord or if a power
failure occurs
The clock loses the setting and is reset to "0:00." If this happens, set
the clock again.
Continued II_
AdjustingtheVolume
You can adjust the volume level only while the unit is turned
on. The volume level can be adjusted in 32 steps (VOLUME
MIN, VOLUME 1 - VOLUME 30, and VOLUME MAX).
TUrnVOLUME + /- clockwise (+)
to increase the volume or
counterclockwise (-) to decrease it.
When using the remote control, press
VOLUME + to increase the volume or
VOLUME - to decrease it.
VOLUME
"'-" '"'"E '5
I_ I_11_ Ull _I_
_For private listening
Connect a pair of headphones to the PHONES (0) jack. No sound
comes out of the speakers. Be sure to turn down the volume before
connecting or putting on headphones.
DO NOT turn off (on standby) the unit with the
volume set to an extremely high level; otherwise, a
sudden blast of sound can damage your hearing,
speakers and/or headphones when you turn on the
unit or start playing any source next time.
REMEMBER, you cannot adjust the volume level
while the unit is off (on standby).
Toturndownthe volumelevel temporarily
On the remote control ONLY:
Press FADE MUTING. "°_MUTING
The volume level gradually decreases to
"VOLUME MIN."
To restore the sound, press the button again.
-10-

ReinforcingtheBassSound
You can select one of the 5 subwoofer levels. This function
only affects the playback sound, but does not affect your
recording. The subwoofer level can be adjusted in 5 steps--
LEVEL 0 (MIN LEVEL), LEVEL 1,LEVEL 2, LEVEL 3,
and LEVEL 4 (MAX LEVEL).
Press SUBWOOFER LEVEL + to
increase the subwoofer level or
SUBWOOFER LEVEL -to decrease it.
SUBWOOFER lamp lights up in red.
• The SUBWOOFER lamp lights up in red when LEVEL 1 to
LEVEL 4 (MAX LEVEL) is selected. The lamp turns off when
LEVEL 0 (MIN LEVEL) is selected.
SelectingtheSoundModes
You can select one of the 6 preset sound modes (3 surround
modes and 3 SEA--Sound Effect Amplifier--modes) and 3
user modes. This function only affects the playback sound,
but does not affect your recording. Each Sound Mode has its
own illumination display.
To select the sound modes, turn
SOUND MODE (or press SOUND MODE
on the remote control) until the sound mode
you want appears on the display.
"i"1I_--_Ihlr r sgggg
x!¢1I_1 I-- !"--
The sound modes change as follows:
fr-_ DANCE _ HALL--_--STADIUM ---,--ROCK7
OFF POP
(Canceled)
LUSER 3_'-USER2"-'-USER1"-'-CLASS'CJ
When using the remote control, the sound mode changes only
clockwise in the above sequence.
Surround modes*
DANCE: Increases resonance andbass.
HALL: Adds depth andbrilliance to the sound.
STADIUM: Adds clarity and spreads the sound, like in an
outdoor stadium.
SEA (Sound Effect Amplifier) modes
ROCK: Boosts low and high frequency. Good foracoustic
music.
POP: Good for vocal music.
CLASSIC: Good for classical music.
User Modes
USER 1/2/3: Your individual mode stored in memory. See
"Creating Your Own Sound Mode--User
Mode" on page 12.
OFF: The sound mode is canceled.
* Surround elements are added to the SEA elements to create a
being-there feeling in your room.
•When a sound mode is selected, the lamp for the selected sound
mode (in this example, DANCE) flashes while the SOUND MODE
and the other sound mode lamps light up.
• When one of the user modes (USER 1, USER 2, or USER 3) is
selected, only the SOUND MODE lamp lights up.
• When the sound mode is canceled ("OFF" is selected), all sound
mode lamps including the SOUND MODE lamp go off.
-11 -

CreatingYourOwnSoundMode--User Mode
You can change SEA pattern to suit your preference. The SEA
pattern can be adjusted into 5 frequency ranges--LOW1,
LOW2, MID, HIGH1, and HIGH2. These changed settings
can be stored in the USER 1, USER 2, and USER 3 modes.
• There is a time limit in doing the following steps. If the setting
is canceled before you finish, start from step 1again.
On the unit ONLY:
1Select one of the preset sound modes.
•If you want to add the surround elements in your SEA
pattern, select one of the surround modes (DANCE,
HALL, or STADIUM) before starting the procedure
below. (See "Selecting the Sound Modes" on page 11.)
2Press SET/DISPLAY while the
selected sound mode is still shown
on the display.
I_IE I_I I-- I--I I_1 _"
_ _ r'i I_ I_11_1 i
SET#
DISPLAY
%
Turn I<< /_ to select one
of the user modes (USER 1, _"_'_
USER 2, or USER 3) in
which you want to store your
SEA pattern.
6Press SET/DISPLAY again. SET#
DISPLAY
lwl lwl I--I
IIEII!_IP_ "i
The SEA pattern you have created are stored into the user
mode selected in step 5.
Touseyourownsoundmode
Select USER 1, USER 2, or USER 3 mode when using the
sound modes. See "Selecting the Sound Modes" on page 11.
When you unplug the AC power cord or if a power
failureoccurs
The setting will be erased inafew days. Ifthishappens, set theuser
modesagain.
I I--II I I .L -=-I
l_ !_IH I c_']]'_
Current levelappears.
3Adjust the SEA pattern.
1) Turn _ /_to select the
frequency range (LOW 1, LOW2,
MID, HIGH1, or HIGH2).
2) Press _ or _ to adjust the ........................
level (-3 to +3) of the selected {_
frequency range.
3) Repeat steps 1) and 2) to adjust
the level of the other frequency
ranges.
4Press SET/DISPLAY again.
|!.....
,_,'=_',F_"Z;'......
_ _ ........I _i_
SET#
DISPLAY
%
Setting the AM Tuner Interval Spacing
Some countries space AM stations 9 kHz apart, and some
countries use 10 kHz spacing.
On the unit ONLY:
You can only change the AM tuner interval spacing while
tuning in to anAM station. (See page 13.)
Press O/I while holding down I.
• Each time you press these buttons, the AM tuner interval
spacing alternates between 9 kHz and 10 kHz.
-12-

Listeningto FMandAM Broadcasts
Tuning in to a Station
1Press FM/AM.
The unit automatically turnson and tunes
in to the previously received station (either
FM or AM).
•Each time you press the button, the band
alternates between FM and AM.
/AM
2Start searching for stations.
On the unit:
Press and hold TUNING +
or TUNING -for more
than 1 second.
........... • JNING.......... -]"
On the remote control:
Press and hold _(_).-)
or _1< (<<) for more
than 1 second. _7_
The unit starts searching for
stations and stops when astation of sufficient signal
strength is tuned in.
•Ifaprogram is broadcast instereo, the ST (stereo) indicator
lights up.
To stop searching, press TUNING + or TUNING - (or
_t (l,q_) /_ (<<) on the remote control).
When you press TUNING +or TUNING - (or _(IH_) /
_I< (<1<) on the remote control) briefly and repeatedly
The frequency changes step by step.
On the unit ONLY:
1Tune in to the station you want to preset.
• See "Tuning in to aStation."
2Press SET/DISPLAY. SET/
DISPLAY
%
3
4
Turn PRESET + /- to select a__
preset number. __
..... _,- _ _ _
..........r" "" i'
Press SET/DISPLAY again, og_Y
'3"-' -
_, ,_,I;'EiI
The tuned station in step 1is stored in the preset number
selected in step 3.
• Storing a new station on a used number erases the
previously stored one.
When you unplug the AC power cord or if a power
failure occurs
The preset stations will be erased in a few days. If this happens,
preset the stations again.
Tochangethe FM receptionmode
On the remote control ONLY:
When an FM stereo broadcast is hard to receive FM.ODE
or noisy, press FM MODE so that the MONO
indicator lights up on the display. Reception
improves.
To restore the stereo effect, press FM MODE again so that
the MONO indicator goes off. In this stereo mode, you can
hear stereo sounds when a program is broadcasted.
Presetting Stations
You can preset 30 FM and 15 AM stations.
In some cases, test frequencies have been already memorized
for the tuner since the factory examined the tuner preset
function before shipment. This is not a malfunction. You can
preset the stations you want into memory by following the
presetting method.
• There is a time limit in doing the following steps. If the setting
is canceled before you finish, start from step 2again.
Tuning in to a Preset Station
1Press FM/AM.
The unit automatically turnson and tunes
in to the previously received station (either
FM orAM).
• Each time you press the button, the band
alternates between FM andAM.
/AM
2Select a preset number.
On the unit:
Turn PRESET + / -.
On the remote control:
Press the number buttons.
Ex.: For preset number 5, press 5.
For preset number 15, press
+10, then 5.
For preset number 25, press
+10, +10, then 5.
For preset number 30, press
+10, +10, then 10.
@
@
@
@
@@
@@
@@
-13-

DiscPlayIntroduction Continued I_
This unit has been designed to play back the following discs:
• CD (Audio CD)
• CD-R (CD-Recordable)
• CD-RW (CD-ReWritable)
• MP3 disc (MP3 files recorded on a CD-R or CD-RW)
Whenplayinga CD-RorCD-RW
User-edited CD-Rs (CD-Recordable) and CD-RWs
(CD-ReWritable) can be played back only if they are already
"finalized."
• You can play back your original CD-Rs or CD-RWs recorded
in music CD format or in MP3 format. (However, they may
not be played back depending on their characteristics or
recording conditions.)
• Before playing back CD-Rs or CD-RWs, read their
instructions or cautions carefully.
• Some CD-Rs or CD-RWs may not be played back on this
unit because of their disc characteristics, damage or stain
on them, or if the player's lens is dirty.
• CD-RWs may require a longer readout time. This is caused
by the fact that the reflectance of CD-RWs is lower than for
regular discs.
About the CD ready lamps
Each CD ready lamp corresponds to the disc tray of the
same number.
When and why they light up?
- When you turn on the unit for the first time after
plugging into a wall outlet, all CD ready lamps (CD1
READY, CD2 READY, and CD3 READY) light up.
From the next time on, CD ready lamp(s) light(s) up
according to the previous condition.
- Each time you press the disc tray open/close buttons
--_ (CD1, CD2, and CD3), the corresponding CD
ready lamp lights up.
When and why they go off?.
Only when the unit detects there is no disc loaded on a
certain tray, the corresponding CD ready lamp goes off.
("NO DISC 1," "NO DISC 2," or "NO DISC 3"
appears on the display.)
When and why they flash?
The corresponding CD ready lamp flashes during
playback and pause.
_If the loaded disc is an MP3 disc
The corresponding CD ready lamp and the MP3 indicator will
light up.
MP3 Introduction
What is MP3?
MP3 is an abbreviation of Motion Picture Experts Group 1
(or MPEG-1) Audio Layer 3. MP3 is simply a file format
with a data compression ratio of 1:10 (128 kbps*). By using
MP3 format, one CD-R or CD-RW can contains 10 times as
much data volume as a regular CD can.
* Bit rate is the average number of bits that one second of audio
data will consume. The unit uses kbps (l,000 bits per second). To
get a better audio quality, choose a higher bit rate. The most
popular bit rate for encoding (recording) is 128 kbps.
MP3 disc structure
On an MP3 disc, each song (material) is recorded as a file.
Files are grouped into a directory (or folder). Directories can
also include other directories, creating hierarchical directory
layers. (See "How are MP3 files recorded and played back?"
on page 15.)
This unit manages files and directories as "tracks" and "groups."
This unit can recognize up to 255 tracks per disc, up to 64 groups
per disc. The unit ignores those exceeding the maximum
numbers and cannot play them back.
_About MP3 discs
• MP3 discs (either CD-R or CD-RW) require a longer readout time.
(It varies due to the complexity of the recording configuration.)
° When making an MP3 disc, select ISO 9660 Level 1 or Level 2 as
the disc format.
° This unit does not support multisession recording.
° This unit can play MP3 files only with the following file extensions--
".MP3," ".Mp3"' ".mP3," and ".mp3."
° Files other than MP3 are ignored.
° Some MP3 discs may not be played back because of their disc
characteristics or recording conditions.
-14-

How are MP3 files recorded and played back?
MP3 "tracks (files)" can be recorded in "group"--folders or
directories, in PC terminology.
During recording, the tracks and groups can be arranged
similarly to the tracks and folders/directories of computer
data. "Root" is similar to the root of a tree. Every track and
group can be linked to the root.
In compliance with ISO 9660, the maximum allowable depth
of nested directories--so called "hierarchy"--is eight
(inclusive of the root).
Playback order, track search order, and group search order of
the MP3 tracks recorded on a disc are determined by the
writing (or encoding) application; therefore, playback order
may be different from the one you have intended while
recording the groups and the tracks.
The illustration shows an ordinary example of how MP3
tracks are recorded on a CD-R or CD-RW, how they are
played back and how they are searched for on this unit.
• The numbers in circles next to the MP3 tracks (_') indicate
the playback order and search order of the MP3 tracks.
Normally this unit plays back MP3 tracks in the recorded
order.
• The numbers inside the groups indicate the playback order
and search order of the groups on an MP3 disc. Normally
this unit plays back MP3 tracks in the groups in the
recorded order.
The groups marked with asterisk (*) will be skipped since
they do not include any MP3 tracks.
MP3 orouo/trackconfiouration:
i i
i
i
i
i
iE
_-[_®
,._®! j'-
_._@
__
__
Groups
_/> MP3 tracks
-15-
Table of contents
Other JVC Stereo System manuals