JVC CA-MXDK51 User manual

COMPACT COMPONENT SYSTEM
CA-MXDK51
INSTRUCTIONS
GVT0178-001A
[US,UN,UG,UX,A]
MXDK51_Cover.fm Page 1 Wednesday, March 1, 2006 4:49 PM

G-1
Warnings, Cautions and Others
Caution–– (standby/on) button!
Disconnect the mains plug to shut the power off completely (the STANDBY lamp goes off). When installing the apparatus,
ensure that the plug is easily accessible. The (standby/on) button in any position does not disconnect the mains line.
• When the System is on standby, the STANDBY lamp lights red.
• When the System is turned on, the STANDBY lamp goes off.
The power can be remote controlled.
CAUTION
To reduce the risk of electrical shocks, fire, etc.:
1. Do not remove screws, covers or cabinet.
2. Do not expose this appliance to rain or moisture.
CAUTION
• Do not block the ventilation openings or holes.
(If the ventilation openings or holes are blocked by a newspaper or cloth, etc., the heat may not be able to get out.)
• Do not place any naked flame sources, such as lighted candles, on the apparatus.
•When discarding batteries, environmental problems must be considered and local rules or laws governing the disposal of these
batteries must be followed strictly.
•Do not expose this apparatus to rain, moisture, dripping or splashing and that no objects filled with liquids, such as vases, shall
be placed on the apparatus.
IMPORTANT FOR LASER PRODUCTS
1. CLASS 1 LASER PRODUCT
2.
CAUTION
: Do not open the top cover. There are no user
serviceable parts inside the Unit; leave all servicing to qualified
service personnel.
3.
CAUTION
: Visible and/or invisible class 1M laser radiation when
open. Do not view directly with optical instruments.
MXDK51_Safety.fm Page 1 Wednesday, February 15, 2006 9:59 AM

G-2
Caution: Proper Ventilation
To avoid risk of electric shock and fire, and to prevent damage, locate the apparatus as follows
1. Front: No obstructions and open spacing.
2. Sides/ Top/ Back: No obstructions should be placed in the areas shown by the dimensions below.
3. Bottom: Place on the level surface. Maintain an adequate air path for ventilation by placing on a stand with a height
of 10 cm or more.
The minimal clearance is shown as below:
[European Union only]
15 cm15 cm 15 cm
15 cm
10 cm 10 cm
15 cm
Front view Side view
CA-MXDK51CA-MXDK51
Wall or obstructions Wall or obstructions
Front
No obstructions
MXDK51_Safety.fm Page 2 Wednesday, February 15, 2006 9:59 AM

1
Introduction
Precautions
Installation
•Install the System in a location with adequate ventilation to
prevent internal heat buildup in the System.
•Install in a place which is level, dry and neither too hot nor
too cold—between 5°C and 35°C.
• Leave sufficient distance between the System and the TV.
•Keep the speakers away from the TV to avoid interference
with the TV.
Power sources
•When unplugging the System from the wall outlet, always
pull on the plug, not the AC power cord.
Moisture condensation
Moisture may condense on the lenses inside the System in
the following cases:
• After starting to heat the room
• In a damp room
• If the System is brought directly from a cold to a warm
place.
Should this occur, the System may malfunction. In this case,
leave the System turned on for a few hours until the moisture
evaporates, unplug the AC power cord, then plug it in again.
Internal heat
• Make sure there is good ventilation around the unit. Poor
ventilation could overheat and damage the unit.
•Acooling fan is inside the System to prevent heat buildup.
Others
• Should any metallic object or liquid fall into the System,
unplug the AC power cord and consult your dealer before
operating any further.
•If you are not going to operate the System for an extended
period of time, unplug the AC power cord from the wall
outlet.
If anything goes wrong, unplug the AC power cord and
consult your dealer.
Playable Disc Types
In addition to the above discs, this System can play back
audio data recorded on CD Text, and CD-Extra.
•It is possible to play back finalized +R/+RW (DVD Video
Format only) discs. “DVD” lights on the front display
panel when a +R/+RW disc is loaded.
• The following discs cannot be played back:
DVD-ROM, DVD-RAM, CD-I (CD-I Ready), CD-G (CD
Graphics), Photo CD, etc.
Playing back these discs will generate noise and damage
the speakers.
•In this manual, “file” and “track” are interchangeably used
for MP3/WMA/MPEG-1/MPEG-2/ASF/DivX/JPEG
operations.
About color system
This System accommodates both NTSC and PAL system
and can play back discs recorded with either system.
To change the color system, see page 6.
Note on Region Code
DVD players and DVDs have their own Region Code
numbers. This System can play back only DVDs with
Region Code numbers including “4” for Australia, “3” for
Southeast Asia, and “2” for the Middle East. For your
available Region code, check the rear panel of your main
unit.
EX.: For Southeast Asia
If a DVD with the improper Region Code numbers is loaded,
“REGION ERR” appears on the display and playback will
not start.
DO NOT install the System in a location near
heat sources, or in a place subject to direct
sunlight, excessive dust or vibration.
DO NOT handle the AC power cord with wet
hands.
DO NOT block the ventilation openings or
holes. If they are blocked by a newspaper or
cloth, etc., the heat may not be able to get out.
DO NOT disassemble the System since there
are no user serviceable parts inside.
DVD Logo is a trademark of DVD Format/Logo Licensing
Corporation.
•CD-R/-RW/-ROM: Recorded in the Audio CD, Video CD
and SVCD formats. MP3, WMA, JPEG, MPEG-1,
MPEG-2, ASF and DivX files written in accordance with
the “ISO 9660” format can also be played.
•DVD-R/-RW: Recorded in the DVD Video format or the
DVD Video Recording (VR) format. MP3, WMA, JPEG,
MPEG-1, MPEG-2, ASF and DivX files written in the
UDF format can also be played.
INFO
COMPACT
DIGITAL AUDIO
DIGITAL VIDEO
MX_DK51.book Page 1 Tuesday, February 28, 2006 5:10 PM

2
The System can play back the following digital audio
formats.
•
LPCM
(Linear PCM),
DIGITAL
(Dolby Digital),
DTS
(Digital Theater Systems),
MLP
(Meridian Lossless
Packing)
Caution for DualDisc playback
The Non-DVD side of a “DualDisc” does not comply with
the “Compact Disc Digital Audio” standard. Therefore, the
use of Non-DVD side of a DualDisc on this product may not
be recommended.
How to Read This Manual
• Button and control operations are explained in the table
below.
•
Some related tips and notes are explained later in the
sections “Learning More about This System” and
“Troubleshooting,” but not in the same section
explaining the operations ( indicates that the
content has some information).
Contents
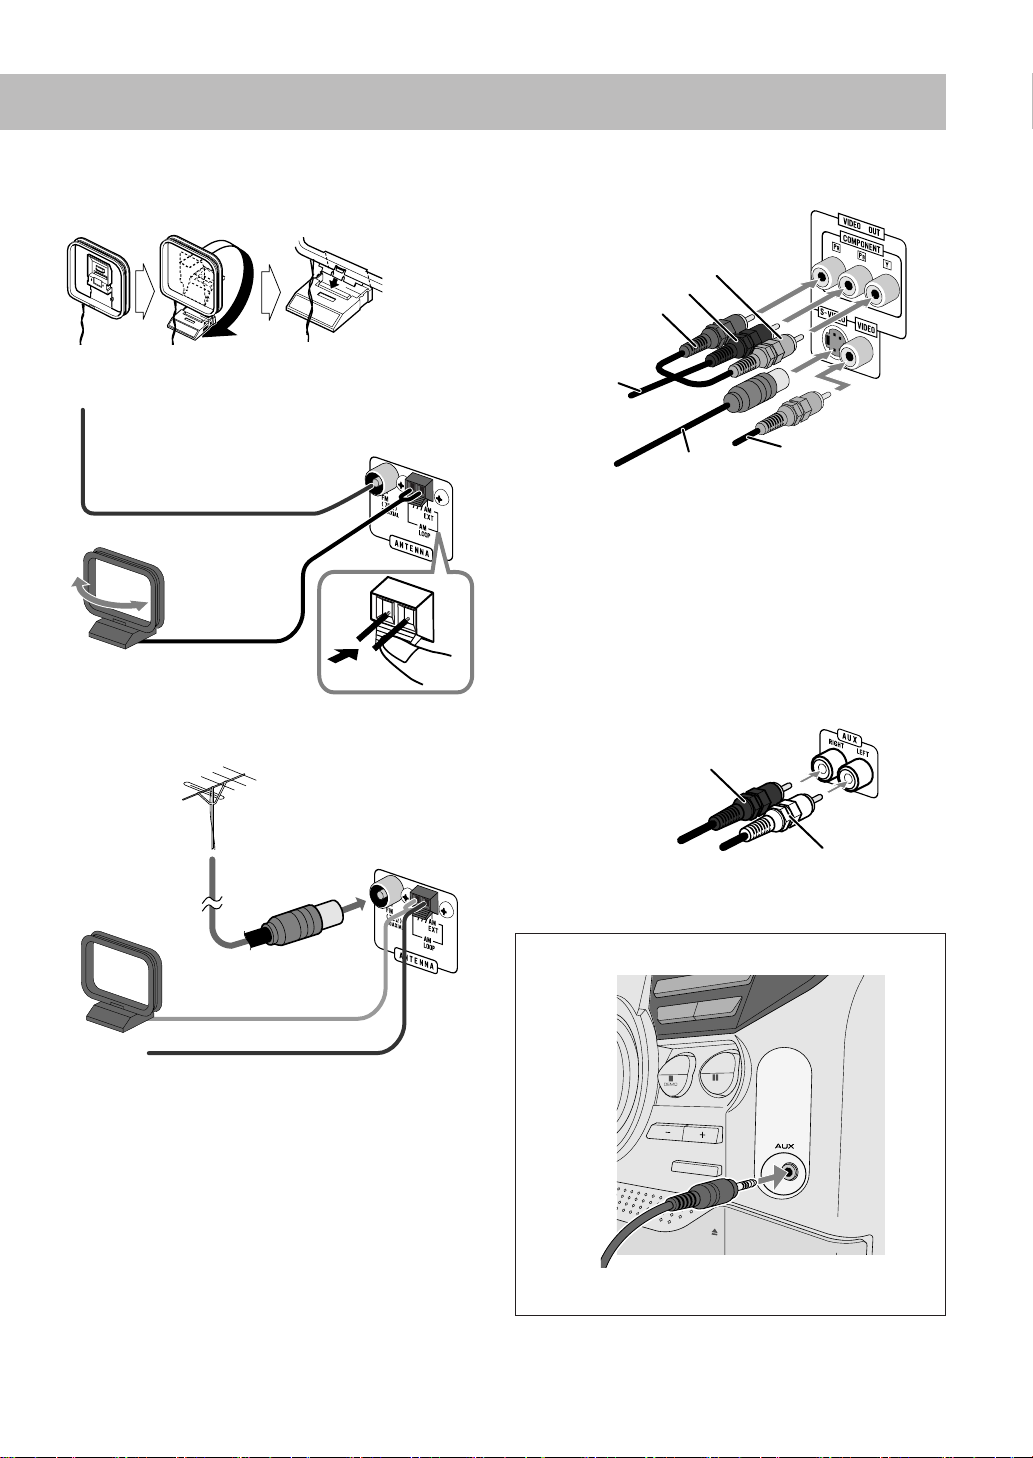
Connections .............................................................3
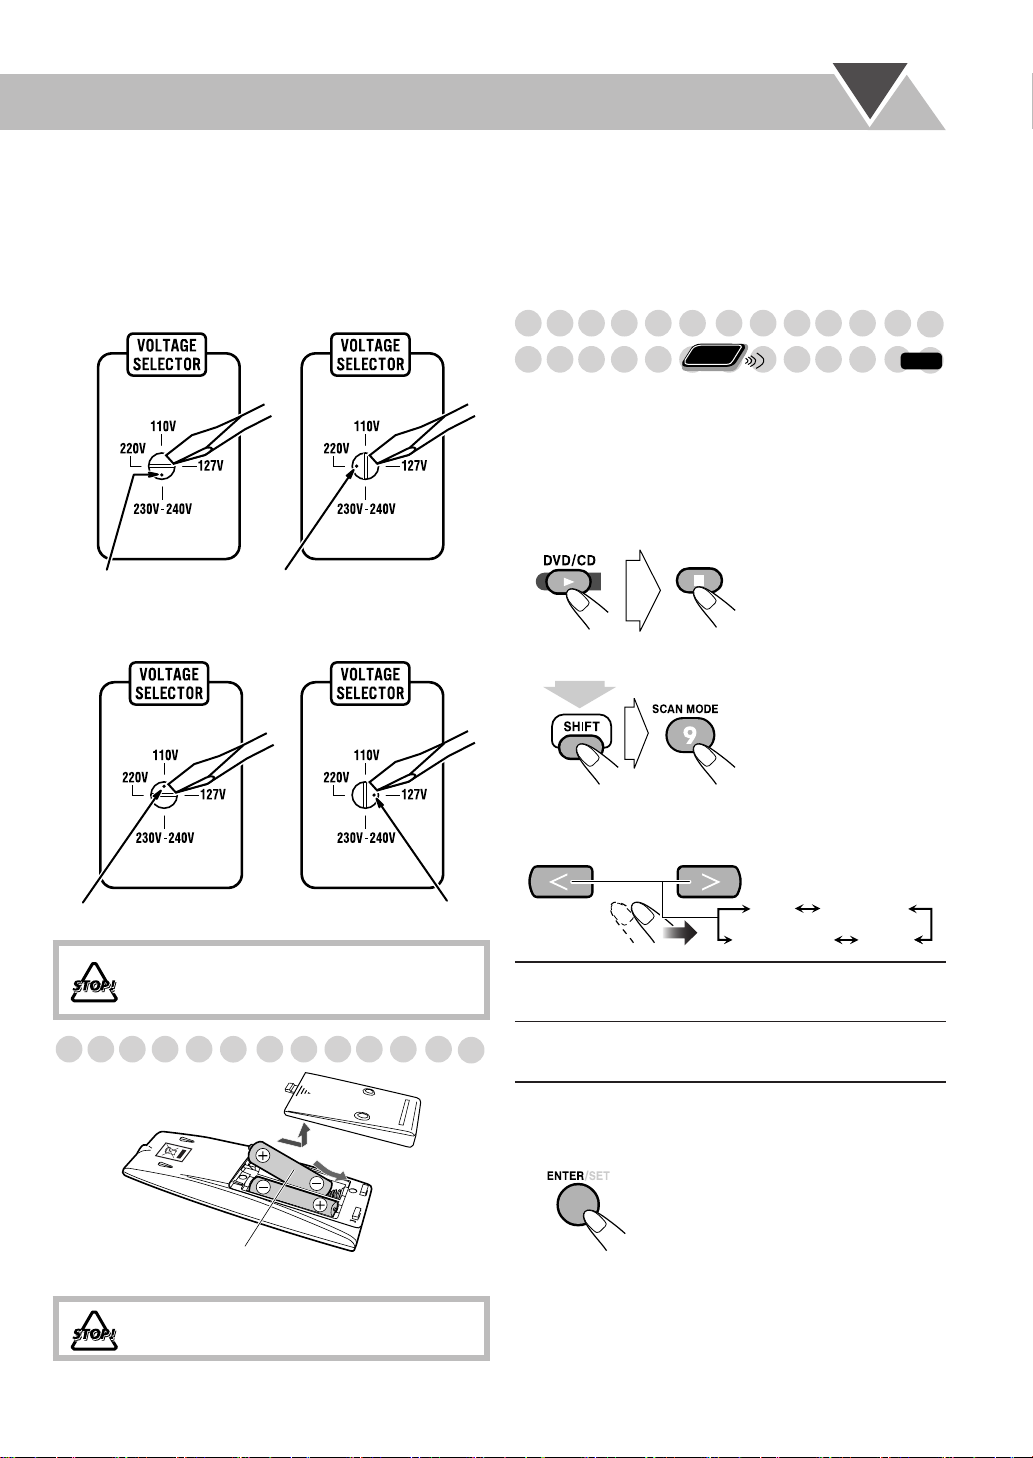
Preparing the Remote Control ............................................ 6
Changing the Color System and Scanning Mode .............. 6
Display Indication ...................................................7
Daily Operations—Playback .................................8
Daily Operations—Sound & Other Adjustments ... 12
Canceling the Demonstration ........................................... 12
Reinforcing the Bass Sound ............................................. 12
Presetting Automatic DVD Video Sound
Increase Level .............................................................. 12
Adjusting the Speaker Output Level ................................ 13
Selecting the Sound Modes .............................................. 13
Creating Your Own Sound Modes—User Mode ............. 13
Selecting the Surround Modes ......................................... 14
Changing the Picture Tone ............................................... 15
Changing the Display Brightness ..................................... 15
Setting the Clock .............................................................. 15
Unique DVD/VCD Operations ............................16
Selecting the Sound Track ................................................ 16
Selecting the Subtitle Language........................................ 17
Selecting the View Angle ................................................. 17
Selecting Browsable Still Pictures .................................... 17
Playing Back a Bonus Group ............................................ 18
Special Picture Playback................................................... 18
Advanced Disc Operations ...................................19
Programming the Playing Order—Program Play ............ 19
Playing at Random—Random Play ................................. 20
Playing Repeatedly .......................................................... 21
Prohibiting Disc Ejection—Child Lock ........................... 21
On-Screen Disc Operations ..................................22
Recording Operations ..........................................27
Enjoying Karaoke .................................................29
Singing Along (Karaoke) .................................................. 29
Singing Along Using Stereo Discs—Vocal Masking ....... 30
Microphone Mixing .......................................................... 31
Reserving Karaoke Songs—Karaoke Program Play......... 32
Timer Operations ..................................................33
Setup Menu Operations .......................................35
Operating the TV ..................................................37
Additional Information ........................................38
Learning More about This System ................................... 38
Troubleshooting ............................................................... 41
Maintenance ..................................................................... 42
Specifications ................................................................... 43
Parts Index ............................................................44
IMPORTANT: Before playing a disc, make sure of
the following...
•Turn on the TV and select an appropriate input mode on
the TV to view the pictures or on-screen displays on the
TV screen.
•For disc playback, you can change the initial setting to
your preference. See “Setup Menu Operations” on
page 35.
If “ ” appears on the TV screen when you press a
button,
the disc cannot perform the operation you have
tried to do, or data required for that operation is not
recorded on the disc.
Indicates that you press the button
briefly
.
Indicates that you press the button
briefly
and repeatedly
until an option you want is
selected.
Indicates that you press one of the buttons.
Indicates that you
press and hold
the button
for a specified period.
The number inside the arrow indicates the
time to hold (in the example, 2 seconds).
Indicates that you turn the control toward the
specified direction(s).
Indicates that this operation is only possible
using the remote control.
Indicates that this operation is only possible
using the buttons and controls on the main
unit.
INFO
2 sec.
Remote
ONLY
Main Unit
ONLY
MX_DK51.book Page 2 Tuesday, February 28, 2006 5:10 PM

3
Connections
• Connect VIDEO OUT directly to the video input of your
TV. Connecting VIDEO OUT to a TV via a VCR may
cause a monitor problem when playing back a
copy-protected disc. You may also have a monitor problem
when connecting the player to an integrated TV/Video
system.
Do not connect the AC power cord until all other
connections have been made.
Supplied Accessories
• FM antenna (1)
• AM loop antenna (1)
• Composite video cord (1)
• Remote control (1)
• Batteries (2)
•AC plug adaptor (1) (not supplied for the Middle East
and Australia)
If any item is missing, consult your dealer immediately.
~From AM/FM antenna
See page 4.
ŸFrom the video input of TV/monitor
See page 4.
¤To a wall outlet
Plug in the AC power cord only after all connections are complete.
•Before plugging in, confirm the position the voltage selector points
to. See page 6 and the back cover.
•If the wall outlet does not match the AC plug, use the supplied AC
plug adaptor (not supplied for the Middle East and Australia).
@Voltage Selector
Before plugging in, confirm the position
the voltage selector points to. See page 6
and the back cover.
⁄From speakers
See page 5.
!From auxiliary equipment
See page 4.
MX_DK51.book Page 3 Tuesday, February 28, 2006 5:10 PM

4
~
AM/FM antenna
To assemble the AM loop antenna
To connect AM/FM antenna
For better AM/FM reception
• Disconnect the supplied FM antenna, and connect to an
outdoor FM antenna using a 75
Ω
wire with coaxial type
connector (IEC or DIN45325).
• Make sure the antenna conductors do not touch any other
terminals, connecting cords or the power cord. Also, keep
the antennas away from metallic parts of the System,
connecting cords, and the AC power cord. This could cause
poor reception.
Ÿ
TV/monitor
• Connect the VIDEO jack, S-VIDEO jack, or
COMPONENT jacks whichever you want to use.
• To select progressive scanning mode (see page 6), use
COMPONENT jacks.
• To select the video output to match the color system of
your TV (PAL or NTSC), see page 6.
!
Auxiliary equipment
Extend it so that you can
obtain the best reception.
AM loop antenna
(supplied)
FM antenna (supplied)
Turn it until the best
reception is obtained.
AM loop antenna (supplied)
Keep it connected.
Vinyl-covered wire (not supplied)
Extend it horizontally.
FM outdoor antenna
(not supplied)
Green
Blue
Red
Composite video
cord (supplied)
S-video cord
(not supplied)
Component
video cord
(not supplied)
Stereo audio cord
(not supplied)
Red
White
For the Australian model
Stereo mini plug
(not supplied)
MX_DK51.book Page 4 Tuesday, February 28, 2006 5:10 PM

5
⁄
Speakers
To connect the speaker cords
• When connecting the speaker cords, match the polarity of
the speaker terminals: (+) to (+) and (–) to (–).
•
Use only speakers with the same speaker impedance as
indicated by the speaker terminals on the rear of the unit
.
• The front speakers, the surround speakers and the center
speaker are magnetically shielded to avoid color
distortions on TVs. However, if not installed properly, it
may cause color distortions. So, pay attention to the
following when installing the speakers.
- When placing the speakers near a TV set, turn off the
TV’s main power switch or unplug it before installing the
speakers.
Then wait at least 30 minutes before turning on the TV’s
main power switch again.
Some TVs may still be affected even though you have
followed the above. If this happens, move the speakers
away from the TV.
•The subwoofer is not magnetically shielded. If it is located
nearby the TV or monitor, it will probably cause color
distortion on the screen. To avoid this, do not place the
speaker nearby the TV or monitor.
From left
front speaker
From right
front speaker
Surround speakers
Front speakers
From right
surround speaker
From left
surround speaker
Center speaker and Subwoofer
From center speaker From subwoofer
•DO NOT connect more than one speaker to
each terminal.
• DO NOT push or pull the speakers as this
will damage the foot spacers at the bottom
of the speakers.
Speaker layout
To enjoy multi-channel sound, locate the speakers as
follows. If you cannot locate like this, adjust the speaker
setting by using the SPK. SETTING menu (see page 36).
MX_DK51.book Page 5 Tuesday, February 28, 2006 5:10 PM

6
@
Voltage Selector
Use a screwdriver to rotate the voltage selector so that the
voltage mark is pointing to the same voltage as where you
are plugging in the unit. (See also the back cover page.)
Preparing the Remote Control
• Dispose of batteries in the proper manner, according to
federal, state, and local regulations.
When using the remote control
Point the top of the remote control toward the remote sensor
as directly as possible. If you operate it from a diagonal
position, the operating range (approx. 5 m) may be shorter.
Changing the Color System and
Scanning Mode
You can select the video output to match the color system of
your TV (PAL or NTSC).
Also, this System supports progressive scanning. If you
connect a progressive TV through the COMPONENT jacks,
you can enjoy a high quality picture from the built-in DVD
player by selecting “PAL/NTSC PRG.”
1
Change the source to DVD/CD.
2
Enter the color system setting mode.
3
Select the color system and scanning mode.
• PROGRESSIVE indicator lights on when progressive
mode is selected.
4
Store the setting.
DO NOT plug in before setting the voltage
selector on the rear of the unit and all
connection procedures are complete.
DO NOT recharge, short, disassemble, heat
the battery or dispose of it in a fire.
Voltage mark
When your mains lead (AC)
line voltage is 220 V
When your mains lead (AC)
line voltage is 230-240V
Voltage mark
Voltage mark
When your mains lead (AC)
line voltage is 127 V
When your mains lead (AC)
line voltage is 110V
Voltage mark
R6(SUM-3)/AA(15F)
PAL/NTSC
Interlaced scanning.
For a conventional TV.
PAL/NTSC PRG
Progressive scanning.
For a progressive TV.
INFO
Remote
ONLY
(While holding...)
NTSC PRG NTSC
PAL PRGPAL
MX_DK51.book Page 6 Tuesday, February 28, 2006 5:10 PM

7
Display Indication
The indications on the display tell you a lot of things while you are operating the System.
Before operating the System, be familiar with when and how the indicator illuminates on the display.
1
PROGRESSIVE indicator
• Lights when the progressive scanning mode is selected
(see page 6).
2
BONUS indicator
• Lights when DVD Audio with bonus group is detected
(see page 18).
3
DVD LEV. 1/2/3 indicators
•Lights to indicate the DVD increase level (see page 12).
4
MIC indicator
• Lights when the Karaoke mode is activated (see
page 29).
5
V.MASK indicator
• Lights when the Vocal Masking mode is activated (see
page 30).
6
RESUME indicator
• Lights when the Resume function is activated (see
page 10).
7
SOUND TURBO indicator
•Lights when SOUND TURBO is activated (see page 12).
8
SURROUND indicator
(see page 14)
• SURROUND: lights when Surround mode is activated.
• MOVIE/MUSIC: lights when Dolby Pro Logic II Mode
(Movie or Music) is activated.
9
Timer indicators (see pages 33 and 34)
• SLEEP: flashes when the Sleep Timer is activated.
• DAILY: lights when the Daily Timer is on standby;
flashes while working or being set.
• REC: lights when the Recording Timer is on standby;
flashes while working or being set.
•:lights when Sleep Timer is working or when Daily
Timer or Recording Timer is on standby, working or
being set.
p
Source signal indicators
• D: lights when a source signal is Dolby Digital.
• DTS: lights when a source signal is DTS.
• PLII: lights when Dolby Pro Logic II Mode (Movie
or Music) is activated.
q
Tape operation indicators
•REC: lights while recording (see pages 27 and 28).
• TAPE: lights when TAPE-A or TAPE-B is selected.
• A: lights when TAPE-A is selected.
• B: lights when TAPE-B is selected.
•
2
3
(tape direction):
– Lights to indicate the current tape running direction.
– Flashes slowly during playback and recording.
– Flashes quickly while rewinding a tape.
w
Main display
e
MP3 indicator
• Lights while playing back an MP3 track.
r
WMA indicator
• Lights while playing back a WMA track.
t
Disc operation indicators
• REP: lights when Repeat Play mode is activated.
• 1: lights when One Track/Chapter/Step Repeat is
activated.
y
PRGM indicator
• Lights when Program Play mode is activated.
u
RND indicator
• Lights when Random Play is activated.
i
B.S.P. indicator
• Lights when browsable still picture on DVD Audio is
available (see page 17).
o
ST (stereo) indicator
• Lights while an FM stereo station with sufficient signal
strength is tuned in (see page 9).
;
MONO indicator
•Lights while receiving an FM stereo station in monaural
(see page 9).
MX_DK51.book Page 7 Tuesday, February 28, 2006 5:10 PM

8
Daily Operations
—Playback
¥
Turn on the power.
The STANDBY lamp on the main unit goes off.
• Without pressing AUDIO, the System also turns
on by pressing one of the source select buttons in the
next step.
ø
Select the source.
Playback automatically starts if the selected source is
ready to start playback.
• If you press AUX, start playback on the external
component.
π
Adjust the volume.
[
Operate the target source as explained
later.
To turn off (standby) the System
Adjusting the Volume
The volume level can be adjusted in 32 steps (VOLUME
MIN, VOLUME 1 – VOLUME 30, and VOLUME MAX).
Continued on the next page...
In this manual, the operations using the remote control
are mainly explained; however, you can use the buttons
and controls on the main unit if they have the same (or
similar) name and marks.
1
3
2
1
3
1,¡
FM MODE
7,8
SHIFT
TOP MENU
MENU
FADE
MUTING
2
, , ,
ENTER/SET
PREV.,NEXT
4,¢
TITLE/GROUP
RETURN
Number
buttons
The STANDBY lamp on the main unit
lights in red.
•Asmall amount of power is always
consumed even while on standby.
For private listening
Connect a pair of headphones to the PHONES jack on the
main unit. The sound will no longer come out of the
speakers.
Be sure to turn down the volume before
connecting or putting on the headphones.
• Disconnecting the headphones will activate the
speakers again.
DO NOT turn off (standby) the System with
the volume set to an extremely high level;
otherwise, the sudden blast of sound can
damage your hearing, speakers and/or
headphones when you turn on the System or
start playback.
Remote control: Main unit:
MX_DK51.book Page 8 Tuesday, February 28, 2006 5:10 PM

9
To drop the volume in a moment
Listening to the Radio
To select the AM tuner interval spacing
Some countries space AM stations 9 kHz apart, and other
countries use 10 kHz spacing.
1
Select “AM,” then turn off (standby) the System.
2
Select the appropriate AM space interval for your
area.
To select the band (FM/AM)
To tune in to a station
While FM or AM is selected...
Frequency starts changing on the display.
When a station (frequency) with sufficient signal strength is
tuned in, the frequency search stops.
• When you repeatedly press the button, the frequency
changes step by step.
To stop searching manually,
press either button.
If the FM station has poor reception
To preset stations
You can preset 30 FM and 15 AM stations.
1
Tune in to a station you want to preset.
2
Select a preset number.
3
Store the station.
To tune in to a preset station
1
Select the band (FM or AM).
2
Select the preset number for the preset station.
• You can also use 1
or ¡
buttons.
To restore the volume,
press again, or
adjust the volume level.
Remote
ONLY
INFO
Main Unit
ONLY
FM
AM
(While holding...) (9 kHz interval)
(10 kHz interval)
FM AM
Remote
ONLY
Increases the frequencies.
Decreases the frequencies.
1 sec.
The MONO indicator lights on the display.
Reception will improve though stereo
effect is lost—monaural reception mode.
To restore the stereo effect,
press the
button again (the MONO indicator goes
off).
Examples:
To select number 5, press 5.
To select number 10, press 10.
To select number 15, press h
10,
1, then 5.
To select number 30, press h
10,
3, then 0.
Remote
ONLY
FM AM
MX_DK51.book Page 9 Tuesday, February 28, 2006 5:10 PM

10
Playing Back a Disc
Before operating a disc, be familiar how a disc is recorded.
• DVD Video/DVD-VR consist of “
Titles
” which include
“
Chapters
,” DVD Audio/MP3/WMA/MPEG-1/MPEG-2/
ASF/DivX consist of “
Groups
” which include “
Tracks
,”
JPEG consist of “
Groups
” which include “
Files
,” and CD/
SVCD/VCD consist of only “
Tracks
.”
•For DVD-VR/MP3/WMA/MPEG-1/MPEG-2/ASF/
DivX/JPEG playback, see also “Operations on the
Control Screen” on page 25.
To insert discs
•When using an 8 cm disc, place it on the inner circle of the
disc tray.
To close the disc tray,
press OPEN/CLOSE 0
again.
If you press DVD/CD 3
, disc tray closes automatically and
playback starts.
While playing a disc except CDs:
This System can store the
stop point, and when you start playback again by pressing
DVD/CD 3
(even while on standby), it starts from the
position where you have stopped—Resume Play. (RESUME
appears on the display when you stop playback.)
To stop completely while Resume is activated,
press 7
twice. (To cancel Resume, see “RESUME” on page 36.)
To select a title/group
While playing a disc...
To select a chapter/track
While playing a disc...
To locate a particular portion
While playing a disc except for MP3/WMA/DivX...
While playing a DivX disc...
• For MP3/WMA/DivX discs, search speed and the
indications on the TV are different.
• No sound comes out while searching on DVD Video/
SVCD/VCD.
To return to normal playback,
press DVD/CD 3
.
• For DivX discs, each time you press the or button,
you can skip to a scene 30 seconds or 5 minutes before or
after depending on the DivX file.
To start: To pause: To stop:
To release it, press
DVD/CD 3
.
On-screen guide icons
•During disc playback, the following icons may appear for
a while on the TV screen:
Appears at the beginning of a scene containing
multi-angle views.
Appears at the beginning of a scene containing
multi-audio languages.
Appears at the beginning of a scene containing
multi-subtitle languages.
•The following icons will be also shown on the TV screen
to indicate your current operation.
, , , , ,
• To deactivate the on-screen guide icons, see “ON
SCREEN GUIDE” on page 36.
INFO
Examples:
To select number 5,
press 5.
To select number 10,
press 10.
To select number 15,
press h
10, 1, then 5.
To select number 30,
press h
10, 3, then 0.
Remote
ONLY
Remote
ONLY
MX_DK51.book Page 10 Tuesday, February 28, 2006 5:10 PM

11
T
o select
an item directly
You can select a title/chapter/track directly and start
playback.
For DVD Video, you can select
a title before starting
playback
, while you can select
a chapter after starting
playback
.
To play back using the disc menu
You can operate the disc play—DVD and SVCD/VCD with
Playback Control (PBC)—using the disc menu shown on the
TV screen.
7
For DVD Video/DVD Audio:
1
Show the disc menu.
2
Select an item on the disc menu.
•With some discs, you can also select items by entering the
number using the number buttons.
7
For SVCD/VCD with PBC:
While playing a disc with PBC, “PBC” appears on the
display instead of the playing time.
When disc menu appears on the TV screen, select an item on
the menu. Playback of the selected item starts.
To cancel PBC
Before playback...
You can also cancel PBC function by pressing the number
button to select a track.
To reactivate PBC,
press 4
.
Playing Back a Tape
To insert a tape
You can play back type I tapes.
• The use of C-120 or longer tapes is not recommended.
Examples:
To select number 5, press 5.
To select number 10, press 10.
To select number 15, press h
10,
1, then 5.
To select number 30, press h
10,
3, then 0.
Examples:
To select number 5, press 5.
To select number 10, press 10.
To select number 15, press h
10,
1, then 5.
To select number 30, press h
10,
3, then 0.
Remote
ONLY
Remote
ONLY
or
To move to the next or
previous page of the
current menu:
To return to the previous
menu:
To start: To stop: To fast-forward or
rewind:
(While holding...)
Push Insert and close
MX_DK51.book Page 11 Tuesday, February 28, 2006 5:10 PM

12
Daily Operations
—Sound & Other Adjustments
Canceling the Demonstration
When you plug in the AC power cord to a wall outlet, the
System automatically starts the display demonstration.
To start the demonstration
, select DEMO START.
Reinforcing the Bass Sound
To adjust the bass level
You can select the subwoofer level from level 0 (minimum)
to level 4 (maximum).
To reinforce the heavy sound—SOUND TURBO
You can boost the low and high frequency sound.
Presetting Automatic DVD Video Sound
Increase Level
The DVD Video sound is sometimes recorded at a lower
level than other discs and sources. You can set the increase
level for the currently loaded DVD Video, so you do not
have to adjust the volume when you change the source.
As the number increases, sound level also increases.
SOUND TURBO
DEMO
DVD LEVEL
SURROUND MODE
SOUND MODE
SUBWOOFER
LEVEL –,
+
Main unit
Remote Control
DVD LEVEL
SUBWOOFER
LEVEL
+
,
–
VFP
SURROUND MODE/
CH LEVEL
DIMMER
SHIFT
, , ,
ENTER/SET
CLOCK/
DISPLAY
SOUND TURBO
SOUND MODE
Main Unit
ONLY
DEMO START
DEMO OFF
2 sec.
DVD LEVEL3
DVD LEVEL2DVD LEVEL1
MX_DK51.book Page 12 Tuesday, February 28, 2006 5:10 PM

13
Adjusting the Speaker Output Level
You can adjust the speaker output level from –6 (dB) to +6
(dB).
• You can also use the SPK. SETTING menu to adjust the
speaker output level (see page 36).
1
Select the speaker you want to adjust.
2
Adjust the output level.
3
Repeat steps
1
and
2
to adjust other speakers.
Selecting the Sound Modes
You can select one of the preset Sound Modes.
Creating Your Own Sound Modes
—User Mode
You can create your own Sound Modes to make sounds suit
your taste. The changed settings can be stored as the
USER 1, USER 2 and USER 3 Modes.
1
Select one of the preset Sound Modes.
2
Enter the SEA Control Mode.
Remote
ONLY
FRONT L
FRONT R
SURR L
SURR RCENTER
(Front left
speaker)
(Front right
speaker)
(Center
speaker)
(Surround left
speaker)
(Surround right
speaker)
(While holding...)
SEA (Sound Effect Amplifier) Modes
ROCK
Boosts low and high frequency. Good for
acoustic music.
POP
Good for vocal music.
CLASSIC
Good for classical music.
User Modes
USER 1/2/3
Your individual mode stored in memory.
See the next column “Creating Your Own
Sound Modes—User Mode.”
OFF
No Sound Mode effect.
POP CLASSIC
USER 1-3
OFF
ROCK
SEA Modes
INFO
Remote
ONLY
POP CLASSIC
USER 1-3
OFF
ROCK
SEA Modes
MX_DK51.book Page 13 Tuesday, February 28, 2006 5:10 PM

14
3
Adjust the SEA pattern.
1
Select one of the tones—BASS or TRE (treble).
2
Adjust the level of the selected tone.
• You can adjust the bass and treble level from
–3 to +3.
3
Repeat steps 1
and 2
to adjust the level of the other
tone.
4
Finish the SEA pattern setting.
4
Select one of the User Modes.
5
Store the setting.
Selecting the Surround Modes
For DVD/CD:
For other sources:
DSP Modes
DANCE
Increases resonance and bass.
HALL
Adds depth and brilliance to the sound.
STADIUM
Adds clarity and spreads the sound, as in
an outdoor stadium.
ALL CH. ST
All Channel Stereo; Creates larger stereo
sound field using all the connected
speakers.
Stereo Modes
STEREO
Cancels the Surround Mode.
Auto Surround Mode
AUTO
• When multi-channel surround signal
comes in, multi-channel surround mode
is activated.
•When Dolby Surround signal comes in,
MOVIE (Dolby Pro Logic II Movie)
mode is selected.
• When 2-channel signal comes in,
STEREO mode is selected.
Dolby Pro Logic II Modes
MOVIE
Creates 5.1-channel surround field from
2-ch source (suitable for movie source).
MUSIC
Creates 5.1-channel surround field from
2-ch source (suitable for music source).
INFO
STEREOAUTO
DANCE HALL
MOVIEMUSIC
STADIUM ALL CH. ST
STEREO
DANCE HALL STADIUM
ALL CH. ST
MX_DK51.book Page 14 Tuesday, February 28, 2006 5:10 PM

15
Changing the Picture Tone
While showing a playback picture on the TV, you can select
the preset picture tone, or adjust it and store your own
settings.
To select a preset picture tone
1
While playing, display VFP setting screen.
2
Select a preset picture tone.
To adjust the picture tone
1
Select “USER1” or “USER2.”
• Follow steps
1
and
2
explained above.
2
Select a parameter you want to adjust.
3
Adjust the parameter.
4
Repeat steps
2
to
3
to adjust other parameters.
To remove the setting screen,
while holding SHIFT, press
VFP again. The screen will automatically be erased after 9
seconds even if you do not press VFP.
Changing the Display Brightness
You can dim the display window and the illuminations on
the main unit.
Setting the Clock
• To exit from the clock setting, press CLOCK/
TIMER as required.
• To go back to the previous step, while holding SHIFT,
press CANCEL.
1
Activate clock setting mode.
•If you have already adjusted the clock before, press the
button repeatedly until the clock time starts flashing.
2
Adjust the hour, then minute.
To check the current time when the System is turned on
NORMAL
Normally select this.
CINEMA
Suitable for a movie source.
USER1/USER2
You can adjust parameters and can
store the settings (see below).
GAMMA
Adjust if the neutral color is bright or
dark (–3 to +3).
BRIGHTNESS
Adjust if the picture is bright or dark
as a whole (–8 to +8).
CONTRAST
Adjust if the far and near positions
are unnatural (–7 to +7).
SATURATION
Adjust if the picture is whitish or
blackish (–7 to +7).
TINT
Adjust if human skin color is
unnatural (–7 to +7).
SHARPNESS
Adjust if the picture is indistinct (–8
to +8).
Remote
ONLY
On the TV screen
NORMAL
GAMMA
BRIGHTNESS
CONTRAST
SATURATION
TINT
SHARPNESS
0
0
0
0
0
0
(While holding...)
NORMAL CINEMA
USER2 USER1
Remote
ONLY
DIMMER ON
DIMMER OFF
(Normal)
(While holding...)
INFO
Remote
ONLY
(While holding...)
MX_DK51.book Page 15 Tuesday, February 28, 2006 5:10 PM

16
Unique DVD/VCD Operations
Selecting the Sound Track
For DVD Video/DivX:
While playing back a chapter
containing audio languages, you can select the language to
listen to.
For DVD Audio:
While playing back a track containing
audio channels, you can select the audio channel to listen to.
For DVD-VR or SVCD/VCD:
When playing back a track,
you can select the audio channel to play.
•You can also select the audio track using the on-screen bar
(see page 22).
While playing a DVD Video...
While playing a DVD Audio/DivX...
Ex.:
While playing a DVD-VR or SVCD/VCD...
•SVCD can have 4 audio channels. Karaoke SVCD usually
uses these 4 channels to record two 2-channel recordings
(ST1/ST2).
Remote Control
SLOW –,+
8
DVD/CD
3
SUB TITLE
SHIFT
ANGLE
PAGE
ZOOM
AUDIO/MPX
, , ,
ENTER/SET
Number
buttons
ST1/ST2/ST
To listen to normal stereo (2 channel)
playback.
L1/L2/L
To listen to the left audio channel.
R1/R2/R
To listen to the right audio channel.
Remote
ONLY
INFO
(While holding...)
ENGLISH
1/3 3/3
FRENCH
2/3
JAPANESE
ENGLISH
1/3
FRENCH
2/3
JAPANESE
3/3
Ex.:
JAPANESE
3/3
3
JAPANESE
2/3
2
JAPANESE
1/3
1
ST L
R
DVD-VR/VCDSVCD
ST1 ST2 L1
R2 L2 R1
MX_DK51.book Page 16 Tuesday, February 28, 2006 5:10 PM

17
Selecting the Subtitle Language
For DVD Video:
While playing back a chapter containing
subtitles in different languages, you can select the subtitle
language to display on the TV screen.
For SVCD:
While playing, you can select the subtitles even
if no subtitles are recorded on the disc.
For DVD-VR:
While playing, you can turn the subtitle on or
off.
• You can also select the subtitle language using the
on-screen bar (see page 22).
While playing a DVD Video...
1
Display the subtitle selection window.
2
Select the subtitle language.
While playing an SVCD...
While playing a DVD-VR...
Selecting the View Angle
For DVD Video only:
While playing back a chapter
containing multi-view angles, you can view the same scene
from different angles.
•You can also select the view angle using the on-screen bar
(see page 22).
While playing...
Selecting Browsable Still Pictures
For DVD Audio only:
While playing back a track linked to
browsable still pictures (B.S.P.), you can select the still
picture (turn the page) to be shown on the TV screen.
•If a track is linked to browsable still pictures (B.S.P.), they
are usually shown in turn automatically during playback.
• You can also select the page using the on-screen bar (see
page 22).
Remote
ONLY
(While holding...)
ENGLISH
1/3
ENGLISH
1/3
1/3 3/3
2/3
FRENCH JAPANESEENGLISH
1/3 2/3
JAPANESE
3/3
ENGLISH FRENCH JAPANESE
Ex.:
(While holding...)
Each time you press the
button, the still picture
changes one after
another (if available).
ON
ON
OFF
OFF
(While holding...)
Remote
ONLY
1
1/3
2
2/3
3
3/3
1
1/3
2
2/3
3
3/3
Ex.:
(While holding...)
Remote
ONLY
(While holding...)
MX_DK51.book Page 17 Tuesday, February 28, 2006 5:10 PM
Table of contents
Other JVC Stereo System manuals