JVC UX-LS5V User manual

UX-LS5V
—Consists of CA-UXLS5V and SP-UXLS5V
MICRO COMPONENT SYSTEM
English
INSTRUCTIONS
LVT2113-001B
[US/UG/UA]
EN_UX-LS5V[US_UG].indd 1EN_UX-LS5V[US_UG].indd 1 10.4.2 11:06:11 AM10.4.2 11:06:11 AM

2
CAUTION
• Do not block the ventilation openings or holes.
(If the ventilation openings or holes are blocked
by a newspaper or cloth, etc., the heat may not
be able to get out.)
• Do not place any naked flame sources, such as
lighted candles, on the apparatus.
• When discarding batteries, environmental
problems must be considered and local rules or
laws governing the disposal of these batteries
must be followed strictly.
• Do not expose this apparatus to rain, moisture,
dripping or splashing and that no objects filled
with liquids, such as vases, shall be placed on the
apparatus.
CAUTION
Excessive sound pressure from earphones or
headphones can cause hearing loss.
CAUTION:
Battery shall not be exposed to excessive heat such
as sunshine, fire, or the like.
Warnings, Cautions and Others
CAUTION
The button in any position does not disconnect
the mains line.
Disconnect the mains plug to shut the power off
completely (the STANDBY lamp goes off).
The MAINS plug or an appliance coupler is used as the
disconnect device, the disconnect device shall remain
readily operable.
• When the System is on standby, the STANDBY lamp
lights red or orange.
• When the System is turned on, the STANDBY lamp
goes off.
The power can be remote controlled.
CAUTION
To reduce the risk of electrical shocks, fire, etc.:
1. Do not remove screws, covers or cabinet.
2. Do not expose this appliance to rain or moisture.
IMPORTANT FOR LASER PRODUCTS
1. CLASS 1 LASER PRODUCT
2. CAUTION: Do not open the top cover or cabinet.
There are no user serviceable parts inside the unit;
leave all servicing to qualified service personnel.
3. CAUTION: Visible and/or invisible class 1M laser
radiation when open. Do not view directly with
optical instruments.
4. REPRODUCTION OF LABEL: CAUTION LABEL,
PLACED INSIDE THE UNIT.
EN_UX-LS5V[US_UG].indd 2EN_UX-LS5V[US_UG].indd 2 10.4.2 11:06:14 AM10.4.2 11:06:14 AM

3
Caution: Proper Ventilation
To avoid risk of electric shock and fire, and to prevent damage, locate the apparatus as follows:
1. Front: No obstructions and open spacing.
2. Sides/Top/ Back: No obstructions should be placed in the areas shown by the dimensions below.
3. Bottom: Place on the level surface. Maintain an adequate air path for ventilation by placing on a stand with
a height of 10 cm or more.
Front view Side view
SP-UXLS5V CA-UXLS5V SP-UXLS5V CA-UXLS5V
[European Union Only]
EN_UX-LS5V[US_UG].indd 3EN_UX-LS5V[US_UG].indd 3 10.4.2 11:06:14 AM10.4.2 11:06:14 AM

4
Contents
Unpacking
Unpack the unit carefully and make sure that all
accessories are present.
FM indoor antenna..............................................................................(1)
AM loop antenna..................................................................................(1)
Dock for iPod...........................................................................................(1)
Remote control unit
with a built-in button battery (RM-SUXLS5V)...........(1)
AC adapter (AA-R1808).....................................................................(1)
Power cord................................................................................................(1)
AC plug adapter
(not supplied for Middle East and Thailand) .............(1)
If any accessories are missing, or if the unit is damaged of falls
to operate, notify your dealer immediately. If your unit was
shipped to you directly, notify your shipper immediately. JVC
recommends that you retain the original carton and packing
materials in case you need to move or ship the unit in the
future.
Keep this manual handy for future reference.
Before use .......................................................4
Contents ...........................................................................................4
Unpacking ....................................................................................... 4
Preparing the remote control unit ...................................5
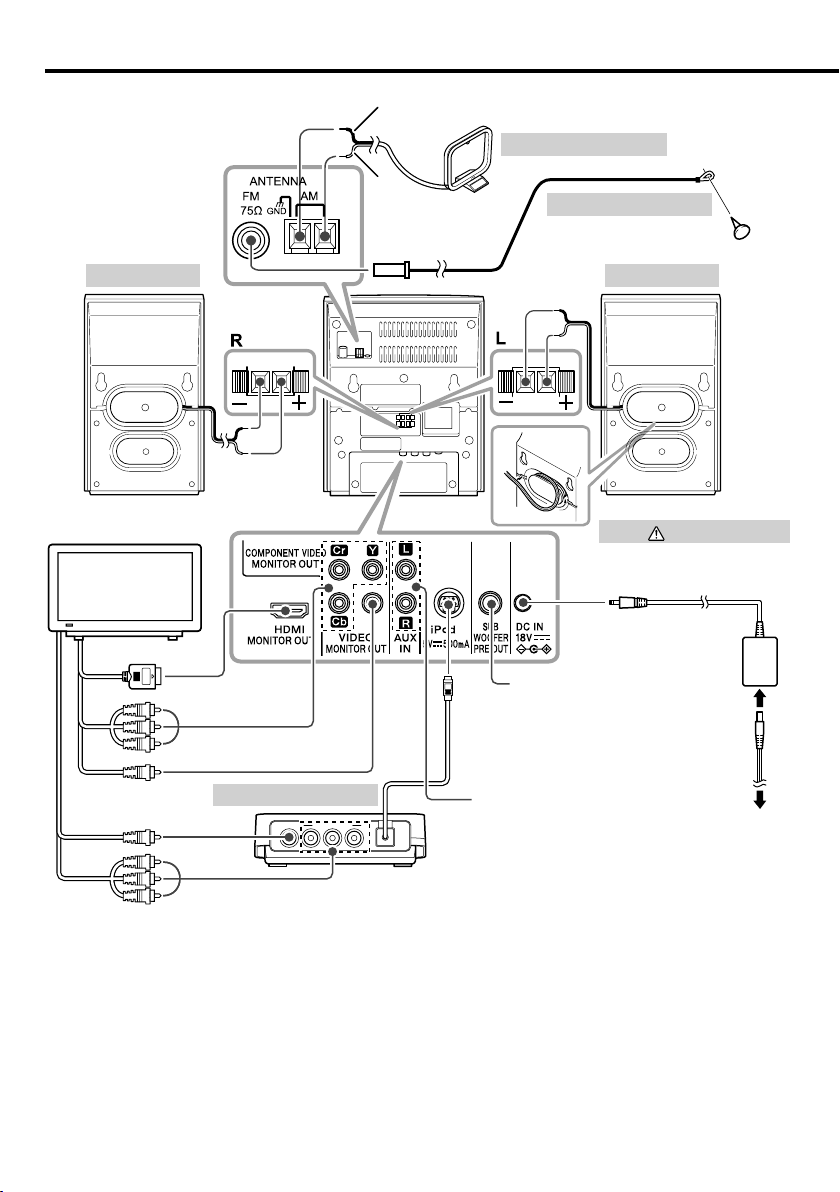
Connections ....................................................6
Disc information .............................................8
Handling discs...............................................................................9
About USB device.......................................................................9
Supported iPod ...........................................................................9
About MP3 and WMA............................................................ 10
About Video le......................................................................... 11
About Picture le...................................................................... 11
About SD card............................................................................ 11
Component names and functions...............12
Basic function ...............................................14
Switching the system on..................................................... 14
Switching the system to standby mode.................... 14
Volume control .......................................................................... 14
Sound control............................................................................. 14
Headphones................................................................................ 14
Using the DVD/USB device/SD card ............15
Preparation................................................................................... 15
Playing a DVD/ Video CD.....................................................16
Playing a CD/ audio le/ video le................................ 16
Time Search ................................................................................. 17
File Select....................................................................................... 17
Selecting a desired le by le name............................. 17
Programming chapters/tracks/les .............................. 18
Random play............................................................................... 18
Repeat play................................................................................... 18
Zoom................................................................................................ 19
Changing the display information................................. 19
DVD Setup.....................................................20
Switching the video resolution ....................................... 20
Adjust the settings...................................................................20
Using the iPod ..............................................22
Playing an iPod .......................................................................... 22
Repeat play................................................................................... 22
Random play............................................................................... 22
iPod Video Output ................................................................... 22
Using the D.AUDIO .......................................23
Playback of Digital Audio Player...................................... 23
Using the AUX ..............................................23
Playing an external component......................................23
Using the radio .............................................24
To select the AM tuner interval spacing .................... 24
Tuning in radio stations........................................................24
Auto preset................................................................................... 24
Manual preset............................................................................. 24
Tuning to a preset radio station...................................... 24
Using Radio Data System.................................................... 25
Changing the Radio Data System display
information .......................................................................... 25
Tuning by Program Type (PTY search).........................25
Clock/timer operation..................................26
Clock setting................................................................................ 26
Timer setting ............................................................................... 26
To activate/deactivate the timer.....................................27
Sleep timer setting.................................................................. 27
System setup.................................................27
Adjusting the display brightness (BACKLIGHT)..... 27
Adjusting the display contrast (CONTRAST)............27
Setting Auto Power Save (A.P.S.)...................................... 28
In case of diculty........................................28
General information.....................................30
Maintenance ............................................................................... 30
To install this unit and/or speakers on a wall.......... 30
Specications................................................31
Before use
Thank you for purchasing a JVC product. Please read all instructions carefully before operation, to ensure your
complete understanding and to obtain the best possible performance from the System.
EN_UX-LS5V[US_UG].indd 4EN_UX-LS5V[US_UG].indd 4 10.4.2 11:06:15 AM10.4.2 11:06:15 AM

5
Preparing the remote control unit
Pull the battery sheet out from the
remote control unit to the direction of
the arrow.
Operation
When the power cord is plugged in, STANDBY/TIMER
indicator is lit. The power turns ON by pressing
button on the remote control unit pointing at the
remote sensor. When the power comes on, press the
button you want to operate.
Approx. 6 m
30°
30°
Remote sensor
⁄
• The supplied battery may have shorter live than ordinary
battery due to use during operation checks.
• When the remote-controllable distance gets shorter than
before, replace the battery with a new one.
• Placing the remote sensor in direct sunlight, or in direct
light from a high frequency fluorescent lamp may cause a
malfunction.
In such a case, change the location of the system installation
to prevent malfunction.
¤ CAUTION
• Lithium battery.
Danger of explosion if the battery is incorrectly replaced.
Replace only with the same or equivalent type.
• The battery pack or batteries shall not be exposed to
excessive heat such as sunshine, fire or the like.
• Keep battery out of reach of children and in original
package until ready to use. Dispose of used batteries
promptly. If swallowed contact physician immediately.
Changing the battery of the remote control
unit
Use a commercially available button battery
(CR2025).
1Insert something narrow like a paperclip into
the hole and pull out the battery tray.
Keep on slide
Pull out
2Replace the old battery with a new one.
CR2025(+side)
EN_UX-LS5V[US_UG].indd 5EN_UX-LS5V[US_UG].indd 5 10.4.2 11:06:15 AM10.4.2 11:06:15 AM

6
VIDEO COMPONENT VIDEO
YCb Cr
Connections
AM loop antenna
FM indoor antenna
Dock for iPod
Right speaker Left speaker
To AC wall outlet
• Insert the plug firmly
all the way into the
AC wall outlet.
To TV with video input terminal
Video cord
Component Video
cord
Component Video cord
Video cord
HDMI cord
Power cord
AC adapter
Use the AC adapter (AA-R1808)
provided with this product.
Connect the audio output
of the VCR, etc. to the
[AUX IN] terminals on the
rear of the main unit.
Connect a subwoofer (separately
available) to the [SUB WOOFER PRE
OUT] terminal on the rear of the main
unit.
Black
White
EN_UX-LS5V[US_UG].indd 6EN_UX-LS5V[US_UG].indd 6 10.4.2 11:06:16 AM10.4.2 11:06:16 AM

7
Connecting the FM antenna
1 Connect the lead to the [FM 75] terminal.
2 Find the location that gives the best
reception.
3 Secure the antenna as high up as possible.
• The antenna supplied with the system is a basic antenna
for indoor use. For stable signal reception, the use of an
outdoor antenna (commercially available) is recommended.
Disconnect the indoor antenna first before connecting an
outdoor antenna.
¤
CAUTION on installing an outdoor
antenna
• Since antenna installation necessitates skill and experience,
always consult your dealer before installation. The antenna
should be placed at a distance from the power distribution
wires. Otherwise, an electric shock accident may occur if the
antenna falls down.
Connecting the AM antenna
1 Connect the AM antenna cord to the [AM] and [HGND]
terminals.
2 Setup the antenna in the position and the direction to be
able to receive AM broadcast.
• The antenna supplied with the system is for indoor use. Place
it as far away as possible from the system, your TV set, the
speaker cords, AC adapter and the power cord, and point it in
the direction that provides the best reception.
Connecting the speakers
1 Connect the right speaker to terminal marked "R", with the
red wire to + and the black wire to –.
2 Connect the left speaker to terminal marked "L", with the red
wire to + and the black wire to –.
Insert this portion.
• For optimal sound performance, it is recommended to use
the supplied speakers.
• Do not connect more than one speaker to any one pair of
+/– speaker terminals.
¤
Caution for connection
• Do not plug the power cord into the power outlet until
all other connections are completed. Before unplugging
a connected cord or cable, be sure to switch the system
OFF and unplug the power cord from the power outlet in
advance.
• If the wall outlet does not match the AC plug, use the
supplied AC plug adapter (not supplied for Middle East and
Thailand).
Connecting the iPod adapter
• Connect an iPod adapter, which is provided with your iPod or
commercially available in iPod dealers, to the dock for iPod of
this unit. Note that the iPod adapter is not provided with this
unit.
• See page 9 for the supported iPod models.
1 Insert the iPod adapter into
unit.
2 Connect your iPod.
To remove the iPod adapter
• Insert a thin object such as the tip of a flat-blade screwdriver
into the slit on the dock adapter and lift it to remove.
Connecting the HDMI terminal
1 When you use HDMI connection, you can change the
resolution (576p, 720p, 1080i, 1080p) for the HDMI output.
(See page 20)
The HDMI will be outputted at 576p resolution, even if you set
the resolution to 576i on the HDMI connection.
• When the no sound or noisy sound are outputted with HDMI
connection, set the HDMI AUDIO in DVD SETUP menu to
PCM. (See page 21)
• If there is noise or lines on the screen, please check the HDMI
cable.
• Not all HDCP-compatible DVI devices will work with this unit.
• If your HDMI TV does not support HDCP, the blue screen
appears on the screen.
• If the abnormal picture appears on the TV screen, turn off the
unit and then turn the unit on again.
FM
75Ω
Dock for iPod
iPod adapter
EN_UX-LS5V[US_UG].indd 7EN_UX-LS5V[US_UG].indd 7 10.4.2 11:06:17 AM10.4.2 11:06:17 AM

8
Types of Playable Discs
The system this unit is using does not only play music from CD but can also play the discs listed below to oer
you high-quality entertainment of video of movies and live concerts.
Playable Disc DVD VIDEO
(DVD-R/RW, DVD+R/RW) CD (CD-R, CD-RW) VCD (SVCD*)
Logo mark
on disc
Disc size
8 cm 12 cm 8 cm 12 cm 8 cm 12 cm
Played sides One or both One or both One side only One side only One side only One side only
Contents
Video +
Audio
Approx. 41 min.
(1 side, 1 layer)
Approx. 75 min.
(1 side, 2 lay-
ers)
Approx. 82 min.
(2 sides, 1
layer)
Approx. 150 min.
(2 sides, 2 lay-
ers)
Approx. 133 min.
(1 side, 1 layer)
Approx. 242 min.
(1 side, 2 lay-
ers)
Approx. 266 min.
(2 sides, 1
layer)
Approx. 484 min.
(2 sides, 2 lay-
ers)
Max. 20 min. Max. 74 min.
(In case of an SVCD, the possible
playback time becomes shorter.)
Audio Max. 20 min., digi-
tal
Max. 80 min.,
digital
• * This unit can play SVCDs, but some functions will not work.
• A Dual Disc is a two-sided disc combining a DVD side according to the DVD standard and a music side. The video content re-
corded on the DVD side can be played back. As the music side is not compatible with the Compact Disc (CD) standard, playback
on this unit is not assured.
• This unit can play back DVD-R and DVD-RW discs recorded in the DVD VIDEO format and DVD+R and DVD+RW discs, but de-
pending on the recording unit, the disc manufacturer, etc., playback sometimes may not be possible.
• This unit may also be incapable of playing certain CD-R/RW discs depending on their properties, recording conditions, etc.
• This player cannot play back discs compatible with CPRM. CPRM is the abbreviation of Content Protection for Recordable Media,
and it is a technique for copyright protection for recording media.
Unplayable discs
This player cannot play back any of the following discs.
DVD AUDIO discs, DVD-RAM discs, SACD discs, VSD discs, CDV discs (Only the audio part can be reproduced.), CD-G/CD-EG/
CD-EXTRA discs (Only the audio can be reproduced.)
Regional code
This unit has a regional code printed on the rear of the unit. This unit can play only DVD discs labeled same as the
rear of the unit or "ALL".
• Most DVD discs have a globe with one or more numbers in it clearly visible on the cover. This number must match your unit’s
regional code or the disc cannot play.
• If you try to play a DVD with a different regional code from your unit, the message “WRONG REGION” appears on the TV screen.
Disc information
EN_UX-LS5V[US_UG].indd 8EN_UX-LS5V[US_UG].indd 8 10.4.2 11:06:18 AM10.4.2 11:06:18 AM

9
About USB device
Notes on use of the USB device
This unit can play audio les stored in the ash
memory and digital audio player that have a USB port
(these devices are referred to as USB devices in this
document).
The following restrictions are placed on the types and
usage of available USB devices:
Available USB devices
• USB devices belonging to the USB mass storage class.
• USB devices whose maximum current consumption is 500
mA or less.
⁄
• USB Mass Storage Class : USB devices that the PC can
recognize as an external storage without using any special
driver or application software.
• Contact the sales agent as to whether your USB device
conforms to the USB mass storage class specs.
• Using an unsupported USB device can result in abnormal
playback or display of the audio file.
Even if you use the USB device conforming to the above
specs, audio files cannot be played normally depending on
the type or condition of the USB device.
Supported iPod
Made for
• iPod nano (1st generation)
• iPod nano (2nd generation)
• iPod nano (3rd generation)
• iPod nano (4th generation)
• iPod nano (5th generation)
• iPod (4th generation)
• iPod with video
• iPod classic
• iPod touch (1st generation)
• iPod touch (2nd generation and Fall '09)
(As of February 2010)
⁄
• Be sure to update the software of your iPod to the latest
version.
• The iPod cannot be connected together with its accessories
such as the cover or case. Be sure to remove any accessories
before connecting the iPod.
• Video output setting of iPod needs to be set on your iPod.
• When the iPod is detached from the dock for iPod, the TV Out
setting of the iPod may sometimes be set to On. Check this
setting if the iPod cannot display video.
Operation regulatory marks
With this DVD, some functions of this unit such as the
play function may be restricted depending on the
location where the DVD is playing. In this case, the
following marks will appear on the screen. For more
information, refer to the disc manual.
"Invalidity key"
Handling discs
Handling precautions
Hold a disc taking care not to touch the played surface. (The
side without the printed label is the playback side.)
Notes on CD-ROM/CD-R/CD-RW discs
If the CD-ROM, CD-R or CD-RW disc in use has a printable label
surface, the disc may be unable to be taken out of the system
due to sticking of the label surface. To prevent malfunction of
the system, do not use such a disc.
Cautions on CD discs
Always use a CD carrying the marking.
A disc without this marking may be unable to be played back
correctly.
The disc rotates at a high speed during playback. Never use a
cracked, chipped or greatly warped disc. Otherwise, damage or
malfunction of the player may result.
Also, do not use a disc with a non-circular shape as this may
result in malfunction.
EN_UX-LS5V[US_UG].indd 9EN_UX-LS5V[US_UG].indd 9 10.4.2 11:06:20 AM10.4.2 11:06:20 AM

10
About MP3 and WMA
The playable MP3/WMA le (hereafter called Audio
le) and the media format have the following
limitation. The Audio le, which is not conforming to
the specication, may not play normally.
Playable Audio le
Playable MP3 le
• File formats: MPEG 1/2 Audio Layer 3 file
• Extension: .mp3
• Transfer bit rate: 8 kbps – 320 kbps
• Sampling frequency: 48/ 44.1/ 32/ 24/ 22.05/ 16/ 12/
11.025/ 8 kHz
Playable WMA le
• File format: Windows Media™ Audio compliant
• Extension: .wma
• Transfer bit rate: 32 kbps – 320 kbps
• Sampling frequency: 48/ 44.1/ 32 kHz
• Files created using functions in Windows Media™ Player 9 or
later cannot be played.
- WMA Professional
- WMA Lossless
- WMA Voice
⁄
• Do not attach the extensions to files other than the Audio file.
If the extension is attached, the file, which is not the Audio
file, will play and outputs a loud noise, causing damage to the
speaker.
• The files with copy protection cannot be played.
• Audio files cannot be played depending on the encoding
software setting, USB device type, and/or recording
conditions.
• The unit may not be compatible with upgrade of
compression format standard and additional specifications.
• Audio files encoded using VBR (Variable Bit Rate) may use bit
rates that fall outside the supported range. Audio files with bit
rates outside the supported range cannot be played.
Playable storage media
• DVD±R/RW, DVD-ROM, CD-ROM, CD-R, CD-RW
• USB device (USB version 1.1/2.0)
• SD, SDHC, mini SD, micro SD/SDHC card
⁄
• CD-RW discs which are quick formatted by the writing
software cannot be used.
• When recording to the maximum CD-R/RW media capacity at
once, the writing software is set to "Disc at once".
• For details on the available USB devices, refer to <About USB
device> (page 9).
• For details on the available SD/SDHC card, refer to <About SD
card> (page 11).
Playable DVD±R/RW format
• UDF-Bridge
Playable CD-R/RW format
• ISO 9660 Level 1/2
• Joliet
Playable le system of USB device/ SD card
• FAT 16/ 32
The maximum number of characters for
display
• File/Folder name: 30/ 10 characters
• MP3 ID3 Tag/ WMA Contents property:
30 characters
(The information which can be displayed with this unit:
title, artist name, and album name)
⁄
• File/Folder name is the number of the characters including
the extensions.
• This unit can display the following versions of MP3 ID3 tag:
version 1.0/ 1.1/ 2.2/ 2.3
• A character that cannot be displayed with this unit is
displayed incorrectly or substituted by “-“.
Limitation of structure for the le and the
folder
• Maximum number of folders: 130 (including root folder)
• Maximum number of files per media: 999
Playing order of the audio le
• Audio files are played in the order the files are written. You can
specify the order of playback by numbering files in a folder
and writing them by folder.
Example
v
<
()
: Root <: Folder
v: Audio le
v
v
v
v.
v
v
v
v
v
v.
v
Folder
Audio file
• Playing order
Playing order after ¡! play:
➡¡", ¡#, ¡$, ¡%...
EN_UX-LS5V[US_UG].indd 10EN_UX-LS5V[US_UG].indd 10 10.4.2 11:06:20 AM10.4.2 11:06:20 AM

11
About Video le About SD card
Acceptable video les
Playable MPEG1, MPEG2 le
• File formats: MPEG 1/2
• Extension: .mpg, .mpeg, .m1v, .m2v
• Picture size: 720 × 480, 720 × 576
• Profile & Level: MP@ML (Main Profile at Main Level)
• Audio format: MPEG Audio Layer 2/3
• Audio sampling frequencies: 32/ 44.1/ 48 kHz
• Audio bit rate: 32–384 kbps (Only constant bit rates)
• File size: Max. 4 G bytes
Playable DivX le
• File format: DivX
• Extension: .divx, .div, .avi
• Picture size: 352 x 240, 352 x 288, 720 x 480, 720 x 576
• Audio format: MP3, Dolby Digital
• Audio sampling frequencies: 32/ 44.1/ 48 kHz
• Audio bit rate: 32–384 kbps (Only constant bit rates)
• File size: Max. 4 G bytes
ABOUT DIVX VIDEO:
DivX® is a digital video format created by DivX, Inc. This is an
official DivX Certified device that plays DivX video. Visit www.
divx.com for more information and software tools to convert
your files into DivX video.
ABOUT DIVX VIDEO-ON-DEMAND:
This DivX Certified® device must be registered in order to
play DivX Video-on-Demand (VOD) content. To generate the
registration code, locate the DivX VOD section in the device
setup menu. Go to vod.divx.com with this code to complete the
registration process and learn more about DivX VOD.
⁄
• When buying DRM enabled contents, check the Registration
Code in the <DIVX [R] VOD> (page 21). Registration Code
changes each time a file with the displayed Registration Code
is played to protect against copying.
About Picture le
Acceptable picture les
Playable JPEG le
• File formats: JPEG
• Extension: .jpg, .jpeg
• Baseline format: Up to a maximum of 8192(W) × 7680(H)
pixels
• Progressive format: —
• File size: Max. 4 M bytes
Available SD card
• SD, SDHC, mini SD, micro SD/SDHC card
• An SD card of 512 MB to 32 GB can be used.
⁄
• A special adapter is required for using a mini SD/micro SD
card.
• A multimedia card (MMC) cannot be used.
• Data recorded in the SD audio format cannot be played back.
• This unit is capable of playback of SD/SDHC memory cards
complying with the SD or SDHC standard.
EN_UX-LS5V[US_UG].indd 11EN_UX-LS5V[US_UG].indd 11 10.4.2 11:06:20 AM10.4.2 11:06:20 AM

12
Component names and functions
DISPLAYSLEEP
USB/SD
DVD
STOP X-BASS
VOLUME
MUTE
D.AUDIO/iPod AUX SOUND
V. F. S
BAND
TUNER
AUDIO
SUBTITLE
DVD SETUP
RESOLUTION
STEREO/MONO
ABC DEF
GHI JKL MNO
PQRS TUV WXYZ
ANGLE
P.MODE
FOLDER
P.CALL
TIMER SET
ZOOM
RANDOM
MEMORY
REPEAT
TIMER
ON/OFF
FILE
SEARCH
PTY
CLEAR
BACKLIGHT
CONTRAST
TOP MENU MENU
RETURN ON SCREEN
ENTER
26
25
24
23
22
21
19
16
18
17
20
1
2
3
5
4
6
14
15
9
10
11
12
13
8
7
7 689101112
1 2 3 4 5
13
14
15
16
32Source buttons
To select the source you want, or to turn the system on
to the selected source.
TUNER BAND button
FM ➜AM
DVD/USB/SD button
DVD ➜USB ➜SD
D.AUDIO/iPod button
D.AUDIO ➜iPod
AUX button
AUX
1
SLEEP
button
To select the sleep time.
21button
To switch the system on or to standby mode.
[STANDBY/TIMER] indicator
Red lighting: Ordinary standby mode
Orange lighting: Timer standby mode
EN_UX-LS5V[US_UG].indd 12EN_UX-LS5V[US_UG].indd 12 10.4.2 11:06:21 AM10.4.2 11:06:21 AM

13
433/8button
To start or interrupt playback for DVD, audio le, video
le and iPod.
STOP 7button
To stop playback for DVD, audio le and video le.
544/ ¢buttons
To search forward/backward to next/previous title/
chapter/track for DVD.
To search forward/backward or to skip to the next/
previous les for audio les and iPod.
To tune to higher/lower radio frequency or search
radio stations for TUNER.
6DVD SETUP button
To access or remove setup menu.
7MULTI CONTROL 5/ ∞/ 2/ 3buttons
To select a setting item.
ENTER button
To enter the selected item.
RETURN button
To Return on a Video CD with PBC.
ON SCREEN button
To access On-Screen Display.
8AUDIO button
To select an audio language or an audio channel for
DVD, Audio le or video le.
9SUBTITLE button
During playback, this button repeatedly to select a
desired subtitle language for DVD.
10 RESOLUTION/ STEREO/MONO button
Press to switch the resolution of the video output as a
result of conversion of an analog video signal.
To switch between stereo mode and mono mode (on
FM band only) for TUNER.
11 ZOOM RANDOM button
To playback in random order for CD, audio le.
To select the zoom ratio for DVD, Video CD.
12 MEMORY/REPEAT button
To auto /manual preset radio stations for TUNER.
To repeat one track/le or all tracks/les for CD, audio
le and iPod.
13 ANGLE P.MODE button
To program tracks/les for DVD and audio le.
To select a DVD camera angle for DVD.
14
PTY/CLEAR
button
To carry out PTY search.
To delete the track/le number entered during
track/le search.
15 digit 0 – 9/ A – Z buttons
To select a track/le number for CD and audio le.
To select a preset radio station for TUNER.
To enter le names in le search mode for audio les.
16 FILE SEARCH button
To select a desired le in audio le.
To select a desired title/chapter/track/le or time with
on screen bar.
17 TIMER ON/OFF button
To switch the timer on/o.
18 TIMER SET button
To set the clock.
To set the timer.
To set the A.P.S.
19 FOLDER/P.CALL 5/ ∞buttons
To select an album (folder) of audio les and iPod.
To select a preset radio station for TUNER.
20 MUTE button
To interrupt and resume sound reproduction.
21 5VOLUME 5/ ∞buttons
To increase or decrease the volume.
22 7X-BASS button
To switch on/o bass enhancement.
23 8SOUND button
To select the desired sound eect : POP, CLASSIC,
ROCK, JAZZ, GAME or FLAT (o ).
24 V.F.S. button
For DVD/USB/SD, to toggle between CHURCH, WIDE
and LIVE.
25 BACKLIGHT/CONTRAST button
To switch the display backlight and illumination on
and o.
To adjust the display contrast.
26 DISPLAY button
To change the time display for CD.
To change the information display for audio les.
To change the display for Radio Data System.
To change the clock display for AUX and iPod.
6[0]button
To open or close the DVD door.
9SD card slot
10 USB connector
11 D.AUDIO input terminal
12 PHONES jack
13 Remote sensor
14 Display
15 Illumination
16 DVD door
Standby mode
While the STANDBY/TIMER indicator is lit, a small amount of
power is supplied to the system to back up the memory. This is
called standby mode. Under the condition, the system can be
turned ON by the remote control unit.
EN_UX-LS5V[US_UG].indd 13EN_UX-LS5V[US_UG].indd 13 10.4.2 11:06:22 AM10.4.2 11:06:22 AM

14
Switching the system on
Press , TUNER BAND, DVD/USB/SD, D.AUDIO/
iPod, AUX button.
The [STANDBY/TIMER] LED will go out.
The system will switch to the last selected source or
the selected source.
Switching the system to standby mode
Press button.
[STANDBY/TIMER] indicator is lit.
Volume control
Press VOLUME 5button to increase, or press
VOLUME ∞to decrease the volume level.
"VOL XX" is displayed. "VOL XX" denotes the volume
level.
To switch o the volume temporarily
Press MUTE button.
Playback continues without sound, and "MUTE" is
displayed.
⁄
• To restore the volume, press MUTE button again or adjust the
volume.
Basic function
Sound control
The sound control system feature enables you to
enjoy special sound eects; preset equalizer settings
and bass enhancement, providing the best music
reproduction.
To switch on preset equalizer settings
Press SOUND button to select the desired sound
eect: POP, CLASSIC, ROCK, JAZZ, GAME or FLAT
(o).
When an eect other than FLAT is selected, the
"EQ" icon appears on the display.
To switch on the bass enhancement
Press X-BASS button.
The icon "X-BASS" appears on the display.
⁄
• To switch off X-BASS, press X-BASS button. The icon "X-BASS"
disappears.
To switch on the V.F.S. (Virtual Front Sound)
Press V.F.S. button to set the virtual front sound or
to change sound mode repeatedly.
The icon "EQ" appears on the display.
For DVD/USB/SD , "CHURCH" ➜"WIDE" ➜"LIVE".
⁄
• V.F.S. cannot be switched in stop mode.
Headphones
To listen to your stereo with headphones (separately
available), use the 3.5 mm phones jack on the main
unit.
Connecting headphones mutes the sound from
the speakers.
¤ CAUTION
• Excessive sound pressure from earphones and headphones
can cause hearing loss.
EN_UX-LS5V[US_UG].indd 14EN_UX-LS5V[US_UG].indd 14 10.4.2 11:06:22 AM10.4.2 11:06:22 AM

15
Using the DVD/USB device/SD card
Preparation
Inserting a disc
1Press DVD/USB/SD button once or more to
select "DVD".
2Press 0button to open the DVD door.
3Insert a disc into the disc loader with the label
side facing you.
4Press 0button to close the DVD door.
For a DVD, playback starts automatically.
For a CD, the total playtime and total number of
tracks will appear in the display.
For an audio le-CD, the total album number and
total le number will appear on the display.
Removing a disc
1Press 0button and carefully pull it out.
2Press 0button to close the DVD door.
Inserting a USB device
1Press button to select standby mode.
2Insert a USB device to the USB connector on the
front panel.
3Press DVD/USB/SD button once or more to
select "USB".
"USB" is displayed. The total album number and
total le number will appear on the display.
Removing the USB device
1Press button to select standby mode.
2Remove the USB device.
Inserting an SD card
1Press button to select standby mode.
2Insert the SD card into the SD card slot until it
clicks.
Insert the SD card so that the label side faces
up and the side with a cut comes on the right.
3Press DVD/USB/SD button once or more to
select "SD".
The total album number and total le number will
appear on the display.
Removing the SD card
1Press button to select standby mode.
2Remove the SD card.
⁄
• To ensure good system performance; wait until the unit
completely reads the disc/USB device/SD card before
proceeding.
• If the disc compartment is not loaded with a disc, "NO DISC" is
displayed.
• If the disc is unreadable or there is no playable audio file in
the USB device/SD card , "NO DATA" is displayed.
• For audio files, reading time may exceed 10 seconds due
to the large number of songs compiled into one disc/ USB
device/ SD card.
• The icon "MP3" appears only when an MP3-file is played.
The icon "WMA" appears only when a WMA-file is played.
The icon "DivX" appears only when a DivX-file is played.
EN_UX-LS5V[US_UG].indd 15EN_UX-LS5V[US_UG].indd 15 10.4.2 11:06:22 AM10.4.2 11:06:22 AM

16
Playing a DVD/ Video CD
Press 6button to start playback.
The title/track number and elapsed playing time of
the current title/track appear on the display.
Basic operations
Operation type Operation
To stop playback Press STOP 7button. When pressed
twice, the disc is played from its
beginning when you play it in the next
time.
To interrupt
playback
Press 6button.
Press again to resume playback.
To select a chapter/
track
Press 4or ¢button in play or pause
mode.
To search for a
particular passage
during playback
Press and hold 4or ¢button
for more than 2 seconds to select the
searching speed, then release the button.
"x2" ="x4" ="x8" ="x20"
Press 6button at any time to resume
normal playback.
Slow-motion
playback *1
1. Press 6button to pause.
2. Press MULTI CONTROL 2or 3button.
"1/2" ="1/3" ="1/4" ="1/5" ="1/6"
="1/7" ="1/8"*2="PLAY"
3. Press 6button at any time to resume
normal playback.
Forward frame-by-
frame playback
1. Press 6button to pause.
2. Press MULTI CONTROL 5button.
3. Press 6button at any time to resume
normal playback.
To Select a subtitle
language
(For DVD only)
During playback, press SUBTITLE button
repeatedly to select a desired subtitle
language.
To Select an audio
language
(For DVD only)
During playback, press AUDIO button
repeatedly to select a desired audio
language.
To Select an audio
channel
(For Video CD only)
During playback, press AUDIO button. Each
press switches the selection.
MONO L ➜MONO R ➜STEREO ➜Mix
MONO
To Select a camera
angle
(For DVD only)
During the angle indicator has blinked,
press ANGLE button. Select the camera
angle with press ANGLE button.
*1Slow motion playback in reverse is not possible with Video
CDs.
*2Slow motion playback in reverse only.
DVD disc menu
Operation type Operation
To View the title
menu
Press TOP MENU button to display the
disc's title menu, if available.
To View the DVD
menu
Press MENU button to display the disc
menu, if available.
To select a menu
item
Use the MULTI CONTROL 5/ ∞/ 2/ 3
button to highlight your selection, then
Press ENTER button.
Video CD PBC Menu
Operation type Operation
To turn the PBC On
or Off
Press TOP MENU button.
To select a menu
item
Press the digit buttons 0-9, and then
press ENTER button.
To return Press RETURN button to return to the
menu screen.
Playing a CD/ audio le/ video le
Press 6button to start playback.
The track/le number and elapsed playing time of
the current track/le appear on the display.
Basic operations
Operation type Operation
To stop playback Press STOP 7button. When pressed
twice, the disc is played from its
beginning when you play it in the next
time.
To interrupt
playback
Press 6button.
Press again to resume playback.
To search for a
particular passage
during playback
Press and hold 4or ¢button
for more than 2 seconds to select the
searching speed, then release the button.
"x2" ="x4" ="x8" ="x20"
Press 6button at any time to resume
normal playback.
To select a track/ file Press 4or ¢button in play or pause
mode.
To select a folder
(For audio file/
video file only)
Press FOLDER/P.CALL 5or ∞button in
play or pause mode.
⁄
• For audio file, video file; "F:xxx T:xxx" appears on the display.
"F:xxx" indicates album number and "T:xxx" indicates the file
number.
Using the DVD/USB device/SD card
EN_UX-LS5V[US_UG].indd 16EN_UX-LS5V[US_UG].indd 16 10.4.2 11:06:23 AM10.4.2 11:06:23 AM

17
• The digit buttons, 0–9 on the remote control unit can also be
used to select a track/file.
Press the digit buttons as shown below:
CD Audio/ video file
To select track/file 2 2and ENTER 2 and ENTER
To select track/file 23 2and 3 2, 3 and ENTER
To select file 120 — 1, 2 and 0
If the ENTER button is not pressed, the search for the selected
track/file will start in 5 seconds.
Time Search (For DVD, Video CD, CD,
audio le only)
1Press FILE SEARCH button.
In case of Audio le or Video le, press this button
during playback.
2Press MULTI CONTROL 2or 3button to select
an item.
Example : DVD Video
TT
'9' 01/12 CH 1/24 00:01:23
3Press the digit buttons 0-9 to input.
4Repeat step 2 and 3 to enter the time.
5Press ENTER button to conrm the start time.
File Select (For audio le, video le,
picture le only)
You can select a le from the list display.
Folder column
Track column
File type
Audio file
Picture file
Video file
[Folder1 ]File2. mp3
01.File1
02.File2
03.File3
01.Folder1
02.Folder2
03.Folder3
04.Folder4
05.__________
__________
06.
04.File4
05.File5
06.File6
ALBUM :
SONG :
Folder1
File2
A TI ------
1During playing of video le/ picture le, press 7
button to stop.
The list display is remained during the playback of
audio les.
2Press MULTI CONTROL 2or 3button to select
the Folder column, Track column, or File type.
3Press ENTER button.
4Press MULTI CONTROL 5or ∞button to select a
folder or track.
5Press ENTER button to the start playback.
For picture le
Operation type Operation
To start slide show Press 6button.
To stop playback Press STOP 7button.
To interrupt
playback
Press 6button.
To select a file Press 4or ¢button.
To full screen view Press ENTER button.
To rotate picture Press MULTI CONTROL 2or 3button.
To flip vertical Press MULTI CONTROL 5button.
To flip horizontal Press MULTI CONTROL ∞button.
⁄
• When selecting a picture file, the preview appears in the
folder column.
Selecting a desired le by le name
(For audio le only)
1In stop mode, press FILE SEARCH button.
The icon "F-SEARCH" appears on the display.
2Press the digit buttons A-Z, 0-9 to input the rst
character of the le name you want to search.
3Press ENTER button.
"_" appears and ashes on the next of the rst
character.
4Repeat step 2 and 3 to enter the characters
until the one before the last character.
5For the last character, press the digit buttons
A-Z, 0-9 to input.
6Press FILE SEARCH button.
"SEARCHING" appears on the display.
Select one of them with the 4or ¢button.
7Press 6button to start playback.
⁄
• If there is no appropriate file, "NO DATA" is displayed.
Continued to next page
EN_UX-LS5V[US_UG].indd 17EN_UX-LS5V[US_UG].indd 17 10.4.2 11:06:24 AM10.4.2 11:06:24 AM

18
Programming chapters/tracks/les
Programming chapters/tracks/les of a DVD/ audio
le/ video le is possible when playback is stopped.
Up to 32 tracks can be stored in the memory in any
order.
1In stop mode, press P.MODE button to enter
program setting.
The icon "PGM" and "P–01 T– –" appears on the
display.
"T– – C– –" indicates track number of the DVD.
"T– –" indicates track number of the CD/ Video CD
[PBC o ].
"T– – –" indicates le number of the audio le/
video le/ picture le.
"P–01" indicates program number.
The icon "PGM" starts ashing.
2Press MULTI CONTROL 5or ∞button, or digit
buttons 0–9 to select the desired title/track/le.
For DVD: Press ENTER button, and then press MULTI
CONTROL 5or ∞button, or digit buttons 0–9 to
select the desired chapter.
3Press ENTER button to store the selected
chapter/track/le.
The track/le number returns to "T– –"/ "T– – –" and
the next program number appears on the display.
4Repeat steps 2 to 3 to select and store other
desired chapters/tracks/les in this way.
The icon "PGM" appears on the display.
5Press 6button to play the programmed
chapters/tracks/les.
⁄
• "PGM FULL" appears on the display, if you attempt to program
more than 32 tracks/files.
• Audio files can only be programmed within the same source.
• Now enter the new track/file number with either method
below.
– Press CLEAR button to clear the chapter/track/file number
programmed. Select the new chapter/track/file number
using digit buttons "0" to "9" on the remote control unit.
• If you press REPEAT button during programmed playback,
the current track or all programmed tracks/files is/are played
repeatedly.
The icon "REP." or "REP. ALL" and the icon "PGM" appear on the
display.
To clear the program
Press P.MODE button.
The icon "PGM" disappears from the display.
⁄
• "P" represents PROGRAM.
• The program is automatically cleared as soon as the DVD door
is opened.
• The function of program setting cannot be used in PLAY/
PAUSE mode.
Random play (except picture le)
You can play all the tracks/les in random order.
1During playing, pause or stop mode, press
RANDOM button to enable random play mode.
The icon "RDM" appears on the display.
2To exit random mode, press RANDOM button
again.
The icon "RDM" disappears from the display.
Repeat play
You can play the current track/le/album or the
whole disc/audio le repeatedly.
Press REPEAT button in play or pause mode.
Every time the button is pressed, the repeat play
changes in the following order:
For DVD Video :
Repeat mode Icon/ Display
Repeat a chapter "REP."/ "CHAPTER"
Repeat a title "REP."/ "TITLE"
Repeat all "REP. ALL"/ "REP ALL"
Repeat off —/ "OFF"
For CD/ Video CD [PBC o] :
Repeat mode Icon/ Display
Repeat a single track "REP."/ "REP 1"
Repeat all the tracks *1"REP. ALL"/ "REP ALL"
Repeat off —/ "OFF"
For audio le/ video le/ picture le :
Repeat mode Icon/ Display
Repeat a single file "REP."/ "REP 1"
Repeat one album *2"REP. ALB."
Repeat all the files *1"REP. ALL"/ "REP ALL"
Repeat off —
⁄
• *1All tracks/files are repeated continuously.
• *2This function cannot be used in program mode.
Using the DVD/USB device/SD card
EN_UX-LS5V[US_UG].indd 18EN_UX-LS5V[US_UG].indd 18 10.4.2 11:06:26 AM10.4.2 11:06:26 AM

19
Zoom
The zoom function allows you to enlarge the video
image.
1Press ZOOM button repeatedly during playback
or in the pause mode to enlarge the image.
"OFF" ="2" ="3" ="4" ="1/2"*1="1/3"*1=
"1/4"*1=…
2You can move through the zoomed picture
using MULTI CONTROL 5/ ∞/ 2/ 3.
3To cancel Zoom, press ZOOM button repeatedly
until “ZOOM OFF” appears on the TV.
⁄
• *1You cannot move the zoomed-in position when“1/2,”“1/3,”
or “1/4” is selected.
Changing the display information
To display the on-screen bar
Press ON SCREEN button.
Every time the button is pressed, the display
changes in the following order:
For DVD :
Information Icon/ Display
The current title elapsed time. —/
Disc information —
The current title remaining time. "REMAIN"/ "C -"
The whole disc elapsed time. "TOTAL"/ "T"
The whole disc remaining time. "TOTAL REMAIN"/
"T -"
On-screen is clear —/ —
For CD/ Video CD :
Information Icon/ Display
The current track elapsed time. —/
The current track remaining time. "REMAIN"/ "C -"
The whole disc elapsed time. "TOTAL"/ "T"
The whole disc remaining time. "TOTAL REMAIN"/
"T -"
On-screen is clear —/ —
For audio le/ video le :
Information Icon/ Display
The current file elapsed time. —/
The current file remaining time. "REMAIN"/ "C -"
On-screen is clear —/ —
For picture le :
Information Icon/ Display
The file number —/
On-screen is clear —/ —
To display the main unit
Press DISPLAY button in play or pause mode.
Every time the button is pressed, the display
changes in the following order:
For audio le :
Information Icon
Status display —
Album name and file name. —
Tag information (Track, album title and
artist name).
—
Album number and track number. —
EN_UX-LS5V[US_UG].indd 19EN_UX-LS5V[US_UG].indd 19 10.4.2 11:06:26 AM10.4.2 11:06:26 AM

20
DVD Setup
Switching the video resolution
Press to select the resolution of the video output as a
result of video signal conversion.
Press RESOLUTION/ STEREO/MONO button.
Display* "576I" "576P" "1080I" "720P" "1080P"
Setting 720 x
576i
720 x
576p
1920 x
1080i
1280 x
720p
1920 x
1080p
HDMI ✔✔✔✔✔
Component
video
✔✔✔✔✔
Composite
video
✔————
* The frequency setting for TV system (50 Hz/60 Hz) is
shown after the resolution value. Select "50 Hz" when
using a PAL TV and "60 Hz" when using NTSC TV.
⁄
• If your TV does not accept your resolution setting, abnormal
picture appears on the screen. Please read TV’s owner’s
manual then set the resolution that your TV can accept.
• For 1080i, 720p and 1080p resolution on the component
video out, only non-copy protected discs can be played back.
If the disc is copy protected, it will be displayed at the 576p
resolution without HDMI cable connection.
Adjust the settings
1Press DVD/USB/SD button to select the DVD,
USB, or SD source.
2In stop mode, press DVD SETUP button.
SCREEN SAVER
TV TYPE
PASSWORD
RATING
EXIT SETUP
3Press MULTI CONTROL 2or 3button to select
the menu.
4Press MULTI CONTROL 5or ∞button to move
to select the item.
5Press ENTER button.
6Press MULTI CONTROL 5or ∞button to select
the options, and then Press ENTER button.
Menu Item Contents
SCREEN
SAVER
You can set the screen saver function
(ON or OFF). If no operation is done
for about 3 minutes, starts the screen
saver.
TV TYPE 4:3 PS (Pan Scan conversion): Select
when a standard 4:3 TV is connected.
Automatically displays the wide
picture on the entire screen and cuts
off the portions that do not fit.
4:3 LB (Letter Box conversion): Select
when a standard 4:3 TV is connected.
Displays a wide picture with bands
on the upper and lower portions of
the screen.
16:9 (Wide-screen television): Select
when a 16:9 wide TV is connected.
PASSWORD You can prohibit operations used for
changing the RATING setup. Enter a 4
digit password. We recommend that
you write your password here for your
reminder.
Password:
If you forget your password, you can
release it by entering 0000.
RATING You can set playable rating level with
the System.
EXIT SETUP Exit DVD SETUP mode
EN_UX-LS5V[US_UG].indd 20EN_UX-LS5V[US_UG].indd 20 10.4.2 11:06:27 AM10.4.2 11:06:27 AM
This manual suits for next models
2
Table of contents
Other JVC Stereo System manuals

JVC
JVC HX-D7 User manual

JVC
JVC HX-Z10 User manual

JVC
JVC UX-S59 User manual

JVC
JVC UX-M5R User manual

JVC
JVC FS-SD990 User manual

JVC
JVC MX-C55A User manual

JVC
JVC UXG50 - CD Microsystem With USB Audio User manual

JVC
JVC HX-C6 - Twin GIGA Tube Audio System User manual

JVC
JVC FS-GD7 User manual

JVC
JVC CA-DXU10 User manual