JVC UX-G49 User manual

MICRO COMPONENT SYSTEM
INSTRUCTIONS
GVT0226-001A
[B]
SUPER VIDEO
UX-G49—Consists of CA-UXG49 and SP-UXG49
UX-G48—Consists of CA-UXG48 and SP-UXG48
UX-G48[B].book Page 1 Friday, June 22, 2007 11:28 AM

G-1
Warnings, Cautions and Others
CAUTION— (Standby
/
on) button!
Disconnect the mains plug to shut the power off completely
(the STANDBY lamp goes off). When installing the apparatus,
ensure that the plug is easily accessible. The (Standby/
on) button in any position does not disconnect the mains line.
• When the System is on standby, the STANDBY lamp lights
red.
• When the System is turned on, the STANDBY lamp goes off.
The power can be remote controlled.
CAUTION
To reduce the risk of electrical shocks, fire, etc.:
1. Do not remove screws, covers or cabinet.
2. Do not expose this appliance to rain or moisture.
IMPORTANT FOR LASER PRODUCTS
1. CLASS 1 LASER PRODUCT
2.
CAUTION:
Do not open the top cover or cabinet. There are
no user serviceable parts inside the unit; leave all servicing
to qualified service personnel.
3.
CAUTION:
Visible and/or invisible class 1M laser radiation
when open. Do not view directly with optical instruments.
4. REPRODUCTION OF LABEL: CAUTION LABEL, PLACED
INSIDE THE UNIT.
Dear Customer,
This apparatus is in conformance with the valid European
directives and standards regarding electromagnetic
compatibility and electrical safety.
European representative of Victor Company of Japan, Limited
is:
JVC Technology Centre Europe GmbH
Postfach 10 05 52
61145 Friedberg
Germany
IMPORTANT for the U.K.
DO NOT
cut off the mains plug from this equipment. If the
plug fitted is not suitable for the power points in your home
or the cable is too short to reach a power point, then obtain
an appropriate safety approved extension lead or consult
your dealer.
BE SURE
to replace the fuse only with an identical approved
type, as originally fitted.
If nonetheless the mains plug is cut off ensure to remove the
fuse and dispose of the plug immediately, to avoid a possible
shock hazard by inadvertent connection to the mains supply.
If this product is not supplied fitted with a mains plug then
follow the instructions given below:
IMPORTANT:
DO NOT
make any connection to the terminal which is
marked with the letter E or by the safety earth symbol or
coloured green or green-and-yellow.
The wires in the mains lead on this product are coloured in
accordance with the following code:
Blue: Neutral
Brown: Live
As these colours may not correspond with the coloured
markings identifying the terminals in your plug proceed as
follows:
The wire which is coloured blue must be connected to the
terminal which is marked with the letter N or coloured black.
The wire which is coloured brown must be connected to the
terminal which is marked with the letter L or coloured red.
IF IN DOUBT - CONSULT A COMPETENT ELECTRICIAN.
CAUTION
• Do not block the ventilation openings or holes.
(If the ventilation openings or holes are blocked by a
newspaper or cloth, etc., the heat may not be able to get
out.)
• Do not place any naked flame sources, such as lighted
candles, on the apparatus.
• When discarding batteries, environmental problems must
be considered and local rules or laws governing the
disposal of these batteries must be followed strictly.
• Do not expose this apparatus to rain, moisture, dripping or
splashing and that no objects filled with liquids, such as
vases, shall be placed on the apparatus.
CAUTION:
Excessive sound pressure from earphones or headphones
can cause hearing loss.
UX-G48[B].book Page 1 Friday, June 22, 2007 11:28 AM

G-2
Information for Users on Disposal of Old equipment
[European Union]
This symbol indicates that the electrical and electronic equipment should not be disposed as general
household waste at its end-of-life. Instead, the product should be handed over to the applicable
collection point for the recycling of electrical and electronic equipment for proper treatment, recovery
and recycling in accordance with your national legislation.
By disposing of this product correctly, you will help to conserve natural resources and will help
prevent potential negative effects on the environment and human health which could otherwise be
caused by inappropriate waste handling of this product, please contact your local municipal office,
your household waste disposal service or the shop where you purchased the product.
Penalties may be applicable for incorrect disposal of this waste, in accordance with national
legislation.
(Business users)
If you wish to dispose of this product, please visit our web page www.jvc-europe.com to obtain
information about the take-back of the product.
[Other Countries outside the European Union]
If you wish to dispose of this product, please do so in accordance with applicable national legislation
or other rules in your country for the treatment of old electrical and electronic equipment.
Attention:
This symbol is only valid
in the European Union.
Caution: Proper Ventilation
To avoid risk of electric shock and fire, and to prevent damage, locate the apparatus as follows:
1. Front: No obstructions and open spacing.
2. Sides/Top/ Back: No obstructions should be placed in the areas shown by the dimensions below.
3. Bottom: Place on the level surface. Maintain an adequate air path for ventilation by placing on a stand with a height of 10 cm
or more.
Front view Side view
SP-UXG49
SP-UXG48
CA-UXG49
CA-UXG48
SP-UXG49
SP-UXG48 CA-UXG49
CA-UXG48
UX-G48[B].book Page 2 Friday, June 22, 2007 11:28 AM

1
Introduction
Thank you for purchasing a JVC product. Please read all instructions carefully before operation, to ensure your complete
understanding and to obtain the best possible performance from the System.
Precautions
Installation
• Install the System in a location with adequate ventilation to
prevent internal heat build-up in the System.
• Install in a place which is level, dry and neither too hot nor
too cold—between 5°C and 35°C.
• Leave sufficient distance between the System and the TV.
• Keep the speakers away from the TV to avoid interference
with the TV.
Power sources
• When unplugging the System from the wall outlet, always
pull on the plug, not the power cord.
Moisture condensation
Moisture may condense on the lenses inside the System in
the following cases:
• After starting to heat the room
• In a damp room
• If the System is brought directly from a cold to a warm
place.
Should this occur, the System may malfunction. In this case,
leave the System turned on for a few hours until the moisture
evaporates, unplug the power cord, then plug it in again.
Internal heat
• Make sure there is good ventilation around the System.
Poor ventilation could overheat and damage the System.
Others
• Should any metallic object or liquid fall into the System,
unplug the power cord and consult your dealer before
operating any further.
• If you are not going to operate the System for an extended
period of time, unplug the power cord from the wall outlet.
If anything goes wrong, unplug the power cord and consult
your dealer.
Playable Disc/File Types
In addition to the above discs/files, this System can play
back audio data recorded on CD-Extra.
• The following discs cannot be played back:
DVD-RAM, CD-I (CD-I Ready), CD-ROM, Photo CD,
CD-G (CD-Graphics) and DVD/CD Text.
Playing back these discs will generate noise and damage
the speakers.
• In this manual, “file” and “track” are used interchangeably
for MP3/WMA/WAV/JPEG/MPEG-1/MPEG-2/DivX
operations.
• It is possible to play back finalized +R/+RW (DVD Video
format only) discs. “DVD” lights on the front display panel
when a +R/+RW disc is loaded.
• “DVD Logo” is a trademark of DVD Format/Logo
Licensing Corporation.
About color system
This System is compatible with PAL video format. You
cannot play back NTSC discs properly.
Note on Region Code
DVD players and DVDs have their own Region Code
numbers. This System can play back only DVDs with
Region Code numbers including “2.”
DO NOT install the System in a location near
heat sources, or in a place subject to direct
sunlight, excessive dust or vibration.
DO NOT handle the power cord with wet
hands.
DO NOT block the ventilation openings or
holes. If they are blocked by a newspaper or
cloth, etc., the heat may not be able to get out.
DO NOT disassemble the System since there
are no user serviceable parts inside.
• CD-R/-RW: Recorded in the Audio CD, Video CD, and
SVCD formats. MP3, WMA, WAV, JPEG, MPEG-1,
MPEG-2 and DivX files written in accordance with the
“ISO 9660” format can also be played.
• DVD-R/-RW, +R/+RW: Recorded in the DVD Video
format. MP3, WMA, WAV, JPEG, MPEG-1, MPEG-2
and DivX files written in the UDF-Bridge format can
also be played.
• DVD-R/-RW: Recorded in the DVD Video Recording
(VR) format.
• DVD-ROM: Recorded in the MP3, WMA, WAV,
JPEG, MPEG-1, MPEG-2 and DivX format.
• USB mass storage class device: MP3, WMA, WAV,
JPEG, MPEG-1, MPEG-2 and DivX files.
EX.:
DIGITAL VIDEO
SUPER VIDEO
COMPACT
DIGITAL AUDIO
UX-G48[B].book Page 1 Friday, June 22, 2007 11:28 AM

2
Caution for DualDisc playback
The Non-DVD side of a “DualDisc” does not comply with
the “Compact Disc Digital Audio” standard. Therefore, the
use of the Non-DVD side of a DualDisc in this product may
not be recommended.
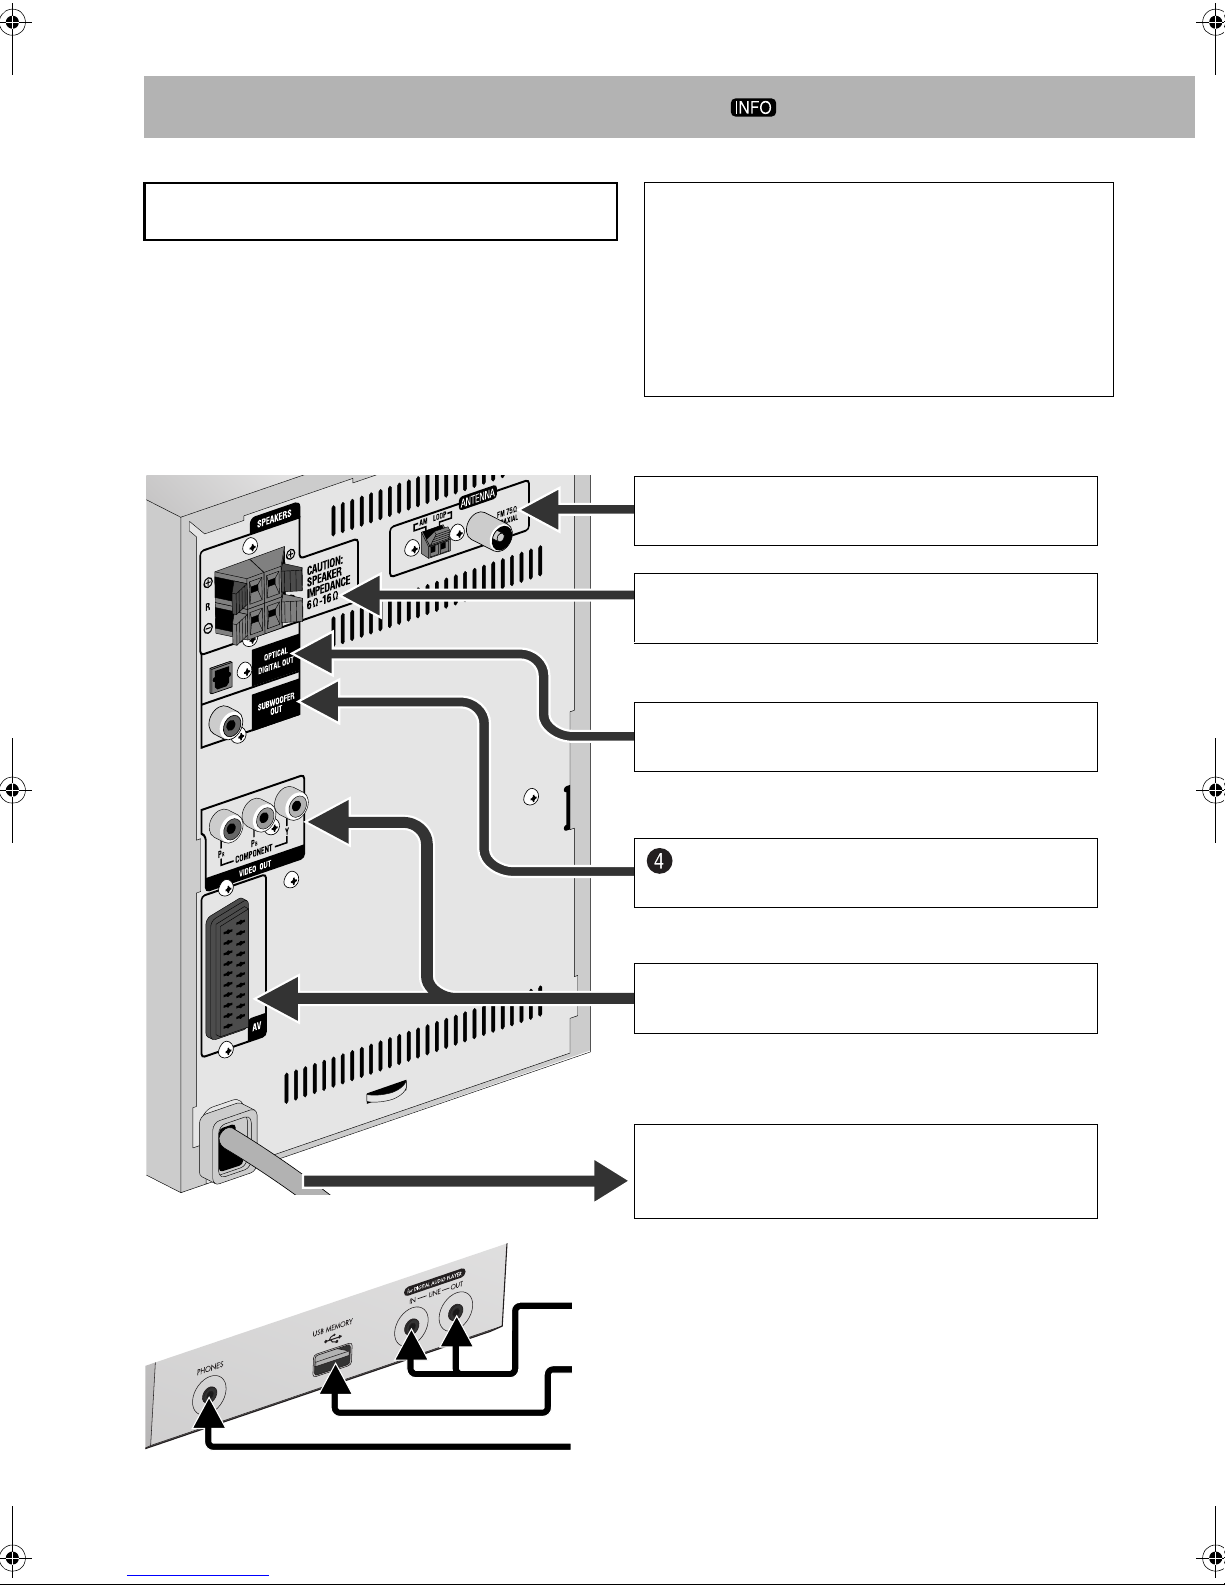
• When playing a multi-channel encoded software, the
System properly converts the multi-channel signals into 2
channels, and emits the downmixed sound from the
speakers. To enjoy the powerful sound of these multi-
channel encoded software, connect a proper decoder or an
amplifier with a proper built-in decoder to the OPTICAL
DIGITAL OUT terminal on the rear.
How to Read This Manual
• Button and control operations are explained in the table
below.
•
Some related tips and notes are explained later in the
sections “Learning More about This System” and
“Troubleshooting,” but not in the same section
explaining the operations ( indicates that the
content has some information).
Contents
Connections .............................................................. 3
Display Indicators.................................................... 6
Daily Operations—Playback .................................. 7
Listening to the Radio ......................................................... 8
Listening to the TV Sound.................................................. 9
Playing Back a Disc/USB mass storage class device ......... 9
Playing Back a Digital Audio Player ................................ 11
Daily Operations—Sound & Other Adjustments
..... 12
Adjusting the Volume ....................................................... 12
Adjusting the Sound.......................................................... 12
Creating 3-Dimensional Sound Field—3D Phonic........... 13
Using Headphone Surround .............................................. 13
Making Dialogues Clear—Clear Voice ............................ 13
Presetting Automatic DVD Sound Increase Level ........... 13
Changing the Display Brightness...................................... 13
Changing the Scanning Mode........................................... 14
Changing the Picture Tone................................................ 14
Setting the Clock............................................................... 15
Turning Off the Power Automatically .............................. 15
Advanced Radio Operations................................. 16
Receiving FM Stations with Radio Data System.............. 16
Searching for a Program by PTY Codes........................... 16
Switching Temporarily to a Program of
Your Choice Automatically .......................................... 17
Unique Video Disc/File Operations...................... 18
Selecting the Audio Track................................................. 18
Selecting the Subtitle Language........................................ 19
Selecting the View Angle ................................................. 19
Special Effect Playback .................................................... 20
Advanced Playback Operations ........................... 21
Programming the Playing Order—Program Play ............. 21
Playing at Random—Random Play .................................. 22
Playing Repeatedly ........................................................... 22
Prohibiting Disc Ejection—Child Lock............................ 23
On-Screen Operations ........................................... 24
On-screen Bar Operations................................................. 24
Operations on the Control Screen ..................................... 27
Daily Timer Operations ........................................29
Setup Menu Operations ........................................31
Additional Information .........................................33
Learning More about This System.................................... 33
Maintenance ...................................................................... 35
Troubleshooting ................................................................ 36
Language Code List .......................................................... 37
OPTICAL DIGITAL OUT Signals................................... 38
Operating JVC’s TVs Using the Remote Control............. 38
Specifications .................................................................... 39
Parts Index ............................................................ 40
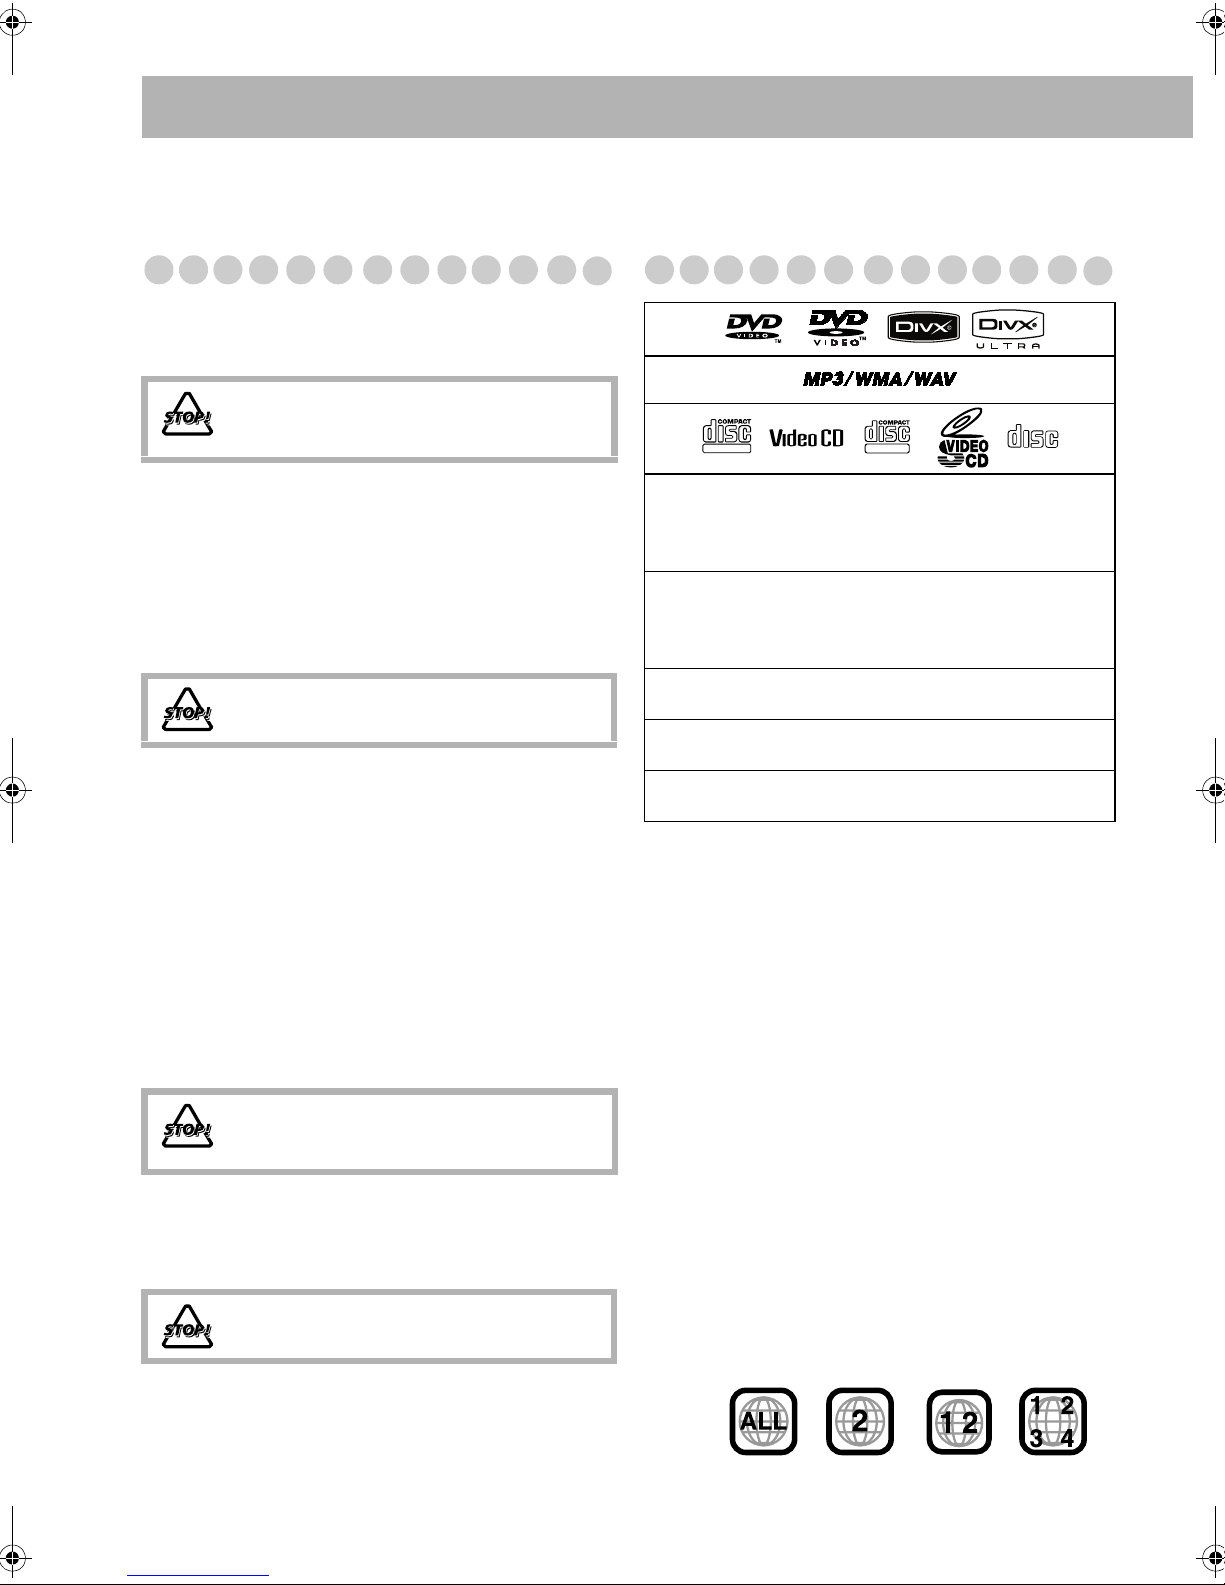
IMPORTANT: Before playing a disc/file, make sure
of the following...
• Turn on the TV and select an appropriate input mode on
the TV to view the pictures or on-screen displays.
• For disc/file playback, you can change the initial setting
to your preference. See “Setup Menu Operations” on
page 31.
If “ ” appears on the TV screen when you press a
button, the disc/file cannot perform the operation you
have tried to do.
Indicates that you press the button
briefly
.
Indicates that you press the button
briefly and
repeatedly
until the option you want is
selected.
Indicates that you press one of the buttons.
Indicates that you
press and hold
the button
for a specified period.
Indicates that you turn the control in the
specified direction(s).
Indicates that this operation is only possible
using the remote control.
Indicates that this operation is only possible
using the main unit.
INFO
2
sec.
Remote
ONLY
Main Unit
ONLY
UX-G48[B].book Page 2 Friday, June 22, 2007 11:28 AM

3
Connections
• Connect AV (SCART) directly to the video input of your
TV. Connecting AV (SCART) to a TV via a VCR may
interfere with your viewing when playing back copy-
protected discs/files. Connecting AV (SCART) to an
integrated TV/VCR system may also interfere with your
viewing.
Do not connect the power cord until all other
connections have been made. Supplied accessories
Check to be sure that you have all the following items.
• FM antenna (x1)
• AM loop antenna (x1)
• Remote control (x1)
• Batteries (x2)
If any items are missing, consult your dealer
immediately.
Front panel
From the digital audio player
See page 5.
From the USB mass storage class device
See page 5.
From the headphones
See page 7.
¤To a wall outlet
Plug in the power cord only after all connections
have been completed.
!From the digital input of digital audio component
See page 4.
From the powered subwoofer
See page 5.
@From the input of TV/monitor
See page 5.
~From AM/FM antenna
See page 4.
ŸFrom the speakers
See page 4.
Rear panel
connection.fm Page 3 Monday, July 2, 2007 12:50 PM

4
~AM/FM antenna
To assemble the AM loop antenna
To connect AM/FM antenna
For better FM reception
• Disconnect the supplied FM antenna, and connect to an
outdoor FM antenna using a 75
Ω
wire with coaxial type
connector (IEC or DIN45325).
ŸSpeakers
• When connecting the speaker cords, match the polarity of
the speaker terminals: red to (+) and black to (–).
!Digital audio component
• Set “DIGITAL AUDIO OUTPUT” in the “AUDIO” menu
correctly according to the connected digital audio
equipment (see page 32).
• The digital signal through the OPTICAL DIGITAL OUT
terminal is transmitted only when “DVD/CD” is selected as
the source.
Extend it so that you can obtain the
best reception.
FM antenna (supplied)
AM loop antenna (supplied)
Turn it until the best reception is obtained.
If the cords are covered with vinyl, remove
the vinyl to expose the tip of the cord by
twisting the vinyl.
FM outdoor antenna
(not supplied)
• DO NOT connect more than one speaker to
each terminal.
• DO NOT push or pull the speakers as this
will damage the foot spacers at the bottom
of the speakers.
From right
speaker
From left
speaker
Red
Black
Press and hold
ReleaseInsert
Protective cap
Optical digital
cord (not
supplied)
UX-G48[B].book Page 4 Friday, June 22, 2007 11:28 AM

5
To connect the powered subwoofer
The connected subwoofer can reproduce the bass sounds
recorded in front left and right channels, but cannot
reproduce the LFE signals encoded in multi-channel
software.
• Before plugging the System to the power supply, make sure
that the powered subwoofer is turned off.
@TV/monitor
Connect either component cord or SCART cord.
• This connection allows you to use the progressive scanning
mode. To select progressive (PROGRESS) scanning mode
(see page 14), use COMPONENT VIDEO OUT jacks.
• After connecting a TV, select the appropriate video signal
output according to the connection method. See “Changing
the Scanning Mode” on page 14.
• When connecting with a USB cable, use the USB 2.0 cable
whose length is less than 1 m.
• You can connect a USB mass storage class device such as a
USB flash memory device, hard disk drive, multimedia card
reader, etc. to this System.
• You cannot connect a computer to the USB MEMORY
terminal of the System.
• Do not connect the same digital audio player to both the
LINE IN and LINE OUT jacks at the same time; otherwise,
the sound will be distorted.
• If an external device is not equipped with a stereo mini plug
audio output, use a plug adapter to convert the stereo mini
plug to the corresponding plug of the audio output.
• By using QP Link (Quick Portable Link), you can easily
start playing back a digital audio player on this System. See
page 11 for details.
Preparing the remote control
If the range or effectiveness of the remote control decreases,
replace both batteries.
When using the remote control
Point the top of the remote control towards the remote sensor
as directly as possible. If you operate it from a diagonal
position, the operating range (approx. 5 m) may be shorter.
When connecting a USB mass storage class device
From the powered subwoofer
(not supplied)
Green
Blue
Red Component video
cord (not supplied)
• This connection sends the
video signal (Composite, Y/C,
or RGB) and receives audio
signal from TV. To listen to the
TV sound, see page 9.
SCART cord
(not supplied)
On the front
panel
USB cable
(not supplied)
When connecting a digital audio player
• For listening to a digital audio player
• For recording on a digital audio player
Caution
Do not expose batteries to heat or flame.
Stereo mini plug
(not supplied)
On the front
panel
From audio output (or
headphone out, etc.)
Stereo mini plug
(not supplied)
On the front
panel
From audio input
R6(SUM-3)/AA(15F)
UX-G48[B].book Page 5 Friday, June 22, 2007 11:28 AM

6
Display Indicators
The indications on the display tell you a lot of things while you are operating the System.
Before operating the System, be familiar with when and how the indicators illuminate on the display.
1HP SUR (Headphone Surround) indicator
• Lights when Headphone Surround is activated.
2USB indicator
• Lights when “USB MEM” is selected as the source.
3Disc format indicators
• SVCD: lights when playing back an SVCD.
• VCD: lights when playing back a VCD.
• CD: lights when playing back a CD.
• DVD: lights when playing back a DVD.
4(Clear Voice) indicator
• Lights when Clear Voice is activated.
5Playback mode indicators
• Repeat Mode indicators:
– : lights when One Track/File/Chapter/Step
Repeat is activated.
– : lights when One Group/Title/Program/Play List
Repeat is activated.
– : lights when All Track/File/Title/Program
Repeat is activated.
• RND: lights when Random Play is activated.
• PRGM: lights when Program Play is activated.
6Audio format indicators
• MP3: lights when an MP3 file is detected.
• WMA: lights when a WMA file is detected.
7RESUME indicator
• Lights when the System memorizes the position where
the playback is interrupted.
8S.TURBO (Sound Turbo) indicator
• Lights when Sound Turbo II is activated.
9AHB indicator
• Lights when AHB Pro (Active Hyper Bass Pro) is
activated.
pRadio band indicators
• AM: lights when tuning in to an AM station.
• FM: lights when tuning in to an FM station.
qFM reception indicators
• ST (stereo): lights while an FM stereo station with
sufficient signal strength is tuned in.
• MONO: lights while receiving an FM stereo station in
monaural.
wDaily Timer indicators
• : lights when Daily Timer is on standby or is being
set; flashes while it is working.
• 1/2/3: lights when a Daily Timer (1, 2, or 3) is on
standby or is working; flashes while being set.
e3D P. indicator
• Lights when 3D Phonic is activated.
rQPL (Quick Portable Link) indicator
• Lights when QP Link is activated.
t(Progressive) indicator
• Lights when the progressive scanning mode is selected.
yMain display
• While listening to the radio: band (or preset number)
and station frequency appear.
• While “LINE” is selected: “LINE” appears.
• While “TV SOUND” is selected: “TV SOUND”
appears.
• While playing a disc or file: current status appears.
uEnhanced Other Networks indicators
• TA/NEWS/INFO:
– Lights to indicate the currently selected program type
for PTY Standby Reception.
– Flashes when a program is automatically tuned in with
PTY Standby Reception.
iA.STBY (Auto Standby) indicator
• Lights when Auto Standby is activated.
• Flashes when playback stops with Auto Standby
activated.
oSLEEP indicator
• Lights when the Sleep Timer is activated.
i
1235
67 8
er y
p9
u
4
t
qw
o
1
UX-G48[B].book Page 6 Friday, June 22, 2007 11:28 AM

7
Daily Operations—Playback
1Turn on the power.
The STANDBY lamp on the main unit turns off.
• Instead of pressing AUDIO, the System is turned
on by pressing one of the source buttons.
• When QP Link is activated, the System turns on and
automatically changes the source to “LINE” as the
source by starting playback on an external device.
(See page 11 for details.)
2Select the source.
• Playback automatically starts if the selected source is
ready.
• You can change the display information by pressing
DISPLAY. For details, see page 15.
3Adjust the volume.
To turn off (standby) the System
You can reduce power consumption by turning off the
display. To turn off the display, select “DISP OFF” by
pressing DIMMER (while holding SHIFT) when on
standby.
• To restore the display indication, select “DISP ON” by
pressing DIMMER (while holding SHIFT) again.
In this manual, operations using the remote control are
mainly explained; however, you can use the buttons
and controls on the main unit if they have the same (or
similar) name and marks.
2
1
AUDIO VOL
TV VOL
3
DVD/CD
USB
MEMORY
LINE/
TV SOUND
1
3
87
,, ,
2
DIMMER
ENTER/SET
TOP MENU/PG
RETURN
QP LINK
1, ¡
SHIFT
DVD/LINE
LEVEL
MENU/PL
GROUP/TITLE
GROUP/TITLE SKIP
4, ¢
FM/PLAY MODE
Number
buttons
Remote control
The STANDBY lamp on the main unit lights
in red.
• A small amount of power is always
consumed even while on standby.
For private listening
Connect a pair of headphones to the PHONES jack on the
main unit. The sound will no longer come out of the
speakers. Be sure to turn down the volume before
connecting or putting on the headphones.
• Disconnecting the headphones will activate the speakers
again.
DO NOT turn off (standby) the System with the
volume set at an extremely high level;
otherwise, the sudden blast of sound may
damage your hearing, speakers and/or
headphones when you turn on the System or
start playback.
UX-G48[B].book Page 7 Friday, June 22, 2007 11:28 AM

8
Listening to the Radio
To select the band (FM or AM)
To tune in to a station
While FM or AM is selected...
Frequency starts changing on the display.
When a station (frequency) with sufficient signal strength is
tuned in, the frequency stops changing.
• When you repeatedly press the button, the frequency
changes step by step.
To manually stop the search,
press either button.
If the FM reception is poor
The MONO indicator lights on the display. Reception will
improve though stereo effect is lost—Monaural reception.
To restore the stereo effect,
press the button again (the
MONO indicator disappears).
If the beats are heard while listening to
AM station
• If you change to another station, this setting is
automatically canceled.
To preset the stations
You can preset 30 FM and 15 AM stations.
1Tune in to a station you want to preset.
• You can also store the monaural reception mode for
FM preset stations if it is selected.
2Activate the preset number entry mode.
• Finish the following process while the indication on the
display is flashing.
3Select a preset number for the station you store.
4Store the station.
To tune in to a preset station
1Select the band (FM or AM).
2Select the preset number for the station you stored.
How to select a number
DIMMER
A.STANDBY
SLEEP
VFP
3D P/HP S
CLOCK/TIMER
ZOOM
RETURN
SCAN MODE
1
4
7
10
2
5
8
3
6
9
10
ANGLE
C.VOICE
0
CANCEL
Examples:
To select number 5, press 5.
To select number 10, press 10.
To select number 15, press 10, 1,
then 5.
To select number 30, press 10, 3,
then 0.
To select number 125, press 10,
10, 1, 2, then 5.
INFO
FM
AM
GROUP/TITLE SKIP
2sec.
Remote
ONLY
FM/PLAY
MODE
Remote
ONLY
FM/PLAY
MODE
BCUT ON
BCUT OFF
(Canceled)
• To select a number, see “How to
select a number” on the left
column.
• You can also use the ¡or 1
button.
• To select a number, see “How to
select a number” on the left
column.
• You can also use the ¡or 1
button.
Remote
ONLY
ENTER/SET
DIMMER
A.STANDBY
SLEEP
VFP
3D P/HP S
CLOCK/TIMER
ZOOM
RETURN
SCAN MODE
1
4
7
10
2
5
8
3
6
9
10
ANGLE
C.VOICE
0
CANCEL
ENTER/SET
Remote
ONLY
FM
AM
DIMMER
A.STANDBY
SLEEP
VFP
3D P/HP S
CLOCK/TIMER
ZOOM
RETURN
SCAN MODE
1
4
7
10
2
5
8
3
6
9
10
ANGLE
C.VOICE
0
CANCEL
UX-G48[B].book Page 8 Friday, June 22, 2007 11:28 AM

9
Listening to the TV Sound
You can listen to the TV sound through this System when the
TV is connected using the SCART cable (see page 5).
Playing Back a Disc/USB mass storage
class device
To insert a disc
• When using an 8 cm disc, place it on the inner circle of the
disc tray.
To close the disc tray,
press 0again.
• If you press DVD/CD 3, disc tray closes automatically
and playback starts (depending on how the disc is
programmed internally).
To connect a USB mass storage class device
• For connecting a USB mass storage class device, see
page 5.
• Always set volume level to the minimum level when
connecting or disconnecting a USB mass storage class
device.
• To disconnect a USB mass storage class device safely, turn
off the System before disconnecting it.
To play back a disc/USB mass storage class
device
• For MP3/WMA/WAV/JPEG/MPEG-1/MPEG-2/DivX
files:
– If different types of playable files (audio/still picture/
moving picture) are recorded on a disc or USB mass
storage class device, select a file type to play (see “FILE
TYPE” in “PICTURE” menu on page 31).
– When the System detects MP3/WMA/WAV/JPEG/
MPEG-1/MPEG-2/DivX files, the control screen appears
on the TV. (For still/moving picture files, it appears while
playback is stopped.) For details, see page 28.
• The System can store the stop point, and when you start
playback again by pressing DVD/CD 3or USB
MEMORY 3(even while on standby), it starts from the
position where you have stopped—Resume Play.
(RESUME indicator lights on the display when you stop
playback.)
To stop completely while Resume is activated,
press 7
twice. (To cancel Resume, see “RESUME” in “OTHERS”
menu on page 32.)
.
To select a title/group
While playing...
• You can select a title/group directly by pressing the
number buttons after pressing GROUP/TITLE (not
applicable for DVD-VR). To select a number, see “How to
select a number” on page 8.
To start:
To pause: To stop:
To release, press DVD/CD 3or
USB MEMORY 3.
LINE
TV SOUND
LINE/
TV SOUND
(See page 11.)
INFO
Main Unit
ONLY
DVD/CD
USB
MEMORY
Disc USB mass storage class device
On-screen guide icons
• During playback, the following icons may appear on the
TV:
At the beginning of a scene containing
multi-angle views.
At the beginning of a scene containing
multi-audio sounds.
At the beginning of a scene containing
multi-subtitles.
• The following icons will also be shown on the TV to
indicate your current operation.
, , , , ,
• To deactivate the on-screen guide icon, see “ON
SCREEN GUIDE” in “OTHERS” menu on page 32.
Remote
ONLY
GROUP/TITLE SKIP
(while holding...)
UX-G48[B].book Page 9 Friday, June 22, 2007 11:28 AM

10
To select a chapter/track/file
• For VCD/SVCD, cancel PBC (see the right column).
While playing...
To locate a particular portion
• This does not function for JPEG files.
While playing...
• For MP3/WMA/WAV/DivX files, the search speed and
indications on the TV are different from those above.
• No sound comes out if searching is carried out while
showing the moving picture.
To return to normal playback,
press DVD/CD 3or USB
MEMORY 3(depending on the current source).
• For DivX/MPEG-1/MPEG2 files, each time you press the
> or < button, you can skip to a scene by 30 seconds or
5 minutes depending on the files.
To locate an item directly
You can select a title/chapter/track/file directly and start
playback.
• For DVD Video, you can select
a title before starting
playback
, while you can select
a chapter after starting
playback
.
To play back using the disc menu
7For DVD Video:
1Show the disc menu.
2Select an item on the disc menu.
• For some discs, you can also select items by entering the
number using the number buttons.
7For SVCD/VCD with PBC:
While playing a disc with PBC, “PBC” appears on the
display.
When disc menu appears on the TV, select an item on the
menu. Playback of the selected item starts.
To cancel PBC,
press 7, then select a track by using the
number buttons (see page 8). Playback starts with the
selected track.
To reactivate PBC,
press 7(twice if Resume is turned
“ON”), then press DVD/CD 3.
• When you press 4for the
first time, you will go back to
the beginning of the current
chapter/track/file.
• To select a number, see “How to
select a number” on page 8.
GROUP/TITLE SKIP
Remote
ONLY
SLOW
+
–
x2 x5
x10 x20 x60
x2 x5
x10 x20 x60
PTY PTY
Remote
ONLY
DIMMER
A.STANDBY
SLEEP
VFP
3D P/HP S
CLOCK/TIMER
ZOOM
RETURN
SCAN MODE
1
4
7
10
2
5
8
3
6
9
10
ANGLE
C.VOICE
0
CANCEL
• To select a number, see “How to
select a number” on page 8.
To move to the next or previous page of the current
menu:
To return to the previous menu:
Remote
ONLY
TOP MENU/PG MENU/PL
PTY
SEARCH
TV CH
ENTER/SET
TV CH
PTY PTY
DIMMER
A.STANDBY
SLEEP
VFP
3D P/HP S
CLOCK/TIMER
ZOOM
RETURN
SCAN MODE
1
4
7
10
2
5
8
3
6
9
10
ANGLE
C.VOICE
0
CANCEL
GROUP/TITLE SKIP
Moves to the next page.
Moves to the previous page.
RETURN
10
(while holding...)
UX-G48[B].book Page 10 Friday, June 22, 2007 11:28 AM

11
Playing Back a Digital Audio Player
• For connecting a digital audio player, see page 5.
To listen to digital audio player
You can listen to the digital audio player connected to the
LINE IN jack.
• Make sure to turn down the volume on the System to
minimum level before starting playback.
To adjust the audio input level
If the sound from the device connected to the
LINE IN jack is too loud or too quiet, you can change the
audio input level through the LINE IN jack (without
changing the volume level).
While “LINE” is selected as a source...
• As the number of the level increases, the input level is
increased.
To activate QP Link
By using QP Link (Quick Portable Link), you can easily start
playing back a digital audio player connected to the LINE IN
jack.
• Make sure to set the volume of your digital audio player
loud enough so that the System can detect the sound signal.
When QP Link is activated, connecting a digital audio player
to the LINE IN jack and starting playback performs the
following:
• While the System is turned on...
Changes the source to “LINE” automatically. (If you
change from “LINE” to another source, QP Link will be
canceled.)
• While the System is on standby...
Turns on the System and automatically changes the source
to “LINE,” except when the display is turned off (see
page 7).
While QP Link is playing the device...
To record on a digital audio player
You can record the sound from the System to the digital
audio player connected to the LINE OUT jack.
1Start recording on the digital audio player.
2Start playing the disc, USB mass storage class device,
or tune in to the station you want to record.
• Before recording on a digital audio player, deactivate QP
Link or do not connect the digital audio player to the LINE
IN jack; otherwise, “LINE” will be selected as the source
and the recording will stop.
• Sound adjustments (see pages 12 and 13) do not affect
recording on the digital audio player.
To adjust the audio output level
If the recorded sound on the digital audio player connected
to the LINE OUT jack is too loud or too quiet, you can
change the audio output level through the LINE OUT jack
(without changing the volume level).
While “LINE” is selected as a source...
• As the number of the level increases, the output level is
increased.
INFO
LINE/
TV SOUND
LINE
TV SOUND
(See page 9.)
Remote
ONLY
IN_LVL1 IN_LVL2
DVD/LINE
LEVEL
IN_LVL3
(Initial setting)
Remote
ONLY
AHB PRO
QP LINK
QPL ON
QPL OFF
(Initial setting)
(Canceled)
IMPORTANT:
It should be noted that it may be unlawful to re-record
pre-recorded tapes, records, or discs without the
consent of the owner of copyright in the sound or video
recording, broadcast or cable program and in any
literary, dramatic, musical, or artistic work embodied
therein.
Bubbles appear when
QP Link is working.
Bubbles disappear
when the sound signal
stops or is too weak.
DVD/CD
USB
MEMORY
Remote
ONLY
DVD/LINE
LEVEL
OUT_LVL1
OUT_LVL2
3
sec.
(Initial setting)
UX-G48[B].book Page 11 Friday, June 22, 2007 11:28 AM

12
Daily Operations—Sound & Other Adjustments
Adjusting the Volume
You can adjust the volume level from VOL MIN to level 40
(VOL MAX).
To drop the volume in a moment
Adjusting the Sound
To reinforce the heavy sound
This boosts the low and high frequency sound—Sound
Turbo II.
• When Sound Turbo II is turned on:
– AHB Pro (see below) is automatically turned on, and
cannot be turned off. (The AHB indicator does not light
even though the function is turned on.)
– The bass and treble level (see below) is set to “+2.”
To reinforce the bass sound
While Sound Turbo II is off, the richness and fullness of the
bass sound is clearly maintained regardless of how you set
the volume—AHB Pro (Active Hyper Bass Pro).
To adjust the tone
You can adjust the bass and treble level from –3 to +3.
To adjust the bass
To adjust the treble
Remote control: Main unit:
SOUND
TURBO
VOLUME
+, –
DIMMER
Remote control
Main unit
AUDIO VOL
+,–
A.STANDBY
SLEEP
ENTER/SET
AHB PRO
DISPLAY
CLOCK/TIMER
BASS/TREBLE
VFP
DVD/LINE
LEVEL
DIMMER
SCAN MODE
SHIFT
FADE
MUTING
,, ,
3D P/HP S
C.VOICE
CANCEL
SOUND
TURBO
AUDIO VOL
TV VOL
VOLUME
To restore the volume,
press again, or
adjust the volume level.
Remote
ONLY
FADE
MUTING
INFO
SOUND
TURBO
TURBO ON
TURBOOFF
(Canceled)
Remote
ONLY
AHB ON
AHB OFF
AHB PRO
QP LINK
(while holding...) (Canceled)
Remote
ONLY
BASS/
TREBLE
BASS TREBLE
AUDIO VOL
TV VOL
Canceled
BASS/
TREBLE
BASS TREBLE
AUDIO VOL
TV VOL
Canceled
UX-G48[B].book Page 12 Friday, June 22, 2007 11:28 AM

13
Creating 3-Dimensional Sound Field
—3D Phonic
• This only functions while listening to disc/USB mass
storage class device.
• This does not function for MPEG-1/MPEG-2/DivX files.
While playing...
Using Headphone Surround
You can enjoy a surround effect while listening through
headphones.
• This only functions while listening to disc/USB mass
storage class device playback.
• This does not function for MPEG-1/MPEG-2/DivX files.
While playing...
• If you plug in the headphones while 3D Phonic is in use,
Headphone Surround is turned on automatically.
• When 3D Phonic is not in use and Headphone Surround is
turned on, unplugging the headphones turns 3D Phonic to
“ACTION.”
Making Dialogues Clear—Clear Voice
When you play back a disc or USB mass storage class
device, you can make the singer’s voices or dialogues of the
movie clear—Clear Voice. When Clear Voice is in use, the
(Clear Voice) indicator lights on the display.
• This function works for multi-channel software which
contains a center channel signal and for 2-channel software
with 3D Phonic activated.
Presetting Automatic DVD Sound
Increase Level
DVD sound is sometimes recorded at a lower level than
other discs and sources. You can set the increase level for the
currently loaded DVD, so you do not have to adjust the
volume when you change the source.
• This only functions for DVD Video and DVD-VR.
Changing the Display Brightness
You can dim the display window.
ACTION Suitable for action movies and sports
programs.
DRAMA Creates natural and warm sound. Enjoy
movies in a relaxed mood.
THEATER Enjoy sound effects like in a major theater.
Remote
ONLY
4
3D P/HP S
DRAMA
THEATER
3D OFF
ACTION
(while holding...)
(Canceled)
Remote
ONLY
4
3D P/HP S
SURR ON
SURR OFF
(while holding...)
(Canceled)
NORMAL Original recording level.
MIDDLE Output level is increased (less than “HIGH”).
HIGH Output level is increased (more than
“MIDDLE”). (initial setting)
DIM ON Dims the display.
AUTO
DIM
Dims the display during playback of still/
moving pictures.
• Dimmer is canceled when playback stops.
Remote
ONLY
5
C.VOICE
(while holding...)
Canceled
On
Remote
ONLY
DVD/LINE
LEVEL
NORMAL MIDDLE
HIGH
1
DIMMER
DIM ON
AUTO DIM
DIM OFF
(while holding...)
(Canceled)
UX-G48[B].book Page 13 Friday, June 22, 2007 11:28 AM

14
Changing the Scanning Mode
This System supports progressive scanning.
Select the video signal output according to the type of your
TV. If you connect a progressive TV through the
COMPONENT VIDEO OUT jacks, you can enjoy a high
quality picture playback by selecting “PROGRESS.”
Before playback...
Changing the Picture Tone
While showing a playback picture on the TV, you can select
a preset picture tone, or adjust it and store your own
preference.
To select a preset picture tone
1While playing, display VFP setting screen.
2Select a preset picture tone.
To clear the screen,
press VFP again while holding SHIFT.
To adjust the picture tone
1Select “USER1” or “USER2.”
• Follow steps 1and 2explained in “To select a preset
picture tone.”
2Select a parameter you want to adjust.
3Adjust the parameter.
4Repeat steps 2and 3to adjust other parameters.
To clear the screen,
press VFP again while holding SHIFT.
RGB For a conventional TV.
Select to send the composite video signals
or RGB signals through the AV (SCART)
terminal.
Y/CFor a conventional TV.
Select to send S-Video signals through the
AV (SCART) terminal.
PROGRESS For a progressive TV.
Select to enjoy a progressive scanned
picture through the COMPONENT
VIDEO OUT jacks.
•The (Progressive) indicator lights on
the display.
Remote
ONLY
INFO
PROGRESS
SCAN MODE
9
Y/CRGB
ENTER/SET
(while holding...)
Remote
ONLY
VFP
10
0
NORMAL
GAMMA
BRIGHTNESS
CONTRAST
SATURATION
TINT
SHARPNESS
0
0
0
0
0
(while holding...) On the TV
NORMAL Normally select this.
CINEMA Suitable for a movie source.
USER1/USER2 You can adjust parameters and can
store the settings.
GAMMA Adjust if the neutral color is bright
or dark (–3 to +3).
BRIGHTNESS Adjust if the entire picture is bright
or dark (–8 to +8).
CONTRAST Adjust if the brightness ratio is
unnatural (–7 to +7).
SATURATION Adjust if the picture is whitish or
blackish (–7 to +7).
TINT Adjust if the human skin color is
unnatural (–7 to +7).
SHARPNESS Adjust if the picture is indistinct
(–8 to +8).
PTY PTY
NORMAL CINEMA
USER2 USER1
ENTER/SET
TV CH
TV CH
ENTER/SET
TV CH
TV CH
UX-G48[B].book Page 14 Friday, June 22, 2007 11:28 AM

15
Setting the Clock
Without setting the built-in clock, you cannot use Daily
Timers (see page 29).
• To exit the clock settings, press CLOCK/TIMER (while
holding SHIFT) as required.
• To correct a mis-entry during the process, press CANCEL
(while holding SHIFT). You can return to the previous
step.
1Activate the clock setting mode.
• If you have already adjusted the clock before, press the
button repeatedly until the clock setting mode is
selected.
2Adjust the hour, then the minute.
Now the built-in clock starts working.
To check the current clock time during playback
Ex.: While playing a disc...
* Only while playing back a disc or USB mass storage
class device.
** Only while playing back the following discs/files:
DVD-VR: Program number/Play List number and
chapter number.
MP3/WMA/WAV/JPEG/MPEG-1/MPEG-2/DivX files:
Group and file number.
DVD Video: Title and chapter number.
Turning Off the Power Automatically
Auto Standby
• This only functions while playing a disc/USB mass storage
class device/digital audio player (with QP Link activated).
When Auto Standby is in use, the A.STBY indicator lights
on the display.
When the playback stops, the A.STBY indicator starts
flashing. If no operation is done for about 3 minutes while
the indicator is flashing, the System turns off (standby)
automatically.
• Auto Standby works for “DVD/CD,” “USB MEM” and
“LINE.”
• Changing the source to “FM,” “AM” or “TV SOUND”
temporarily deactivates Auto Standby.
Sleep Timer
You can set the shut-off time so that you can go to bed
without turning off the System yourself.
1Specify the time (in minutes).
2Wait until the set time disappears.
To check the time remaining until the shut-off time, press
SLEEP while holding SHIFT.
• If you press the button repeatedly, you can change the shut-
off time.
Remote
ONLY
INFO
CLOCK/TIMER
6
(while holding...)
PTY PTY
ENTER/SET
DISPLAY
Source information
Clock
Disc/file type*
Title and chapter
number**
Remote
ONLY
A.STANDBY
3
(while holding...)
Canceled
On
SLEEP
2
10 20 30 60 90 120 150 180
(while holding...)
Canceled
UX-G48[B].book Page 15 Friday, June 22, 2007 11:28 AM

16
Advanced Radio Operations
Receiving FM Stations with Radio Data
System
Radio Data System allows FM stations to send an additional
signal along with their regular program signals.
This System can receive the following types of Radio Data
System signals.
To show the Radio Data System information
While listening to an FM station...
Searching for a Program by
PTY Codes
You can locate a particular kind of program from the preset
channels (see page 8) by specifying the PTY codes.
To search for a program using the PTY codes
1While listening to an FM station...
2Select a PTY code (see page 17).
3Start searching.
The System searches for 30 preset FM stations, stops
when it finds the one you have selected, and tunes in to
that station.
• If no program is found, “NOTFOUND” appears on the
display.
• To stop searching any time during search, press PTY
SEARCH (while holding SHIFT).
To continue searching after it stops on an unwanted
station
While the indications on the display are flashing, press PTY
SEARCH again (while holding SHIFT).
PS (Program
Service)
Shows commonly known
station names.
PTY (Program
Type)
Shows types of broadcast
programs.
RT (Radio Text)
Shows text messages the station
sends.
Enhanced Other
Networks
Provides information about the
types of the programs broadcast
by the Radio Data System
stations of the different
networks.
PS Station names are displayed. “NO PS” will
appear if no signal is sent.
PTY The broadcast program type is displayed. “NO
PTY” will appear if no signal is sent.
RT Text messages the station sends are displayed.
“NO RT” will appear if no signal is sent.
PTY ,
PTY
SEARCH
TA/News/Info
DISPLAY
SHIFT
Remote control
Remote
ONLY
DISPLAY
PS PTY RT
Frequency
(Non-Radio Data
System signal)
Clock
Remote
ONLY
MENU/PL
PTY
SEARCH
(while holding...)
PTY PTY
(while holding...)
MENU/PL
PTY
SEARCH
Ex. When “NEWS” is selected
(while holding...)
UX-G48[B].book Page 16 Friday, June 22, 2007 11:28 AM

17
Switching Temporarily to a Program of
Your Choice Automatically
The Enhanced Other Networks function allows the System
to switch temporarily to a preset FM station broadcasting a
program of your choice (TA, NEWS, or INFO).
• This function works while listening to an FM station
providing the required signals.
While listening to an FM station, select the program type.
Description of the PTY codes
• Classification of the PTY codes for some FM stations may
be different from the above list.
TA Traffic announcement in your area
NEWS News
INFO Program the purpose of which is to impart
advice in the widest sense
How the Enhanced Other Networks function works:
CASE 1
If a station is not broadcasting the program of your
choice
The System continues tuning in to the current station.
«
When a station starts broadcasting the program of your
choice, the System automatically switches to that station.
The Enhanced Other Networks indicator starts flashing.
«
When the program is over, the System goes back to the
previously tuned station, but the function still remains
active (the indicator stops flashing and remains lit).
CASE 2
If a station is broadcasting the program of your choice
The System automatically switches to the station. The
Enhanced Other Networks indicator starts flashing.
«
When the program is over, the System goes back to the
previously tuned station, but the function still remains
active (the indicator stops flashing and remains lit).
CASE 3
If the station currently tuned in is broadcasting the
program of your choice
The Enhanced Other Networks indicator starts flashing.
«
When the program is over, the indicator stops flashing (the
function still remains active).
Remote
ONLY
SET UP
TA/News/
Info
TA NEWS INFO
OFF
(while holding...)
(Canceled)
NEWS: News.
AFFAIRS: Topical program expanding or enlarging
upon the news—debate, or analysis.
INFO: Programs the purpose of which is to impart
advice in the widest sense.
SPORT: Programs concerned with any aspect of
sports.
EDUCATE: Educational programs.
DRAMA: All radio plays and serials.
CULTURE: Programs concerning any aspect of national
or regional culture, including language,
theater, etc.
SCIENCE: Programs about natural sciences and
technology.
VARIED: Used for mainly speech-based programs
such as quizzes, panel games and
personality interviews.
POP M: Commercial music of current popular
appeal.
ROCK M: Rock music.
EASY M: Current contemporary music considered to
be “easy-listening”.
LIGHT M: Instrumental music, and vocal or choral
works.
CLASSICS: Performances of major orchestral works,
symphonies, chamber music, etc.
OTHER M: Music not fitting into any of the other
categories.
WEATHER: Weather reports and forecasts.
FINANCE: Stock Market reports, commerce, trading
etc.
CHILDREN: Programs targeted at a young audience.
SOCIAL: Programs about sociology, history,
geography, psychology and society.
RELIGION: Religious programs.
PHONE IN: Involving members of the public expressing
their views either by phone or at a public
forum.
TRAVEL: Travel information.
LEISURE: Programs about recreational activities.
JAZZ: Jazz music.
COUNTRY: Songs which originate from, or continue the
musical tradition of the American Southern
States.
NATION M: Current popular music of the nation or
region in that country’s language.
OLDIES: Music from the so-called “golden age” of
popular music.
FOLK M: Music which has its roots in the musical
culture of a particular nation.
DOCUMENT: Programs concerning factual matters,
presented in an investigative style.
TEST: Broadcasts for testing emergency broadcast
equipment or unit.
ALARM: Emergency announcement.
NONE: No program type, undefined program, or
difficult to categorize into particular types.
UX-G48[B].book Page 17 Friday, June 22, 2007 11:28 AM
This manual suits for next models
1
Table of contents
Other JVC Stereo System manuals