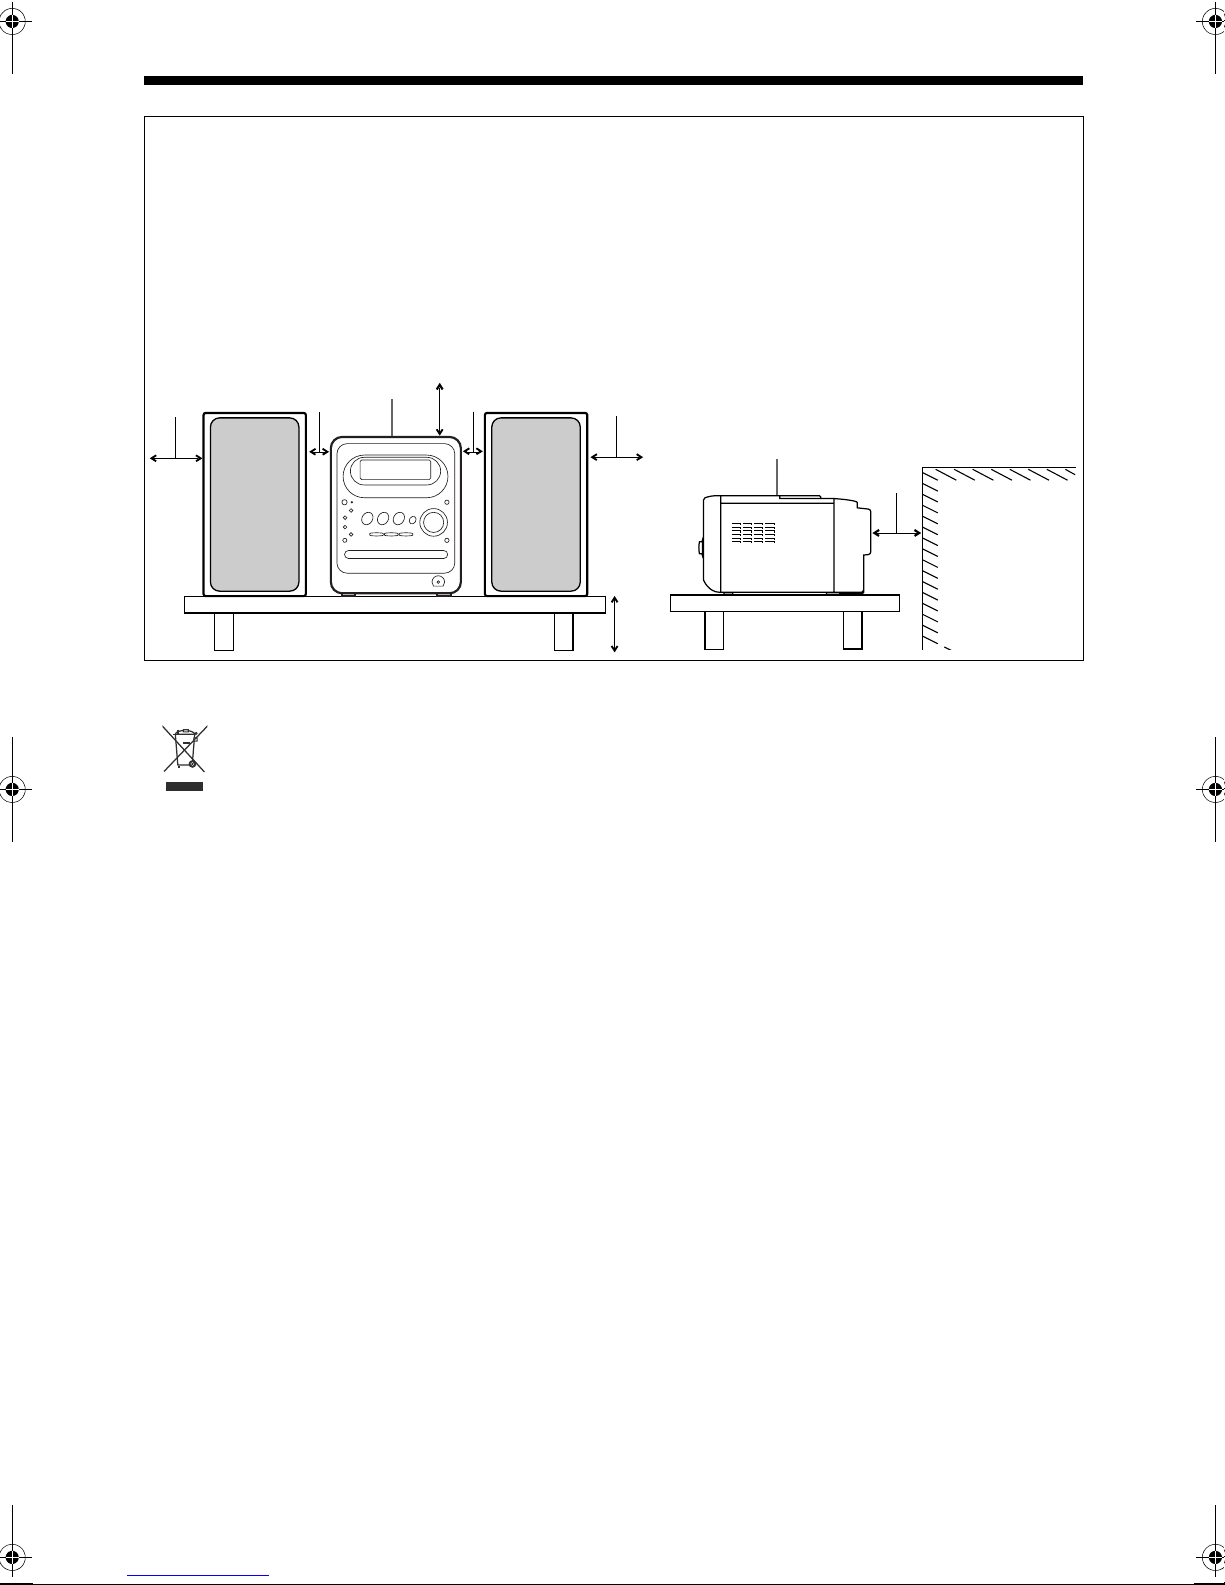
JVC UX-QD90S User manual

MICRO COMPONENT DVD SYSTEM
微型 DVD 组合音响
For turning off the demonstration
display, refer to page 15.
关闭演示显示的有关详情,请参阅
第15 页。
UX-QD90S
Consists of CA-UXQD90S and SP-UXQD90S
由CA-UXQD90S 和SP-UXQD90S 组成
INSTRUCTIONS
使用说明书
LVT1368-001A
[UN,US]
English
中
文
UX-QD90[UNUS]-01.fm Page 1 Thursday, September 29, 2005 2:22 PM

G-1
IMPORTANT FOR LASER PRODUCTS / ᮸Дڳሇᠳᢪ
CAUTION
To reduce the risk of electrical shocks, fire, etc.:
1. Do not remove screws, covers or cabinet.
2. Do not expose this appliance to rain or moisture.
༉ଐ
ϛϽՐᡌᆀˉဟဨᎋᰔƳ
1. ׅ౮ᖪλៀϊˉሣ࣒ୈസࠤˊ
2. ׅᡥലസا᰾ཱུୈᒳЃྰᄔࠏϔˊ
CAUTION — Fbutton!
Disconnect the mains plug to shut the power off
completely (the STANDBY lamp goes off).
The Fbutton in any position does not disconnect the
mains line.
• When the system is on standby, the STANDBY lamp
lights red.
• When the system is turned on, the STANDBY lamp
lights green.
The power can be remote controlled.
༉ଐƦ Fԟƚ
ᠳࣶԘԟᯄᆀྶ ơᡥ STANDBY ဢၷအƢƥᆀྶఠ
࠽Эఠκλˊ
ುᡴ FᮁࠨЃѲጕѬᒳƥϜᆀЬണԟᯄˊ
•ᐄᑏࠨЃസჁઔƥ STANDBY ဢဿؤᐗԍˊ
•ᐄᑏࠨЃ٦Ⴡઔƥ STANDBY ဢဿؤᑬԍˊ
ᆀྶԟظᅶᩎఊݥᨆఊցˊ
CAUTION
• Do not block the ventilation openings or holes.
(If the ventilation openings or holes are blocked by a
newspaper or cloth, etc., the heat may not be able to
get out.)
• Do not place any naked flame sources, such as lighted
candles, on the apparatus.
• When discarding batteries, environmental problems
must be considered and local rules or laws governing
the disposal of these batteries must be followed strictly.
• Do not expose this apparatus to rain, moisture, dripping
or splashing and that no objects filled with liquids, such
as vases, shall be placed on the apparatus.
༉ଐ
•ժׅࠁࠈᨭᲰحୈᨭᲰࣕˊ
ơᨭᲰحୈᨭᲰࣕஎᐫୈৈᎋႪࠁࠈƥၔು
ಖՠˊƢ
•ժׅޗലᐄᑏκಇᒳဟƥဿႄሇថ။ˊ
•ᠳόᆀໆƥ֩ᓣᄔұᯅᲢмؠώඨᩓࣳޞ
ԟЃࠨᄮᆀໆሮԟሇᠸࣽڔോҐˊ
•ժׅᡥലസا᰾ཱུˉاྰˉᚽκୈྲκາƥГׅޗ
ലസκᱤಇᒳሦ࿕ཬѱሇݥƥᘆᅨˊ
1. CLASS 1 LASER PRODUCT
2. CAUTION: Do not open the top cover. There are no
user serviceable parts inside the unit; leave all
servicing to qualified service personnel.
3. CAUTION: Visible and invisible laser radiation when
open and interlock failed or defeated. Avoid direct
exposure to beam.
4. REPRODUCTION OF LABEL: CAUTION LABEL,
PLACED INSIDE THE UNIT.
1. δᐜ᮸Дڳˊ
2. ༉ଐƳׅ୧ᲄሣ൙ƥലസԬ᪇ണᅶୗظᖪᑢһ
ሇ᪇хƴണᑢһষѸᅽണᤨඨሇОٽࣶୄˊ
3. ༉ଐƳԬ᪇᭗ࣽ᠆ᒳ࠼ಊୈᓥ௬ޫَƥ୧ሣ൙ظᕜ
ѕДᅴظᠶୈνظᠶሇ᮸᧠ˊ ᩕԏاտ᮸ԍ
ሇርఉၯˊ
4. ඓᎡሇࠪցඓዥƳ ༉ଐඓᎡѬЃസԬˊ
Introd uction
Warnings, Cautions and Others
/
ᡚٴƥ༉ଐؠԢвቹЀᲇ

G-2
CAUTION — Proper Ventilation
To avoid risk of electric shock and fire and to protect from
damage, locate the apparatus as follows:
Top/Front/Back/Sides: No obstructions should be placed in
the areas shown by the dimensions
below.
Bottom: Place on the level surface. Maintain
adequate air path for ventilation by
placing on a stand with a height of
10 cm or more.
In addition, maintain the best possible air circulation.
注意 —正确的通风方法
为了防止触电,火灾及避免损坏,
按如下要求放置机器:
上面 /前面 /后面 /侧面: 在图中所示范围中,不应放置任何障
碍物。
底部: 放置在水平面上。 放置在一个高
10 cm
或更高的台上以保留足够的通风道。
此外,如图所示,尽可能保持最佳的空气循环。
15cm
10cm
15cm 15cm 1cm
1cm
15cm Wall or
obstructions
墙壁或障碍物
Front
前面
Main unit
本机
Main unit
本机
Front view
前视图
Side view
侧视图
[European Union only]
[仅对应欧洲联盟 ]
UX-QD90[UNUS]-02.fm Page 2 Thursday, September 29, 2005 2:22 PM

1
Table of Contents
marks refer to operation used frequently. You can quickly learn the general usage of this
product by reading those parts only.
Notes on Operation .............................. 3
Suitable Locations for the Main Unit ............3
Condensation...............................................3
Cleaning the Main Unit ................................3
Listener's Etiquette ......................................3
Playable DVD/CD Types .............................4
Disc Structure ..............................................5
Special Cautions................................... 6
Notes on Handling .......................................6
Supplied Accessories ..................................6
Voltage Adjustment .............................. 7
Part Description .................................... 8
Remote Control .................................... 9
Inserting Batteries into the Remote
Control ..................................................... 9
Operating the TV Using the Remote
Control ...................................................10
Connections........................................ 11
Connecting the Antennas ..........................11
Connecting the Speakers ..........................13
Connecting Other Equipment ....................14
Connecting with a TV.................................14
When a Clearer Picture Is Desired ............15
Connecting the Power Plug .......................15
Disabling the Demonstration Display ......... 15
Basic Operations ................................ 16
Setting the Clock........................................16
Turning On/Off the Main Unit
.
17
Adjusting the Volume.............. 17
Adjusting the Sound Quality ......................17
Temporarily Turning Off the Sound
(FADE MUTING) ...................................18
Emphasizing Heavy Bass Sound
(AHB PRO)............................................18
Changing the Display Brightness
(DIMMER)..............................................18
Changing the Color Patterns .....................18
Selecting the Color System and the Video
Processing System (SCAN MODE).......19
Listening to Radio Broadcasts
................................................
20
Setting the AM Tuner Spacing...................20
Selecting a Radio Station ..........................21
Storing Radio Stations (Preset) .................21
Tuning In to a Preset Radio Station...........21
Basic Operations of the DVD Player
......22
Playback ................................ 22
Playing Back from a Position 10 Seconds
Before (One Touch Replay)...................24
Stopping Playback ................. 25
Resuming Playback (RESUME) ................25
Pausing Playback ...................................... 25
Advancing Picture Frame by Frame ..........25
Fast Reverse/Fast Forward
Search ............................... 25
Slow Motion Playback................................ 26
Skipping to the Beginning of
a Track............................... 26
Skipping to the Beginning of a Track
with the Number Buttons .......................26
Selecting a Track from the Menu Screen ..27
Convenient Functions of the DVD
Player ................................................28
Selecting the Audio
Language .......................... 28
Selecting the Subtitle Language ................29
Selecting a View Angle ..............................29
Magnifying the Picture (ZOOM) ................. 29
Adjusting the Picture Quality (VFP) ...........30
Creating Realistic Sound
(3D PHONIC)......................................... 30
Adjusting Playback Level (DVD LEVEL)....31
Playing Back the Bonus Group.................. 31
Browsable Still Pictures (B.S.P.)................32
Playing Back the Disc in the Desired
Order (Program Playback).....................32
Random Playback...................................... 34
Repeat Playback........................................34
Status Bar and Menu Bar ....................35
Using the Status Bar and Menu Bar ..........35
Playing Back the Designated Part Repeatedly
(A-B Repeat Playback).......................... 36
Designate the Time
(Time Search)........................................36
Introduction
Preparation
Basic Operations
Listening to Radio Broadcasts
Listening to Discs
UX-QD90[UNUS].book Page 1 Thursday, September 29, 2005 1:29 PM

2
EnglishIntroduction
Playing Back MP3/WMA and
JPEG Discs....................................... 37
Playback ....................................................37
Preferences ........................................ 39
Basic Operations .......................................39
LANGUAGE...............................................39
PICTURE ...................................................39
AUDIO .......................................................40
OTHERS....................................................40
Language Codes ................................ 41
Listening to Cassette Tapes
.................................................
42
Listening to Other Equipment ............. 43
Adjusting the Sound Input Level from
Other Equipment ...................................43
Recording Sound to Cassette
Tapes
.....................................
44
Quitting Recording .....................................45
Recording Only One Track from a Disc .....45
Recording the Second or Subsequent
Track to the Last Track from a Disc.......45
Program Recording from a Disc ................45
Recording with No Blank Time between
Tracks.................................................... 45
Erasing Recorded Sound from
a Cassette Tape ....................................45
Using the Timers ................................ 46
Sleep Timer ...............................................46
Recording Timer ........................................47
Playback Timer ..........................................48
Auto Standby ...................................... 50
Disc Ejection Lock .............................. 51
Using AV COMPU LINK ..................... 51
Connection and Setting .............................51
Operations .................................................51
Handling Discs/Cassette Tapes ..........52
Disc Messages ....................................53
Troubleshooting...................................53
Specifications ......................................54
Listening to Cassette Tapes
Listening to Other Equipment
Recording Sound
Convenient Functions
Reference
UX-QD90[UNUS].book Page 2 Thursday, September 29, 2005 1:29 PM

Introduction
3
3Introductio n
Notes on Operation
To minimize the need for servicing and maintain
the high quality of this product, do not place the
main unit in the following locations:
• In a position subject to high humidity or consid-
erable dust
• On an uneven or unstable surface
• Near a heat source
• Near a computer, fluorescent light or other elec-
tric appliance
• In a small room with insufficient ventilation
• In a position exposed to direct sunlight
• In a position exposed to excessive cold
• In a position exposed to strong vibration
• Near a TV, other amplifier, or tuner
• Near a magnetic source
CAUTION
• The operating temperature of this product is 5°C to
35°C. Use in temperatures outside this range may
cause a malfunction or damage the product.
Under the following conditions, you may not be
able to operate this product properly due to con-
densation formed on the lens of the main unit:
• When you have just started an air conditioner to
warm your room
• When you have placed the main unit at an area
with high humidity
• When you have moved the main unit from a cold
place to a warm place
When condensation forms, leave the main unit
turned on, wait for approximately 1 or 2 hours, and
then operate the main unit.
When the operation panel becomes dirty, dust it
with a soft dry cloth. When the operation panel is
very dirty, wipe it with a cloth dampened with a
small amount of a neutral detergent, and then wipe
it with a soft dry cloth.
CAUTION
• Do not wipe the operation panel with thinners, ben-
zenes or other chemical agents. Do not spray
insecticides onto the operation panel. These may
cause discoloration and damage to the surface.
When using headphones, keep the volume at a
moderate level so as not to over-stimulate your
ears.
■When enjoying sound from the speakers,
adjust the volume to a suitable level to
avoid disturbing your neighbors.
Even low-volume sound carries a long way,
especially at night. Show consideration to
your neighbors by closing windows or using
headphones.
Suitable Locations for the
Main Unit
Condensation
• Manufactured under license from Dolby Laboratories. "Dolby", "MLP Lossless", and the double-D symbol are trade-
marks of Dolby Laboratories.
• "DTS" and "DTS 2.0+DIGITAL OUT" are registered trademarks of Digital Theater Systems, Inc.
• This product incorporates copyright protection technology that is protected by method claims of certain U.S. patents
and other intellectual property rights owned by Macrovision Corporation and other rights owners. Use of this copyright
protection technology must be authorized by Macrovision Corporation, and is intended for home and other limited
viewing uses only unless otherwise authorized by Macrovision Corporation. Reverse engineering or disassembly is
prohibited.
• DVD Logo is a registered trademark of DVD Format/Logo Licensing Corporation.
Cleaning the Main Unit
Listener's Etiquette
UX-QD90[UNUS].book Page 3 Thursday, September 29, 2005 1:29 PM

4
Introduction English
• Discs should be finalized before being played back.
1 Among MP3/WMA/JPEG discs, only discs formatted
with ISO 9660 (known as UDF Bridge) are playable.
2 Only when a DVD-RW is compatible with CPRM
(Content Protection for Recordable Media), DVD VR
format can be used.
It is possible to play back finalized +R/+RW (DVD Video
Format only) discs. "DVD" lights on the front display
panel when a +R/+RW disc is loaded.
Some discs may not be played back because of their disc
characteristics, recording conditions, or damage or stains
on them.
Only sounds can be played back from the following discs:
MIX-MODE CD CD-G
CD-EXTRA CD TEXT
Region code of DVD VIDEO
DVD players and DVD VIDEOs have their own
region code numbers. This product can only play
back a DVD VIDEO recorded with the region code
number "3" (or any region code number that
includes "3") or "ALL".
If a DVD VIDEO with an improper region code
number is loaded, "REGION CODE ERROR!"
appears on the TV screen and playback cannot
start.
• On some DVD VIDEOs, DVD AUDIOs, VCDs or
SVCDs, their actual operation may be differ-
ent from what is explained in this manual.
This is due to the disc programming and disc
structure, not a malfunction of this product.
Discs you can play back:
• Playback is impossible in some cases
due to the disc characteristics, recording
condition, scratches or dirt on the disc, or
dirt or condensation on the lens.
• Before using a disc, carefully read the
cautions regarding the disc.
• This product does not support playback
or CD text display of sound files such as
MP3s.
• To play back a CD-RW or DVD-RW on
this product, erase all tracks if the CD-
RW or DVD-RW was recorded in a format
other than the format described on the
left. Using the CD-RW or DVD-RW with-
out erasing all tracks may result in dam-
age to the speakers or other parts caused
by sudden loud volume.
Discs that cannot be played back
• The following discs cannot be played back:
DVD-ROM, CD-ROM, DVD-RAM, Photo CD,
SACD, etc.
Playing back these discs will generate noise and
damage the speakers.
• Damaged discs and discs in an extraordinary
shape (other than a disc of 12 cm or 8 cm in
diameter) cannot be played back.
• JVC do not guarantee the operation and sound
quality of discs not authorized by CD-DA, which
is a CD specification.
Before playback, confirm that the disc complies
with this CD specification by checking the marks
and reading notes printed on the package.
Playable DVD/CD Types
CD-R/
CD-RW DVD-R DVD-RW
Audio CD Playable ——
VCD/SVCD Playable ——
MP3/WMA/JPEG Playable Playable
1
Playable
1
DVD Video —Playable Playable
DVD VR —
—
Playable
2
Examples:
Disc Type Mark (Logo)
DVD VIDEO
DVD AUDIO
VCD
SVCD
CD
CD-R
CD-RW
AUDIO
About CD-Rs/CD-RWs and DVD-Rs/DVD-RWs
UX-QD90[UNUS]-03.fm Page 4 Wednesday, October 5, 2005 12:51 PM

Introduction
5
(Continued)
Notes on Operation
About MP3/WMA/JPEG discs
Playable MP3/WMA/JPEG discs and files
• CDs recorded in the ISO 9660 format are play-
able (except CDs recorded in the "packet write"
format (UDF format)).
• CDs recorded in the multi-session format are
also playable.
• Files with an extension of ".mp3", ".wma", ".jpg"
or ".jpeg" (extensions with uppercase and lower-
case letters mixed are also acceptable) are play-
able.
• This product cannot play back DVDs recorded in
multi-session or multi-border format.
Notes on MP3/WMA/JPEG discs and files
• A disc may not be played back, or reading it may
take a long time depending on its recording con-
ditions or properties.
• The time needed for reading varies with the num-
ber of groups or tracks (files) recorded on the disc.
• If a character other than single byte English
characters is used in the file name of an MP3/
WMA/JPEG file, the track/file name will not be
displayed correctly.
• The order of tracks/groups displayed on the
MP3/WMA Control screen, and the order of files/
groups displayed on the JPEG Control screen
may be different from that of files/folders dis-
played on a computer monitor screen.
• In the case of MP3/WMA discs, since groups/
tracks are played back in alphabetical order, a
commercially available MP3/WMA disc may be
played back in an order different from that indi-
cated on the label attached to the disc.
• Playing back an MP3 file including a still image
may take a long time. The elapsed time is not
displayed until playing back starts. If playing
back starts, the elapsed time may not be dis-
played correctly.
• For an MP3 file, a disc with a sampling frequency
of 44.1 kHz and transmission rate of 128 kbps is
recommended.
• This product is not compatible with MP3i or
MP3PRO.
• This product can play back a baseline JPEG file,
excluding monochromatic JPEG files.
• This product can play back JPEG data taken with a
digital camera conforming to the DCF (Design
Rule for Camera File System) standard (when a
function such as the automatic image rotation
function of a digital camera is applied, the data no
longer complies with the DCF standard, so the
image may not be displayed).
• If data has been processed, edited and restored
with PC image editing software, the data may
not be displayed.
• This product cannot play back animations such
as MOTION JPEG, still pictures (TIFF etc.) other
than JPEG, or image data with sound.
• The resolution of 640 x 480 pixels is recom-
mended for JPEG files. If a file has been
recorded at a resolution of more than 640 x 480
pixels, display may take a long time. An image
with a resolution of more than 8 192 x 7 680 pix-
els cannot be displayed.
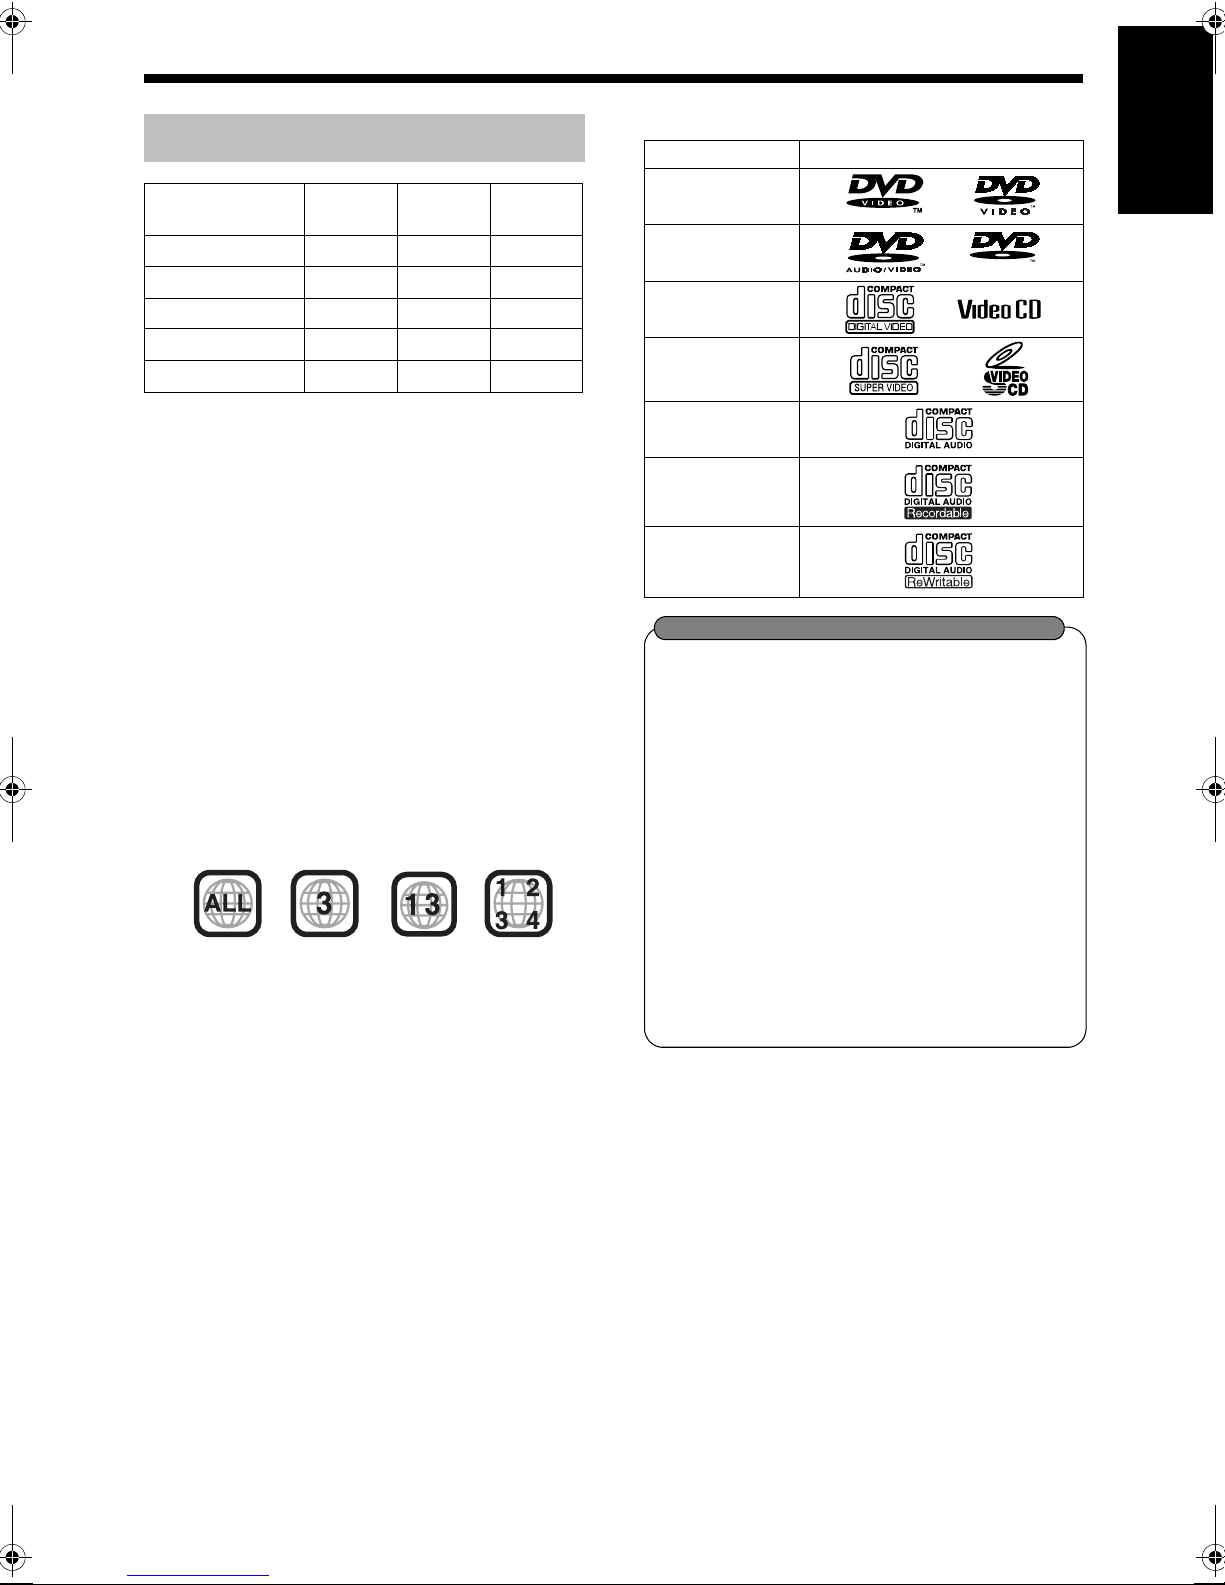
DVD VIDEO
A DVD VIDEO consists of "titles" and each title
may be divided into "chapters".
DVD AUDIO
A DVD AUDIO consists of "groups" and each
group may be divided into "tracks".
Some discs include a "bonus group" that requires
a password for playing ( page 31).
VCD/SVCD/CD
VCD, SVCD and CD consist of "tracks".
In general, each track has its own track number.
(On some discs, each track may also be further
divided by indexes.)
MP3/WMA [JPEG] discs
On an MP3/WMA [JPEG] disc, each still picture
(material) is recorded as a track [file]. Tracks
[Files] are usually grouped into a folder. Folders
can also include other folders, creating hierarchical
folder layers.
This unit simplifies the hierarchical construction of
a disc and manages folders by "groups".
This product can recognize up to 4 000 tracks
[files] in a disc. Also, the product can recognize up
to 150 tracks [files] per group and up to 99 groups
in a disc. Since the unit ignores tracks [files] with
numbers exceeding 150 and groups with numbers
exceeding 99, these cannot be played back.
• If there is any type of files other than MP3/WMA
[JPEG] files in a disc, those tracks [files] are also
counted in the total file number.
Disc Structure
Title 1 Title 2
Chapter 1 Chapter 2 Chapter 3 Chapter 1 Chapter 2
Group 1 Group 2
Track1Track2Track3Track1Track2
Track1Track2Track3Track4Track5
Up to 99 groups
Up to 150 files
Group 1 Group 2
Track 1
[File 1]
Track 2
[File 2] Group 3 Group 4 Group 5
UX-QD90[UNUS].book Page 5 Thursday, September 29, 2005 1:29 PM

6
Introduction English
Special Cautions
■Important cautions
Installation of the system
• Select a place which is level, dry and neither too
hot nor too cold; between 5°C and 35°C.
• Leave sufficient distance between the system
and the TV.
• Do not use the system in a place subject to
vibration.
Power cord
• Do not handle the power cord with wet hands!
• A small amount of power is always consumed
while the power cord is connected to the wall
outlet.
• When unplugging the power cord from the wall
outlet, always pull on the plug, not the power
cord.
To prevent malfunctions of the system
• There are no user-serviceable parts inside. If
anything goes wrong, unplug the power cord and
consult your dealer.
• Do not insert any metallic object into the system.
• Do not use any non-standard shape disc (like a
heart, flower or credit card, etc.) available on the
market, because it may damage the system.
• Do not use a disc with tape, stickers, or paste on
it, because it may damage the system.
Note about copyright laws
Check the copyright laws in your country before
recording from CDs. Recording of copyrighted
material may infringe copyright laws.
■Safety precautions
Avoid moisture, water and dust
Do not place the system in moist or dusty places.
Avoid high temperatures
Do not expose the system to direct sunlight and do
not place it near a heating equipment.
When you are away
When away on travel or for other reasons for an
extended period of time, disconnect the power
cord plug from the wall outlet.
Do not block the vents
Blocking the vents may damage the system.
Care of the cabinet
When cleaning the system, use a soft cloth and fol-
low the relevant instructions on the use of chemi-
cally-coated cloths. Do not use benzene, thinner or
other organic solvents including disinfectants.
These may cause deformation or discoloring.
If water gets inside the system
Turn the system off and disconnect the power cord
plug from the wall outlet, then call the store where
you made your purchase. Using the system in this
condition may cause fire or electrical shock.
■When condensation or water drops adhere
to the lens
In any of the following cases, condensation or
water drops may adhere to the lens to prevent the
system from working properly:
• Immediately after roomheating starts
• When the system is installed in a steamy or
damp space
• When the system is suddenly moved from a cold
place to a warm space
In any of these cases, leave the system turned on
for 1 or 2 hours before use.
Check to be sure you have all of the supplied
accessories.
The number in parentheses is the quantity of the
pieces supplied. If anything is missing, contact
your dealer immediately.
Remote control (1)
Batteries (2)
FM antenna (1)
AM loop antenna (1)
Video cord (1)
AC plug adaptor (1)
Notes on Handling
Label sticker
Sticker
Paste
• This product incorporates copyright protection technology that is protected by method claims of certain
U.S. patents and other intellectual property rights owned by Macrovision Corporation and other rights
owners. Use of this copyright protection technology must be authorized by Macrovision Corporation, and is
intended for home and other limited viewing uses only unless otherwise authorized by Macrovision
Corporation. Reverse engineering or disassembly is prohibited.
Supplied Accessories
UX-QD90[UNUS]-03.fm Page 6 Wednesday, October 5, 2005 12:51 PM

Introduction
7
Introduction /Preparation
Voltage Adjustment
Before connecting the power plug, make sure that
the voltage selector is set to the correct voltage for
your area.
CAUTION
• DO NOT plug in before setting the voltage selector
on the bottom of the main unit and all connections
are complete.
Bottom view of the main unit
UX-QD90[UNUS].book Page 7 Thursday, September 29, 2005 1:29 PM

8
Introduction/Preparation English
Part Description
*1 When the power is turned off, the STANDBY indicator lights up red. When the power is turned on, the
STANDBY indicator lights up green.
*2 This terminal is for connecting a pair of headphones equipped with a stereo mini plug (commercially avail-
able). While the headphones are connected, the speakers do not produce any sound.
The numbers refer to the pages in which the parts are explained.
Cassette holder: 42
PUSH-OPEN
Disc tray: 22
Remote control sensor: 9
18
46 - 49 17 50 32 - 34
42
15, 18
25, 4226, 31, 38, 45
22, 51
17
43
44, 45
30
18
21
22
42, 44, 45
31, 32
*2
23
22
*1
17, 20
30
26, 38, 45
20, 25, 4220, 25, 42
21
UX-QD90[UNUS].book Page 8 Thursday, September 29, 2005 1:29 PM

Introduction
9
Preparation
Remote Control
CAUTION
• Do not use a used battery and a new battery
together.
• Do not use different types of batteries at the
same time.
• Take out the batteries if the remote control is not
to be used for a long time. Otherwise it may
cause a leakage.
• When operating the remote control, point it at
the front panel of the main unit.
• The effective distance between the remote con-
trol and the remote control sensor on the main
unit is approximately 5 m maximum.
• When the effective distance decreases, replace
the batteries.
• Do not drop the remote control or subject it to
excessive shock.
The numbers refer to the pages in which the parts are explained.
17
17
10 43
10
21
35, 36
Number
buttons:
16, 21, 26,
32, 36
42, 44
42
17
26
27
50
34
17
29
31
29
19, 30
30
18
18
18
25
25 - 27
,
42, 45
39
16, 47, 48
24
21, 33
28
24
18
10
26, 38, 45
27
23, 27,
28, 31, 32
10,
16
17
21, 47 - 50
33, 48, 50
17
25, 42, 45
10
22
32
Opening the cover
46
29
Inserting Batteries into the
Remote Control
R6P (SUM-3) /AA (15F)
type dry-cell batteries (2)
Remote control operation
23, 27, 29, 38
25 - 27, 42, 45
UX-QD90[UNUS].book Page 9 Thursday, September 29, 2005 1:29 PM

10
Preparation English
1Slide the remote control mode
selector to the TV side.
2Hold down .
Hold down until step 4 is completed.
3Press and release.
4
Press number buttons ( - , ).
Examples:
For a Hitachi TV: Press 1, then 0.
For a Toshiba TV: Press 0, then 8.
If there are two or more manufacturer's codes, try
them in turn and select the one that enables the
product to work properly.
5Release .
NOTE
• The manufacturer's codes may be changed without
notice. You may not be able to operate a TV
produced by the manufacturer shown above.
Operate the remote control by pointing it towards
the TV.
*1 Make sure to slide the remote control mode selector
to the TV side in advance.
NOTE
• When the batteries are replaced, perform the man-
ufacturer's code setting again.
This page is for when operating your TV using
the remote control of this product.
Operating the TV Using the
Remote Control
Remote control
mode selector
Number buttons
Setting the manufacturer's code
Manufacturer Code Manufacturer Code
JVC 01 Samsung 12
Hitachi 10 Sanyo 13
Magnavox 02 Sharp 06
Mitsubishi 03 Sony 07
Panasonic 04, 11 Toshiba 08
Philips 14 Zenith 09
RCA 05
Turn on/off the power.
Change channels.
Adjust volume.
- /
/
Select channels.
Change between the previously
selected channel and the cur-
rent channel.
Change between TV and video
input.
For TV operation
*1
UX-QD90[UNUS].book Page 10 Thursday, September 29, 2005 1:29 PM

Introduction
11
Connections
1Set up the AM antenna (supplied).
2Connect the antenna cord.
3Turn the AM loop antenna to find
the best position for radio
reception.
Place the AM loop antenna as far
from the main unit as possible.
• Do not place the AM loop antenna on a
metallic table or close to a TV, computer, or
other electric appliances. Doing so may
affect radio reception.
■When radio reception with the supplied AM
loop antenna is poor
Connect all necessary parts before connecting the power plug.
Connecting the Antennas
Connecting the AM antenna
Insert the tab into
the slot.
Main unit (rear view)
Main unit (side view)
Connecting the antenna
cord
Connect the ends of
the antenna cord as
shown above.
When insulation
covers the tips of
the antenna cord,
twist and pull off
the insulation.
When positioning the antennas, find the best position for reception while listening to an actual radio program
(refer to "Listening to Radio Broadcasts" ( page 20)).
Electric wire: 3 - 5 m (not
supplied)
Twist together electric
wire and the AM loop
antenna cord.
Stretch out the electric
wire horizontally,
preferably in a high place
such as above a window
or outdoors.
Connect the AM loop
antenna cord to the main
unit together with the
electric wire.
Main unit (rear view)
Electric wire
AM loop antenna cord
UX-QD90[UNUS].book Page 11 Thursday, September 29, 2005 1:29 PM

12
Preparation English
Stretch out the FM antenna to the best position for
radio reception, and then fix it with adhesive tape.
■When radio reception with the supplied FM
antenna is poor, or when using a communal
antenna
When using an antenna other than those supplied
with this product, refer to the operation manuals
for the antenna for details of connection.
Connecting the FM antenna
Main unit (rear view)
FM antenna
(supplied)
Main unit (side view)
When positioning the antennas, find the best position for reception while listening to an actual radio program
(refer to "Listening to Radio Broadcasts" ( page 20)).
Main unit
(rear view)
Main unit (side view)
Depending on the radio reception
conditions, an FM feeder antenna (sold
separately: compatible with 300 Ω) can
be used. In the case, a converter (sold
separately) is required.
Antenna cord (sold
separately)
Communal
antenna terminal
or
Outdoor FM antenna
(commercially
available)
Coaxial cable
(commercially
available)
Converter
(sold separately:
compatible with
300
Ω/75 Ω)
UX-QD90[UNUS].book Page 12 Thursday, September 29, 2005 1:29 PM

Introduction
13
(Continued)
Connections
CAUTION
• Do not short-circuit the and speaker termi-
nals. Doing so may damage the main unit.
• Do not connect other speakers together with the
supplied speakers. The change in impedance
may damage the main unit and the speakers.
• The speakers of this product are magnetically
shielded, but color irregularities may occur on the
TV depending on how the speakers are installed.
Keep in mind the following.
1. Turn off the main power of your TV before
installing the speakers. Wait for about 30 min-
utes before turning on the TV again.
2. If color irregularity occurs in pictures, keep
enough distance between the TV and the
speakers.
NOTE
• Improper speaker cord connection spoils the stereo
effect and sound quality.
• The impedance of speakers connected to this
product must be within the range of 4 Ωto 16 Ω.
• A cooling fan is built into the main unit. The inter-
nal cooling fan automatically rotates to dissipate
generated heat. To ensure sufficient cooling,
leave a space of at least 1 cm between the main
unit and the speakers or other objects.
Connect all necessary parts before connecting the power plug.
Connecting the Speakers
After connecting the speakers, gently pull on the
speaker cords to make sure that they are firmly
connected.
Speaker cord
Speaker cord
Red
Black
Red
Black
Right speaker (rear view) Left speaker (rear view)
Speaker cord
Main unit (rear view)
You can detach the speaker cover.
Speaker
cover
UX-QD90[UNUS].book Page 13 Thursday, September 29, 2005 1:29 PM

14
Preparation English
CAUTION
• Before connecting other equipment, turn off both
the main unit and the equipment.
CAUTION
• For details of signals to be output, refer to "List of
relationships of DIGITAL AUDIO OUTPUT prefer-
ence items and output signal". ( page 40)
• If the main unit is connected to equipment with a
Dolby Digital decoder, "D. RANGE COMPRES-
SION" setting of "AUDIO" ( page 40) is dis-
abled for sound from the digital audio output of
the main unit.
• Set "3D PHONIC" to "OFF" ( page 30)
when an external equipment is using a signal
from the OPTICAL DVD DIGITAL OUT terminal
on the main unit.
CAUTION
• Connect the main unit directly with a TV (or a
monitor) without routing through a VCR. Otherwise
it may cause picture distortion while playing back.
(Such picture distortion is caused by a copy
protection system and is not a malfunction.)
Also, if the main unit is connected to a TV with a
built-in VCR, there may be picture distortion during
playback.
NOTE
• Before playing back the discs with video output,
you need to select the color system and the video
processing system. Refer to "Selecting the Color
System and the Video Processing System (SCAN
MODE)" ( Page 19).
• You need to set "MONITOR TYPE" in the "PIC-
TURE" menu correctly according to the aspect
ratio of your TV. ( page 39)
Connecting Other Equipment
Read this section when connecting other audio
equipment to this product.
Other audio
equipment
Audio cord (not supplied)
Connecting with digital equipment
AV amplifier with a built-in
decoder (not supplied)
To an optical digital input
terminal
Optical digital cable
(not supplied)
Connecting with a TV
TV
Supplied video cord
Main unit
Main unit
Connecting directly
TV
(or monitor)
VCR
UX-QD90[UNUS].book Page 14 Thursday, September 29, 2005 1:29 PM

Introduction
15
(Continued)
Connections
You can enjoy pictures of better quality using the
following cord instead of the supplied video cord.
You can enjoy better quality pictures than when
using the S-video cord.
CAUTION
• Use one of either the S-video cord or the
component video cord. If both cords are used,
pictures may not be played back properly.
NOTE
• In order to enjoy pictures with the progressive
mode ( page 19), the TV is required to have
progressive video input.
• If the component video input jacks of your TV are
BNC type, use a plug adapter (not supplied) to
convert the plugs.
• After making all other necessary connections,
connect in the power plug.
• If not using this product for a long period, discon-
nect the power plug from the AC outlet for safety
and to save electricity.
• The clock setting will be lost after the power plug
has been disconnected or the power is inter-
rupted for more than 1 minute. The timer set-
tings will be lost when the power is interrupted.
When the power is restored, set the clock and
the timers again.
■When the power is turned off
Hold down on the main
until "DEMO CLEAR" appears.
Disconnecting and then reconnecting the power
plug will not start the demonstration display.
NOTE
• To activate the demonstration display again, hold
down on the main unit while the power is off
until "Hello" appears.
• Activating the demonstration display turns on the
main unit.
• When you press a button on the main unit,
"DEMO OFF" appears in the display window and
the demonstration display is canceled. (Discon-
necting and then reconnecting the power plug
will start the demonstration display again.)
Connect all necessary parts before connecting the power plug.
When a Clearer Picture Is
Desired
Connecting by using the S-video cord
TV
Main unit
S-video cord
(not supplied)
Connect the ends of S-video cord making sure that each
end matches its compatible terminal.
Connecting by using the component
video cord
TV
Main unit
Component video cord
(not supplied)
Connecting the Power Plug
Disabling the Demonstration
Display
When you connect the power plug into the AC
outlet, "DEMO START!" appears in the display
window and the demonstration display starts.
Before using the main unit, turn off the demon-
stration display by setting the function to "DEMO
CLEAR".
AC outlet Main unit (rear view)
UX-QD90[UNUS].book Page 15 Thursday, September 29, 2005 1:29 PM

16
Preparation/Basic Operations English
Preparation/Basi c Operations
Basic Operations
This manual explains the operations assuming that
you will use the remote control. Some buttons on
the main unit are the same as those on the remote
control.
CAUTION
• Set the remote control mode selector to
AUDIO before using the number buttons.
You can set the clock while the main unit is turned
either on or off.
Example: To set the clock to 10:10 a.m. on Wednesday
1Press .
2Set the hour.
or
Back Next
• Holding down the button causes the hour to
increment.
• You can use the number buttons to specify
the hour.
Refer to "Using the number buttons" shown
on the left.
3Press or .
4Set the minute.
• Set the minute in the same manner as in step 2.
5Press or .
6Set the day of the week.
or
Back Next
• Each time you press or ,
the day of the week changes.
• Abbreviations are used for the days of the week.
Sun. →Sunday
Mon. →Monday
Tue. →Tuesday
Wed. →Wednesday
Thu. →Thursday
Fri. →Friday
Sat. →Saturday
7Press or .
• The clock starts from 0 seconds in the minute you set.
NOTE
• While setting the clock, you can return to the previ-
ous step by pressing .
(Continued on next page)
Number buttons
Remote control
mode selector
Examples:3:
13: →
20: →
23: →→
Setting the Clock
Back Next
Back Next
Using the number buttons
UX-QD90[UNUS].book Page 16 Thursday, September 29, 2005 1:29 PM

Introduction
17
(Continued)
Basic Operations
Press four times to display the clock, and
then adjust the clock starting from step 2 on page
16.
Press repeatedly.
NOTE
• The time display on the main unit is a 24-hour
clock.
• The clock will gain or lose approximately 1 minute
per month.
• Set the clock again after you have disconnected
the power plug or a power is interrupted.
Press (or on the main unit).
• With the power off, pressing either button
also turns on the main unit.
Remote control:
Main unit:
When a disc or cassette tape has been
loaded, playback starts automatically.
NOTE
• Cooling fan is built into the main unit for emitting
generated heat. When you turn on the main unit,
the internal cooling fan automatically starts rotating.
Press .
NOTE
• You can also adjust the volume by turning the
VOLUME control on the main unit.
• You can adjust the volume within the range of 0
to 40.
Press .
• Each time you press , the display
changes as follows.
• While the sound mode is set to an item other
than "FLAT", is displayed in the
display window.
NOTE
• This function does not affect recording sound.
1Press repeatedly to display
"MANUAL".
2For adjusting bass sound;
Press .
For adjusting treble sound;
Press .
• You can adjust the sound quality within the
range of -5 to +5.
• The display returns to the sound source dis-
play in a few seconds.
NOTE
• While the sound mode is set to an item other than
"MANUAL", "NO OPERATE" is displayed in the dis-
play window and you cannot adjust bass/treble
sound.
Turning On/Off the Main Unit
Adjusting the Volume
Adjusting the clock
Displaying the clock while using the
main unit
Adjusting the Sound Quality
Selecting the sound mode
: For emphasizing treble
and bass sounds.
: Adequate for songs
and narrations.
: For emphasizing treble
sound.
: For uplifting a feeling
of being at a live per-
formance.
: For adjusting treble and
bass sounds of your
choice (shown below).
: Cancels the sound
mode (factory setting).
Adjusting bass/treble sound
UX-QD90[UNUS].book Page 17 Thursday, September 29, 2005 1:29 PM
This manual suits for next models
5
Table of contents
Other JVC Stereo System manuals