manuals.online logo
Brands
  1. Home
  2. •
  3. Brands
  4. •
  5. JVC
  6. •
  7. TV
  8. •
  9. JVC InteriArt AV-28E50SK User manual

JVC InteriArt AV-28E50SK User manual

Other manuals for InteriArt AV-28E50SK

3

This manual suits for next models

1

Other JVC TV manuals

JVC PD-42B50BU, PD-35B50BU, PD-42B50BJ,... User manual

JVC

JVC PD-42B50BU, PD-35B50BU, PD-42B50BJ,... User manual

JVC AV-20320, AV-20321, C-20310, C-13310,... User manual

JVC

JVC AV-20320, AV-20321, C-20310, C-13310,... User manual

JVC AV-28GH1BUF User manual

JVC

JVC AV-28GH1BUF User manual

JVC AV42PD20ES User manual

JVC

JVC AV42PD20ES User manual

JVC AV-28GT1BJF, AV-28GT1SJF User manual

JVC

JVC AV-28GT1BJF, AV-28GT1SJF User manual

JVC AV-32Z25EUY User manual

JVC

JVC AV-32Z25EUY User manual

JVC AV-21RM4SN User manual

JVC

JVC AV-21RM4SN User manual

JVC AV-28WFT1EPG User manual

JVC

JVC AV-28WFT1EPG User manual

JVC AV-21Q3/D Administrator Guide

JVC

JVC AV-21Q3/D Administrator Guide

JVC HV-32D25EUW User manual

JVC

JVC HV-32D25EUW User manual

JVC AV-14FN14 User manual

JVC

JVC AV-14FN14 User manual

JVC AV-T2922 User manual

JVC

JVC AV-T2922 User manual

JVC LT-32VAF5035 User manual

JVC

JVC LT-32VAF5035 User manual

JVC AV-28X4SK User manual

JVC

JVC AV-28X4SK User manual

JVC AV32L5EKGY User manual

JVC

JVC AV32L5EKGY User manual

JVC AV-25MT35/P User manual

JVC

JVC AV-25MT35/P User manual

JVC AV-25P8PH User manual

JVC

JVC AV-25P8PH User manual

JVC LT-22E710 User manual

JVC

JVC LT-22E710 User manual

JVC AV-32X5SU Mounting instructions

JVC

JVC AV-32X5SU Mounting instructions

JVC AV-28X5BU System manual

JVC

JVC AV-28X5BU System manual

JVC AV-36P902 User manual

JVC

JVC AV-36P902 User manual

JVC AV-28X37SUE User manual

JVC

JVC AV-28X37SUE User manual

JVC AV-21F3 User manual

JVC

JVC AV-21F3 User manual

JVC AV-21FT5SU Mounting instructions

JVC

JVC AV-21FT5SU Mounting instructions

Popular TV manuals by other brands

IKEA UPPLEVA user manual

IKEA

IKEA UPPLEVA user manual

Toshiba 19A20 Service manual

Toshiba

Toshiba 19A20 Service manual

Sony XBR-100Z9D reference guide

Sony

Sony XBR-100Z9D reference guide

Sony Trinitron KV-HR36M90 Service manual

Sony

Sony Trinitron KV-HR36M90 Service manual

Loewe Table Stand Reference 55 user guide

Loewe

Loewe Table Stand Reference 55 user guide

Panasonic Genus TX-G10 operating instructions

Panasonic

Panasonic Genus TX-G10 operating instructions

Samsung LN26C350D1D Service manual

Samsung

Samsung LN26C350D1D Service manual

BBK LT1516D Service manual

BBK

BBK LT1516D Service manual

Samsung 55S9 B Series Quick setup guide

Samsung

Samsung 55S9 B Series Quick setup guide

Sharp LC-40FI5012E user manual

Sharp

Sharp LC-40FI5012E user manual

Evervue BN185 Operation manual

Evervue

Evervue BN185 Operation manual

North State TV2GO user guide

North State

North State TV2GO user guide

Toshiba CX35F70 owner's manual

Toshiba

Toshiba CX35F70 owner's manual

Magnavox PS1980 owner's manual

Magnavox

Magnavox PS1980 owner's manual

Philips 20HF5335D manual

Philips

Philips 20HF5335D manual

Panasonic QuintrixF TX-29AS1D operating instructions

Panasonic

Panasonic QuintrixF TX-29AS1D operating instructions

Samsung 4 Series Quick setup guide

Samsung

Samsung 4 Series Quick setup guide

Panasonic TX-21FG20R Service manual

Panasonic

Panasonic TX-21FG20R Service manual

manuals.online logo
manuals.online logoBrands
  • About & Mission
  • Contact us
  • Privacy Policy
  • Terms and Conditions

Copyright 2025 Manuals.Online. All Rights Reserved.

©2005 Victor Company of Japan, Limited 0205MKH-VT-VT
50066123
INSTRUCTIONS
ENGLISH
INTEGRATED DIGITAL COLOUR TELEVISION
AV-28E50SK
AV-32E50SK
Digital ideo
roadcasting
V
B
DV
B
Trade Mark of the DVB Digital Video Broadcasting
Project (1991 to 1996) Number: 3590, 3591
D:\TEMP\Rar$DI00.188\JVC-AK49-IDTV-ENG-28&3229W-STEREO-COVER-BSI-C1815S-(AV-28&32E50SK)-50066123.cdr
07 Haziran 2005 Sal 09:48:50
Color profile: Disabled
Composite Default screen
- 1 -
Contents
Remote Control ............................................. 2
TV Buttons and Functions ............................ 3
Features .......................................................... 4
Safety Precautions ........................................ 4
Preparation ..................................................... 6
Before Switc ing on your TV ....................... 6
Power connection ................................................. 6
Connections to the RF input socket ...................... 6
How to connect other devices ............................... 6
Inserting batteries into the remote control ............. 6
Switc ing t e TV ON/OFF ............................. 6
o switch the V on .............................................. 6
o switch the V off............................................... 6
Initial Settings ................................................ 7
-V LINK ............................................................... 7
Basic Operations ........................................... 8
Operating w ile watc ing IDTV.................... 9
Everyday Operation ............................................... 9
Digital eletext ..................................................... 11
DTV Menus .................................................... 11
imers (D V imer Recording) ............................. 11
Configuration ....................................................... 13
Edit PR List ........................................................ 14
Installation .......................................................... 15
Common Interface ............................................... 16
Setting t e TV .............................................. 16
Picture Menu ...................................................... 17
Sound Menu ....................................................... 18
Feature Menu ..................................................... 18
Installation Menu ................................................. 19
Programme Menu ............................................... 20
Ot er Features ............................................ 21
Analogue Teletext ....................................... 22
Perip eral Equipment Connections .......... 23
Rear Panel .................................................... 25
Antenna Connections.................................. 26
Tips................................................................ 27
Specifications .............................................. 28
Important Instruction ................................... 29
JVC-AK49-IDTV-ENG-28&3229W-STEREO-BSI-C1815S-(AV-28&32E50SK)-50066123.p65 24.05.2005, 15:161
- 2 -
Remote Control

/ I = (Stand By) button

TV / VCR / DVD Switch

Number buttons

AV button (E T1, E T2, E T2S, E T3)

Colour buttons

MENU = Menu button

= Cursor Up button

OK button

= Cursor Right button


BACK = Back button

= Volume - /+ buttons


GUIDE button


SUBTITLE button


= Hyper Sound on/off button

ZOOM = Zoom button


VCR / DVD / Teletext control buttons


P buttons


= Cursor Down button


= Teletext button


= Cursor Left button


TV / DTV button

= Information Button / T-V Link in
Program Menu


= Mute button
Functions of VCR / DVD control buttons:
VCR DVD
: Prog. up Chapter up
: Rewind Rewind
: Play Play
: Fast Forward Fast Forward
: Prog. down Chapter down
: Record Top Menu
: Stop Stop
: Pause Pause























JVC-AK49-IDTV-ENG-28&3229W-STEREO-BSI-C1815S-(AV-28&32E50SK)-50066123.p65 24.05.2005, 15:162
- 3 -
TV Buttons and Functions

Power On / Off
Power lamp
!
Remote control sensor

!
"
#
$
"
Menu
#
Programme Up/Down
$
Volume Up/Down
JVC-AK49-IDTV-ENG-28&3229W-STEREO-BSI-C1815S-(AV-28&32E50SK)-50066123.p65 24.05.2005, 15:163
- 4 -
Features
 It is a remote controlled Integrated Digital colour tele-
vision.
 100 programmes from VHF, UHF bands or cable chan-
nels can be preset.
 It can tune cable channels.
 Controlling the V is very easy by its menu driven
system.
 It has two Euroconnector sockets for external devices
(such as computer, video, video games, audio set, etc.)
 NICAM Stereo sound system.
 eletext (Fastext, optext).
 It is possible to connect headphone.
 Direct channel access.
 A.P.S. (Automatic Programming System).
 All programmes can be named.
 Programme swapping between last watched two pro-
grammes.
 Forward or backward automatic tuning.
 Sleep timer.
 Child Lock.
 Automatic sound mute when no transmission.
 When no valid signal is detected, after 5 minutes the
V switches itself automatically to stand-by mode.
 WSS (Wide Screen Signaling).
 N SC Playback.
 S-VHS (via SCAR )
 Front AV in is available.
 Real Flat
Safety Precautions
1. Power Source
he receiver should be operated only from a 220-240V
AC, 50 Hz outlet. Ensure you select the correct voltage
setting for your convenience.
2. Power Cord
he power supply cord should be placed so that it is
not likely to be walked on or pinched by items placed
upon them or against it. Pay particular attention to cord
where it enters the plug, power outlet, and the point
where it exits from the receiver.
3. Moisture and Water
Do not use this equipment in a humid and damp place
(avoid the bathroom, the sink in the kitchen, and near
the washing machine). Do not expose this equipment
to rain or water, as this may be dangerous and do not
place objects filled with liquids on top. Avoid from drip-
ping or splashing.
4. Cleaning
Before cleaning, unplug the V from the main supply,
outlet. Do not use liquid or aerosol cleaners. Use soft
and dry cloth.
5. Ventilation
he slots and openings on the receiver are intended for
ventilation and to ensure reliable operation. o prevent
overheating, these openings must not be blocked or
covered in anyway.
6. Lightning
In case of storm and lightning or when going on holi-
day, disconnect the power cord from the wall outlet.
7. eplacement Part
When replacement parts are required, be sure the ser-
vice technician has used replacement parts which are
specified by the manufacturer or have the same specifi-
cations as the originals. Unauthorised substitutions may
result in fire, electrical shock, or other hazards.
JVC-AK49-IDTV-ENG-28&3229W-STEREO-BSI-C1815S-(AV-28&32E50SK)-50066123.p65 24.05.2005, 15:164
- 5 -
he lightning flash with arrowhead symbol, within an equilateral triangle, is intended to
alert the user to the presence of uninsulated "dangerous voltage" within the product's
enclosure that may be of sufficient magnitude to constitute a risk of electric shock of
persons.
he exclamation point within an equilateral triangle is intended to alert the user to the
presence of important operating and maintenance (servicing) instructions in the literature
accompanying the appliance.
RISK OF ELECTRIC SHOCK
CAUTION
8. Servicing
Please refer all servicing to qualified personnel. Do not
remove cover as this may result in electric shock.
9. X-rays
he X-rays generated in this television are shielded suf-
ficiently.
10. Naked Flame Sources
Do not place naked flame sources on the apparatus.
Warning!
Any intervention contrary to regulations, in particular,
any modification of high voltage or a replacement of the
picture tube may lead to an increased concentration of
x-rays. Any television modified in this way no longer
complies with license and must not be operated.
Instructions for waste disposal:
 Packaging and packaging aids are recyclable and
should principally be recycled. Packaging materials,
such as foil bag, must be kept away from children.
 Batteries, including those which are heavy metal-free,
should not be disposed of with household waste.
Please dispose of used batteries in an environmen-
tally sound manner. Find out about the legal regula-
tions which apply in your area.
DO NOT EAVE YOUR TV AT
STAND-BY OR OPERATING WHEN
YOU EAVE YOUR HOUSE
Cleaning The Screen
Your V is fitted with a Real Flat" picture tube. he
surface of the screen is covered with a foil. Under no
circumstances may this be damaged.
To clean
Clean the laminated screen with a soft cotton cloth.
Only non-alkaline, thinned soapsuds on a basis of
water or alcohol be used to moisten the cloth. Rub
the surface gently with the cloth until the surface is
completely dry.
Under no circumstances...
may the screen be wiped with conventional glass
cleaning fluid.
may the screen be brought into contact with abra-
sive materials.
may soiling be removed by polishing or scouring.
To clean off stic y substances, the cloth can be
moistened with acetone.
Under no circumstances should acetone be
used to clean the TV cabinet.
JVC-AK49-IDTV-ENG-28&3229W-STEREO-BSI-C1815S-(AV-28&32E50SK)-50066123.p65 24.05.2005, 15:165
- 6 -
Preparation
For ventilation, leave a space of at least 10 cm free all
around the set. o prevent any fault and unsafe situa-
tions, please do not place any objects on top of the set.
Use this apparatus in moderate climate.
Before Switching on your TV
Power connection
IMPORTANT: he V set is designed to operate on 220-
240V AC, 50 Hz.
 After unpacking, allow the V set to reach the ambi-
ent room temperature before you connect the set to
the mains.
Connections to the F input socket
 Connect the aerial or cable V plug to the RF input
socket located at the back of the V and connect the
cable plug coming out from the V out socket located
at the devices (VCR, DVB etc.) to this socket as well.
9+)8+)

:
795($53$1(/
&$%/(79
How to connect other devices
IMPORTANT: Switch off the V before connecting any
external device.
Sockets for external connections are at the back and
right side of the V. For connection of other devices via
Euroconnector refer to the manuals of the related de-
vices.
Inserting batteries into the remote control
 Remove the battery cover located on the back of the
remote control by gently pulling downwards from the
indicated part.
 Insert two AA (R06) or equivalent type batteries in-
side. Place the batteries in the right directions as seen
below.
 Replace the battery cover.
NOTE: Remove batteries from remote control when it is
not to be used for a long period. Otherwise it can be
damaged due to any leakage of batteries.
Switching the TV ON/OFF
To switch the TV on
Your V will switch on in two steps:
1- Press the power button located on the front of the
V. hen the V switches itself to standby mode and
the power lamp becomes RED located on the lower
part of the V.
2- o switch on the V from stand-by mode either:
Press the 
,
 button on the remote control,
or,
Press a digit button on the remote control so that a
programme number is selected,
or,
Press Programme Up or Down buttons on the right side
of the V or on the remote control, so that last switched
off programme is selected.
he V will switch on and the power lamp will turn off.
To switch the TV off
 Press the stand-by button on the remote control, so
the V will switch to stand-by mode and the power
lamp will become RED,
or,
 Press the power button located on the front of the V,
so the V will switch off and the power lamp will turn
off.
JVC-AK49-IDTV-ENG-28&3229W-STEREO-BSI-C1815S-(AV-28&32E50SK)-50066123.p65 24.05.2005, 15:166
- 7 -
Initial Settings
When the V is first turned on, it goes into the initial
settings mode. Follow the instructions on the screen
display to make the initial settings.
Note: If the TV does not go into the initial settings mode this is because your
TV has already been turned on for the first time. (Perform the factory settings
with INSTALLATI N (see page 15) in the DTV menu and AUT ST RE
(Analogue) (see page 20) in the PR GRAMME menu.)
Because this is the first time that ID V has been used,
there are no channels stored in the memory and below
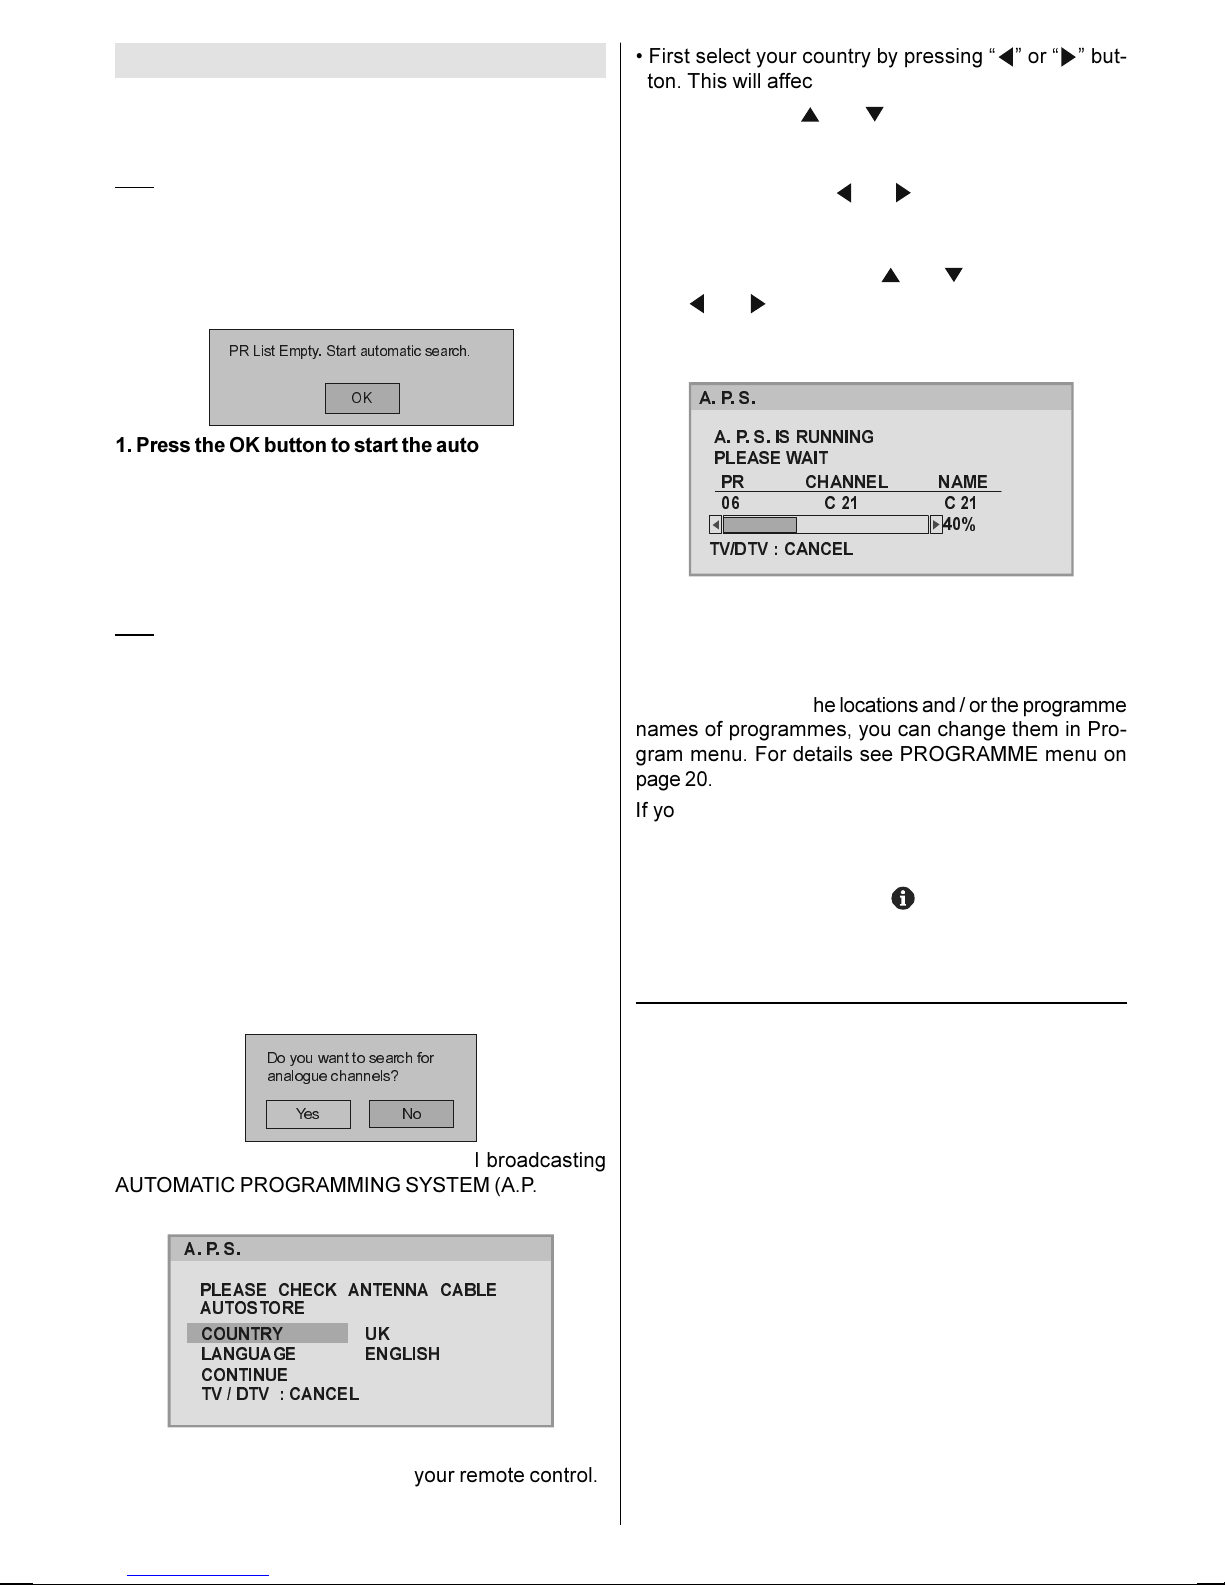
information will be displayed on the screen.
35/LVW(PSW\6WDUWDXWRPDWLFVHDUFK

2.
1. Press the OK button to start the automatic search.
he ID V will automatically tune to the UHF transmis-
sion channels 21 to 68 looking for digital terrestrial V
broadcasts and displaying the names of channels found.
his process will take about five minutes. o cancel
searching, you can press MENU button at any time
during the process.
HINT: Depending on the reception conditions in your particular area, you
may find that the list of channels found includes one or more repeated
names. This is because the receiver may detect and store some channels,
including those it cannot receive clearly, from adjacent areas alongside the
strong channels from a transmitter nearby. This is not a problem and the
weaker channels can be deleted from the receiver later, as described in -
Edit PR List on page 14.
2. When the automatic search has finished, the
EDIT PR LIST menu appears.
 If you want to, you can now edit the programme num-
bers (PR) using the EDI PR LIS function. For details,
see Edit PR List on page 14.
 If you do not want to edit programme numbers (PR),
go to the next step.
3. Press the MENU button.
he EDI PR LIS menu disappears and the following
message appears.
'R\RXZDQWWRVHDUFKIRU
DQDORJXHFKDQQHOV"
<HV 1R
If you select Yes, Analogue terrestrial broadcasting
AU OMA IC PROGRAMMING SYS EM (A.P.S.) win-
dow is displayed.
3/($6( &+(&. $17(11$ &$%/(
$8726725(
&28175<
/$1*8$*(
&217,18(
79'79&$1&(/
8.
(1*/,6+
$36
 If you do not want to start A.P.S., you can cancel it by
pressing the TV/DTV button on your remote control.
 First select your country by pressing   or   but-
ton. his will affect the sort process in APS.
 By pressing the   or   buttons, come to the Lan-
guage item and select the language in which the menus
of the V will appear. You can see the available lan-
guages by pressing   or   button. As soon as you
change the language, the menu items will be displayed
in the selected language.
 o select Continue use   or   button. By press-
ing   or   button start the A.P.S.
 When you start A.P.S. the following window will ap-
pear on the screen.
35&+$11(/1$0(
&&

$36,65811,1*
3/($6(:$,7

79'79&$1&(/
$36
After APS is finalized, a programme list will appear on
the screen. In the programme list you will see the
programme numbers and names assigned to the
programmes.
If you do not accept the locations and / or the programme
names of programmes, you can change them in Pro-
gram menu. For details see PROGRAMME menu on
page 20.
If you do not have a -V LINK compatible VCR, press
MENU button to exit the menu.
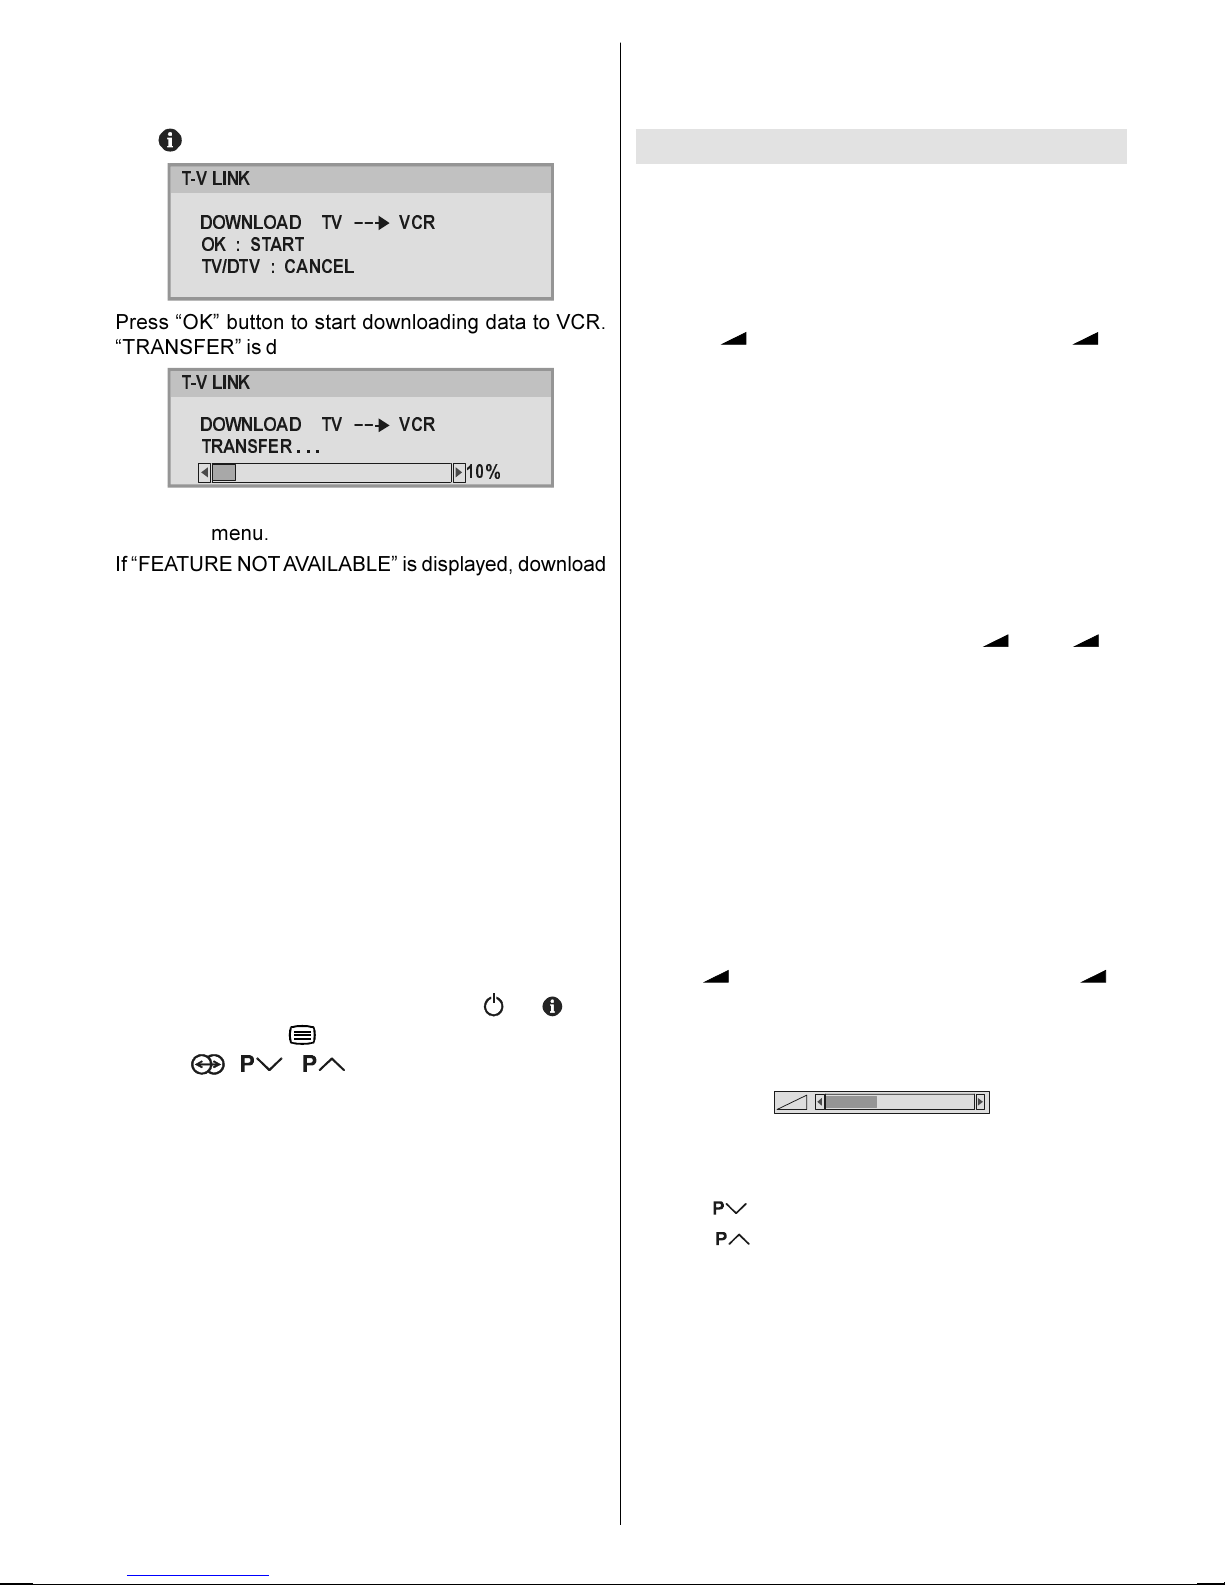
If you have a -V LINK compatible VCR connected to
the EX .2 terminal, press   button to display -V
LINK menu. hen follow the operating procedure Down-
loading data to VCR in the following -V LINK section.
T-V LINK
When a -V LINK compatible VCR is connected to the
EX .2 terminal on the V, it is easier to set up the VCR
and to view videos. -V LINK uses the following fea-
tures:
To use T-V LINK functions
A  -V LINK compatible VCR means a JVC video cas-
sette recorder with the -V LINK logo, or with one of the
following logos. For details see your VCR instruction
manual.
Q-LINK (A trademark of Panasonic Corporation)
Data Logic (A trademark of Metz Corporation)
Easy Lin  (A trademark of Philips Corporation)
Megalogic (A trademark of Grundig Corporation)
SMARTLINK (A trademark of Sony Corporation)
Downloading data to VCR:
he VCR will automatically download the registered data
on the V channels from the V. his means you do not
JVC-AK49-IDTV-ENG-28&3229W-STEREO-BSI-C1815S-(AV-28&32E50SK)-50066123.p65 24.05.2005, 15:167
- 8 -
need to set up the programme channels on your VCR
manually.
he  -V LINK menu will be displayed when you press
the   button while PROGRAM menu is displayed.
'2:1/2$' 79 9&5
2.67$57
79'79&$1&(/
79/,1.
Press OK button to start downloading data to VCR.
 RANSFER is displayed in the menu.
'2:1/2$' 79 9&5
75$16)(5
79/,1.

If you do not want to continue press the TV/DTV button
to exit the menu.
If FEA URE NO AVAILABLE is displayed, download
was not performed correctly. Before trying to download
again, check that:
 he VCR power is turned on.
 he VCR is -V LINK compatible.
 he VCR is connected to the EX .2.
 he scart cable is fully wired.
Direct REC:
You can easily record to VCR the images that you are
watching on the V. For details, read the manual for
your VCR. Use your VCR controls. VCR IS RECORD-
ING is diplayed. You can not carry out Direct REC us-
ing your Vs control.
When the VCR is not ready (For example when there is
no tape inserted), NO RECORDING is displayed.
When you press the following buttons (
,
, , AV,
MENU, V/D V, , BACK, SUB I LE, GUIDE,
ZOOM, , / , number buttons) during re-
cording, a message appears asking if you want to stop
recording or not. Press OK button to stop recording or
BLUE button to continue recording.
Do not turn the TV off in the following cases:
 When recording images from an external device con-
nected to V (For example camcorder).
 When recording a V channel after it has been un-
scrambled on a decoder.
 When recording a V channel by using the Vs out-
put because the VCRs own tuner can not properly
receive that channel.
 When recording Digital terrestrial broadcasting (DVB-
).
TV autopower on/VCR image view:
When the VCR starts playing, the V automatically turns
on and images from EX 2 appear on the screen.
his function does not happen if your Vs main power
is turned off. Set your Vs main power to on (StandBy
Mode).
Basic Operations
You can operate your TV using both the remote con
trol and onset buttons.
Operation with the buttons on the TV
Volume Setting
 Press  - button to decrease volume or  +
button to increase volume, so a volume level scale
(slider) will be displayed at the middle of the bottom
on the screen.
Programme Selection
 Press P/CH + button to select the next programme
or P/CH - button to select the previous programme.
Entering Main Menu
 Press MENU button to enter Main menu. In the Main
menu select sub-menu using P/CH - or P/CH + but-
ton and enter the sub-menu using  - or  +
button. o learn the usage of the menus, refer to the
Menu System sections.
Operation with emote Control
he remote control of your V is designed to control all
the functions of the model you selected. he functions
will be described in accordance with the menu system
of your V.
Functions of the menu system are described in follow-
ing sections.
Volume Setting
Press  + button to increase volume. Press  -
button to decrease volume. A volume level scale (slider)
will be displayed in the middle at the bottom of the
screen.
Programme Selection (Previous or next
programme)
 Press   button to select the previous programme.
 Press   button to select the next programme.
Programme Selection (direct access):
Press digit buttons on the remote control to select
programmes between 0 and 9. V will switch to the
selected programme. o select programmes between
10 - 99, press the digit buttons consecutively which
programme you want to select (eg. for programme 27,
first press 2 and then 7). When it is late to press sec-
ond digit button only the first digit programme will be
displayed. he limit of the delay time is 3 seconds.
JVC-AK49-IDTV-ENG-28&3229W-STEREO-BSI-C1815S-(AV-28&32E50SK)-50066123.p65 24.05.2005, 15:168
- 9 -
Example: PR6 press 6, PR12 press 1 and 2.
Press directly the programme number to reselect single
digit programmes.
Hint: The channel list numbers are assigned by the broadcasters. Because
not all channels are broadcast free-to-air and stored by the receiver, the
channel list numbers do not run continuously. The fifteenth channel in the
list, for example, may not be channel number 15 but channel number 17.
Hint: If you enter a number which does not correspond to a stored channel,
the next valid channel number is selected instead. If you enter a number
greater than the highest numbered channel in the channel list, the IDTV will
select the last channel in the list.
Operating while watching IDTV
Pressing the  V/D V button at any time while watch-
ing television programmes will switch the V set be-
tween displaying the digital terrestrial television broad-
casting and its normal analogue broadcasting.
It is also used to switch to the last watched mode ( V
or DIGI AL V) from the EX mode. For example; if a
DVD player is connected with a SCAR cable and pow-
ered on, then the ID V will automatically switch to EX
mode. he ID V will switch to the last watched mode
( V or DIGI AL V) if DVD player is switched off or  V/
D V button is pressed.
EVE YDAY OPE ATION
While using the ID V to the full, there are great many
buttons to use in different situations. Many of the menu
screens displayed by the ID V have reminders as to
which button do what, at the base of the screen. In ad-
dition, many screens have further help available which
is displayed when the button is pressed, as
prompted at the bottom right of the screen.
OVER AIR DOWNLOAD
Over Air Download (OAD): o ensure that your ID V al-
ways has the most up-to-date information. Please en-
sure that after use it is set to its standby mode. At 3AM
each day, the ID V automatically searches for any new
information which may be broadcast and will download
this to your ID V automatically. his operation will nor-
mally take approximately 30 seconds.
If you want to do this, you need to set Automatic Down-
load to Enabled in Receiver Upgrade setting. For de-
tails see page 13.
INFORMATION BANNER
Whenever you change channel, using the /
buttons or the number buttons, an information banner
is displayed at the bottom of the screen. his will re-
main on the screen for approximately three seconds.
he information banner can also be displayed at any
time while watching V by pressing the button on
the remote control. Pressing the button again re-
moves the banner.
Hint: Not all channels broadcast the programme data. If the
name and times of the programme is not available then No
Information is displayed in the information banner.
he information banner gives a number of facts on the
channel selected and the programmes on it. he name
of the channel is displayed, along with its channel list
number and an indication of the strength of the signal
received on this tuning channel.
he name and the start and finish time of the programme
currently showing on the selected channel are given,
and the current time.
Icons are also displayed in the information banner and
if this channel is a favourite channel.
favorite channel icon
If the selected channel is locked, you must enter the
correct four digit code to view the channel.
ELECTRONIC PROGRAMME GUIDE (EPG)
Another way of selecting a channel is with the elec-
tronic programme guide, or EPG. Like the Channel List,
the EPG screen displays a list of the stored channels
along with information on what programmes are being
broadcast.
Using the Electronic Programme Guide
EPG can display 7 days programme guide, but in some
areas only current and next programme guide is dis-
played.
By using EPG, you can select the channel and set the
reminder for the programme which you do not want to
miss.
o display the EPG screen, press the GUIDE button
while watching Digital terrestrial broadcasting.
You can exit the EPG screen by pressing the GUIDE
button again or the MENU button.
MN O P
Q
M
Current date and time
N
Channel listings
O
Selected date and time
JVC-AK49-IDTV-ENG-28&3229W-STEREO-BSI-C1815S-(AV-28&32E50SK)-50066123.p65 24.05.2005, 15:169