JVC HR-J647MS User manual

HR-J747MS
HR-J647MS
VIDEO CASSETTE RECORDER
INSTRUCTIONS
LPT0002-0J4A
PAL NTSC
q
POWER
REW FF
TV PROG /
JOG
SHUTTLE
VIDEO (MONO)L – AUDIO – R
AUTO SP/LP TIMER
DISPLAY SIMUL COLOUR
SYSTEM
AUDIO
MONITOR
SP/ LP/EP
+8
4
0
6
10
–20dB
NORM
LR
M
SP
LP
EP
REVIEW
WIDE
QUALITY

REC
1
4¢
7
STOP
3
PLAY
8
PAUSE
FF
¡
TV
123
45
/ADD TIME
6
7
8
/DAILY
0
/AUX
9
/
WEEKLY
TV/VCR
CANCEL
/C.RESET
PROG CHECK
4 TIMER
TV PROG
DATESTOPSTART
PROG
/MENU
OK
C.MEMORY
TV VOL
TV VOL
VCR
2
1
3
EXPRESS PROGRAMMING
PUSH JOG
REW
EN
CONTENTS
ENGLISH
SAFETY FIRST 2
Safety Precautions ...................... 2
INSTALLING YOUR NEW RECORDER 3
Basic Connections ..................... 3
INITIAL SETTINGS 4
Auto Set Up ............................... 4
Video Channel Set ..................... 5
Select Language ......................... 6
Select Television System............. 7
Clock Set ................................... 8
On-Screen Displays ................... 9
PLAYBACK 10
Basic Playback ......................... 10
Playback Features .....................11
RECORDING 15
Basic Recording ....................... 15
Recording Features .................. 16
B.E.S.T. Picture System ............. 18
TIMER RECORDING 20
Timer Programming ................. 20
EDITING 24
Edit To Or From Another Video
Recorder .................................. 24
Edit From A Camcorder ............ 25
INFORMATION ON MULTI-SYSTEM
COMPATIBILITY 26
TUNER SET 28
REMOTE CONTROL 32
Multi-Brand Remote Control .... 32
TROUBLESHOOTING 33
QUESTIONS AND ANSWERS 36
INDEX 37
SPECIFICATIONS 40

2EN
SAFETY FIRST
IMPORTANT
nPlease read the various precautions on this page before
installing or operating the recorder.
nIt should be noted that it may be unlawful to re-record
pre-recorded tapes, records, or discs without the consent
of the owner of copyright in the sound or video record-
ing, broadcast or cable programme and in any literary,
dramatic, musical, or artistic work embodied therein.
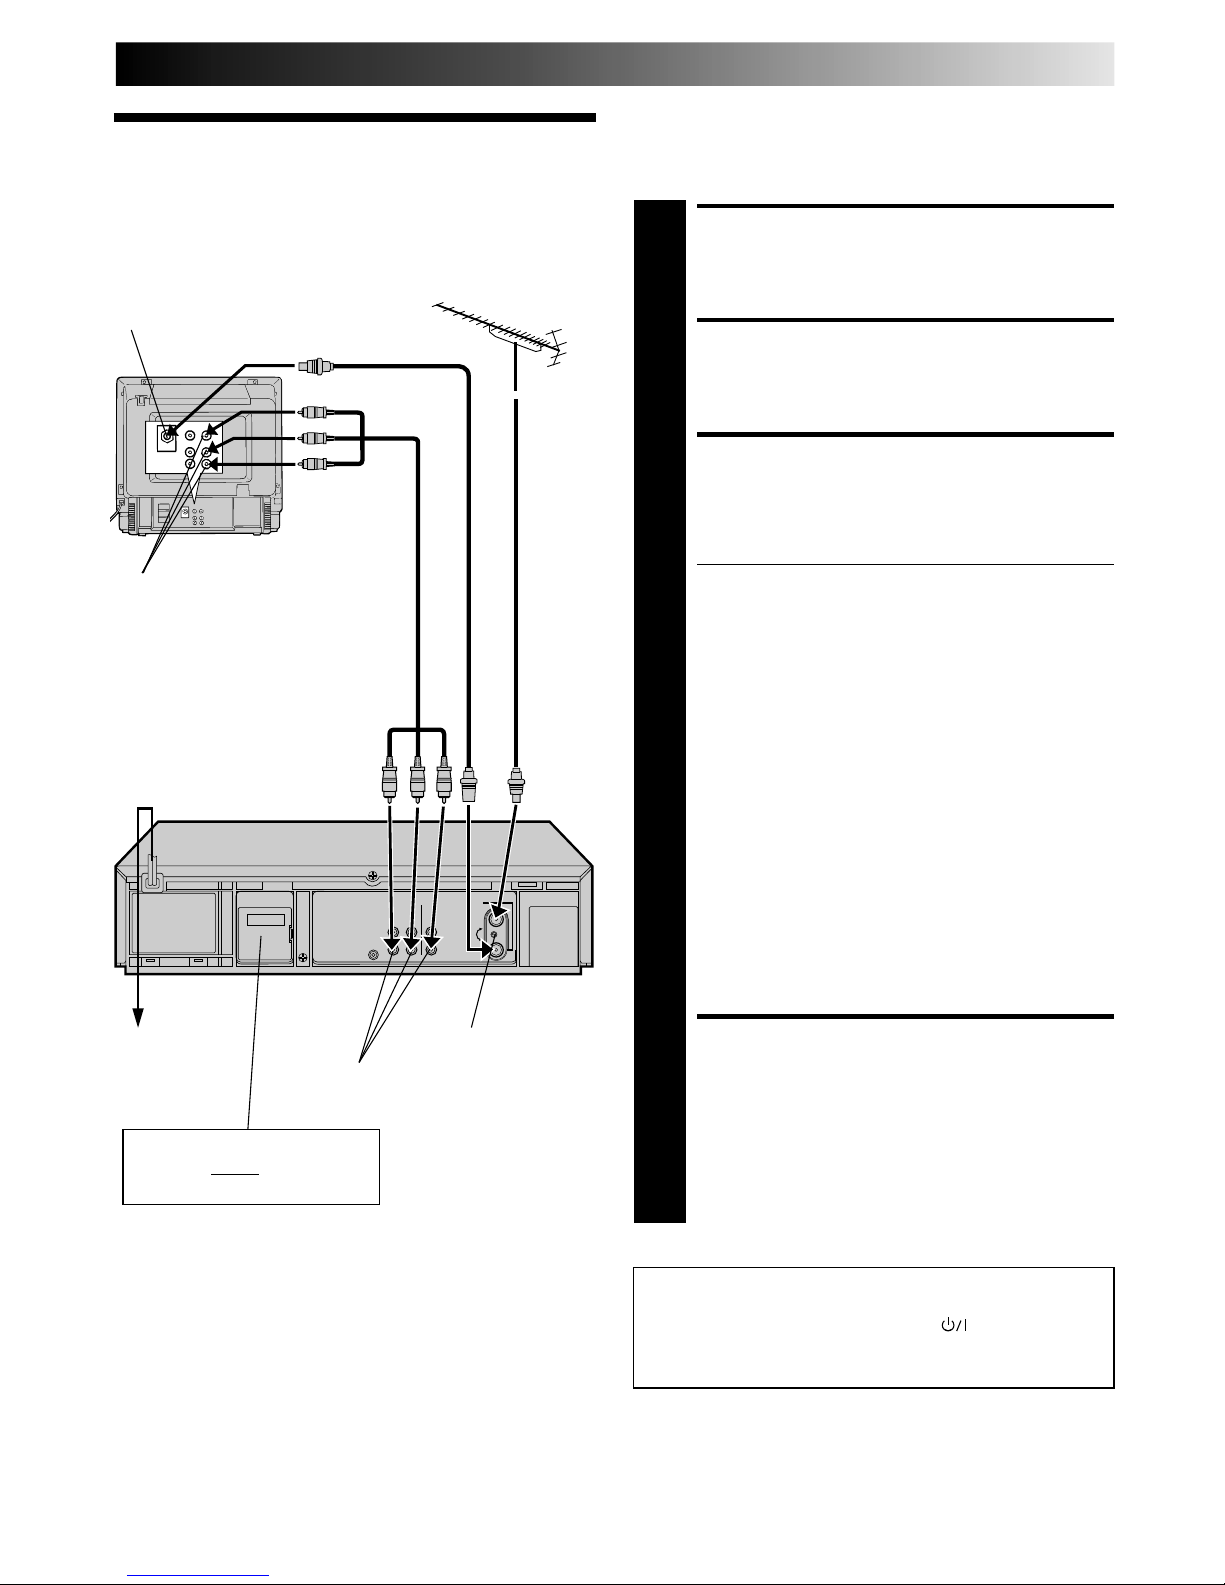
The rating plate and the safety caution are on the rear of the unit.
WARNING: DANGEROUS VOLTAGE INSIDE
WARNING: TO PREVENT FIRE OR SHOCK HAZARD, DO NOT EXPOSE THIS UNIT TO RAIN OR
MOISTURE.
Safety Precautions
CAUTION
nWhen you are not using the recorder for a long period of
time, it is recommended that you disconnect the power
cord from the mains outlet.
nDangerous voltage inside. Refer internal servicing to
qualified service personnel. To prevent electric shock or
fire hazard, remove the power cord from the mains
outlet prior to connecting or disconnecting any signal
lead or aerial.
nUse the conversion plug (not provided in certain areas)
depending on the type of your AC wall outlet.
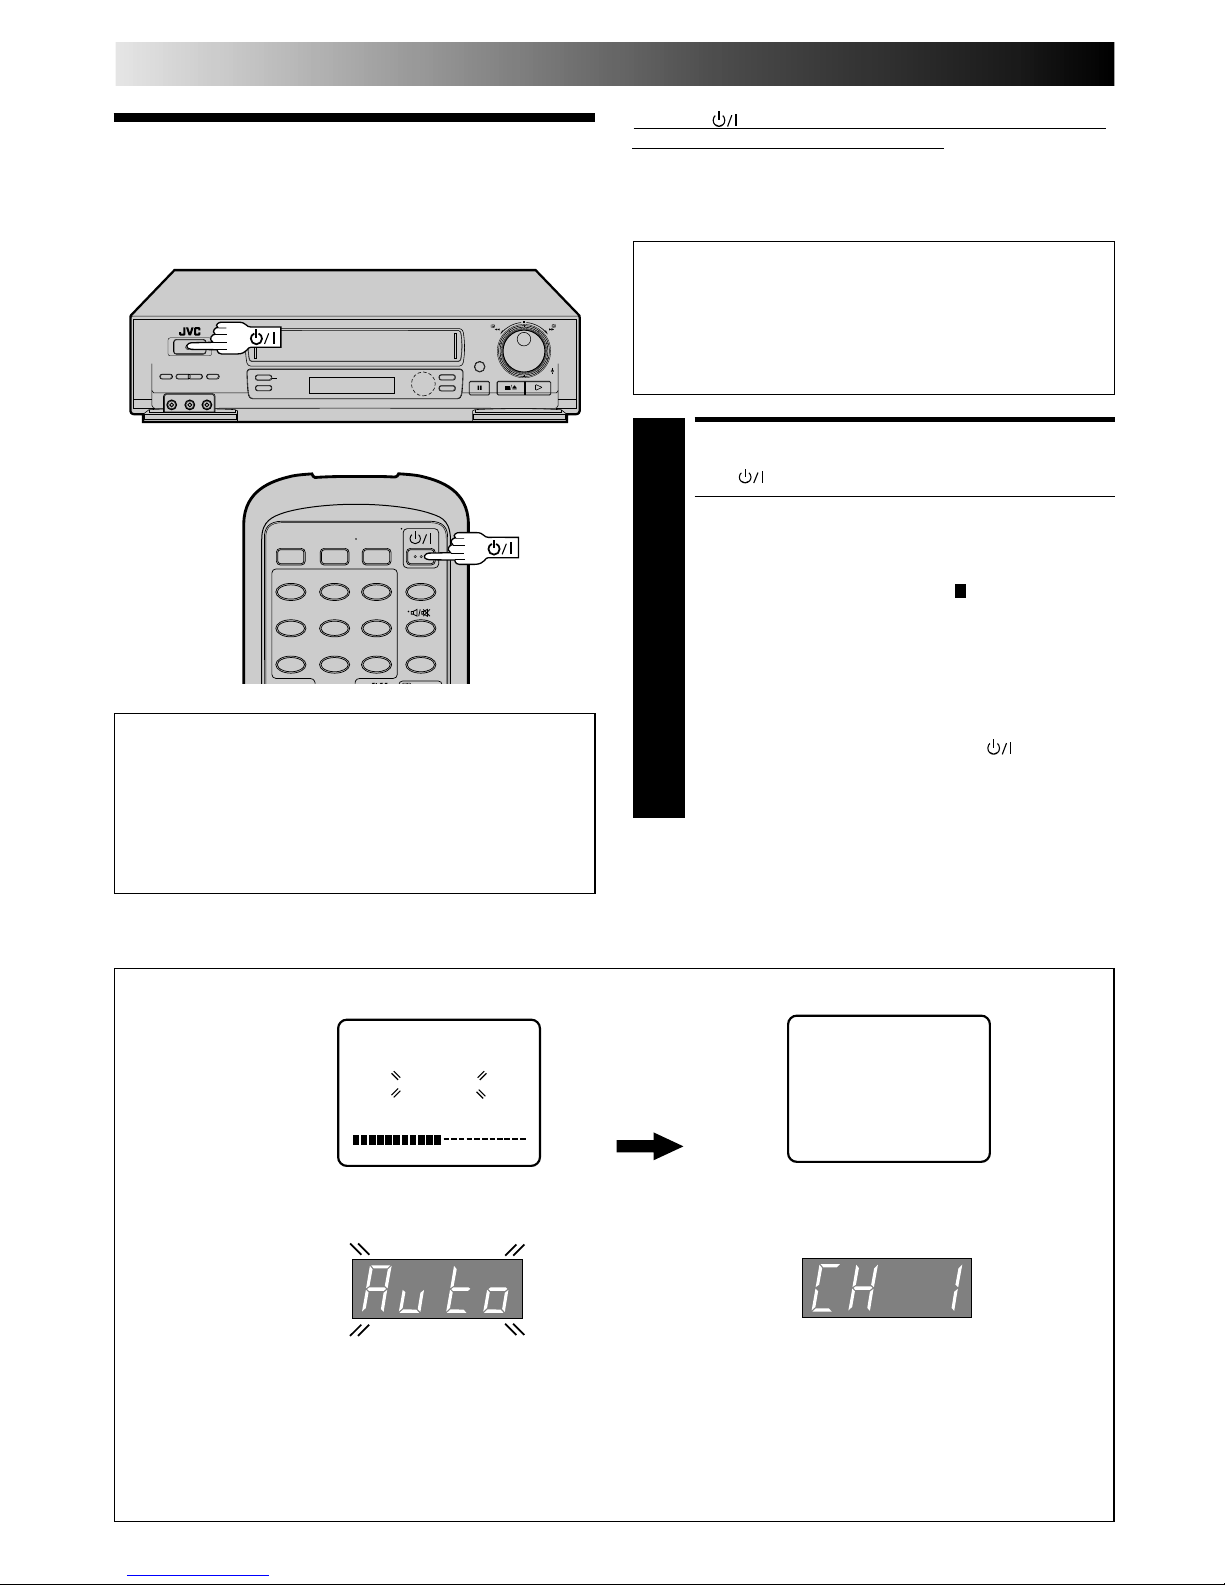
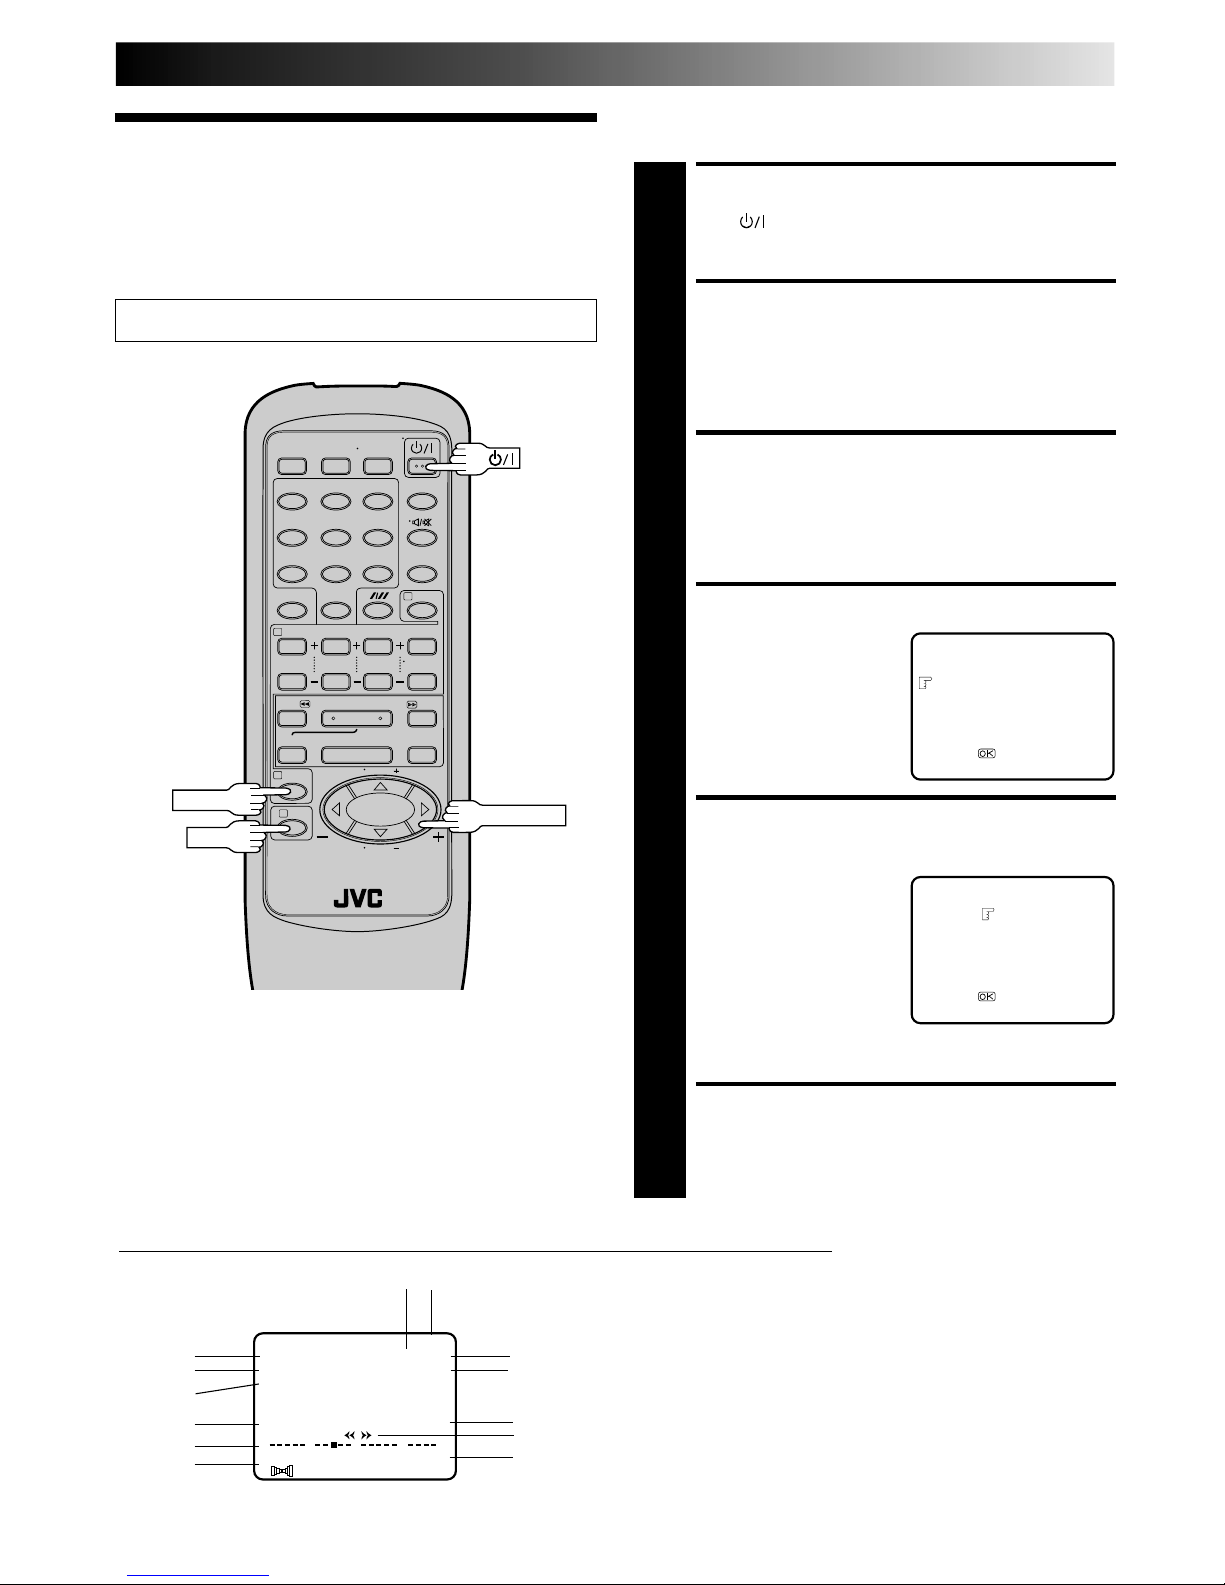
The POWER button does not completely shut off
mains power from the unit, but switches operating current
on and off. " " shows electrical power standby and " "
shows ON.
PAL NTSC
nOnly cassettes marked "VHS" can be used with this
videorecorder.
nHQ VHS is compatible with existing VHS equipment.
Failure to heed the following precautions may result in
damage to the recorder, remote control or video
cassette.
1. DO NOT place the recorder . . .
... in an environment prone to extreme temperatures or
humidity.
... in direct sunlight.
... in a dusty environment.
... in an environment where strong magnetic fields are
generated.
... on a surface that is unstable or subject to vibration.
2. DO NOT block the recorder’s ventilation openings.
3. DO NOT place heavy objects on the recorder or remote
control.
4. DO NOT place anything which might spill on top of the
recorder or remote control.
5. AVOID violent shocks to the recorder during transport.
MOISTURE CONDENSATION
Moisture in the air will condense on the recorder when you
move it from a cold place to a warm place, or under extremely
humid conditions—just as water droplets form in the surface of
a glass filled with cold liquid. Moisture condensation on the
head drum will cause damage to the tape. In conditions where
condensation may occur, keep the recorder turned on for a few
hours to let the moisture dry.
ABOUT HEAD CLEANING
Accumulation of dirt and other particles on the video heads
may cause the playback picture to become blurred or inter-
rupted. Be sure to contact your nearest JVC dealer if such
troubles occur.
Video tapes recorded with this video recorder in the LP (Long
Play) or EP (Extended Play) mode cannot be played back on a
single-speed video recorder.
ATTENTION
1.This recorder can also receive SECAM colour television
signals for recording and playback.
2.Recordings made of SECAM television signals produce
monochrome pictures if played back on another video
recorder of SECAM standard, or do not produce normal
colour pictures if played back on another video recorder
of PAL standard.
3.SECAM prerecorded cassettes or recordings made with a
SECAM video recorder produce monochrome pictures
when played back with this recorder.
POWER SYSTEM
This set operates on voltage of AC110 – 240 V`(Rating),
AC90 – 260 V`(Operating), 50/60 Hz with automatic
switching.
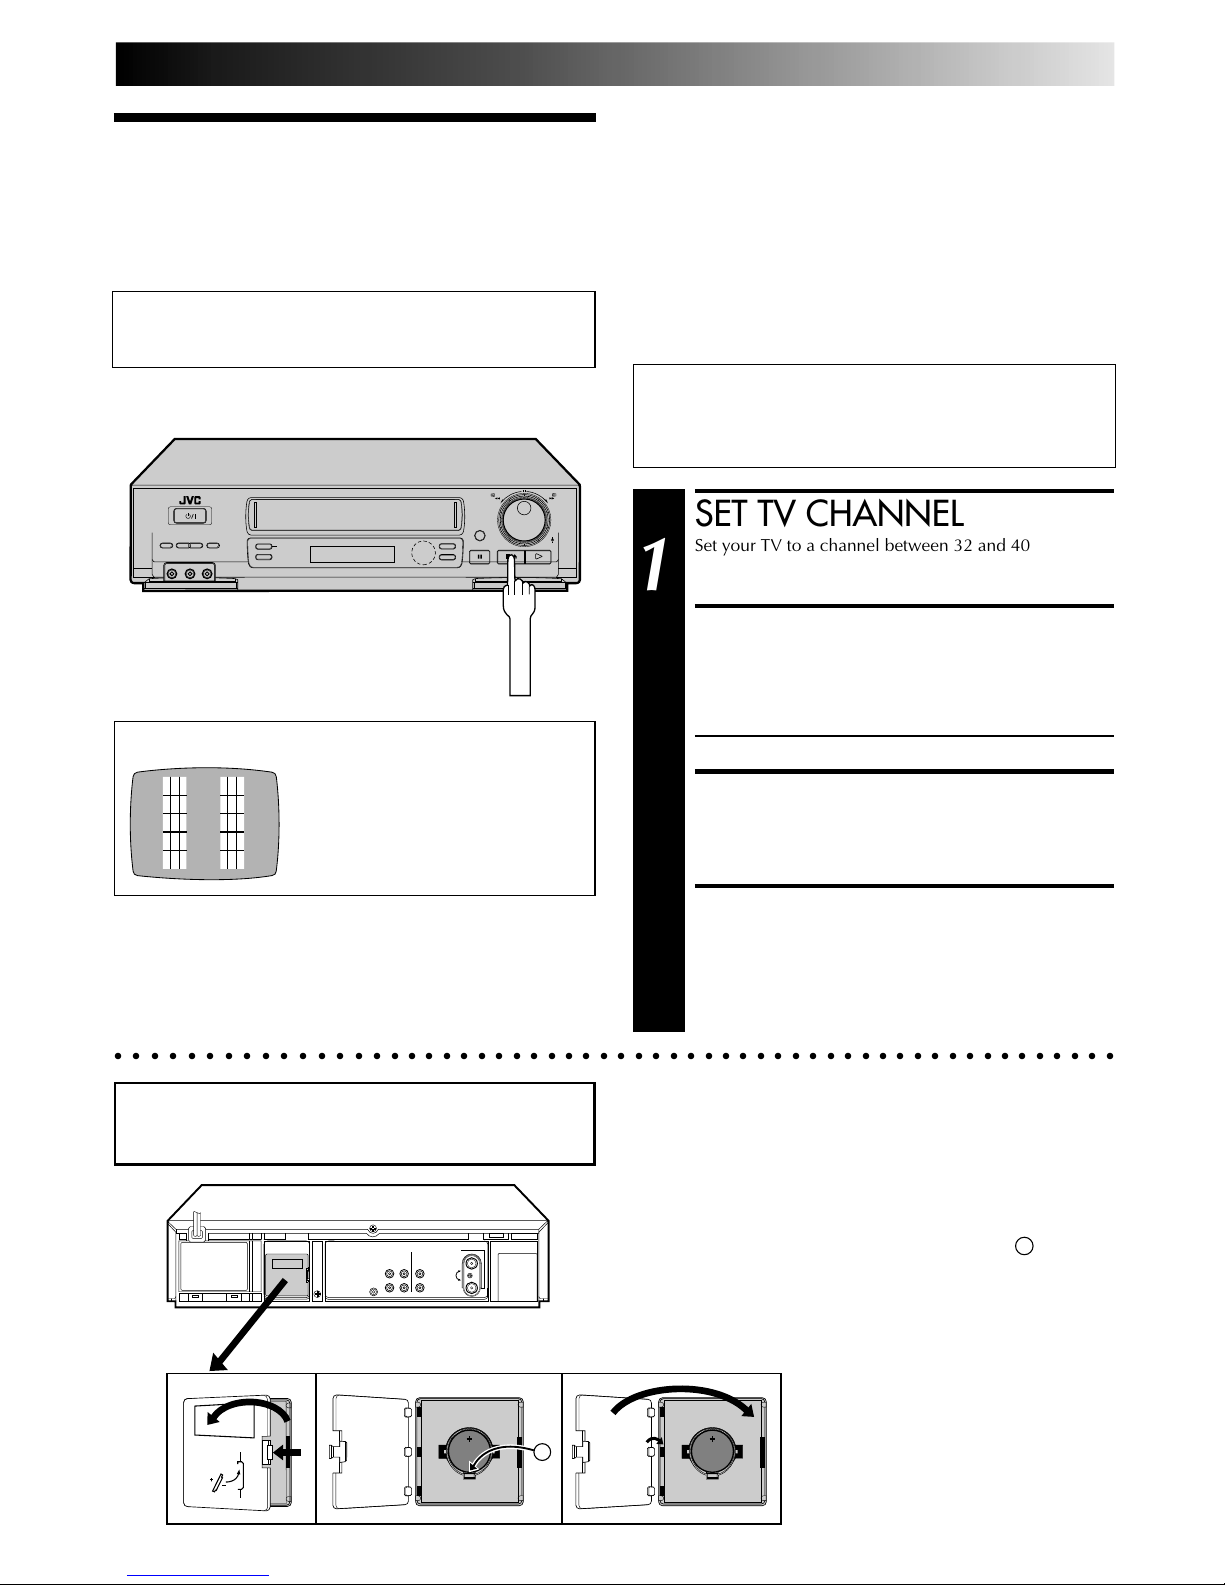
Warning on lithium battery
The battery used in this device may present a fire or
chemical burn hazard if mistreated. Do not recharge,
disassemble, heat above 100°C or incinerate.
Replace battery with Panasonic (Matsushita Electric),
Sanyo, Sony or Maxell CR2025; use of another battery may
present a risk of fire or explosion.
nDispose of used battery promptly.
nKeep away from children.
nDo not disassemble and do not dispose of in fire.

EN 3
Basic
Connections CHECK CONTENTS
1
Make sure the package contains all of the accessories
listed in “Specifications” (Zpg. 40).
SITUATE RECORDER
2
Place the recorder on a stable, horizontal surface.
CONNECT RECORDER TO
TV
3
The connection method you use depends on the type
of TV you have.
RF CONNECTION
●
To Connect To A TV With NO AV Input Terminals . . .
a– Disconnect the TV aerial cable from the TV.
b– Connect the TV aerial cable to the ANT. IN jack
on the rear panel of the recorder.
c– Connect the provided RF cable between the RF
OUT jack on the rear panel of the recorder and
the TV’s aerial terminal.
Before operating the recorder, make sure the
TV’s channel is set to the VIDEO channel
(Zpg. 5).
AV CONNECTION
●
To Connect To A TV With AV Input Terminals . . .
a– Connect the aerial, recorder and TV as per “RF
CONNECTION”.
b– Connect an optional AV cable between the
AUDIO OUT and VIDEO OUT connectors on the
rear panel of the recorder and the TV’s AV-IN
terminals .
Before operating the recorder, make sure the TV
is set to the VIDEO (or AV) mode.
CONNECT RECORDER TO
MAINS
4
Plug the end of the mains power cord into a mains
outlet.
NOTE:
Use the conversion plug (not provided in certain areas)
depending on the type of your AC wall outlet.
It's essential that your video recorder be properly connected.
Follow these steps carefully. THESE STEPS MUST BE COM-
PLETED BEFORE ANY VIDEO OPERATION CAN BE PER-
FORMED.
INSTALLING YOUR NEW RECORDER
Aerial terminal
AV-IN terminals
After you plug the mains power cord into a mains outlet, the
Auto Set Up display appears on the TV screen and/or on the
recorder's front display panel when the button on the
recorder/remote control is pressed for the first time to power
on the recorder Zpg. 4.
Mains outlet
AUDIO OUT/
VIDEO OUT
Connect the power plug to an
AC outlet before installing the
lithium battery. Zpg. 5
AV Cable
(not provided)
TV
Aerial
Cable
RF Cable
(provided)
Back of TV
Mains Power
Cord
Rear View
RF output channel
adjustment screw

4EN
q
INITIAL SETTINGS
When the button on the recorder/remote control is pressed
for the first time to power on the recorder after you plug the
mains power cord into a mains outlet, the Auto Set Up function
sets the tuner channels automatically.
You can refer to the front display panel and/or the on-screen
display to perform this procedure.
Before starting, make sure of the following:
●The TV aerial cable should be connected to the recorder.
●The recorder's mains power cord should be connected to
a mains outlet. Zpg. 3
●If you want to use the on-screen display, the TV should
be set to its AV mode (with AV connection Zpg. 3) or
UHF channel 36 (with RF connection Zpg. 3).
Auto Set Up
Auto Channel Set
START AUTO SET UP
1
Press .
●The Auto Set Up function scans all the channels that
are receivable by your recorder. It then automatically
assigns each receivable channels to the TV PROG
buttons. It skips non-receivable channels.
●As Auto Set Up progresses, the " " mark on the
screen moves from left to right.
●After you perform Auto Set Up, if the tuner channels
have not been set properly or if "CH – –" is displayed
on the front display panel, make sure that the aerial
cable is connected to the recorder properly and turn
off the recorder power once, and turn the power back
on to try Auto Set Up again.
●If there is a power cut, or if you press or MENU
while Auto Set Up is in progress, Auto Set Up will be
interrupted; be sure to turn off the recorder power once
and try again.
123
456
7
8
0
9
4
ATTENTION
Once you have performed Auto Set Up, even if the
recorder's memory backup has expired, all the stored
stations remain in the recorder's memory and the recorder
will not perform Auto Set Up again.
If you have moved to a different area or a new station starts
broadcasting in your area, perform tuner setting. Zpg. 28
On-Screen Display
AUTO CH SET
PLEASE WAIT
START FINISH
TV Screen
When Auto Set Up is completed, the lowest position
number will appear on the front display panel.
During Auto Set Up
"PLEASE WAIT" blinks on the screen and "Auto"
blinks on the front display panel.
Front Display Panel
NOTES:
●
If you have connected your TV to the recorder with RF connection and the on-screen display appearing on UHF channel 36
looks distorted, refer to the front display panel.
●
If you want to set the tuner manually such as to add or skip channels, to swap channel positions, or to fine-tune channels,
Z
pg. 29.
●
If no sound accompanies the picture on some channels that have been stored by Auto Set Up, the TV system setting for those
channels may be incorrect. Select the appropriate TV system for those channels.
Z
"TV System Selection – When you see the
picture but hear no audio" on page 31.
DO NOT press any button on the recorder or remote control while Auto Set Up is in progress.

EN 5
Video
Channel Set
Video Channel (RF Output Channel) is the channel on
which your TV receives picture and sound signals from the
video recorder through the RF cable.
q
TEST SIGNAL
To view picture signals from the video recorder, set
your TV to the Video Channel.
The channel on which the screen to
the left appear clearly in step 3is
your Video Channel.
The video recorder is designed to send picture and sound signals
via the connected RF cable to your TV on UHF channel 36.
After you have turned on the recorder, set your TV to UHF
channel 36, fine-tune as necessary, and check if picture and
sound being received from the recorder come out clearly or not:
●If clear enough you don't have to perform the following
steps. Go to "Installing/Removing the
lithium battery" on this page.
●If not UHF channel 36 or neighbouring channels
may be occupied by local stations. Perform
the following steps to change the Video
Channel to another channel between 32 – 40.
Installing/Removing the lithium battery
1Make sure that the power plug is connected to an AC outlet
and turn off the VCR power.
2Open the battery cover while pressing the release tab as
illustrated.
3Insert a lithium battery with the plus (+) side up and push it
in.
●To remove the lithium battery, press the latch A down-
ward using a pointed non-metallic object, then pull out
the lithium battery.
4Close the battery cover until it clicks in place.
Be sure to connect the power plug to an AC outlet first
before installing the lithium battery; otherwise, the
battery's service life will be drastically shortened.
A
○○○○○○○○○○○○○○○○○○○○○○○○○○○○○○○○○○○○○○○○○○○○○○○○○○○○○○○○○
SET TV CHANNEL
1
Set your TV to a channel between 32 and 40 that you
want to use as the Video Channel on the TV.
BRING TEST SIGNAL ON
SCREEN
2
Hold down the recorder's STOP/EJECT button for more
than 5 seconds.
●"– OUT" appears on the display panel.
TUNE YOUR RECORDER
3
Turn the RF output channel adjustment screw on the
rear panel of the recorder by using a screwdriver until
the two vertical bars become as clear as they can be.
EXIT VIDEO CHANNEL SET
MODE
4
Press the recorder's STOP/EJECT button again to finish
the setting.
Before starting, make sure of the following:
●The recorder's power should be off.
●No cassette should be inserted in the recorder.
●The connected TV's power should be on.
STOP/EJECT

6EN
INITIAL SETTINGS (cont.)
TURN ON THE RECORDER
1
Press .
ACCESS MAIN MENU
SCREEN
2
Press MENU twice.
ACCESS INITIAL SET
SCREEN
3
Press PUSH JOG %fi to
place the pointer next to
"INITIAL SET", then press
OK.
ACCESS LANGUAGE
SELECT SCREEN
4
Press PUSH JOG %fi to
place the pointer next to
"LANGUAGE SELECT",
then press OK.
SELECT LANGUAGE
5
Place the pointer next to the language of your choice
(English or Chinese) by pressing PUSH JOG %fi, then
press OK.
RETURN TO NORMAL
SCREEN
6
Press MENU.
Select
Language
Turn on the TV and select the VIDEO channel (or AV mode).
MAIN MENU
FUNCTION SET
TUNER SET
INITIAL SET
[5/∞] =
[MENU] : EXIT
INITIAL SET
CLOCK SET
LANGUAGE SELECT
TV SYSTEM SELECT
[5/∞] =
[MENU] : EXIT

1
4¢
7
3
8
¡
123
456
7
8
0
9
2
4
1
3
OK
PUSH JOG
MENU

EN 7
TURN ON THE RECORDER
1
Press .
ACCESS MAIN MENU
SCREEN
2
Press MENU twice.
ACCESS INITIAL SET
SCREEN
3
Press PUSH JOG %fi to
place the pointer next to
"INITIAL SET", then press
OK.
ACCESS TV SYSTEM
SELECT SCREEN
4
Press PUSH JOG %fi to
place the pointer next to
"TV SYSTEM SELECT", then
press OK.
SELECT TELEVISION
SYSTEM
5
Place the pointer next to
the appropriate TV system
that matches the system of
TV being used (refer to the
table to the left). Then
press OK.
RETURN TO NORMAL
SCREEN
6
Press MENU.
Select
Television
System
MAIN MENU
FUNCTION SET
TUNER SET
INITIAL SET
[5/∞] =
[MENU] : EXIT
INITIAL SET
CLOCK SET
LANGUAGE SELECT
TV SYSTEM SELECT
[5/∞] =
[MENU] : EXIT
Turn on the TV and select the VIDEO channel (or AV mode).
TV SYSTEM SELECT
B/G
D/K
I
M
[5/∞] =
[MENU] : EXIT
Major Countries TV System
Kuwait, U.A.E, Indonesia, Singapore,
Thailand, Malaysia, Iran, Saudi Arabia, B/G
Egypt, Morocco, Lebanon, Iraq
China, Mongolia, Russia D/K
Hong Kong I
U.S.A., Japan, S.Korea, Taiwan M

1
4¢
7
3
8
¡
123
456
7
8
0
9
2
4
1
3
MENU
OK
PUSH JOG
NOTES:
●
If no colours appear on the screen when using a multi-system
television with its system select switch set to AUTO, change
the TV system setting of the recorder.
●
For more information on multi-system compatibility.
Z
p. 26

8EN
INITIAL SETTINGS (cont.)
TURN THE RECORDER ON
1
Press .
ACCESS MAIN MENU
SCREEN
2
Press MENU twice.
ACCESS INITIAL SET
SCREEN
3
Press PUSH JOG %fi to
place the pointer next to
"INITIAL SET", then press
OK.
ACCESS CLOCK SET
SCREEN
4
Press PUSH JOG %fi to place the pointer next to
"CLOCK SET", then press OK. The Clock Set screen
appears.
SET TIME
5
Press START +/– to set the time.
●Press and hold either button to delay or advance the
time by 30 minutes.
SET DATE
6
Press STOP +/– to set the date.
●Press and hold either button to change the date by 15
days.
SET YEAR
7
Press DATE +/– to set the year.
START CLOCK OPERATION
8
Press MENU.
Clock Set
Turn on the TV and select the VIDEO channel (or AV mode).

1
4¢
7
3
8
¡
123
456
7
8
0
9
2
4
1
3
MENU
OK
PUSH JOG
START+/–
STOP+/–
DATE+/–
MAIN MENU
FUNCTION SET
TUNER SET
INITIAL SET
[5/∞] =
[MENU] : EXIT
CLOCK SET
TIME DATE YEAR
00: 00 01 . 01 00
[+/–] =
[MENU] : EXIT
INITIAL SET
CLOCK SET
LANGUAGE SELECT
TV SYSTEM SELECT
[5/∞] =
[MENU] : EXIT
NOTE:
If the year digits are automatically cleared, it is possible that you
have input 29th February for a non-leap year. Input the correct data.

EN 9
q6
PR. 12 ]SP
21 : 00 MESECAM
24. 12. 97
ST SIM. ON
HIFI M –1 : 23 : 45
L R
On-Screen
Displays
You can choose whether or not to have various operational
indicators appear on screen, by setting this function ON or OFF.
Turn on the TV and select the VIDEO channel (or AV mode).

1
4¢
7
3
8
¡
123
456
7
8
0
9
2
4
1
3PUSH JOG
MENU
TURN ON THE RECORDER
1
Press .
ACCESS MAIN MENU
SCREEN
2
Press MENU twice.
ACCESS FUNCTION SET
SCREEN
3
Place the pointer next to "FUNCTION SET" by pressing
PUSH JOG %fi, then press OK.
ACCESS O.S.D. SCREEN
4
Place the pointer next to
"O.S.D." by pressing PUSH
JOG %fi, then press OK.
ENABLE/DISABLE
ON-SCREEN
DISPLAY
5
The default setting is
“ON”, so if you want on-
screen displays, leave the
setting as it is and go to
step 6. If you don’t want
the displays to appear,
press PUSH JOG %fi to place the pointer next to
"OFF", then press OK.
RETURN TO NORMAL
6
Press MENU.
OK
The superimposed indication on the TV screen tells you what the recorder is doing.
1– Operation mode indicators
2– Channel position number/Aux. indicator (AUX)
3– Cassette loaded mark
4– Clock display
5– Current day/month/year
6– Tape direction
7– Tape position indicator (Zpg. 13)
8– Counter display (including Counter Memory indicator)
9– Colour system indicator (Zpg. 26)
10– Tape speed SP/LP/EP
11– Type of broadcast (Zpg. 17)
12– Audio mode display (Zpg. 14)
13– Simulcast recording indicator (Zpg. 17)
FUNCTION SET
AUTO TIMER
O.S.D.
B.E.S.T.
[5/∞] =
[MENU] : EXIT
O.S.D.
ON
OFF
[5/∞] =
[MENU] : EXIT
NOTES:
●
When you use this recorder as the player for editing, be sure
to set "O.S.D." to "OFF" before starting.
●
During playback, the operation mode indicators may be
disturbed depending on the type of tape being used.
6
0
+++
+
7
11
12 8
13
10
9
2
4
5
1
3

10 EN
PLAYBACK
Basic
Playback
The easiest, most basic operation possible with your video
recorder is tape playback. Already-recorded signals on a video
tape are read by your video recorder and displayed on your TV
just like a TV programme.
LOAD A CASSETTE
1
Make sure the window side is up, the rear label side is
facing you and the arrow on the front of the cassette is
point toward the recorder. Don’t apply too much
pressure when inserting.
●The recorder power comes on automatically and the
counter is reset to 0:00:00.
●Select the appropriate colour system by pressing the
COLOUR SYSTEM button.(Zpg. 26)
●If the record safety tab has been removed, playback
begins automatically.
FIND PROGRAMME START
POINT
2
If the tape is advanced past the start point, press REW
or turn the SHUTTLE ring to the left and release it.
To go forward, press FF or turn the SHUTTLE ring to the
right and release it.
START PLAYBACK
3
Press PLAY. “BEST” appears blinking in the recorder's
display panel during automatic tracking. (Zpg. 18)
STOP PLAYBACK
4
Press STOP on the remote or STOP/EJECT on the
recorder’s front panel. Then press STOP/EJECT to
remove the cassette.
Turn on the TV and select the VIDEO channel (or AV mode).

1
4¢
7
3
8
¡
123
456
7
8
0
9
2
4
1
3
q
PLAY
REW FF
STOP
Usable cassettes
●Compact VHS camcorder recordings can be played on
this video recorder. Simply place the recorded cassette
into a VHS Cassette Adapter and it can be used just like
any full-sized VHS cassette.
●This video recorder can record on regular VHS and
Super VHS cassettes. However, it will record and play
back regular VHS signals only. It is not possible to play
back a recorded Super VHS tape.
COLOUR SYSTEM
STOP/EJECT
PLAY
SHUTTLE

EN 11
Playback
Features
Take advantage of special functions possible with the recorder’s
controls or the remote control.
NOTE:
Refer to the SHUTTLE ring illustration below as you read the
following procedures.
R
e
v
e
r
s
e
R
e
v
e
r
s
e
R
e
v
e
r
s
e
S
l
o
w
P
l
a
y
F
o
r
w
a
r
d
s
e
a
r
c
h
p
l
a
y
s
l
o
w
m
o
t
i
o
n
s
e
a
r
c
h
Still
Variable-Speed Search
ACTIVATE VARIABLE-SPEED
SEARCH
1
During playback or still, turn the SHUTTLE ring to the
right for forward variable-speed search, or to the left for
reverse variable-speed search (refer to the above
illustration.
OR
During playback, press PUSH JOG or .
●The more times you press, the faster the playback
picture moves.
●To decrease speed, press the button for the opposite
direction.
To resume normal playback, press PLAY.
%
%
High-Speed Search
NOTES:
●
For short searches, press and hold FF or REW for over 2
seconds. When released, normal playback resumes.
●
In the search, still, or frame by frame playback mode, the
picture may be distorted, and there may be a loss of colour.
ACTIVATE HIGH-SPEED
SEARCH
1
During playback or still, turn the SHUTTLE ring all the
way to the right for forward high-speed search, or to
the left for reverse high-speed search.
●For forward search with a visible picture, turn the
SHUTTLE ring all the way to the right and release it
within 1 second.
●For reverse search with a visible picture, turn the
SHUTTLE ring all the way to the left and release it
within 1 second.
OR
During playback or still, press FF for forward high-
speed search, or REW for reverse high-speed search.
To resume normal playback, press PLAY.
Still Picture/Frame-By-Frame
Playback
%
%
PAUSE DURING PLAYBACK
1
Press PAUSE. If there is vertical jitter, use the TV PROG
buttons to correct the picture.
ACTIVATE FRAME-BY-FRAME
PLAYBACK
2
Turn the JOG dial to the right for forward frame-by-
frame playback, or to the left for reverse frame-by-frame
playback.
OR
Press PAUSE.
OR
Press PUSH JOG or .
To resume normal playback, press PLAY.
Slow Motion
ACTIVATE SLOW-MOTION
PLAYBACK
1
During playback or still, turn the SHUTTLE ring to the
right for forward slow motion, or to the left for reverse
slow motion (refer to the illustration to the left).
OR
During still picture, press and hold PAUSE for 2
seconds, then release. Press and release again to return
to still picture.
OR
During still picture, press and hold PUSH JOG or .
Release to return to still picture.
To resume normal playback, press PLAY.
%
%

12 EN
PLAYBACK (cont.)
Manual Tracking
Your video recorder is equipped with automatic tracking
control. During playback, you can override this and adjust the
tracking manually by pressing the TV PROG buttons.
OVERRIDE AUTOMATIC
TRACKING
1
Press (SP/LP/EP) on the remote to engage manual
tracking.
ADJUST TRACKING
MANUALLY
2
Press TV PROG +or –to adjust tracking.
RETURN TO AUTOMATIC
TRACKING
3
Press SP/LP/EP ( ) on the remote to re-engage
automatic tracking.
NOTE:
When a new tape is inserted, the recorder enters the automatic
tracking mode automatically.
Repeat Playback
Your video recorder can automatically play back the whole tape
20 times repeatedly.
START PLAYBACK
1
Press PLAY.
ACTIVATE REPEAT
PLAYBACK
2
Press PLAY and hold for over 5 seconds, then release.
●The Play indicator ($) on the display panel blinks
slowly.
●The tape plays 20 times automatically, and then
stops.
STOP PLAYBACK
3
Press STOP at any time to stop playback.
NOTE:
Pressing PLAY, REW, FF or PAUSE also stops Repeat Playback.

1
4¢
7
3
8
¡
123
456
7
8
0
9
2
4
1
3
REVIEW
FF
PAUSE
PLAY
REW
C.MEMORY
PUSH JOG
C. RESET
TV PROG
Wide Quality
Use this function to improve image contrast which tends to
degrade especially with wide-screen TVs.
ACTIVATE WIDE QUALITY
1
During playback, press WIDE QUALITY on the recorder.
●The button will light up.
●Pressing the button again turns off the light.
●Turn on/off the light according to the type of playback
picture you want.
●The setting will remain effective even though you
turn on/off the recorder.
●This function is also effective with large-screen 4:3
aspect ratio TVs as well.
STOP
SP/LP/EP

EN 13
Index Search
Your recorder automatically marks
index codes at the beginning of
each recording. This function gives
you quick access to any one of 9
index codes in either direction.
NOTE:
Before starting, make sure the
recorder is in the Stop mode.
ACTIVATE INDEX SEARCH
1
Press PUSH JOG or (™or £) on the remote
control. “™1” or “£1” is displayed on screen
and search begins in the corresponding direction.
●To access index codes 2 through 9, press PUSH JOG
or repeatedly until the correct index number is
displayed.
Ex.: To locate the beginning of B from the current
position, press PUSH JOG twice.
To locate the beginning of D from the current
position, press PUSH JOG once.
●When the specified index code is located, playback
begins automatically.
%
fi
fi
%
fi%
Current position
AB C D E F
–2 –1 1 2 3
%
%
Index number
Next Function Memory
You can set your recorder's power to go off automatically after
the tape is fully rewound. Before starting, make sure the
recorder is in the Stop mode.
For Automatic Power Off After Tape Rewind . . .
. . . press REW, then press within 2 seconds.
NOTE:
If you want the power to be turned off automatically when the
counter reads “0:00:00” (instead of at the beginning of the
tape), press C. MEMORY so that the “M” mark appears before
pressing REW.
Counter Memory
Returns to the counter reading of “0:00:00” to conveniently find
a specific place on the tape automatically.
SET COUNTER MEMORY
1
Press C. RESET during playback at a point you wish to
locate later. The counter reads “0:00:00”. Then press
C. MEMORY, and “M” appears in front of the counter
digits.
ACTIVATE COUNTER
MEMORY
2
When you wish to return to the designated point, press
STOP and then REW or FF.
●The tape rewinds or fast-forwards and stops at about
0:00:00 automatically.
●To cancel Counter Memory, press C. MEMORY again.
Instant ReView
Simply by pressing a single button, the recorder power comes
on, rewinds, and begins playback of the last timer-recorded
programme. If you have several programmes recorded, you can
easily access any of them.
NOTE:
Before starting, make sure that the recorder is off and that the
Timer mode is disengaged.
ACTIVATE INSTANT
REVIEW
1
Press REVIEW. The recorder power comes on and the
recorder searches for the index code indicating the start
of the last timer-recorded programme. Once it’s found,
playback begins automatically.
The front display panel tells you how many programmes
have been recorded. If you have, for example, 3
programmes, “REVIEW” and "3" appear and blink. To
watch the first of the 3 programmes, press REVIEW three
times. The recorder searches and begins playback
automatically. You can access a programme as far as 9
index codes away from the current tape position.
NOTE:
Instant ReView is not possible while the recorder is in the Timer
mode.
£2

14 EN
PLAYBACK (cont.)
Tape Position Indicator
The tape position indicator
appears on screen when, from
the Stop mode, you press FF,
REW or perform an Index
Search. The position of “5” in
relation to “0” (beginning) or
“+” (end) shows you where you
are on the tape.
”O.S.D.” (Zpg. 9) must be
set to “ON”, or the indicator
will not appear.
NOTE:
Depending on the type of tape used, there may be times when
the indication is not correct.
3
1:23:45
0
+++
Beginning End

1
4¢
7
3
8
¡
123
456
7
8
0
9
2
4
1
3
FF
REW
Soundtrack Selection
Your video recorder is capable of recording three soundtracks (HI-FI L, HI-FI R and NORM) and will play back the one you select.
During Playback
Pressing AUDIO MONITOR on the recorder (or /on the remote control) changes the soundtrack being played back as
follows:
TRACK
Recorder's Front Panel On-Screen Display USE
L + R HI FI For Hi-Fi stereo tapes
LR
L HI FI For main audio of Bilingual tapes
L
R HI FI For sub audio of Bilingual tapes
R
NORM NORM For audio-dubbed tapes
L + R + NORM HI FI For audio-dubbed tapes
NORM
NOTES:
●
"L + R" should normally be selected. In
this mode, Hi-Fi stereo tapes are
played back in stereo, and the NORM
track is played back automatically for
tapes with only normal audio.
●
For instructions on recording stereo
and bilingual programmes, refer to
page 17.
●
"O.S.D." must be set to "ON" or the
on-screen displays will not appear
(
Z
pg. 9).
AUDIO MONITOR

EN 15
TV signals being received by the recorder’s built-in tuner can be
recorded onto a video tape. You can “capture” a TV programme
using your video recorder.
RECORDING
Basic
Recording
●Turn on the TV and select the VIDEO channel (or AV
mode).
●Press VCR on the remote control to select the VCR
mode.
LOAD A CASSETTE
1
Insert a cassette with the record safety tab intact.
●The counter is reset to 0:00:00 and the recorder
power comes on automatically.
●Select the appropriate colour system by pressing the
COLOUR SYSTEM button.(Zpg. 26)
CHOOSE A PROGRAMME
2
Press TV PROG +/– or the NUMBER keys to select the
channel you wish to record.
●The TV PROG dial can also be used to select a channel.
SET TAPE SPEED
3
Press (SP/LP/EP). Check the SP/LP/EP indicator on
the recorder display panel to confirm the selected tape
speed.
START RECORDING
4
Press and hold RECORD and PLAY on the remote
control, or press RECORD on the recorder.
PAUSE/RESUME
RECORDING
5
Press PAUSE. Press PLAY to resume recording.
STOP RECORDING
6
Press STOP on the remote control or STOP/EJECT on
the recorder. Then press STOP/EJECT to remove the
cassette.
●To prevent accidental recording on a recorded cassette,
remove its safety tab. To record on it later, cover the hole
with adhesive tape.
Record safety tab
Accidental erasure prevention
Recording Resume Function
If there is a power outage during recording (or Instant Timer
Recording or timer recording), the recording will resume
automatically when power is restored to the recorder unless the
recorder's memory backup has expired.

1
4¢
7
3
8
¡
123
456
7
8
0
9
2
4
1
3
q
NUMBER
PLAY
PAUSE
STOP
RECORD
TV PROG
SP/LP/EP
B.E.S.T. takes place at the beginning of each first
SP and first LP (or EP) recording after inserting the
cassette (Zpg. 18).
COLOUR SYSTEM
RECORD
STOP/EJECT
PLAY
TV PROG

16 EN
RECORDING (cont.)

1
4¢
7
3
8
¡
123
456
7
8
0
9
2
4
1
3
Recording
Features
Record One Programme
While Watching Another
q
C. RESET
SELECT CHANNEL TO
WATCH
1
Once recording is in progress, all you need to do is to
set the channel controls on the TV for the station you
wish to view.
●The programme selected with the TV’s channel
controls appears on the TV screen while the one
selected with the TV PROG buttons is recorded on
the tape.
Instant Timer Recording (ITR)
This easy method lets you record for from 30 minutes to 6 hours
(selectable in 30-min. increments), and shuts the recorder off
after recording is finished.
START RECORDING
1
Press RECORD on the recorder.
ENGAGE ITR MODE
2
Press RECORD again. " " blinks and 0:30 appears on
the front display panel.
SET RECORDING DURATION
3
If you want to record for more than 30 minutes, press
RECORD to extend the time. Each press extends
recording time by 30 minutes.
NOTE:
You can only perform ITR using the RECORD button on the
recorder's front panel.
Elapsed Recording Time
Indication
You can check the exact time of a recording.
SET COUNTER DISPLAY
1
Press DISPLAY until a counter reading appears on the
dispay panel.
●By pressing the DISPLAY button, you can change the
display to show the counter reading, channel
position* or clock time.
* channel position is not displayed during playback.
RESET COUNTER
2
Press C. RESET before starting recording or playback.
●The counter is reset to “0:00:00” and shows the exact
elapsed time as the tape runs.
RECORD
DISPLAY
AUDIO MONITOR
SIMUL
PAUSE
AUDIO MONITOR
PLAY
RECORD
TV PROG

EN 17
Receiving Stereo And Bilin-
gual Programmes
(HR-J747MS only)
Your recorder is equipped with a Sound-Multiplex decoder (A2) and
a Digital stereo sound decoder (NICAM) as well, making reception
of stereo and bilingual broadcasts possible.
When the channel is changed, the type of broadcast being
received will be displayed on the TV screen for a few seconds.
Simulcast Recording
If FM simulcast TV programmes are available, you can record the
TV programme with the soundtrack from an FM-broadcast. In the
simulcast mode, the external audio programme is recorded on the
audio track (both Hi-Fi and normal).
To Record Stereo And Bilin-
gual Programmes (A2)
(HR-J747MS only)
●Stereo programmes are automatically recorded in stereo on
the Hi-Fi audio track (with the normal audio track recording
mixed L and R channel sound).
●Bilingual programmes are automatically recorded in bilingual
on the Hi-Fi audio track. The main soundtrack will be recorded
on the normal audio track.
To Record NICAM Stereo
And Bilingual Programmes
(HR-J747MS only)
●The NICAM audio programme will be recorded on the Hi-Fi
audio track, and the Standard audio programme on the
normal audio track.
NOTES:
●
If the quality of stereo sound being received is poor, the
broadcast will be received in monaural with better quality.
●
Before playing back a programme recorded in stereo, or a
bilingual programme, refer to "Soundtrack Selection" (
Z
pg. 14).
Type of Broadcast On-screen
Being Received Display
A2 (GERMAN) Stereo ST
A2 (GERMAN) Bilingual BIL
Regular Monaural (none)
NICAM Stereo ST NICAM
NICAM Bilingual BIL NICAM
NICAM Monaural NICAM
●To listen to a stereo programme, press AUDIO MONITOR on
the recorder (or on the remote control) until "L" and "R"
appear on the front display panel.
●To listen to a bilingual programme, press AUDIO MONITOR
on the recorder (or on the remote control) until either
"L" or "R" appears on the front display panel (as required).
●To listen to the Standard (regular monaural) audio while
receiving a NICAM broadcast, press AUDIO MONITOR on
the recorder (or on the remote control) until "NORM"
appears on the front display panel.
NOTE:
"O.S.D." must be set to "ON" or the on-screen displays will not
appear (
Z
pg. 9).
MAKE CONNECTIONS
1
Connect the FM tuner to the rear panel AUDIO IN
connectors.
CHOOSE FM BROADCAST
2
Set the FM tuner to the desired broadcast.
SELECT TV PROGRAMME
3
Press TV PROG or the NUMBER keys to select the TV
programme you wish to record.
ENGAGE SIMULCAST
MODE
4
Press SIMUL.
●"SIM. ON" will appear on the screen.
START RECORDING
5
Press RECORD on the recorder (or RECORD and PLAY
on the remote control).
NOTES:
●
If you stop recording with the PAUSE button to avoid
unwanted TV programme material, the audio programme is
also cut.
●
After finishing simulcast recording, be sure to press the
SIMUL button to cancel the Simulcast mode, otherwise it is
not possible to record on the audio track from the built-in
tuner.
●
If TV broadcast is interrupted while simulcast recording,
external audio input will not be recorded.

18 EN
B.E.S.T. Picture
System
Turn on the TV and select the VIDEO channel (or AV mode).
q
The B.E.S.T. (Biconditional Equalised Signal Tracking) system
checks the condition of the tape in use during recording and
playback, and compensates to provide the highest-possible
recording and playback pictures. The default setting for both
recording and playback is “ON”.
Recording
LOAD A CASSETTE
1
Insert a cassette with the record safety tab intact.
●The recorder power comes on automatically.
ACCESS MAIN MENU SCREEN
2
Press MENU twice.
ACCESS FUNCTION SET SCREEN
3
Place the pointer next to
"FUNCTION SET" by
pressing PUSH JOG %fi,
then press OK.
ACCESS B.E.S.T. SCREEN
4
Place the pointer next to
"B.E.S.T." by pressing
PUSH JOG %fi, then press
OK.
SELECT MODE
5
Place the pointer next to
"ON" by pressing PUSH
JOG %fi, then press OK.
RETURN TO NORMAL SCREEN
6
Press MENU.
START RECORDING
7
Press and hold RECORD and PLAY on the remote, or
press RECORD on the recorder.
●The recorder spends approximately 7 seconds
assessing the condition of the tape, then begins
recording.
●When the "BEST" indicator begins blinking, that
means adjustment is complete.
●Pressing the recorder's RECORD button while "BEST"
is displayed does not start Instant Timer Recording
(Zpg. 16).
MAIN MENU
FUNCTION SET
TUNER SET
INITIAL SET
[5/∞] =
[MENU] : EXIT
B.E.S.T.
ON
OFF
[5/∞] =
[MENU] : EXIT

1
4¢
7
3
8
¡
123
456
7
8
0
9
2
4
1
3
FUNCTION SET
AUTO TIMER
O.S.D.
B.E.S.T.
[5/∞] =
[MENU] : EXIT
PUSH JOG
MENU
OK
RECORD
PLAY
RECORDING (cont.)
RECORD
Display Panel Indication
As the tape check progresses, the “– –” marks on the display
panel increase upward. Once the "BEST" indicator starts
blinking, the check is complete.

EN 19

1
4¢
7
3
8
¡
123
456
7
8
0
9
2
4
1
3
q
NOTES:
●
The B.E.S.T. system works for SP and LP (or EP) modes only
after a tape has been inserted and the Record mode is first
initiated. It does not work during recording.
●
In the case of timer recording, the B.E.S.T. system works
before recording is initiated.
●
Once the cassette is ejected, the B.E.S.T. data is cancelled.
The next time the cassette is used for recording, B.E.S.T. is re-
performed.
RECORD PAUSE
START PLAYBACK
1
Press PLAY.
●The recorder adjusts the playback picture quality
based on the quality of the tape in use.
●B.E.S.T. is active during Auto Tracking. “BEST”
appears blinking on the recorder’s display panel.
NOTES:
●
When watching a rental tape or one recorded on another
video recorder, or when using this recorder as the player for
editing, set B.E.S.T. to your preference by performing steps 2
through 6on page 18.
●
"BEST" only appears at the beginning of automatic tracking.
Even though it doesn't appear after that, the B.E.S.T. function
is operative.
Playback
The recorder assesses the quality of the tape once you initiate
playback.
When watching a tape recorded with “B.E.S.T.” set to “ON”, it is
recommended that you leave B.E.S.T. on during playback as well.
ATTENTION:
Since the B.E.S.T. system works before recording actually
starts, there is a delay of approximately 7 seconds after
RECORD and PLAY on the remote are pressed, or RECORD
on the recorder is pressed. To make sure you record the
desired scene or programme in its entirety, first perform the
following steps:
1) Press and hold PAUSE and RECORD to engage the
RECORD PAUSE mode.
●
The recorder then automatically checks the condition
of the tape and, after approximately 7 seconds, re-
enters RECORD PAUSE.
2) Press PLAY to start recording.
●
If you want to bypass the B.E.S.T. system and begin
recording immediately, set “B.E.S.T.” to “OFF” in step
5on page 18.
PLAY
PAUSE
PLAY
RECORD

20 EN
Timer
Programming
Remember, the clock must be set before you can
programme the timer (Zpg. 8).
Before performing the following steps:
●Insert a cassette with the safety tab in place. The recorder
will come on automatically.
●Turn on the TV and select the VIDEO channel (or AV mode).
●Select the appropriate colour system by pressing the
COLOUR SYSTEM button.(Zpg. 26)
ACCESS TIMER
PROGRAMMING SCREEN
1
Press PROG.
ACCESS PROGRAMME
SCREEN
2
Press START +/–. (If you’re
just starting out, “P1”
appears.)
ENTER PROGRAMME
START TIME
3
Press START +/– to enter
the time you want
recording to start.
●Press and hold START
+/– to move in 30-
minute increments, or
press and release
repeatedly to move 1
minute at a time.
ENTER PROGRAMME STOP
TIME
4
Press STOP +/– to enter the time you want recording to
stop.
ENTER PROGRAMME DATE
5
Press DATE +/–. (The current date appears on screen.
The date you enter appears in its place.)
ENTER CHANNEL
POSITION
6
Press TV PROG +/–.
SET TAPE SPEED
7
Press (SP/LP/EP) to set the tape speed.
TIMER RECORDING
– P1 –
START STOP
–:– – =–:– –
SP
DATE TV PROG
25.12 – –
[+/–] =
[MENU] : EXIT
– P1 –
START STOP
21:00 =–:– –
SP
DATE TV PROG
25.12 – –
[+/–] =
[MENU] : EXIT
– P1 –
START STOP
21:00 =22:00
SP
DATE TV PROG
25.12 1
[+/–] =
[MENU] : EXIT
q

1
4¢
7
3
8
¡
123
456
7
8
0
9
2
4
1
3
START+/–
DATE+/–
STOP+/–
PROG
SP/LP/EP
TV PROG+/–
COLOUR SYSTEM
This manual suits for next models
1
Table of contents
Other JVC VCR System manuals

JVC
JVC HR-J267MS User manual

JVC
JVC HR-J672EU User manual

JVC
JVC HR-A43U, HR-A63U User manual

JVC
JVC HM-DH5U User manual

JVC
JVC HR-DD848E User manual

JVC
JVC HR-A630EK User manual

JVC
JVC SR-W5U - W-vhs Recorder/player User manual

JVC
JVC HR-A47U User manual

JVC
JVC HR-J271MS User manual

JVC
JVC HR-S9500EK User manual