JVC HR-S5912U User manual

CONTENTS
Buttons,ConnectorsandIndicators................................................4
ConnectionsandPlug&PlaySetting................................................5
InitialSettings..............................................................................6
Language Setting .................................................................... 6
Clock Setting .......................................................................... 6
Tuner Setting .......................................................................... 7
Cable Box and/or DBS Receiver Control Setting ..................... 7
Playback......................................................................................9
Basic Playback ....................................................................... 9
Playback Features ................................................................... 9
Recording............_......................................................................11
Basic Re_ording ................................................................... 11
Recording Features ............................................................... 1[
TimerRecording..........................................................................12
Changing VCR Plus+ _'Setting ................................................ 12
VCR Plus+ _Timer Programing .............................................. 12
Express Timer Programing .................................................... 13
24HR Quick Programing ...................................................... 13
OtherFunctions..........................................................................14
Timer warning display .......................................................... 14
Checking tape position ......................................................... 14
Changing display information ............................................... 14
Function settings .................................................................. 14
Satellite Auto Recording ....................................................... 16
Child lock ............................................................................ 16
Multi-Brand Remote Control ................................................ 17
Changing Remote Control Code ........................................... 17
Editing.._....................................................................................18
Editing with Another VCR ...................................................... 18
Audio Dubbing .................................................................... 19
Insert Editing and AV Dubbing ............................................. 19
Specifications..............................................................................20
Troubleshooting..........................................................................21
FORSERVICING(OnlyinU.S.A.)..................................................22
WARRANTY(OnlyinU.S.A.).......................................................23
Dear Customer,
Thank you for purchasing the JVC S-VHS video cassette recorder.
Before use, please read the safety information and precautions to
ensure safe use of your new VCR.
CAUTIONS
CAUTION: TO REDUCE THE RISK OF ELECTRIC SHOCK.
DO NOT REMOVE COVER (OR BACK).
NO USER-SERVICEABLE PARTS INSIDE.
REFER SERVICING TO QUALIFIED SERVICE PERSONNEL.
The lightning flash with arrowhead symbol, within
an equilateral triangle, is intended to alert the user
to the presence of uninsulated "dangerous voltage"
within the product's enclosure that may be of
sufficient magnitude to constitute a risk of electric
shock to persons.
The exclamation point within an equilateral triangle
is intended to alert the user to the presence of
important operating arid maintenance (servicing)
instructions in the literature accompanying the
appliance.
WARNING:
TO PREVENT FIRE OR SHOCK HAZARD, DO NOT EXPOSE
THIS UNIT TO RAIN OR MOISTURE.
CAUTION:
This video cassette recorder should be used with AC 12OVa,,
60Hz only.
To prevent electric shocks and fire hazards, DO NOT use any
other power source.
CAUTION:
TO PREVENF ELECTRIC SHOCK, MATCH WIDE BLADE OF
PlUG TO WIDE SLOT, FULLY INSERT,
ATTENTION:
POUR EVITER IES CHOCS El ECTRIQUES, INIRODUIRE LA
LAME LA PLUS LARGE DE IA FICHE DANS LA BORNE
CORRESPONDANfE DE LA PRISE ET POUSSER JUSQU'AU
FOND.
Note to CATV system installer:
This renlinder is provided to call the CRTV system installeffs
attention to Article 820-40 of the NEC that provides guidelines
for proper grounding and, in particular, specifies that the cable
ground shall be connected to the grounding system of the
building, as close to the point of cable entry as practicah
--1 --

NOTE:
Change or modifications not approved by the party responsible
for compliance could void the user's authority to operate the
equipment.
This equipment has been tested and found to comply with the
limits for a Class B digital device, pursuant toPart 15 of the FCC
Rules. These limits are designed to provide reasonable
protection against harmful interference in a residential
installation. This equipment generates, uses and can radiate
radio frequency energy and, if not installed and used in
accord/ance with the instructions, may cause harmful
interference to radio conlmunications. However, there is no
guarantee that interference will not occur in a particular
installation. If this equipment does cause harmful interference
to radio or television reception, whi(h can be determined by
turning the equipment off and on, the user is encouraged to try
to correct the interference by one or more of the following
measures.
Reorient or relocate the receiving antenna.
increase the separation between the equipment and
receiver.
Conne(t the equipment into an outlet on a circuit different
from that to which the receiver is (onnected.
Consult the dealer or an experienced radio TV re( hnician for
help.
Declaration of Conformity
Model Number: HR-S5902/5g 12U
ffade Name: JVC
Responsible Party: IVC Amerk as Corp.
Address: 1700 Valley Road Wayne, N.J. 07470
Telephone Number: 973-31 7-5000
[his devi(e complies with Part 15 of FCC Rules.
Operation is subject to the following two conditions:
(I) This device nlay not cause harmful interference, and (2) this
devi(e must a_(ept any interference received, inc[uding
interference that may cause undesired operation.
Failure to heed the following precautions may result in damage to
the VCR, Remote or video cassette.
1. DO NOT place the VCR . . .
...in an environment prone to extreme temperatures or
humidity.
...in direct sunlight.
...in a dusty environment.
...in an environment where strong magnetic fields are
generated.
...on a surface that is unstable or subje(t to vibration.
2. DO NOT block the VCR's ventilation openings.
3. DO NOT place heavy objects on the VCR or on the Remote.
4. DO NOT place anything which might spill on the top of the
VCR or on the Remote.
5. AVOID violent shocks to the VCR during transport.
VCR Plus+, C _and PiusCode are registered trademarks of Gemstar
Development Corporation.
The VCR Plus+ system is manufactured under license from
Gemstar Development Corporation.
For Customer Use:
Enter below the Model No. and Serial No. which are located
on the rear of cabinet. Retain this information for future
reference.
Model No.
Serial No.
• Cassettes marked "S-VHS" and "VHS" can be used with this
video cassette recorder. However, S-VHS recordings are
possible only with cassettes marked "S-VHS".
By using S-VHS ET it is possible to record and play back with
S-VHS picture quality on VHS cassettes with this VCR.
• As an ENERGYSTAR' Partner, JVC has determined that this product
or product model meets the ENERGY STAR' guidelines for energy
effi( iency.
IMPORTANTPRODUCTSAFETY
INSTRUCTIONS
Electrical energy can perform many useful functions. But inlproper
use can result in potential electrical shock or fire hazards. [his
product has been engineered and manufactured to assure your
personal safety. In order not to defeat the built-in safeguards,
observe the following bask rules for its installation, use and
servicing.
ATTENTION:
Follow and obey all warnings and] instructions marked on your
produ(t and its operating instructions. For your safety, please read
all the safety and operating instructions before you operate this
produ(t and keep this booklet for future reference.
INSTALLATION
1. Grounding or Polarization
(A) Your product may be equipped with a polarized alternating-
( urrent line plug (a plug having one blade wider than the
other). This plug will fit into the power outlet only one way.
This is a safety feature.
If you are unable to insert the plug fully into the outlet, try
reversing the plug. If the plug should still fail to fit, contact your
electrician to replace your obsolete outlet. Do not defeat the
safety purpose of the polarized plug.
(B) Your product may be equipped with a 3-wire grounding-type
plug, a plug having a third (grounding) pin. This plug will only
fit into a grounding-type power outlet. This is a safety feature.
If you are unable to insert the plug into the outlet, contact your
electrician to replace your obsolete outlet. Do not defeat the
safety purpose of the grounding-type pl us.
2. Power Sources
Operate your product only from the type of power source
indicate(] on the marking label. If you are not sure of the type of
power supply to your home, consult your product dealer or local
power company. If your produ(t is intended to operate from
battery power, or other sour(es, refer to the operating instructions.
3. Overloading
Do not overload wall outlets, extension cords, or integral
(onvenience receptacles as this can result in a risk of fire or
electric shock.
4. Power Cord Protection
Power supply cords should be routed so that they are not likely to
be walked on or pinched] by items placed upon or against them,
paying particular attention to cords at plugs, convenience
receptacles, and the point where they exit from the produ(t.
5. Ventilation
Slots and openings in the (abinet are provided for ventilation.To
ensure reliable operation of the product and to protect it from
overheating, these openings must not be blocked or covered.
• Do not block the openings by placing the product on a bed,
sofa, rug or other similar surface.
• Do not place the product in a built-in installation such as a
bookcase or rack unless proper ventilation is provided or the
manufacturer's instructions have been adhered to.
6. Wall or Ceiling Mounting
The product should be mounted to a wall or (eiling only as
recommended by the manufacturer.
ANTENNA INSTALLATION INSTRUCTIONS
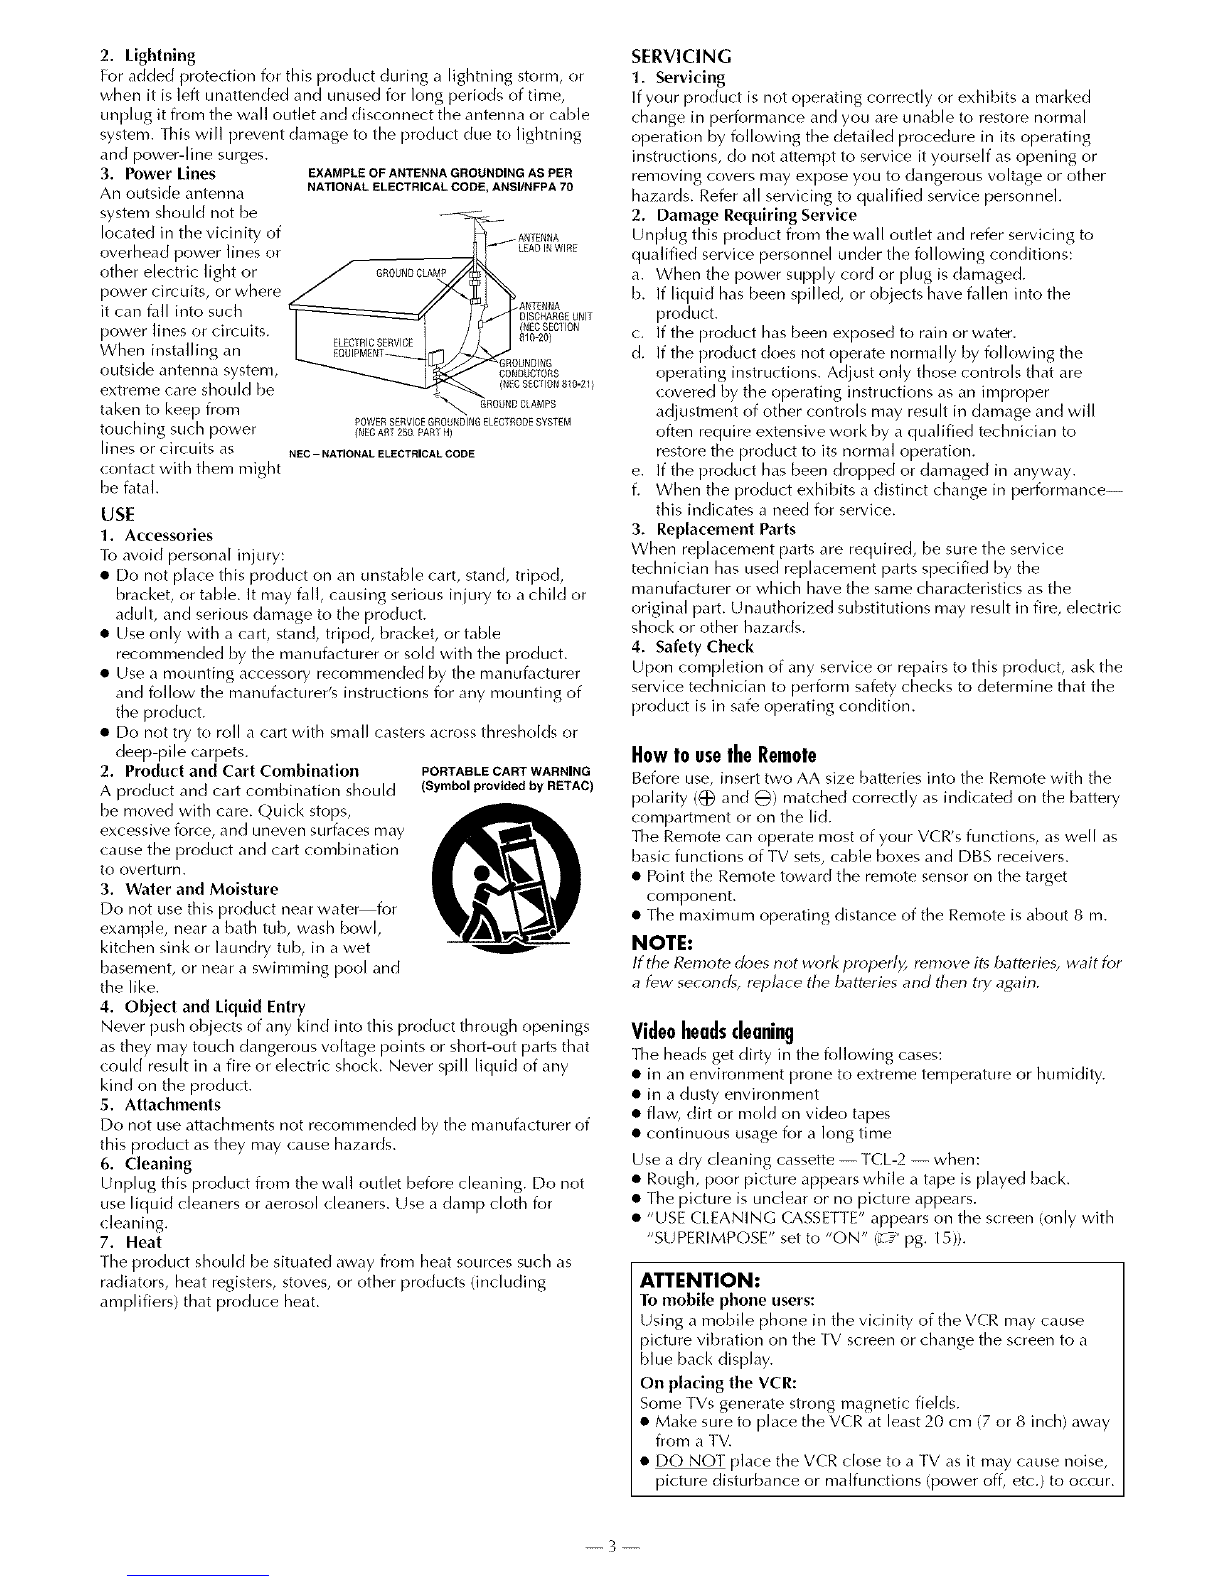
1. Outdoor Antenna Grounding
If an outside antenna or cable system is (onne(ted to the product,
be sure the antenna or cable system is grounded so as to provide
some protection against voltage surges and built-up stati( charges.
Article 810 of the National Electrical Code, ANSI/NFPA 70,
provides information with regard to proper grounding of the mast
and supporting stru(ture, grounding of the lead-in wire to an
antenna discharge unit, size of grounding connectors, location of
antenna discharge unit, connection to grounding electrodes, and
requirements for the grounding ele(trode.
--2--

2. Lightning
For added protection for this product during a lightning storm, or
when it is left unattended and unused for long periods of time,
unplug it from the wall outlet and disconnect the antenna or cable
system. This will prevent damage to the product due to lightning
an(:] power-line surges.
3. Power Lines
An outside antenna
system should not be
located in the vicinity of
overhead power lines or
other electric light or
power circuits, or where
it can fall into such
power lines or circuits.
When installing an
outside antenna system,
extreme care should be
taken to keep from
touching such power
lines or circuits as
contact with them might
be fatah
USE
1. Accessories
EXAMPLE OF ANTENNA GROUNDING AS PER
NATIONAL ELECTRICAL CODE, ANSI/NFPA 70
GROUNDCLAMP
_ _ANTENNA
DISCHARGEUNIT
= (NECSECilON
ELECTRICSERVICE 810-20)
GROUNDING
CONDUCTORS
(NECSEC[ ION 8 0-2I )
"_,,,, GROUNDCAMPS
POWER SERVICEGROUNDINGELECTRODESYSTEM
/NECAR 250 PANI H)
NEC - NATIONAL ELECTRICAL CODE
]b avoid personal injury:
•Do not place this product on an unstable cart, stand, tripod,
bracket, or table. It may fall, causing serious injury to a child or
adult, and serious damage to the product.
• Use only with a cart, stand, tripod, bracket, or table
recommended by the manufacturer or solE] with the product.
• Use a mounting accessory recommended by the manufacturer
and follow the manufacturer's instructions for any mounting of
the product.
• Do not try to roll a cart with small casters across thresholds or
deep-pile carpets.
2. Product and Cart Combination PORTABLECARTWARNING
A produ_ t and cart combination should (Symbolprovidedby RETAC)
be moved with care. Qukk stops,
excessive force, and uneven surfaces may D
Eause the product and cart combination
to overturn.
3, Water and Moisture
Do not use this product near water for
example, near a bath tub, wash bowl,
kitchen sink or laundry tub, in a wet
basement, or near a swinlming pool and
the like.
4. Object and Liquid Entry
Never push objects of any kind into this product through openings
as they may touch dangerous voltage points or short-out parts that
could result in a fire or electric shock. Never spill liquid of any
kind on the product.
5. Attachments
Do not use attachments not recommended by the manufacturer of
this product as they may cause hazards.
6. Cleaning
Unplug this product from the wall outlet before cleaning. Do not
use liquid cleaners or aerosol cleaners. Use a damp cloth for
cleaning.
7, Heat
The product should be situated away from heat sources such as
radiators, heat registers, stoves, or other products (including
amplifiers) that produce heat.
SERVICING
1. Servicing
If your product is not operating correctly or exhibits a marked
change in performance and you are unable to restore normal
operation by following the detailed procedure in its operating
instructions, do not attempt to service it yourself as opening or
removing covers may expose you to dangerous voltage or other
hazards. Refer all servicing to qualified service personnel.
2, Damage Requiring Service
Unplug this product from the wall outlet and refer servicing to
qualified service personnel under the following conditions:
a. When the power supply cord or plug is damaged.
b. If liquid has been spilled, or objects have fallen into the
product.
(. If the product has been exposed to rain or water.
d. If the product does not operate normally by following the
operating instructions. Adjust only those controls that are
covered by the operating instructions as an improper
adjustment of other controls may result in damage and will
often require extensive work by a qualified technician to
restore the product to its normal operation.
e. If the product has been dropped or damaged in anyway.
f. When the product exhibits a distinct change in performance--
this indicates a need for service.
3. Replacement Parts
When replacement parts are required, be sure the service
technician has used replacement parts specified by the
manufacturer or which have the same characteristics as the
original part. Unauthorized substitutions may result in fire, electric
shock or other hazards.
4. Safety Check
Upon completion of any service or repairs to this product, ask the
service technician to perform safety checks to determine that the
product is in safe operating condition.
Howto usetheRemote
Be_re use, insert two AA size batteries into the Remote with the
polarity (L_ an(] (_) matched correctly as indicated on the battery
compartment or on the lid.
The Remote can operate most of your VCR's functions, as well as
basic functions of TV sets, cable boxes and DBS receivers.
• Point the Renlote toward the remote sensor on the target
component.
• The maximum operating distance of the Remote is about 8 m.
NOTE:
If the Remote does not work properly, remove its batteries, wait for
a few secon(L_, repLrce the batteries and then try a_qain.
Videoheadscleaning
The heads get dirty in the following cases:
• in an environment prone to extreme temperature or humidity.
• in a dusty environment
• flaw, dirt or mold on vide() tapes
•continuous usage for a long time
Use a dry cleaning cassette -- TCL-2 -- when:
• Rough, poor picture appears while a tape is played back.
• The picture is unclear or no picture appears.
• "USE CI.EANING CASSETTE" appears on the screen (only with
"SUPERIMPOSE" set to "ON" (Z_" pg. 15)).
ATTENTION:
To mobile phone users:
Using a mobile phone in the vicinity of the VCR may cause
picture vibration on the TV screen or change the screen to a
blue back display.
On placing the VCR:
Some TVs generate strong magnetic fields.
• Make sure to place theVCR at least 20 cm (7 or 8 inch) away
from a TV.
• DO NOT place the VCR close to a TV as it may cause noise,
picture disturbance or malfunctions (power off, etc.) to occur.
--3--

IXndicators
FrontPanel
24HR QUICK
INSERT PROGRAM
Cassette loading slot REC LINK Advanced
JOG dial
POWER C2/I
S-VIDEO VIDEO/AU DIe input
input C()nl3ect( )lS
cl)nnector STOP/EJECT
Display panel Timer mode indicator
Hay indicatol VCR mode
Retold indicator
I
Channel and auxiliary input/Ch:)ck time
Remote
TV/VCR
REVIEW -
Number ke
CANCEL
[C.RESET] "
MEN[
SHUTTLE AV
[TV CH+/-]
SET
[A/B]
POWERc)/t
A.MONITOR [(l/_,_ ]
DISPLAY
DAiLY(M-F)
WEEKLY
AUX
TIMER
DATE+i-
CH+/-
SKIP SEARCH
SP/EP
FF
PAUSE
OK
[ENTER/OSD]
SHUTTLE PLUS
[TV VOL+/-]
RearPanel
AC powei cord S-VIDEO IN
CABLE BOX
ANT. IN
S-VIDEO OUT
AUDIO/VIDEO IN AUDIO/VIDEO OUT
TV OUT
PAUSE/
AV COMPULINK
The glow-in-the-dark buttons shown in white on the illustration
above are helpful when using the Remote in darkened rooms.
On-screendisplay
If you press OSD (OK) on the Remote when "SUPERIMPOSE" is
set to "ON" (L_" pg. 15), you can see the <urrent VCR status on the
TV screen.
The indications are not recorded even if the VCR is in the
recording mode.
Channel and
auxilialy in
Day and
clock time -
STEREO
program
indication /
SAP--
indication
Audio
nlonitol
indications
VCR opeiation
)ut Timer warning display mode
rcRt25 ReCORO
-THU 12:00AM I PAUSEJ]
-STEREO - WARNING- _SP'7_ TJp spe,e,d
,SAP T',MER RECORDING I I
TO START SOON Cassette mark
(CANCEL),
B...... +..... +..... +-I1---- z Tape,position
:NDEX
"NORM REMAIN Index number
.H_-F: COUNT Tape
_emaining time
Tim( • C( )unte[
To recall an indication
[] Press OSD (OK).
• All indications corresponding to the current status are
displayed for 5 seconds. After that, the counter
information and RECORD/PAUSE (if in the Record Pause
mode), remain on the TV screen.
[] Press OSD (OK) again to clear the display.
• The RECORD/PAUSE indication remains on the TV screen.
--4--

Connections and Plug&Play
[] Checkcontents
Make sure the pa(kage contains all of the accessories listed in
"Specifications" (_-_ pg. 20).
[] SituateVCR
Place the VCR on a stable, horizontal surface.
[] ConnectVCRto TV
Antenna ()[ cable
LL Coaxial cable
Matching tlansf)inle[ i_]_1 /
m('t supl_li"d} _ /
I.. _14
AC pOVvre[ cord
Back of VCR
AC outlet
TV
To 75 {_ t_,rmina[
RFcable
.. ISLpp ed)
To S-video input S-video cable
c(_nnector _supplied)
RFConnection
[] Disconnect the EV antenna from the IV.
[] Connect the TV antenna cable to the ANF. IN terminal on the
rear of the VCR.
[] Connect the supplied RE cable between the TV OUT terminal
on the rear of the VCR and the TV's antenna input terminah
AV Connection
(improves picture quality during tape playback.)
If your TV is equipped with audio/video input connectors
[] Connect the antenna, VCR and TV as shown in the illustration.
[] Connect an audio/video cable between the AUDIO/VIDEO
OUT connectors on the rear of the VCR and the audio/video
input connectors on the TV.
S-videoConnection
(allows you to make the most of the S-VHS picture performance.)
If your TV is equipped with a S-video input connector
[] Perform "RF Connection" previously described.
[] Connect the supplied S-video cable between the S-VIDEO
OUT connector on the rear of the VCR and the S-video input
connector on the IV.
[] Connect an audio cable between the AUDIO OUT connectors
on the rear of the VCR and the audio input connectors on the
TV.
• Even if you are using audio/video cables to connect your VCR to
your TV, you must also connect it using the RF cable. This will
ensure that you can record one show while watching another.
[] PerformPlug&Playsetup
Plug the AC power cord into an AC outlet. Do not turn on the
VCR. The clock and tuner channels will be set automatically. The
time and date can be set automatically by the clock setting data
transmitted from one of the regular TV broadcast channels. We
call this TV channel the "host channel" and it is a PBS channel in
your area.
AI"rENTION:
• If you use a cable box, Plug&Play will not function; set the clock
and tuner channels separately (_ _" pg. 6 - 7).
• Depending on areas or reception conditions, the VCR may not
receive the Auto clock setting data from a PBS channel. If this
function is taking a considerable amount of time, it may be
necessary to perform the procedure in "Semiauto Clock Set"
?-_" pg. 6) or "Manual Clock Set" ?-_" pg. 6).
During Initial Auto Clock Set
"Aut" blinks.
During Auto Channel Set
The channel numbers are displayed as they are
scanned and set.
Plug&Play Completed
The current time is displayed.
What to do if Plug&Play setting failed
• If an incorrect time is displayed on the display panel, perform
the procedure in "Semiauto Clock Set" ?-_" pg. 6) or "Manual
Clock Set" (a__ pg. 6).
• [f "-:- -" appears on the display panel, ensure that the antenna
cable is connected correctly. [hen turn on an(:] off the VCR; the
Plug&Play setting will be automatically reactivated. If Plug&Play
setting is not performed though the antenna cable is connected
correctly, perform the procedure in "Manual Clock Set"
{L_ _ pg. 6) and "Auto Channel Set" (L_ _pg. 7) or "Manual
Channel Set" {_ pg. 7).
[] SetVCRchannel
The VCR drarmel is the channel on which you can watch the
picture from the VCR on the rv when only using the RF
connection. Press POWER _/I to turn off the VCR, then press
STOP/ElECT (11/____.)on the VCR for more than 5 seconds. "CH3"
appears on the display panel. Press CH+/- on the Remote to select
"CH3", "CH4" or "CH-"(OFF), then press OK.
• [he VCR channel is preset to "CH3". Set to "CH4" ifCH3 is
used for broadcasting in your area.
[] Finalpreparationfor use
Earn on the VCR and the TV, and select the VCR channel 3 or 4 {or
AV mode) on the TV. You can now perform basic playback or
basic recording.
• If you connect the TV and the VCR only using the RF
connection, press TV/VCR on the Remote so that the VCR nlode
indicator lights on the display panel.
--5--

LanguageSetting
The default setting is "ENGL.ISH".
Turn on the VCR and TV, and select the VCR ( hannel (or AV
mode).
[] AccessMainMenuscreen,thenInitial vA_,VEHO
Setscreen FUNCTION SET
TUNER SET
G_IH | V:_IE.']q
Press MENU on the Remote. Press _V to
move the highlight bar (arrow) to "INFF[AL
SET", then press OK or _>.
[] Selectlanguage
This VCR offers you the language choice to
view menus and some messages -- in
English, Spanish or French. Press _V to
move the highlight bar (arrow) to
"LANGUAGE', then press OK or _>
repeatedly until the desired language is
selected.
Press MENU to return to normal screen.
Language selection will be reset to "ENGLISH" after a power
failure o(( urs.
IOIT[AL SET
CLOCKSET
GUIDECHAHOELSET
CABLEBOXSET
DBORECEIVER SET
ClockSetting
Perform clock setting only if the clunk has not been set (orrectly
by the Plug&Play setting or if you use a cable box.
Turn on the VCR and TV, and select the VCR ( hannel (or AV
mode).
Preparations
[] AccessMainMenuscreen,thenInitial
Setscreen
Press MENU on the Remote. Press _V to
nlove the highlight bar (arrow) to "INITIAl.
SET", then press OK or _>.
[] AccessClockSetscreen
Press _V to move the highlight bar
(arrow) to "CLOCK SEI ", then press OK or
P*.
VAIN VEHU
FUNCTION SET
TUNER SET
_IH|V:_IE3q
IHITIAL SET
mLAHOUAGE EHGLIOH
GUIDE CHAHOEL SET
CAOLEOOXSET
OBO RECEIVERSET
[] SelectD.S.T.mode
Press OK or _> to move the highlight bar to "D.S.T.", then press
_V repeatedly until the desired setting is selected.
AUTO: Select if you want to adjust your VCR's clock
automatically by the inconling signal from the host
(hannel. (Auto Daylight Saving Time enables automatic
adjustment of the VCR's clock at the start and end of
Daylight Saving Time.) Be sure to sele(t the correct time
zone manually in step Lq.
ON: Adjustment will be made by the built-in clo<k itself.
OFF: Select when Daylight Saving Time does not apply to you.
[] Selecttimezone
Press OK or _> to move the highlight bar to "TIME ZONE", then
press _V repeatedly until "AUTO" or the desired time zone is
selected. Each time you press the button, the time zone ( hanges as
follows:
"-"AUTO _-_ ATLANTIC _-_ EASTERN _-_ CENTRAL
MOUNTAIN _ PACIFIC ","*ALASKA _ HAWAII
(back to the beginning)
[] CompleteSemiautoClockSet
Press MENU to return to normal screen. Turn off the VCR. "Aut"
will appear on the display panel while the clock is being set. [he
( urrent clo(k time will appear automatically when the ( Icx-k
setting is complete.
Selections of host channel and D.S.T. mode will be reset to
"AUTO" after a power failure o(curs.
Settingclocksemiautomatically
- SemiautoClockSet
You (an change the host channel/D.S.T. (Daylight SavingTime)/
time zone setting manually. First follow steps [] to [] in
"Preparations" above, then go to the following steps.
NOTE:
The time set previously will be erased when "AUTO CLOCK';
"HOST CH'; "D.S/f: "or "fTME ZONE" setting is changed.
[] SetAutoClocktoON
Press OK or _>on the Remote repeatedly to
move the highlight bar to "AUTO CLOCK",
then press _V so that "ON" is selected.
[] Selecthostchannel
CLOCKSET ]
TIME DATE YEAR
'. 03
HOST CH _AUT_ (CATO) /
D.S.T. : AUTO |
TIVE ZONE : AUTO
You can either select "ALYI-(_)" or enter a PBS channel number.
Press OK or _> to move the highlight bar to "HOST CH', then
press ,/_,V repeatedly until "AUTO" or the desired PBS channel
number is selected.
• Some PBS channels do not transmit clock setting data.
Settingclockmanually
- ManualClockSet
First follow steps [] to [] in "Preparations" above, then go to the
following steps.
[] Sellime, dateandyear
Press ,/_,V until the desired time appears,
then press OK or _>. Set the date an(:] year
in the same way.
• Holding ,/_,V changes the time in 30-
minute intervals, or changes the date in
15-day intervals.
[] SelectD.S.T.mode
Press OK or _>to move the highlight bar to
"D.S.T.", then press _V to select the
desired setting.
ON: Adjustment will be made by the
built-in clock itself.
OFF: Select when Daylight Saving Time
does not apply to you.
[] Startclock
Press MENU and normal screen appears.
_ ICLOCKSET
•ME // HATE YEAH
HOST CH :AUTO (CATV) |
D.S.T. :AUTO l
TIME ZONE :AUTO
CLOCKSET
TIME DATE YEAR
1:00AM z_12/24 OOWEOt
To make corrections any time during the process
Press OK or _ repeatedly until the item you want to ( hange
blinks, then press _.
Manual setting of the (lock will be lost after a power failure
O( ( urs.
--6--
CONTINUED ON NEXTPAGE

TunerSetting
Turn on the VCR and TV, and select the VCR ( hannel (or AV
mode).
Settingchannelsautomatically
- AutoChannelSet
Perform Auto Channel Set only if d/annels have not been set
correctly by the Plug&Play setting.
[] AccessMainMenuscreen,thenTuner MA,.MENU
Setscreen FU=T,O.SET
Press MENU on the Remote. Press '/_x,V to
move the highlight bar (arrow) to "TUN ER
SET", then press OK or _>.
[] PerformAutoChannelSet
Press ,/_XV to move the highlight bar
(arrow) to "AUTO CHANNEl SET", then
press OK or _>. The VCR selects the correct
band (TV or CATV) automatically during
Auto Channel Set.
• When Auto Channel Set is complete,
"SCAN COMPLETED" appears on
screen.
• If the scan was unsuccessful, "SCAN
COMPLETED-NO SIGNAl.-" appears on
screen. Check the connections and start
again.
Press MENU to return to normal screen.
TUNER SET
NANU CATV
_ET
AUTOCHANNEL SET
SCANNING...
CableBoxand/or DBSReceiverControl
Setting
The following procedure is required if you receive your TV
channels through a cable box (descrambler) and/or if you receive
satellite channels through DBS (Direct Broadcast Satellite)
receiver. The Controller allows the VCR to automatically switch
the cable box or DBS receiver's channel during timer recording.
NOTES:
• The Controller is not supplieEI with this unit. It can be requested
by mailing in tile completed lVC (able Mouse Certificate that is
included with tile accessory package.
• Fbr tile cable box, tile Controller is effective for VCR Plus+ or
Fxpress timer programing.
•For tile DBS receiver, the (bntroller is effective only for Fxpress
timer progmming,
•When connecting your cable box or DBS receiver, refer to its
instruction manual.
Turn on the VCR and TV, and select the VCR channel (or AV
mode).
[] SituateController
If both a cable box and a DBS receiver are used, position the
Controller so its signal reaches the remote sensors on both the
cable box and DBS receiven
[] AttachController
Fix securely using the adhesive strip attached on the back of the
Controller.
Cable box or DBS ieceiver
Settingchannelsmanually
- ManualChannelSet
You can add the channels you want or delete the channels you do
not want manually.
[] AccessMainMenuscreen,thenTuner MA_NMENU
Setscreen FU.CT,O.set
Press MENU on the Remote. Press ,_V to INITIALSET
move the highlight bar (arrow) to "TUNER
SET", then press OI4, or P*.
[] AccessManualChannelSetscreen
Press _V to move the highlight bar
(arrow) to "MANUAL CHANNEL SET",
then press OK or P>.
TUNER SET
BAND CATV
AUTOCHANNEL SET
[] AddorSKIp'"desiredchannels _ANOALC.ANNEESET
To add channels
[] Press the Number keys on the Remote
to input a channel number you want to
add.
[] Press OK or P>to set to"ADD".
[] Repeat [] to [] to add other channels.
Press MENU to return to normal screen.
To skip channels
[] Press '/_x,V or the Number keys to select a channel number you
want to skip.
[] Press OK or P>to set to "SKIP".
[] Repeat [] and [] to skip other channels. Press MENU to return
to normal screen.
After a power failure occurs, band selection will be reset to
"CATV'.
Your VCR Contio[Jer
{suggested locations)
[] Connectcableboxand/orDBSreceivertoVCR
RF out I
Transmitter I
Controlle[ I
To A NT. IN _,
Audio/video output
To AUDIO/VIDEO IN
• If your cable box or DBS receiver does not have audio/video
output connectors, connect the RF output terminal on the unit to
the AN]. IN terminal on the rear of your VCR.
• If your cable box or DBS receiver has audio/video output
connectors, connect an audio/video cable between the AUDIO/
VIDEO IN connectors on the rear of the VCR and the audio/
video output connectors on the unit.
• If both a cable box and a DBS receiver are used, it is
recommended that you connect the DBS receiver to your VCR%
AUDIO/VIDEO IN connectors and the cable box to your VCR's
ANT. IN connector.
CONTINUED ON NEXTPAGE
--7--

[] ConnectControllertoVCR
Connect the Controller to the CABLE BOX Controller connector
on the rear paneh
[] TurnoncableboxorDBSreceiver
Select a channel other than channel 9 on your cable box, or
channels 100, 205 on your DBS receiver.
[] AccessMainMenuscreen,thenInitialSetscreenonVCR
Press MENU on the Remote. Press _7 to move the highlight bar
(arrow) to "INITIAL SET", then press OK or P_.
[] AccessCableBoxSetscreenor DBS IRmA_BE_
ReceiverSetscreen G_GGKGET
LANGUAGE ENGLISH
Press/,_,_7 to move the highlight bar GUIDECHANRELSET
(arrow) to "CABLE BOX SEI" or "10BS DesRECEIVERGET
RECEIVER SET", then press OK or _>.
[] Selectoutputchannel CABLEGOXSET
Your selection depends on how the unit is "1_1_
(onnected to your VCR. ,,
•If the unit is connected to your VCR's
ANT. IN terminal on the rear panel,
Press _V until the channel number
representing the cable box's output (CH2
CH9) or DBS receiver's output (CH3 or CH4) appears on the
screen.
• If the unit is comEected to your VCR's AUDIO/VIDEO IN
connectors on the front panel, press _V until "ON F-1
(FRONI)" appears on the screen.
• If the unit is comEected to your VCR's AUDIO/VIDEO IN
connectors on the rear panel, press _7 until "ON L-I (REAR)"
appears on the screen.
• If you do not use any unit, press _V until "OFF" appears on
the screen.
[] AccessBrandSetscreen
Press OK or l>.
• If the Clock Set screen appears, perform "Manual Clock Set". If
you press MENU after the clock has been set, the Brand Set
screen appears.
[] Enterbrandcodeandperformtest
Press the appropriate Number keys on the
Remote to enter the brand code from the
following list, then press OK or l>.
CABLE 80X 8RARD SET
CABLE BOX BRAND
ARCHER
CABLETENNA
CABLEVIEW
CITIZEN
CURTIS
DIAMOND
GC BRAND
GEMINI
GENERAL INSTRUMENTS
HAMLIN
JASCO
IERROLD
NOVAVISION
OAK
PANASONIC
PULSER
RCA
REGAL
REMBRANDT
SAMSUNG
SCIENTIFIC ATLANTA
SIGMA
SLMARX
SPRUCER
STARGATE
TELFVIEW
TOCOM
UNIKA
UNIVERSAL
VIDEOWAY
ZENITH
CODE
1,5,17
1,17
15,16.17,2L25
15,16,17,2L25
Z8
1,17
15,16,17,2L25
15
L4,6,11,1Z15,28
10, l& 23
15
1,4,6,11,1Z15,28
Z8
7,20
13, 14
15,16.17,21,25
13, 14
10, l& 23
1,16,17
5, 16,24
Z8
7,20
5, 16, 17, 24, 25
13, 14
5, 15, 16, 17, 21, 24, 25
5, 16,24
b4,16
L17
16, 17, 25
3, 9, 22
3, 9, 22
DBS RECEIVER BRAND cODE DBS RECEIVEr BRAND CODE
JVC(DISH Net\yolk) 51 SONY (DSS) 41
E(-HOSTAR (DISH 51 RCA(DSS) 40
Network)
For cable box CAGLE GOXGRAND SET
•If the cable box's channel changes to 9, 1
setting is (omplete. Press OK. IO YONR CABLE BOX
•If the cable box's channel does not CHANGET_NELOG?
change to 9; BO
[] Press ,/_,_7 to move the highlight bar
(arrow) to "NO", then press OK or L>.
[] Repeat step [] until the cable box's channel changes to 9 by
entering another code.
[] If the channel does not change after going through all the code
numbers listed for your model of cable box, then try all the
other numbers.
For DBS receiver DBS RECEIVERGNAND SET
•If the DBS receiver's chamEel changes to 51
the channel listed below for your brand, GIUVGNR_GSUEGEIVER
setting is complete. Press OK or [>. CHANGET_NEL2GG?
JVC -'_ 100 SONY "+205 BO
ECHOSTAR -'_ 205 RCA "+205
•If the DBS receiver's channel does not
change as shown above;
[] Press ,/_V to move the highlight bar (arrow) to "NO", then
press OK or [".
[] Repeat step [].
--8--

I
BasicPlayback
Turn on the VCR and TV, and select the VCR channel (or AV
mode).
[] Loadacassette
Make sure the window side
is up, the rear label side is
facing you and the arrow on
the front of the cassette is
pointing towards the VCR.
• Do not apply too much pressure when inserting.
• The VCR turns on, and the (ounter on the on-s( reen display is
reset, automatically.
• If the cassette's record safety tab has been removed, playback
begins automatk ally.
[] Startplayback
Press PLAY (1_).
• The S-VHS indicator lights up when you play hack a tape
recorded in S-VHS mode or in S-VHS ET mode (L<_"pg. I1).
PressstOP (m)on the OR PressSTOP/EJECT(II!A/on
Remote. the VCR.
Press PAUSE (11)_ or Push the JOG diah
• Press PLAY I_) to resume • Push the JOG dial again to
normal playback, resume norma! playback.
NOTE:
During still picture, vertical vibration may appear on the 7V
screen. Press CH+/- on the Remote to _et a clearer picture.
Press PAUSE (ll) to pause, OR Push the JOG dial to pause,
then press 14141 or I_l_[ or then turn the JOG dial to the
PAUSE (I I)) iepeated!y, left Or iight.
• Press pLAY (l_) to resume O Push the JOG d!al again to
normal playbackl resume normal playback.
Press REW (4141) or FF OR Turn the JOG dial qu!ck!y to
(1_1_). the !eft or righ L
• Press PLAY (1_)to resume non'hal playback.
• If you press and hoId REW (41-,91) or FE (1_1_) for more than
2 seconds, simply releasing !t cancels the p!cture search, and
normal playback resumes.
Press 14141 or I_1_1 OR [um the JOG dial to the left
repeatedly• Or right.
• Press PLAY (P")to resume normal playback.
• Each time you press 141_1 or 1•41_1or each time JOG dial passes
a dick position, the playback speed changes.To decrease the
speed during picture search, press the opposite direction button
repeatedly or turn the diai in the opposite direction.
• During stil! picture, press and hold I_!l_l to start fopward (or
!4!41 to start reverse) slow motion playback. When you release
the button, still picture resumes. During still picture, holding
PAUSE (11) for more than 2 seconds also starts forward slow
motion playback. If you press PAUSE (!l) again, stil ! picture
During slow motion, some noise may appear on the T V screen.
Press CH+/- on the Remote to eliminate the noise.
•l"VOH+
"_0 _
Reverse _ "TVCH _ Forwal d
:eveise Reverse Reversesl)w S[°\v Norma F°iwarc_
_earc_ )la_ i 'l m_ _n )la_' _earch
"I,' Ill :)t[ :in ,I,' ,
I sePsI I psI s°PsI I s0psI
Press REW (41-,91) or FF OR Turn the JOG dial to the left
(1_1_). Or right.
Press STOP/EJECT (ll t_---).
• You can also eject the cassette when the VCR is turned off.
Press POWER _/L
PlaybackFeatures
Turn on the VCR and TV, and select the VCR channel (or AV
mode).
Adjustingtrackingcondition
- TrackingAdjustment
Automatic tracking adjustment
Whenever you insert a tape and start playback, automatic tracking
starts working and continuously analyzes the signal to enable
optinlum picture quality during playback.
Manual tracking adjustment
If automatic tracking cannot eliminate noises well during
playback, follow the procedures below.
On the Remote
[] Press SP/EP during playback to activate manual tracking.
[] Press CH +/- to eliminate the noises. Press it briefly for a fine
adjustment, or press and hold for a coarse adjustment.
• Press SP/EP again to rea(tivate automatic tracking.
Selectingmonitorsound
- AudioMonitor
While playing back a tape on whi(h stere() sound or SAP sound is
recorded, press A.MONITOR on the Remote. Each time you press
the button, sound changes.
HI-FI: Normally select this. Hi-Fi sound is played hack.
HI-FI L: Sound on the left Hi-Fi channel is played back.
HI-FI R: Sound on the right Hi-Fi channel is played hack.
NORM: Sound on the normal track is played hack.
NORM HI-FI: Both sounds on the Hi-Fi track and normal track are
mixed and played back.
NOTE:
7he above indication appears when "SUPFRIMPOSF" is set to
"ON" (z_:" p_. 1_), though the monitor sound changes in
sequence,
--9--
CONTINUED ON NEXT PAGE

Automaticoperationsafter rewinding
- Next FunctionMemory
The Next Fun< tion Memory "tells" tile VCR what to do after
rewinding is complete. Ensure that the VCR is in stop mode.
•For Automatic Playback Start
Press REW ('_l_l), then press PLAY (11_)within 2 se<onds.
• For Automatic Power Off
Press REW ('_l_l), then press POWER _/I within 2 seconds.
• For Automatic Timer Standby
Press REW ('_14), then press TIMER within 2 se< onds.
NOTE:
It is not possible to select the Automatic f_mer .Standby function if
the cassette_ record safety tab is removed.
Playingbacktaperepeatedly(100 times)
- RepeatPlay
During playback, press and hold PLAY (11_)for more than
5 se< onds. The play indicator ([::>) on the display panel starts
blinking slowly. ib stop playback, press STOP (I) on the Remote
or STOP/ElECT (I/m) on the VCR.
Locatingbeginningof recordings
- IndexSearch
Index _odes are placed on the tape at the beginning of ea<h
re<ording when re<ording on this VCR.
[] While the tape is not running, press SHUTTLE PLUS 141_1or I_l_l
on the Remote to start search.
[] ]b access a recording of 2 to 9 index
<odes away, press I_1_1 or _-I_1
repeatedly until the correct number is
displayed on the screen (only if
"SUPERIMPOSE" is set to "ON" tNOEX1
(_-_"pg. 15)). Playback begins
automatically when the desired
re<ording is located.
Beginning of the CLuient
-2 -1
_1 I-q141 1
Beginning of the
2nd next piogram
)ec_)rded
2_ 3
Locatingbeginningof timerrecordings
- InstantReview
After ensuring that the VCR is turned off and that the timer mode is
disengaged, press REVIEW.
• The VCR turns on, and rewinds to the index code indi< ating the
beginning of the last timer-re¢ orded program, then begins
playback automatically.
• You can a(cess a program of 2 to 9 index codes away from the
current position on the tape. If, for example, you have
5 programs recorded and you want to watch the third one, press
REVIEW three times.
• The Instant Review fun¢tion will also operate if the VCR is
turned on.
Skippingunwantedportions
- SkipSearch
Press SKIP SEARCH on the Remote once to 4 times during
playback. Ea<h press initiates a 30-second period of high speed
playback (up to 2 minutes). When the specified portion of the tape
is skipped, normal playback resumes automatically.To return to
normal playback during Skip Search, press PLAY (11_).
--10--

I
[t may be unlawful to record or play back copyrighted material
without the consent of the copyright owner.
Accidental erasure prevention
To prevent accidental recording on a
recorded cassette, remove its record
safety tab. To record on it later, cover
the hole with adhesive tape. Record safety tab
BasicRecording
Turn on the VCR an(] TV, an(] select the VCR channel ]or AV
nlode).
[] Loada cassette
Make sure the record safety tab is intact. If not, cover the hole with
adhesive tape before inserting the cassette.
• The VCR turns on, and the counter on the on-screen display is
reset, automatically.
[] Selectrecordingchannel
Press CH+/- or the Number keys on the Remote. Or push the JOG
dial, then turn it to the left or right.
• If you connect the TV and the VCR only using the RF
connection (_-7_pg. 5), press TV/VCR on the Remote so that the
VCR mode indicator lights on the display panel, to view the
program to be recorded.
[] Settapespeed
Press SP/EP. The selected tape speed will appear on the TV screen.
NOTE:
You can select tape speed in the stop mode or during re_ ording
pause r'node,
[] Startrecording
On the VCR, press REC (0). Or on the Remote, while holding REC
(0), press PLAY (1_).
NOTE:
If "VIDPO (_d3BRATION" is set to "ON" (_ 7_ pg. 15) (default
setting), the VCR takes about 7 second5 to assess the quality of the
tape in use, then recording begins with the picture level
optimized,
Press PAUSE (11).
•Press PLAY (11_)to resume recording.
• You can select channel in the recording pause mode.
Press STOP ill) on the OR Press STOP/EJECT (11 t_.) on
Remote. the VCR.
NOTE:
If the tape reaches it5 end during recording, the re_ ording stops
and "0" and "[:>" on the display panel blink. Press STOP/EJECT
(11 /Am) on the VCR to eject the cassette or press REW (_91) on the
Remote to rewind the tape.
RecordingFeatures
Turn on the VCR and TV, and select the VCR channel !or AV
mode).
Specifyingrecordinglength
- InstantTimerRecording(ITR)
During recording, press REC (0) on the VCR repeatedly until the
recording length you want appears on the display panel. The
record indicator (_) on the display panel starts blinking.
• Each time you press the button, recording length increases in
30-minute intervals (up to 6 hours).
• The VCR shuts off after recording is finished.
• To cancel an ITR, press STOP (11) on the Remote or STOP/ElECT
(ll/m-) on the VCR.
Watchingoneprogramwhilerecordinganother
During re_ording...
• [f you connect the TV and the VCR only using the RF
connection (_ 7" pg. 5) to view pictures from the VCR, press TV/
VCR on the Remote so that VCR mode indicator goes off from
the display paneh ([he TV broadcast being recorded
disappears.)
• If you are using the AV connection (_7° pg. 5) to view pictures
from the VCR, change the TV's input mode from AV to IV.
Then, select the channel you want to watch, on the TV.
SecondAudioRecording
This VCR's built-in MTS decoder enables reception of
Multichannel TV Sound broadcast. To record a SAP program
receive(], set "2ND AUDIO RECORD" to "ON" (_7 ° pg. 15).
S-VHS(SuperVHS),S-VHSETor VHSRecording
Mode
]his VCR can record in S-VHS {Super VHS), S-VHS ET or VHS.
•To record in S-VHS:
Set "S-VHS MODE" to "ON" (_8 _pg. 16). Then, insert a cassette
marked "S-VHS". The S-VHS indicator lights up on the display
panel.
The S-VHS recording mode is selected.
• To record in S-VHS ET on a VHS cassette:
Set "S-VHS ET" to "ON" (_ 7: pg. 15). [hen, insert a _assette
marked "VHS". The S-VHS indicator lights up on the display
panel.
• To record in VHS:
Insert a cassette marked "VHS".
Set "S-VHS ET" to "OFF" (z:7_pg. 15).
• To record in VHS oil an S-VHS cassette:
Insert a cassette marked "S-VHS". [he S-VHS indicator lights up
on the display panel. Then, set "S-VHS MODE" to "OFF"
]_7 _ pg. 16). The S-VHS indicator goes off.
The VHS recording mode is selected.
NOTE:
When playing back a tape that has been re_ orded in S-VHS or
S- VHS EI, the S-VHS indicator light_ up on the display panel
regardless of the "S-VHS EI" (_7 pg. 1_) or "S-VHS MODE"
(ZT: pg. 16) setting.
--11 --

ITimerRecording
Up to 8 timer recording programs can be made using VCR Plus+
timer programing, Express timer programing or 24HR Quick
Programing method as far as a year in advance. Remember, the
clock must be set before you can program the timer.
Turn on the VCR and TV, and select the VCR channel (or AV
nlode).
NOTES:
•If all the 8 prograEns have already been set, "PROGRAM FULL"
appears on the TV screen.
• After timer recording is completed, the VCR turns off
automa tic ally.
• You +an program the timer recording while a regular recording
is in progress; the menu screens will not be re( orded.
•To timer-record cable or satellite (hannels, perform "(i_ble Box
and/or DBS Receiver Control Setting" (_ _" pg. 7) and be sure to
kee I) the cable box or DBS receiver turned on.
• Ever) ifa power failure o_urs, the VCR keeps your timer
programs. Howeve); the ok)ok time, channel settings, and other
menu settings are lost. As a result, when the power is supplied
again to this VCR after the power failure, this VCR start__ the
Plug&Play setting automatically to restore the ck)( ktime and
(hannel setting. If the clock time and channel setting are
restored correctly, each timer program you have made will start
at it5 start time unless it5 end time has elapsed.
• If the tape reaches it5 end during timer recording, the recording
stops and "Q" "0 " and "L>" on the dispby panel blink. Press
TIMER to disengage time), then press STOP/EJECT (11/Am) on
the VCR to eject the cassette or press POWER cp/[ then press
REW (_1..I12 on the Remote to rewind the tape.
ChangingVCRPlus+®Setting
The VCR Plus+ programing system assigns a VCR Plus+ guide
channel to the TV channels and the cable channels. These guide
channel numbers are also called the VCR Plus+ channel codes.
Most TV listings have a section, usually a chart, indicating the
guide channel numbers assigned to each station.
To ensure that VCR Plus+ timer recording operates correctly, it is
necessary to set the VCR Plus+ "Guide Channel Set" for each
station.
If you have moved to a different area or if a broadcasting station's
channel number has been changed, perform the following steps to
set the correct guide channel number.
[] AccessMainMenuscreen,thenInitialSetscreen
Press MENU on the Remote. Press _V to move the highlight bar
(arrow) to "INEEIAL SET", then press OK or _>.
[] AccessGuideChannelSetscreen
Press _V to move the highlight bar (arrow) to "GUIDE
CHANNEL SET", then press OK or P*.
[] Inputguidechannelnumber GU,DDDGANND[GD,
Press ,/_,V or the Number keys to select the
VCR Plus+ guide channel number as
shown in the TV listing, then press OK or
_>.
[] Inputreceivingchannelnumber
Press _V or the Number keys to select the
number of the channel on which the guide
channel's broadcasts are received, then
press OK or _>.
•Repeat steps 1_1and L_lfor each instance.
[] Returntonormalscreen
Press MENU on the Remote.
GUIDE CHANNEL SET
VCRPlus+®TimerPrograming
]he PlusCode programing numbers are
the numbers next to the program in
most TV listing.
Load a cassette with the record safety
tab intact. The VCR turns on, and the
counter is reset, automatically.
[] Press PROG. on the Remote to access
the PlusCode No. screen.
PLUSCODE NO.
[] Press the appropriate Number keys
to input the PlusCode number, then
press OK or b>. Check to make sure
the setting is accurate on the Program screen.
PLUSCODE NO.
8:O0PM + 1O:0OPM
DATE CH
12/24/03 12 SP
WED
,,t@
•If the Guide Channel Set screen GUIDECHANNDLGDT
appears after pressing OK, press the
Number keys, CH+/- or _V to input
the number of the channel on which
the broadcast for the PlusCode
number is received on the VCR or
cable box, then press OK.
•]b set the tape speed, press SP/ER
•]b change the stop time, press STOP+/-.
•]b timer-record daily (MondapFriday) or weekly serials,
press DALLY (M-F) (Number key "8") or WEEKLY (Number
key "9"). Pressing the button again makes the "DAllY" or
"WEEKLY" display disappear.
•If you made a mistake, press CANCEL to access the PI usCode
No. screen again.
•If an incorrect PlusCode number or the one for a broadcast
already finished has been inputted, "ERROR" is displayed for
about 5 seconds, then the PlusCode No. screen reappears.
[] Press OK or PROG..
•If "PROGRAM NOT COMPLETED PROGRAM OVERLAP"
appears, see "Program overlap warning display" (_" pg. 14).
[] Press TIMER. The VCR turns off automatically and "(_)" is
displayed on the display panel.
12
CONTINUED ON NEXT PAGE

ExpressTimerPrograming
Load a cassette with the re_ord safety tab intact. The VCR turns
on, and the counter is reset, automatically.
[] Press PROG. on the Remote to a((ess the PlusCode No. screen.
[] Press START+/- once to access PROGRAM1
Progra nl s_ reerl. START STOP
Press START+/-, STOP+/-, DATE+/- or _ []
DATE CH
CH+/- repeatedly to enter the start _ _ lk'_J
time, stop time, (]ate or channel.
• Press and hold START+/- or STOP+/-
to increase the time in 30-minute
intervals.
• To set the tape speed, press SP/EP.
• To timer-re( or(/daily (Monday-Friday) or weekly serials,
press DAILY (M-F) (Number key "8") or WEEKLY (Number
key "9"). Pressing the button again makes the "DAllY" or
"WEEKLY" display disappear.
• If you are using a DBS receiver an(] PROGRAM1
"DBS RECEIVER SET" is set to "ON', START STOP
the band indi( ation appears under _ []
DATE CH
the <hannel number indi(ation. _ Ii]_J
WED ORS
(Refer to "Cable Box and/or DBS
Receiver Control Setting" (L_ ° pg. 7).)
TV: lo timer-record a regular TV
broadcast received on the VCR.
CATV: Ib timer-record a cable TV broadcast received on the
VCR, or through a cable box (unless "CABLE BOX
SEI" is set to "OFF").
DBS: Ib tinier-record a satellite broadcast re(eive(] through
a DBS receiver.
If the channel number entered reEtuires that the band be set
and "7=DBS" is displayed on the s( reen, press DBS (Number
key "7") to select "DBS".
[] Press OK or PROG..
• If "PROGRAM NOT COMPLETED PROGRAM OVERLAP"
appears, see "Program overlap warning display" (L_ ° pg. 14).
[] Press TIMER. The VCR turns off automatically and "(_)" is
displayed on the display panel.
24HRQuickPrograming
You (an program a timer reDording that starts within 24 hours
using the JOG dial on theVCR.
Load a cassette with the reEord safety tab intact. The VCR turns
on, and the (ounter is reset, automatically.
[] Press 24HR QUICK PROGRAMon theVCR.
"[::>" starts blinking on the display panel.
[] Turn the JOG dial to the left or right to set -e_
the start time. Start time
• One click stop of the JOG dial changes
the time in 5-minute intervals.
[] Push the lOG dial. "(_" starts blinking on Stop tim__
the display panel. Turn the JOG dial to the
left or right to set the stop time.
• To set the tape speed, press SP/EP. The _,
current setting for the tape speed appears Channel number
on the display panel for about 5 seconds.
Press SP/EP again to change the setting
while tape speed is displayed.
[] Push the lOG dial. Turn the JOG dial to the
left or right to select the channel, then press 24HR QUICK
PROGRAM. The VCR turns off automatically and "(_)" is
displayed on the display panel.
NOTES:
•If "IW" appears on the display panel, repeat the above st_ps
again.
•When a menu sDreen is shown, you cannot use 24HR Quick
Programing function. Press MENU to return to nom}al screen,
and try again.
•You can use 24HR Quick PrograD'ning fdnction also when the
VCR is turned off.
• Fbr 24HR Quick Programing function, the program overlap
warning display does not appear even if some programs overlap
each other,
TousetheVCRwhileit isintimerrecordingstandby
mode
Press TIMER, then press POWER d_/L After you use the VCR, press
TIMER again to put the VCR into timer recording standby nlo!]e.
Checking,cancelingorchangingprogramsettings
[] Disengagetimer
Press TIMER, then press POWER d_/L
• When "AUTO TIMER" is set to "ON" (Z_:"pg. 15), you do not
have to press TIMER.
[] AccessProgramCheckscreen
Press PROG. CHECK.
[] AccessProgramscreen
Press PROG. CHECK again. Each time you
press PROG. CHECK, the next program's
Program screen appears.
[] Cancelorchangeprogramsetting
R START STOP CH DATE
1 S:O0P 10:00 12 12/24
2 1O:0OA 10:45 40 12/25
11:3OP 1:00 125 12/25
To cancel aprogram, press CANCEL when the Program screen
you do not want is shown.
To change aprogram, press the appropriate button: START+/-,
STOP+/-, DATE+/-, CH+/-, DAILY (M-E) (Number key "8"),
WEEKLY (Number key "9"), and/or SP/EP when the Program
screen on which you want to make changes is shown.
[] Returntonormalscreen
Press PROG. CHECK repeatedly until no Program screen is
shown.
[] Reengagetimerrecordingstandbymode
Press TIMER. The V(_:R turns off automatically and "Q" is
displayed on the display panel.
• When "AUTO TIMER" is set to "ON" (_-_ pg. 15), the timer
recording standby mode automatically resumes when you turn
off the VCR.
CONTINUED ON NEXT PAGE
--13--

Programoverlapwarningdisplay
If "PROGRAM NOT COMPLETED PROGRAM OVERLAP"
appears, you have another program overlapping the program you
have just made. The Program Check screen appears and
( onflicting programs will start blinking.
PROGRAM NOTOOMPLETOD
PROGRAM OVERLAP
Example:
Program 1 (you have just made) and Program 4 overlap each other
[] Selectprogramtomodify PROTAOTGr0PCROAT0.
1 O:OOP 10:00 12 10/24 _
Press _V, then press OK or _. o 10:S0A10:45 40 10/20"
overlapping programs. "
•If you do not mind this overlap, press
PROG. to f inish th e tim er prog ram
setting. The program starting earlier or
program with the lower program number will be re<orded.
[] Cancelorchangeprogramselling OROGOAM4
To cancel aprogram, press CANCEL when START STOP
O:00PM _10:OOPM
the Program screen you do not want is OAT0 CH
12/24/03 10 SP
shown. WED
To change aprogram, press the
appropriate button: START+/-, STOP+/-,
DATE+/-, CH+/-, DALLY (M-F) (Number
key "8"), WEEKLY (Number key "9") and/or SP/EP when the
Program screen on which you want to make <hanges is shown,
then press OK or _>.
• If the overlap is not yet solved, the conflicting programs will be
shown on the Program che<k s< teen. Repeat the above steps
again.
[OtherFunctions
Timerwarningdisplay
A warning appears on the TV screen to tell -WARNING-
TIMER RECORDING
you thatthe timer-recording isto startin TOSTARTGOON
(CANCEL)
5 nfinutes if you are not in the timer
re_ ording standby mode at that time. Press
TIMER to put the VCR into timer re_ ording
standby mode. IZ_ clear the display, press CANCEL on the Remote.
Checkingtapeposition
When you change the VCR operation
mode from the stop mode to fast forward
or rewind mode, or when you perform an
Index Search (_-_ pg. I 0) or Instant Review
(_-_ pg. I 0), the tape position indicator
appears.
.... +-=-+--= +-_r-- E
REMA[H l:oo
COUNT _1:23:45
The position of ,,11,,in relation to "B" (Beginning) or "E" (End)
shows you where you are on the tape.
• Set "SUPERIMPOSE" to "ON" (ZT_ pg. 15).
Changingdisplayinformation
Ea<h time you press DISPLAY, the display panel
shows the <hannel number and the clock time
alternatively.
• You can change display in the stop or recording
mode, or during rewind/fast-forward.
• When "SUPERIMPOSE" is set to "ON"
(_-_" pg. 15) and DISPLAY on the Remote is pressed, time
counter and tape remaining time will appear on the TV s<teen.
To reset the time <ounter, press C.RESET on the Remote.
Functionsettings
You can use the other useful fun( tion settings on the Function Set
screen.
[] Access_aJnMenuscreen,then MA_NMENU
FunctionSetscreen TOHERSOT
_[IJI[_I[I]IIG']RI
Press MENU on the Remote. Press ,/_V to INITIALSOT
move the highlight bar (arrow) to
"FUNCTION SET", then press OK or _>.
[] SelectFunction
Press ,/_V to move the highlight bar (arrow) to the function you
want to set.
FUNCTION PREVIOUS PAGE PREVIOUSPAGEPREVIOUSPAGE
VIDEO GAUBRATIOH ON BLUE BASK ON _ROAR AUXINPUT VIDEO
PICTURE GOHTROL AUTO 2ND AUDIO RECORD OFF
AUTO TIMER OFF AUD O MOH TOR H-F
SUPERIMPOSE ON bS.VHG MODE ON I_
NExTAVCOMPU-UNRpAGE OH t_g_C T
[] Changesetting
Press OKor _>. The default setting is bold in the table below. Press
MENU to return to normal screen.
After a power failure occurs, Function Settings will be reset to
its default setting.
--14--
CONTINUED ON NEXTPAGE

•S-VHSET-- ON/OFF
When this function is set to "ON", you _an record on VHS
cassettes with S-VHS picture quality. Tapes recorded using this
function can be played back on most S-VHS VCRs or VHS VCRs
equipped with the S-VHS ET function or VHS VCR equipped with
the SQPB (S-VHS QUASI PLAYBACK) function.
When this function is set to "ON", the S-VHS indicator lights up
on the display panel.
NOTES:
•Before recording, set "VIDEO (?_LIBRATION" to "ON'.
(_° See below)
• You cannot activate the S-VHS ET function while re(ording
(_-_" pg. 77), time_recording (___ pg. 72) or Inst, mt lTmer
Re( ording (_ _log. 7 72or &e "VIDFO (>,LIBRATION" function
(_-_" See below) is in progress.
•lhe S-VHS EI function does not work with S-VHS cassettes.
•Po kee I) the highest quality re_ording andplayback pictures
over a long period of time, S-VHS recording on S- VHS cassettes
is recommended.
• Use of high grade tapes is recommended for S-VHS ET
recordings. On some tapes, picture quality will not improve
even if the S-VHS EI function is used. Check the recording
quality before you start itr_portant re( ordings.
•VIDEOCALIBRATION-- ON/OFF
When this function is set to "ON', this VCR che_ks the _ondition
of the tape in use during playback and recording, and
compensates to provide the highest-possible pictures. This takes
place whenever you play back a tape or start recording after
inserting a tape.
NOTE:
7_e VCR checks _e _pe con_tion for about 7 seconds, _en
starts recording. lb make sure you record the desired s( ene or
program completely, perform &e following steps:
[] Press and hold PAUSE (11), and press REC (Q). After about
7 seconds, the VCR re-enters Record Pause mode.
[] Press PLAY (11_)to start recording.
• PICTURECONTROL-- AUTO(NORM)/EDIT/S0FT/SHARP
This function helps you to adjust the playback picture quality
according to your preference.
AUTO (NORM): Normally select this. Picture quality is adjusted
automatically. When "VIDEO CAHBRATION" is "OFF", "NORM"
will appear instead of"AUTO".
EDIT: Minimizes picture degradation during editing (recording and
playback).
SOFT: Reduces image coarseness when viewing overplayed tapes
containing much noise.
SHARP: Clearer, sharper-edged picture when viewing images with
much flat, same-colored surfaces such as cartoons.
NOTE:
Sele( t "EDIT" when you are editing tapes. After you finish editing
the tapes, sele( t "AUTO".
•AUTOTIMER-- ON/OFF
•When this function is set to "ON":
The timer recording standby mode is automatically engaged
when the VCR is turned off. It is temporarily canceled when the
VCR is turned on. You do not have to press TIMER to engage or
disengage the timer recording standby mode.
•When this fundion is set to "OFF":
You have to press TIMER to engage or disengage the timer
recording standby mode.
• SUPERIMPOSE-- ON/OFF
When this function is set to "ON", w/rious VCR status information
(on-screen display) appears on the screen.
NOTE:
When you use this VCR a_ the playba( k VCR for editing a tape, be
sure to set this function to "OFF';" otherwise, the VCR status
information (on-s( reen dispby) will be recorded on the edited
tape.
•AUTOSP-,-EPTIMER-- ON/OFF
When this function is set to "ON', the VCR automatically
switches to EP mode to allow complete recording if there is not
enough tape to record the entire program while timer-recording in
SP mode.
For Example, Recording a program of 140 minutes in length onto
a 120-minute tape
Approximately 110 minutes Approximately 30 minutes
ISP mode J FP mode J
NOTES:
• If you have programed the VCR to timer-re(ord 2 or more
programs, do not use this function, but change the tape speed
manually during timer programing.
•lhere may be some noise and sound disturbance where the tape
speed swit( hes from SP to EP mode on the tape.
•7his function is not available during ITR (Instant 7Truer
Recording), and will not work properly on the following tapes:
7(ST2-30, 7(ST2-60, 7(5T)-90, and 7(ST)-720.
•VIDEOSTABILIZER-- ON/OFF
When this function is set to "ON', you can automatically corre(t
vertical vibrations in the picture when playing back unstable
recordings made on another VCR.
NOTE:
To wat( hre( ordings with (lose-( aption or when you finish
viewing atape, set this function to "OFF".
•BLUEBACK-- ON/OFF
When this function is set to "ON", the TV screen becomes all blue
when receiving a channel not in use.
NOTE:
When you want to re( eive an unstable ( hannel with poor signals,
set this function to "OFF".
•2NDAUDIORECORD-- ON/OFF
•When this function is set to "ON";
If a SAP program is received, the SAP audio is recorded on both
the normal and Hi-Fi tracks. [he main audio is not recorded.
If a non-SAP program is receive((, the main audio is recorded on
both the Hi-Fi and normal tracks.
•When this function is set to "OFF", the SAP audio cannot be
recorded.
NOTE:
When the ( hannel is _hanged on the VCR;
•7he "STFREO" indi(ation appears on the screen for about
5second,s if the program is a stereo broad(ast.
•7he "SAP" indication appears on the screen for about 5seconds
if the prr)gram is a SAP broad( ast.
• Both indicatk)ns appear when a stere() program is accompanied
by SAP sound.
--15--
CONTINUED ON NEXT PAGE

• AUDIOMONITOR-- HI-FI/HI-FI UHI-FI R/NORM/MIX
This VCR can record two sound tracks simultaneously (normal and
Hi-Fi) on a Hi-Fi stere() tape. You can select the sound track(s) to
listen to while playing back a Hi-Fi stereo tape. In addition, when
playing back a prerecorded tape containing two separate audio
programs on the Hi-Fi tracks, you can choose either one by
selecting either "HI-FI I" or "HI-FI R'.
HI-R: Normally select this. Hi-Fi sound is played back.
HI-FI L: Sound on the left Hi-Fi channel is played back.
HI-FI R: Sound on the right Hi-Fi channel is played back.
NORM: Sound on the normal track is played back.
MIX: Both sounds on the Hi-Fi track and normal track are mixed
and played back.
NOTES:
•While playing back a monaural tape, soun(Ls on the nom_al
track will be heard reganlless of this setting.
• If RF connection (_ pg. _2 is used for viewing pictures on the
TV, sound will be monaural even though you select "H!-FI".
• You can al_o use the A.MONITOR button on the Remote to
select the desired monitor sound. (_-_" pg. 92
•S-VHSMODE-- 0H/OFF
You can determine which recording mode -- either S-VHS mode
or VHS nrode -- is use(] for recording on S-VHS tapes.
•When this function is set to "ON", you can record on S-VHS
tapes with S-VHS picture quality.
•When this function is set to "OFF", you can record on S-VHS
tapes with VHS picture quality.
NOTES:
•S-VHS mode allows you to make high quality video recordings
with horizontal resolutk)n of 400 lines, comparing with the 2_0
lines of resolution of conventional VHS recordings. To achieve
the highest quality picture we recommended to record in S-VHS
mode. (But remember that a conventional VHS VCR without
SQPB cannot play back S-VHS tapes recorded in S-VHS mode.)
•S-VHS MODE setting does not affect recording on VHS tapes.
Recording on VHS tapes is always performed in VHS mode
except when using S-VHS ET mode (_Z_pg. !_2.
• AVCOMPU-LINI(-- 0H/0FF
The remote PAUSE/AV COMPUL]NK ternfinal on the rear panel
can be used as either the remote PAUSE terminal or the AV
COMPULINK terminah
•When this function is set to "ON", you can use this tenninal as
the AV COMPUI INK terminal By connecting other JVC's AV
COMPUHNK components, including amplifiers (or receivers)
and televisions, one touch control of the audio and video
components linked via their AV COMPUHNK connectors
becomes possible.
•When this function is set to "OFF", you can use this terminal as
the remote PAUSE terminal. If your JVC camcorder is equipped
with the Master Edit Control, you can control the VCR from the
cam(order. Connect the mini-plug cable (not supplied with this
VCR) between the remote PAUSE terminal and the EDIT
connector on the camcorder.
NOTE:
Refer to the other component.," instruction manuals for connection
and it_ operations.
• FRONTAUXINPUT-- VIDE0/S-VIDE0
You have to select which terminal either VIDEO (composite) or
S-VIDEO (Y/C separate signals) to use as the video input terminal
on the front panel.
Make sure to select the correct terminal; otherwise, you may fail in
recording (editing) on this VCR.
• REARALIXINPUT-- VIDEO/S-VIDE0
You have to select which terminal -- either VIDEO (composite) or
S-VIDEO (Y/C separate signals) to use as the video input terminal
on the rear panel.
Make sure you select the correct terminal; otherwise, you may fail
in recording (editing) on this VCR.
SatelliteAutoRecording
You can automati(ally record a satellite program which is timer-
programed on your DBS receiver.
Turn on the VCR and TV, and select the VCR channel (or AV /
mode). J
[] Con nect a DBS receiver to the AU DIO/V] D EO IN or S-V] DEO ] N
connectors* on the rear panel. You can also connect the (:able
box if it has a timer.
* To use these donne(tots, y_u have to select which one to use. ISee
abow', "REAR AUX INPUT".)
[] Set timer program on DBS receiver referring to its instruction
manuah
[] Load a cassette with the record safety tab intact.
[] Press SP/EP to set the tape speed. lhe selected tape speed will
appear on the TV screen.
[] Press REC LINK for more than 2 seconds. The VCR turns off
automatically and enter the Satellite Auto Recording standby
mode ("[.-1" and "Q" light up). When signals come into the
VCR from the DBS receiver, the VCR starts recording ("Q" arid
"O" light up and "1-1" blinks). When no signals come into the
VCR, the VCR stops recording ("O" goes off).
NOTES:
• Be sure not to turn on the DBS receiver before the program start.s
broadcasting; otherwise, the VCR will start recording when the
DBS receiver is turned on.
• To disengage the Satellite Auto Recording standby mode, press
REC LINK ("®" goes off).
• Depending on the type of satellite receiver, Satellite Auto
Recording may not be compatible.
ChildLock
Turn on the VCR and TV, and select the VCR channel (or AV /
mode). J
You can disable the VCR operations. While the VCR is turned on,
press and hold POWER _/I on the Remote for more than
10 seconds. The VCR turns off, "CL" appears for about 5 seconds
on the display panel.
To release the child lock, press and hold POWER _/I on the
Remote until the VCR turns on.
NOTES:
• Pressing TIMER during timer recording, unplugging the A(
power cord or a power outage also releases the child lock.
• Even if the child lock function is in use, it is possible to engage
and disengage the timer mode with TIMER (Q) on the Remote.
Keep the Remote out of the children's reach.
• T_mer re(ording programs will be perforated even if the child
lock function is activated.
--16--
CONTINUED ON NEXTPAGE

Multi-BrandRemoteControl
This Remote carl control some functions of remote controllable
TVs, cable boxes or DBS (Direct Broadcast Satellite) receivers
listed below. Without setting, you can control a IVC TV.
NOTES:
•Some unit_ brand5 have more than one _ode. If the unit does
not function with a specified _ode, try other codes,
• Depending on the type of unit, some or all functions cannot be
operated using this Remote,
• It is not possible to operate a unit not equipped with a remote
ser) sotq
• It is not possible to set the Remote for both your cable box and a
DBS receiver at the same time,
• Once you have set the Remote to operate the unit, )/ou do not
have to set it until you replace the batteries from the Remote,
• If the batteries of the Remote are discharged, the Remote may
not be able to control the TV, cable box or DBS receiver,
Replace the batteries,
WBrandSetting
[] TurnonTV
Turn on the TV using the Power button on the TV or its Remote.
[] SetTVbrandcode
[] Press and hold TV.
[] Press MBR SET.
[] Press the Number keys to enter your TV's brand code.
[] Press OK, and release TV. [he TV should turn off.
[] OperateTV
While holding down TV, press one of the following buttons:
POWER c9/1, TV/VCR, TV CH+/-, _/q_ (TV Muting), TV VOL+/-,
and the Number keys,
•For some brands, you must press ENTER after having pressed the
Number keys to enter a channel number.
TV BRAND CODE TV BRAND CODE
JVC 01,03 SONY 07
HITACHI 10 SAMSUNG 12
MAGNAVOX 02 SANYO 13
MITSUBISHI 03 SEARS 13
PANASONIC 04, 11 TOSHIBA 08
RCA 05 ZENITH 09
SHARP 06
CableBoxor DBSReceiverBrandSetting
Turn on the VCR and TV, and select the VCR channel (or AV
nlode).
[] Turnoncableboxor DBSreceiver
Turn on the cable box or DBS receiver using the Power button on
the unit or its Remote.
[] Enterbrandcode
[] Press and hold CABLE/DBS.
[] Press MBR SET.
[] Press the Number keys to enter your cable box's (or DBS
receiver's) bran(:] code,
[] Press OK, and release CABLE/DBS.
[] Operatecableboxor DBSreceiver
While holding down CABLE/DBS, press one of the following
buttons: POWER _/1, TV CH+/-, and the Number keys.
•For some brands, you must press ENTER after having pressed the
Number keys to enter a channel number.
•lb change the cable box's (or DBS receiver's) channels, press TV
CH+/- or the Number keys, (The CH+/- button can be used to
change the VCR's channels only.)
CABLE BOX BRAND
ARCHER
CABLETENNA
CABI.EVIEW
CITIZEN
OJRTIS
DIAMOND
GC BRAND
GEMINI
GENERAL INSTRUMENTS
HAMI J N
JASCO
JERROI D
NOVAVISION
OAK
PANASONIC
PULSER
RCA
REGAL
REMBRANDT
SAMSUNG
SCIENTIFIC ATLAN1A
SIGMA
SL MARX
SPRUCER
STARGATE
TEl EVIEW
T(:)COM
UNIKA
UNIVERSAL
V IDE(:)WAY
ZENITH
DBS RECEIVER BRAND
IVC (DISH Network)
ECHOSTAR (DISH Network)
SONY (DSS)
RCA (DSS)
CODE
01,05, 17
01, 17
15,16,17,21,25
15,16,17,21,25
02
01, 17
15,16,17,21,25
15
01,04, 06, 11, 12, 15,28
10, 18, 23
15
01,04, 06, 11, 12, 15,28
O2
O7
13, 14
15,16,17,21,25
13, 14
10, 18, 23
01, 16, 17
05,16,24
O2
O7
05,16,17,24,25
13, 14
05, 15, 16, 17,21,24,25
05,16,24
01,04, 16
01, 17
16,17,25
03, 09, 22
03, 09, 22
CODE
51
51
41
4O
ChangingRemoteControlCode
This Remote is capable of transmitting two control codes; one set
to respond to A code control signals and another set to respond to
B code control signals, This Remote control is preset to send A
code signals because your VCR is initially set to respond to A code
signals. You can easily modify your VCR and the Remote to
respond to B code signals. When using two JVC VCRs, set two
VCRs and their Remotes to different codes, so that you can
operate these VCRs separately.
[] Setremotecontrolcodefor Remote
[] Press and hold A/B.
[] Press the Number key "2".
[] Press OK, and release A/B.
•The Remote now can transmit B code control signals.
[] CheckremotecontrolcodeforVCR
Press and hold I_ on the VCR for more than 5 seconds while the
VCR is turned off. ]he code currently set appears on the display
panel.
[] ChangecodeforVCR
Press any key on the Remote. 1he VCR now responds to B code
control signals,
•To set the Remote and the VCR back to A code control signals,
repeat the same procedure as shown above except pressing the
Number key "1" in step [] of IBI.
Tocontroltwo VCRswith the sameRemote
You can control two IVC VCRs by switching the remote control
code for the Remote between A and B ( " step IBI), keeping two
VCRs to different control codes.
•To change only the remote control code for the Remote, DO
NOT perform steps [] and [],
17

IEditing
Editingwith AnotherVCR
You (an use your VCR as the playback or recording VCR. You carl
use a camcorder as the playback VCR and your VCR as the
recording VCR. Refer also to the other components' instruction
manuals for connection and its operations.
[] Makeconnections
Example 1: When another VCR is VHS VCR
ToAUDIO/VIDEOIN t t t
A/hen using this VCR
as the recording VCR,
connect this VCR's
AUDIO/VIDEO IN
connectors to the
audio/video output
connectors on another
VCR.
To AUDIO/VIDEO OUT
When using this VCR
as the playback VCR,
connect this VCR's
AUDIO/VIDEO OUT
connectors to the
audio/video input
con nectars on another
VCR.
To audio/videooutput ,_ ,_ ,_ To audio/video input
•If another VCR is monaural, connect this VCR's AUDIO I IN (or
OUT) connector to the audio output (or input) connector on
another VCR.
Example 2: When another VCR is S-VHS VCR and when using
this VCR as the playback VCR
ToAUDIOOUT t t
Audio ca _c_1 _
(not suppli_
T,, _,L,di,, input _ ,_
t To SWIDEO OUT
Swideo cable
/supplied}
_l" To S-video input
Example 3: When another VCR is S-VHS VCR and when using
this VCR as the recording VCR
To AUDIO input t t
Audio ca_
(not suppli_
T° audi° °utput _lr _lr
t To SWIDEO input
S-video c:able
(supplied)
_!" To S-video output
[] Loadcassettes
Insert the playback cassette into the playback VCR and the
(assette to be recorded on into the recording VCR.
[] SelectinputmodeonrecordingVCR
Select the correct external input on the recording VCR.
On this VCR (when using this VCR as the recording VCR);
Sele(t "E-1" -- when connecting the other VCR to the audio/video
(or S-video) input _onne_tors on the rear panel.
Sele(t "F-1" -- when connecting the other VCR to the audio/video
(or S-video) input connectors on the front panel.
Press AUX or CH+/-on the Remote. Or push the lOG dial, then
turn it to the left or right.
[] SelectvideoinputconnectoranrecordingVCR
When using this VCR as the recording VCR, select the appropriate
mode depending on the _onne(tor being used (_" pg. 16).
When using S-VIDEO input connector on the front panel, set
"FRONT AUX INPUT" to "S-VIDEO".
When using S-VIDEO IN connector on the rear pane[, set "REAR
AUX INPUT" to "S-VIDEO".
When using VIDEO input connector on the front panel, set
"FRONT AUX INPUT" to "VIDEO".
When using VIDEO IN connector on the rear pane[, set "REAR
AUX INPUT" to "VIDEO'.
[] Selecteditmode
Set the edit mode to "ON" _r the VCRs if such a mode is
equipped.
• On this VCR, set "PICTURE CONTROl." to "EDIT" (_° pg. 15).
[] Startplayback
Press PLAY (1_) on the playback VCR.
[] Slarl recording
Press REC (I) on the recording VCR.
--18--
CONTINUED ON NEXT PAGE

Variousconnectionforeditingtapes
The following three methods carl be used for editing tapes.
• VHS to S-VHS editing (VIDEO-VIDEO connedion):
Although the picture quality is inherently limited by the
original VHS quality, the edited tape has better picture quality
than those made by VHS-to-VHS editing.
•S-VHS to VHS editing (VIDEO-VIDEO connection):
Sin_e the original source is re_orded in S-VHS mode, the
edited tape has better picture quality than those made by
VHS-to-VHS editing.
• S-VHS to S-VHS (S-VIDEO connection):
Original picture quality of S-VHS made can be duplicated
with minimal pk ture degradation. [his is the best editing
method you can use on S-VHS VCRs.
AudioDubbing
Audio Dubbing replaces the normal audio sound of a previously
recorded tape with a new soundtra(k.
[] Makeconnections
Connect an audio cable between the VCR's audio input
connectors and the audio component's audio output connectors.
• When connecting a monaural audio component, use only the
VCR's AUDIO I input connecton
• Audio Dubbing is possible by using the audio input connectors
on the front panel or on the rear panel.
ToAUDIO input 1" 1"
To AUDIO output It
[] Selectinputmode
Select "F-1" when connecting the audio conlponent to the
audio input connectors on the front panel.
Select "L-1" when connecting the audio component to the
audio input connectors on the rear panel.
Press AUX or CH+/- on the Remote. Or push the JOG dial, then
turn it to the left or right.
[] Locatestall point,andengageAudioDubbingmode
Load a cassette and press PLAY (1_) on the VCR. Press PAUSE (11)
at the point where you want to start dubbing, then press A.DUB.
• • • ,, t/
The VCR enters the Audio Dubbing Pause mode. _) blinks
and "1:>" lights on the display paneh
[] Startdubbing
Engage the Play nrode of the audio component, then press PLAY
(1_) on the VCR. Audio Dubbing begins at this point.
• Ib pause dubbing, press PAUSE (11). Press PLAY (1_) to resume
dubbing.
[] EndAudioDubbing
Press STOP (I) on the Remote or STOP/EJECT (I/_) on the VCR,
then engage the Stop mode of the audio component.
NOTES:
•When monitoring tile sound during Audio Dubbing, the normal
soundtrack is automatically selected. If you wish to hear the
Hi-Fi or mixed sound (Hi-Fi + nomlal soundtra_ ks), press
A.MONITOR to select "NORM HI-FI". (t__" p<q.g, "Selecting
monitor sound")
•Audio Dubbing stops automatically when the counter reaches
"0:00:00"; and tile VCR enters tile PLry mode. Check tile
counter reading on the screen before dubbing.
•Audio Dubbing is not possible with a cassette whose reconl
safety tab has been removed.
•When pLrying back an audio-dubbed tape, press A.MONITOR
to select tile soundtrack you wish to hear. (_-_ pg. g, "Selecting
monitor sound")
InsertEditingandAVDubbing
Insert Editing:
You can replace a recorded scene with new scene recorded on
another tape or with other materiah Both the picture and the
sound recorded on the Hi-Fi sound track are replaced at the same
time.
AV Dubbing:
You (:an perfornl Audio Dubbing and Insert Editing at the same
time. This means that the picture and the sounds recorded on the
Hi-Fi sound track and on the normal track are replaced at the
same time.
• For AV Dubbing, you can edit pictures and sound using different
sources; connect a video source to the video input connector,
and an audio source to the audio input connectors.
[] Makeconnecli0ns
Connect an audio/video cable between the VCR's audio/video
input connectors and the other (omponent's audio/video output
connectors.
• Insert Editing and AV Dubbing are possible by using the audio/
video input connectors on the front panel or on the rear panel.
To AUDIOA/IDEO IN t t t
Audio/video caMe
mot supplied)
$ $
t To S-VIDEO IN
Swideo cable
_supp ed)
To S-video output
[] Selectinputmode
Select "F-I " _hen connecting the other component to the
audio/video input connectors on the front panel.
Select "L-1 " _hen connecting the other component to the
audio/video input connectors on the rear panel.
Press AUX or CH+/- on the Remote. Or push the lOG dial, then
turn it to the left or right.
--19--
CONTINUED ON NEXTPAGE

[] Selectvideoinputconnector
Select the appropriate mode depending on the connector being
used (L_ _pg. 16).
When using S-VIDEO input connector on the front pane[, set
"FRONT AUX INPUT" to "S-VIDEO".
When using S-VIDEO IN connector on the rear panel, set "REAR
AUX iNPUT" to "S-VIDEO".
When using VIDEO input connector on the front pane[, set
"FRONF AUX iNPUT" to "VIDEO'.
When using VIDEO IN connector on the rear pane[, set "REAR
ALJX INPUT" to "VIDEO".
[] Selecteditmode
Set the eclit mode to "ON" _r the VCRs if such a nlode is
equipped.
• On this VCR, set "PICTURE CONTROL" to "EDIT" (_ pg. 15).
[] Locateendpoint
Load the cassette to be edited into the VCR and press PLAY (1_),
then press PAUSE (11) when you find the end of the scene for
which you want to edit.
Press C.RESET so that the counter reading becomes "0:00:00".
[] Locatestartpoint,andengageInsertEditingmode
Press REW ('_l_l), then press PAUSE (11) when you find file
beginning of the s(ene for whi(h you want to edit, then press
INSERT.
) " .
• The VCR enters the Insert Editing Pause re(de. _) and "L>"
light on the display panel.
• If you want to perform AV Dubbing anti replace the picture,
Hi-Fi audio soundtrack and normal audio soundtra( k all at the
same time, after you press INSERT, press A.DUB also.
[] Startediting
I.oad the source cassette and engage the Play mode of the other
( omponent, then press PLAY (1_) on the VCR. insert Editing begins
at this point.
• Insert Editing stops automatically when the counter reaches
"0:00:00", and the VCR enters the Play nlode.
To stop editing any time during recording
Press STOP (11) on the Remote or STOP/EJECT (111._-A) on the
VCR, then engage the Stop mode of the other (onlponent.
NOTES:
•Be sure to select "AUTO" for "PICTURI_ CONTT_OL" (or
"NORM" when "VIDEO CALIBRATION" is set to "OFF'9 after
you finish editin_q (_" pg. !_;.
• Fk]iting is not possible with a cassette whose record safety tab
has been removed.
•The recording speed (SP/EP; is determinedby tile previous
recording to be repMced. If tile recordinff_ speed changes on tile
tape to be edited while editing the tape, the inserted picture will
be distorted where the recording speed chan_qes.
•When you edit a tape, a small portion of tile re(ordin_
preceding to tile editing start point will be erased from the
edited tape.
ISpecifications
GENERAL
Power requirement
Power consumption
Power on
Power off
]_rnperature
Operating
Storage
Operating position
Dimensions (W x H x D)
Weight
Format
Maximum recording time
SP
EP
AC 120 V_, 60 Hz
16W
1.5 W
5°C to 40°C (41 °F to 104°F)
-20°C to 60°C (-4°F to140°F)
Horizontal only
435 mmx 94 mm x 242 mm
(I 7-3/I 6" x 3-3/4" x 9-3/4")
2.7 kg G.9 Ibs)
S-VHS/VHS NTSC standard
210 min. with ST-210 vide() cassette
630 rain. with ST-210 vide() cassette
VIDEO/AUDIO
Signal system
Recording/Playback
system
Signal-to-noise ratio
Horizontal resolution
VHS
S-VHS
Frequency range
Normal audio
Hi-Fi audio
Input/Output
NTSC-type color signal and EIA
monochrome signal, 525 lines/
60 fields
DA-4 (Double Azimuth) head helical
scan system
45 dB
230 lines
400 lines
70 Hz to 10,000 Hz
20 Hz to 20,000 Hz
RCA connectors (IN x 2, OUT x I)
S-video (onnectors (IN x 2, OUT x 1)
TUNER
Tuning system
Channel coverage
VHF
UHF
CATV
RF output
Frequency-synthesized tuner
Channels 2-13
Channels 14-69
113 Channels
Channel 3 or 4 (switchable; preset to
Channel 3 when shipped) 75 ohms,
unbalan(ed
TIMER
Clock reference Quartz
Program capa( ity 1-year progranlmable timer/
8 programs
Memory backup for timer is not supported.
ACCESSORIES
Provided ac(essories : Infrared remote control unit,
"AA" battery x 2,
S-video cable (4-pin),
RF cable (F-type)
Specifications shown are for SP mode unless specified otherwise.
E. & O.E. Design and spe( ifi(ations subject to (hange without
notice.
--20--
This manual suits for next models
1
Table of contents
Other JVC VCR System manuals