5
For PAL video output format the system default value is 12 frames per second for each channel, which
means that the system will record 48 frames per second for all channels. You can set the frame rate
between 3~25 frames per second for each channel. The total value of all frames per second for all
channelsismax.50.
For NTSC video output format the system default value is 15 frames per second for each channel,
which means that the system will record 60 frames per second for all channels. You can set the frame
rate between 3~30 frames per second for each channel. The total value of all frames per second for all
channelsismax.60.
Pressthe“Select”/”CH4”buttonsorclickthe►icontoincreasetherecordframerateperchannel.
Pressthe“CH3”buttonorclickthe◄icontodecreasetherecordframerateperchannel.
If you turn the record frame rate off, the channel will not record.
RECORD QUALITY:
Select the recording quality as 1, 2 or 3. The best recording quality is 3; the lowest recording quality
is 1. The higher the recording quality, the higher is the video image quality during playback. A higher
quality uses more hard disk storage space. Record frame rate, recording quality and hard disk space
will affect the total recording time of the DVR system.
The video system is PAL. The estimated recording time is based on a 320GB HDD.
Recording speed Recording quality Data rate (GB/hours) Recording time (hours)
50fps
3 4.4 73
2 2.8 114
1 2.3 139
25fps
3 2.4 133
2 1.6 200
1 1.3 246
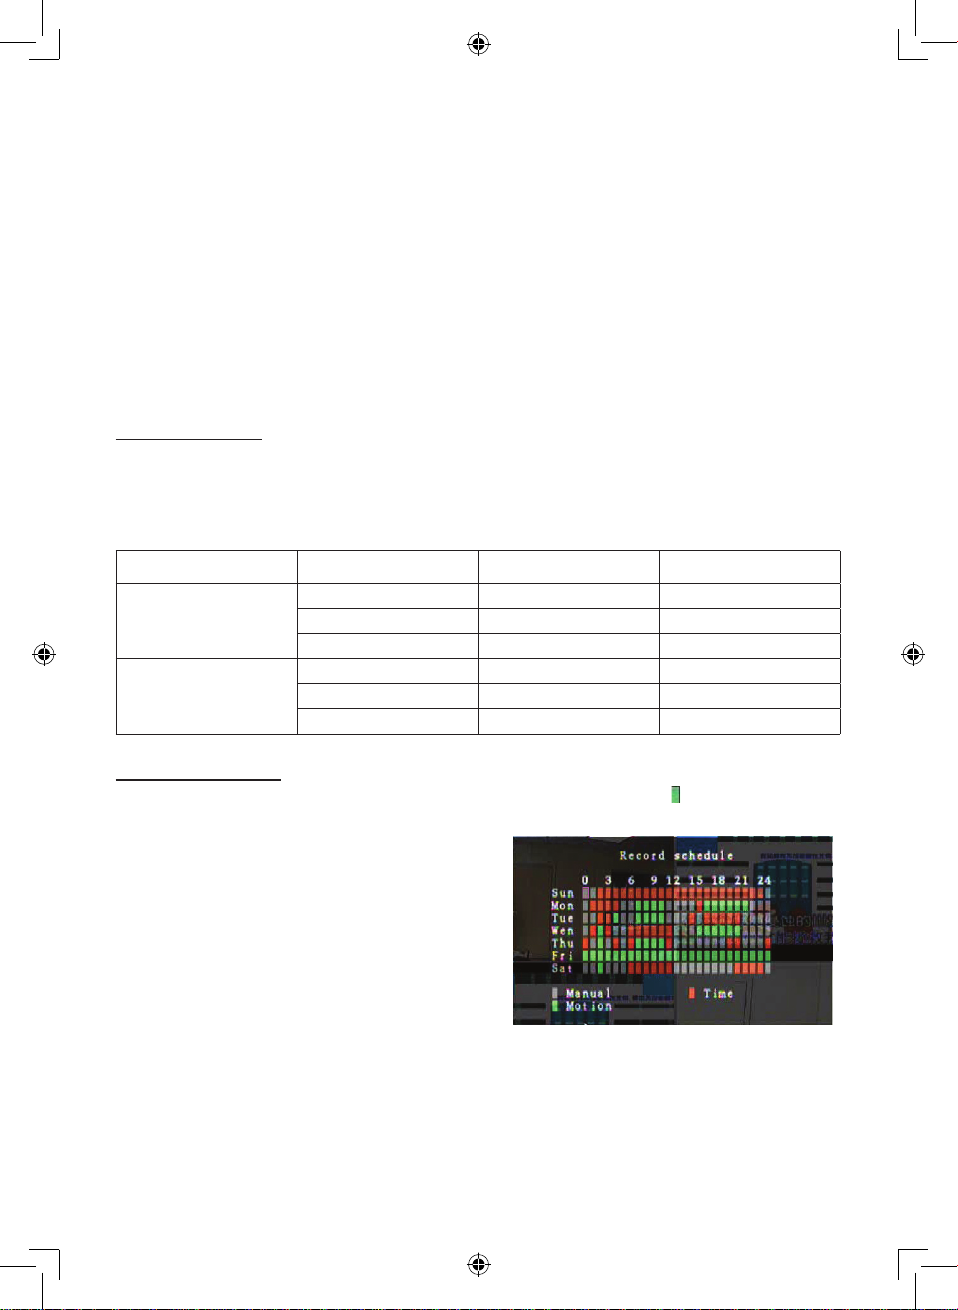
RECORD SCHEDULE:
Please note: Before starting motion record, ensure that the recording period is on the “Record
Schedule” menu. The time 00:00:00 corresponds to 24:00:00.
- Grey bar: No recording will be made for this time
period if manual recording is not activated.
- Red bar: The time period with a red bar will activate
the continuous recording mode (Time recording)
unless there is a manual stop during the recording
in that time period.
- Green bar: The time period with a green bar for
integrated motion-detected recording (MD) (see
chapter “MOTION DETECTION”).
Using the Remote Control:
Press the “Up”/”Down” buttons to move the cursor, then press the “Select” button to set the video
recording method for each time period for every day. Adjust the same recording method for same time
periods synchronously. Move the cursor and press the [QUAD] button on the remote control, then
move the cursor to enlarge the area (CH1=Up, CH2=Down, CH3=Left, CH4=Right) and press “Select“
to set the video recording method.