K-Rain RPS469 User manual

Station ModelS - Available in 4, 6 or 9 stations.
oUtdoor Model - Supplied with 120VAC x 24 AC or 240VAC (International)
x 24VAC inbuilt transformer.
OPTIONAL LEAD WITH PLUG.
INSTRUCTION MANUAL
Mid-Size irrigation Controller
www.krain.com

INTRODUCTION ............................................1
GLOSSARY ..................................................2
KEY FEATURES ............................................3
PROGRAMMING INSTRUCTIONS
Introduction ................................................4
Set automatic program ..............................4
General tips for easy programming ...........5
PROGRAMMING
Set current time & correct day ...................6
Set calendar
...............................................6
Set start times ...........................................7
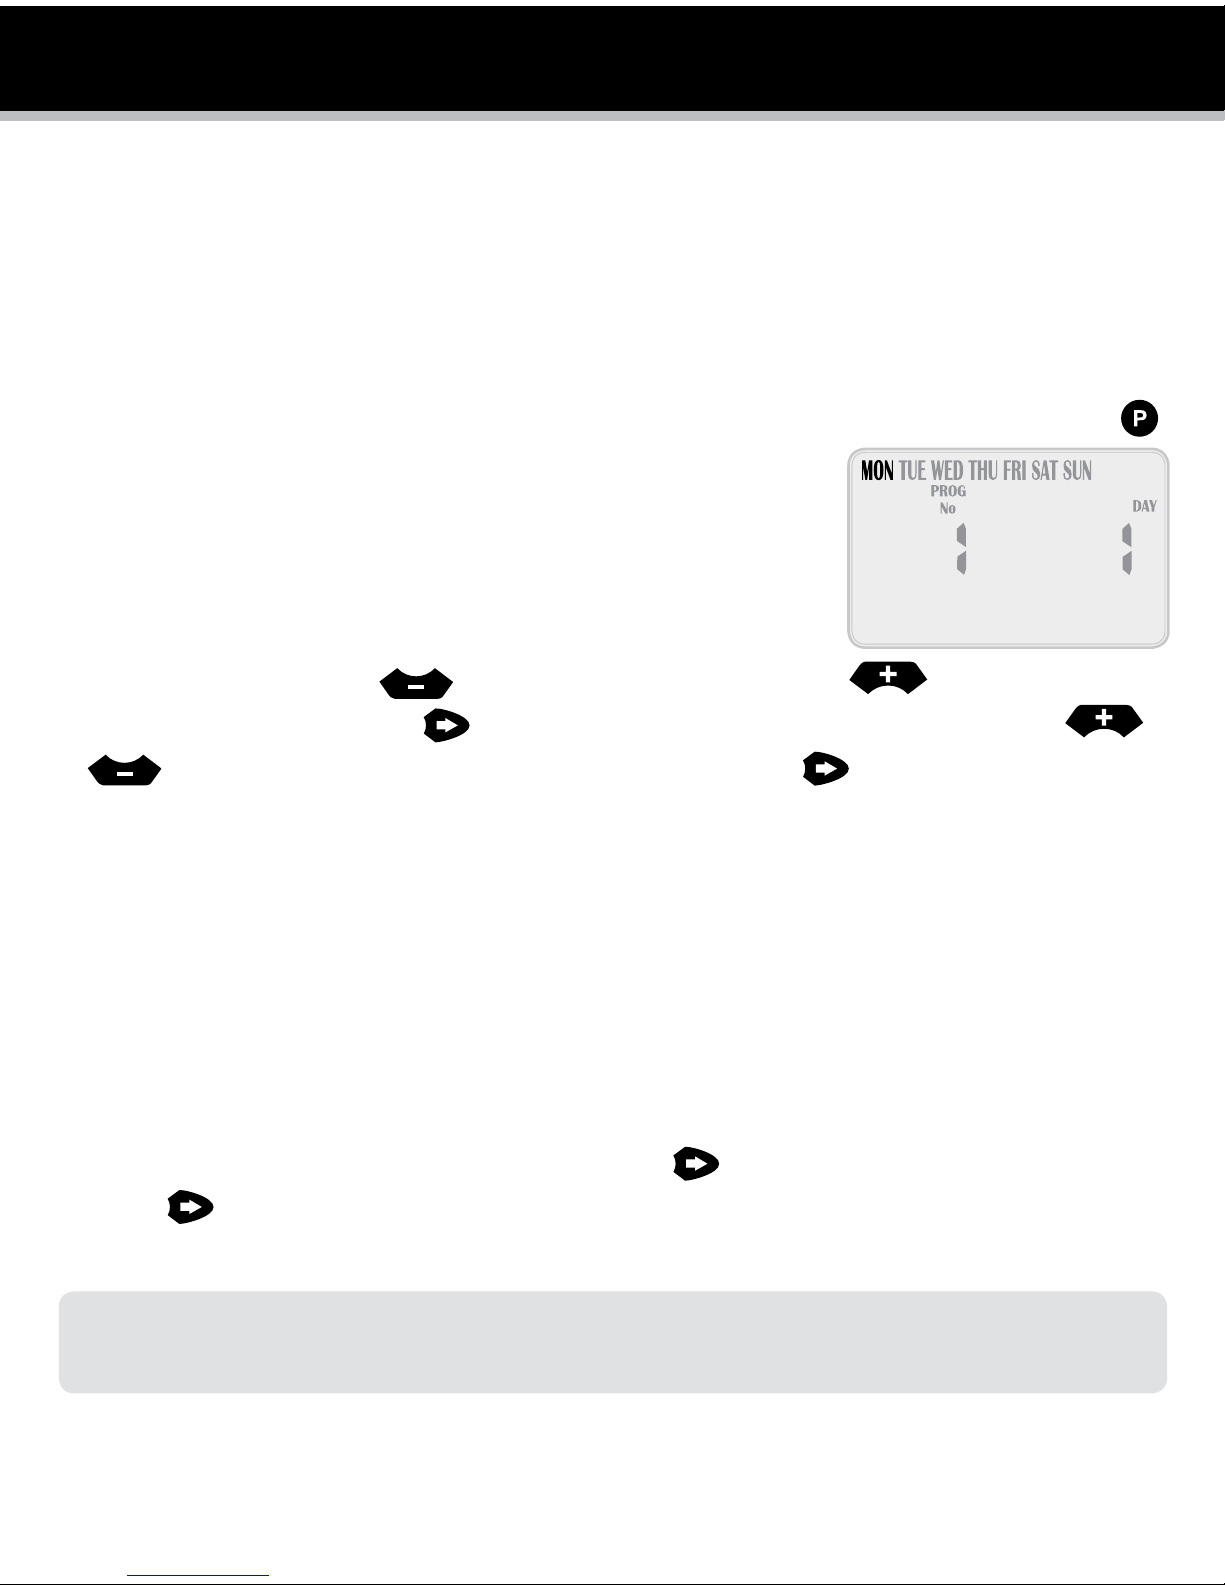
Set watering days ..................................8-9
Set station run times ............................9-10
MANUAL OPERATIONS
Run a single station ..................................11
Run a system test ..............................11-12
Run a program ...................................12-13
Stop watering ..........................................14
Stacking start times .................................14
Automatic back up ...................................14
OTHER FEATURES
Rain sensor .........................................15-16
Rain delay ................................................16
STOP all watering ................................16-17
Water budgeting & seasonal
adjustment ..............................................17
SPECIAL FUNCTIONS
Pump ON/OFF selection.......................18-19
Pressure build ....................................19-20
Water hammer saver ................................20
INSTALLATION INSTRUCTIONS
Mounting the controller ............................21
Electrical hook-up ....................................21
Field wiring connections .....................21-22
Terminal block layout ..............................22
Pump Start Relay Connection ...................23
Pump Installation ......................................23
Master valve installation ...........................24
Pump protection (system test) ..................25
TROUBLE SHOOTING GUIDE ..................26-27
ELECTRICAL CHARACTERISTICS
Electrical outputs ......................................28
SERVICING THE CONTROLLER ....................29
SPARE WATERING PLANNER ................30-31
WARRANTY ...............................................34
CONTENTS

1
RPS469 is available in 4, 6 and 9 station configurations. Designed to cover a wide range of
applications from residential and commercial turf, to light agriculture, and professional nursery.
This controller has a possible 6 separate programs with up to 36 starts per day. The controller has
a 7 day watering schedule with individual day selection per program or a 365 calendar for odd/even
day watering or selectable interval watering schedules from every day to every 15th day. Individual
stations can be allocated to one or all programs and can have a run time of 1 minute to 12 hours 59
minutes or 25 hours if the water budget is set to 200%.
K-Rain has always been concerned with sustainable water usage. The controller has many water
saving features that can be used to maintain the highest standard of plant quality with the least
amount of water consumption. The integrated budget facility allows global changes of run times
without affecting programmed run times. This allows for decreasing total water consumption on days
of minimal evaporation.
INTRODUCTION

2
GLOSSARY
FRONT MOUNTED
SENSOR SWITCH
ON/OFF switch for easy
access to override
TERMINAL COVER
Easy to remove for
easy access
LARGE HIGH CONTRAST LCD
Displays all
programming information
LARGE SELECTION DIAL
Navigates through all
programming information
QUICK PROGRAM SELCTION KEY
The “P” key allows faster program
entry and
review
LARGE MENU BUTTONS
Easy operation with fast scroll
feature for entry and review

3
KEY FEATURES
4,6 & 9 station models.
Indoor/Outdoor model with built-in transformer.
6 programs, each of which has 6 start times. Maximum of 36 start times per day.
Station run times from 1 minute to 12 hours & 59 minutes.
Selectable watering options:
- Individual 7 day selection.
- Odd or Even day selection.
- Interval watering day selection from every day to every 15th day.
Watering budgeting feature allows quick adjustment of the station run times by
percentage, from 10% to 200%.
Rain sensor input will turn off all stations or selected stations during wet periods,
if a sensor is installed.
Permanent memory feature will retain automatic programs during power failures.
Standard 9 volt battery can be used to program the controller remotely
and to maintain the clock.
Manual functions:
- Run a program or group of programs once.
- Run a single station.
- Run a test cycle for all stations.
- “OFF” position, stops a watering cycle or to stop automatic
programs during winter.
Pump or master valve input is standard.
Pump or master valve input can be turned off by program or by individual stations,
for dual water supply situations or if stations are used to turn on garden lights.
LARGE MENU BUTTONS
Easy operation with fast scroll
feature for entry and review

4
PROGRAMMING INSTRUCTIONS
INTRODUCTION
This controller has been designed with 6 separate programs to allow different landscape areas to
have their own individual watering schedules. A program is a method of grouping stations (valves)
with similar watering requirements to water on the same days. These stations will water
in sequential order and on the days selected.
Group the stations (valves) which are watering similar landscape areas together.
Examples: Turf, flower beds, gardens. These different groups may require individual
watering schedules, or programs.
Plan your watering schedule completing the planner supplied at the back of this book.
Set the current time and correct day of the week. If odd or even day watering is going to be
used, make sure the current year, month and day of the month is correct.
HINT: To select a different program use the button marked .Each press will move to the next
program number. This is handy for quick reviewing of previously entered information without losing your
place in the programming cycle.
SET AUTOMATIC PROGRAM
Set the automatic program for each group of stations (valves) by completing the
following three steps:
1. Set start times
This sets the time when the watering schedule is to commence.
NOTE: For each start time, all the stations (valves) selected for the program will come
on in sequential order. If two start times are set, the stations (valves) will come on twice.
2. Set Watering Days
These are the selected days when the automatic system will be active.
3. Set Station Run Times
This sets the watering duration required for each station (valve).

5
PROGRAMMING INSTRUCTIONS
GENERAL TIPS FOR EASY PROGRAMMING
This controller has been designed for quick intuitive programming.
Remember these simple tips for hassle free programming.
1. Complete the spare watering planner at the back of this book.
2. When setting, one push of the button will increment one unit.
3. Holding one button down will fast scroll through units.
4. During the programming, only flashing units are able to be set.
5. Adjust flashing units using the or buttons.
6. Pressing will scroll forward through the settings in an orderly sequence.
7. Pressing will scroll back to previous settings and setting can be changed.
The is used to select different programs. Each push
on this button will increment one program number.
Once you have selected the primary function and
program you wish to alter, you can then use the
or to change that function’s value.
Only display elements that are flashing can be altered
with the keys.
Use the to scroll through other values within
the function that can be altered.
INCREASE VALUE
(+)
(-)
DECREASE VALUE
SCROLL
FORWARD
SCROLL
BACK
The large dial is the primary
device for selecting an operation.
Rotate the dial to the function
you wish to alter or review.

6
PROGRAMMING
SET CURRENT TIME & CORRECT DAY
Turn the dial to “Set Clock/Calendar” position.
The hour will be flashing. Use the or to adjust.
NOTE: AM/PM must be set correctly.
Press button and the “minutes” will flash. Use or to adjust
the minutes.
Press and the “day of the week” will flash. Use or to set the
correct day.
SET CALENDAR
NOTE: The calendar only needs to be set when selecting Odd/Even day watering in areas where water
restrictions may require this feature.
Press button until the year, month and day are shown. The “year” will be flashing. Use
or to adjust if required.
Press and the “month” will flash. Use or to adjust if required.
Press and the “day” will flash. Use or to adjust if required.
HINT: To return to the clock, press and together or turn dial to another position.
Before proceeding, ensure the spare watering planner has been completed. From your planner, you
should be aware which stations (valves) are allocated to each program. Set one program at a time to
ensure that the schedules are completed correctly.

7
Example: SET PROGRAM 1
STEP 1 – SET START TIMES
NOTE:All stations will come on in sequential order for each start time.
Turn the dial to “Set Start Times” and ensure that “Prog No 1” is showing. If not, then use the
button to select “Prog No 1”.
The “Start No” will be flashing. THE DISPLAY WILL SHOW:
Use
or
to change the “Start No” if required, otherwise press
and the “hour” will
flash.
Use or to adjust if required.
NOTE: Ensure AM/PM position is correct.
Press
and the “minutes” will flash.
Use or to adjust if required
.
Each program has up to 6 start times. Should you require a second start time,
press
and “Start1” will flash.
Advance to “Start2” by pressing
.
THE DISPLAY WILL SHOW:
Press
and proceed as per setting Start 1.
HINT: To toggle a start on or off press
or
when the hour is flashing. To change to a different
program either to review or alter, press the
button. Every press will increment to the next program.
PROGRAMMING

8
PROGRAMMING
STEP 2 – SET WATERING DAYS
This unit has interval watering from every day to every 15th day, individual day selection or a 365
day calendar with odd/even day selection in areas where water restrictions require this feature.
INDIVIDUAL DAY SELECTION
Turn the dial to “Set Watering days” and ensure that “Prog No 1” is showing. If not, then use the
button to select “Prog No 1”.
“Monday” will be flashing. THE DISPLAY WILL SHOW:
This refers to Mon being Day1.
To turn Monday off press
the button.
To turn it back on press the
button. To advance
to the next day and set it use the
button, the display will then flash Tue and Day 2. Use
or to turn days ON or OFF
and advance to the next day using
. Remember to set all 7 days
ON or OFF.
ODD/EVEN DAY SELECTION (OPTIONAL)
In some areas users are only allowed to water their landscapes on odd dates if their house number is
odd, or even dates when their house number is even.
This controller allows this to be done simply by setting the relevant selection of odd or even and
setting the current date into the controller. The controller will account for leap years.
If you require the odd/even day option, simply press the button until “Odd” is shown.
Press the button and “Even” will be shown.
This feature may be required in areas where water restrictions are enforced.
Note: Remember to set the 365 day calendar when setting the clock, or this feature will be
out of sequence (refer page 6 “set calendar”).

9
INTERVAL DAY SELECTION
Press the button until the “interval days” is flashing.
THE DISPLAY WILL SHOW:
“Interval 1” will be flashing. This means the controller will
water every day. The display will show how many days
are left before an active schedule.
For example, if it showed “1” then in one day’s time the controller will run this program. To change
the interval day, press the
or
button.
Select from 1 to 15 interval days.
NOTE: When changing the interval day, the next active day is always changed to 1. This means that
tomorrow is the first active day to run.
STEP 3 – STATION RUN TIMES
This is the length of time that each station (valve) is scheduled to water on a particular program.
Maximum watering time is 12 hours 59 minutes for each station.
A station can be assigned to any or all of the possible 6 programs, if required.
Turn the dial to the “Set Station Run Times” position.
THE DISPLAY WILL SHOW:
NOTE: This means that station 1 of program
1 has no run time programmed in it. The controller
has permanent memory so when the device is first used
there will be no run times set. Unlike other controllers,
when there is a power failure, even if the battery is not
installed, the programmed values will be restored to the unit.
PROGRAMMING

10
PROGRAMMING
Continue until all the stations in Program1 have been set with a run time or if a station(s) is not
required to be active in this particular program, ensure that the run time is set to “OFF”.
NOTE: To turn a station “OFF” press the
and
at the same time when the station number is
flashing or use to set minutes to 00 when flashing.
This completes the setting up procedure for automatic program 1.
Select from up to 6 programs using the button for different watering schedules. On every press
of the button the program number will increment. Once on the desired number, follow the three
steps to set an automated program:
1. Set start Times.
2. Set Watering Days.
3. Set Station Run Times.
TIP: Although the controller will run automatic programs with the main dial in any position (with the exception
of “OFF”), it is advisable to leave the main dial in the “AUTO RUN” position when not programming or running
manual stations or programs.
STEP 3 - STATION RUN TIMES (CONT.)
Press or button to select the station (valve) number, and press the button and the
run time minutes will flash. Alter by using or .
Press the button and the run time hours will flash. Alter by using or .
Press the button and the current station will flash. Select the next station to change by using
or and proceed by pressing and alter using or .

11
MANUAL OPERATIONS
RUN A SINGLE STATION
The maximum run time for a station is 12 hours 59 minutes. To manually run a single station once,
turn the dial to the “System Test or Run Single Station” position.
THE DISPLAY WILL SHOW:
The default run time for a single station is 10 minutes.
Advance to the selected station by pressing as many
times as required, and adjust the run time with or .
The controller will start running the selected station and the run time will decrement in the display.
If there is an active pump set for this station, the pump icon will flash once the button has been
pressed, indicating that the pump/master is running. As soon as the single station run time has
elapsed, the unit will revert back to automatic mode. This means that if you forget to turn the dial
back to the “Run” position, the controller will still run its automatic starts, as scheduled. To turn the
station off, change the position of the main dial, to “OFF”.
HINT: If you wish to alter the default value from 10 mins to some other value and set this as the new default
time. Turn the dial to “Run Single Station” press the
button. Then alter the run time using the
or
buttons. Once the new default time is set press the
button again, and the new default will
now always appear when you select a “manual single station”.
RUN A SYSTEM TEST
To manually run a system test turn the dial to the “System Test or Run Single Station” position, press
and together.
THE DISPLAY WILL SHOW:
The default run time for a single station is 2 minutes.
If you wish to alter the run time for this start only,
use the or buttons. Once the correct run time has been entered, turn the station
on and make it run by pressing the button.

12
MANUAL OPERATIONS
The controller will start running all stations with the selected run time. The time will decrement in
the display and will sequentially move through all stations, running them for the same set period of
time. This option is designed so that it is possible to test all sprinklers and valves that make up the
irrigation design.
To skip to the next station press the button. To go back a station press the button. To stop
the system test, change the position of the main dial, to “OFF”.
HINT: If you wish to alter the default value from 2 mins to some other value and set this as the new
default time, press the
and
together followed by
button. Then alter the run time using
the
or
buttons. Once the new default time is set press the
button again, and the new
default will now always appear when you select a “manual system test”.
RUN A PROGRAM
To manually run a complete program or to stack multiple programs to run, rotate the dial
to “Run Program”. The word “OFF” will be flashing.
THE DISPLAY WILL SHOW:
To enable program 1 to start press the
button.
The icon “OFF” will change to “ON”.
This program has now been enabled so that it can be
run. To make program 1 run, press the
button.
NOTE: So long as there are run times in program 1 then program 1 will start and water the stations
associated with it.

13
There may be times when it is desirable to run more than one program manually. The controller
allows this to occur using its unique feature of enabling a program, before running it. For example
if you wish to run Program 1 and also Program 2, the controller will manage stacking of the programs
so they do not overlap.
Enable program 1 by pressing the button. To select the next program press
the button, the program number will increment to program 2.
Enable program 2 to run by pressing the button.
NOTE: To disable a program number, press the button.
Once both programs have been enabled, they can be run by pressing the button. The controller
will now run all programs that have been enabled starting with the highest numbered program.
So in this case, program 2 would run and when it has completed its cycle, program 1 would start
and run its cycle.
This method can be used to enable any, or all of the available programs on the controller.
NOTE: When running programs in manual mode the “Budget %” will alter the running times of each
individual station.
MANUAL OPERATIONS

14
MANUAL OPERATIONS
STOP WATERING
To stop an automatic or manual watering schedule, turn the dial to the “OFF” position.
NOTE: For automatic watering remember to turn the dial back to the “Auto Run” position, as “OFF” will
stop any future watering cycles from occurring.
STACKING START TIMES
Should you accidentally set the same watering start time on more than one program, the controller
will “stack” them in sequential order. All programmed start times will be watered from the highest
number first.
AUTOMATIC BACKUP
This product has permanent memory. This allows the controller to hold all stored values even in the
absence of power sources, which means that programmed information will never be lost. Using a
9 volt battery will keep the real time clock running during power outages. However, if the battery is
not used the real time clock is backed up every 10 minutes to the non volatile memory. This means
that when the power returns the clock will be restored to its last known value.
It is recommended that the battery is replaced every 12 months.
A low battery icon will light when the battery has a week left to run. When this occurs, replace the
battery as soon as possible so that the clock is maintained correctly during power failures.

15
OTHER FEATURES
RAIN SENSOR
When installing a rain sensor, first remove the the factory
fitted link between the “C” and “R” terminals shown here
by the wire.
Replace with the two wires from the rain sensor into these
terminals, polarity NOT required. Move the rain sensor
switch on the fascia to “ON”.
Turn the dial to “Set Auxiliaries” to enable individual
stations to be set rain sensor “ON” or “OFF”.
THE DISPLAY WILL SHOW:
Rain sensor installation

16
OTHER FEATURES
RAIN SENSOR (CONT.)
If a station is turned “ON” this means that the sensor will control it, should it rain. The default mode
is for all stations to be rain sensor “ON”. Should you have a station (valve) that always needs to be
watered, e.g. an enclosed green house or plants that are under cover, then the rain sensor can be
turned “OFF” for these particular stations. To select a station to turn “OFF”. Press the button,
the word “ON” will now be flashing, use the button to change to “OFF”.
TIP: To turn the station back “ON” press the
button. To advance to the next station use
the
button and the station number will increase. Do this operation for all stations (valves)
on the controller that need to be altered.
HINT: To disable the rain sensor and allow all stations to water regardless of the setting, move the slide
switch marked Rain/Sensor to the “OFF” position. The reactivate it slide the switch to the “ON” position.
RAIN DELAY
Different rain sensors react in different ways. The most common complaint about rain sensors,
is that they dry out too quickly, and allow the system to come on within hours of a rain storm. To
counter this problem the controller has a “Rain Delay” setting that allows a specific delay time to
elapse after the rain switch has dried out before the controller will water again. Turn the dial to the
“Set Auxiliaries” position. Then press the button. The rain delay value will now be flashing.
THE DISPLAY WILL SHOW:
Press the button to alter the rain delay time in
increments of 12 hours at a time.
A maximum delay of 240 hours or 10 days can be set.
STOP ALL WATERING
To stop all watering cycles during winter, turn the dial to the “OFF” position.
The display will show “ALL OFF”:

17
This means that all automatic schedules will not come on,
but the programmed information is still retained in the memory
and the clock still keeps track of time even though it is no
longer being displayed.
To reactivate watering, turn the dial to the “Auto Run” position.
WATER BUDGETING & SEASONAL ADJUSTMENT
The automatic station run times can be adjusted by percentage as the seasons change. This will save
valuable water as the run times can be adjusted quickly in spring, summer, and autumn to reduce or
increase water usage.
Ensure the dial is in the “Auto Run” position.
Press the button.
THE DISPLAY WILL SHOW:
This means that the run times are set to 100%, i.e. if station 1 is set to 10 minutes then it will run
for 10 minutes. For example, should the value change to 50% then instead of running for 10 minutes
station 1 would now run for 50% of 10 minutes, i.e. 5 minutes.
Conversely should the budget value be altered to show 200% then instead of running 10 minutes
on station 1, it would run for 20 minutes. The budget calculation is applied to all stations and all run
times that are active.
To increase the budget percentage press the , to decrease the budget percentage press the
. The percentage value will increment or decrement in multiples of 10%. The maximum value
is 200% and the minimum value is 10%.
To return to the clock display press the button.
Should the budget value no longer be 100% then it will be shown
in the clock display, e.g. if we set the budget to 200%.
THE DISPLAY WILL SHOW:
OTHER FEATURES

18
SPECIAL FUNCTIONS
PUMP ON/OFF SELECTION
In most systems the water supply will be from a well or from the mains. This controller will turn on
either a pump (well supply) or master valve (mains supply) each time an automatic or manual start
occurs. Normally the pump or master valve is activated for all stations. However if there is a dual
water supply or some of the stations may be used to run garden lights, the pump master valve may
need to be turned off for selected stations. Pumps can be assigned to be activated by a program or
alternatively by individual stations. The standard default is that all programs are set to pump “ON”.
To set pumps per program:
Turn the dial to “Set Auxiliaries”.
Press the
button once.
THE DISPLAY WILL SHOW:
This means we are in the pump per program menu for Pump
No 1 (master valve). Press the button to enter this menu
option. Program 1 will now be flashing.
THE DISPLAY WILL SHOW:
This means that the pump will turn on when program 1 is running.
To select a different program number press the or
the button. To turn a pump ON or OFF for a particular
program press the button so that “ON” is now flashing.
Press the button to turn the pump ON or press the
button to turn the pump OFF for that particular number.
Complete this sequence for all program No’s.
To set pumps per stations:
Turn the dial to the “Set Auxiliaries” position. Press the
button twice and the pump per station menu will be displayed.
THE DISPLAY WILL SHOW:
This means we are in the Pump per Station menu for Pump No 1 (master valve).
Press the button to enter this menu option.
Table of contents
Other K-Rain Timer manuals
Popular Timer manuals by other brands

Clas Ohlson
Clas Ohlson 31-4165 quick start guide

Dazon
Dazon ZON TIMER GT 300 operating instructions

Nakayama
Nakayama PRO GH9136 instructions

Menuett
Menuett 002-444 operating instructions

Berker
Berker 2948 operating instructions

Tamarack Technologies
Tamarack Technologies 42E724P Installation and operating instructions