Küschal Champion User manual

KüschallsChampion
EN Active wheelchair
User Manual
This manual MUST be given to the user of the product.
BEFORE using this product, read this manual and save for future reference.

©2013 Küschall AG
All rights reserved. Republication, duplication or modification in whole or in part is prohibited without
prior written permission from Küschall AG. Trademarks are identified by ™and ®. All trademarks are
owned by or licensed to Küschall AG or its subsidiaries unless otherwise noted.

Contents
1 General. . . . . . . . . . . . . . . . . . . . . . . . . . . . . . . . . . . . . . . 4
1.1 Information about the User Manual . . . . . . . . . . . . . 4
1.2 Symbols . . . . . . . . . . . . . . . . . . . . . . . . . . . . . . . . . 4
1.3 Warranty. . . . . . . . . . . . . . . . . . . . . . . . . . . . . . . . . 4
1.4 Intended use. . . . . . . . . . . . . . . . . . . . . . . . . . . . . . 5
1.5 Service life . . . . . . . . . . . . . . . . . . . . . . . . . . . . . . . 5
1.6 Copyright protection . . . . . . . . . . . . . . . . . . . . . . . . 5
2 Safety . . . . . . . . . . . . . . . . . . . . . . . . . . . . . . . . . . . . . . . . 6
2.1 Safety information. . . . . . . . . . . . . . . . . . . . . . . . . . 6
2.2 Safety devices . . . . . . . . . . . . . . . . . . . . . . . . . . . . . 6
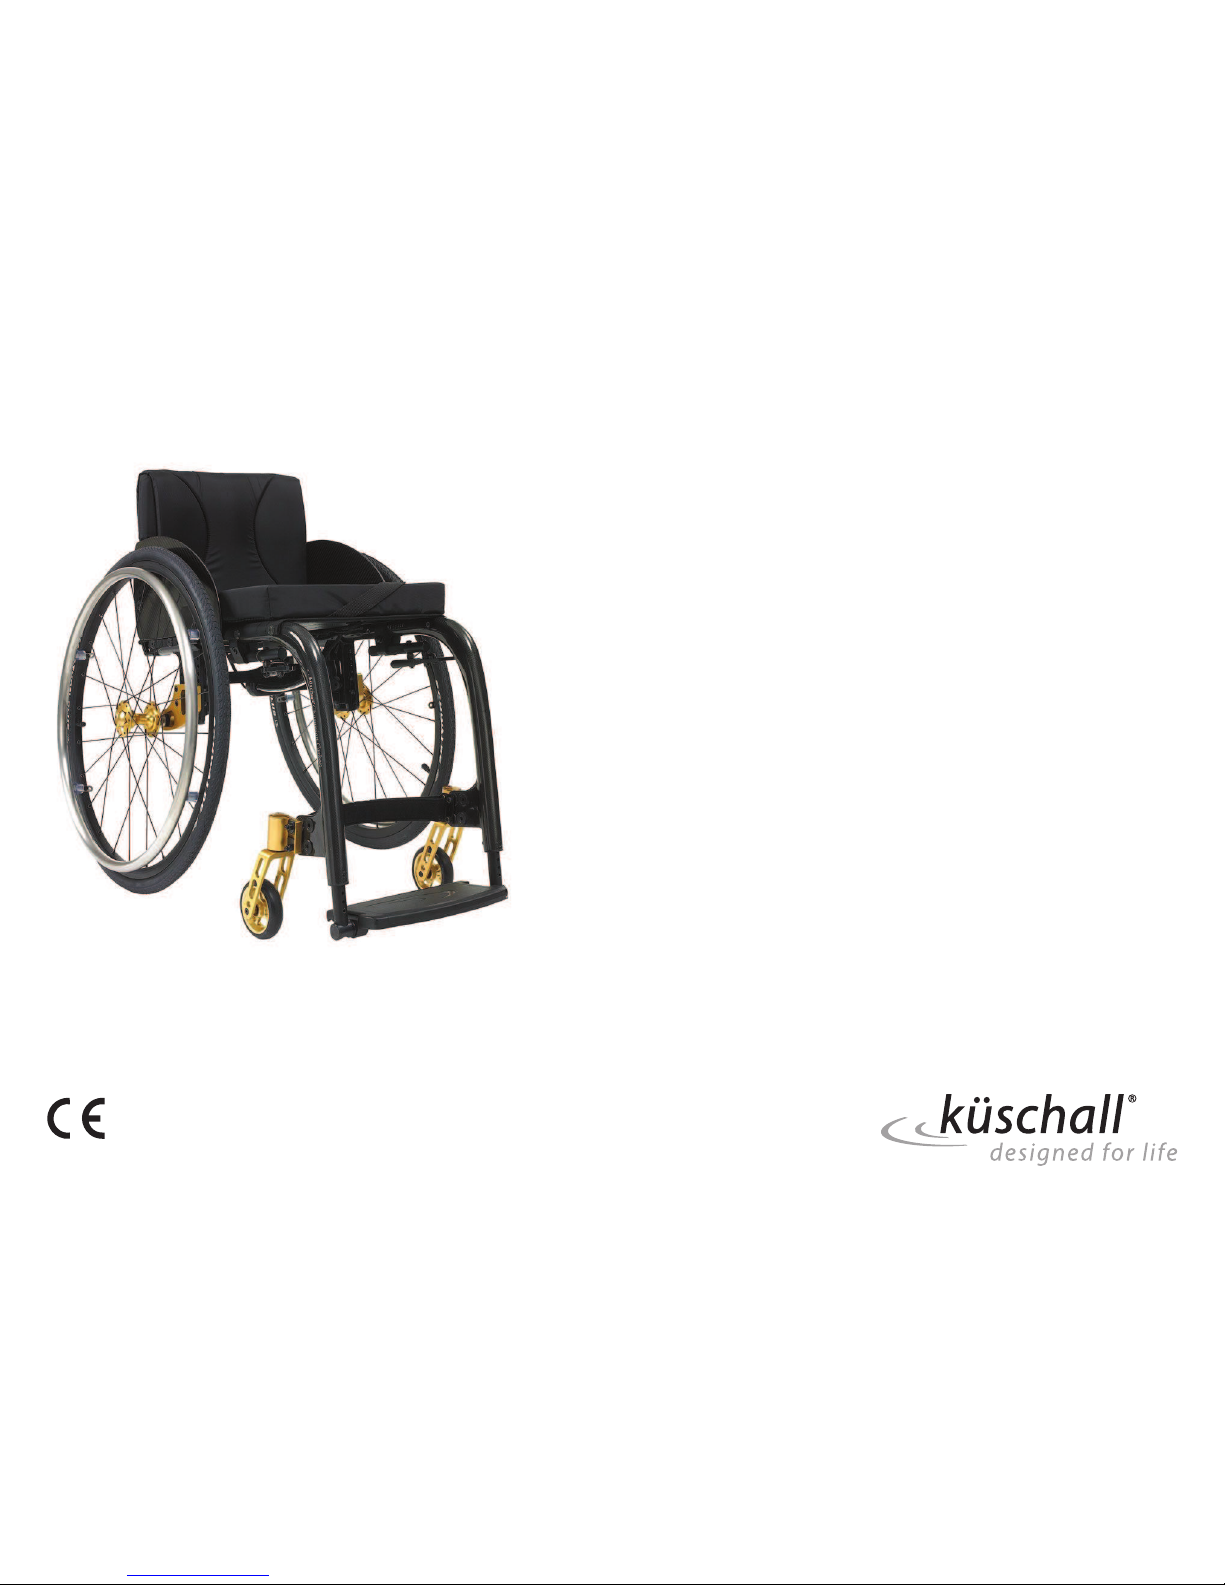
3 Components and their functions . . . . . . . . . . . . . . . . . . . 7
3.1 Overview . . . . . . . . . . . . . . . . . . . . . . . . . . . . . . . . 7
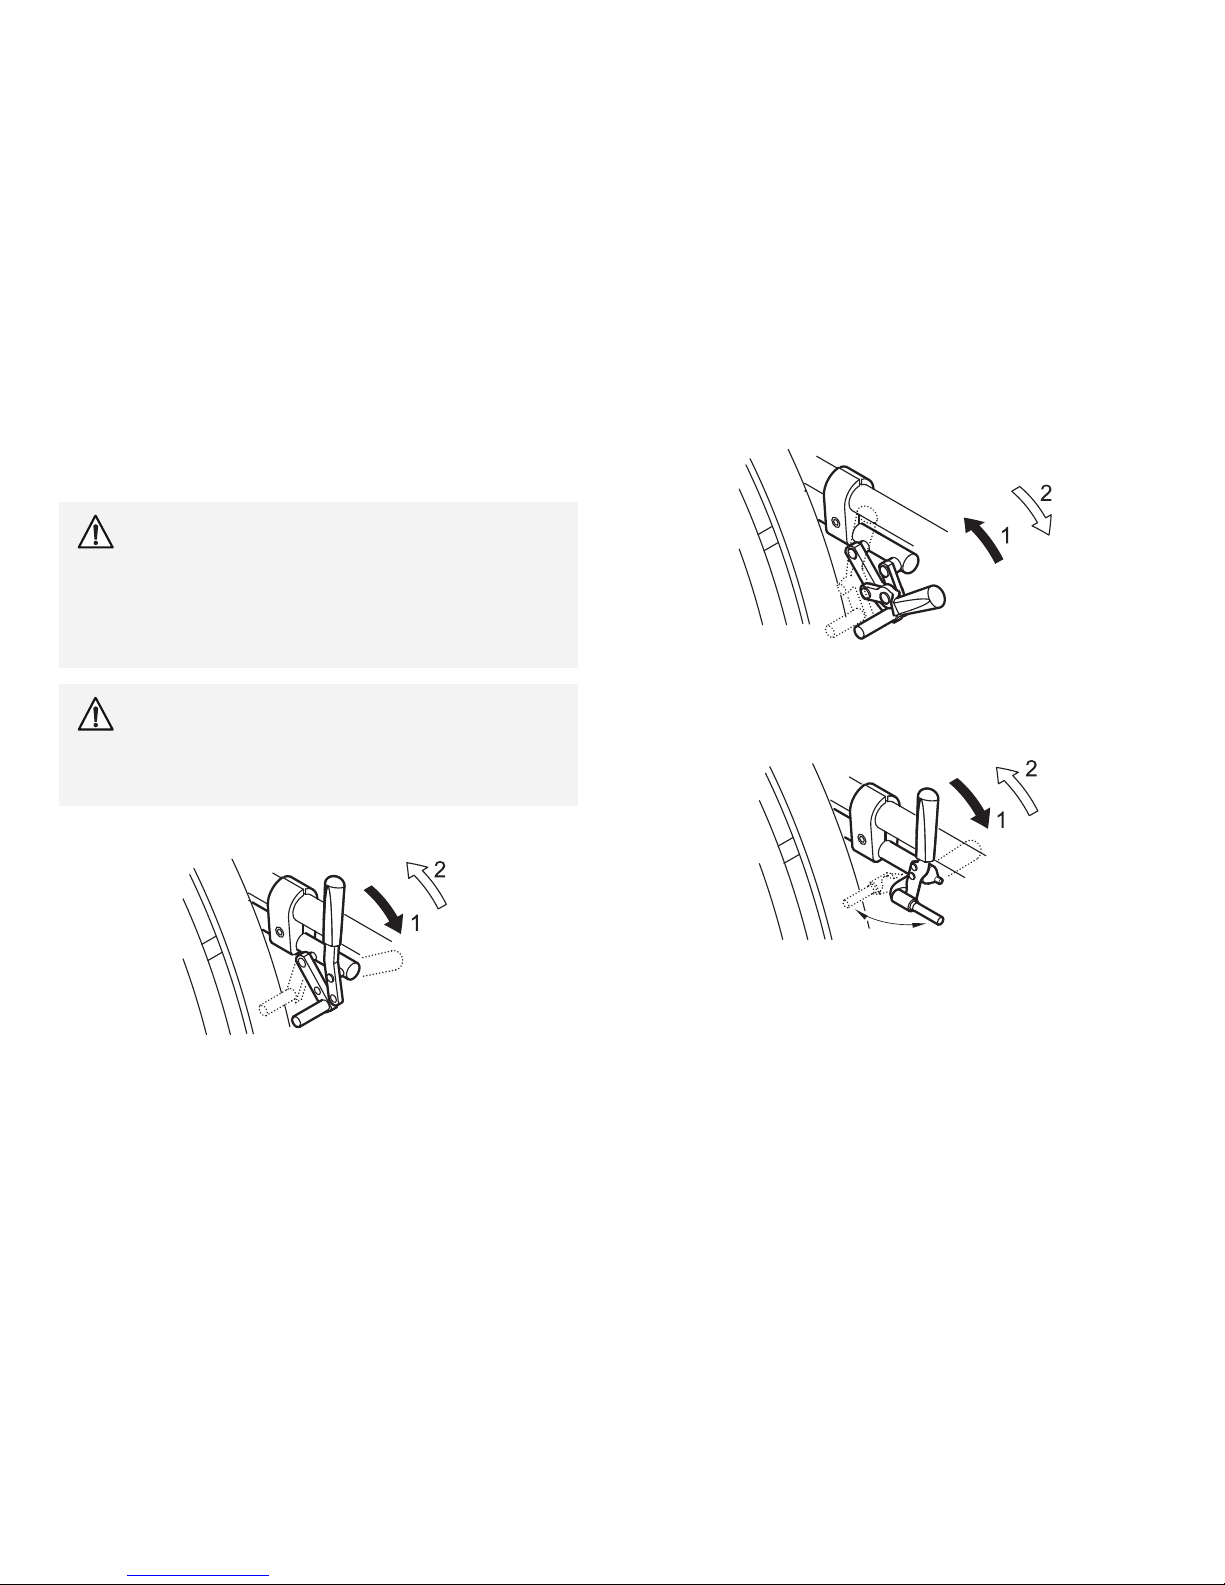
3.2 Parking brakes. . . . . . . . . . . . . . . . . . . . . . . . . . . . . 8
3.3 Backrest . . . . . . . . . . . . . . . . . . . . . . . . . . . . . . . . . 9
3.4 Stabilizing bar for the back (optional) . . . . . . . . . . . . 9
3.5 Push handles. . . . . . . . . . . . . . . . . . . . . . . . . . . . . . 10
3.6 Side rest, infinitely height adjustable
(optional) . . . . . . . . . . . . . . . . . . . . . . . . . . . . . . . . 11
3.7 Antitipper . . . . . . . . . . . . . . . . . . . . . . . . . . . . . . . . 11
3.8 Seat cushion . . . . . . . . . . . . . . . . . . . . . . . . . . . . . . 12
4 Accessories. . . . . . . . . . . . . . . . . . . . . . . . . . . . . . . . . . . . 13
4.1 Securing strap . . . . . . . . . . . . . . . . . . . . . . . . . . . . . 13
4.2 Pelvic belt . . . . . . . . . . . . . . . . . . . . . . . . . . . . . . . . 13
4.3 Air pump . . . . . . . . . . . . . . . . . . . . . . . . . . . . . . . . 14
4.4 Wheelchair carry bag (optional) . . . . . . . . . . . . . . . . 14
4.5 Passive illumination. . . . . . . . . . . . . . . . . . . . . . . . . 14
4.6 Transit wheels . . . . . . . . . . . . . . . . . . . . . . . . . . . . . 14
4.7 Tipper aid . . . . . . . . . . . . . . . . . . . . . . . . . . . . . . . . 15
4.8 Cane holder . . . . . . . . . . . . . . . . . . . . . . . . . . . . . . 15
5 Setup . . . . . . . . . . . . . . . . . . . . . . . . . . . . . . . . . . . . . . . . 16
5.1 Safety information. . . . . . . . . . . . . . . . . . . . . . . . . . 16
6 Using the wheelchair . . . . . . . . . . . . . . . . . . . . . . . . . . . . 17
6.1 Safety information. . . . . . . . . . . . . . . . . . . . . . . . . . 17
6.2 Braking during use . . . . . . . . . . . . . . . . . . . . . . . . . 17
6.3 Getting in and out of the wheelchair . . . . . . . . . . . . 18
6.4 Driving and steering the wheelchair . . . . . . . . . . . . . 19
6.5 Negotiating steps and kerbs . . . . . . . . . . . . . . . . . . 20
6.6 Going up and down stairs . . . . . . . . . . . . . . . . . . . . 22
6.7 Negotiating ramps and slopes . . . . . . . . . . . . . . . . . 22
6.8 Stability and balance when seated . . . . . . . . . . . . . . 23
7 Transport . . . . . . . . . . . . . . . . . . . . . . . . . . . . . . . . . . . . . 25
7.1 Safety information. . . . . . . . . . . . . . . . . . . . . . . . . . 25
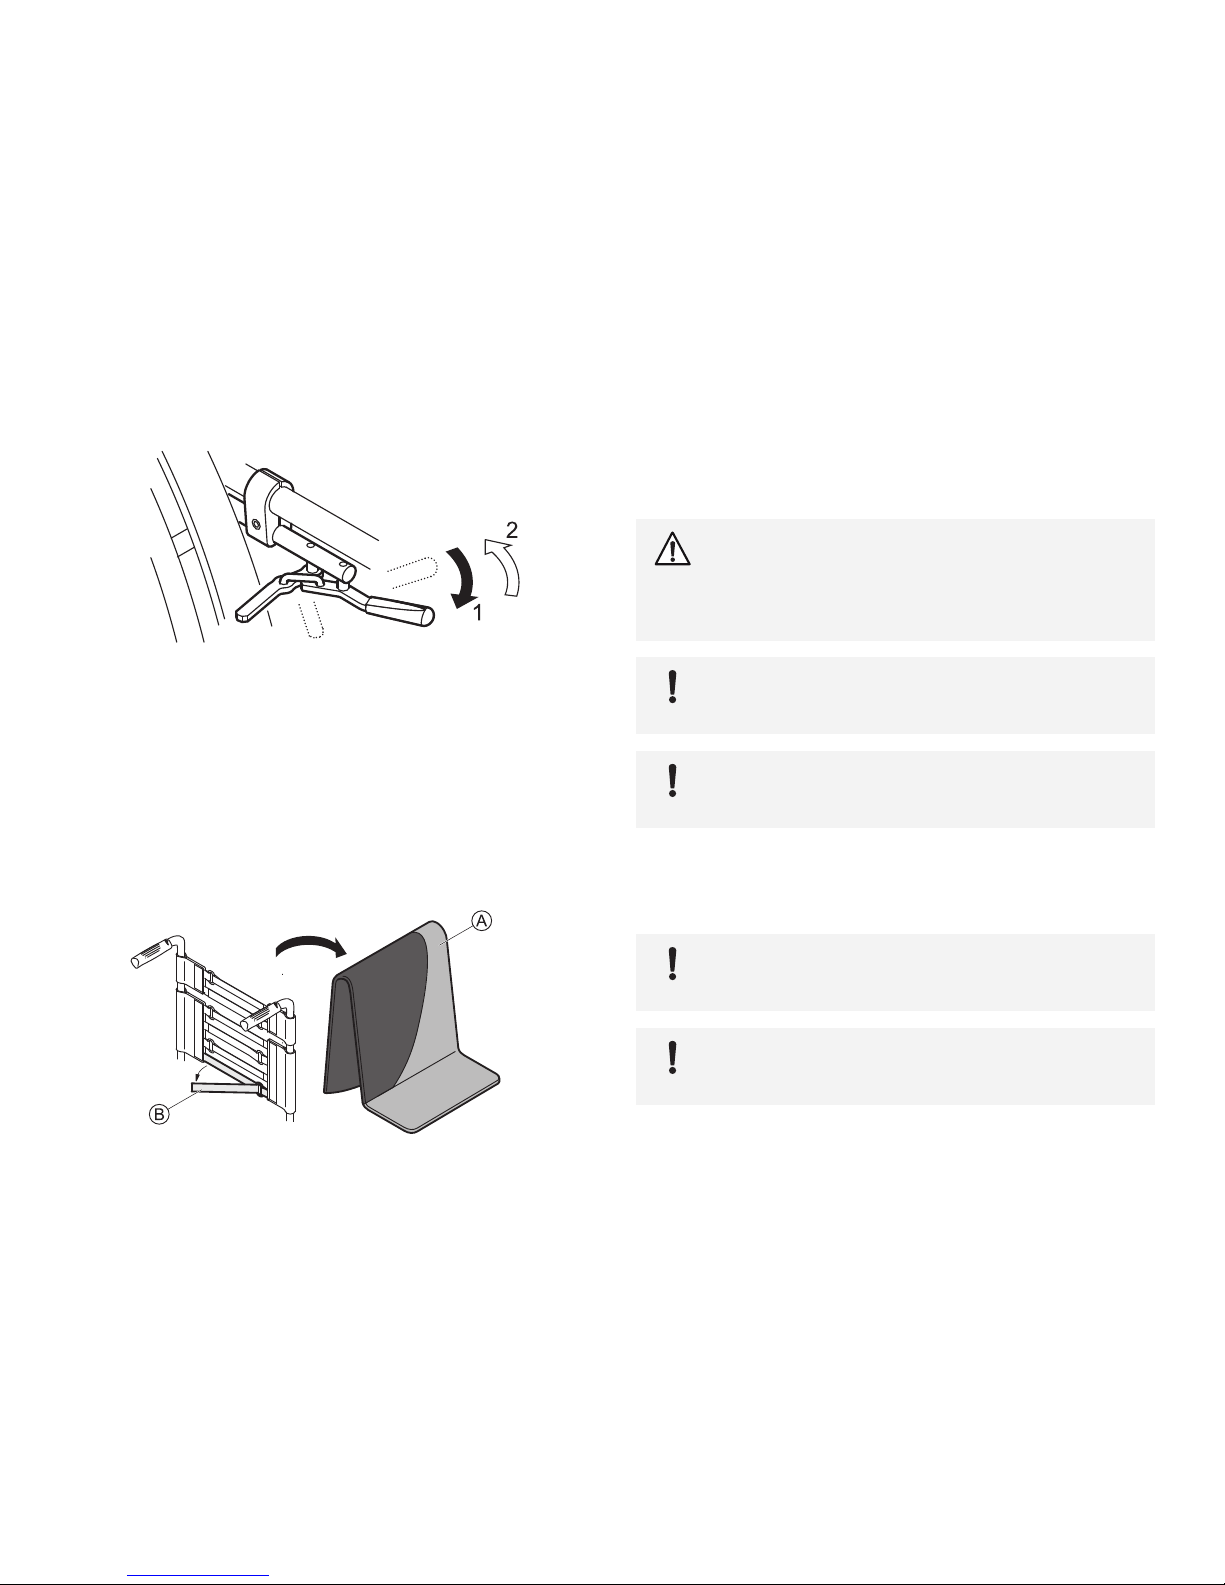
7.2 Folding and unfolding the wheelchair . . . . . . . . . . . 25
7.3 Removing and fitting the rear wheels . . . . . . . . . . . . 26
8 Maintenance . . . . . . . . . . . . . . . . . . . . . . . . . . . . . . . . . . 28
8.1 Safety information. . . . . . . . . . . . . . . . . . . . . . . . . . 28
8.2 Maintenance Schedule . . . . . . . . . . . . . . . . . . . . . . 28
8.3 Cleaning . . . . . . . . . . . . . . . . . . . . . . . . . . . . . . . . . 30
8.4 Disinfection. . . . . . . . . . . . . . . . . . . . . . . . . . . . . . . 30
9 Troubleshooting. . . . . . . . . . . . . . . . . . . . . . . . . . . . . . . . 31
9.1 Safety information. . . . . . . . . . . . . . . . . . . . . . . . . . 31
9.2 Identifying and repairing faults . . . . . . . . . . . . . . . . 32
10 After Use. . . . . . . . . . . . . . . . . . . . . . . . . . . . . . . . . . . . . . 33
10.1 Re-use . . . . . . . . . . . . . . . . . . . . . . . . . . . . . . . . . . 33
10.2 Disposal . . . . . . . . . . . . . . . . . . . . . . . . . . . . . . . . . 33
11 Technical data . . . . . . . . . . . . . . . . . . . . . . . . . . . . . . . . . 34
11.1 Dimensions and weight . . . . . . . . . . . . . . . . . . . . . . 34
11.2 Environmental conditions . . . . . . . . . . . . . . . . . . . . 35
11.3 Tyres. . . . . . . . . . . . . . . . . . . . . . . . . . . . . . . . . . . . 35
11.4 Identification label. . . . . . . . . . . . . . . . . . . . . . . . . . 35

Champion
1 General
1.1 Information about the User Manual
Thank you for choosing a küschall® wheelchair.
This User Manual contains important information about using the
wheelchair. In order to ensure safety when using your wheelchair, read
the User Manual carefully and follow the safety information.
If your vision is impaired, you can view the user manual as a PDF file on
the Internet at www.kueschall.com and enlarge it on-screen as required.
If you cannot enlarge the texts and graphics sufficiently, please contact
the küschall® distributor for your country;
→addresses on the reverse of this document. If necessary, we will
provide you with a high resolution PDF file of the user manual.
Moreover, you can have the PDF file read out to you with the aid of
suitable programs using special language functions on your computer
(e.g. in Adobe®Reader®X: Shift+Ctrl+Y).
The equipment of your wheelchair may differ from the
descriptions and diagrams given here due to the wide range of
models available.
If you need additional information, please refer to our website at
www.kueschall.com.
1.2 Symbols
Symbols in this manual
In this User Manual warnings are indicated by symbols. The warning
symbols are accompanied by a heading that indicates the severity of
the danger.
WARNING!
Indicates a hazardous situation that could result in
serious injury or death if it is not avoided.
CAUTION!
Indicates a hazardous situation that could result in
minor or slight injury if it is not avoided.
IMPORTANT!
Indicates a hazardous situation that could result in
damage to property if it is not avoided.
Gives useful tips, recommendations and information for
efficient, trouble-free use.
This product complies with Directive 93/42/EEC
concerning medical devices. The launch date of this
product is stated in the CE declaration of conformity.
1.3 Warranty
Küschall AG guarantees that their wheelchairs are free from defects and
are fully functional. The warranty covers all faults and defects which are
verifiably attributable to faulty construction, substandard materials or
poor workmanship. Warranty claims against the manufacturer may only
be made by the distributor and not by the user of the product.
The warranty does not cover normal wear and tear, the consequences
of improper handling or damage, poor maintenance and incorrect
assembly or commissioning by the purchaser or a third person or faults
which are attributable to circumstances beyond our control. Wearing
parts are not covered by the guarantee. The warranty is voided if
modifications are made to the product which were not authorised and
not performed by the specialist dealer or if inappropriate accessories
or spare parts are used. The warranty does not cover consequential
41512598-B

General
costs arising from the rectification of defects such as freight and travel
expenses, labour costs, fees etc.
The term of the warranty is 24 months. The frame is guaranteed for
5 years.
Furthermore, the terms and conditions are part of the general terms and
conditions particular to the individual countries in which the product
is sold.
Quality and Flame Retardancy
Quality is fundamental to the company’s operation, working within the
disciplines of ISO 9001 and ISO 13485.
The wheelchair has been tested in accordance with EN 12183. It
includes a test for flammability.
1.4 Intended use
The active wheelchair is propelled manually and should only be used
for independent or assisted transport of a disabled person with mobility
difficulties. When used without an assistant, it should only be used by
persons who are physically and mentally able to use the wheelchair
safely (e.g. to propel themselves, steer, brake). The wheelchair should
only be used on level ground and accessible terrain, as well as indoors.
This active wheelchair needs to be subscribed and fit to your specific
health condition.
WARNING!
Any other or incorrect use could lead to hazardous
situations.
1.5 Service life
The expected service life is five years, presuming that the product is
used daily and in accordance with safety instructions, maintenance
instructions and intended use, stated in this manual.
1.6 Copyright protection
This User Manual is protected by copyright. It may not be reprinted or
copied or transferred to third parties in part or in full without the prior
written consent of the manufacturer.
1512598-B 5

Champion
2 Safety
2.1 Safety information
This section contains important safety information for the protection
of the wheelchair user and assistant and for safe, trouble-free use of
the wheelchair.
WARNING!
Risk of accidents and serious injury
Accidents with resulting serious injury can occur if the
wheelchair is wrongly adjusted.
ದAdjustments at the wheelchair always must be carried
out by a specialist dealer.
WARNING!
Risk due to driving style being unsuitable for the
conditions
There is a risk of skidding on wet ground, gravel or
uneven terrain.
ದAlways adjust your speed and driving style to the
conditions (weather, surface, individual ability, etc.).
WARNING!
Risk of injury
In a collision you could sustain injury to parts of your
body that extend beyond the wheelchair (e.g. feet or
hands).
ದAvoid an unbraked collision.
ದNever drive into an object head-on.
ದDrive carefully through narrow passages.
WARNING!
Risk due to wheelchair being out of control
At high speed you could lose control of your wheelchair
and overturn.
ದNever exceed a speed of 7 km/h.
ದAvoid collisions in general.
CAUTION!
Risk of burning
The wheelchair components can heat up when exposed
to strong sunlight.
CAUTION!
Risk of getting fingers caught
There is always a risk of getting, e.g. fingers or arms,
caught in the moving parts of the wheelchair.
ದMake sure when activating the folding or insertion
mechanisms of moving parts, such as the removable
axle of the rear wheel, folding backrest or antitipper,
that nothing becomes caught.
2.2 Safety devices
WARNING!
Risk of accidents
Safety devices that are incorrectly set or no longer
working (brakes, antitipper) can cause accidents.
ದAlways check that the safety devices are working
before you use the wheelchair and have them
checked regularly by the specialist dealer.
The functions of the safety devices are described in chapter 3
Components and their functions, page 7 .
6 1512598-B

Components and their functions
3 Components and their functions
3.1 Overview
$Push handle
%Rear wheel with handrim
&Quick release axle
'Folding mechanism
(Front wheel fork with front wheel
)Footrest
*Frame
+Parking brake
,Seat cushion
-Clothes-guard
Short description
The küschall Champion is a folding active wheelchair with a horizontal
folding mechanism.
The equipment of your wheelchair may differ from the
diagram as each wheelchair is manufactured individually to
the specifications in the order.
1512598-B 7

Champion
3.2 Parking brakes
The parking brakes are used to immobilise the wheelchair when it is
stationary to prevent it from rolling away.
WARNING!
Risk of overturning if you brake sharply
If you apply the parking brakes while you are moving,
the direction of movement can become uncontrollable
and the wheelchair may stop suddenly, which can lead
to a collision or to you falling out.
ದNever apply the parking brakes while you are moving.
WARNING!
Risk of overturning
The parking brakes will not operate correctly unless
there is sufficient air in the tyres.
ದEnsure the correct tyre pressure, 11.3 Tyres, page 35.
Standard brake
1. To apply the brake, push the brake lever forwards as far as possible.
2. To release the brake, pull the brake lever backwards.
Pull brake
1. To apply the brake, pull the brake lever backwards as far as possible.
2. To release the brake, push the brake lever forwards.
Performance brake
1. To apply the brake, push the brake lever forwards as far as possible.
2. To release the brake, pull the brake lever backwards.
8 1512598-B

Components and their functions
Active brake
1. To apply the brake, pull the brake lever forwards beside or between
your knees as far as possible.
2. To release the brake, push the brake lever backwards beside or
between your knees.
3.3 Backrest
Backrest cover
You can adjust the tension of the backrest cover as required.
Adjusting the backrest cover
1. Remove the backrest cushion $.
2. Loosen the Velcro® tapes %on the rear of the backrest cover by
simply pulling on them.
3. Tighten or loosen the tapes as required then reattach them.
WARNING!
Risk of tipping
If the bands are set very loose, the tipping point of your
wheelchair is changed for the worse.
ದEnsure that the bands are set correctly.
IMPORTANT!
ದDo not overtighten the bands; this is to ensure that
the geometry of the wheelchair is not changed.
IMPORTANT!
ದOnly ever tighten the bands when the wheelchair is
unfolded.
3.4 Stabilizing bar for the back (optional)
An optional stabilizing bar is available to increase the rigidity of the
backrest on wheelchairs with large back heights or widths.
IMPORTANT!
ದDo not use the stabilizing bar to lift or push the
wheelchair. It could break.
IMPORTANT!
ದRelease the stabilizing bar before folding the
wheelchair.
1512598-B 9

Champion
Releasing the stabilizing bar
1. Push the spring pin $on the fastening on the left-hand side and
swivel the stabilizing bar downwards.
The stabilizing bar can also be completely removed, by pushing the
spring pins on both sides. The stabilizing bar can then be taken off.
3.5 Push handles
IMPORTANT!
ದAlways check the push handles before using the
wheelchair, as to whether the hand grips are secure,
cannot be turned and cannot be pulled off.
Foldable push handles (optional)
Foldable push handles are used when the push handles are only
required occasionally.
1. To fold down the push handles, hold the wheelchair with one hand.
Grip the push handle with the other and using your thumb activate
the release (1) that is concealed under the plastic.
2. At the same time pull the push handle backwards (2) and fold it
down (3).
3. To fold the push handles up, bring the push handle into the
horizontal position until it engages.
IMPORTANT!
ದMake sure that the push handle does actually engage
so that it does not accidentally fold down while
pushing the wheelchair.
Height adjustable, angled push handles (optional)
The infinitely height adjustable push handles allow any assistant to
adjust the handles to a comfortable level.
10 1512598-B

Components and their functions
1. To set the height of the push handles, loosen the bolt $, push the
handle to the desired position and tighten the bolt again.
3.6 Side rest, infinitely height adjustable (optional)
Removing
1. Pull the side rest by the arm cushion out of the holder.
2. To adjust how easy or difficult it is to pull the side rest out of the
holder, change the degree to which the screws &are tightened.
Fitting
1. Push the side rest into the holder.
Adjusting the height
1. Loosen the screw $of the retaining plate %.
2. Move the armrest upwards or downwards until you reach the
desired height.
3. Tighten the screw $.
4. Perform the setting on both sides.
3.7 Antitipper
An antitipper prevents the wheelchair from tipping backwards.
WARNING!
Risk of overturning
Antitippers that are incorrectly set or no longer working
can lead to overturning.
ದAlways check that the antitipper is working before
using the wheelchair and have it set or readjusted by
a specialist dealer when required.
1512598-B 11

Champion
Activating the antitipper
1. Push the antitipper to the front against the spring and swivel it
through 180° until it engages in the lower position.
WARNING!
Risk of tipping
An activated antitipper can catch when negotiating a
step or an edge.
ದAlways deactivate the antitipper before driving over
a step or kerb.
Deactivating the antitipper
1. Push the antitipper to the front against the spring and swivel it
through 180° until it engages in the upper position.
Setting the height
1. Press the spring pin on the antitipper and push the inner section
to the position required. Allow the spring pin to engage in the
nearest hole.
3.8 Seat cushion
A suitable cushion is needed to provide an even pressure distribution
on the seat.
Use an antislip underlay or Velcro® fastening tapes to avoid
slipping of the seat cushion.
12 1512598-B

Accessories
4 Accessories
4.1 Securing strap
The securing strap is used to secure the wheelchair when folded.
This prevents the wheelchair from unfolding accidentally (e.g. during
transport).
1. Release both sides of the seat bag from the clip fastener (if fitted).
2. Fold the wheelchair (7.2 Folding and unfolding the wheelchair,
page 25) and clip both ends of the securing strap together.
4.2 Pelvic belt
Your wheelchair can be fitted with a pelvic belt which will prevent
you from sliding forward in the wheelchair or from falling out of the
wheelchair.
WARNING!
Risk of serious injuries through strangulation.
ದEnsure that you are sitting fully back in the seat and
that the pelvis is as upright and symmetrical as
possible - not forward on one side or tilted back.
ದPosition the lap belt so that the hip bones can be felt
above the belt.
ದAdjust the length using the buckles so that there is
just sufficient room for your hand to slide between
your body and the belt. It is recommended that
the clasp is kept in a central position, i.e. make
adjustments to each side.
ದMake sure that the belt cannot slide and the clasp
does not dissolve. Refit the pelvic belt if necessary,
→specialist dealer.
ದCheck and possibly change these adjustments each
time the belt is used.
1512598-B 13

Champion
Fitting the pelvic belt
1. Remove the backrest cover and attach the Velcro® fastener to the
backrest at the required height. Ensure that the fastener is at the
front.
Opening the pelvic belt
1. Push in the PRESS button and pull the catch $out of the
buckle %. The pelvic belt opens.
Closing the pelvic belt
1. Push the catch $into the buckle %.
2. Pull the belt &until you are held securely in the wheelchair.
4.3 Air pump
The air pump is fitted with a universal valve connection.
1. Remove the dust cap from the valve connection.
2. Push the valve connection onto the open valve on the wheel and
pump the wheel up.
4.4 Wheelchair carry bag (optional)
Your folded wheelchair can be stored in a carry bag to keep it
safe and clean during transport.
4.5 Passive illumination
You can attach reflectors to the rear wheels.
4.6 Transit wheels
If your wheelchair is too wide for certain applications, e.g.
trains/aeroplanes, narrow passageways, narrow doors, the transit
wheels can be used.
WARNING!
ದWhen using transit wheels, the parking brakes no
longer have any effect and you cannot control your
wheelchair via the handrims.
Switching to transit wheels
1. Lower the transit wheels into the operating position. To do this,
press the pin inwards until you can pull the tube down.
2. Press the second pin in.
3. Pull the tube further downwards until the pin engages into the slot.
4. Move the wheelchair to a stable object (door frame, heavy table),
which you can use for support and hold onto it firmly with one
hand.
5. Tilt the wheelchair until the rear wheel on the opposite side rises
off the floor.
Prior to removing the rear wheels, the distance between
the lowered transit wheels and the floor should not be
more than 2 cm.
14 1512598-B

Accessories
6. Remove the rear wheel,
→7.3 Removing and fitting the rear wheels, page 26.
7. Repeat the process on the other side.
Switching from transit wheels to rear wheels
1. Move the wheelchair to a stable object, which you can use for
support and hold onto it firmly with one hand.
2. Tilt the wheelchair until the transit wheel on the opposite side rises
slightly off the floor.
3. Fit the rear wheel back onto the removable axle,
→7.3 Removing and fitting the rear wheels, page 26.
4. Bring the transit wheels back into the inactive position.
5. Repeat the process on the other side.
4.7 Tipper aid
With the tipper aid, an assistant can tip the wheelchair more easily, in
order to navigate steps for example.
WARNING!
Risk of overturning
ದMake sure the tipper aid does not project beyond the
external diameter of the rear wheel.
1. Hold the wheelchair by the push handles.
2. Press the tipper aid with your foot and hold the wheelchair in the
tipped position until you have overcome the obstacle.
4.8 Cane holder
WARNING!
Risk of overturning
ದEnsure that the cane holder does not project beyond
the external diameter of the rear wheel.
1. Place the cane in the holder.
2. Fix the top of the cane to the backrest.
1512598-B 15

Champion
5 Setup
5.1 Safety information
CAUTION!
Risk of injury
ದBefore using the wheelchair, check its general
condition and its main functions, 8.2 Maintenance
Schedule, page 28 .
Your specialist dealer will supply your wheelchair ready for use. Your
dealer will explain the main functions and ensure that the wheelchair
meets your needs and requirements.
Adjustments of the axle position and the front wheel supporters must
be carried out by a specialist dealer.
If you receive your wheelchair folded, please read section 7.2 Folding
and unfolding the wheelchair, page 25.
16 1512598-B

Using the wheelchair
6 Using the wheelchair
6.1 Safety information
WARNING!
Risk of accidents
Uneven tyre pressure can have a huge effect on
handling.
ದCheck the tyre pressure before each journey.
CAUTION!
Risk of crushing
There may be a very small gap between the rear wheel
and the mudguard with the risk that you could trap
your fingers.
ದEnsure that you always propel your wheelchair using
the handrims only.
CAUTION!
Risk of crushing
There may be a very small gap between the rear wheel
and the parking brake with the risk that you could trap
your fingers.
ದEnsure that you always propel your wheelchair using
the handrims only.
6.2 Braking during use
Whilst you are moving, you brake by transferring force to the handrim
with your hands.
WARNING!
Risk of overturning
If you apply the parking brakes while you are moving,
the direction of movement can become uncontrollable
and the wheelchair may stop suddenly, which can lead
to a collision or to you falling out.
ದNever apply the parking brakes while you are moving.
WARNING!
Risk of falling out of the wheelchair
If the wheelchair is rapidly decelerated by an assistant
pulling at the push handles, the user may fall out of the
wheelchair.
ದAlways apply the pelvic belt if present.
ದMake sure your assistant has been trained individually
in transferring occupied wheelchairs.
CAUTION!
Risk of burning your hands
If you brake for a long time, a lot of frictional heat is
produced at the handrims (especially MaxGrepp and
Supergripp).
ದWear suitable gloves.
1. Hold the handrims and press evenly with both hands until the
wheelchair stops.
1512598-B 17

Champion
Braking with an assistant
With an assistant’s brake (drum brake) an assistant can brake the
wheelchair while it is moving. The assistant’s brake can also be used
as a parking brake.
1. To brake, pull the brake lever on the push handle.
2. To park, pull the brake lever firmly until the safety lever engages.
3. To release, pull the brake lever and release the safety lever
underneath the brake lever.
6.3 Getting in and out of the wheelchair
WARNING!
Risk of overturning
There is a high risk of overturning during the transfer.
ದOnly get in and out without assistance if you are
physically able to do so.
WARNING!
Risk of overturning
The wheelchair could tip forwards if you stand on the
footrest.
ದNever stand on the footrest when getting in and out.
CAUTION!
If you release or damage the brakes the wheelchair
could roll away out of control.
ದDo not support yourself on the brakes when getting
in and out.
IMPORTANT!
The mudguards and armrests could become damaged.
ದNever sit on the mudguards or armrests when getting
in and out.
1. Apply the parking brakes.
2. Place your feet on the ground.
3. Hold the wheelchair and, if necessary, also hold a fixed object in
the vicinity.
4. Move slowly to chair.
18 1512598-B

Using the wheelchair
6.4 Driving and steering the wheelchair
You drive and steer the wheelchair using the handrims.
Before driving without an assistant you must find your wheelchair’s
tipping point.
WARNING!
Risk of tipping
The wheelchair can tip backwards if it is not fitted
with an antitipper . When finding the tipping point,
an assistant must stand immediately behind the
wheelchair to catch it if it tips over.
ದTo prevent tipping, install an antitipper device.
WARNING!
Risk of tipping
The wheelchair can tip forwards.
ದWhen setting up your wheelchair, test its behaviour
in terms of tipping forward and adjust your driving
style accordingly.
CAUTION!
A heavy load hanging on the backrest can affect the
wheelchair’s centre of gravity.
ದChange your driving style accordingly.
Finding the tipping point
1. Release the brake.
2. Roll forwards a short distance, grasp both handrims firmly and pull
backwards with a slight kick.
3. The shift in weight and steering in opposite directions with the
handrims will enable you to identify the tipping point.
1512598-B 19

Champion
6.5 Negotiating steps and kerbs
WARNING!
Risk of overturning
When negotiating steps you could lose your balance
and tip the wheelchair over.
ದAlways approach steps and kerbs slowly and carefully.
ದDo not go up or down steps that are higher than
25 cm.
CAUTION!
An activated antitipper prevents the wheelchair from
tipping backwards.
ದDeactivate the antitipper before going up or down
steps or kerbs.
With an assistant
Going down a step
1. Move the wheelchair right up to the kerb and hold the handrims.
2. The assistant should hold both push handles, place one foot on the
tipper aid (if installed) and tilt the wheelchair backwards so that the
front wheels lift off the ground.
3. The assistant should then hold the wheelchair in this position, push
it carefully down the step and then tilt it forwards until the front
wheels are back on the ground.
20 1512598-B
Table of contents