Kaden KW Series User manual

Owner’s
Manual
R32 WINDOW AIR CONDITIONER
KW Series
KW09 | KW12 | KW18 | KW21

2| Kaden Owner’s Manual

Kaden Owner’s Manual | 3
Table of contents
Important note
Read this manual carefully before installing
or operating your new air conditioning unit.
Make sure to save this manual for future reference.
Important note
This appliance must be installed in accordance with:
Manufacturer’s Installation Instructions
Current AS/NZS 3000, AS/NZS 5141
Local Regulations and Municipal Building Codes including
local OH&S requirements
This appliance must be installed, maintained, and removed
only by an Authorised Person.
For continued safety of this appliance, it must be installed
and maintained in accordance with the manufacturer’s
Instructions.
REFRIGERANT
R32
1. Safety precautions 4
2. Function 6
3. Unit specications and remote control functions 7
4. Manual operation (without remote) 10
5. Wi-Fi 11
6. Operation tips and safety 12
7. Care and maintenance 13
8. Warranty information 14
9. Troubleshooting guide 15
10. Installation 16
11. Installation notes 19
12. Installation record form 22

4| Kaden Owner’s Manual
1. Safety precautions
Read safety precautions before installation
Incorrect installation due to ignoring instructions can cause serious damage or injury.
The seriousness of potential damage or injuries is classified as either a WARNING or CAUTION.
WARNING
This appliance can be used by children aged from 8 years and above and persons with reduced physical, sensory or mental
capabilities or lack of experience and knowledge if they have been given supervision or instruction concerning use of the
appliance in a safe way and understand the hazards involved. Children shall not play with the appliance. Cleaning and
user maintenance shall not be made by children without supervision.
INSTALLATION WARNINGS
• Ask an authorised professional to install this air conditioner. Inappropriate installation may cause water leakage, electric shock, or fire.
• All repairs, maintenance and relocation of this unit must be performed by a licensed service technician.
Inappropriate repairs can lead to serious injury or product failure.
WARNINGS FOR PRODUCT USE
• If an abnormal situation arises (like a burning smell), immediately turn off the unit and pull the power plug.
Call your dealer for instructions to avoid electric shock, fire or injury.
• Do not insert fingers, rods or other objects into the air inlet or outlet. This may cause injury, since the fan may be
rotating at high speeds.
• Do not use flammable sprays such as hair spray, lacquer or paint near the unit. This may cause fire or combustion.
• Do not operate the air conditioner in places near or around combustible gases. Emitted gas may collect around
the unit and cause explosion.
• Do not operate the air conditioner in a wet room (e.g., bathroom or laundry room). This can cause electrical
shock and cause the product to deteriorate.
• Do not expose your body directly to cool air for a prolonged period of time.
REFRIGERANT
This appliance uses R32 (difluoromethane) refrigerant, which is a flammable gas class 2.2 according to AS 1677 and must be
handled by a refrigeration technician with an appropriate Australian Refrigerant Handling License.
WARNING
Risk of fire / flammable material. If the refrigerant is leaked, together with an external ignition source, there is a possibility of ignition.
This symbol indicates that ignoring instructions may cause moderate injury to your person, or damage to your
unit or other property.
This symbol indicates that ignoring instructions may cause death or serious injury.

Kaden Owner’s Manual | 5
ELECTRICAL WARNINGS
• Only use the specified power cord. If the power cord is damaged, it must be replaced by the manufacturer, certified
service agent or licensed electrical contractor.
• Keep power plug clean. Remove any dust or grime that accumulates on or around the plug. Dirty plugs can cause fire
or electric shock.
• Do not pull power cord to unplug unit. Hold the plug firmly and pull it from the outlet. Pulling directly on the cord can
damage it, which can lead to fire or electric shock.
• Do not use an extension cord, manually extend the power cord, or connect other appliances to the same outlet as
the air conditioner. Poor electrical connections, poor insulation, and insufficient voltage can cause fire.
CLEANING AND MAINTENANCE WARNINGS
• Turn off the device and pull the plug before cleaning. Failure to do so can cause electrical shock.
• Do not clean the air conditioner with excessive amounts of water.
• Do not clean the air conditioner with combustible cleaning agents. Combustible cleaning agents can cause fire
or deformation.
CAUTION
• If the air conditioner is used together with burners or other heating devices, thoroughly ventilate the room
toavoid oxygen deficiency.
• If you are not going to use the air-conditioner for a long time, disconnect the power from the main isolator.
• During storms or bad weather turn off the unit and disconnect the power from the main isolator.
• Make sure that water condensation can drain unhindered from the unit.
• Do not operate the air conditioner with wet hands. This may cause electric shock.
• Do not use device for any other purpose than its intended use.
• Do not climb onto or place objects on top of the outdoor unit.
• Do not allow the air conditioner to operate for long periods of time with doors or windows open,
or if thehumidity is very high.

6| Kaden Owner’s Manual
2. Function
Introduction
Window air conditioners are designed to regulate a rooms
temperate and dry the room.
Cooling in Summer
In the hot summer, the air conditioner can cool down the
room’s air by transferring heat out.
Dehumidifying in rainy or humid season
Without reducing the room temperature, the air conditioner can
dehumidify and make the room air dry and comfortable.
Heating in Winter
In the cold winter, the air conditioner can heat up the room’s air.
Exchange fresh air
Open the storm door to keep the fresh air in the room.
Working temperature range
The operating temperature range (outdoor temperature):
• -7°C – 43°C.
Power requirements
CAUTION
Rated voltage: 220 – 240V ~ 50Hz
The electric components will be damaged when
the voltage is too high. If the voltage is too low, the
compressor will vibrate violently to damage the refrigerant
system and easily cause the compressor and electric
components to not work.
CAUTION
The ground must be connected.
Special sockets must be used. Furthermore, the socket
and wiring must conform to National and State Wiring
Regulations and Standards, and the earthing method must
be reliable.
In a fixed circuit, there must be an RCD or RCBO with a
maximum rated residual current of 30mA installed as per
AS/NZS 3000:2018 (Clause 2.6.3.2.2).

Kaden Owner’s Manual | 7
3. Unit specications and
remote control functions
Unit parts
Remote control function buttons
Air direction adjustment
Airflow direction adjustment up and
down is controlled by positioning the
vanes to discharge the air upwards,
downwards or straight out.
Front intake grille
Air filter
(behind the front
intake grille)
Cabinet
Front grille
Remote control panel
Front grille
Vanes
3 +/- button
2 Mode button
4 Swing button
7 Timer button
9 Wi-Fi button
1 On/Off button
5 Fan button
6 Sleep button
8 Health button

8| Kaden Owner’s Manual
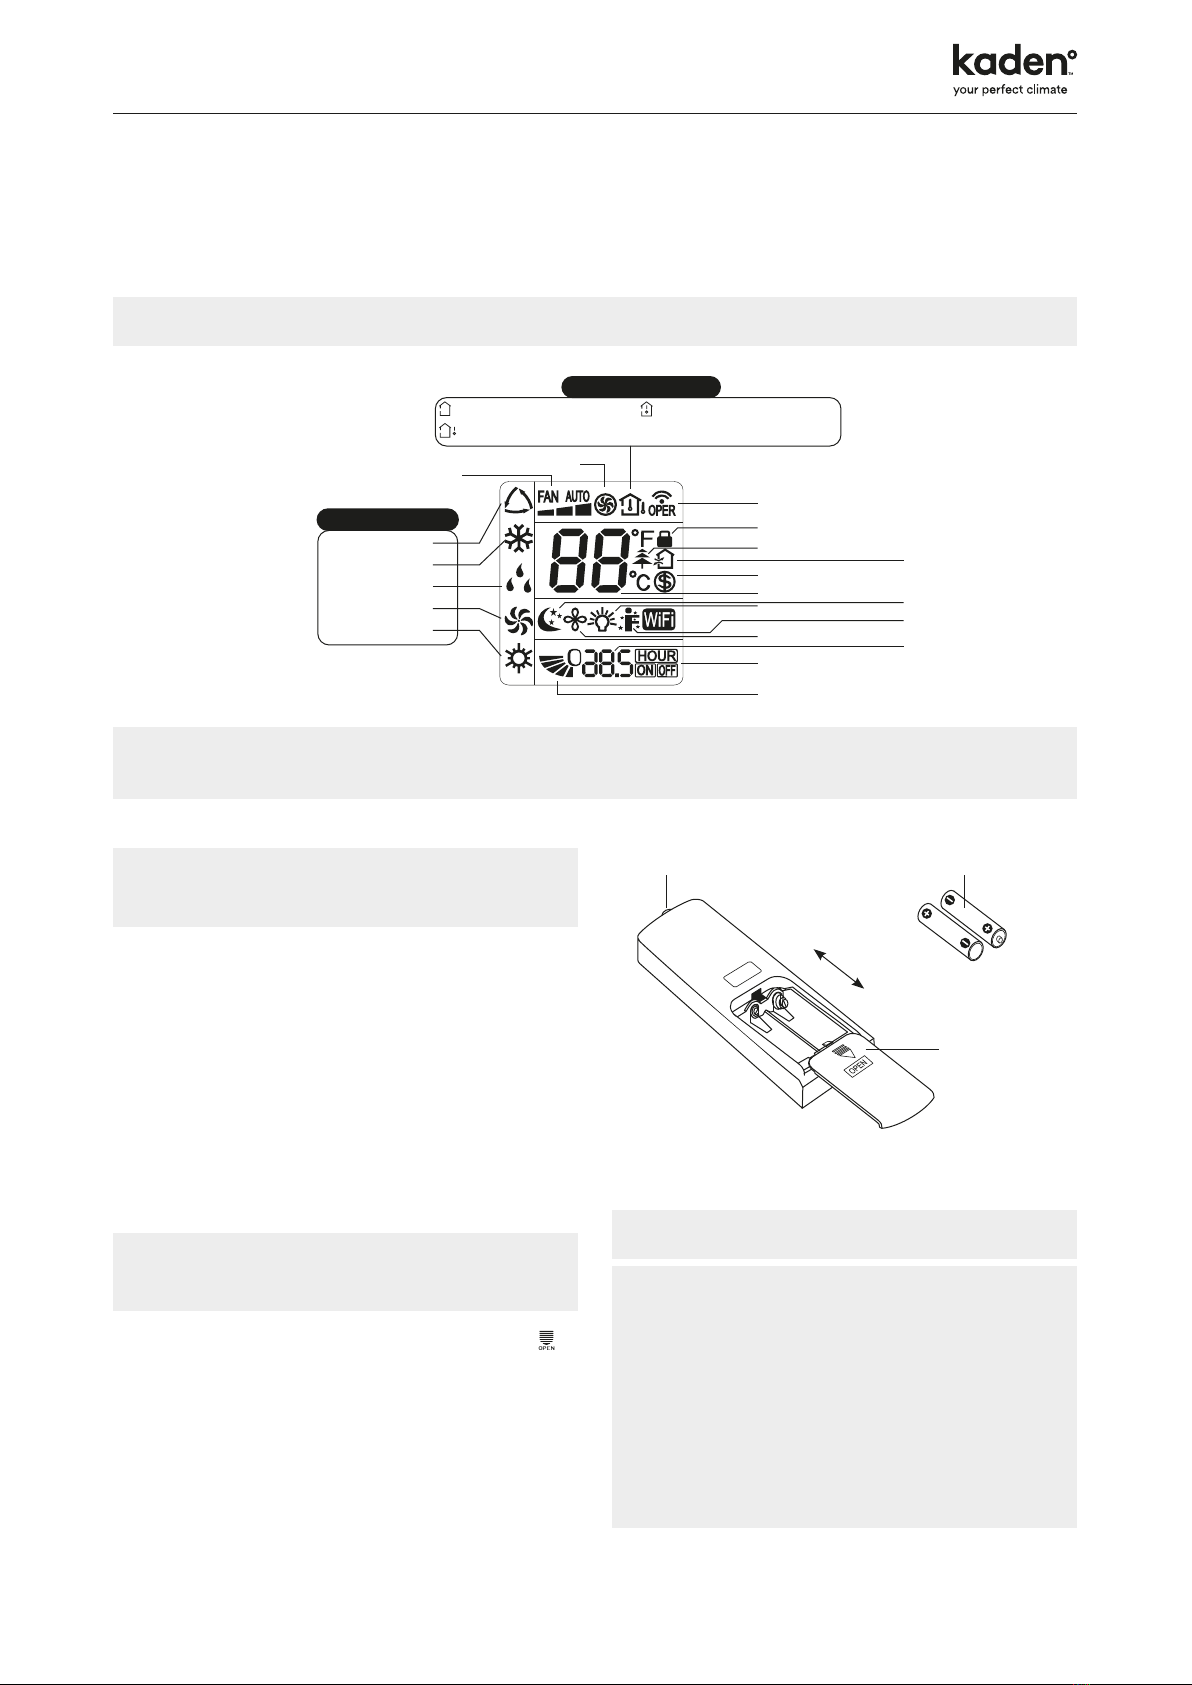
Remote control operation procedure
1. On/O button
Press this button to turn on the unit. Press this button again to
turn off the unit.
2. Mode button
Press this button to switch between the different operating
modes. The corresponding indicator will appear on.
Auto: Under this mode, the unit will operate automatically
according to ex-factory setting. In this case, set temperature
cannot be adjusted.
Cool: Under this mode, the unit will operate under cooling
mode. Cooling indicator will be on. Press Fan Speed button to
adjust the fan speed.
Dry: Under this mode, the unit runs in low fan speed for
dehumidification and the corresponding indicator will be on;
under dry mode, the fan speed cannot be adjusted.
Fan only: Under this mode, the unit will not cool or heat, only
blow air. Fan indicator will be on. Press Fan Speed button to
adjust the fan speed.
Heat: Under this mode, the unit operates under heating mode.
Press Fan Speed button to adjust the fan speed.
3. +/– button
Pressing +or –button once will increase or decrease set
temperature by 1°C (or °F).
Hold +or –button for two seconds, set temperature on remote
controller will change more quickly.
Release the button after your required set temperature
is reached.
Under timer setting status, after each pressing of +or –button,
time will increase or decrease 0.5 hours. Hold +or –button,
after two seconds the time shown on the display will quickly
change. Loosen the button until the time is reached to your
set time.
4. Swing button
Press this button to turn swing on or off.
5. Fan button
This button is used for setting Fan Speed in the sequence that
goes from Auto, through the speed settings then back to Auto.
NOTE: There are three speeds for the fan speed of this model.
6. Sleep button
Press this button to go into the Sleep operation mode. Press it
again to cancel this function.
7. Timer button
Under On status, press this button to set timer Off.
Under Off status, press this button to set timer On.
Press this button once and the characters of Hour On (Off) will
flash to be displayed. Meanwhile, press +button or –button
to adjust timer setting (time will change more quickly if holding
+or –button). Time setting range is 0.5 to 24 hours. Press
this button again to confirm timer setting and the characters of
Hour On (Off) will stop flashing.
If the characters are flashing but you haven’t pressed the Timer
button, timer setting status will quit after five seconds. If timer is
confirmed, press this button again to cancel timer.
8. Health button
The KW range does not come with the additional health
feature. The standard remote included with the KW range
includes the health button, however this button will not
activate a health feature mode.
9. Wi-Fi button
Press Wi-Fi button to turn on Wi-Fi function, Wi-Fi icon will be
displayed on the remote controller.
Hold Wi-Fi button for five seconds to turn off Wi-Fi function
and Wi-Fi icon will disappear. Under off status, press Mode
and Wi-Fi buttons simultaneously for one second and the Wi-Fi
module will restore factory settings.
Auto Speed 1 Speed 3Speed 2

Kaden Owner’s Manual | 9
Remote control display icons
Send signal
Set fan speed Turbo mode
Operation mode
: Set temp.
:Outdoor ambient temp.
: Indoor ambient temp.
Temp. display type
Auto mode
Cool mode
Dry mode
Fan mode
Heat mode
Child lock
Health function
8º heating function
TIMER ON /TIMER OFF
Up & down swing
X-fan mode
Set temperature
Light function
Ventilation operation
Set time
Sleep mode
I feel function
NOTE: This is a standard remote and may not feature every function above, if a button is pressed for an unavailable function,
repress the button to resume the system operating as normal.
Function introduction for
combination buttons
Temperature display switch over function
Under Off status, press –and Mode buttons simultaneously to
switch temperature display between °C and °F.
Light function
Under Switch-on or Switch-off state, you may hold + and Fan
buttons simultaneously to set the lamp on or off. After being
energized the lamp is defaulted on.\
Replacement of batteries in
remote controller
1. Press the back side of remote controller marked with
as shown in the figure, and then push out the cover of the
battery box along the arrow direction.
2. Replace two 7# (AAA 1.5V) dry batteries, and make sure
the position of + polar and – polar are correct.
3. Reinstall the cover of battery box.
Signal sender Battery
reinstall
remove
Cover of
battery box
Note
• The distance between signal sender and signal
receiver should be no more than eight metres, and
there should be no obstacles between them.
• As there may be signal interference in the room
with objects such as; electronic fluorescent lamps,
conversion florescent lamps and/or wireless phones,
you may need to get closer to the air conditioner when
using the remote controller.
• Remove batteries from remote controller when not in
use for a long time.

10 | Kaden Owner’s Manual
4. Manual operation
(without remote)
NOTE: If wireless remote controller is lost, you can use the remote control panel and operate manually.
1. ON/OFF button
Operation starts when pressing this button, and stops when
pressing this button again.
2. SWING button
Activates the automatic louvre swing function.
3. FAN SPEED button
Select the fan speed LOW, MID, HIGH and AUTO in sequence.
4. TIME/TEMP button
Press the keypad to increase the set (operating) temperature
of the unit. Press the keypad to decrease the set (operating)
temperature of the unit. The temperature setting range is from
16 to 30°C. Press the keypad also to increase the selected
time in 0.5 hour increments, and Press the keypad to
decrease the selected time in 0.5 hour decrements. The time
setting range is from 0 to10 hours. Press the keypad also to
increase the selected time in 1 hour increments, and press
the keypad to decrease the selected time in 1 hour
decrements. The time setting range is from 10 to 24 hours.
5. Signal receiver
Ensure the signal receiver is not blocked to optimally control
your unit from the remote control.
6. MODE button
Select the operation mode, AUTO, COOL, DRY, FAN, HEAT
(for reverse cycle model).
7. FILTER button
This feature is a reminder to clean the air filter (see Care and
Maintenance) for a more efficient operation and cooling. The
LED light will illuminate after 250 hours of operation. To reset
after cleaning the filter, press the Filter button and the light will
go off. Before the LED light illuminates, press the Filter button
for three seconds, the accumulated time of operation will be
cancelled.
Ventilation lever
When the slider is at the OPEN
position, the ventilation door opens to
allow air, smoke or odours to be
expelled from the room.
When the slider is at the CLOSE
position, the ventilation door is closed
and the air will be circulated inside the
room and conditioned.
5 Signal receiver
1 ON/OFF button
6 MODE button
4 TIME/TEMP button
2 SWING button
5 FANSPEED button
7 FILTER button

Kaden Owner’s Manual | 11
5. Wi-Fi
Wi-Fi app and set up
Operating systems
Requirement for user’s smart phone:
iOS system
Support iOS7.0 and above version
Android system
Support Android 4.4 and above version
Download and installation
Scan the QR code or search Ewpe Smart in the application
market to download and install it. When the application is
installed, register the account and add the device to achieve
long-distance control and LAN control of smart home appliances.
For more information, please refer to Help in app.
Set up process
1. Scan the QR code above with your smart phone to
download and install the Wi-Fi application directly.
2. Open the Wi-Fi app and click Sign up for registration.
3. Sign in through the prompt interface, you can also enter
the homepage and click the profile picture at the left upper
corner to sign in.
4. Click +at the right upper corner of homepage to add
device and select AC.
5. After selecting AC, you can select different reset tools
according to actual situation. The app interface will provide
relevant operation instructions for different tools.
6. Reset the air conditioner (refer to the operation instructions
in app interface) and click Next to add home appliance
automatically (Wi-Fi password shall need to be inputed).
7. Or after setting and activating the air conditioner, click Add
appliance manually at the right upper corner to select the
wireless network for controlling the device. Then confirm
family Wi-Fi and arrange configuration.
8. After finalising device reset and filling in the correct
information, search device and arrange configuration.
Main function settings
In the homepage, click the device in device list and enter device
operation interface.
Set mode, temperature and fan speed to your desired choice.
Advanced settings
Click FUNC in the lower left corner in device operation interface
to enter advanced settings
Swing Settings
Click Up down swing or Left right swing to turn on or turn off
swing function. Click the arrow at the right lower corner of icon
to enter the set swing range.
Preset Setting
Select Timer to set preset times of your choice
Other function settings
Homepage menu
Click the profile picture at the left upper corner of homepage
and set each function in the following menu.
Scene
Click Scene and then you can operate the devices in the
preset scene.
Home management
Click Home management to create or manage family. You can
also add family members according to the registered account.
Help
Click Help and view the operation instructions of the app.
Cloud
Internet
Intelligent
home
appliances
Home Wi-Fi
Home wireless
router
Home Wi-Fi
App
Cellular
/other
Wi-FI

12 | Kaden Owner’s Manual
6. Operation tips and safety
Operation tips
• Do not over-cool the room
temperature. This is not good for
health and wastes electricity.
• Keep curtains closed. Do not let
sunshine enter the room directly when
the air conditioner is in operation.
• Keep the room temperature uniform.
Adjust the vertical and horizontal
airflow direction to ensure a uniform
temperature in the room. Air can’t be
discharged to the direction of air in.
• Make sure that the doors and windows
are tightly closed. Avoid opening doors
and windows as much as possible to
keep air conditioning in the room.
• Clean the air filter regularly. Blockages
in the air filter reduce dehumidifying
effects. Clean the air filter at least once
every two weeks.
• Ventilate the room occasionally. Since
windows are kept closed, it is a good
idea to open them and ventilate the
room now and then. When starting the
unit, curtains or windows should be
closed to prevent the heat/cool leakage.
CAUTION
Operations for safety and health
1. The plug must be accessible after the appliance
is positioned.
2. Do not use this appliance in the laundry.
3. If the power cord is damaged, it must be replaced
by the manufacturers or its service agent in void
of hazard.
Safety tips
• Do not pull out the power cord.
• Damage to the cord may result in
serious electric shocks
• Do not use the air conditioner for other
purposes except for cooling the room.
• Do not use the air conditioner for
other
purposes such as drying
clothes, preserving foods, or
cultivating vegetables.
• Do not block the air intake and
outlet vents. This causes lowered
performance and irregular operation.
• Do not insert sticks or other objects into
these vents as it is dangerous to touch
the electric components and the fan.
• Select the most appropriate
temperature. Pay attention to adjust
the temperature to suit the conditions.
Rooms occupied by infants,the elderly,
or the sick should be kept at an
appropriate temperature.
• Do not use heating apparatuses in
the vicinity. The air conditioner’s
plastic parts will melt if exposed to
excessive heat.
• Avoid exposing the body directly to a
continuous unidirectional air flow for
long periods This is not recommended
for health reasons.
Note
Always wait at least three minutes before switching the air
conditioner on again after you have switched it off during
cooling or heating.
Please note that the unit is filled with flammable gas
R32. Inappropriate treatment of the unit involves
the risk of severe damages of people and material.
The appliance must be installed, operated and stored in a
room with a floor area larger than 4m2.

Kaden Owner’s Manual | 13
7. Care and maintenance
CAUTION
Always turn off the air conditioner and main power supply before cleaning to ensure safety.
Cleaning the unit
1. Turn off the system before cleaning.
Take the plug out only after air
conditioner stops completely.
2. Use a soft cloth when cleaning
cabinet. If the cabinet is very dirty,
dip cloth into warm water below
40°C, dry the cloth and then rub off
the dirt.
3. Do not use gas, benzene, solvent,
wash, chemical solvent, etc. for
cleaning.
4. Do not splash water directly into
the unit, in which there are micro-
computer and circuit plate, they
must not be drenched with water.
Air lter
The air filter behind the intake grille should be washed at least
once every two weeks or as often as it needs cleaning.
To clean the air filter:
1. Turn off the system before cleaning.
Take the plug out only after air
conditioner stops completely.
2. Vacuum the filter on the dusty side to
remove light dust.
3. The clean side faces upwards; use
water to gently flush the filter to wash
away the accumulated dust and fluff.
4. If the filter is very dirty, use a mild
household detergent in the wash
water. Let the air filter dry thoroughly
before reinstalling it.

14 | Kaden Owner’s Manual
8. Warranty information
Reece Limited Product Quality Guarantee
You have purchased a quality product from Reece Australia
Pty Ltd ABN 84 004 097 090 (“Reece Limited”).
Warranty Terms & Conditions
These Warranty Terms and Conditions (“Warranty”) constitute your agreement with Reece Limited and will apply to your
service order. The benefits given by this Warranty are in addition to all consumer guarantees and other rights and remedies
prescribed by the Australian Consumer Law and any other applicable laws.
Our goods come with guarantees that cannot be excluded under the Australian Consumer Law. You are entitled to a
replacement or refund for a major failure and compensation for any other reasonably foreseeable loss or damage. You are
also entitled to have the goods repaired or replaced if the goods fail to be of acceptable quality and the failure does not
amount to a major failure.
In addition to your rights and remedies under the Australian Consumer Law, Reece Limited provides consumers with a Warranty
which covers faults in product construction, materials and assembly in the following applicable warranty periods:
KW Series Window Air Conditioners
Use Warranty
Residential applications (human comfort use) 5 years
Commercial applications (human comfort use) 5 years
Non-human comfort applications and portables 1 year
Claim Procedure
In order to claim the Warranty, you must cease using the product when a fault arises, contact the Reece Limited branch
where the product was purchased to report the issue and follow Reece Limited’s directions regarding what to do next. The
relevant Reece Limited branch details can be found on your purchase invoice. Reece Limited’s general contact details are
as follows:
For more information on warranty please visit:
https://www.kadenair.com.au/faqs/
If applicable, all replacement products will be available for collection at no cost to the customer at the nearest Reece
Limited branch to the customer’s location, or elsewhere as agreed between the customer and Reece Limited.

Kaden Owner’s Manual | 15
9. Troubleshooting guide
Issue Possible causes
Air conditioner does not operate at all.
Is there a power failure?
Is the plug out?
Is power fuse or switch off ?
Is the voltage too high or too low?
Cooling or heat efficiency is not good.
Is air inlet or outlet locking?
Is there any other heat /cool source in the room?
Are the air filters very dirty?
Is indoor fan speed set at LOW?
Maybe the room is too hot/cold when the unit is started.
Foggy air flows out.
In COOL mode operation, sometimes there is foggy air flowing
out of the unit. This is because the humid air from the room has
been cooling rapidly.
The unit is normal while the indoor outlet is sending out some
odour, because the inlet air may be mixed with the smell of
furniture and smoke.
The air conditioner operation is noisy.
For a noise that sounds like water flowing: This is the sound
of refrigerant flowing inside the air conditioner unit.
For a noise that sounds like a shower: this is the sound of
the dehumidifying water being processed inside the air
conditioner unit.
Condensation appears to be leaking from the air conditioner. Condensation occurs when the airflow from the air conditioner
cools the warm room air.
Air conditioner does not operate for about three minutes
when restarted.
This is to protect the mechanism. Wait about three minutes and
operation will begin.
CAUTION
In the following situations immediately stop all operations
and pull the plug out, please contact your supplier.
• Operation starts or stops abnormally.
• Power fuse or switch often breaks.
• Accidentally splashed water or something into air
conditioner.
• Electrical lines are very hot or lines cover breaks.
• Other strange situations.
Others
• The connection between AC and power cord or among
other elements independently shall be subject to wiring
diagram on the unit.
• Model and rated value of fuse shall be subject to screen
print on corresponding controller or protective bushing.
After service
• If your air conditioner has the questions of quality or
anything else, please contact your supplier.

16 | Kaden Owner’s Manual
10. Installation
Installation precaution
Improper installation of the window air conditioner could result
in a damaged unit. Please allow a professional technician
to install the unit and don’t install it by yourself. Kaden is
not responsible for the damage if done by an unlicensed
professional.
Location
• Ensure unit is installed in a location where the condensate
water is drained appropriately.
• Install air conditioner unit far away from TV set or radio etc.
to avoid disturbing video or voice.
• In coastal, thermal or other special areas, where pollution,
gases and/or salt are in high concentration, consider
using coil protection products and contact seller before
installation.
• Avoid a place where it is possible for inflammable gas
to leak out.
• Avoid other heat sources or direct sun light.
• Avoid a place where it is easy for children to touch.
• Do not use the unit in the immediate surroundings of a
laundry, bath, shower or swimming pool.
• It’s not allowed to be installed on an unstable or motive
base structure (such as truck) or in a corrosive environment
(such as chemical factory).
How to install
1. Choose a location where there are no obstacles
surrounding the unit, and the plug is accessible.
2. Prepare the installation hole slightly bigger than unit size.
3. Choose the installation space according to the following
diagram (pictured right). The distance between the air
conditioner and the surrounding obstacles should meet
the requirement as below: over 150mm (upper side), over
150mm (left side), over 150mm (right side), over 1000mm
(front side) and over 500mm (rear side).
Over
150mm
Over
150mm
Over
1000mm
Less than
220mm
Over
500mm
Over 500mm
Over 150mm
Over 150mm
Fence or similar
Wall
Top view
Front view
Side view
Wall
Wall

Kaden Owner’s Manual | 17
Installation notes
• The air conditioner should not be used in a room that has
running fire (such as fire source, working coal gas ware,
operating heater).
• The air conditioner must be installed in a room that is larger
than the minimum room area.
• The minimum room area is shown on the nameplate or
following table.
• A leak test must be conducted after installation.
• Minimum install height is 1 metre.
• Do not fill unit above max refrigerant charge.
Minimum room area (m2)
Charge amount (kg) ≤1.2 1.3 1.4 1.5 1.6 1.7 1.8 1.9 2 2.1 2.2 2.3 2.4 2.5
Window mounted 4.0 5.2 6.1 7.0 7.9 8.9 10.0 11.2 12.4 13.6 15 16.3 17.8 19.3
Note: the unit must not be installed in a space less than 4m2.
Model Pre-Charged Refrigerant Max Refrigerant Charge
KW09 0.60kg 0.60kg
KW12 0.86kg 0.86kg
KW18 1.08kg 1.08kg
KW21 1.05kg 1.05kg
Installation procedure
1. Remove the sticker from the front panel.
2. Put the unit into the installation hole.
When installing the unit, it should be slanted down to
the back to avoid the enlargement of noise or vibration.
(Slant between 6–10mm.) (Shown at right figure.)
The installation place should be strong enough to
avoid the enlargement of noise or vibration.
3. Fill up gaps in the cabinet with sponge or foam.
Installation assistance
Use iron support
The installation hole should be strong enough to support the air
conditioner. If it cannot, a suitable bracket with an appropriate
weight rating has to be used to assist in supporting the outdoor
portion of the unit. The suitable supporting bracket should be
fixed to the building (shown at right figure.)
Use sunshade board
A sunshade board should be installed above the outer portion
of the unit to avoid anything falling onto the unit and reduce the
amount of direct sunlight. When installing the sunshade board,
ensure it does not block the air inlet on the side of the unit.
Horizontal line
6–10mm
Wall
Wooden frame
Rubber plate
Sunshade board
6–10mm
Support
Horizontal line

18 | Kaden Owner’s Manual
Drain water
Drain pan and drain hose need to be installed before using.
Drain hose is not included in the products, you need to
purchase it locally to satisfy your particular needs. Use the
following procedure to install drain pan and drain hose.
1. Slide out the chassis from the cabinet.
2. Install the drain pan to the corner of the cabinet with
two screws.
3. Connect the drain hose to the outlet on the drain pan bottom.
4. Slide the chassis into its original place in the cabinet.
To get the maximum cooling efficiency, the air conditioner is
designed to splash the condensation water on the condenser
coil. If the splashing sound is excessive, you can remove the
rubber plug from the chassis to lower the noise, this may cause
a slight reduction in performance on hot days.
Internal view
Screws
Drain pan
Drain hose
External view
Notes for installation
Electric wiring
• The unit must be connected to ground.
• The unit requires an exclusive fixed power circuit as per
AS/NZS 3000:2018.
• Do not pull on the power cord strongly.
• The fixed circuit must be installed with an RCD or RCBO
with a maximum rated residual current of 30mA as per
AS/NZS 3000:2018 (Clause 2.6.3.2.2).
• Connecting method between air conditioners and power
cord and interconnecting method of each individual element
with one another should accord with wiring diagram on
the unit.
• The air conditioner should be installed in accordance with
National and State Wiring regulations and standards.
• An all-pole circuit breaker having a contact separation of at
least 3mm in all poles should be connected in fixed wiring.
• If the supply cord is damaged, it must be replaced by the
manufacturer, its service agent, or similarly qualified persons
in order to avoid a hazard.
• All the electrical work must be done in accordance with
National and State Wiring regulations and standards.
Removal
In the event of removing the air conditioner to another location,
you should contact the seller first.
This must be done under the
direction of a professional technician.
Noise
• Install the unit in a location that is stable enough to avoid
possible vibration and noise.
• Don’t put anything in front of the outlet of the unit to avoid
increasing noise.
• Be sure that hot air or noise will not inconvenience neighbours.
• Please contact the seller as soon as there is strange noise
during operation.
• Please use the safety support.

Kaden Owner’s Manual | 19
11.Installation notes
• Initial safety checks shall include:
- that capacitors are discharged: this shall be done in a
safe manner to avoid possibility of sparking;
- that no live electrical components and wiring are exposed
while charging, recovering or purging the system;
- that there is continuity of earth bonding.
• Checks to the area
Prior to beginning work on systems containing flammable
refrigerants, safety checks are necessary to ensure that the
risk of ignition is minimised. For repair to the refrigerating
system, DD.4.3 to DD.4.7 within ASNZS 60335.2.40-2019
shall be completed prior to conducting work on the system.
• Work procedure
Work shall be undertaken under a controlled procedure so
as to minimise the risk of a flammable gas or vapour being
present while the work is being performed.
• General work area
All maintenance staff and others working in the local area
shall be instructed on the nature of work being carried out.
Work in confined spaces shall be avoided.
• Checking for presence of refrigerant
The area shall be checked with an appropriate refrigerant
detector prior to and during work, to ensure the technician
is aware of potentially toxic or flammable atmospheres.
Ensure that the leak detection equipment being used is
suitable for use with all applicable refrigerants, i.e. non-
sparking, adequately sealed or intrinsically safe.
• Presence of fire extinguisher
If any hot work is to be conducted on the refrigeration
equipment or any associated parts, appropriate fire
extinguishing equipment shall be available to hand. Have
a dry powder or CO2 fire extinguisher adjacent to the
charging area.
• Ventilated area
Ensure that the area is in the open or that it is adequately
ventilated before breaking into the system or conducting
any hot work. A degree of ventilation shall continue during
the period that the work is carried out. The ventilation
should safely disperse any released refrigerant and
preferably expel it externally into the atmosphere.
• Checks to the refrigeration equipment
Where electrical components are being changed, they
shall be fit for the purpose and to the correct specification.
At all times the manufacturer’s maintenance and service
guidelines shall be followed. If in doubt, consult the
manufacturer’s technical department for assistance.
The following checks shall be applied to installations using
flammable refrigerants:
- the charge size is in accordance with the room size within
which the refrigerant containing parts are installed;
- the ventilation machinery and outlets are operating
adequately and are not obstructed;
- if an indirect refrigerating circuit is being used, the
secondary circuit shall be checked for the presence of
refrigerant;
- marking to the equipment continues to be visible and
legible. Markings and signs that are illegible shall be
corrected;
- refrigeration pipe or components are installed in a position
where they are unlikely to be exposed to any substance
which may corrode refrigerant containing components,
unless the components are constructed of materials
which are inherently resistant to being corroded or are
suitably protected against being so corroded.
• Checks to electrical devices
Repair and maintenance to electrical components shall
include initial safety checks and component inspection
procedures. If a fault exists that could compromise
safety, then no electrical supply shall be connected to the
circuit until it is rectified. If the fault cannot be corrected
immediately but it is necessary to continue operation, an
adequate temporary solution shall be used. This shall be
reported to the owner of the equipment so all parties are
advised:
- that capacitors are discharged: this shall be done in a
safe manner to avoid possibility of sparking;
- that no live electrical components and wiring are exposed
while charging, recovering or purging the system.
• No ignition sources
No person carrying out work in relation to a refrigerating
system which involves exposing any pipe work shall use
any sources of ignition in such a manner that it may lead
to the risk of fire or explosion. All possible ignition sources,
including cigarette smoking, should be kept sufficiently far
away from the site of installation, repairing, removing and
disposal, during which refrigerant can possibly be released
to the surrounding space. Prior to work taking place, the
area around the equipment is to be surveyed to make sure
that there are no flammable hazards or ignition risks. ‘’No
Smoking’’ signs shall be displayed.
• Repairs to sealed components
During repairs to sealed components, all electrical supplies
shall be disconnected from the equipment being worked
upon prior to any removal of sealed covers, etc. If it
is absolutely necessary to have an electrical supply to
equipment during servicing, then a permanently operating
form of leak detection shall be located at the most critical
point to warn of a potentially hazardous situation.
Particular attention shall be paid to the following to ensure
that by working on electrical components, the casing is not
altered in such a way that the level of protection is affected.
This shall include damage to cables, excessive number of
connections, terminals not made to original specification,
damage to seals, incorrect fitting of glands, etc.
- Ensure that the apparatus is mounted securely.
- Ensure that seals or sealing materials have not degraded
to the point that they no longer serve the purpose of
preventing the ingress of flammable atmospheres.

20 | Kaden Owner’s Manual
Replacement parts shall be in accordance with the
manufacturer’s specifications.
NOTE: The use of silicon sealant can inhibit the
effectiveness of some types of leak detection equipment.
Intrinsically safe components do not have to be isolated
prior to working on them.
• Repair to intrinsically safe components
Do not apply any permanent inductive or capacitance
loads to the circuit without ensuring that this will not exceed
the permissible voltage and current permitted for the
equipment in use.
Intrinsically safe components are the only types that
can be worked on while live in the presence of a
flammable atmosphere. The test apparatus shall be at
the correct rating.
Replace components only with parts specified by the
manufacturer. Other parts may result in the ignition of
refrigerant in the atmosphere from a leak.
• Cabling
Check that cabling will not be subject to wear, corrosion,
excessive pressure, vibration, sharp edges or any other
adverse environmental effects. The check shall also take
into account the effects of aging or continual vibration from
sources such as compressors or fans.
• Leak detection methods
Leak detection fluids are suitable for use with most
refrigerants but the use of detergents containing chlorine
shall be avoided as the chlorine may react with the
refrigerant and corrode the copper pipe-work.
• Detection of flammable refrigerants
Under no circumstances shall potential sources of ignition
be used in the searching for or detection of refrigerant
leaks. A halide torch (or any other detector using a naked
flame) shall not be used.
The following leak detection methods are deemed
acceptable for all refrigerant systems.
Electronic leak detectors may be used to detect refrigerant
leaks but, in the case of flammable refrigerants, the
sensitivity may not be adequate, or may need re-calibration.
(Detection equipment shall be calibrated in a refrigerant-free
area.) Ensure that the detector is not a potential source
of ignition and is suitable for the refrigerant used. Leak
detection equipment shall be set at a percentage of the LFL
of the refrigerant and shall be calibrated to the refrigerant
employed, and the appropriate percentage of gas (25%
maximum) is confirmed.
Leak detection fluids are also suitable for use with most
refrigerants but the use of detergents containing chlorine
shall be avoided as the chlorine may react with the
refrigerant and corrode the copper pipe-work.
NOTE: Examples of leak detection fluids are
- bubble method,
- fluorescent method agents.
If a leak is suspected, all naked flames shall be removed/
extinguished. If a leakage of refrigerant is found which
requires brazing, all of the refrigerant shall be recovered
from the system, or isolated (by means of shut off valves)
in a part of the system remote from the leak. Removal of
refrigerant shall be according to clause DD.9.
• Removal and evacuation
When breaking into the refrigerant circuit to make repairs
– or for any other purpose – conventional procedures shall
be used. However, for flammable refrigerants it is important
that best practice is followed since flammability is a
consideration. The following procedure shall be adhered to:
- remove refrigerant;
- purge the circuit with inert gas (optional for A2L);
- evacuate (optional for A2L);
- purge with inert gas (optional for A2L);
- open the circuit by cutting or brazing.
The refrigerant charge shall be recovered into the correct
recovery cylinders. For appliances containing flammable
refrigerants other than A2L refrigerants, the system shall be
purged with oxygen-free nitrogen to render the appliance
safe for flammable refrigerants. Compressed air or oxygen
shall not be used for purging refrigerant systems.
For appliances containing flammable refrigerants, other
than A2L refrigerants, refrigerants purging shall be achieved
by breaking the vacuum in the system with oxygen-free
nitrogen and continuing to fill until the working pressure is
achieved, then venting to atmosphere, and finally pulling
down to a vacuum. This process shall be repeated until no
refrigerant is within the system. When the final oxygen-free
nitrogen charge is used, the system shall be vented down
to atmospheric pressure to enable work to take place. This
operation is absolutely vital if brazing operations on the
pipe-work are to take place.
Ensure that the outlet for the vacuum pump is not close
to any potential ignition sources and that ventilation is
available.
• Charging procedures
In addition to conventional charging procedures, the
following requirements shall be followed.
- Ensure that contamination of different refrigerants does
not occur when using charging equipment. Hoses or lines
shall be as short as possible to minimise the amount of
refrigerant contained in them.
- Cylinders shall be kept in an appropriate position
according to the instructions.
- Ensure that the refrigerating system is earthed prior
to charging the system with refrigerant.
- Label the system when charging is complete
(if not already).
- Extreme care shall be taken not to overfill the
refrigerating system.
Prior to recharging the system, it shall be pressure-
tested with the appropriate purging gas. The system shall
be leak-tested on completion of charging but prior to
commissioning. A follow up leak test shall be carried out
prior to leaving the site.
This manual suits for next models
4
Table of contents
Other Kaden Air Conditioner manuals
Popular Air Conditioner manuals by other brands

Gree
Gree GWH09AB-D3DNA1D/I Service manual

Panasonic
Panasonic CS-MKE7NKU Technical & service manual

Gree
Gree GMV-ND07PLS/A-T(U) Service manual

Carrier
Carrier 50VL-D installation instructions

Mitsubishi Electric
Mitsubishi Electric CITY MULTI PKFY-P-VBM-E installation manual

Dometic
Dometic Blizzard NXT H540315 installation instructions