Kaiser Baas XS4 User manual

Complete User Guide
Visit kaiserbaas.com for more information


CONTENTS
Safety Precautions
Product Diagram
Preparing the XS4
Mounting your Smartphone
Operation
Connecting & Using the App
Specications
Support
01
03
05
06
09
13
18
19

SAFETY PRECAUTIONS
Before using your Kaiser Baas XS4 Gimbal
please ensure you read and understand the
following product and safety precautions.
• Intricate components inside the XS4 may
be damaged upon impact and cause the
gimbal to malfunction.
• Ensure there is nothing obstructing the
gimbal when the XS4 is powered on.
• Unlock the arms before powering up the
gimbal.
• XS4 gimbal is not water resistant. Do not
use any liquid cleansers. Only use a soft
dry cloth to clean the XS4.
• Keep the XS4 away from sand and dust
to safeguard the sensors in the motors.
• ONLY recharge the XS4 using the
supplied USB cable: If using a wall
charger, ensure that it is a certied
product for your region. AC Input: 100-
240VAC 50/60Hz. DC Output: 5V 1A.
Only use a USB wall charger with suitable
approval and certication.Do not charge
in conditions outside of the 10°C - 45°C
range. If you do not know the voltage and
current of your charger, use the included
cable to charge from your computer.
• The gimbal should not be used in heat
exceeding 55°C (131°F).
• DO NOT drop, crush, pierce, bend,
deform, microwave, incinerate or, shoot
the gimbal.
Important Battery Safety Information
• DO NOT use any third-party or unknown
accessories or batteries.
• DO NOT disassemble the battery.
• DO NOT short-circuit the battery. Short
01 - ENG

SAFETY PRECAUTIONS 02 - ENG
circuiting may occur when the battery touches
other metal objects.
• DO NOT charge the battery in direct sunlight.
• Always charge the battery in a designated space,
away from people and animals.
• DO NOT leave a battery on prolonged charge
when not in use.
• If the battery has a high surface temperature,
leave it to cool before you
try to re-charge it.
• DO NOT charge the battery if the ambient
temperature is below 10°C or above 45°C.
• Always use the supplied charger and observe
manufacturer charging requirements.
• Battery performance is best when within normal
room temperature (5°C-20°C).
• Batteries need to be charged before use.

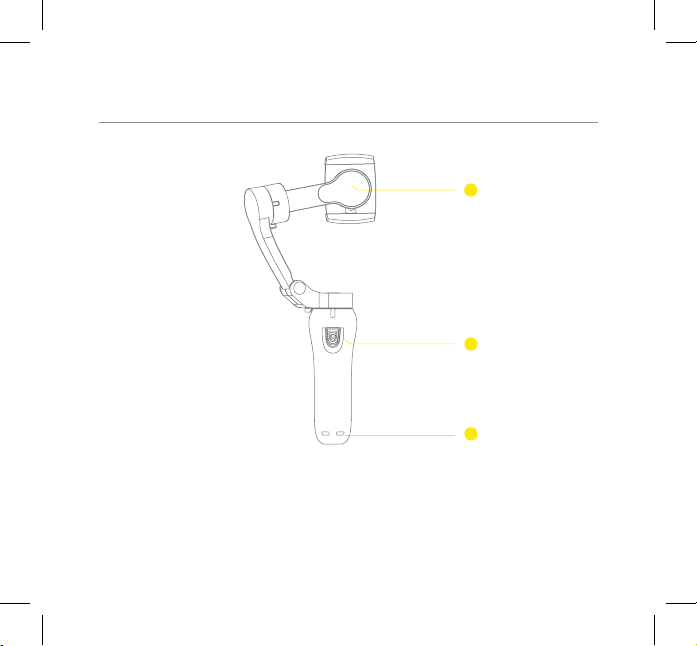
PRODUCT DIAGRAM 03 - ENG
1. Smartphone Holder
2. Tilt Motor
3. Vertical arm
4. Thumb Screw
5. Pan Motor
6. LED Status Indicator
7. Joystick
8. Power Button
9. USB-C Charging Port
1
2
3
4
5
9
6
7
8
12
10
11

13
PRODUCT DIAGRAM 04 - ENG
10. Mode Button
11. Battery Level Indicators
12. ¼ “ Screw Thread
13. Roll Motor
14. Capture Button
15. Lanyard Hole
14
14

The battery status indicator will start ashing blue
when the power cable is connected. The battery
is fully charged when the battery indicator turns
solid blue.
Battery indicator will ash rapidly when the battery
is low.
Recommended charging time is 3 hours. Maximum
runtime is 4-5 hours.
PREPARING THE XS4 05 - ENG

Only mount and balance the smartphone while the
XS4 is powered o.
1. Loosen the thumb screw to unfold the arm.
Tighten the screw back once the arm is steady.
MOUNTING YOUR SMARTPHONE 06 - ENG

2. Turn left to unlock the tilt axis motor
MOUNTING YOUR SMARTPHONE 07 - ENG

MOUNTING YOUR SMARTPHONE
3. Pull the sides of the holder outwards
and place the Smartphone horizontally in
the holder, then release the sides. Slide
the phone in and move it left or right until
the smartphone remains balanced when
released.
It is important to balance the XS4 Gimbal
before turning on.
The axis is balanced if the Smartphone
remains level when released.
Note: Make sure the Smartphone is mounted
and balanced before the Gimbal is turned
on. Do not power on the XS4 Gimbal without
a phone.
08 - ENG

09 - ENG
OPERATION
To power ON / OFF the Gimbal, press and hold
the power button for few seconds.
Once powered on, press the Power button to
switch between Portrait/Landscape mode.

OPERATION 10 - ENG
CONTROLS
1. Power Button
• Press & Hold the Power Button to power
ON/OFF
• Press once to switch between Portrait/
Landscape mode
• Press twice to switch between Front/Rear
Camera when using the KB XS4 app
• Press three times to switch between Video/
Photo Mode on smartphone when using
the KB XS4 app
2. Mode Button
Press Mode button once to switch between
Gimbal Modes (Pan & Tilt Following mode/ Pan
Following Mode/Lock Mode)
Press Mode button twice to re-centre the
Smartphone
3. Joystick
Use the joystick to pan or tilt the Smartphone
The Joystick can be used in all 3 modes.
4. Capture Button
Press the capture button once to either
Start / Stop recording or to capture a photo
depending on the mode you are in.
Note: This button will only work when using the
KB XS4 App.

11 - ENG
OPERATION
TILT AXIS
ROLL AXIS
PAN AXIS
OPERATING MODES
Use the mode button to switch between Pan
& Tilt Follow, Pan / Follow and Lock modes.
The Gimbal enters Pan & Tilt Follow by default
when the gimbal is powered on.
1. Pan & Tilt Follow mode
In this mode, roll axis is locked. Pan axis and tilt
axis allows the Gimbal to move in both horizontal
and vertical axis.
Push the joystick UP / DOWN to manually control
the tilt axis, move the joystick LEFT / RIGHT to
manually control pan axis.

12 - ENG
OPERATION
TILT AXIS
TILT AXIS
ROLL AXIS
ROLL AXIS
PAN AXIS
PAN AXIS
2. Pan Follow mode
In this mode, the Smartphone will follow the
movement of the Gimbal while the tilt and
roll axis are locked. Push the joystick UP /
DOWN to manually control the tilt axis, move
the joystick LEFT / RIGHT to manually control
pan axis.
3. Lock Mode
In this mode all axis are locked (Pan / Tilt / Roll)
to keep the Smartphone / Action Camera still
and stable. Push the joystick UP / DOWN to
manually control the tilt axis, move the joystick
left and right to manually control pan axis.

CONNECTING & USING THE APP 13 - ENG
Install the KB XS4 App
Download and install the KB XS4 app on your
Smartphone.
Initial Setup
Make sure the Gimbal is fully charged before
use. Connect the USB wall charger (not
included) to the Micro USB charging port using
the supplied charging cable.
Find the KB XS4 app on the App store or
Google Play store
Pairing your Smartphone with your XS4
1. Turn on Bluetooth on your
Smartphone.
2. Power on the XS4 by holding the
power button for a few seconds.
3. Launch the KB XS4 App on your
Smartphone to start pairing your Gimbal.
4. Bluetooth ID (STABILIZER_XXXXXX) will
appear once the app nds the XS4 Gimbal,
tap on it to pair it.
5. If the pairing is successful, a blue
colour Bluetooth icon will appear on the
screen. You can now start using all the app
features.
6. If the pairing is not successful try
turning Bluetooth o and on until you see
(STABILIZER_XXXXXX).
Find the KB XS4 app on
the App store or Google
Play store

CONNECTING & USING THE APP 14 - ENG
To review your Footage
Once the device is connected your Smartphone will display the live view.
Record a video/photo via the XS4 App.
To view saved images and video, select the Gallery icon in the bottom left of the screen.
Select a photo / video you wish to playback from the gallery.
To save the les on to your smartphone gallery, select a photo / video you wish to save, tap the Floppy
disc icon at the bottom .
To edit the photos/videos, add lters, add music, trim clips etc, select the photo/video you wish to edit,
tap on the Edit icon at the bottom.
To share the photos/videos, tap on the Share button at the bottom of the screen

15 - ENG
CONNECTING & USING THE APP
1. Photo/Video/Vlog
2. Capture Modes
3. Record
4. Toggle Camera
5. Gallery
6. Bluetooth Status
7. Face / Object Tracking
8. Operating Mode
9. Gimbal Battery Status
10. Flash Light
11. Phone Battery
12. Home
13. Camera Mode
14. Mode Settings
15. Gimbal Settings
16 7 8 9 1210 11
13
14
15
2
3
4
5

16 - ENG
CONNECTING & USING THE APP
Pairing your Gimbal with the XS4 App allows you to access and control range of features.
Video Modes
• Slow Motion
Normal footage being played at a slower speed.
• Time Lapse
Sequence of frames at set intervals to record changes that take place.
Motion Time Lapse
• Motion Time Lapse is a technique used in photography where you take several photos over a
period of time at various intervals moving slightly after each photo, then play it back at a faster
rate so that continuous projection of the frames.
Photo Modes
• Single Shot
Set the timer for automatic capture
• Pano Shot
Gimbal will rotate itself to capture in 180º

17 - ENG
CONNECTING & USING THE APP
Vlog Mode
To access the Vlog Mode, tap on the Photo/Video icon on the top left corner, select Vlog Mode.
• Inception
In this mode, the smart phone will automatically rotate 180 degree to upwards to take inception
footage.
• Dolly Zoom
In this mode, video will be recorded with the zoom-in zoom-out camera-eect while the
foreground subject will stay the same size.
• Fast Transition
Video will be recorded with fast transition eect when switching from one scene to other.
• Face-tracking Shot
In this mode, the smartphone will track the face and capture an image in each scene and convert
the the scenes to a short clip with dynamic eects.
• Panoramic Shot
Gimbal will rotate itself to capture in 180º
Table of contents
Other Kaiser Baas Camera Accessories manuals