manuals.online logo
Brands
  1. Home
  2. •
  3. Brands
  4. •
  5. Kaito
  6. •
  7. Radio
  8. •
  9. Kaito KA-346 User manual

Kaito KA-346 User manual

Kaito®
KA-346 AM|FM|WB Radio & MP3 Player Kaito®
KA-346 AM|FM|WB Radio & MP3 Player
The Kaito KA346 AM|FM|NOAA Weather Band Radio & MP3
Player is a portable radio with many features. It uses DSP digital
signal processing technology to incorporate many feature into one
radio. It has high sensitivity capabilities for receiving radio signals.
That’s easy to uses, with a high-quality built-in speaker and the
Ni-MH batteries or AA batteries for long playing time. It supports
USB Thumb Drive and SD card MP3 player. All of these features
allows users to fully enjoy the radio and the fun of music.
And the KA346 emgergency radio is a comes equipped with
many features for emergency situations and everday use. In the
addtion to NOAA Weather band the radio features, it comes with
NOAA Weather Alert Function, flashlight and Crank Dynamo and
the capacity for external emergency power supply for your outdoor
activities, home, campus, hospital, business or more as well as
emergency situations.
®
Introduction
Function Overviews
Method of Application
Schematic Diagram
Radio:
Radio Band with: FM, AM, WB
Auto and Manual Speed Encoder Tuning
NOAA Weather Alert
MP3 Player:
MP3 Player Back-play Support: SD-card and USB Thumb Drive
Other Parts:
3-LED Flashlight
Cranking Dynamo
Yellow LCD Backlight
Alarm Clock Function
Sleep Timer Function
5V USB DC-out Port
Time and Calendar Display Function
Built-in Rechargeable Ni-MH Batteries and AA Batteries Supports
Built-in Inner-Magnet Speaker
Built-in Telescopic Antenna
Built-in Audio Line-in Input Jack
1
2
3
4
5
6
7
8
9
10
11
12
LDC Display
Power Indicator
Charging Indicator
Built-in Inner-magnet Speaker
Volume Control Knob
Flashlight Switch
FM Band and Time Setup and MP3 Player Forward Button
AM Band and Alarm Clock Set and MP3 Player Pause or Play
Function Button
NOAA Weather Band and Weather Alert Set and MP3 Player
Backward Function Button
Tuning Encoder
Power ON|OFF Switch and Sleep Timer Button
Telescopic Antenna
Overhead Handle
Special-purpose AA Batteries Compartment for Time Clock
Built-in Rechargeable Ni-MH and AA Batteries
Compartments
User’s Manual User’s Manual
Built-in NI-MH Batteries and AA Batteries Select Switch
1. Install the Batteries
2. Setup the Time and Date
3. Setup the Alarm Clock
Open the batteries compartment cover in rear of the radio, insert the rechargeable Ni-MH batteries and replace the cover. Then
will built-in Ni-MH batteries and AA batteries select switch set to the INT.BATT position, the radio’s LCD display will be lit, those initial
date, time and week number was display on the LCD. The radio LCD displayed the time as 12:00. The radio is in standby mode.
In the same time, you can also use additional AA batteries in this main battery compartment, then will the built-in Ni-MH batteries
and AA batteries select switch set to BATT position on front in the radio, uses the AA batteries to power the radio.
At the same time, you can also use two AA batteries in the special-purpose Back-up clock compartment powered for the time clock
of the radio. When the Built-in Ni-MH batteries or AA batteries is exhausted in the Main Battery compartment, the time, date, year or
week number will able to continue to display correctly on the radio, it should avoid reset the time clock.
First, in the standby mode of the radio, short press the FM|TIME SET button, the LCD backlight will be lit, and the number of hours
will be flashing. Using the TUNING encoder to adjust correctly the number of the hours, then short press the FM|TIME SET button
again to confirm it. The number of the minutes will be flashing. Using the TUNING encoder to adjust corectly the number of the
minutes, then short press the FM|TIME SET button again to confirm it. You can adjust separately according to the order these: number
of the day, month and year. When the end value is adjuseted, the number will flash 5 times. The radio will save these setup values, then
it will go back to normal standby mode automatically.
In the standby mode of the radio, short press the AM| MP3 button. Alarm clock symbol will display in the top-right corner of the
LCD, then short press FM|TIME SET button, the number of the hours of the alarm clock will be flashing, using the TUNING encoder to
set the number of the hours of the alarm clock, and short press the FM|TIME SET button again, the number of minutes of the alarm
clock will be flashing, using TUNING encoder to set the number of minutes of the alarm clock. when the end value is adjusted, the
number will be flashing for 5 times, radio will save those setup values to the memory, then it will go back to normal standby mode.
The alarm clock function will be turned on when the time is due. If you want to turn off the alarm clock function, short press the AM|
MP3 button again in the alarm clock work mode, the alarm clock symbol will disappear from the LCD screen, then the alarm function
will set to turn off. When the radio is turned off, the radio stays in either band or MP3 mode, which is played when the alarm is
on.
POWER
CHARGE
Kaito®
VOL.
AM FMWB
MP3
ALERT TIME SET
LIGHT ON
INT.BATT
OFF
BATT
Frequency Range
AM Band: 520kHz- 1710kHz
FM Band: 87.0MHz -108.0MHz
Weather Band:CH1 - CH7
162.40MHz - 162.55MHz
KA346
AM FM Weather Band & MP3 Player
Emergency Radio
www.kaito.us
Kaito Electronics, Inc.
Made in China
13
14
15
16
17
13
14
15
16
17
18
19
20
21
22
23
USB
DC-OUT 5V
LINE-IN
DC-IN 5V
18
19
20
21
22
23
Built-in Dynamo Hand Crank
3-LED Flashlight
USB Thumb Drive Slot
Micro-SD Card Slot
5V DC-out USB Output Port
5V DC-in Mini-USB Charge Port
AUX Line-in Input Jack
Front Views
Rear Views Left Side Views Right Side Views
POWER
CHARGE
Kaito®
VOL.
AM FMWB
MP3
ALERT TIME SET
LIGHT ON
INT.BATT
OFF
BATT
2
3
4
5
6
7
8
9
1011
12
1
Kaito®
KA-346 AM|FM|WB Radio & MP3 Player Kaito®
KA-346 AM|FM|WB Radio & MP3 Player
User’s Manual User’s Manual
WARNING!
Please read the instructions before first use of the radio.
Please unplug the radio from charger after 1 ~ 2 hours charing, do not charge it for more than 2 hours.
In order to prevent the risk of fire or electric shock, do not expose the radio to rain or moisture.
To prevent electric shock, do not open the case. Only qualified personnel may carry out repairs.
Do not placed the radio in water, or close to fire.
Please do not allow children access to the radio when it is charging.
Package Information
Specification
Frequency Range: FM Band FM: 87.0MHz - 108.0MHz Step: 0.1MHz
AM Band 520kHz -1710kHz Step: 10kHz
NOAA Weather Band
CH1 162.400MHz
CH2 162.425MHz
CH3 162.450MHz
CH4 162.475MHz
CH5 162.500MHz
CH6 162.525MHz
CH7 162.550MHz
Power Battery: 3.6V|650mAh Rechargeable Ni-MH Batteries
AA Batteries x 5 (Optional)
Speaker: Inner-magnet 4Ω | 3W | Φ2 inches
Max Consumption: About 500mA
LCD Backlight: Yellow, 10s maintain
Dimension: 7¼(L) x 2(W) x 5½(H) inches
Net Weight: 1 lb (include built-in batteries)
MP3 Player: MP3 format Supports, Storage Capacity Max 32GB
KA346 Emergency Radio
User’s Manual
Product Registration Form
USB Charge Cable
Kaito Electronics, Inc.
Tel: 909.628.6088
Fax: 909.628.7999
E-mail: [email protected]
Website: www.kaito.us
Address: 5185 Cliffwood Dr, Montclair,
CA 91763, U.S.
Copyright © Kaito Electronics, Inc. All Rights Reserved. Paint in China Ver 0.1
For service and questions, please visit our website: www.kaito.us,
or email us at [email protected]
4. Setup the Sleep Timer
5. Using the Flashlight
6. Using the Crank Dynamo
7. Using the Line-in Jack
8. Using the Radio
9. Using the MP3 Player to play the SD-Card or USB Thumb Drive
10. How to Recharge the Built-in Rechargeable Batteries
In the standby mode of the radio, long press the ON|OFF button. The radio will display the sleep timer symbol in the top-right
conner of the LCD screen. It also shows the default value of the sleep timer setting time of 90 minutes. It means that after 90 minutes,
the radio will automatically open and go into radio mode. Continue to press the ON|OFF button to adjust the time, you can choose
the amount of time from 90 to 10 minutes. After setup, this sleep timer function will be run. When the time comes due, the radio will
power itself off automatically.
When activating this sleep timer, it only works one time, and it needs to be reset every time in you use it.
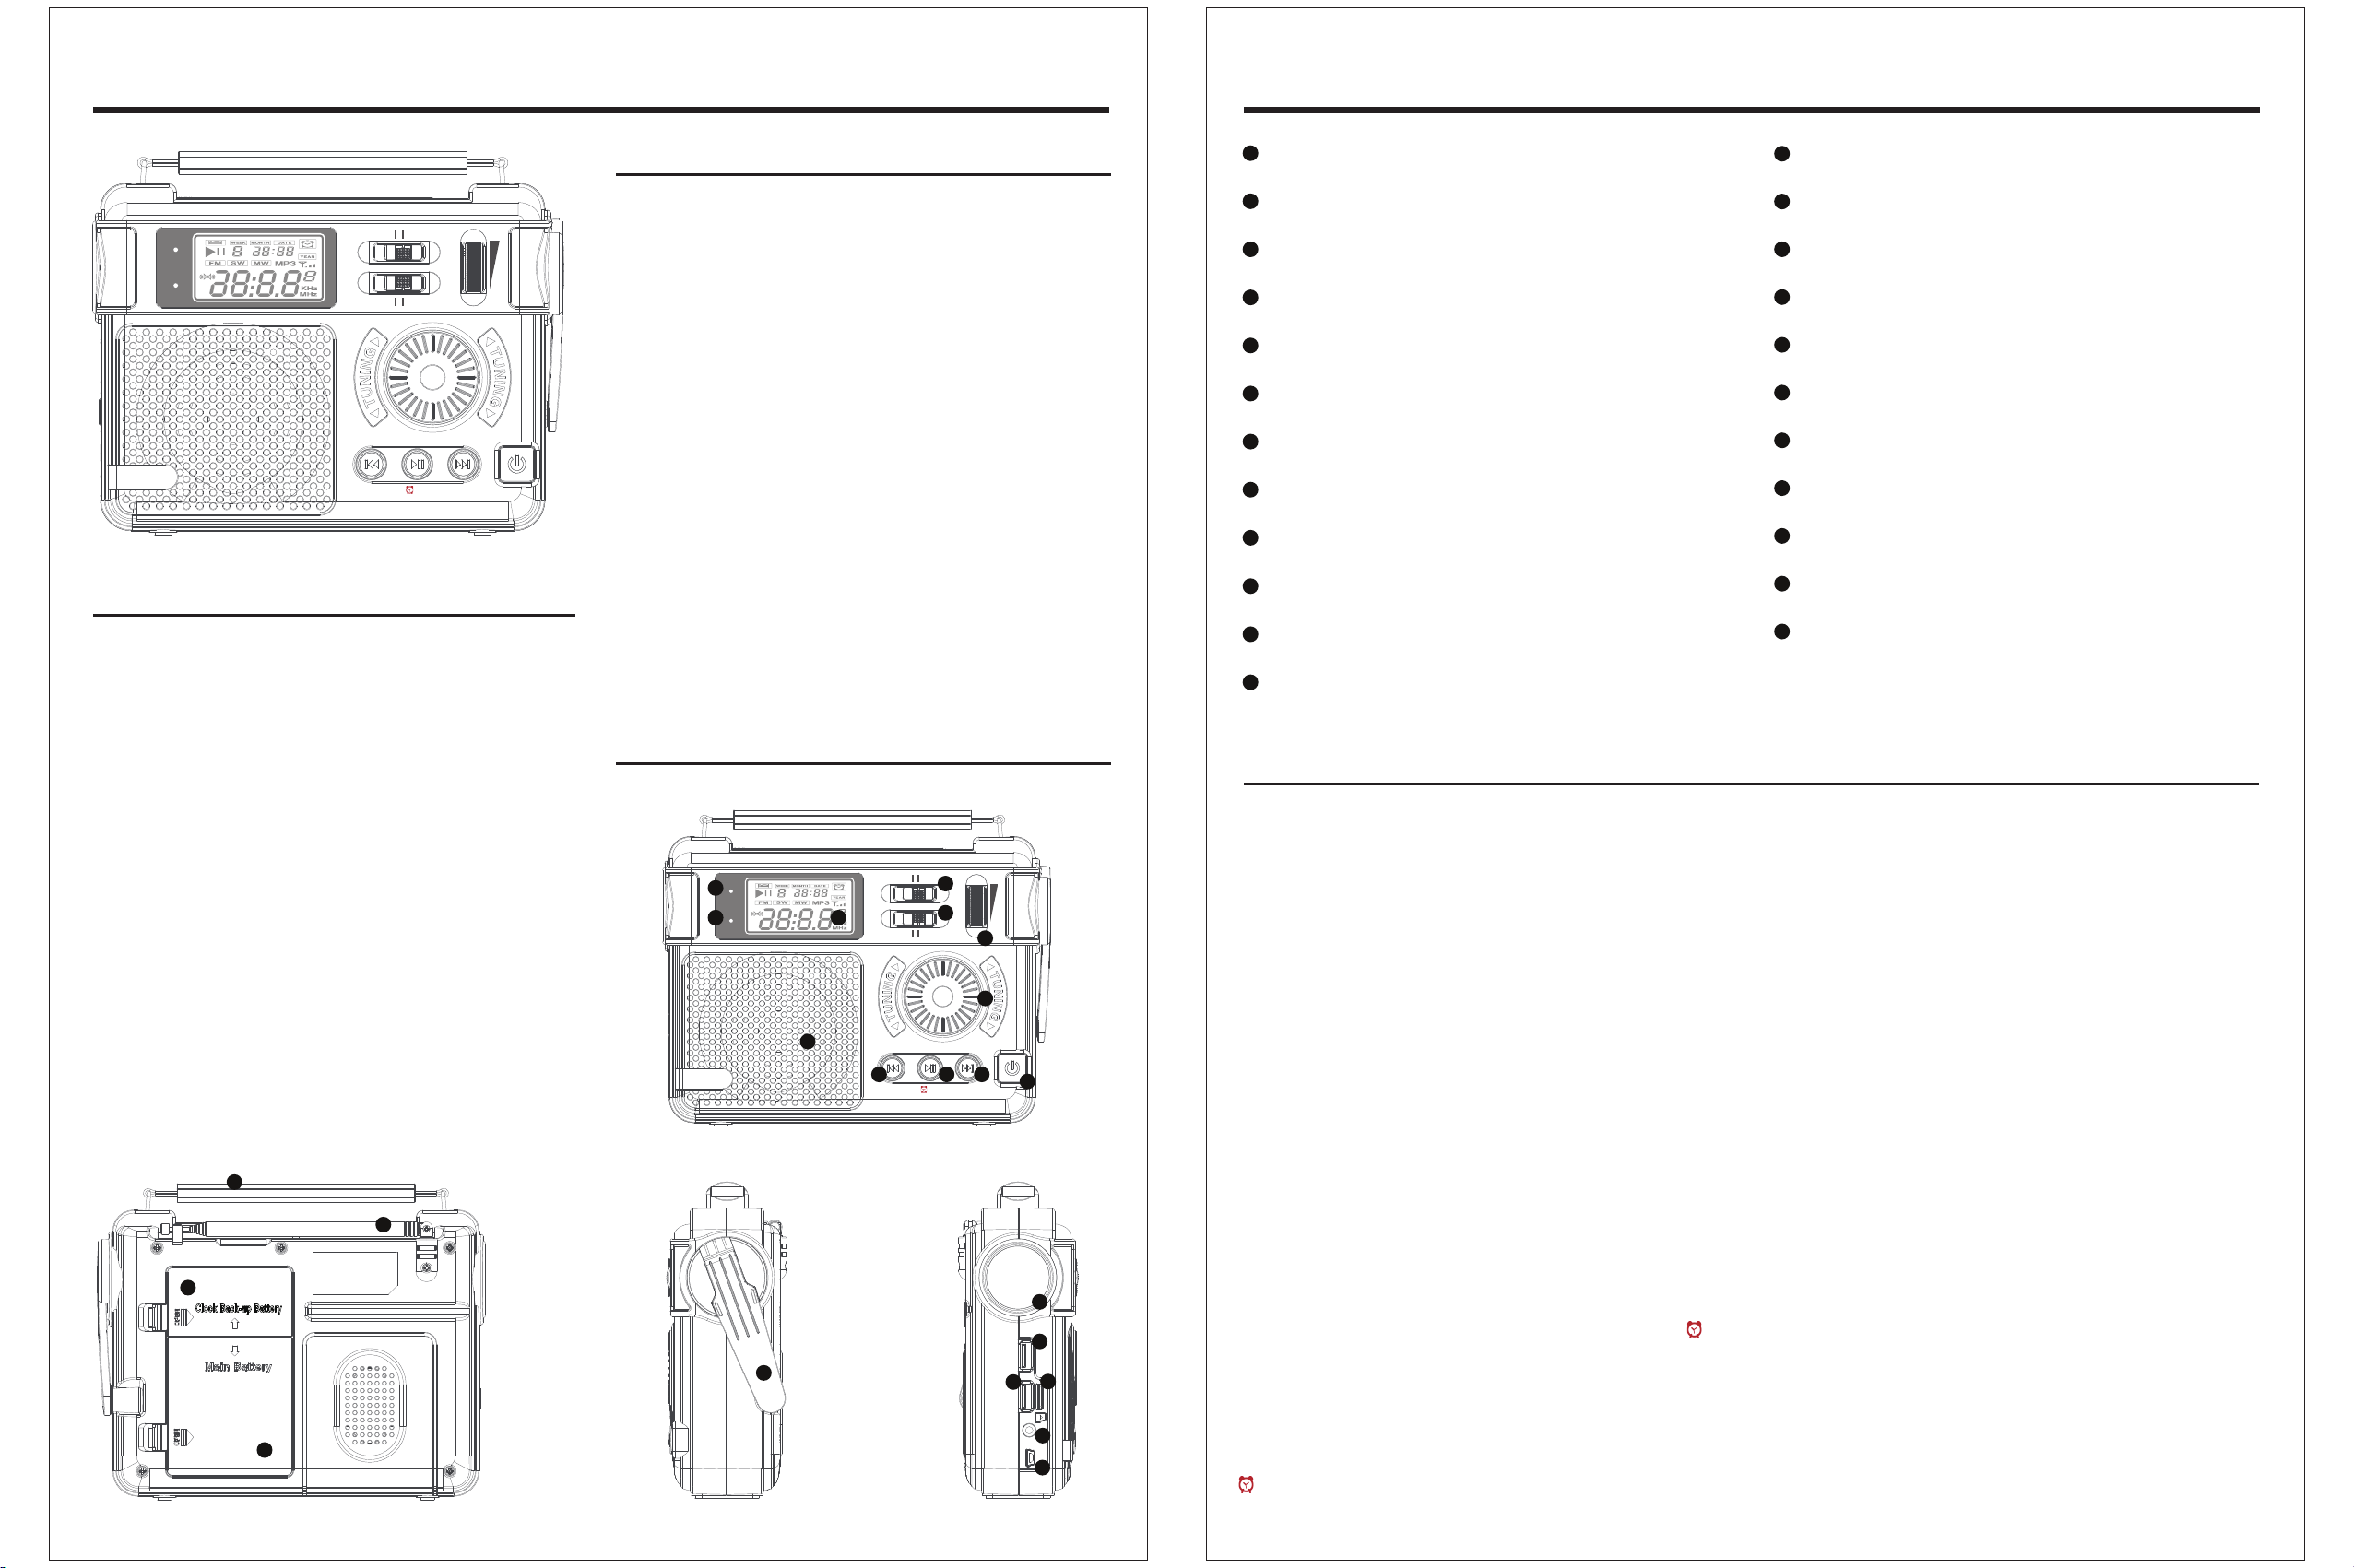
Sliding the flashlight switch to the LIGHT ON position on the front-upper of the radio, the 3-LED flashlight will be on. Slide the
flashligh switch to this OFF position, the 3-LED flashlight will turn off.
Pull out the dynamo crank handle from its recessed holder on left side of the radio, and turn the crank handle a steady speed to
generate power and charge the built-in rechargeable Ni-MH batteries or directly output to the 5V DC-out USB port. When doing this,
turn off the radio and charging will be much more efficient. 3 - 5 minutes of cranking will supply 10 - 15 minutes of radio play time.
(approx values)
Connect your cellphone or other mobile devices with your USB charging cable via the full size DC-out USB port on the radio. Turn
the crank handle at a steady speed. The radio will be charged directly to your mobile devices in emergency situations, without any
other power source. Please note the DC-out USB port output voltage is DC 5V.
Connect your audio devices and insert the audio cable into the Φ3.5mm LINE-IN input jack on right side in the radio, then turn on
the radio, it will play the audio sound from your audio sources priority. Its conforms to the AUX specification.
Short press the power ON|OFF button on the radio. Into the radio function mode, turn the volume control knob to adjust the play
back volume to ready listens it.
Short press the FM|TIME SET button to into FM band. Before that, make sure the telescopic antenna is extended up. And uses the
TUNING encoder to find the stations you want.
Short press the AM| MP3 button, the radio will be into AM band. You can get AM stations. And use the TUNING encoder to find
the stations you want.
Short press the WB|ALERT button, the radio will be into the NOAA Weather band and you can get the weather station. And use the
TUNING encoder to find the weather station in local you want.
Rotate the TUNING encoder to change the radio frequency to find the stations you want, the stations frequency will display on the
LCD screen. Turn off the radio function by short pressing the power ON|OFF button.
Whether the radio in the standby or radio works mode, long press the WB|ALERT button will into the NOAA weather alert
function immediately, the “ALE” warning symbol will be flashing on the LCD screen, the radio will be always scanning the
NOAA Weather alert signals automatically in local, until the released weather alert forecast was searched and playing it.
When you short press the WB|ALERT button again, the radio will be scanning the NOAA Weather alert signals again, Until you
long press the WB|ALERT button to exit the scan and back to WB band.
When use the WB Alert function, please ensure that sufficient batteries power is in the radio, prevent the radio from shut
down due to insufficient power.
Insert the SD-card into the SD Slot or insert the USB thumb drive into the USB slot, short press the power ON|OFF button, to turn
on the radio.
Then long press AM| MP3 button, the radio will be enter into MP3 player playback mode, the MP3 player will playback the
medium you choose in the songs of the MP3 format. Use the BACKWARD or PLAY|STOP or FORWARD buttons to control and select
the MP3 music you want. In MP3 playback mode, you can long press the AM| MP3 button again, back to the radio. You can only use
SD-card or USB thumb drive at a time.
You can any 5V USB charger to charge this radio. Just connect the radio via a cable to a USB charger or Computer USB port, it will
charging the built-in rechargeable batteries of the radio. When the radio is in charging, the radio’s red charge indicator will be lit.
*1
*1
*1
*1
©2017 Kaito. Kaito and other Kaito marks are owned by Kaito Electronics, Inc. and may be registered. All other trademarks are
the property of their respective owners.

Other Kaito Radio manuals

Kaito Voyager MAX KA900 User manual

Kaito

Kaito Voyager MAX KA900 User manual

Kaito KA700 User manual

Kaito

Kaito KA700 User manual

Kaito Voyager KA500 User manual

Kaito

Kaito Voyager KA500 User manual

Kaito Voyager V2 User manual

Kaito

Kaito Voyager V2 User manual

Kaito KA2031 User manual

Kaito

Kaito KA2031 User manual

Kaito KA29 User manual

Kaito

Kaito KA29 User manual

Kaito KA-888 User manual

Kaito

Kaito KA-888 User manual

Kaito KA752 User manual

Kaito

Kaito KA752 User manual

Popular Radio manuals by other brands

LENCO PDR-035 user manual

LENCO

LENCO PDR-035 user manual

TTikorea TX-130U instruction manual

TTikorea

TTikorea TX-130U instruction manual

Midland BIZTALK MB400 Programming instructions

Midland

Midland BIZTALK MB400 Programming instructions

Grundig DTR 4500 user manual

Grundig

Grundig DTR 4500 user manual

Motorola SABER NTN4734A instruction manual

Motorola

Motorola SABER NTN4734A instruction manual

Hitachi KH335FMBE instruction manual

Hitachi

Hitachi KH335FMBE instruction manual

Sepura SC20 series user guide

Sepura

Sepura SC20 series user guide

Sirius Satellite Radio Stratus 9 user guide

Sirius Satellite Radio

Sirius Satellite Radio Stratus 9 user guide

Intek MX-8000U instruction manual

Intek

Intek MX-8000U instruction manual

Roberts R9994 operating instructions

Roberts

Roberts R9994 operating instructions

LENCO CR-2600CD instruction manual

LENCO

LENCO CR-2600CD instruction manual

Pure Digital EVOKE-1 XT quick start guide

Pure Digital

Pure Digital EVOKE-1 XT quick start guide

Siemens 5TC1 series Operating and installation instructions

Siemens

Siemens 5TC1 series Operating and installation instructions

Konig HAV-TR200W manual

Konig

Konig HAV-TR200W manual

Sangean DT-180 Dimensions

Sangean

Sangean DT-180 Dimensions

Midland 203 Instruction guide

Midland

Midland 203 Instruction guide

Medion P85027 user manual

Medion

Medion P85027 user manual

Ericsson GE LBI-38378C Maintenance manual

Ericsson GE

Ericsson GE LBI-38378C Maintenance manual

manuals.online logo
manuals.online logoBrands
  • About & Mission
  • Contact us
  • Privacy Policy
  • Terms and Conditions

Copyright 2025 Manuals.Online. All Rights Reserved.