Kaixin UT01 User manual

KAIXIN
UT01
Backfat Tester
User’s Manual
XUZHOU KAIXIN Electronic Instrument Co., Ltd.

Contents
1. Introduction
2. Technical specifications
3. Primary functions
4. Tester outline
5. Function operation
6. Maintenance
7. Precautions
8. Warranty and repair service
9. Important Statement
Statement
User shall carefully read through this manual and fully understand the text
before operating the tester.
The user’s manual issue date: December 31, 2013, Version: V2.00

1
1. Introduction
Backfat tester is an instrument which can emit and receive ultrasound waves, when the
emitted ultrasound waves travel into the body of the animal during measurement, the tester
can receive the reflect signals from the backfat, the inner surfaces of skin and other tissues
within the animal. The tester ignores the reflections from skin ≤ 3mm thick. The reflections
from the backfat layers are calculated and a reading of the total thickness from the top of the
skin to the bottom of the last layer to be measured will be displayed in the digital tube. The
total backfat depth includes animals having 1, 2 or 3 layers of backfat, such as seals, swine,
sheep and cattle. Total measurement range is 4-35mm (accuracy ± 1mm).
2. Technical specifications
1. Rated power: 5VA;
2. Dimensions: 104 * 73 *25 mm (L*W*H);
3. Weight: about 100g.
3. Primary functions
1. Test data: digital tube displays the backfat thickness;
2. Store data: store 99 groups of data;
3. Read data: read the stored data according to the No.;
4. Display charge: in standby mode, digital tube displays the remaining power.
4. Tester outline
SN
Key symbol
Key name
Key function
1
Power switch Press key to turn off or turn on the machine
2
Reset Press key to reset the machine
3
Test Press key to test the backfat thickness
4
Up/Down selection
Press key to up/down select the record No.
5
Store/Read data Press key to store/read data

2
5. Function operation
(1) Startup and Shutdown
Press key to turn on the tester, the power indicator is lit, left digital tube displays
“HELLO”, later right digital tube displays the value of power “99”. It proves that the tester is
normal.
Press key again, left digital tube displays “End”, the tester will be shut down.
Note: The tester will automatically shut down after 2 minutes without any
operation.
(2) Reset
Press key to reset, the left digital tube displays “HELLO”, it indicates that the tester
function is normal.
(3) Measurement method
1) Before testing, put ultrasonic coupling gel to the appropriate site of swine’s back, in
order to make good contact between swine skin and sound window. The probe is placed
against the skin of the animal, move the probe gently, make sure no air bubbles between the
skin and probe. The probe is kept perpendicular to the back; errors may result if probe is at an
angle. Recommend using dedicated ultrasonic coupling gel, also can use vegetable oil.
2) Measure swine’s backfat: The site B in following figure (the last rib site B) can give
an accurate reading of the three layers of fat. Many hogs have the thin third layer of fat. As
they increase in weight and age, the third layer becomes thicker and wider spread over the
body. Measurement at site C (the trailing edge of shoulder: about 4-5 rib, C-site) is more
difficult and inconsistent. Site A (the lumbosacral junction, A-site) will give accurate
measurement for two layers of fat but may not give an accurate measurement for three layers
of fat due to the muscle tissue.
3) Keep the swine quiet during the test (you can feed the swine during the test).
Note 1:
1. If the skin is less than 3mm thick, the skin thickness is also included within the
reading; if more than 3mm, the skin thickness is often counted as 1 layer. In general, the skin

3
is less than 3mm thick.
2. Correct values displayed on the digital tube indicate that the backfat measurement is
success; if the values are not correctly, it indicates that the contact with skin is not good. Put
amount of coupling gel, move the probe back and forth to remove the air bubbles and keep the
probe perpendicular to the back. Probe coupling is very important for measurement result.
3. Small irregularities in the fat may block the beam of sound. Moving the probe slightly
will allow the beam to bypass, and the correct reading to appear. Fat layers are not uniformly
thick. Averaging two or three readings at adjacent sites insures greatest accuracy.
Note 2:
4. When measuring the older animal, if necessary, it needs to remove the hair at the site
and wet the skin with hot water, then apply light oil to wet the skin one minute or two before
measuring. Always keep the probe perpendicular to the animal’s back. If chooses the
inaccurate site, such as animal shoulder or arm, the measured result is not accurate.
5. Many hogs have the thin third layer of fat at an early age. As they increase in weight
and age, the third layer becomes thicker and wider spread over the body.
6. Applying unevenly ultrasonic coupling gel or testing on the palm or other parts of
body, which may cause two digital tubes respectively display “E” and “1”, which is normal
phenomenon.
7. Have a bad contact, first remove any possible manure, straw and excess hair, etc.,
which may cause a poor contact between the sound window and skin and leading to
inaccurate measured results.
8. When the probe leaves the measuring point, it needs to reapply ultrasonic coupling gel
evenly to continue measurement.
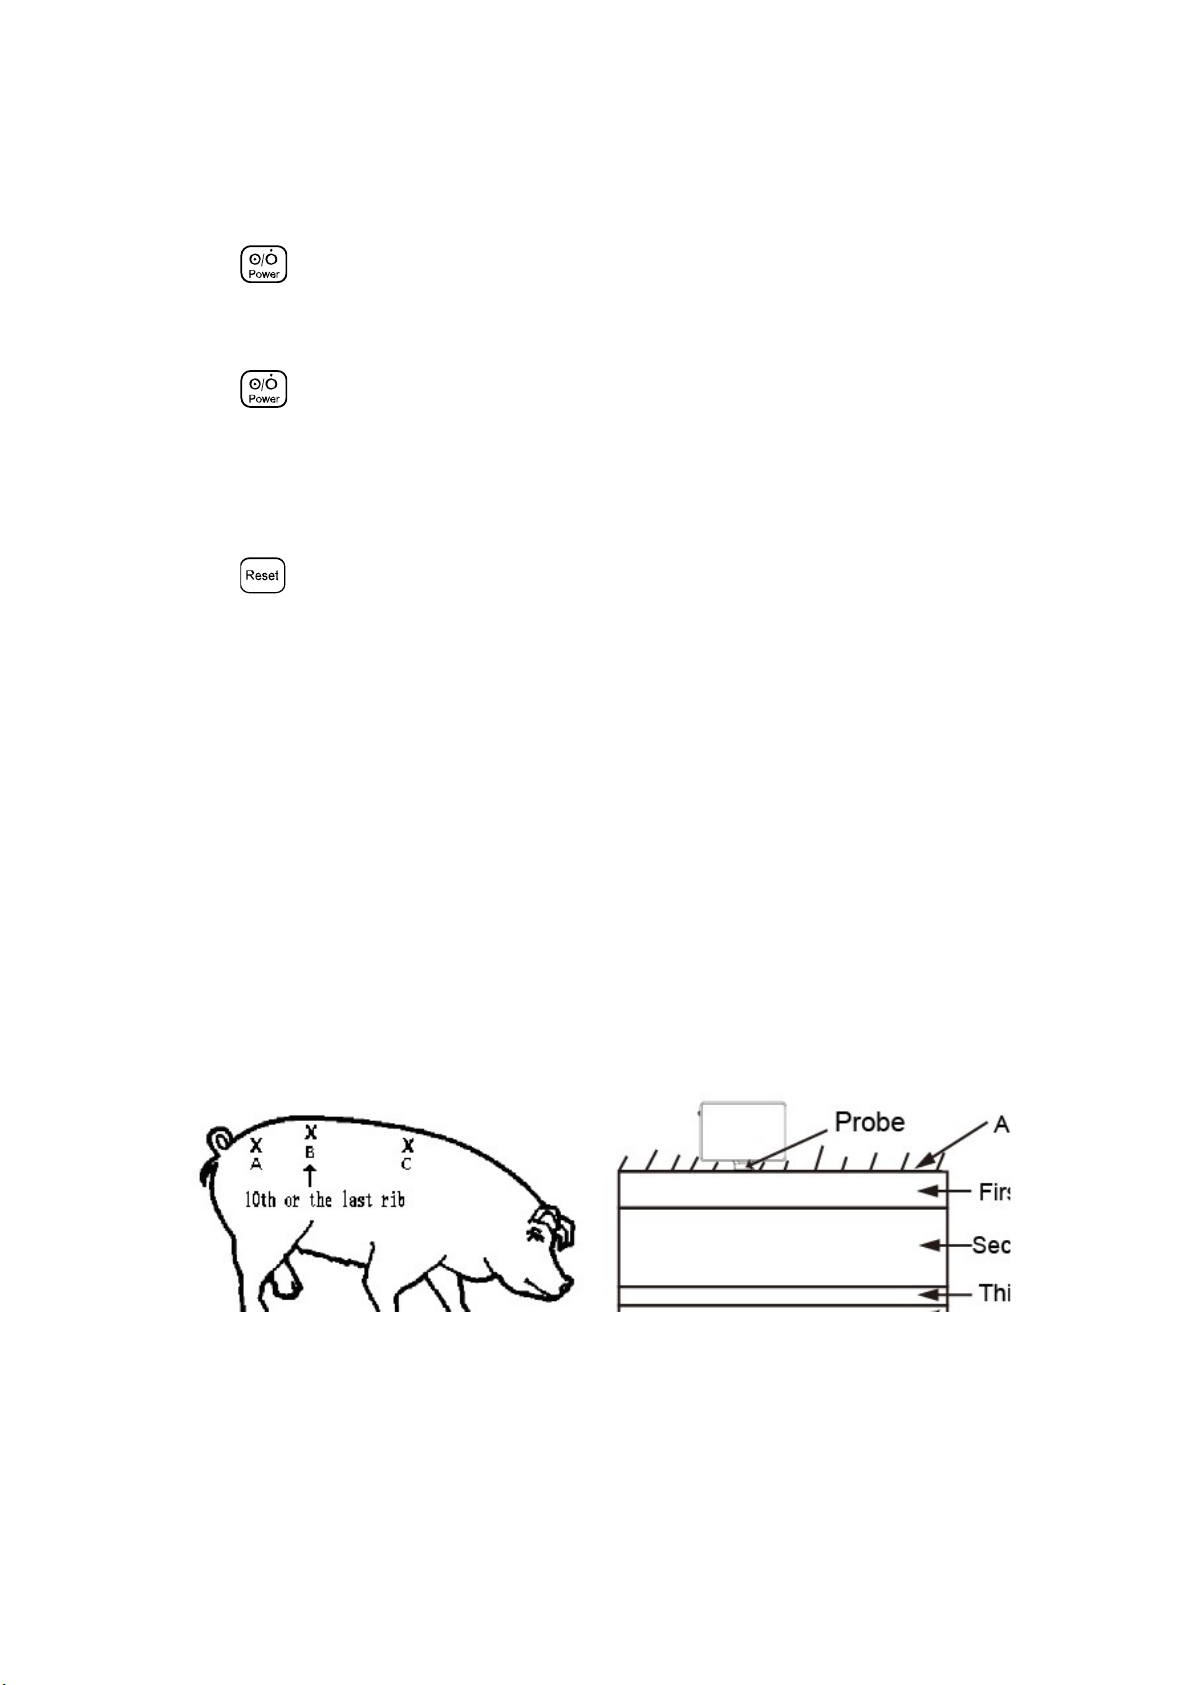
Example: Locating the best test site for swine’s backfat
1. The most accurate measuring site: walk your fingers forward along the flank until you feel
the last rib (determining the front and rear position), 6.5cm from either side of the backbone
(determining the left and right position), put the coupling gel on the skin, make sure good
contact between the probe and skin.
2. Press key with thumb, left digital tube displays “8 13 15”, right digital tube displays
the No. “1”, it indicates that have measured the first group of data. Namely, the first value
represents: the backfat thickness of the first layer is 8mm; the second value represents: the
total of thickness for the first layer plus the second layer is 13mm; the third value represents:
the total of thickness for the first layer plus the second layer and plus the third layer is 15mm.
The display results are as figure:
Note:
1. When the thickness of the first layer ≤15mm thick, the three data were displayed the
first layer of backfat thickness, 2 layers of backfat thickness, 3 layers of backfat thickness. If
there is no third layer, the third data was displayed 0.

4
2. When the first layer of backfat thickness without any display, the second data directly
displays the total thickness of the first layer and the second layer backfat.
(4) Save/Read data
1) When the left digital tube displays backfat values, such as “8 13 15”, press
key to select the stored No. such as selecting “3”, press key, the digital tube
displays level “- - - - - -”, the measured data is saved in the No. “3”; press “Test” key again
to continue measuring, and select other No. for data storage.
2) Press key, press key again to select the stored No. to view the stored
data.
Explanation: The tester can store 99 groups of test data. New data will overwrite the
original data after memory is full, the uncovered data will be remained.
(5) Charging the battery and low power indication
1) If the power displayed on the digital tube is less than “20” and the value of power is
constantly flashing, it indicates that only a short power, please remind users to charge timely
to avoid the data loss.
2) Insert the data line equipped with the tester into the Micro-USB port on the top of
tester, the other end of data line connect to charger, then put the charger into power supply
socket. The charging indicator of tester lights and the tester starts to charge. The charging time
is about 3 hours, the discharge time about 8-9 hours.
6. Maintenance
1. Make sure that the sound window part of Backfat Tester will not be hit, or it may
cause the tester not to work normally.
2. Make sure that the sound window part of Backfat Tester will not be applied to
corrosive liquid, or it may cause damage to sound window and the tester can not work
normally.
7. Precautions
1. Unplug the charger when using the Backfat Tester.
2. The Backfat Tester is not waterproof and can not be submerged in water.
3. Do not use the Backfat Tester on human beings.
4. If you have any questions, please call us to ask our company.
Reference:
Backfat and reproductive performance analysis
1. The backfat thickness of gilts before breeding 15.5-20.0mm is beneficial to the number
born alive and newborn broods.

5
2. The backfat thickness of gilts and sows before delivery being greater than 25mm have an
adverse effect on the reproductive performance;
3. The backfat thickness of lactating sows at weaning being 17.5-22.5mm is beneficial to this
fetal weaning to estrus interval and the next reproductive performance;
4. Backfat loss in sow lactation exceeds a certain range, such as greater than 5.5mm, may be
affected sows estrus after weaning and reproductive performance of the next child.
8. Warranty and repair service
Purchased the product warranty, sees the company's service policies.
Manufacturer’s Information
Xuzhou Kaixin Electronic Instrument Co., Ltd.
Kaixin Mansion, C-01, Economic Development Zone, Xuzhou, Jiangsu, China.
Post Code: 221004
Tel: +86-516-87732932 87733758
Fax: +86-516-87732932 87792848
Website: http://www.kxele.com
E-mail: [email protected]
9. Important Statement
1. User shall be fully responsible for the maintenance and management of this product after
purchasing this product.
2. Even in the warranty period, warranty does not include the following:
(1) Damage or loss caused by error or rough using.
(2) Damage or loss caused by force majeure (such as fires, earthquakes, floods, or lightning
etc.).
(3) Damage or loss caused by not meeting the conditions of use specified by the system,
such as inadequate power supply, incorrect installation or environmental conditions do
not meeting the requirements.
(4) Damage or loss caused by not used the system in the initial buy region.
(5) Damage or loss caused by the system purchased not by Kaixin or its authorized dealer
or agents.
3. Medical personnel qualified with professional qualifications only to use this system.
4. Do not modify the software or hardware of the equipment without authorization of the

6
manufacturer.
5. In any case, Kaixin shall not be liable for the problems, damages or losses due to
re-installation, alteration or repair the system by non-Kaixin designated personnel.
6. This product is intended to provide clinical diagnostic data for the doctor.
The doctor shall be responsible for the diagnostic process. Kaixin shall not be liable for any
problems arising out of the process.
7. Be sure to back up important data to external storage media, such as notebooks.
8. Due to operator’s error or abnormal condition causing the data stored in the internal system
is lost, Kaixin is not responsible.
9. This user’s manual contains warnings for predictable dangers. Users shall also exercise care
at any time to be aware of the dangers unforeseen in this manual.
Kaixin shall not be liable for the damages and losses arising out of neglecting to follow the
operation instructions herein described.
10. This user’s manual shall be furnished with the machine so that managerial and operating
personnel can refer to it any time as necessary. Once the managerial personnel of the
system changes, it shall hand over this user’s manual.
11. Deal with the exhausted product according to the local statute.
12. The maintenance and servicing of product shall be performed by the trained engineer or
by Kaixin Electronic Instrument Company Ltd.
This manual suits for next models
1
Table of contents
Other Kaixin Test Equipment manuals