manuals.online logo
Brands
  1. Home
  2. •
  3. Brands
  4. •
  5. RS MIZAR
  6. •
  7. Test Equipment
  8. •
  9. RS MIZAR Diamond Detective User manual

RS MIZAR Diamond Detective User manual

Congratulations on your purchase of the Diamond
Detective. IDENTIFICATION OF PARTS
1. Probe
2. Diamond Indicator
3. Ready Lamp
4. Wait/Low Battery Lamp
5. Battery Compartment
6. Conductive Panel
7. Small/Large Stone Switch
8. “ON” Button
9. “OFF” Button
*PRIOR TO TESTING, IT IS RECOMMENDED THAT THE TIP
OF THE PROBE BE CLEANED BY GENTLY WIPING ACROSS
A CLEAN SHEET OF PAPER *
OPERATIONAL CHECKOUT
1. Rotate the Thumbwheel (7) to the right for large
stones.
2. Press the “ON” button (8).
3. The Wait Lamp (4) will be lit.
4. All other display lamps will remain extinguished for
the wait period which is typically less than nine
seconds at room temperature. The time can increase
with low temperatures or a weak battery. After the
wait period there is a single beep.
5. If the waiting time exceeds twenty seconds or the Wait
Lamp fails to extinguish replace the battery.
6. The Diamond Tester is ready to use after the Wait
Lamp extinguishes and the Ready Lamp is lit.
7. When testing is completed always press the “OFF”
button. Always turn off the unit immediately after
testing to increase battery life.
AUTOMATIC ALARM
The Diamond Tester will sound alarm after 150 seconds
of inactivity. Whenever the “On” button is pressed the
timer resets to 150 seconds. If the unit alarm sounds
before you have completed your test simply press the on
button and continue your testing. Always press the
“OFF” button after testing to prolong battery life.
MAINTENANCE
Always place the protective cover over the probe
immediately after use. Probe tip damage is not
covered in the warranty.
The only maintenance required is: (1.) cleaning the
probe tip and (2) battery replacement.
SPECIFICATIONS
MODEL DIAMOND DETECTIVE
POWER SOURCE 9 VOLT BATTERY
NEDA SIZE 1604 (006P)
NET WEIGHT 105 GRAMS 3.7 OZ.
WARRANTY
Dymond Inc, provides that each Diamond Detective will be
free from defects in material and workmanship for a period
of two years from the date of purchase. (Batteries and
Probe Tip are not included in Warranty.) This warranty
becomes void by:
1. Unauthorized repair, misuse, modification, alteration,
tampering or breaking any factory seal.
2. Accidental damage, neglect or improper use.
Dymond Inc, shall not be held legally liable or responsible
for any error in display indication or the interpretation
thereof in the identification of any stones, minerals, gems or
gemstones by the Diamond Detective.
WARRANTY SERVICE
Should the Diamond Detective require warranty service
write or call Dymond Inc, for a return material
authorization (RMA). Be prepared to provide proof of
purchase. Pack the Diamond Detective securely along with
a description of the malfunction or problem and return unit
freight pre-paid to the address below. Include along with
the unit a copy of your dated purchase receipt. E.&O.E.
Dymond Inc.
3307 Industrial 25th Street
Fort Pierce, FL 34946
Phone (772) 429-0045 Fax (772) 429-0170
INTERPRETING THE INDICATION
METAL ALERT
The sounding of a continuous “beep” indicates that the probe tip
is in contact with either users hand or the metal setting.
The remedy is to reposition the probe tip as described under “Diamond
testing” section [5,6].
DIAMOND
SIMULANTS
When testing Cubic Zirconium’s, “paste”, strass and other diamond
simulants no illumination of the green diamond lamp will be observed.
DIAMONDS
Testing of a genuine diamond will cause the green diamond lamp to
flash and a discontinuous beeping (beep-beep-beep) will sound.
PREPARATION PRIOR TO TESTING A STONE
The presence of dust, dirt, film and moisture on a stone may produce an inaccurate indication. Therefore, it is
prudent to routinely clean the surface of each stone to be tested by using a damp soft clean fabric followed by
drying using a dry soft clean fabric.
Remove the protective cover from the probe.
The tip of the probe should be cleaned frequently by wiping the tip across the surface of a piece of bonded
paper or a business card. Copier paper and fax paper are to be avoided.
The tip of the probe may be damaged by an accidental dropping of the unit. Always place the protective cover
over the probe immediately after use. Probe tip damage is exempted from the warranty.
During testing the users hands should be clean and dry. Do not wear gloves. One of the User’s “bare” fingers
must be touching the rear metal plate.
The stone to be tested should be allowed to reach room temperature.
For maximum accuracy, minimize handling of the stone prior to testing. If the item to be tested consists of a
setting containing many stones requiring more than ten seconds to test user must avoid heating the setting
with his hand; allow the item to be untouched for about fifteen seconds.
Best results are obtained by performing tests in still air. Avoid fans, drafts or air movement from air
conditioning or heating sources. Avoid breathing directly on the probe tip while testing.
“DIAMOND TESTING”
1. Choose either:
(A) the LARGE (normal) stone position when testing stones .08 Carat or larger (move the LARGE/SMALL
STONE switch to the right).
(B) the SMALL stone position when testing stones .08 Carat or smaller (move the LARGE/SMALL STONE
switch to the left).
2. The ambient temperature should be between 65F and 95F for testing.
3. Hold the diamond tester in your hand so that your fingers are in contact with the conductive panel (6).
4. With the other hand hold the stone to be tested by its setting.
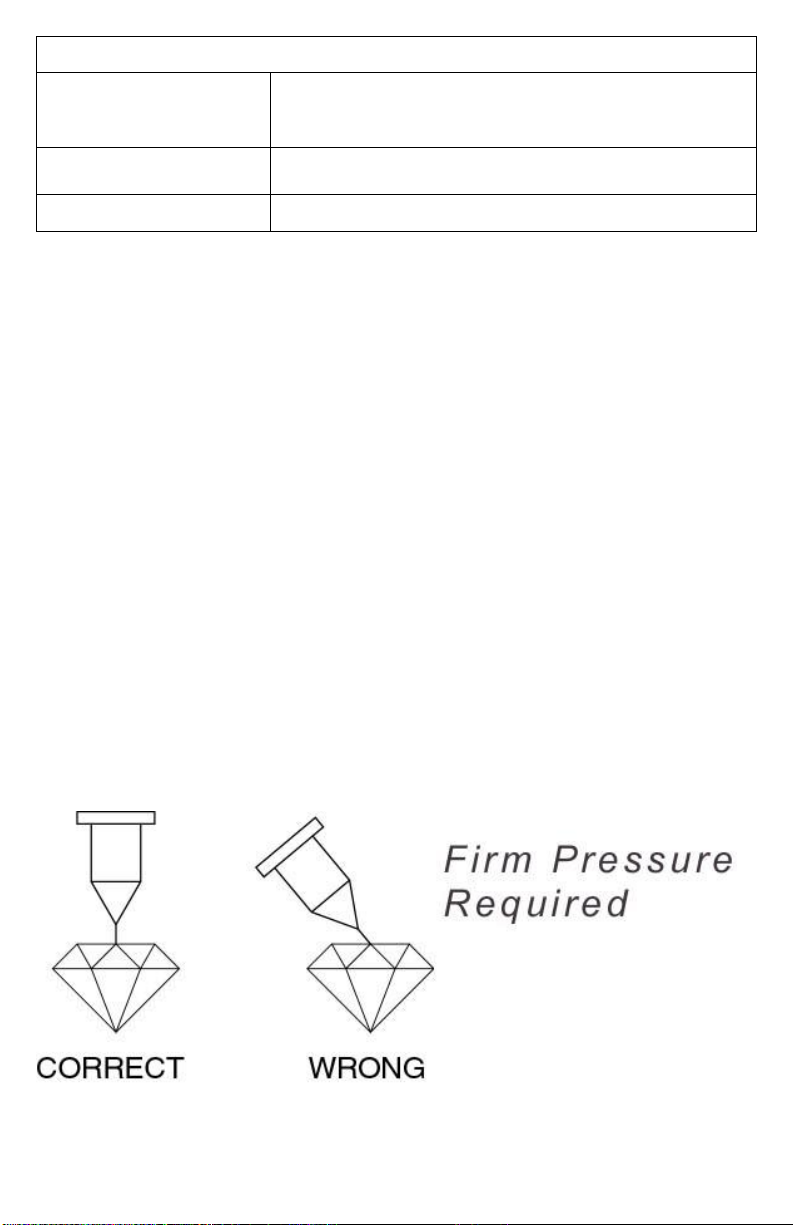
5. Guide the probe tip to the center of a facet on the stone.
6. Touch the probe tip to the stone so that the probe tip is firmly and squarely against the facet of the stone.
Excessive force which might bend or break the tip must be avoided.
7. If a diamond is being indicated the green lamp will flash and a beeping sound (“beep, beep, beep”) will be
heard.
8. As always some stones require further testing to determine what they are. In the case of some Moissanite
stones testing as Diamond you need to do further testing such as checking for Double Refraction, and
shining UV light source on the stone while testing.
HELPFUL HINTS
If the red Low Battery lamp remains on and the Ready Lamp doesn’t light within twenty seconds the battery must be
replaced.
Stones being worn, which may be well above room temperature can be tested immediately using the SMALL STONE
setting. Otherwise allow the stone to return to room temperature before testing.
When testing a small stone use the SMALL STONE setting and make good contact against the stone on the first test
attempt, otherwise allow the stone to return to room temperature before retesting.

Popular Test Equipment manuals by other brands

PIE 530 operating instructions

PIE

PIE 530 operating instructions

PCB Piezotronics 482C Installation and operating manual

PCB Piezotronics

PCB Piezotronics 482C Installation and operating manual

BIRD 4029 Instruction book

BIRD

BIRD 4029 Instruction book

Agilent Technologies ENA Series Service guide

Agilent Technologies

Agilent Technologies ENA Series Service guide

Tektronix TDS 620 user manual

Tektronix

Tektronix TDS 620 user manual

SmartSafe iSmartIMMO 801 user manual

SmartSafe

SmartSafe iSmartIMMO 801 user manual

Tektronix 2225 manual

Tektronix

Tektronix 2225 manual

HP 75000 SERIES C Service manual

HP

HP 75000 SERIES C Service manual

Keysight Technologies InfiniVision 6000L Series Service guide

Keysight Technologies

Keysight Technologies InfiniVision 6000L Series Service guide

Martindale Electric PC15250 Mk2 instruction manual

Martindale Electric

Martindale Electric PC15250 Mk2 instruction manual

JB INDUSTRIES F6-BOOST operating manual

JB INDUSTRIES

JB INDUSTRIES F6-BOOST operating manual

BGS technic 62646 instruction manual

BGS technic

BGS technic 62646 instruction manual

STEP SYSTEMS 23050 user manual

STEP SYSTEMS

STEP SYSTEMS 23050 user manual

Hach TSS sc user manual

Hach

Hach TSS sc user manual

Rheintechnik HK operating instructions

Rheintechnik

Rheintechnik HK operating instructions

Dräger Alcotest 4000 Instructions for use

Dräger

Dräger Alcotest 4000 Instructions for use

GW Instek GOS-630FC user manual

GW Instek

GW Instek GOS-630FC user manual

YOKOGAWA 30032A user manual

YOKOGAWA

YOKOGAWA 30032A user manual

manuals.online logo
manuals.online logoBrands
  • About & Mission
  • Contact us
  • Privacy Policy
  • Terms and Conditions

Copyright 2025 Manuals.Online. All Rights Reserved.