manuals.online logo
Brands
  1. Home
  2. •
  3. Brands
  4. •
  5. Kammok
  6. •
  7. Automobile Accessories
  8. •
  9. Kammok Crosswing User manual

Kammok Crosswing User manual

Popular Automobile Accessories manuals by other brands

Magneti Marelli AC161 Installation instruction

Magneti Marelli

Magneti Marelli AC161 Installation instruction

FDI uEZ GUI Start here

FDI

FDI uEZ GUI Start here

JCROffroad JT Install instructions

JCROffroad

JCROffroad JT Install instructions

Rostra VOXXElectronics 250-1930 owner's guide

Rostra

Rostra VOXXElectronics 250-1930 owner's guide

TOP VEHICLE TECH GR3FORD5 installation manual

TOP VEHICLE TECH

TOP VEHICLE TECH GR3FORD5 installation manual

Safe Fleet PRIME DESIGN AR-2000-BLK manual

Safe Fleet

Safe Fleet PRIME DESIGN AR-2000-BLK manual

Skoda Fabia Combi 5J Fitting instructions

Skoda

Skoda Fabia Combi 5J Fitting instructions

Camcar 40077 Al Mounting instructions

Camcar

Camcar 40077 Al Mounting instructions

Camcar 40089 AL Mounting instructions

Camcar

Camcar 40089 AL Mounting instructions

Impac Tradesman 2000 installation manual

Impac

Impac Tradesman 2000 installation manual

DVB OFFROAD BRSB-01 installation manual

DVB

DVB OFFROAD BRSB-01 installation manual

Safari Snorkel SS385HF installation guide

Safari Snorkel

Safari Snorkel SS385HF installation guide

ULTIMATE SPEED 279746 Assembly and Safety Advice

ULTIMATE SPEED

ULTIMATE SPEED 279746 Assembly and Safety Advice

SSV Works DF-F65 manual

SSV Works

SSV Works DF-F65 manual

ULTIMATE SPEED CARBON Assembly and Safety Advice

ULTIMATE SPEED

ULTIMATE SPEED CARBON Assembly and Safety Advice

Witter F174 Fitting instructions

Witter

Witter F174 Fitting instructions

WeatherTech No-Drill installation instructions

WeatherTech

WeatherTech No-Drill installation instructions

TAUBENREUTHER 1-336050 Installation instruction

TAUBENREUTHER

TAUBENREUTHER 1-336050 Installation instruction

manuals.online logo
manuals.online logoBrands
  • About & Mission
  • Contact us
  • Privacy Policy
  • Terms and Conditions

Copyright 2025 Manuals.Online. All Rights Reserved.

Table of Contents
Crosswing
Car Awning User Manual1.0
Designed in Austin, Texas | Made in China
Parts Included & What You’ll Need.............................................................................................Page 2
Crosswing Setup Instructions....................................................................................................Page 3
Crosswing Operating Instructions.............................................................................................Page 6
Adjusting the Awning’s Tension.................................................................................................Page 9
Replace the Awning’s Fabric....................................................................................................Page 11
Your Crosswing is carefully designed to be serviceable. Details Found
on our website at kammok.com/crosswing-instructions.
1. In rare instances, you may need to add more tension to your
Crosswing. Please reference the "Adjusting The Crosswing's Tension"
section in the online instructions.
2. The fabric on your Crosswing Awning is replaceable if damaged or
for future customization. Please reference the "Replacing The
Crosswing's Fabric" section in the online instructions.
3. For replacement parts due to damage or malfunction, please contact
our Customer Support Team at +1 512-399-1418.
Special Circumstances....................................................................................................Found Online
Crosswing Setup Instructions Page 2
Parts Included
Crosswing Awning x 1
Mounting
Bracket x 2
Angle Adjust
Bracket x 2
Clamping
Plates x 4
What You’ll Need
5 mm Hex Wrench 6 mm Hex Wrench 13 mm Socket or
Crescent Wrench
Rubber Pads for
Clamping Plates x 4
Carriage
Bolts x 8
T-Slot
Nuts x 8
Flat Head
Bolts x 4
Nylon Lock
Nuts x 12
5/8 in
Bolts x 8
1 5/8 in Bolts with
Captive Lock Washers x 4
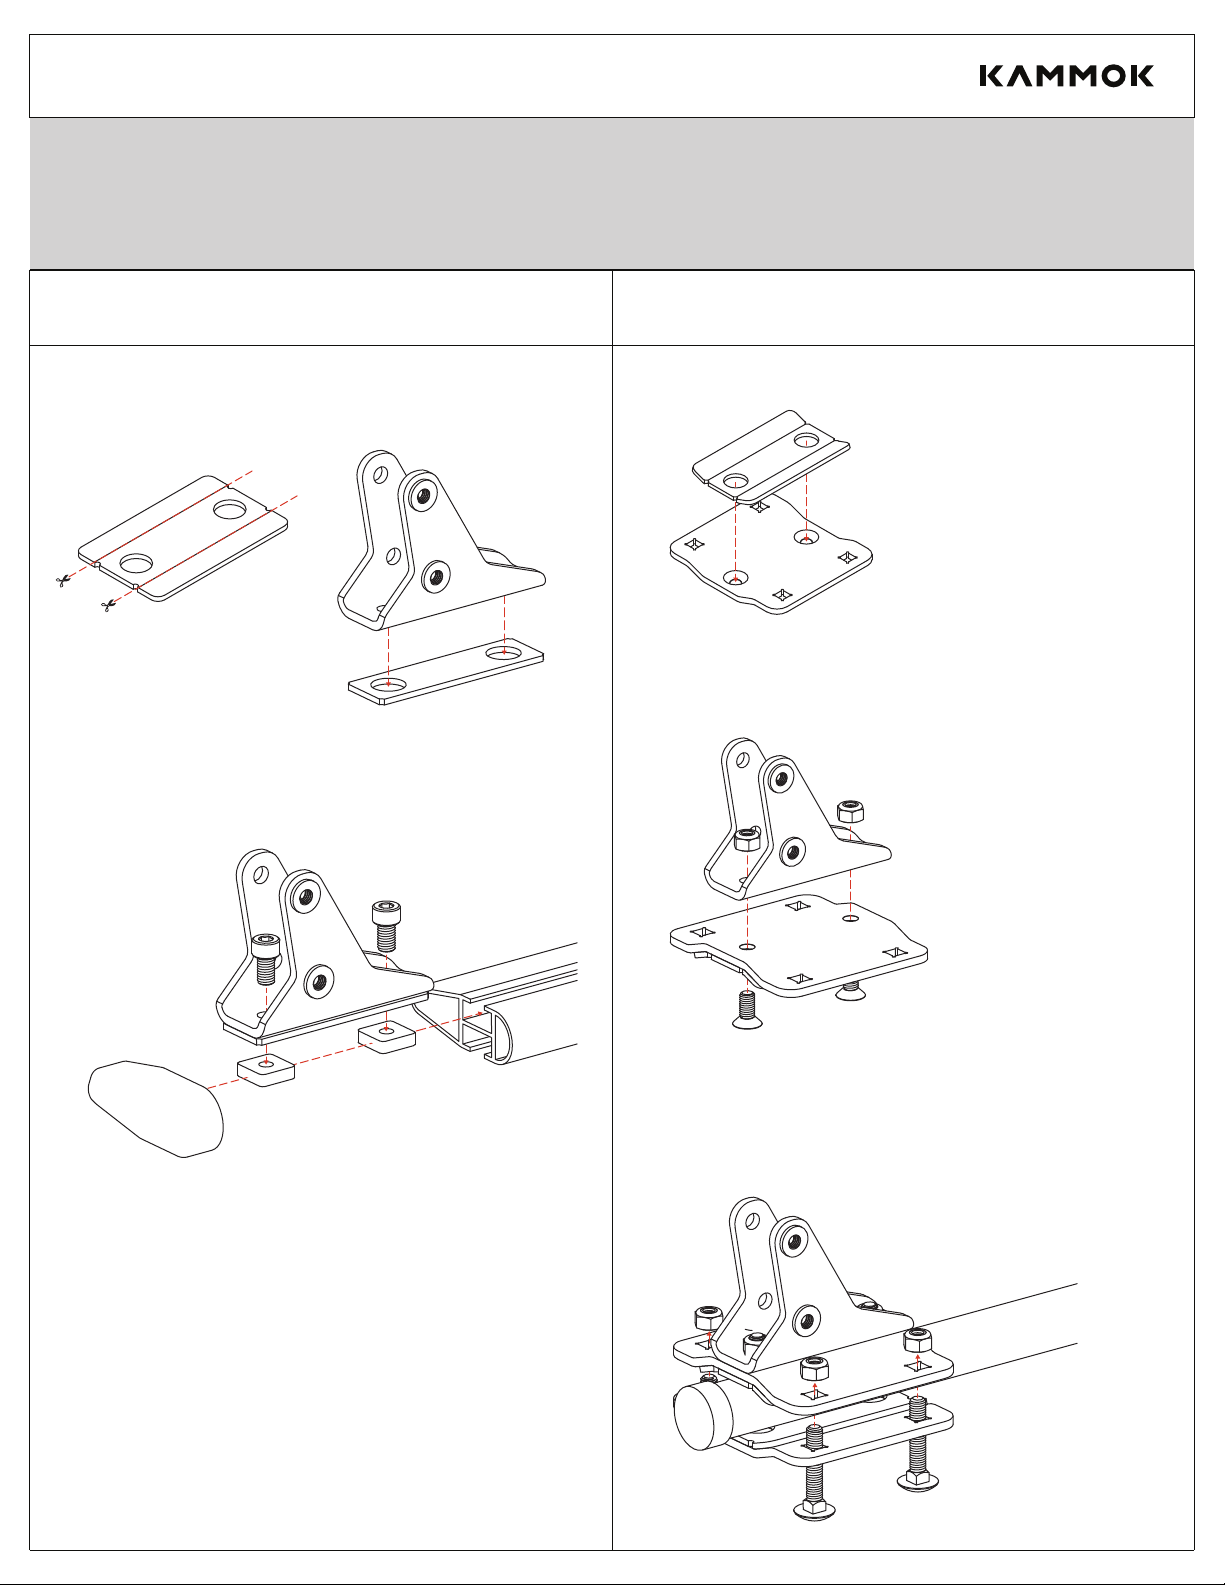
Using additional clamping plate, 4 carriage bolts, and 4 nylon lock
nuts, clamp the Angle Adjust Bracket to crossbar. Repeat for other
crossbar.
TOOL: 13 mm Crescent or Socket Wrench
Attach one clamping plate to each Angle Adjust Bracket using two
flat head bolts and 2 nylon lock nuts.
TOOLS: 13 mm Crescent or socket wrench. 5 mm Hex wrench
Trim rubber pad at indents. Apply adhesive backed rubber pad to
bottom of each Angle Adjust Bracket.
Apply adhesive backed rubber pad to each clamping plate.
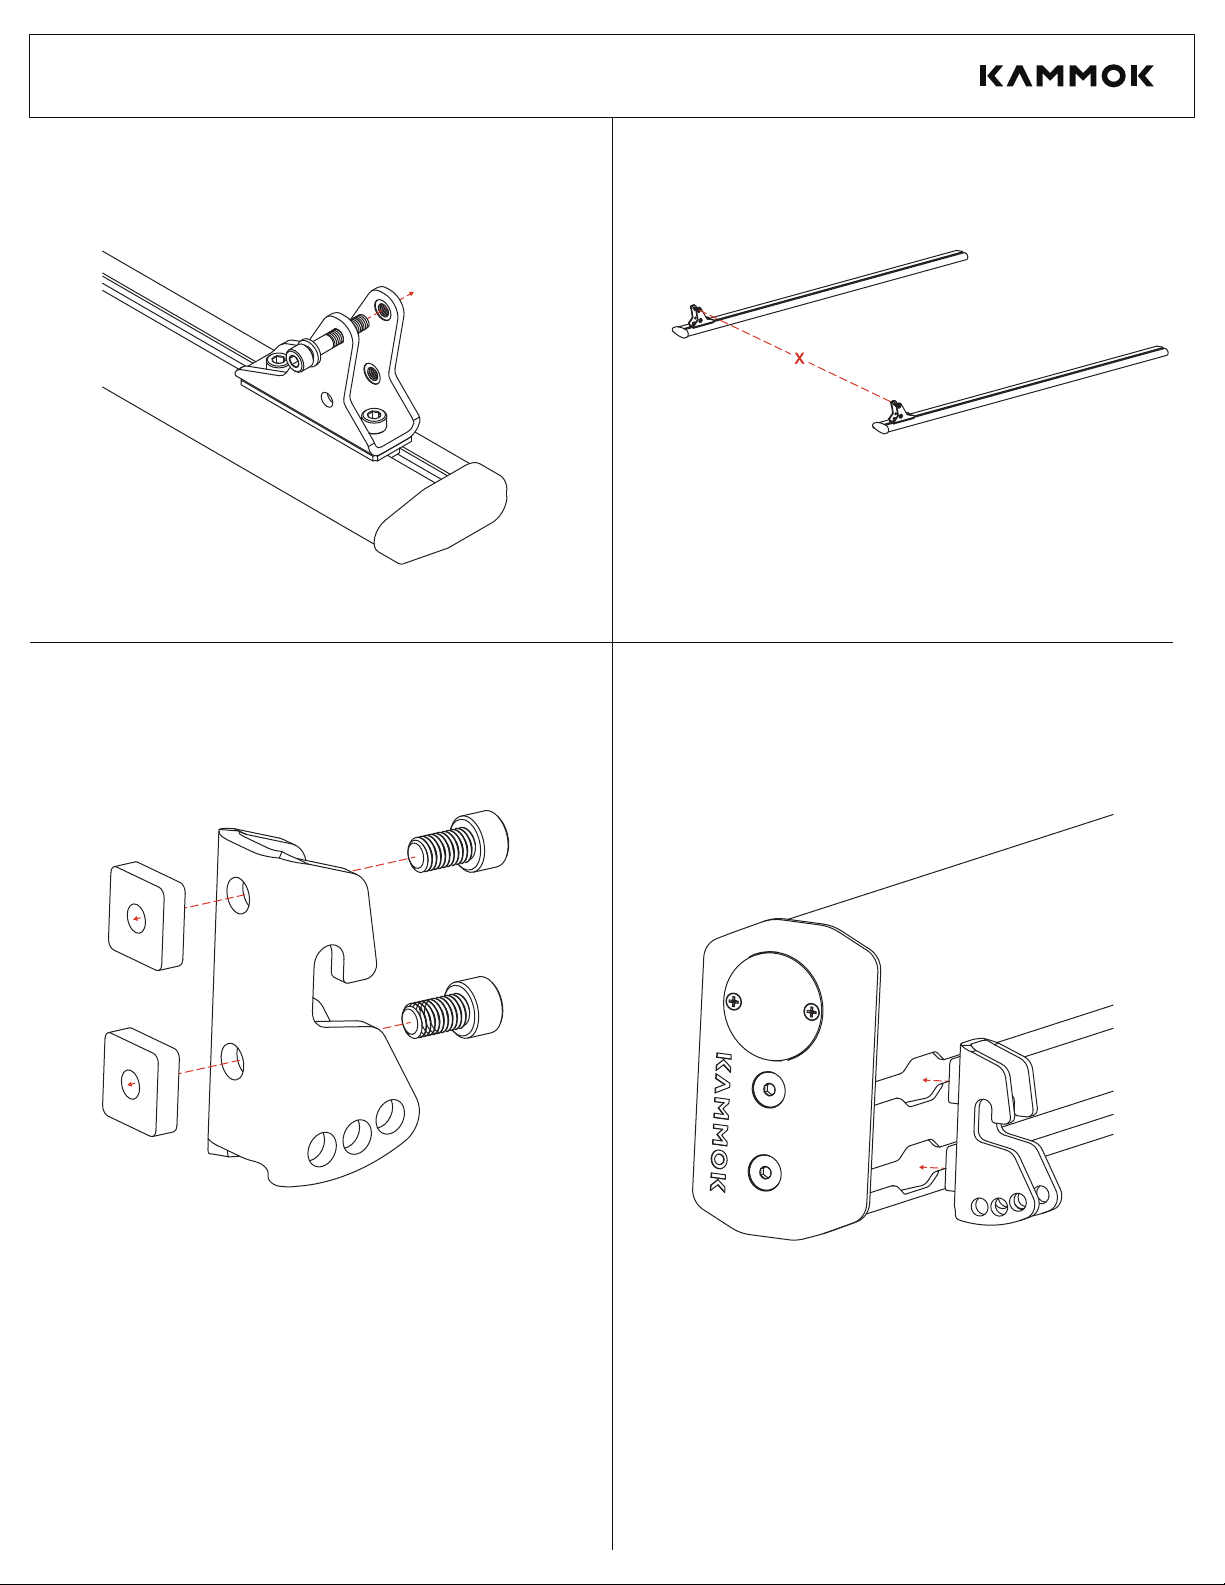
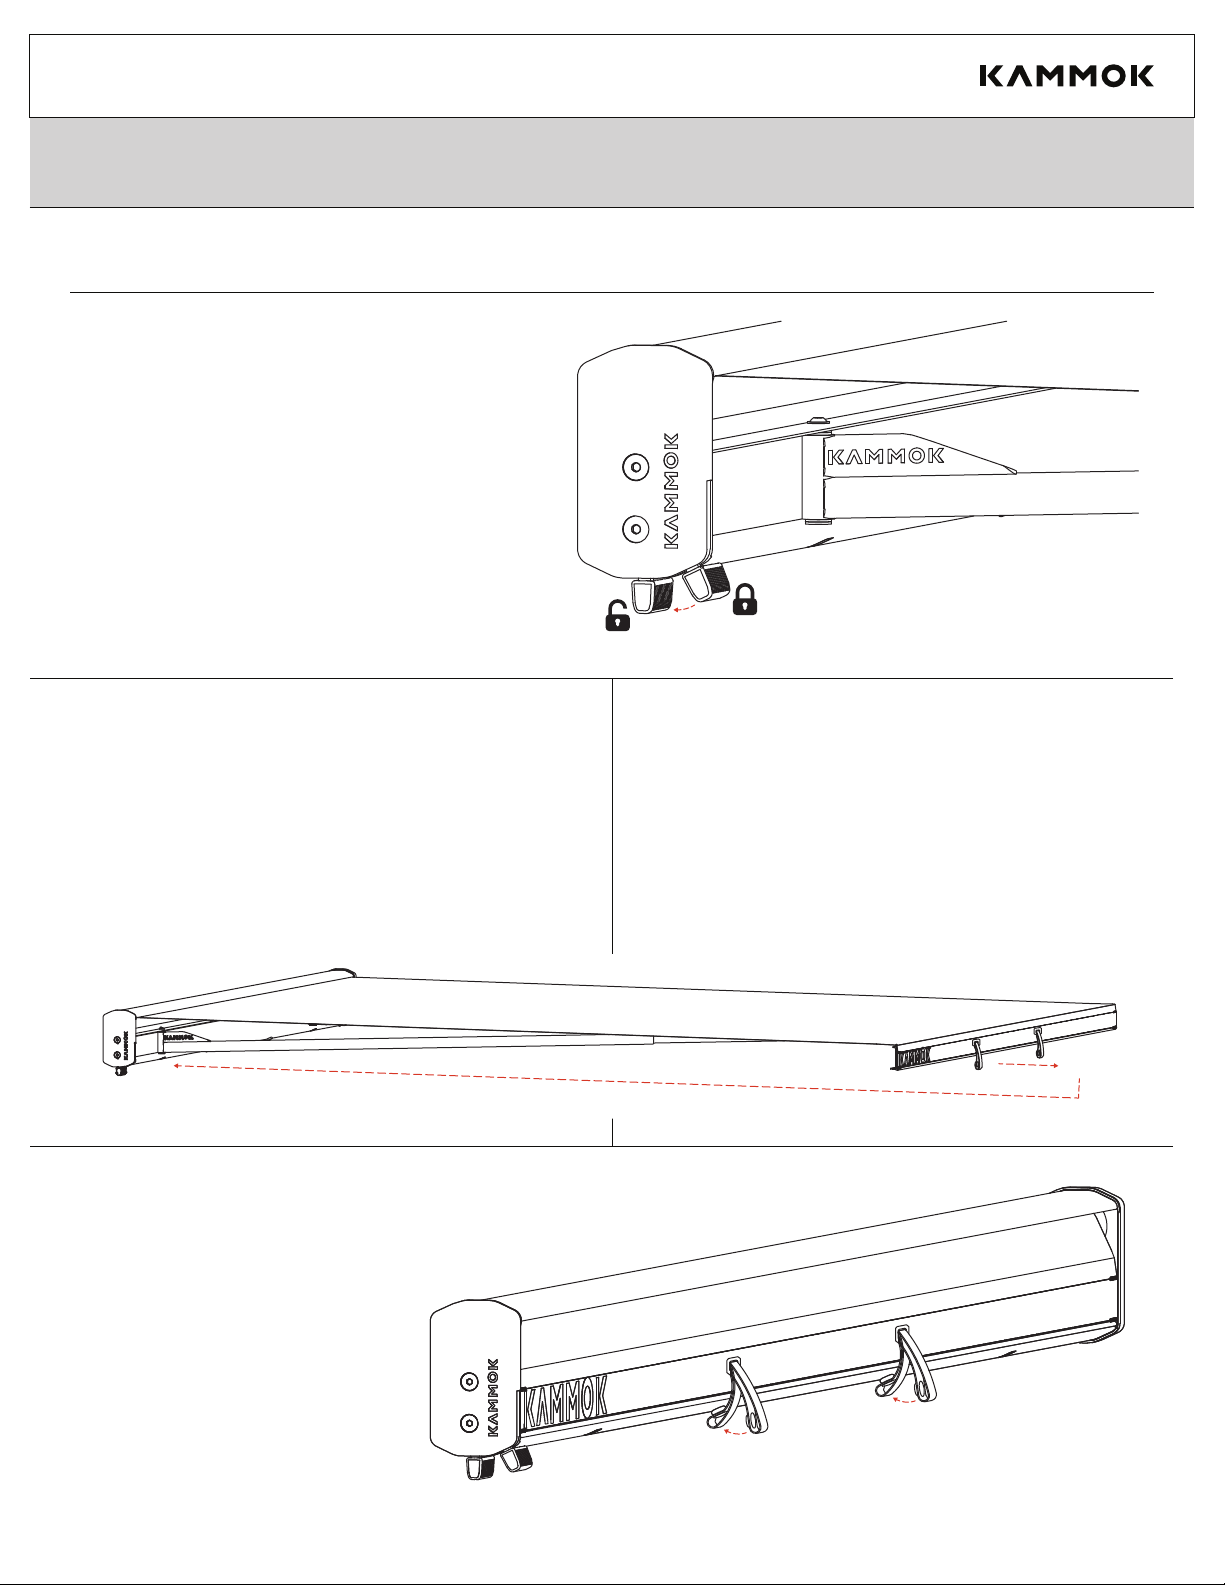
�Check that all awning fasteners are tightened and awning is securely
attached to vehicle before driving.
�Ensure awning is properly closed and secure with pronto latch locked and
safety straps snapped in before driving vehicle.
�Pinch hazard! Keep body parts clear of moving parts during opening and
closing of awning.
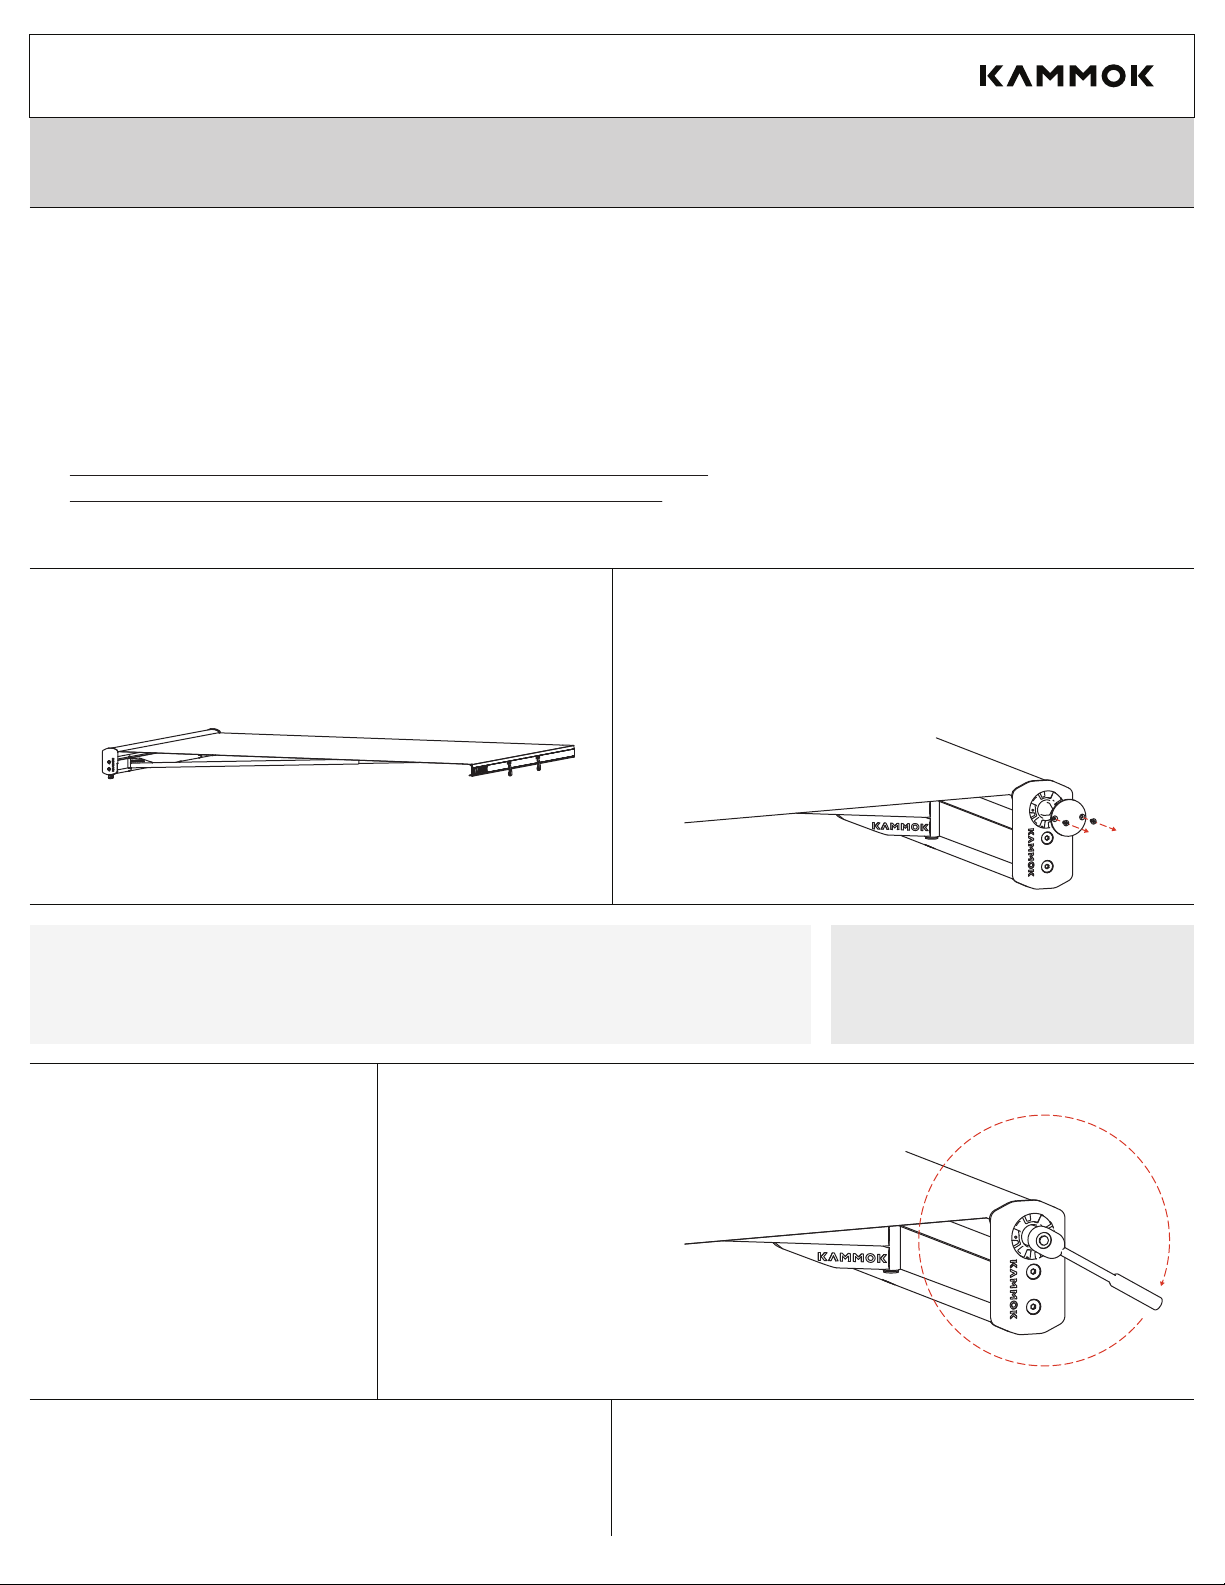
Crosswing Setup Instructions Page 3
1 1
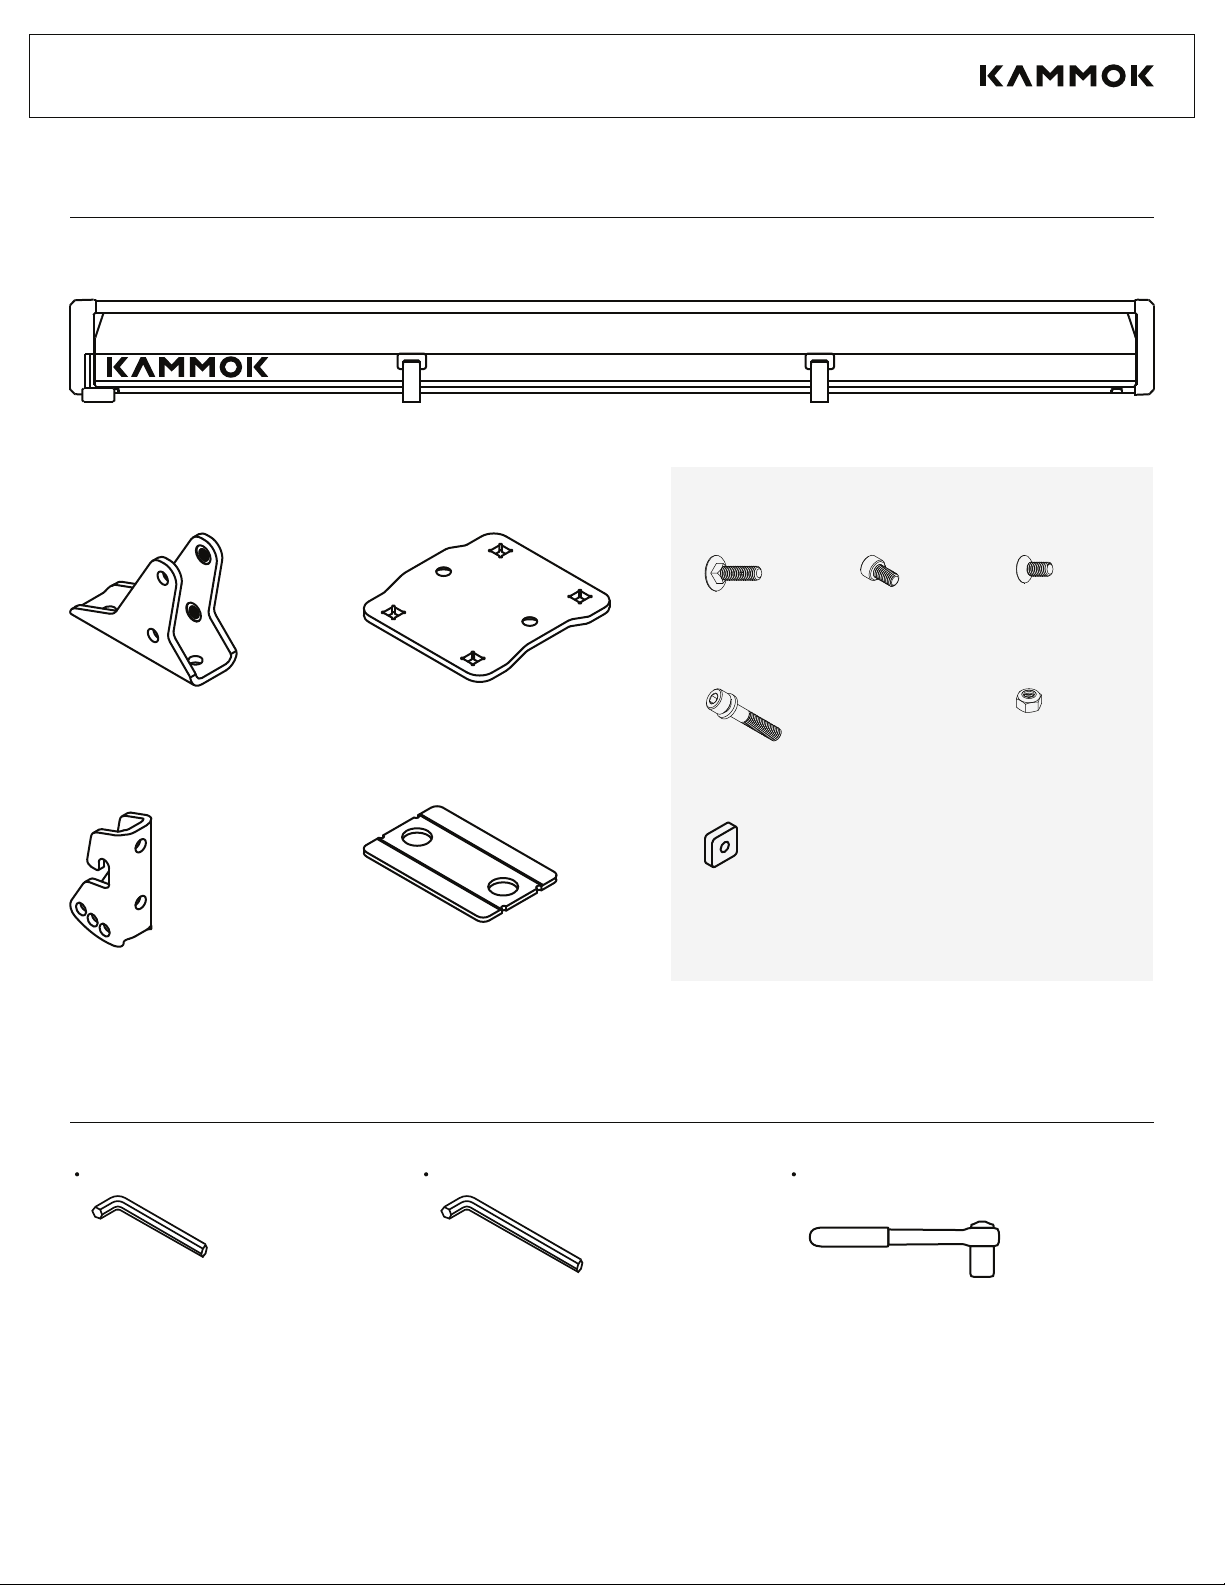
T-Slotted Roof Racks Cross Bars without T-Slots
Attach one Angle Adjust Bracket to each crossbar using two T-slot
nuts and two ⅝” bolts. Place at even positions on the bars.
TOOL: 6 mm Hex wrench
2
3
2
x 2
�Stow awning in high winds (above 25 mph) or heavy snow.
�Do not allow awning to self retract uncontrolled.
�Awning contains a high tension spring system, do not alter the spring system.
�Do not attempt to adjust tension without following provided instructions.
�Do not pull down on or hang from the awning.
�Do not hang any non-Kammok approved items from awning.
WARNING:
Pre-thread one 1 ⅝” bolt with lock washer into the
top hole of each Angle Adjust Bracket.
Pre-thread two T-slot nuts onto each Awning
Mounting Bracket using two ⅝” bolts, do not tighten.
Slip the T-slot nuts (with Awning Mounting Bracket in
tow) into the T-slots located on the back of the
Crosswing Awning using the cutaways at each end.
Measure spacing between angle adjust brackets.
1
3
Crosswing Setup Instructions Page 4
4
2
x 2
Position the Awning Mounting Brackets to align with
the spacing of the Angle Adjust Brackets. Tighten
fasteners lightly.
TOOL: 6 mm Hex wrench
Insert one 1 ⅝” into the bottom hole of each Angle Adjust
Bracket with the Crosswing lined up at the desired angle.
Tighten both 1 ⅝” bolts on each Angle Adjust Bracket.
If the Crosswing is not at the desired position: slightly loosen the four ⅝” bolts holding the
Crosswing to the Awning Mounting Brackets. Slide the Crosswing into the desired position
along the length of the vehicle.
With the help of an additional person, lift the
Crosswing up to the vehicle. Align the Awning
Mounting Brackets with the Angle Adjust Brackets,
slot the hook of each Awning Mounting Bracket onto
the bolts of the Angle Adjust Brackets, let the
Crosswing pivot down until it rests against the Angle
Adjust Bracket, the Crosswing will hang safely.
5
7
8
6
Crosswing Setup Instructions
Tighten all four ⅝” bolts holding the Crosswing to the
Awning Mounting Brackets.
Check that all fasteners are securely tightened.
9 10
Page 5
Place the Control Lever into the unlocked (straight
down) position.
There are three points where the Crosswing will lock into
place (located at 3’, 4’11”, and 6’6”). You will hear two
clicks sounding together at each point. These clicks are
the spring pins locking the awning into place. The awning
cannot be left open at any other location.
Note: The locking buttons engage when the awning is being pulled open
but are automatically disengaged when traveling in the reverse direction.
Refer to closing instructions if you travel past your desired locking position.
Pull the control lever up to tighten the fabric. You
will hear the ratchet mechanism click.
Note: The control lever will automatically return to the locked
position. If you press the lever beyond this position, the tension
will be released. The fabric will loosen and the tightening process
will have to start over.
Release Safety strap snaps. Pull the Crosswing
open evenly by each safety strap. Do not let go of
straps until awning is securely locked in position.
WARNING: Pinch hazard, be careful not to place body parts in path of moving parts.
Crosswing Operating Instructions Page 6
How To Open the Crosswing
1
3
4
2
Place the Control Lever into the unlocked (straight
down) position.
Grab the two safety straps/pull loops. Pull the awning
out 2”-3”, which will disengage the spring pins.
Note: Do not let go of the awning safety straps until fully closed.
Without releasing the pull loops, slowly guide the awning
straight back to it’s closed position. The internal spring will
assist the awning in winding itself up.
Note: If fabric retracts unevenly onto the reel and gets stuck, pull open and
repeat the previous steps, ensuring the frame stays even during closing.
When the awning is fully closed,
click the Safety Straps back onto
their snap fasteners. Return the
Control Lever to the locked position,
the ratcheting feature can be used if
the fabric is loose on the reel.
WARNING: Pinch hazard, be careful not to place body parts in path of moving parts.
Crosswing Operating Instructions Page 7
How To Close the Crosswing
1
23
4
2 in
Special Circumstances
Special
Circumstances
Page 8
Adjusting the Awning’s Tension.................................................................................................Page 9
Replace the Awning’s Fabric....................................................................................................Page 11
Fully open the Crosswing and leave the Control Lever
in the unlocked position. This will allow you to gauge
the spring tension.
Remove the two Philips head screws holding the
Tension Adjust Cover on the right side of the Crosswing.
Remove the Tension Adjust Cover. Be careful not to
misplace the Tension Adjust Cover and screws.
Using a ⅝” socket and wrench,
turn the Tension Adjust hex
clockwise (the hex will pull itself
inward before spinning freely).
Make 4-5 turns clockwise. Allow the socket wrench to slowly
rotate counterclockwise, do not push inwards (the Tension
Adjust hex will push back out and sit into its resting position).
Test the new spring tension by closing and opening the
Crosswing. If additional tension is desired repeat from step 3.
Replace Tension Adjust Cover and screws.
Crosswing Tension Adjust Page 9
1 2
3 4
Note: Once the wrench ceases to spin counterclockwise
on its own you can remove the wrench.
To increase tension.
Continue on to step 3 below. Skip to step 7 on the following page.
To decrease tension.
5 6
4-5 rotations
The spring tension should only be increased if the Crosswing is failing to retract
easily or you are replacing the fabric, described later in these instructions.
Adjusting the
Crosswing’s Tension
WARNING: High spring tension, do not allow socket wrench or tension adjust hex to spin freely once engaged.
Using a 5/8" socket and wrench, turn the Tension Adjust
hex 90 degrees clockwise. The Hex will pull itself inward
and then spin freely.
Push inward on the socket so that the tension adjust hex does not
push out and lock, allow the socket wrench to slowly spin
counterclockwise. (If the tension adjust hex locks and stops
turning repeat from step 3 on Page 9 ensuring that you are
maintaining inward pressure on the socket).
Once the socket wrench has made 4-5 counterclockwise turns, stop
pushing inward on the socket wrench and slowly allow the wrench
to turn counterclockwise (the Tension Adjust hex will push back out
and sit into its resting position).
Once the wrench ceases to spin counterclockwise on its own you
can remove the wrench.
Test the new spring tension by closing and opening the Crosswing.
If less tension is desired, repeat from step 3.
Replace Tension Adjust Cover and screws.
To decrease tension.
Crosswing Tension Adjust Page 10
7 8
9 10
11 12
Continue on to step 7 below. Go back to step 3 on the previous page.
To increase tension.
Rotate clockwise 90 degrees
WARNING: High spring tension, do not allow socket wrench or tension adjust hex to spin freely once engaged.