manuals.online logo
Brands
  1. Home
  2. •
  3. Brands
  4. •
  5. K&M
  6. •
  7. Tractor Accessories
  8. •
  9. K&M KM 402 User manual

K&M KM 402 User manual

Installation Guide
Phone: 1.800.328.1752 / Website: www.tractorseats.com
KM 402 Kit Air/Mech Installation (PN: 6795 & 6796)
Technical Support
1. Remove original seat and suspension from the cab.
2. Cap the hydraulic lines with the nuts and plugs provided. Cut and plug the breather line by turning a 5/16" x 1" bolt
into the tube.
3. Remove and discard the slide rails that come attached to the new seat.
1
Installation Guide
Phone: 1.800.328.1752 / Website: www.tractorseats.com
KM 402 Kit Air/Mech Installation (PN: 6795 & 6796)
Technical Support
2
4. Bolt the 6048 slide rails to the suspension using four 8mm x 12mm low profile socket cap screws. The slide rail
must be assembled with the adjustment lever to the left side of the seat and suspension.
8mm x 12mm Low
Profile Socket Cap
Screw (4)
KM MSG83 PN: 8079
or
KM MSG93 PN: 8080
Slide Rails
PN: 6048
Installation Guide
Phone: 1.800.328.1752 / Website: www.tractorseats.com
KM 402 Kit Air/Mech Installation (PN: 6795 & 6796)
Technical Support
3
5. Bolt the 6080 SAP to the slide rails using four 5/16" x 3/4" flat head socket cap screws, three flat washers, and four
5/16" jam nuts. The three flat washers go in between the 6080 SAP and the slide rails as shown below.
KM MSG83 PN: 8079
or
KM MSG93 PN: 8080
5/16" Jam Nut (4)
5/16" Flat Washer (3)
5/16" Flat Head Socket
Cap Screw (4)
6080 SAP
Installation Guide
Phone: 1.800.328.1752 / Website: www.tractorseats.com
KM 402 Kit Air/Mech Installation (PN: 6795 & 6796)
Technical Support
6. Bolt the suspension to the JD PED 44 using four 5/16" x 5/8" bolts and serrated flange nuts. You will have to loosen
the lower part of the rubber bellows to access the inside of the suspension to get the nuts onto the bolts.
5/16" x 5/8" Bolt (4)
5/16"
Serrated
Flange Nut
(4)
JD PED 44 PN: 6036
KM MSG83 PN: 8079
or
KM MSG93 PN: 8080
4
Installation Guide
Phone: 1.800.328.1752 / Website: www.tractorseats.com
KM 402 Kit Air/Mech Installation (PN: 6795 & 6796)
Technical Support
7. Mount the JD PED 44 and suspension assembly to the cab deck using the original bolts.
5
KM MSG83 PN: 8079
or
KM MSG93 PN: 8080
JD PED 44 PN: 6036
Installation Guide
Phone: 1.800.328.1752 / Website: www.tractorseats.com
KM 402 Kit Air/Mech Installation (PN: 6795 & 6796)
Technical Support
6
8. If a swivel was purchased, remove the plastic knock outs from the locations shown below. If no swivel was
purchased, continue to step 15 on page 9.
Installation Guide
Phone: 1.800.328.1752 / Website: www.tractorseats.com
KM 402 Kit Air/Mech Installation (PN: 6795 & 6796)
Technical Support
9. Rotate the swivel 45 degrees as shown below.
10. Mount the swivel to the 6080 SAP plate using four 5/16" x 5/8" socket head cap screws, lock washers, and 5/16"
jam nuts.
7
5/16" x 5/8" Socket
Head Cap Screw
(4) 5/16" Lock Washer (4)
5/16" Jam Nut (4)
6080 SAP
Installation Guide
Phone: 1.800.328.1752 / Website: www.tractorseats.com
KM 402 Kit Air/Mech Installation (PN: 6795 & 6796)
Technical Support
8
11. Remove the cushion from the new seat by taking out the three screws from the bottom front of the seat pan.
12. Mount the seat to the swivel using four 5/16" x 5/8" socket head cap screws and 5/16" serrated flange nuts.
13. Reinstall the seat cushion.
14. If the suspension is air, connect it to a power source. Keyed power is recommended.
Installation Complete.
5/16" Serrated
Flange Nut (4)
5/16" x 5/8" Socket
Head Cap Screw
(4)
Installation Guide
Phone: 1.800.328.1752 / Website: www.tractorseats.com
KM 402 Kit Air/Mech Installation (PN: 6795 & 6796)
Technical Support
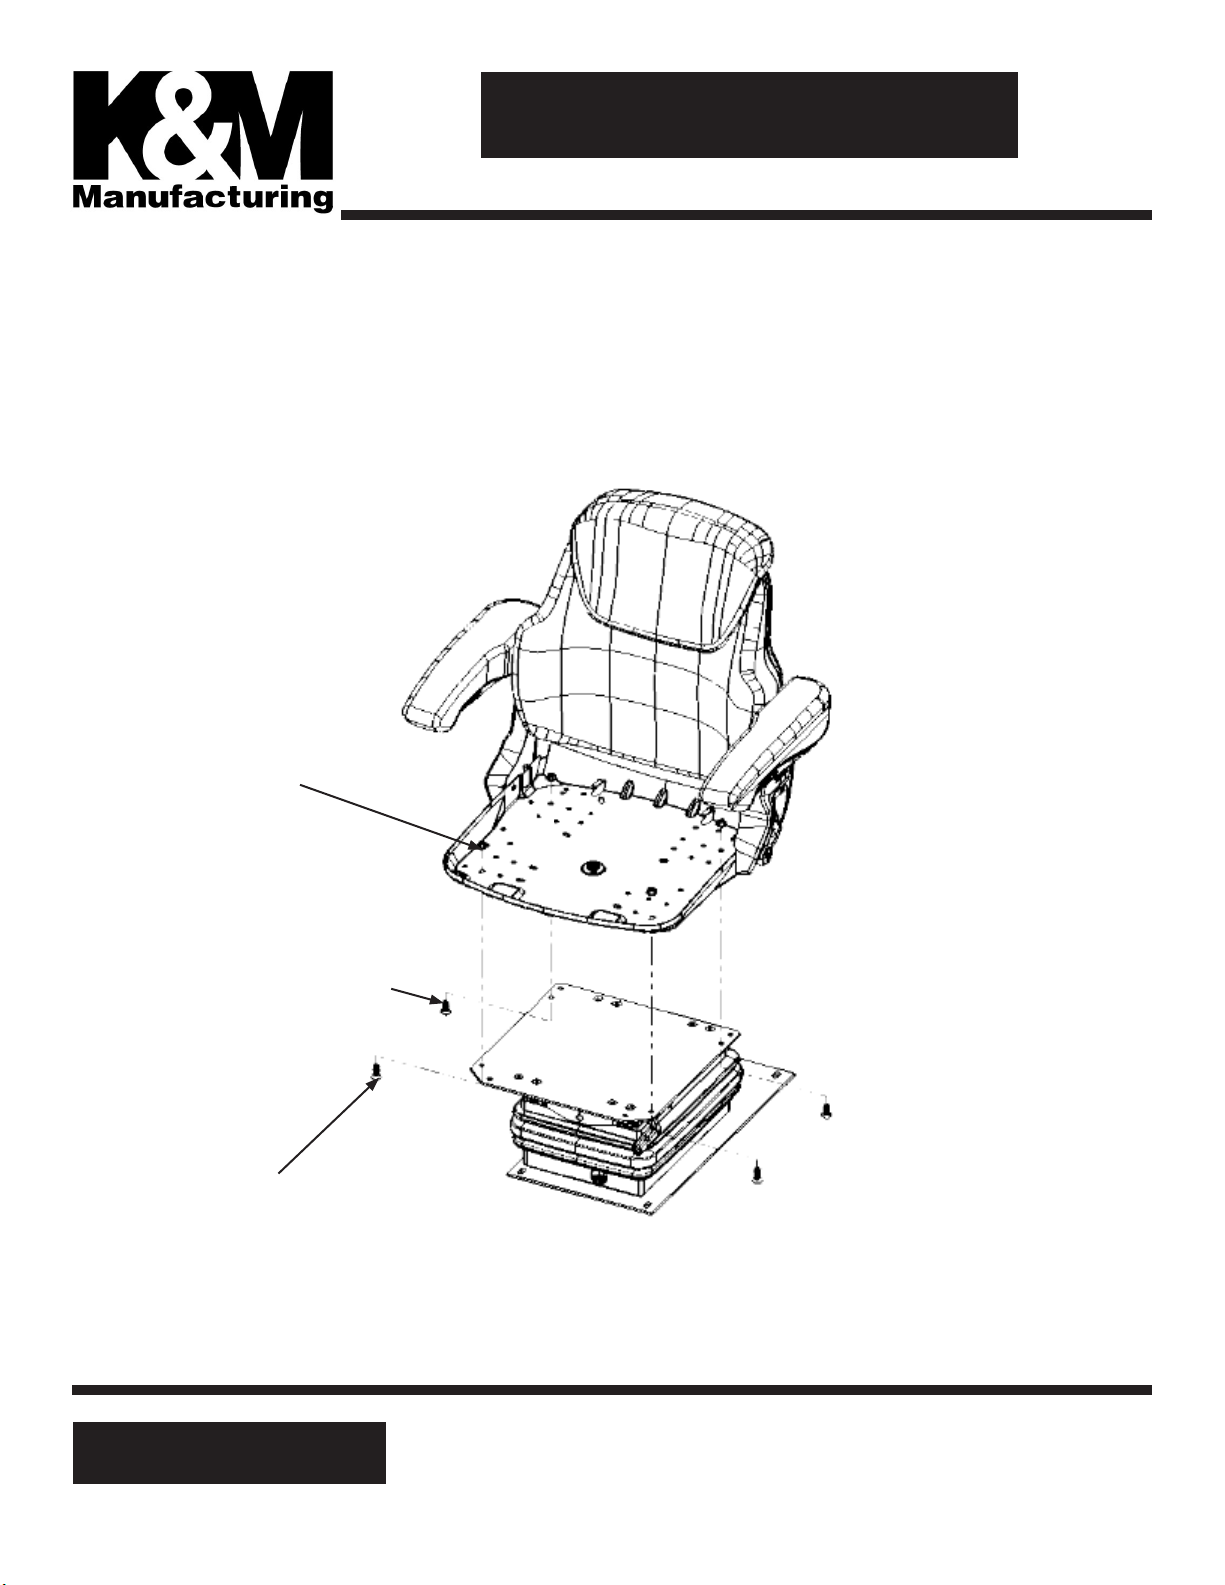
15. Remove the cushion from the new seat by taking out the three screws from the bottom front of the seat pan.
16. Mount the seat to the 6080 SAP using two 5/16" flat head socket cap screws and serrated flange nuts for the front
holes and two 5/16" x 5/8" socket head cap screws and serrated flange nuts for the rear holes.
17. If the suspension is air, connect it to a power source. Keyed power is recommended.
9
5/16" Serrated
Flange Nut (4)
5/16" x 5/8" Socket
Head Cap Screw
(2)
5/16" x 1" Flat
Head Socket Cap
Screw (2)

This manual suits for next models

2

Popular Tractor Accessories manuals by other brands

Grouser Products 760 Owner's manual & parts book

Grouser Products

Grouser Products 760 Owner's manual & parts book

Craftsman 486.244122 owner's manual

Craftsman

Craftsman 486.244122 owner's manual

Land Pride RB16 Series Operator's manual

Land Pride

Land Pride RB16 Series Operator's manual

Homelite T-10 Instructions-parts list

Homelite

Homelite T-10 Instructions-parts list

Black Widow ATV-TINE-2145 instructions

Black Widow

Black Widow ATV-TINE-2145 instructions

MTD 19A30020OEM installation manual

MTD

MTD 19A30020OEM installation manual

Victory BACKHOE Series Operator's manual

Victory

Victory BACKHOE Series Operator's manual

Krone XXL-RGD operating instructions

Krone

Krone XXL-RGD operating instructions

Bomet U 031 owner's manual

Bomet

Bomet U 031 owner's manual

Woods BSS54 Operator's manual

Woods

Woods BSS54 Operator's manual

Raven AccuBoom installation manual

Raven

Raven AccuBoom installation manual

Horst Welding CHCF25 Assembly manual

Horst Welding

Horst Welding CHCF25 Assembly manual

Winton WBS01 owner's manual

Winton

Winton WBS01 owner's manual

LS tractor LS BLADE MBD1160A Operator's manual

LS tractor

LS tractor LS BLADE MBD1160A Operator's manual

Raven SmarTrax MD installation manual

Raven

Raven SmarTrax MD installation manual

MTD 19A30003OEM Operator's manual

MTD

MTD 19A30003OEM Operator's manual

matev FPS JD-2036R operating manual

matev

matev FPS JD-2036R operating manual

Maschio TORO RAPIDO Use and maintenance

Maschio

Maschio TORO RAPIDO Use and maintenance

manuals.online logo
manuals.online logoBrands
  • About & Mission
  • Contact us
  • Privacy Policy
  • Terms and Conditions

Copyright 2025 Manuals.Online. All Rights Reserved.