KANG Industrial HB-10 User manual

HYDRAULIC PIPE BENDER
Model: HB-10
OPERATION MANUAL

-2-
I. SAFETY WARNINGS & CAUTIONS
WARNING: When using tool, basic safety precautions should always be followed to reduce the
risk of person injury and damage to equipment. Read all instructions before using this tool!
1. Keep work area clean. Cluttered areas invite injuries.
2. Observe work area conditions. Do not use machines or power tools in damp or wet
locations. Don’t expose to rain. Keep work area well lighted.
3. Keep children away. Children must never be allowed in the work area. Do not let
them handle machines, tools, or extension cords.
4. Store idle equipment. When not in use, tools must be stored in a dry location to
inhibit rust. Always lock up tools and keep out of reach of children.
5. Do not force tool. It will do the job better and more safety at the rate for which it was
intended. Do not use inappropriate attachments in an attempt to exceed the tool
capacity.
6. Use the right tool for the job. Do not attempt to force a small tool or attachment to do
the work of a large industrial tool. Do not use a tool for a purpose for which it was not
intended.
7. Dress properly. Do not wear loose clothing of jewelry as they can be caught in
moving parts. Protective, electrically non-conductive clothes and non-skid footwear
are recommended when working. Wear restrictive hair covering to contain long hair.
8. Use eye and ear protection. Always wear ISO approved impact safety goggles.
Wear a full-face shield if you are producing metal filings or wood chips. Wear an ISO
approved dust mask or respirator when working around metal, and chemical dusts
and mists.
9. Do not overreach. Keep proper footing and balance at all times. Do not reach over or
across running machine.
10.Maintain tools with care. Keep tools sharp and clean for better and safer
performance. Follow instructions for lubricating and changing accessories. The
handles must be kept clean, dry, and free from oil and grease at all times.
11. Stay alert. Watch what you are doing; use common sense. Do not operate any tool
when you are tried.
12.Check for damaged parts. Before using any tool, any part that appears damaged
should be carefully checked to determine that it will operate properly and perform its
intended function. Check for alignment and binding of moving parts; any broken parts
or mounting fixtures; and any other condition that may affect proper operation. Any
part that is damaged should be properly repaired or replaced by a qualified technician.
13.Guard against electric shock. Prevent body contact with grounded surfaces such as
pipes, radiators, ranges, and refrigerator enclosures.
14.Replacement parts and accessories. When servicing, use only identical
replacement parts. Use of any other parts will void the warranty. Only use accessories
intended for use with this tool. Approved accessories are available from the distributor.
15.Do not operate tool if under the influence of alcohol or drugs. Read warning

-3-
labels on prescriptions to determine if your judgment of reflexes are impaired while
taking drugs. If there is any doubt, do not operate the tool.
II WORK PRINCIPLE FIGURES
1. OPERATION HANDLE
2. PLUNGER
3. SEALING O-RING
4. CYLINDER CAP
5. RELEASES VALVE
6. TANK
7. YX SEALING RING
8. PISTON
9. BACK SPRING
10. CYLINDER
11. DIRECTOR SLEEVE
12. SHELL DIE
13. ROLLING WHEEL
14. TOP BOARD & BOTTOM BOARD
15. THIN SCREW
III FEATURES & APPLICATION SCOPE
A. FEATURES:
16. Horizontally lay up, top bending structure.
17. Can work through out the whole ram stroke.
18. With automatic return.
B. APPLICATION SCOPE:
1. Capable of bending pipes outside diameter from 21.3mm to 60mm.
2. Capable of bending low carbon steel pipe; stainless steel pipe & nonferrous metal pipes.
C. MAIN SPECIFICATIONS:
1. Max. capacity: 10 Ton
2. Max. oil tank pressure: 42 Mpa.
3. Max. outside diameter of pipe 60mm (2”).
4. Max. ram stroke: 155mm.
5. Net weight: 52 kg.
6. Volume (fold-up package): 71x59x21 cm.
7. Bending pipe technical specifications:

-4-
Diameter Outside dia. Max. thickness Radius Bending angle
1/2” 21.30mm 3.25m 62mm 0-90o
3/4” 26.80mm 3.50mm 78mm 0-90o
1” 33.50mm 4.00mm 98mm 0-90o
1-1/4” 42.30mm 4.00mm 128mm 0-120o
1-1/2” 48.00mm 4.25mm 148mm 0-120o
2” 60.00mm 4.50mm 187mm 0-120o
IV OPERATIING INSTRUCTIONS
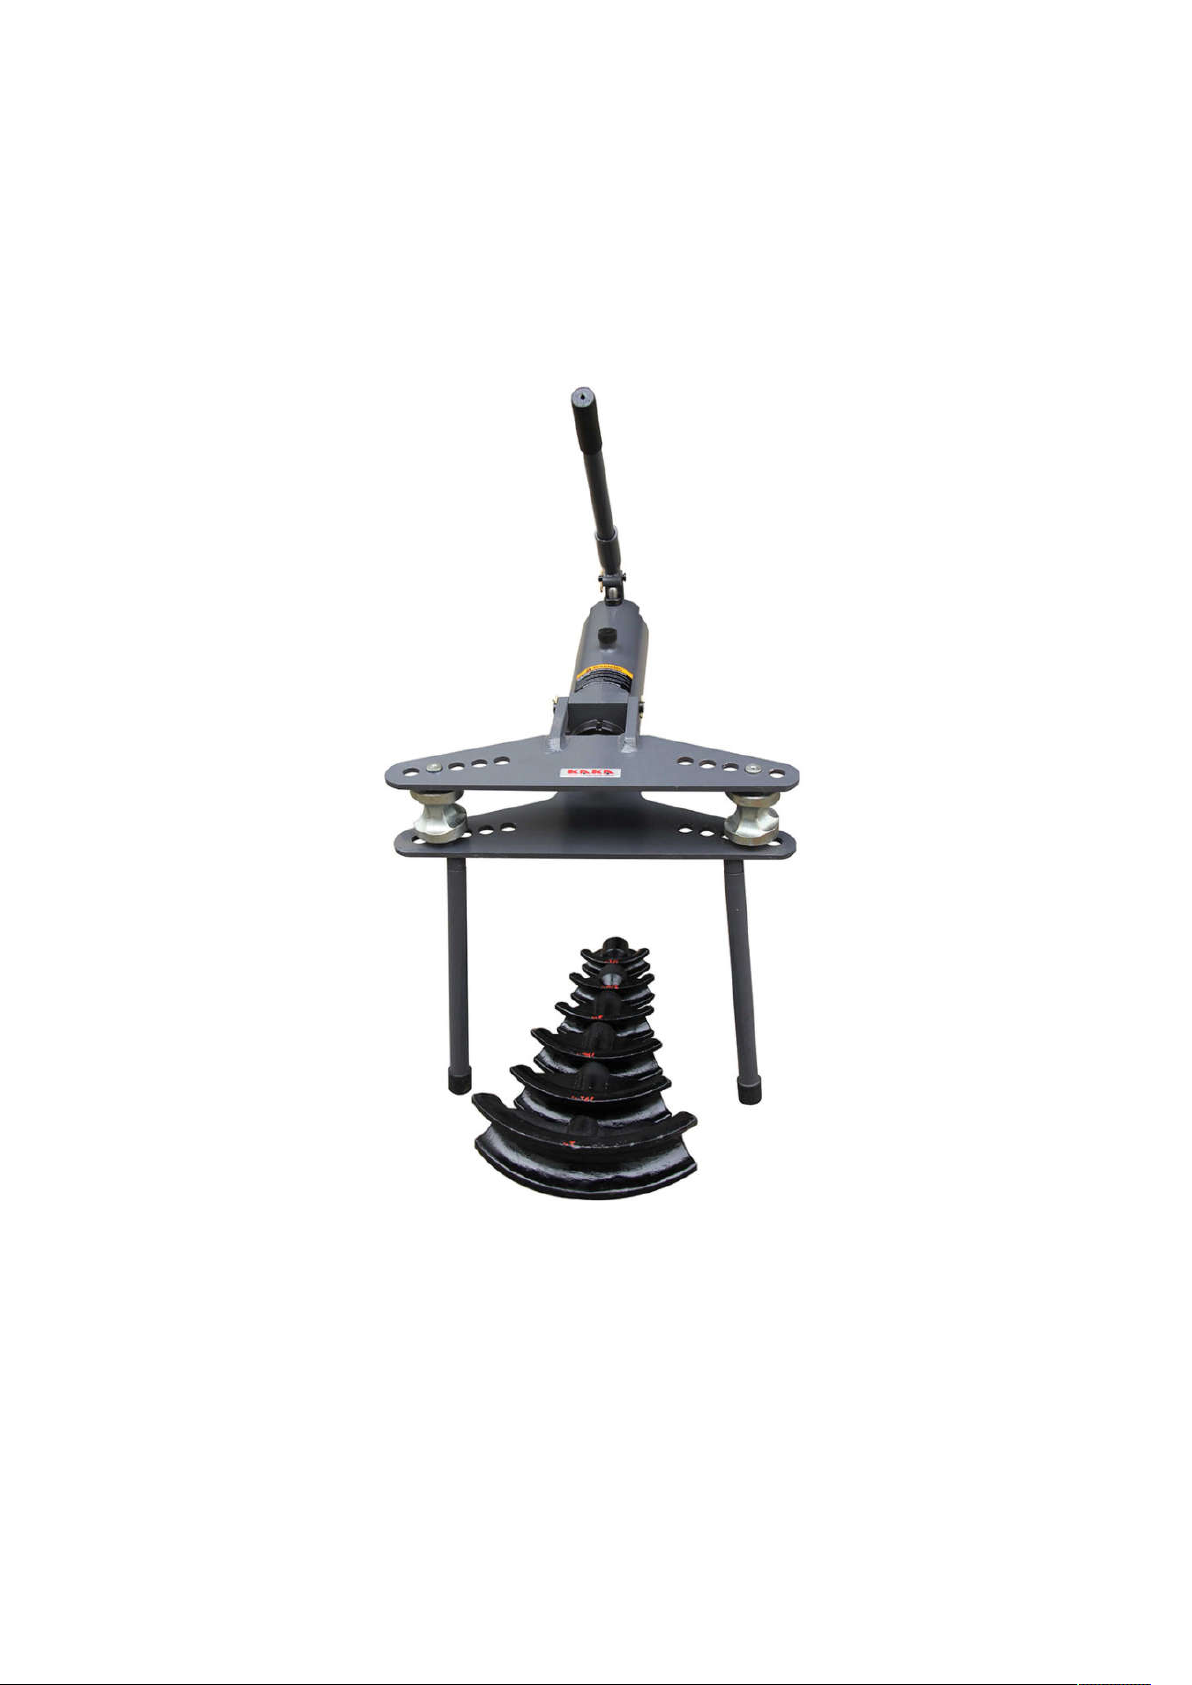
1. Before using, rotating three supporting stands (No. 38) into the position. Remove the
stands and fold the bender for moving or storage after using.
2. The working bench is composed with fixed bottom board (No. 25) and movable top board
(No. 21). Before bending, the top board shall be close to the top board (No. 21) and the
roller wheel (No.24). After the bending is completed, the pipe can be taken out by opening
the top board.
3. There are marks of size on the socket of both the top and bottom boards, the small die
and the curved supporting surface on the rolling wheel. Use the suitable size according to
the work before operation.
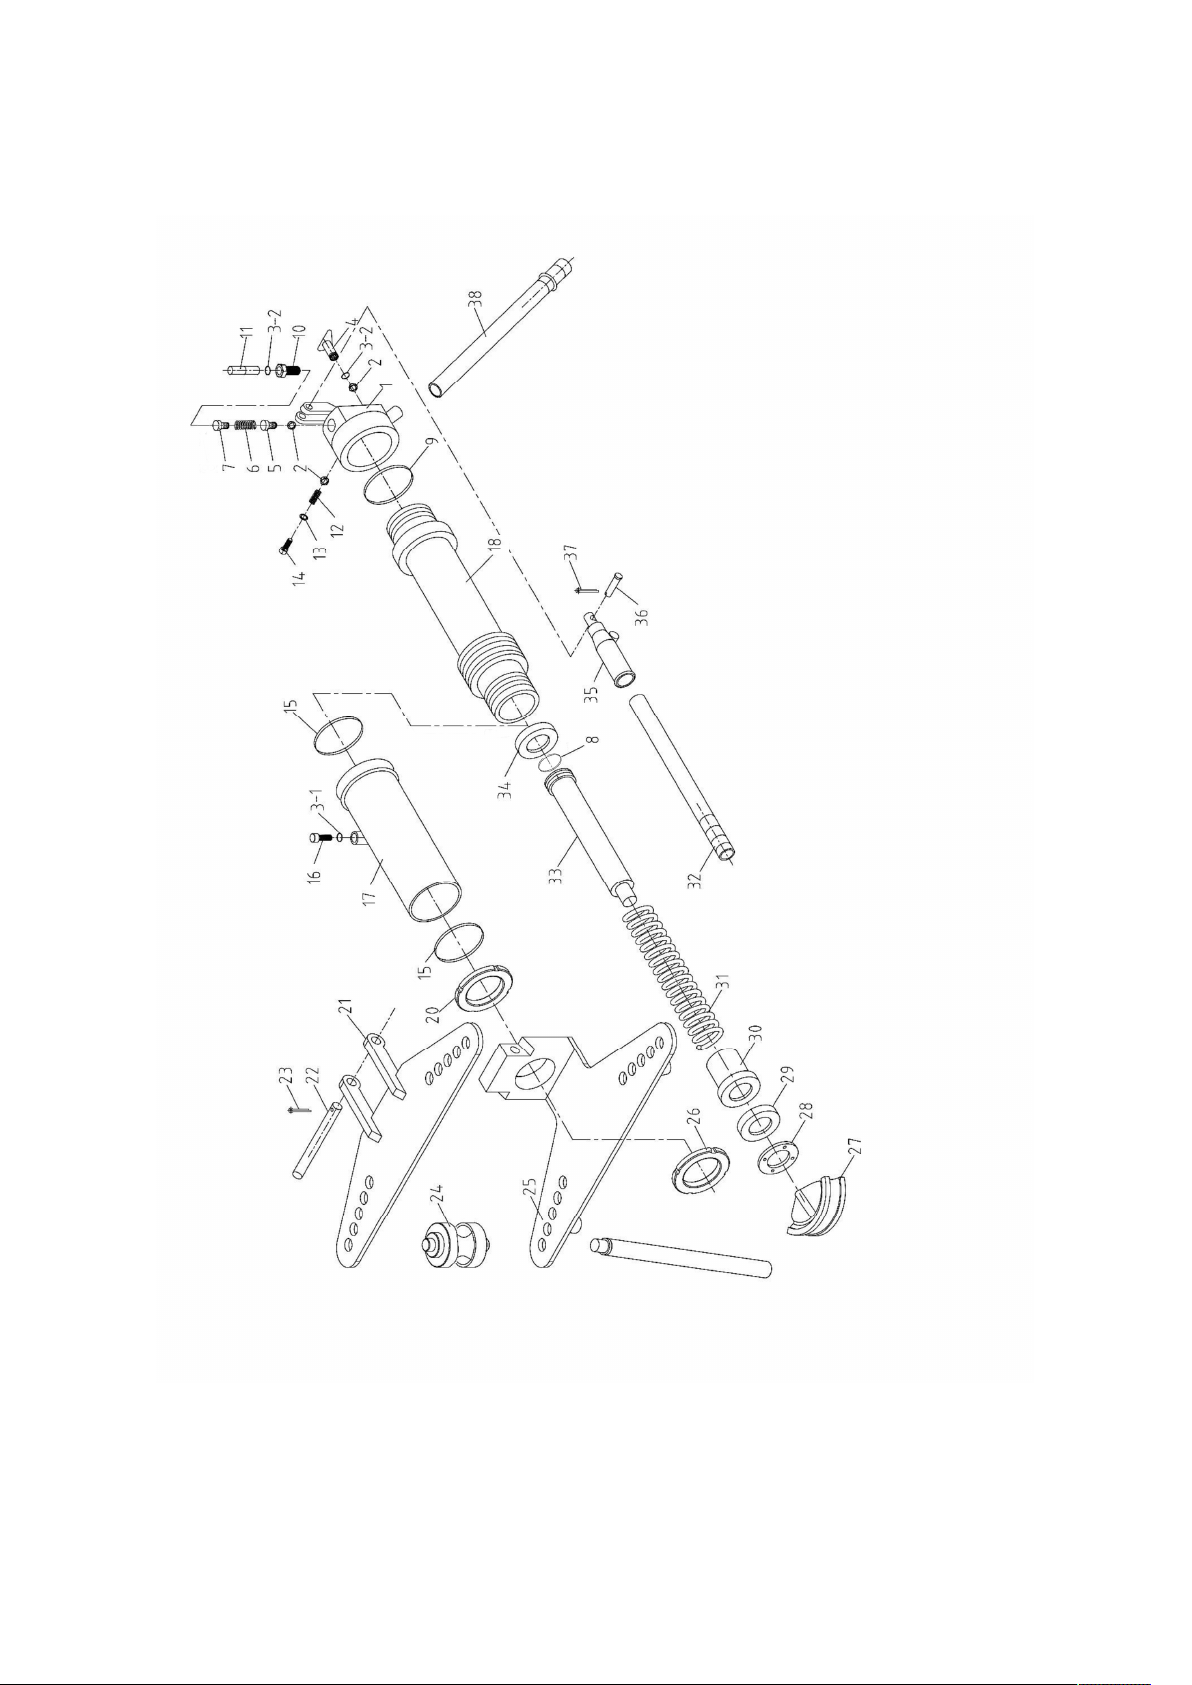
4. Rotating tightly the release valve (No. 4) before operating. Open release valve when
bending is completed and the arm will return automatically.
5. The tank between the outer-casing and the cylinder shall be filled properly with normally
1-1.2 hydraulic oil (No. 10). If the tank is over fed, it will be difficult for the piston to return
and on the contrary the ram will not move all the way to the end.
6. If the pressure on the handle shows the sign of reducing and oil leakage occurs on the
pump after a long time use, remove the trunk piston in the pump and replace the sealing
ring. It is the same problem when it sounds noisy if heavy-load or light-load.
7. The Yx sealing ring can be replaced by removing the thin screw, the direct sleeve and the
piston.
8. If the transporting, rotating, side down display cause the ram unable to proceed, it shows
that the air comes into the tank. Please follow the steps listed below to eliminate the air:
a. Release the piston base (No.10), rotate tightly the release valve No. 4), press the
trunk piston several times till the oil flow out from the gap between the piston base
(No. 10) and valve block (No. 33) proceeds, the machine is normal, otherwise,
please try the second step.
b. Release the adjustable valve, press the truck piston several times till the oil flow out
of the adjustable valve, Then close the adjustable valve. Try it again, if the ram
proceeds, and no “two steps proceed and one step move back” occurs, the machine
is normal, otherwise, please try the third step.
c. Use a hammer to hit the truck piston for several times to clear up the bubbles in the
oil till the machine works normally.
d. If you follow all the steps afford-said, it still appears that the ram can’t proceed. It is
because of the less of the oil. You may fill up the oil till the oil level are not below the
O-ring in the piston base.
Caution: Clear up the air after filling up the oil.

-5-
9. If the truck piston (No. 11) can’t bounce back after being pressed down, you may check
the oil lever to see if it complies with G.D. standard. You shall also check the spring (No. 6)
to see if it is damaged. Then you may fill up the oil and change the spring.
V. PARTS LIST
Part No. Description Qty Part No. Description Qty
1 Valve block 1 21 Top board 1
2 Ball 3 22 Pin 1
3-1 O-Ring 1 23 Cotter pin 2
3-2 O-Ring 4 24 Rolling wheel 2
4 Release valve 1 25 Bottom board 1
5 Top spring plug 1 26 Clamping nut 1
6 Spring 1 27 Shell die 6
7O-Ring 1 28 Check 1
8Support ring 1 29 Ram seal 1
9Rectangular sealing
ring
1 30 Guide socket 1
10 Piston nut 1 31 Spring 1
11 Piston rod 1 32 Handle 1
12 Spring 1 33 Ram 1
13 Sealing washer 1 34 Yx-sealing ring 1
14 Adjusting screw 1 35 Handle socket 1
15 O-Ring 236 Pin 1
16 Oil blug 1 37 Cotter pin 1
17 Oil cylinder 1 38 Stand 3
18 Cylinder 1
20 Tank nut 1

-6-
ASSEMBLY DRAWING

-7-
Note: This manual is only for your reference. Owing to the continuous improvement
of the machine, changes may be made at any time without obligation on notice.
Table of contents
Popular Construction Equipment manuals by other brands

Plymovent
Plymovent KUA-160/H Series Installation and user manual

Wacker Neuson
Wacker Neuson RD24 instruction manual

ROTOTILT
ROTOTILT Quick Change QC45 manual

Discount Equipment
Discount Equipment MULTIQUIP Mikasa Series Operation manual

Fenix
Fenix PA-607M instructions

Jameson
Jameson Bulldog Bender Pup user manual