Karcher Design EZ1060 User manual

Montageanleitung Stoßgriffe Assembly instructions for pull handles Mode d‘emploi pour poignées
battantes
There are different application possiblities and accessories for the mounting
of a pull handle. In the following you will find assembly instruction for
•EZ1060 Fixing as pair for timber, PVC or metal doors.
•EZ1061 Fixing as a pair for glass doors
•EZ1062 Bolt-Through fixing for glass doors with cap inside
•EZ1063 secret fixing for timber doors
•EZ1064 secret fixing for frame/PVC doors
•EZ1066 bolt-through fixing without cover
Es gibt verschiedene Anwendungsmöglichkeiten
und Montagematerialien für Stoßgriffe. Im
folgenden finden Sie Montageanleitungen für
•EZ1060 Paarweise Befestigung auf Holz- Metall,
oder Kunstofftüren.
•EZ1061 Paarweise Befestigung auf Glastüren
•EZ1062 Einseitige Befestigung auf Glas mit
Zierkappe.
•EZ1063 Einseitige Befestigung auf Holztüren
•EZ1064 Einseitige Befestigung auf Metall oder
Kunststofftüren
Il y a plusieurs possibilités d’utilisation et différents sets de
montage pour poignées battantes. Veuillez trouver ci-après
des modes d’emploi pour:
•EZ1060 Fixation double pour porte bois, PVC ou alu (par
paire)
•EZ1061 Fixation double pour porte en verre (par paire)
•EZ1062 Fixation simple et traversante pour porte en verre,
avec cache de l’autre côté
•EZ1063 Fixation simple et invisible sur porte en bois
•EZ1064 Fixation simple et invisible pour porte en PVC/alu
Wichtig: Bitte entfernen Sie die Schutzfolie erst
nach Bauende. Während der Bauphase werden
Edelstahlprodukte oft unsachgemäß behandelt
(z.B. mit Chemikalien verschmutzte Hände).
Es besteht die Gefahr von Flugrost. Bei Abziehen
der Folie vor Bauende stellt Rost keinen
Reklamationsgrund dar !
Important: Please remove the protective film only after completion of
the building. During the construction phase the products in stainless
steel are often treated inappropriately (e.g. the hands are contaminated
with chemicals). Thus, you run the risk that rust film could appear.
If you remove the protective film before completion of the building,
rust will not be accepted as reason for complaint.
Important: Veuillez enlever le film de protection à la fin du
montage seulement pour éviter les risques de corrosion
pendant la manipulation. Dans le cas contraire, les points
de rouille dûs aux traces des doigts ne seront pas pris en
compte dans la garantie.
Karcher GmbH
Design-Beschläge
Raiffeisenstr.32
74906 Bad Rappenau
+49-7264-91640
+49-7264-916440
mail@karcher-design.de
www.karcher-design.de

EZ1060 Paarweise Befestigung auf Holz-Metall, oder Kunstofftüren. Fixing as pair for timber, PVC or metal doors. Fixation béquilles doubles pour porte bois, PVC ou alu
1
2
4
3
A
B
a.) Ermitteln Sie den genauen Achsabstand.
b.) Übertragen Sie das ermittelte Maß auf die Tür.
c.) Bohren Sie zwei Löcher (Ø9mm) durch die
Tür.
d.) Stecken Sie auf Seite A die Buchsen (2) in die
Stoßgriffsockel. Achten Sie auf die richtig
Richtung.
e.) Drehen Sie die Gewindestange (4) in den
Stoßgriffsockel mit Buchse ein.
f.) Führen Sie die eingedrehten Gewindestangen
durch die Bohrungen in der Tür.
g.) Optional können Sie von beiden Seiten die
Unterlegescheiben (3) verwenden.
h.) Drehen Sie auf Seite B die Buchse (2) auf die
Gewindestange (4) und ziehen Sie diese mit
einem Gabelschlüssel fest.
i.) Danach stecken Sie die Stoßgriffsockel auf
Seite B auf die Buchsen (2) und befestigen Sie
die Stoßgriffe auf Seite A und Seite B mit den 8
Stück Innensechskantschrauben (1)
(Madenschrauben)
Karcher GmbH
Design-Beschläge
Raiffeisenstr.32
74906 Bad Rappenau
+49-7264-91640
+49-7264-916440
mail@karcher-design.de
www.karcher-design.de
a.) Measure the exact fixing centre
b.) Transfer this fixing centre to the door
c.) Drill two holes (ø 9 mm) through the door
d.) Insert the bushing (2) [side A] in the
pull handle socket. Pay attention to the
correct direction.
e.)Screw the threaded bolt (4) in the pull
handle socket together with the bushing.
f.) Insert the screwed threaded bolts through
the drillings of the door.
g.) Optionally you can use the washers
(3) from both sides.
h.) Screw the bushing (2) [side B] on the
threaded bar (4) and tighten with an
open-end wrench.
i.) Afterwards put the pull handle socket
on side B on the bushings (2) and fix
the pull handles on side A and B with
the enclosed 8 grub screws (1).
a.) Mesurer l‘entraxe exact.
b.) Transmettez l‘entraxe mesuré sur la porte.
c.) Percez deux trous (Ø9mm) à travers de la porte.
d.) Mettez sur page A les douilles (2) dans les socles
de la poignée battante. Veuillez faire attention à la
direction correcte.
e.) Tournez la tige filetée (4) dans le socle de la
poignée battante avec les douilles.
f.) Mettez les tiges filetées tournées dans les perçages
de la porte.
g.) Optionnellement, vous pouvez prendre les
rondelles (3) des deux côtés.
h.) Tournez sur côté B la douille (2) sur la tige filetée
(4) et serrez celle-ci avec une clé Allen.
i.) Ensuite vous posez les socles du côté B sur les
douilles (2) et fixez les poignées battantes au côté A
et au côté B à l‘aide de 8 vis sans tête à six pans
creux (1) .

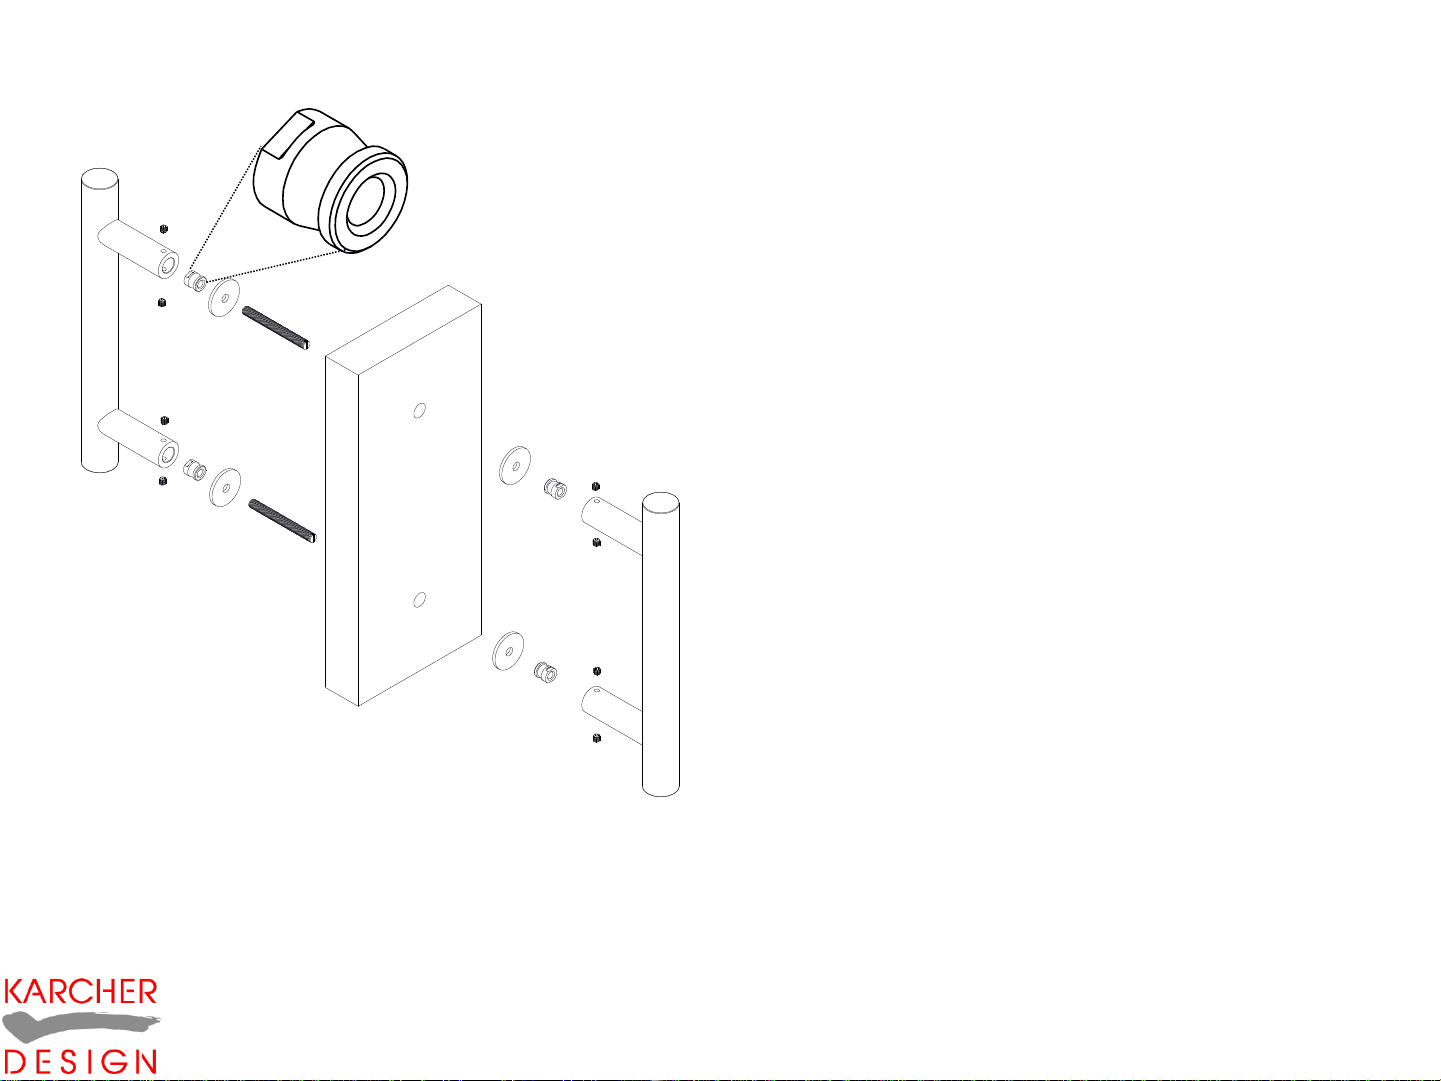
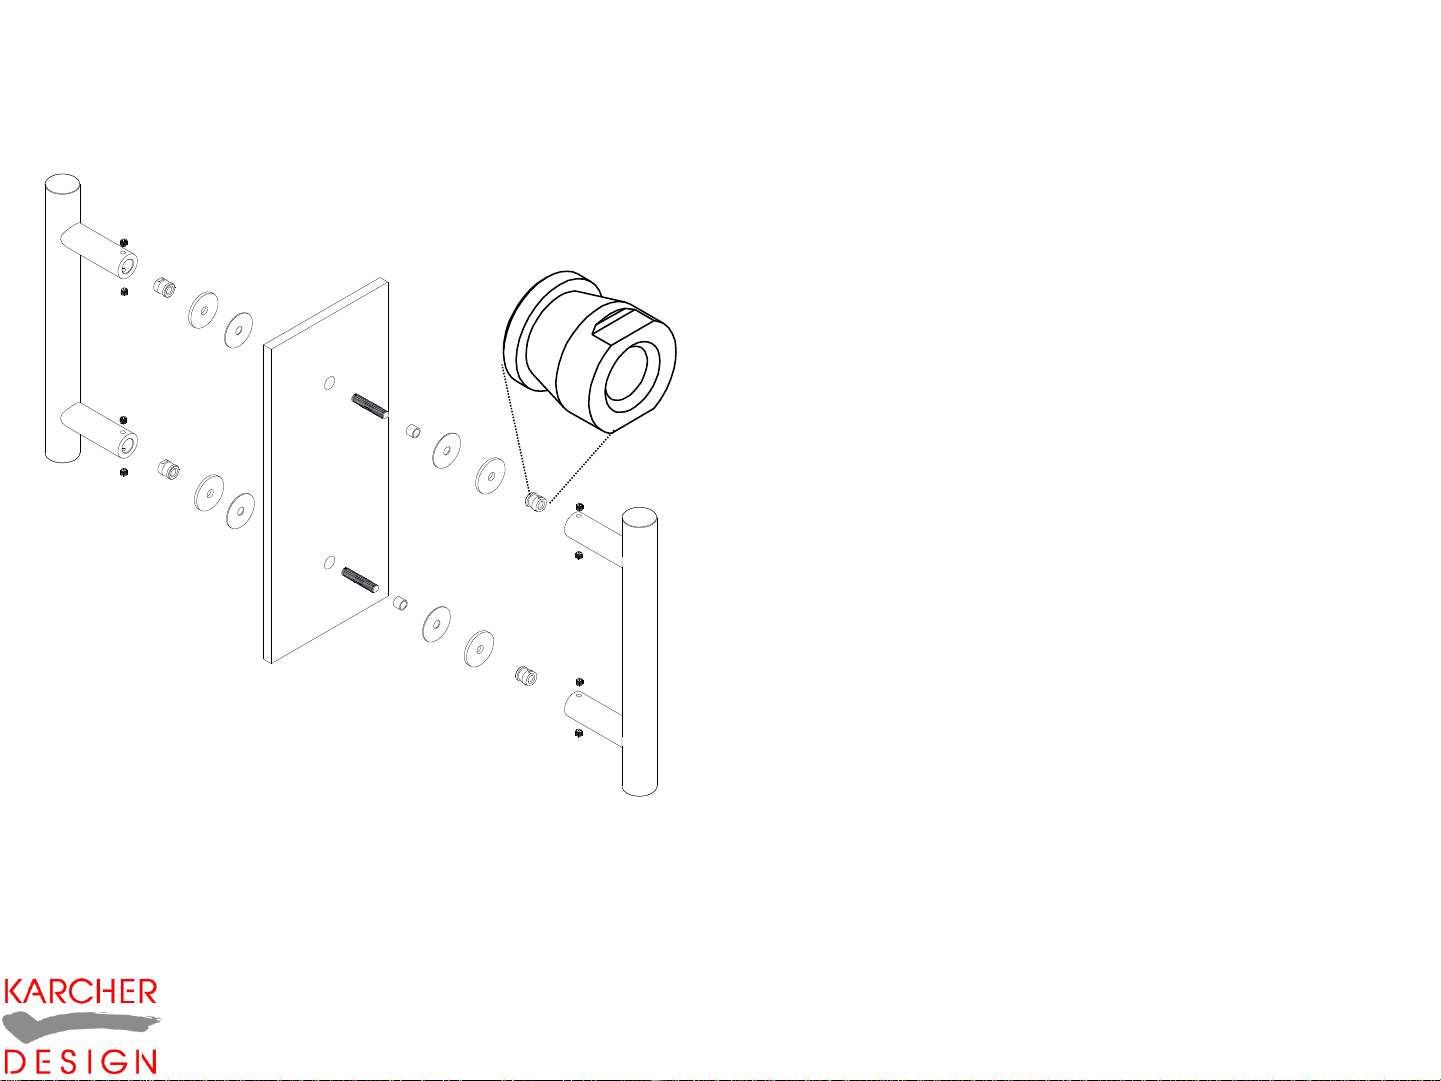
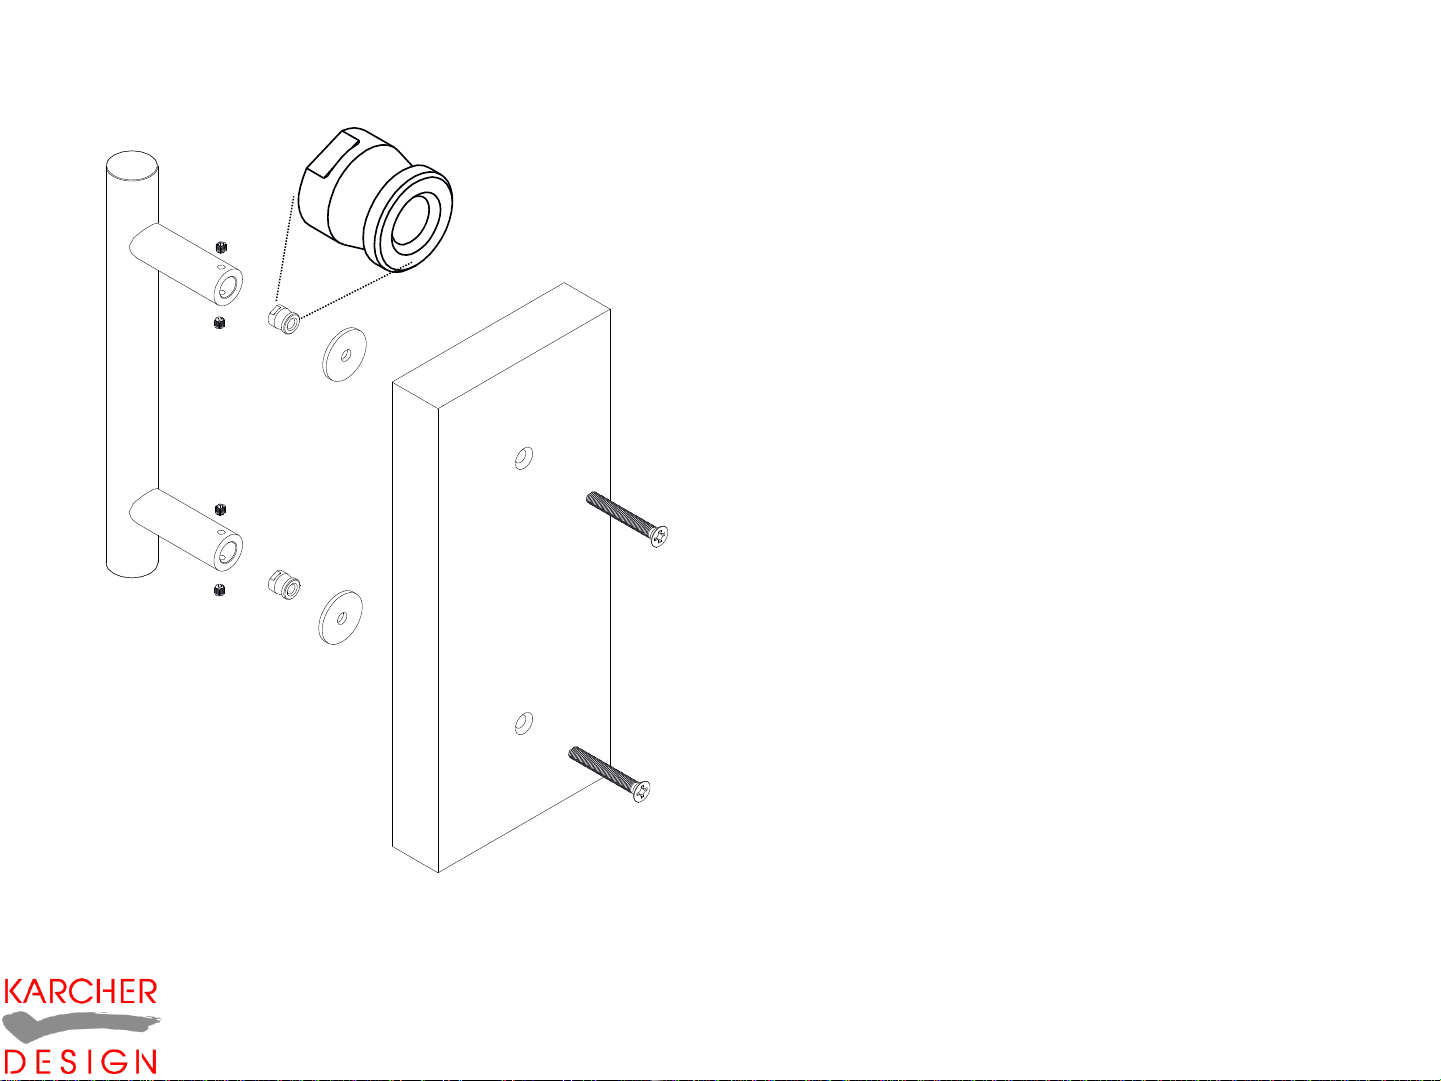
•EZ1061 Paarweise Befestigung auf Glastüren. Fixing as a pair for glass doors. Fixation béquilles doubles sur porte en verre
Ihr Glastürenhersteller ist für die Punkte a.) b.) c.)
Verantwortlich.
a.) Ermitteln des genauen Achsabstands.
b.) Übertragen des ermittelten Maß auf die Tür.
c.) Bohrung der Löcher durch die Tür Ø13mm.
d.) Stecken Sie auf Seite B die Buchsen (2) in die
Stoßgriffsockel. Achten Sie auf die richtig
Richtung.
e.) Drehen Sie die Gewindestange (5) in den
Stoßgriffsockel mit Buchse ein.
f.) Stecken Sie auf die eingedrehte
Gewindestange (5) erst die
Metallunterlegescheibe (3), dann die
Gummiunterlegescheibe (4), so dass die
Gummiunterlegescheibe (4) auf der Glastür
sitzt.
g.) Setzen Sie den Gummiring (6) auf die
Gewindestange (5) und führen Sie die
eingedrehten Gewindestangen (5) durch die
Bohrungen in der Tür, so dass der Gummiring
(6) in der Bohrung sitzt.
h.) Setzen Sie auf Seite A erst die
Gummiunterlegescheibe (4) und dann die
Metallunterlegescheibe (3) auf die durch die
Tür geführte Gewindestange.
i.) Drehen Sie auf Seite A die Buchse (2) auf die
Gewindestange (4) und ziehen Sie diese mit
einem Gabelschlüssel fest.
j.) Danach stecken Sie die Stoßgriffsockel auf
Seite A auf die Buchsen (2) und befestigen Sie
die Stoßgriffe auf Seite A und Seite B mit den 8
Stück Innensechskantschrauben
(1)(Madenschrauben)
2
4 3
A
B
5
6
1
Karcher GmbH
Design-Beschläge
Raiffeisenstr.32
74906 Bad Rappenau
+49-7264-91640
+49-7264-916440
mail@karcher-design.de
www.karcher-design.de
Your glass door manufacturer is responsible
for points a), b) and c)
a.) Measure the exact fixing centre
b.) Transfer this fixing centre to the door
c.) Drilling holes of ø 13 mm
d.) Insert the bushing (2) [side B] in the pull
handle socket. Pay attention to the correct
direction.
e.) Screw the threaded bolt (5) in the pull
handle socket together with the bushing.
f.) Put a metal washer (3) on the screwed
bushing (5) first, then the plastic washer (4).
The plastic washer (4) has to be on the
glass door.
g.) Put the rubber ring (6) on the threaded
bolt (5) and insert the screwed threaded
bolts (5) through the drillings of the door.
The rubber ring (6) has to be in the drilling.
h.) Put the rubber washer (4) [side A] on
the threaded bolt first and then a
metal washer (3)
i.) Screw the bushing (2) on the threaded
bolt (4) [side A] and tighten with an
open-end wrench.
j.) Afterwards put the pull handle socket
on side A on the bushings (2) and fix
the pull handles on side A and B
with the enclosed 8 grub screws (1).
Votre fabricant de portes en verre et responsable pour les points a), b) et c)
a.) Mesurez l’entraxe exact.
b.) Transmettez l‘entraxe mesuré sur la porte.
c.) Percez deux trous (Ø13mm) à travers de la porte.
d.) Mettez sur page B les douilles (2) dans les socles de la poignée battante. Veuillez faire attention à la direction correcte.
e.) Tournez la tige filetée (5) dans le socle de la poignée battante avec douilles.
f.) Mettez d‘abord la rondelle en métal sur la tige filetée (5) et puis la rondelle élastique de telle manière que la rondelle élastique se trouve sur la porte en verre.
g.) Mettez la bague élastique (6) sur la tige filetée (5) et guidez les tiges filetées tournées à travers des perçages dans la porte de sorte que la bague élastique (6) se
trouve dans le trou de perçage.
h.) Posez sur figure A au préalable la rondelle élastique (4) sur la tige filetée, ensuite la rondelle en métal.
i.) Tournez sur côté A la douille (2) sur la tige filetée (4) et serrez celle-ci avec une clé Allen.
j.) Ensuite vous posez les socles du côté A sur les douilles (2) et fixez les poignées battantes au côté A et au côté B à l‘aide de 8 vis sans tête à six pans creux (1) .

Ihr Glastürenhersteller ist für die Punkte a.) b.) c.)
Verantwortlich.
a.) Ermitteln des genauen Achsabstands.
b.) Übertragen des ermittelten Maß auf die Tür.
c.) Bohrung der Löcher durch die Tür Ø13mm.
d.) Stecken Sie auf Seite B die Buchsen (2) in die
Stoßgriffsockel. Achten Sie auf die richtig
Richtung.
e.) Drehen Sie die Gewindestange (5) in den
Stoßgriffsockel mit Buchse ein.
f.) Stecken Sie auf die eingedrehte
Gewindestange (5) erst die
Metallunterlegescheibe (3), dann die
Gummiunterlegescheibe (4), so dass die
Gummiunterlegescheibe (4) auf der Glastür
sitzt.
g.) Setzen Sie den Gummiring (6) auf die
Gewindestange (5) und führen Sie die
eingedrehten Gewindestangen (5) durch die
Bohrungen in der Tür, so dass der Gummiring
(6) in der Bohrung sitzt.
h.) Setzen Sie auf Seite A erst die
Gummiunterlegescheibe (4) und dann die
Metallunterlegescheibe (3) auf die durch die
Tür geführte Gewindestange.
i.) Ziehen Sie die M8 Muttern (7) mit einem
Schraubschlüssel fest.
j.) Drehen Sie die Kappe (8) auf Seite B auf die
Gewindestange (5).
A
B
2
4
3
5
6
1
8
•EZ1062 Einseitige Befestigung auf Glastüren mit Zierkappe. Bolt-Through fixing for glass doors with cap inside. Fixation simple et traversante pour porte
en verre, avec cache de l’autre côté
Karcher GmbH
Design-Beschläge
Raiffeisenstr.32
74906 Bad Rappenau
+49-7264-91640
+49-7264-916440
mail@karcher-design.de
www.karcher-design.de
7
Your glass door manufacturer is responsible
for points a), b) and c)
a.) Measure the exact fixing centre
b.) Transfer this fixing centre to the door
c.) Drilling holes of ø 13 mm
d.) Insert the bushing (2) [side B] in the pull
handle socket. Pay attention to the
correct direction.
e.) Screw the threaded bolt (5) in the pull handle
socket together with the bushing.
f.) Put a metal washer (3) on the screwed
bushing (5) first, then the plastic
washer (4). The plastic washer (4) has
to be on the glass door.
g.) Put the rubber ring (6) on the threaded bolt
(5) and insert the screwed threaded
bolts (5) through the drillings of the
door. The rubber ring (6) has to be in
the drilling.
h.) Put the rubber washer (4) [side A] on the
threaded bolt first and then a metal
washer (3)
i.) Tighten the M8 hexagonal nuts (7) with a
wrench
j.) Screw the casing (8) on side B on the
threaded bolt (5)
Votre fabricant de portes en verre et responsable pour les points a), b) et c)
a.) Mesurez l’entraxe exact.
b.) Transmettez l‘entraxe mesuré sur la porte.
c.) Percez deux trous (Ø13mm) à travers de la porte.
d.) Mettez sur page B les douilles (2) dans les socles de la poignée battante. Veuillez faire attention à la direction correcte.
e.) Tournez la tige filetée (5) dans le socle de la poignée battante avec douilles.
f.) Mettez d‘abord la rondelle en métal sur la tige filetée (5) et puis la rondelle élastique de telle manière que la rondelle élastique se trouve sur la porte en verre.
g.) Mettez la bague élastique (6) sur la tige filetée (5) et guidez les tiges filetées tournées à travers des perçages dans la porte de sorte que la bague élastique (6) se
trouve dans le trou de perçage.
h.) Posez sur page A premièrement la rondelle élastique (4) sur la tige dans la porte et puis la rondelle en métal.
i.) Serrez les écrous M8 (7) à l’aide d’une clé à fourche.
j.) Tournez la cache (8) au côté B sur la tige filetée (5).

EZ1063 Einseitige Befestigung auf Holztür. Secret fixing for timber doors. Fixation simple et invisible pour porte en bois.
1
2
3
4
5
a.) Ermitteln Sie den genauen Achsabstand.
b.) Übertragen Sie das ermittelte Maß auf die Tür.
c.) Bohren Sie mit Ø 14mm ca. 35 mm tief in das
Türblatt. Hierbei ist zu beachten, dass
rechtwinklig zum Türblatt gebohrt wird.
d.) Drehen Sie mit einem
Innensechskantschlüssel SW8 die
Rampamuffe (5) bündig in das Türblatt ein.
Drehen Sie den Gewindestift (4) in die
Rampamuffe (5) ein bis ca. noch 10mm
überstehen. Setzen Sie optional die
Metallunterlegescheibe (3) auf die
Gewindestange (4). Drehen Sie die Buchse (2)
auf die Gewindestange. Achten Sie beim
Aufdrehen der Buchse auf die richtige
Richtung.
e.) Stecken Sie die Stoßgriffsockel auf die
Gewindebuchse (2) und befestigen Sie diese
mit den Innensechskantschrauben (1)
(Madenschrauben).
Karcher GmbH
Design-Beschläge
Raiffeisenstr.32
74906 Bad Rappenau
+49-7264-91640
+49-7264-916440
mail@karcher-design.de
www.karcher-design.de
a.) Measure the exact fixing centre
b.) Transfer this fixing centre to the door
c.) Drill ø 14 mm with a depth of approximately 35mm.
Pay attention that you drill right-angled to the door leaf.
d.) Screw with an allen key (SW8) the inside-outside
threaded screw (Rampa) (5) into the door until it is
planar. Screw the bolt screw (4) into the inside-outsinde
threaded screw Rampa (5) until 10 still mm project from
the inside-outside threaded screw (Rampa) (5).
Optionallly put the metal washers (3) on the bolt screw.
(4). Screw the bushing (2) on the threaded bolt. Pay
attention to the correct direction when screwing the
bushing.
e.) Screw the inside-outside threaded screw (Rampa) (5)
with the already pre-mounted bolt screw (4) and the
bushing (2) in the previewed drilling right-angled and
flush. Tighten with an open-end wrench.
f.) Put the pull handle sockets on the bushing (2) and fix
them with the grub screws (1)
a.) Mesurez l’entraxe exact.
b.) Transmettez l‘entraxe mesuré sur la porte.
c.) Percez env. 35mm (profondeur) dans la porte avec Ø13mm. Veuillez observer que le perçage est fait à angle droit à
la porte.
d.) Tournez l‘écrou à visser Rampa (5) planement dans la porte à l‘aide d‘une clé six pans (SW8). Tournez la tige filetée
(4) dans l‘écrou à visser Rampa (5) jusqu‘il y a une avancée d‘env. 10mm. Optionnellement, posez la rondelle
métallique (3) sur la tige filetée. Veuillez faire attention à la direction correcte quand vous vissez la douille (2).
e.) Ensuite vous posez les socles de la poignée battante sur la douille (2) et les fixez l‘aide de vis sans tête à six pans
creux (1) .

EZ1064 Einseitige Befestigung auf Metall- oder Kunststofftüren. Secret fixing for frame/PVC doors. Fixation simple pour portes métalliques et PVC.
1
2
3
4
5
a.) Ermitteln Sie den genauen Achsabstand
b.) Übertragen Sie das ermittelte Maß auf die Tür
c.) Bohren Sie ca Ø 6mm vor, anschließend mit
mit Ø10,8 max Ø11mm nach ( Bei
Kunststofftüren mit Stahlkern Ø11,3 -
Ø11,4 mm) Hierbei ist zu beachten, dass
rechtwinklig zum Türblatt gebohrt wird.
d.) Drehen Sie den Gewindestift (4) in die
Rampamuffe (5) bis ca noch 10mm aus der
Rampamuffe (5) hinausstehen. Setzen Sie
optional die Metallunterlegescheibe (3) auf die
Gewindestange (4). Drehen Sie die Buchse (2)
auf die Gewindestange. Achten Sie beim
Aufdrehen der Buchse auf die richtige
Richtung.
e.) Drehen Sie die Rampamuffe (5) mit den
bereits vormontiertem Gewindestift (4) und der
Buchse (2) in die vorgesehene Bohrung
rechtwinklig bis zur Bündigkeit rein und ziehen
Sie diese mit einem Gabelschlüssel fest.
f.) Stecken Sie die Stoßgriffsockel auf die
Gewindebuchse (2) und befestigen Sie diese
mit den Innensechskantschrauben (1)
(Madenschrauben)
Karcher GmbH
Design-Beschläge
Raiffeisenstr.32
74906 Bad Rappenau
+49-7264-91640
+49-7264-916440
mail@karcher-design.de
www.karcher-design.de
a.) Measure the exact fixing centre
b.) Transfer this fixing centre to the door
c.) Pre-drill approximately ø 6 mm, then re-drill
with ø 10,8 mm maximum with ø 11 mm
(PVC doors with a steel core ø 11,3 mm
–ø 11,4 mm) Pay attention that you drill
right-angled to the door leaf.
d.) Screw the bolt screw (4) into the inside-
outside threaded screw (Rampa) (5)
until 10 still mm project from the inside-
outside threaded screw (Rampa) (5).
Optionallly put the metal washers (3) on
the bolt screw (4). Screw the bushing (2)
on the threaded bolt. Pay attention to
the correct direction when screwing the
bushing.
e.) Screw the inside-outside threaded screw
(Rampa) (5) with the already pre-
mounted spindles (4) and the bushing
(2) in the previewed drilling right-angled
and flush. Tighten with an open-end
wrench.
f.) Put the pull handle sockets on the bushing (2)
and fix them with the grub screws (1)
a.) Mesurez l’entraxe exact.
b.) Transmettez l‘entraxe mesuré sur la porte.
c.) Percez d‘avance avec Ø6mm, puis avec Ø10,8mm (max. Ø11mm). (En cas de portes en PVC/alu percez avec Ø11,3
–Ø11,4mm). Veuillez observer que le perçage est fait à angle droit à la porte.
d.) Tournez la tige filetée (4) dans l‘écrou à visser Rampa (5) jusqu‘il y a une avancée d‘env. 10mm. Optionnellement,
posez la rondelle métallique (3) sur la tige filetée. Vissez la douille (2) sur la tige filetée et veuillez faire
attention à la direction correcte.
e.) Tournez l‘écrou à visser Rampa (5) avec la tige filetée (4) et la douille (2) déjà montées dans le perçage prévu et
tirez l‘écrou à visser Rampa à angle droit et jusqu‘il est plan. Faites-le à l‘aide d‘une clé à fourche.
f..) Ensuite vous posez les socles de la poignée battante sur la douille (2) et les fixez l‘aide de vis sans tête à six pans
creux (1) .

EZ1066 bolt-through fixing without cover for UK
1
2
4
3
a.) Please measure the exact fixing center
b.) Transfer this fixing center to the door
c.) Drill two holes (Ø9) through the door
d.) Put the bushing (2) into the pull handle socket.
Please take care for the correct direction.
e.) Put the threaded bolt through the bore holes in
the door
f.) Optionally you could use the metal washer (3)
g.) Fasten the threaded bolt (4) into the socket of
the pull handle
h.) Fix the pull handle with the grub screw.
A
Karcher GmbH
Design-Beschläge
Raiffeisenstr.32
74906 Bad Rappenau
+49-7264-91640
+49-7264-916440
mail@karcher-design.de
www.karcher-design.de
This manual suits for next models
5
Other Karcher Design Door Opening System manuals
Popular Door Opening System manuals by other brands

ENFORCER
ENFORCER SD-991A-E1Q installation manual

G-U
G-U SECURY Automatic quick start guide

CornellCookson
CornellCookson SGH 50023E Installation instructions and operation manual

JNF
JNF IN.05.204 Assembly

icontrols
icontrols PULSE Installation Manual and Setup/User Instructions

builddis
builddis Push&Go EVO Technical manual

LCN
LCN 4040XP installation instructions

RUSTICA
RUSTICA STAG HANGER installation instructions

Assa Abloy
Assa Abloy UNION DoorSense 8755A user guide

Dorma
Dorma PORTEO Technical documentation

Assa Abloy
Assa Abloy Corbin Russwin ED5400 (A) Series installation instructions

Assa Abloy
Assa Abloy DC130 installation instructions