manuals.online logo
Brands
  1. Home
  2. •
  3. Brands
  4. •
  5. Kärcher
  6. •
  7. Lawn Sweeper
  8. •
  9. Kärcher NO FOUND KMR 1250 BAT User manual

Kärcher NO FOUND KMR 1250 BAT User manual

This manual suits for next models

3

Other Kärcher Lawn Sweeper manuals

Kärcher KMR 1250 D User manual

Kärcher

Kärcher KMR 1250 D User manual

Kärcher KM 100/100 R P User manual

Kärcher

Kärcher KM 100/100 R P User manual

Kärcher KM 120 User manual

Kärcher

Kärcher KM 120 User manual

Kärcher T 250 T-Racer User manual

Kärcher

Kärcher T 250 T-Racer User manual

Kärcher KM 700 User manual

Kärcher

Kärcher KM 700 User manual

Kärcher KMR 1250 B User manual

Kärcher

Kärcher KMR 1250 B User manual

Kärcher KMR 1550 D User manual

Kärcher

Kärcher KMR 1550 D User manual

Kärcher KM 100 / 100 R User manual

Kärcher

Kärcher KM 100 / 100 R User manual

Popular Lawn Sweeper manuals by other brands

RedMax RedMax Sweeper EX-RMS Operator's manual

RedMax

RedMax RedMax Sweeper EX-RMS Operator's manual

Parker PV0110BSPH Operation service parts care

Parker

Parker PV0110BSPH Operation service parts care

MTD 19468-1 owner's guide

MTD

MTD 19468-1 owner's guide

BLACK DECKER LSWV36 instruction manual

BLACK DECKER

BLACK DECKER LSWV36 instruction manual

Craftsman 486.24229 Operator's manual

Craftsman

Craftsman 486.24229 Operator's manual

Kugelmann AMM Original operating instructions

Kugelmann

Kugelmann AMM Original operating instructions

HAKO Hako-Profi-Flipper instruction manual

HAKO

HAKO Hako-Profi-Flipper instruction manual

Craftsman 486.241322 owner's manual

Craftsman

Craftsman 486.241322 owner's manual

Tornado SWM 31/9 Operation & maintenance manual

Tornado

Tornado SWM 31/9 Operation & maintenance manual

Husqvarna 325L X Series Operator's manual

Husqvarna

Husqvarna 325L X Series Operator's manual

Craftsman 486.240383 owner's manual

Craftsman

Craftsman 486.240383 owner's manual

Windsor Sweepers owner's manual

Windsor

Windsor Sweepers owner's manual

Trynex Sweepex SWB-400 owner's manual

Trynex

Trynex Sweepex SWB-400 owner's manual

Kärcher KM 80 W P Operation manual

Kärcher

Kärcher KM 80 W P Operation manual

MID WEST PRODUCTS B-319SSNT Owner's manual and parts list

MID WEST PRODUCTS

MID WEST PRODUCTS B-319SSNT Owner's manual and parts list

Coopers 8814 instructions

Coopers

Coopers 8814 instructions

International 1A Operator's manual

International

International 1A Operator's manual

Craftsman 486.242221 owner's manual

Craftsman

Craftsman 486.242221 owner's manual

manuals.online logo
manuals.online logoBrands
  • About & Mission
  • Contact us
  • Privacy Policy
  • Terms and Conditions

Copyright 2025 Manuals.Online. All Rights Reserved.

5.956-832 A2008274 (04/04)
KMR 1250 BAT
1.091-101
1.091-111
!
www.kaercher.com
Polski
Suomi
Svenska
Norsk
ÅëëçíéêÜ
Dansk
Español
Nederlands
Italiano
Français
English
Lesen Sie vor der Inbetriebnahme diese Betriebsanleitung und beachten
Sie besonders die “Sicherheitshinweise”.
Pleasereadtheseoperatinginstructionsbeforestartingandstrictly
observethe"SafetyInstructions".
Veuillezlireattentivementlaprésentenoticed´instructionsavantlamiseen
serviceet respecteren particulierles "Consignes de sécurité".
Leggerequesteistruzioniperl´usoprimadellamessaineserciofacendo
particolarmente "Istruzioni per la sicurezza".
Leesvoordeingebruiknemingdezegebruikshandleidingenneeminhet
bijzonderde"Veiligheidsvoorschriften"inacht.
Antesdeponerenmarchaelaparatodeberáestudiaratentamentelas
"Advertencias y observaciones relativas a la seguridad".
Antesdaprimeirautilizaçãodoaparelholeiaeste manualdeutilização e
tenhaemespecialatençãoabrochuraanexa«Conselhos de
segurança».
Ðñéí èÝóåôå ôç óõóêåõÞ ãéá ðñþôç öïñÜ óå ëåéôïõñãßá,
äéáâÜóôå ôéò ðáñïýóåò ïäçãßåò ÷åéñéóìïý êáé ôçñåßôå
éäéáßôåñá ôéò "Õðïäåßîåéò áóöáëåßáò".
Debedeslæsedennedriftsvejledningigennemføridrifttagningenidenne
forbindelseskalisær"Sikkerhedsforskrifter"overholdes.
Føribruktakingmåbruksanvisningenlesesnøyeogdetmåtaeshensyntil
"Sikkerhetsregler".
Läsigenombruksanvisningenföredriftstartochuppmärksamma
"Säkerhetsanvisningar"extranoga.
Lueennenkäyttöönottoatämäkäyttöohjehuolellisestiläpijakiinnitä
erikoistahuomiota"Turvallisuusohjeitiin".
Jeszcze przed pierwszym u¿yciem urz¹dzenia przeczytaæ tê Instrukcjê
obs³ugi i Wskazówki bezpieczeñstwa i przestrzegaæ podanych w nich
warunk w!
Deutsch
1–12
13–24
25–36
37–48
49–60
61–72
85–96
97–108
109–120
121–132
133–144
145–156
Português
73–84
13
English
IMPORTANT INFORMATION
!
For your safety
Before using the machine for the first time, read these user
instructions and the appended booklet Safety Informa-
tion 5.956-250.
Please note carefully all the information contained in them.
Risk of explosion when charging the battery
When low-maintenance batteries are being charged, explo-
si e gases are gi en off. Each time the battery is charged
open the co er of the sweeper and make sure there is
sufficient entilation. Do not smoke and make sure there is
no naked flame. For further information, see chapter
Battery.
Take care when handling the battery!
Obser e the information on safety pro ided by the battery
manufacturer. The right to claim under the warranty exists
only if you are using Kärcher recommended batteries and
battery chargers.
Risk of sweeper toppling over when slope
too great!
The sweeper can topple o er when tra elling or turning on
steep slopes.
 If you are working in the direction of motion, only attempt
slopes of up to 18 % gradient
 If you are working across the direction of motion, only
attempt slopes of up to 10 % gradient
Risk of sweeper toppling over when
negotiating turns quickly!
The sweeper can topple o er if turns are negotiated quickly.
Make slow turns.
Precautions to take when doing repair and
maintenance
To a oid the sweeper being started unintentionally, proceed
as follows after switching the sweeper off:
 Remo e starting key
 Pull out battery plug connection
On behalf of the environment
Caution! Used batteries are a danger to the environment!
Used batteries do not belong in the household rubbish. See
that they are disposed of in a way that will cause no harm
to the en ironment.
Caution! Hydrau ic f uid is a danger to the environment!
When you change the oil, hand in the used oil at a used-
oil collection point or to a disposal firm.
Contents
IMPORTANT INFORMATION ............................... 13
For your safety ........................................................... 13
Risk of explosion when charging the battery ................ 13
Take care when handling the battery! .......................... 13
The sweeper can topple over when travelling or turning
on steep slopes. ......................................................... 13
Risk of sweeper toppling over when negotiating turns
quickly! ...................................................................... 13
Precautions to take when doing repair and
maintenance .............................................................. 13
On behalf of the environment ..................................... 13
General data .............................................................. 14
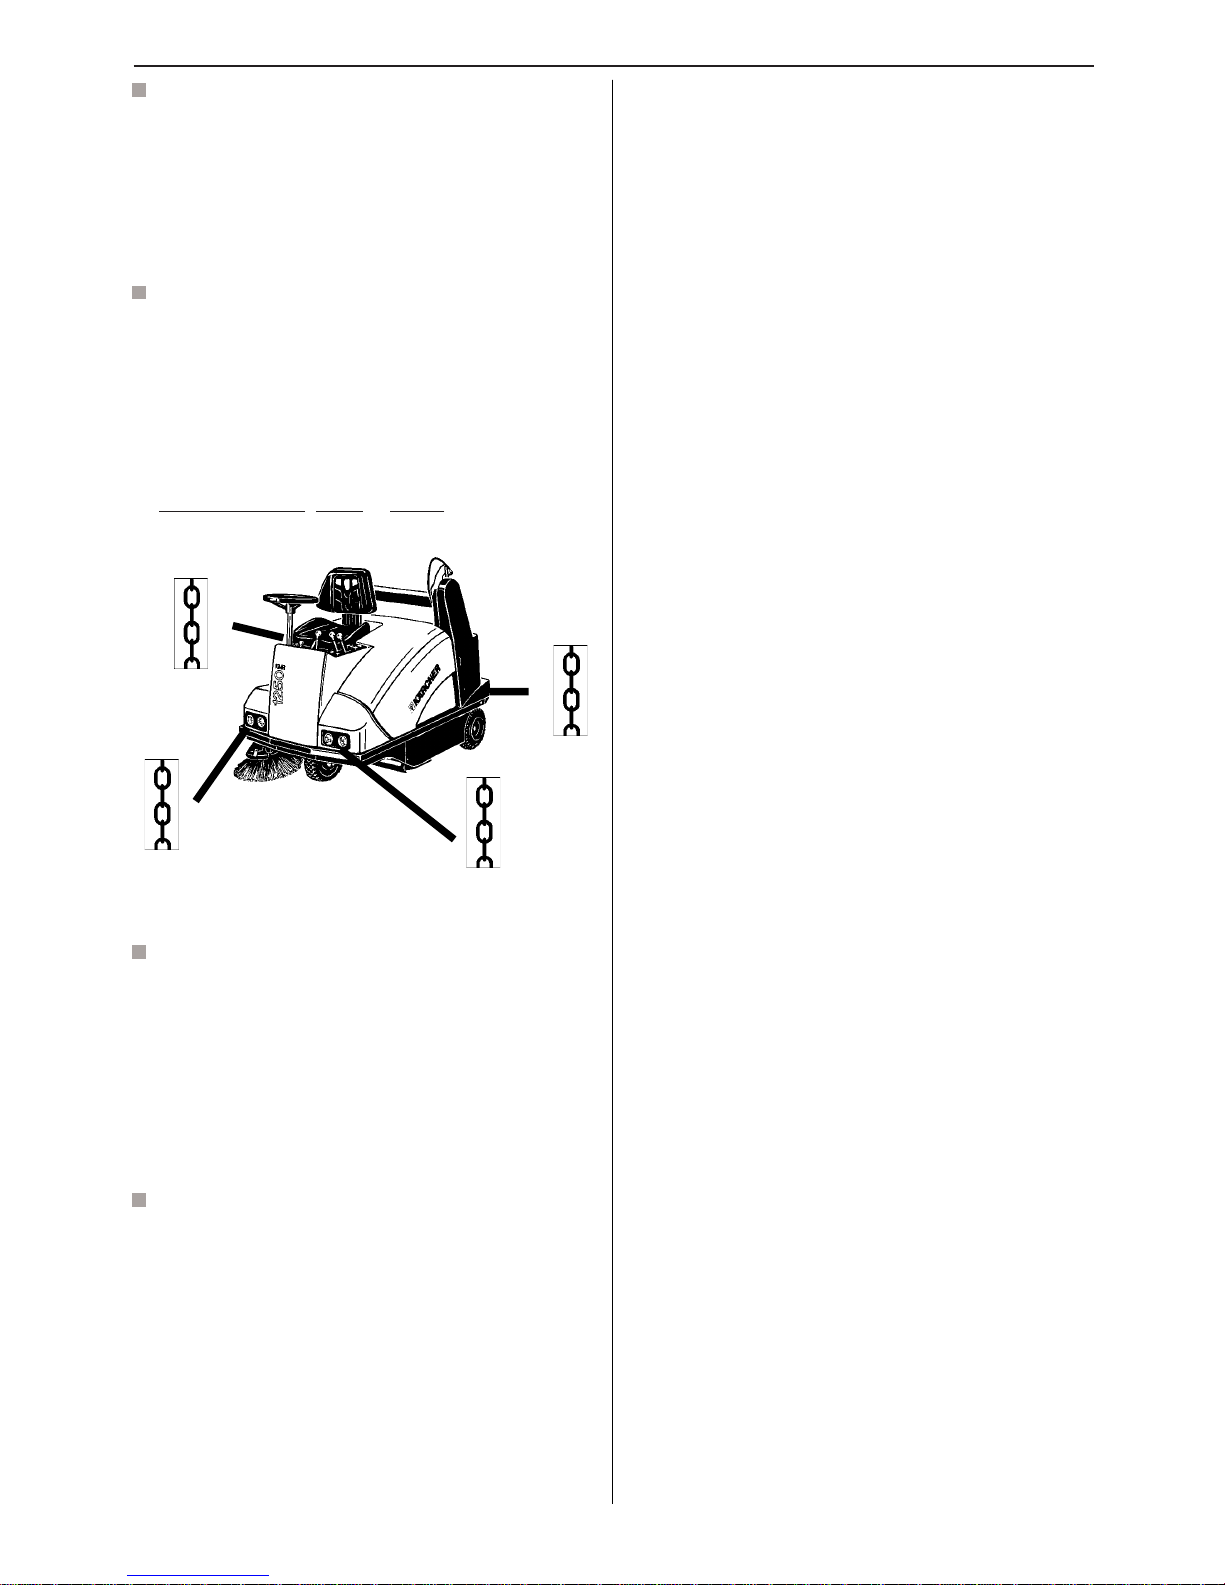
Precautions to take when transporting the sweeper .... 14
Intended usage .......................................................... 14
Function of the main components ............................... 14
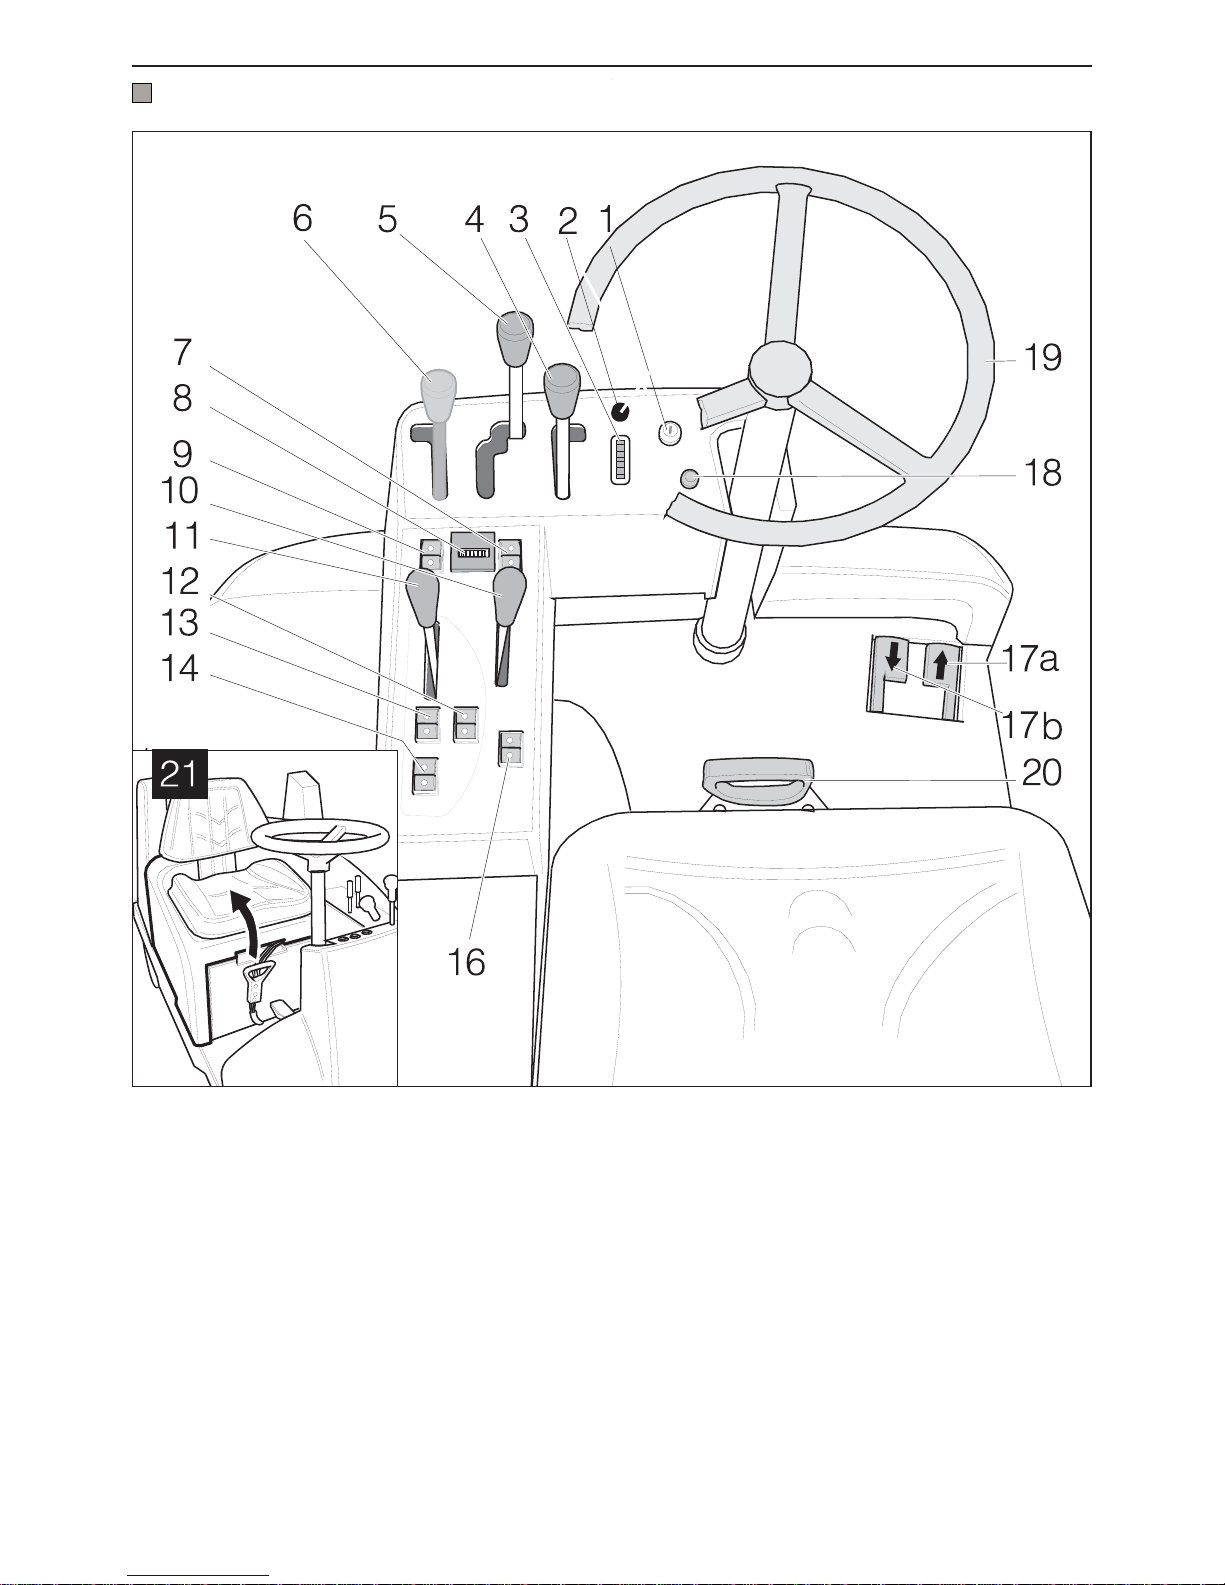
OPERATING CONTROLS .................................... 15
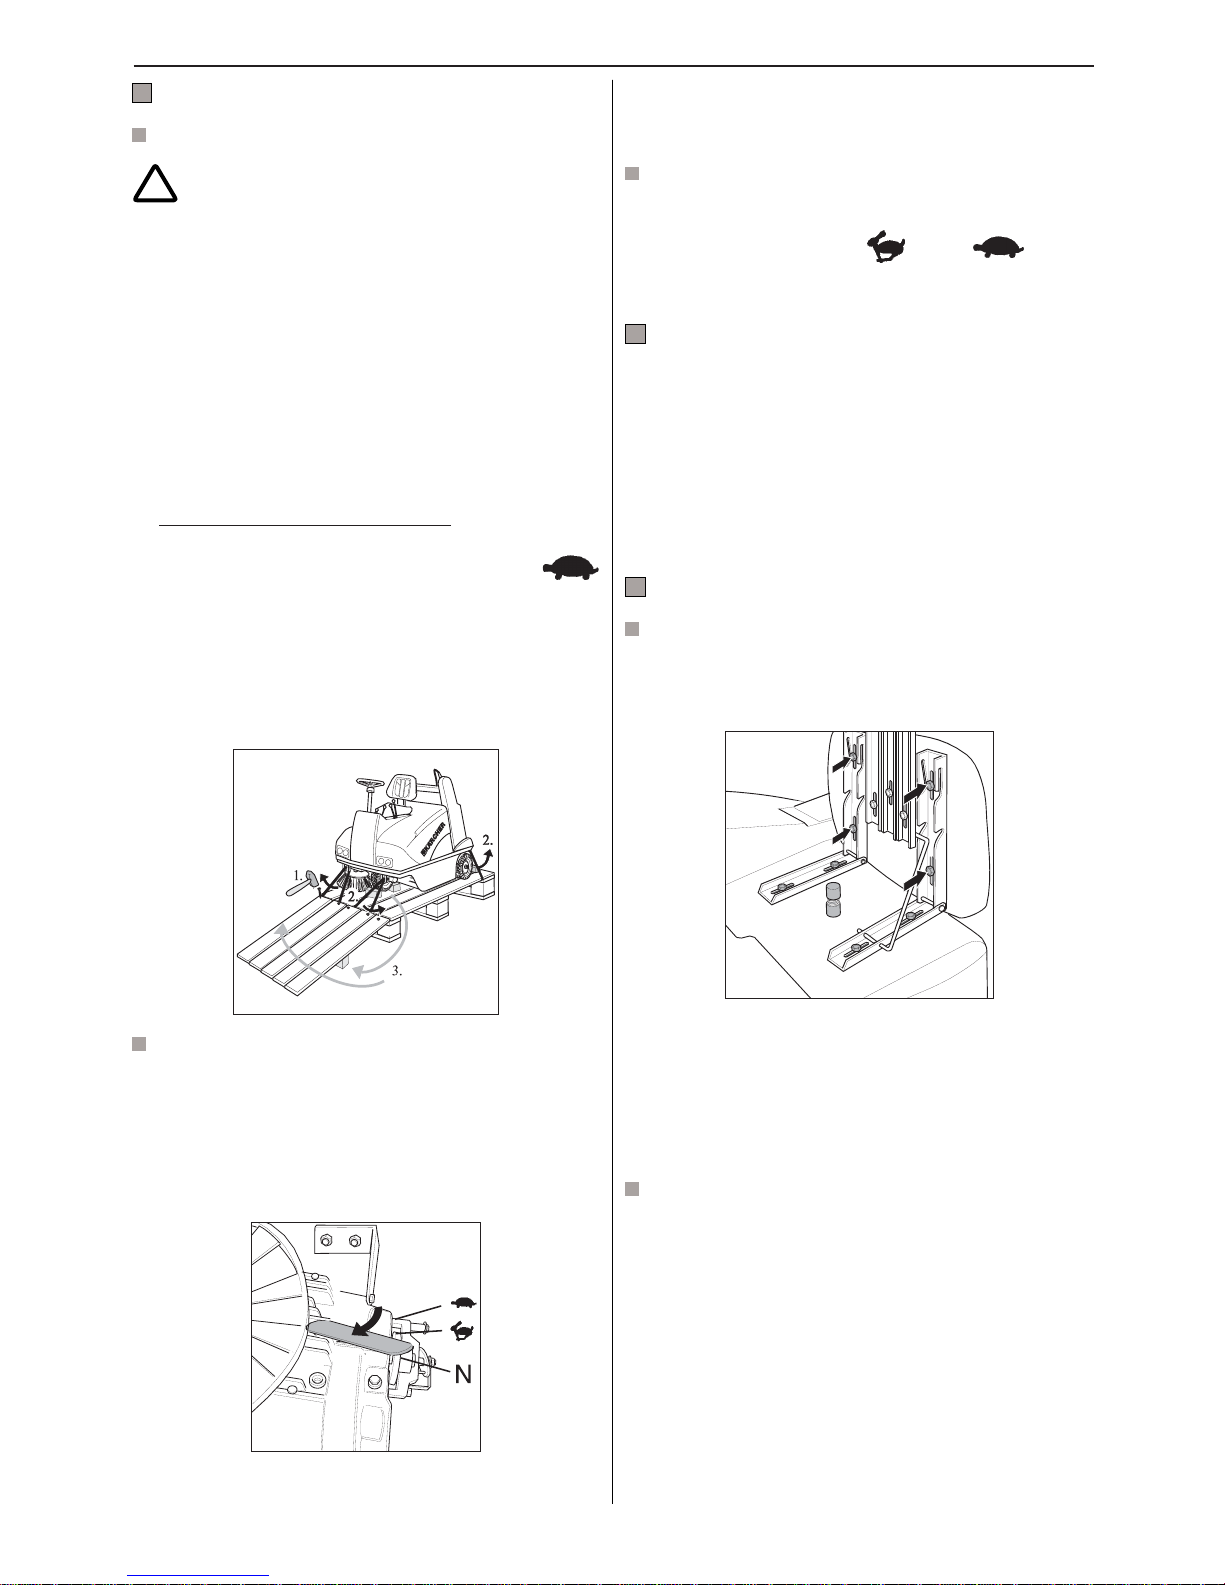
PRIOR TO INITIAL START-UP ............................. 16
Directions for unloading .............................................. 16
Pushing the sweeper by hand .................................... 16
After sweeper has been moved by hand: .................... 16
PRIOR TO EVERY START-UP.............................. 16
STARTING THE SWEEPER ................................. 16
Adjusting the driver’s seat ........................................... 16
Initial driving trials ....................................................... 16
Working with the sweeper .......................................... 17
Braking ...................................................................... 17
Going up slopes ......................................................... 17
Stopping the sweeper and switching off ...................... 17
Cleaning the filter ....................................................... 17
Emptying the waste hopper ........................................ 17
TYPICAL APPLICATIONS .................................... 18
Picking up larger items (sticks, tins, etc.) ..................... 18
Overcoming obstacles ................................................ 18
BATTERY ............................................................. 19
Checking the level of electrolyte in the battery ............. 19
Charging the battery ................................................... 19
MAINTENANCE ................................................... 20
Initial inspection after 8 operating hours ...................... 20
Daily maintenance ...................................................... 20
Maintenance intervals ................................................ 20
Maintenance tasks ..................................................... 20
Checking the hydraulic system ................................... 20
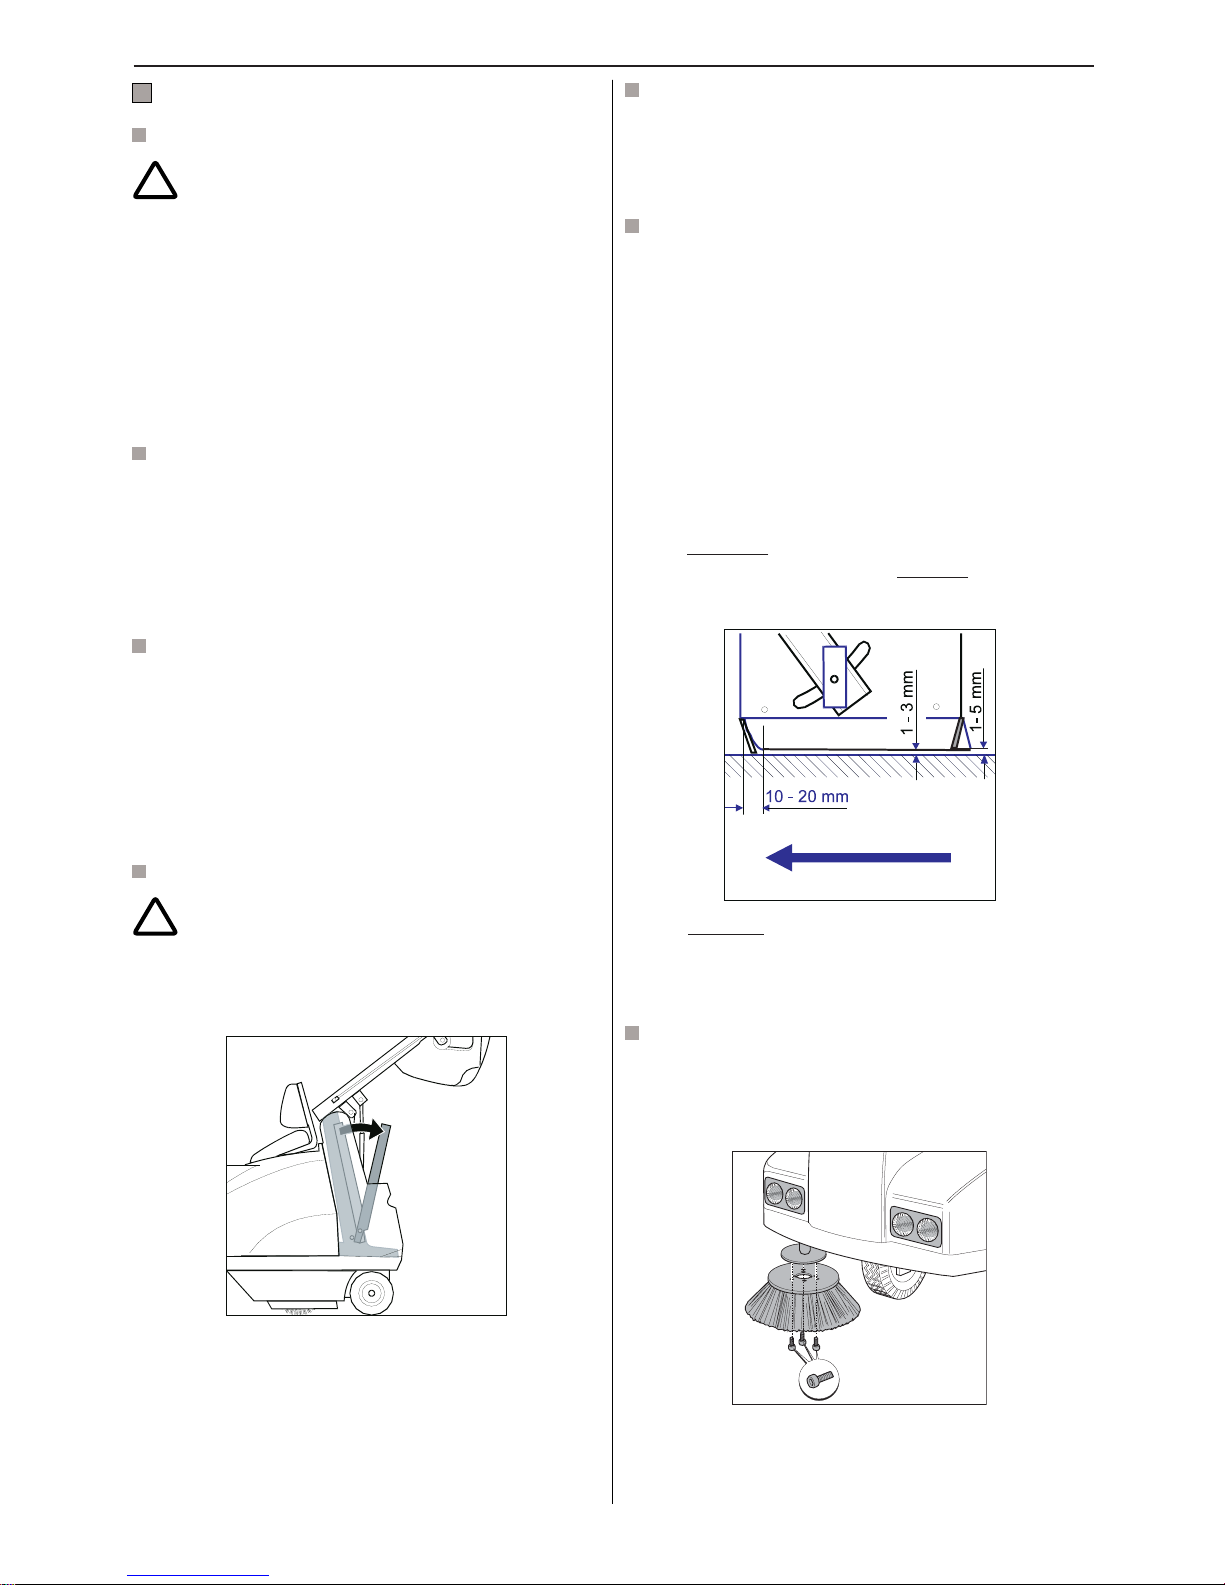
Replacing the sealing skirts ........................................ 20
Replacing the side brush ............................................ 20
Adjusting the sweeping pattern ................................... 21
Replacing the main brush roller .................................. 21
Replacing fuses .......................................................... 22
Replacing the dust filters ............................................ 22
TECHNICAL DATA ............................................... 23
TROUBLESHOOTING.......................................... 24
14
English
eneral data
The sweeper is designed for 24 V direct current. It has been
pro ided with a 24 V trough battery (supplied with the 1.091-
111). In the case of other machines, the battery and its
appropriate charger must be obtained separately.
Your Kärcher dealer will be pleased to ad ise you.
Precautions to take when transporting the
sweeper
If you ha e to transport the sweeper to another location
see that it is firmly attached. Do not use a fork-lift truck to
load or unload it as the sweeper could sustain damage in
this way.
 Lock parking brake
 Attach sweeper only in the manner illustrated, using
elasticated straps, ropes or chains
Intended usage
This sweeper
 is intended to be used for sweeping outdoor and indoor
surfaces,
 corresponds to Usage Category U for dust that is not
injurious to health,
 can only be used on public paths and highways if it has
been fitted with the StVZO Accessory Kit.
Function of the main components
Dri e unit
 dri en by an electric motor
 continuously-adjustable hydraulic dri e to rear wheels
 main brush and side brush dri en by means of electric
motor
 hydraulically controlled emptying of waste hopper
Sweeping mechanism
 main brush employing throw-o er principle for particu-
larly effecti e filling of waste hopper
 floating main brush roller with adjustable height abo e
ground
 quick-change mechanism for main brush
 side brush can be raised and swi els automatically
 bulk waste flap for picking up larger items (e.g.
cigarette packs or drink cans)
Filter system
 integrated dust extraction on the main roller by means
of radial turbine
 2 circular filters with 2 x 3 m2 effecti e surface area
 electric filter cleaner with automatic shaking mecha-
nism
15
English
OPERATING CONTROLS
1. Ignition lock
2 . Pilot lamp - drive malfunction
3. Battery charge monitoring indicator
4. Raise/lower RH side brush
5. Raise/lower main brush
6. Raise/lower LH side brush (optional)
7. Two-handed operation hydraulics
8. Operating hours counter
9. Lights
10. Bulk waste flap
11. Parking brake/Driving brake
12. Tip waste hopper *
13. Raise waste hopper *
14. Lower waste hopper *
16. Blower ON/OFF
17a. Drive pedal forwards
17b. Drive pedal backwards
18. Horn
19. Steering wheel
20. Battery plug connection
21. Cover open/close
*
Function only operative in conjunction with 7 (two-handed operation).
16
English
PRIOR TO INITIAL START-UP
Directions for unloading
!
Do not use a fork- ift truck for un oading the
sweeper as the sweeper can sustain damage
in this way.
The sweeper has been fastened to a pallet for safe transport.
Proceed as follows for unpacking it:
1. Remo e wooden boards from the pallet and nail them to
the abutments of the pallet (front end of the sweeper)
2. Remo e strap attachments at the abutment points
3. Knock away the wooden blocks for locking the wheels
and use them for supporting the wooden boards on right
and left
4. Push the sweeper off the pallet o er the ramp that has
been created
In sweepers with installed battery (1.091-111) it is
possible to dri e down the ramp. To do this, open motor
co er and fold it back. Put gear le er into position
(slow), and close the co er again. Insert battery plug
connection (at dri ers seat). Key switch to Position 1
and dri e down carefully - see in addition chapter Dri ing
trials and Stopping the sweeper and switching off.
5. The side brush is tied to the frame for transportation
purposes. Undo the string.
Pushing the sweeper by hand
If you wish to mo e the sweeper without using its own dri e:
 Open the engine co er.
 Fold the co er towards the rear; it will be held in place by
the gas-filled spring.
 Put gear le er in direction of motion on to the
symbol N
 Release the handbrake.
 Push the sweeper to the required destination.
After sweeper has been moved by hand:
 Apply the handbrake.
 Put gear le er into position (fast) or slow, as
otherwise the sweeper cannot be dri en.
PRIOR TO EVERY START-UP
 Check the hydraulic-fluid le el, fill up if necessary (see
chapter Maintenance)
 Check main brush roller for strapping or cord that may
ha e wrapped round it. If so, remo e it.
 Examine the dust filters, if there is hea y dust accumu-
lation shake them out
 Empty waste hopper.
STARTING THE SWEEPER
Adjusting the drivers seat
The dri ers seat can be adjusted to suit persons of arious
heights by changing the seat position.
 Unhook the rods for the seat tilting de ice.
 Undo the 4 attachment screws
 Mo e the seat to the desired position.
 Tighten the screws and hook the rods back into the tilting
de ice.
Initial driving trials
Carry out initial dri ing trials in an area where there is plenty
of free space until you are familiar with the indi idual
operating controls and their functions.
All indications of direction (right/left, front/rear) are gi en in
relation to the direction of tra el as seen from the dri ers
seat.
 Sit on the dri ers seat.
The sweeper cannot be started until the dri er has sat
down (seat contact switch). As soon as dri er gets up
from the seat, the safety shut-down comes into force and
the dri e control, blower fan and main brush roller dri e
are disconnected.
17
English
 Make sure that
the LH side brush (if fitted) is still in the raised position,
the RH side brush is still in the raised position,
the main brush is still in the raised position.
 Put the starting key into Position 1. The sweeper is
ready to operate.
!
Important information
 The dri e mechanism is equipped with an electronic
o erload fuse. O erload is indicated by a pilot lamp. In
the e ent engage the parking brake and release the dri e
pedals(approx. 10 min.) until the dri e components ha e
cooled down.
 For safety reasons the dri e mechanism remains inac-
ti e if a dri e pedal is engaged before the keyswitch is
turned on.
Working with the sweeper
 Lower the main brush and, if required, the side
brush as well .
 Main brush roller and side brush switch themsel es on
automatically.
 Switch the blower fan on in order to sweep without clouds
of dust forming.
 Release the parking brake by mo ing the le er
forwards
 Slowly depress the dri e pedal, the speed can be
selected smoothly according to the setting.
Depress left pedal, machine mo es backwards.
Depress right pedal, machine mo es forwards.
Braking
 Release the dri e pedal and the sweeper will brake
automatically.
Note: The braking effect can be increased by careful
operation of the drive pedal for the opposite direction
and/or by using the parking brake.
oing up slopes
 The sweeper can be dri en in the fast gear (position )
for slopes up to a gradient of 15 %.
 For slopes of gradients between 15 % and 18 %, the
sweeper must be operated in low gear (position ).
Stopping the sweeper and switching off
 Release the dri e pedal. The sweeper brakes automati-
cally and comes to a halt.
 Apply the parking brake .
 Make sure the main roller and side brush are raised so
that the bristles are not damaged. (Main brush roller,
side brush and blower fan switch off automatically).
 Turn the ignition key to Position 0 and then remo e it.
 Clean the sweeper inside and outside as required.
Recommendation: Clean interior with compressed air.
Wipe over the exterior with a damp cloth but do not use
an aggressive cleaning agent.
 Park sweeper in a protected place and stop it from rolling
away.
 Pull out battery plug connection.
 If the sweeper is shut down for a relati ely long period,
charge the battery at approx. two-monthly inter als, see
in addition chapter Maintenance.
Cleaning the filter
Manua c eaning
While the sweeper is operating, the filter should be cleaned
approx. e ery 1530 minutes (depending on amount of
dust).
 Switch off the blower fan. The electric filter cleaner is
operated automatically for approx. 10 seconds.
 Switch on the blower fan again.
Emptying the waste hopper
!
Important information
Injury hazard!
No person or animal should be allowed to remain in the area
tra ersed by the hopper while it is being emptied.
Danger of being crushed!
Do not reach into the shafts and linkage of the emptying
mechanism.
Do not stand under the raised hopper.
Risk of sweeper topp ing over!
If the sweeper is standing on a slope with a gradient of more
than 5 %, it could topple o er while the hopper is being
emptied. The hopper should therefore only be emptied when
the gradient at the location where the sweeper is standing
is less than 5 % for the direction in which it is facing.
 Stop the sweeper.
 Raise the main brush .
Note: Following steps can only be performed with the
sweeper set to two-handed operation.
 Raise the waste hopper, 1 + 2. +
When the hopper has reached the required height dri e
backwards towards the discharge container.
18
English
Note: The hopper can only be emptied when the supporting
arms have reached a horizontal position. To avoid the dust
billowing up when the hopper is emptied, the waste hopper
should be lowered as far as possible into the discharge
container.
 Tip the waste hopper
1 + 3 +
When you release the button for tipping the waste
hopper, the waste hopper returns to its home position
automatically.
 Raise the waste hopper, dri e away from the discharge
container and retract the waste hopper.
1 + 4 +
Typica app ications
!
Caution whi e sweeping!
Do not sweep up packing bands, wires or similar items,
otherwise the sweeping mechanism will be damaged.
Do not sweep any burning/glowing objects.
For c eaning even surfaces
 set the le er for the main brush roller to the middle
position (minimum brush wear).
For c eaning uneven surfaces
 set the le er for the main brush roller to the lower
position (increased brush wear).
 switch on blower fan for dust extraction
 for cleaning right up to the edges  lower the side brush
.
If you are sweeping up fine dust, use the side brush as
little as possible as it will increase the amount of dust
stirred up by the sweeper.
If the side brush encounters an obstacle, it automati-
cally swi els back inside the outer contours of the
sweeper. A oid collisions!
 To protect the filter from getting damp when sweeping
wet surfaces, switch off the dust extraction
Picking up larger items (sticks, tins, etc.)
!
Caution!
When the bulk waste flap is open, stones or grit could be
thrown forwards by the main brush. Make sure therefore
that when you open the flap no persons, animals or
property are endangered.
 Open the bulk waste flap by hand.
 Dri e o er the items to be picked up, at low speed and
with the bulk waste flap open.
Note: In order to avoid stirring up dust unnecessarily, the
bulk waste flap should be open for short periods only.
Overcoming obstacles
Obstacles up to 2 cm in height can be dri en o er without
any problems. Before you do so, open the bulk waste flap
and raise the main brush.
Obstacles more than 2 cm in height can be only be dri en
o er with the aid of a suitable ramp.
19
English
Battery
Safety instructions to be noted when hand ing
batteries are:
Note instructions for use and display
them where they can be easily seen at
the place where the battery is charged.
Work with batteries only after having
had instruction from skilled personnel.
Wear protective glasses and protective
clothing when working with batteries.
Note the accident-prevention
regulations as well as DIN VDE 0510,
VDE 0105 T.1.
No Smoking !
No naked flames, glowing embers or
sparks in the vicinity of the battery as
there is a risk of explosion and fire.
Splashes of acid in the eyes or on the
skin should be rinsed out or washed
away with copious amounts of clean
water, thereafter consult a doctor
without delay. Wash clothes
contaminated with acid in water.
Risk of explosion and fire! Avoid short-
circuits. Caution! Metal parts of the
battery cells are always live so do not
put any foreign object or tool down on
the battery.
Electrolyte is highly corrosive. Under
normal operating conditions there is
absolutely no contact with the
electrolyte. If the housing is destroyed
the bound electrolyte released is
equally as corrosive as the liquid form.
Return to manufacturer!
Used batteries bearing this symbol are
reusable articles and must be fed back
into the recycling process. Used
batteries which are not fed back into the
recycling process are to be disposed of
as special rubbish in compliance with
the regulations.
Checking the level of electrolyte in the
battery
Note: Applies only to batteries that are not maintenance-
free.
Check regularly the le el of electrolyte in batteries filled
with acid. Make sure the battery is fully charged before you
carry out the check.
 If required top up each cell with distilled water up to the
mark or until the lead plates are co ered by approx.
1 cm of liquid.
Charging the battery
Note: se only the Kärcher recommended battery charger
6.654-107 for the battery 6.654-112 which is installed.
 Bring the sweeper to a halt, remo e the starting key
 Pull out battery plug connection
 Tip seat forwards and open co er
 Connect battery cable to the charger
 Connect charger to the mains power supply and switch
it on. For the period for charging see the information
supplied by the manufacturer of the battery charger.
It is essentia to observe the instructions provided
by the manufacturer of the battery charger!
20
English
MAINTENANCE
Initial inspection after 8 operating hours
!
Caution!
For the safe functioning of your sweeper, an initial inspection
must be carried out after 8 hours of operation. You should
ha e the inspection done by your Kärcher Customer Ser-
ice.
 inspect all bowden cables and adjust where necessary
 check that all hydraulic parts are leakproof and function
correctly
 check that the handbrake functions
Daily maintenance
 Inspect main brush roller for strapping and/or cord, etc.,
which may ha e wrapped round it. If so remo e them.
 Check dust filters. If they are hea ily contaminated with
dust, shake them out.
 Empty waste hopper.
Maintenance intervals
Keep to the maintenance schedule gi en in the Maintenance
book et (5.950-535) in order to ensure that the sweeper
functions reliably and to maintain your rights under the
guarantee.
The maintenance work required must be carried out by an
authorised specialist workshop.
Maintenance tasks
!
Risk of injury
Before you work under the waste hopper in its swung-up
position, you must first secure the hopper against dropping
unintentionally by using the swing-out safety bar.
 Remo e ignition key
 Pull out battery plug connection
 Open co er
Tip seat forwards. Pull co er up by the handle grip
designed for the purpose.
Checking the hydraulic system
 Carry out a isual inspection. If there is any loss of fluid
from the hydraulic unit, cylinder or hoses, call Kärcher
Customer Ser ice.
Replacing the sealing skirts
The sealing skirts fulfil an important function. They retain the
partial acuum in the area round the main brush roller which
is essential so that the sweeper can function properly. They
ensure that sweeping can take place without clouds of dust
being raised.
If the sealing skirts are damaged or worn out, they must be
replaced immediately.
 Park the sweeper and switch off the engine.
 Remo e the retaining screws and detach the sealing
skirts.
 Fit new skirts, and align them as follows:
The side skirts should be adjusted so that they clear the
ground by 13 mm. Adjust the rear skirt so that it clears
the ground by 1-5 mm.
 The front skirt cannot be adjusted. Replace the skirt as
soon as you see signs of excessi e wear.
 Tighten the retaining screws.
Replacing the side brush
 Park the sweeper, switch it off and make it secure.
 Raise the side brush.
 Remo e the three hex-socket bolts (SW 5).
 Detach the side brush.
 Push the new side brush onto the dri e pin.
 Tighten the bolts again.