manuals.online logo
Brands
  1. Home
  2. •
  3. Brands
  4. •
  5. Karlu Photographic
  6. •
  7. Lighting Equipment
  8. •
  9. Karlu Photographic KarLite KARSB60 User manual

Karlu Photographic KarLite KARSB60 User manual

Karlu Photographic
Square Softbox Assembly Instructions
KARSB60/KARSB90/KARSB100/KARSB120
1. The Softbox Kit.
Unpack and identify the items in your
softbox kit:
1: Speedring Assembly (Qty 1).
2: Rods (Qty 4).
3: Karlite Carry Bag (Qty 1).
4: Inner Diffuser (Shown here on
top of carry bag).
5: Outer Diffuser (Shown here
on top of carry bag).
6: Outer Black Cover
2. The S Type Speedring.
Refer to the previous images on page 1 of this guide figure 1, figure 2 and figure 3.
Figure 1 shows the S Type Speedring with the lugs that are used to secure the softbox to any compatible S Type flash
head. Note that the two of the four rod holders that connect the rods to the Speedring are shown in their raised
position (two are hidden). The raised position is used to aid assembly of the softbox and you will see the different rod
holder positions in figure 2.
Figure 2 shows the other side of the Speedring (this is the side that goes inside the back of the softbox) showing the
four rod holders. One of the rod holders is in the raised position (you will find it easier to assemble your softbox with
the holders in the raised position) and the others are in the normal position (the position that all rod holders will be in
when you have assembled your softbox).
Figure 3 shows the view looking from the front of the softbox (with the diffusers removed) looking at the Speedring at
the back. You will see that all 4 rods are in their holders and the holders are in their normal position.
3. Assembly (you will find this easier using the floor as a flat surface)
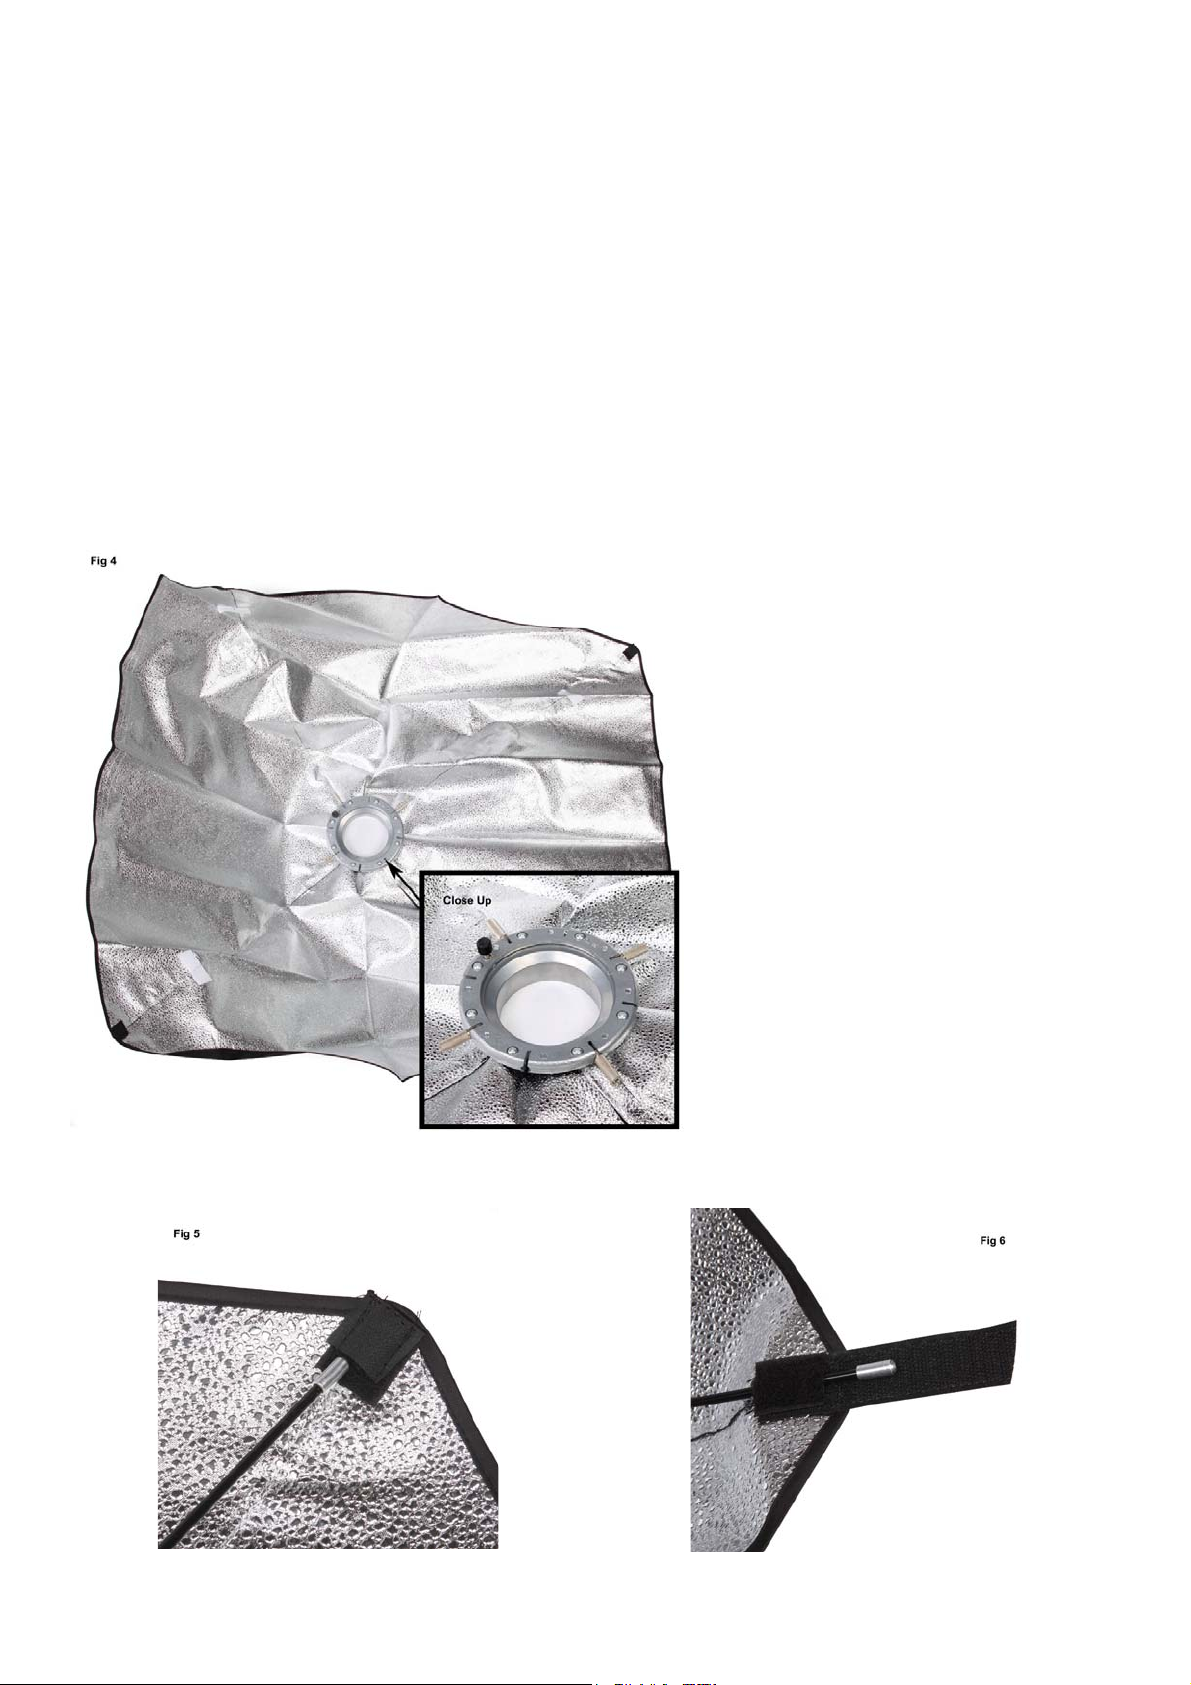
Open up the black outer cover and place on the floor and place the speedring with the S Type lugs facing downwards
in the hole in the centre of the softbox cover (see figure 4 below).
You will find it easier to rotate the Speedring so
that the rod holders on the Speedring are each
pointing toward a corner of the softbox. You
will note that in each corner of the softbox is a
material pocket and it is these pockets that
each take the other end (the shiny bullet nosed
end) of the softbox rods. There are three
(stitched closed) pockets (see figure 5) and
one that is open but subsequently closed by a
strip of Velcro (see figure 6).
Place the four rod holders on the Speedring in
their raised positions (it will be a lot easier
when they are raised) and insert one end of a
metal rod (the non bullet nosed shiny end) into
one of the rod holders (one of the three that
point towards a stitched closed pocket as
described above) and put the other end of the
rod into that corresponding pocket (see figure
5). The softbox is very flexible and will move
about and you will also need to bend the rod to
make it go into the pocket. Do not worry you
will not break the Speedring, rod or cover when
doing this.
Repeat as above with the next two rods (the
ones that will also go into the stitch closed
corner pockets and finally do the same with the rod that goes into the corner pocket that you need to close with the
Velcro strip (see figure 6).
When you have done this place the rod holders in their normal positions (see figure 3 if you are not sure).
Your softbox will now look more like a softbox and should be rigid (see
figure 7) below with the four rods connected to the speedring and the
corners of the softbox and each passing over a Velcro strip (this Velcro
strip is used to help fix the inner diffuser panel).
Place the inner diffuser panel inside the softbox (see figure 8) and then fix each velcro strip on the inner diffuser panel
to the Velcro strips on the softbox itself (see figure 9). This should leave you with the inner diffuser panel fitted and
taught inside the softbox (see figure 10).
With the inner diffuser cover fitted now simply place the outer diffuser cover over the front of the softbox (it helps to
line the corners up) and using the Velcro strips on both the outer diffuser cover and black outer softbox cover fix in
place (see figure 11).
That’s the softbox finished and you can now attach it to
any S Type flash head. Please note though that unless
you have a specific softbox with heat vents DO NOT
connect your softbox to a tungsten or halogen (i.e. hot
lights) light head as this may cause overheating and
damage to equipment as well as being a fire hazard.
The flash head with an S Type fitting will have ports that
match up with the lugs on your softbox as well as a
release mechanism / catch (the release will vary by
manufacturer / model) (see figure 12).
Offer up the softbox to the head and push the
lugs into the ports. Twist the softbox until your
hear a definite click and the softbox is now
secured to the head (see figure 13 for the
alignment process).
Figure 14 shows the softbox fitted to a flash head. Removal is simply a matter of reversing the above. Locate the
release catch, mechanism and whilst pressing that twist your
softbox which will come loose.
When removing the box be careful not to knock the modelling bulb
or flash tube on your flash head.

This manual suits for next models

3

Popular Lighting Equipment manuals by other brands

Tetra LightWave Complete Set 270 instruction manual

Tetra

Tetra LightWave Complete Set 270 instruction manual

Portfolio 00752 installation instructions

Portfolio

Portfolio 00752 installation instructions

Gradus Group Impact FF-OSB60 instructions

Gradus Group

Gradus Group Impact FF-OSB60 instructions

EuroLite LED SLS-6 user manual

EuroLite

EuroLite LED SLS-6 user manual

Lightolier Calculite C7E170HW specification

Lightolier

Lightolier Calculite C7E170HW specification

LumX LED B-180 instruction manual

LumX

LumX LED B-180 instruction manual

olympia electronics GR-938/4P manual

olympia electronics

olympia electronics GR-938/4P manual

Sutter Instrument Lambda 421 Operation manual

Sutter Instrument

Sutter Instrument Lambda 421 Operation manual

Ortech OE-212 instruction manual

Ortech

Ortech OE-212 instruction manual

Eaton FlexiTech AT L Series manual

Eaton

Eaton FlexiTech AT L Series manual

Philips 56433-31-16 user manual

Philips

Philips 56433-31-16 user manual

Laserworld PL-36000RGB user manual

Laserworld

Laserworld PL-36000RGB user manual

Sagitter MOVING WASH 575 user manual

Sagitter

Sagitter MOVING WASH 575 user manual

Organic Lighting Systems liniLED Top manual

Organic Lighting Systems

Organic Lighting Systems liniLED Top manual

Malmbergs ESA05/3H/AT instruction manual

Malmbergs

Malmbergs ESA05/3H/AT instruction manual

PROEL PLC56AL user manual

PROEL

PROEL PLC56AL user manual

Hayward Pool pH owner's manual

Hayward

Hayward Pool pH owner's manual

LUMENWERX MIKRO installation instructions

LUMENWERX

LUMENWERX MIKRO installation instructions

manuals.online logo
manuals.online logoBrands
  • About & Mission
  • Contact us
  • Privacy Policy
  • Terms and Conditions

Copyright 2025 Manuals.Online. All Rights Reserved.