Kaufman & Robinson eHC 3005A User manual

Kaufman & Robinson, Inc.
1306 Blue Spruce Drive, Unit A
Fort Collins, CO 80524
Tel: 970-495-0187, Fax: 970-484-9350
Internet: www.ionsources.com
Copyright © 2007 by Kaufman & Robinson, Inc.
All rights reserved. No part of this publication
may be reproduced without written permission.
December 2007
VERSION 3
AUTOMATED CONTROLLER MANUAL
FOR
eH End-Hall Ion Source with
Hollow Cathode
Models: eHC 3005A
eHC 30010A
eHC 15015A

CONTENTS I
_______________________________________________________________________
Copyright © 2010 by Kaufman & Robinson, Inc., 1306 Blue Spruce Drive, Unit A, Fort Collins, CO 80524
Tel: 970-495-0187, Fax: 970-484-9350, Internet: www.ionsources.com
CONTENTS
1. SAFETY . . . . . . . . . . . . . . . . . . . . . . . . . . . . . . . . . . . . . . . . . . . . . . . . . . . . . 1-1
2. GENERAL DESCRIPTION AND SPECIFICATIONS . . . . . . . . . . . . . . . . . . . .2-1
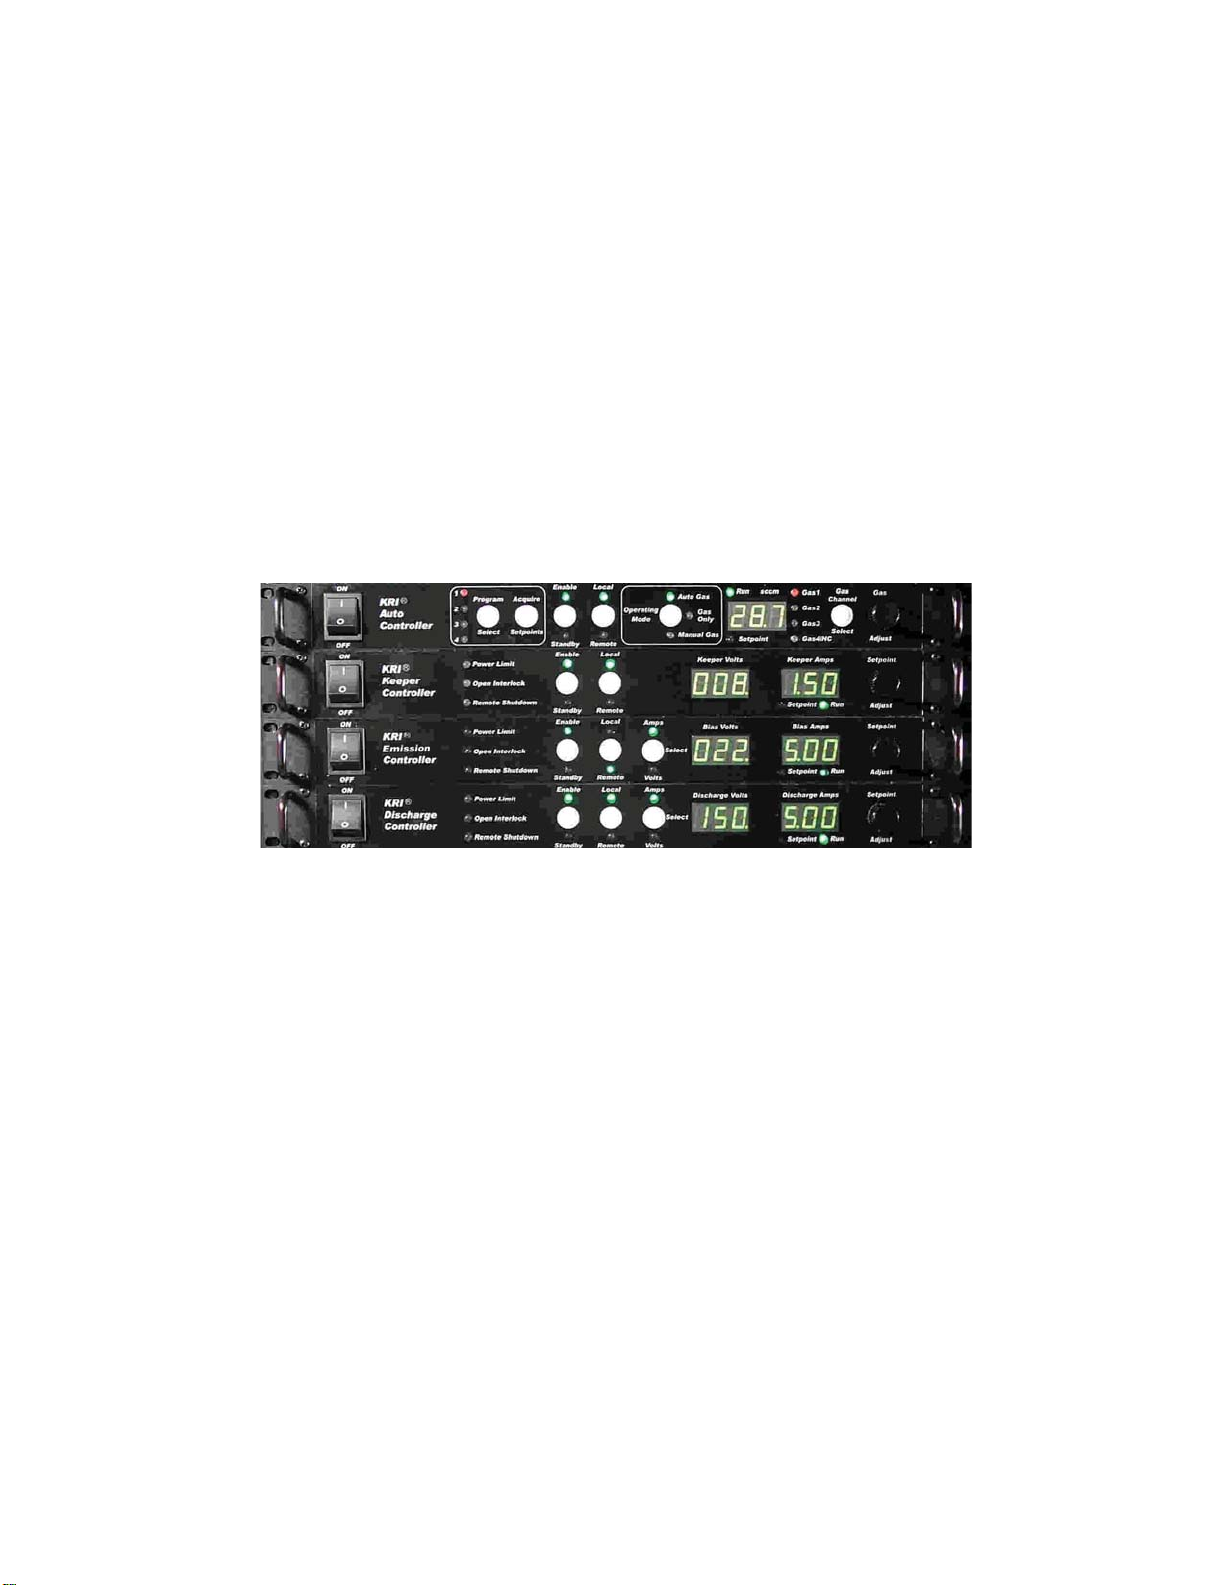
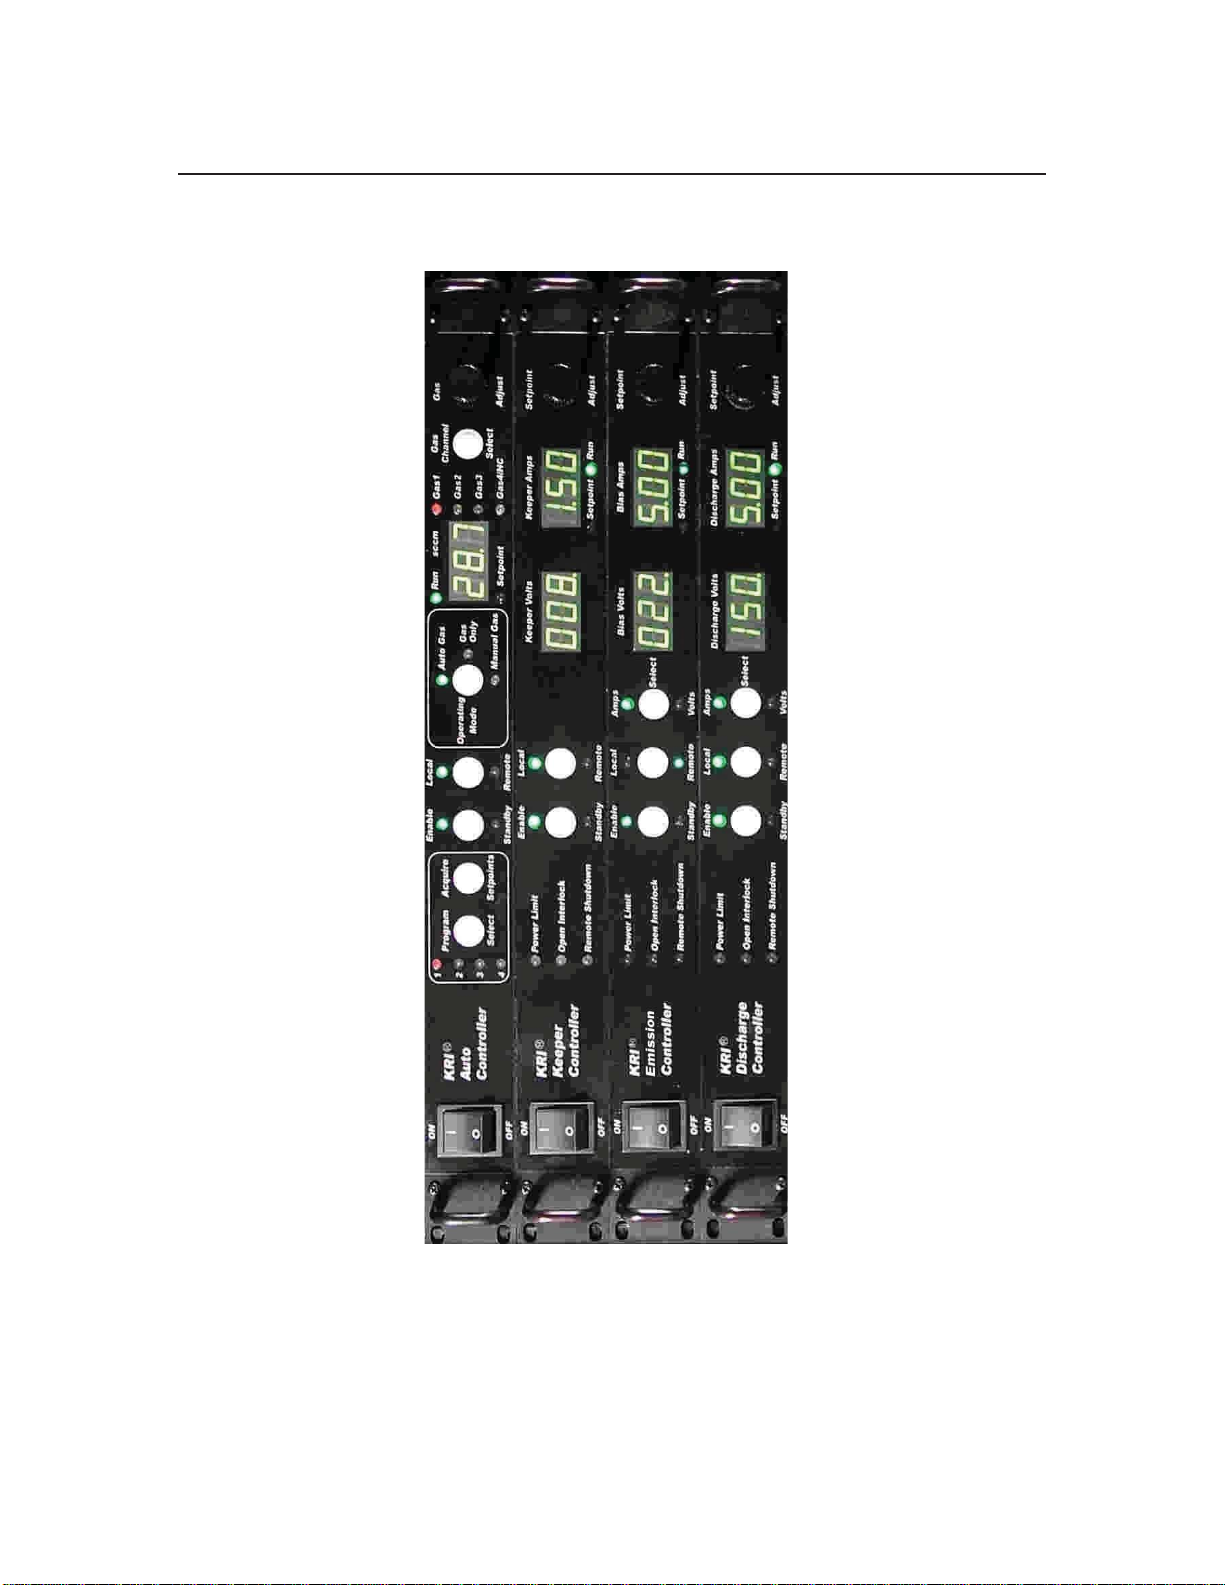
2.1. Auto Controller . . . . . . . . . . . . . . . . . . . . . . . . . . . . . . . . . . . . . . . . . .2-2
2.2. Keeper Power Supply . . . . . . . . . . . . . . . . . . . . . . . . . . . . . . . . . . . . 2-2
2.3. Emission Power Supply . . . . . . . . . . . . . . . . . . . . . . . . . . . . . . . . . . .2-2
2.4. Discharge Power Supply . . . . . . . . . . . . . . . . . . . . . . . . . . . . . . . . . .2-3
2.5. Mass Flow Controllers . . . . . . . . . . . . . . . . . . . . . . . . . . . . . . . . . . . .2-3
3. INSTALLATION . . . . . . . . . . . . . . . . . . . . . . . . . . . . . . . . . . . . . . . . . . . . . . . .3-1
3.1 Unpack . . . . . . . . . . . . . . . . . . . . . . . . . . . . . . . . . . . . . . . . . . . . . . . . 3-1
3.2 Install in Rack Mount Cabinet . . . . . . . . . . . . . . . . . . . . . . . . . . . . . . .3-2
3.3 Ground Connections . . . . . . . . . . . . . . . . . . . . . . . . . . . . . . . . . . . . . 3-2
3.4 Connections Between Controller Components . . . . . . . . . . . . . . . . . 3-3
3.5 Connect Controller to Ion Source . . . . . . . . . . . . . . . . . . . . . . . . . . . . 3-6
4. INITIAL OPERATION . . . . . . . . . . . . . . . . . . . . . . . . . . . . . . . . . . . . . . . . . . . .4-1
4.1 Gas . . . . . . . . . . . . . . . . . . . . . . . . . . . . . . . . . . . . . . . . . . . . . . . . . . 4-1
4.2 Power On . . . . . . . . . . . . . . . . . . . . . . . . . . . . . . . . . . . . . . . . . . . . . .4-1
4.3 Operating Mode . . . . . . . . . . . . . . . . . . . . . . . . . . . . . . . . . . . . . . . . .4-1
4.3.1 Auto Gas Mode . . . . . . . . . . . . . . . . . . . . . . . . . . . . . . . . . . . . . . .4-1
4.3.1.1 Program Select . . . . . . . . . . . . . . . . . . . . . . . . . . . . . . . . . 4-2
4.3.1.2 Gas Setpoints . . . . . . . . . . . . . . . . . . . . . . . . . . . . . . . . . . 4-2
4.3.1.3 Keeper Current Setpoint . . . . . . . . . . . . . . . . . . . . . . . . . .4-3
4.3.1.4 Emission Setpoints . . . . . . . . . . . . . . . . . . . . . . . . . . . . . . 4-3
4.3.1.5 Discharge Parameters . . . . . . . . . . . . . . . . . . . . . . . . . . . 4-4
4.3.1.6 Enable . . . . . . . . . . . . . . . . . . . . . . . . . . . . . . . . . . . . . . . .4-4
4.3.1.7 Standby . . . . . . . . . . . . . . . . . . . . . . . . . . . . . . . . . . . . . . . 4-5
4.3.1.8 Setpoint Adjustment . . . . . . . . . . . . . . . . . . . . . . . . . . . . . . 4-5
4.3.1.9 Saving a program . . . . . . . . . . . . . . . . . . . . . . . . . . . . . . . .4-5
4.3.2 Gas Only Mode . . . . . . . . . . . . . . . . . . . . . . . . . . . . . . . . . . . . . . .4-6
4.3.2.1 Constant Current Mode . . . . . . . . . . . . . . . . . . . . . . . . . . . 4-7
4.3.2.2 Constant Voltage Mode . . . . . . . . . . . . . . . . . . . . . . . . . . .4-9
4.3.3 Manual Gas Mode . . . . . . . . . . . . . . . . . . . . . . . . . . . . . . . . . . . 4-11
5. GENERAL OPERATION . . . . . . . . . . . . . . . . . . . . . . . . . . . . . . . . . . . . . . . . . 5-1
5.1 Description of Ion-Source/Controller Components . . . . . . . . . . . . . . 5-1
6. REMOTE/AUTOMATED CONTROL . . . . . . . . . . . . . . . . . . . . . . . . . . . . . . . .6-1
6.1 Remote Control using the DB-25 Connector . . . . . . . . . . . . . . . . . . .6-1
6.2 Remote Control Using the DB-37 Connector . . . . . . . . . . . . . . . . . . 6-1

II CONTENTS
_______________________________________________________________________
Copyright © 2010 by Kaufman & Robinson, Inc., 1306 Blue Spruce Drive, Unit A, Fort Collins, CO 80524
Tel: 970-495-0187, Fax: 970-484-9350, Internet: www.ionsources.com
6.2.1 Remote enable of the four stored programs using the DB-37
Connector . . . . . . . . . . . . . . . . . . . . . . . . . . . . . . . . . . . . . . . . . . .6-1
6.2.2 Remote Gas Channel Setpoint Description for the
DB-37 Connector . . . . . . . . . . . . . . . . . . . . . . . . . . . . . . . . . . . . . 6-2
6.2.3 Remote Analog Setpoint Option on the DB-37 Connector . . . . . .6-3
6.2.4 Analog Outputs for the DB-37 Connector . . . . . . . . . . . . . . . . . . .6-4
6.2.5 Run Fault and Beam Good on the DB-37 Connector . . . . . . . . . 6-6
6.2.6 Description of the DB-37 pins . . . . . . . . . . . . . . . . . . . . . . . . . . . 6-6
6.3 Interlock . . . . . . . . . . . . . . . . . . . . . . . . . . . . . . . . . . . . . . . . . . . . . . . 6-9
6.4 Remote Control using the RS-232 Serial Interface . . . . . . . . . . . . . .6-10
6.4.1 Interface cable . . . . . . . . . . . . . . . . . . . . . . . . . . . . . . . . . . . . . . 6-10
6.4.2 Communication settings . . . . . . . . . . . . . . . . . . . . . . . . . . . . . . . 6-10
6.4.3 Communication overview . . . . . . . . . . . . . . . . . . . . . . . . . . . . . . 6-10
6.4.4 Commands, queries and responses . . . . . . . . . . . . . . . . . . . . . .6-10
6.4.4.1 VRB - Verbose Command . . . . . . . . . . . . . . . . . . . . . . . .6-11
6.4.4.2 COM - Enable RS-232 Command or Status Query . . . . 6-12
6.4.4.3 *IDN? - Unit Identification Query . . . . . . . . . . . . . . . . . . .6-13
6.4.4.4 *RST – Reset Command . . . . . . . . . . . . . . . . . . . . . . . . .6-14
6.4.4.5 *TST? – Self Test Query . . . . . . . . . . . . . . . . . . . . . . . . . .6-14
6.4.4.6 OUT - System Level Output Control Command
or Status Query . . . . . . . . . . . . . . . . . . . . . . . . . . . . . . . . . 6-15
6.4.4.7 MDE - Mode Set Command or Mode Query . . . . . . . . . . 6-15
6.4.4.8 BEAM - Beam Good Query . . . . . . . . . . . . . . . . . . . . . . .6-16
6.4.4.9 P - Program Value Read/Write Command . . . . . . . . . . . . 6-17
6.4.4.10 R - Monitor Command for Reading the Actual
Feedback Values . . . . . . . . . . . . . . . . . . . . . . . . . . . . . . 6-21
6.4.4.11 CFG? – Query current system configuration . . . . . . . . .6-22
6.4.4.12 LRN – Learn Command or Learn Query . . . . . . . . . . . . 6-22
7. DIAGNOSTICS . . . . . . . . . . . . . . . . . . . . . . . . . . . . . . . . . . . . . . . . . . . . . . . . . . .7-1
7.1 Auto Controller . . . . . . . . . . . . . . . . . . . . . . . . . . . . . . . . . . . . . . . . . .7-1
7.2 Keeper Power Supply . . . . . . . . . . . . . . . . . . . . . . . . . . . . . . . . . . . . .7-4
7.3 Emission and Discharge Power Supplies . . . . . . . . . . . . . . . . . . . . . .7-6
8. APPENDIX . . . . . . . . . . . . . . . . . . . . . . . . . . . . . . . . . . . . . . . . . . . . . . . . . . . . . 8-1
8.1 Auto Controller Setup . . . . . . . . . . . . . . . . . . . . . . . . . . . . . . . . . . . . .8-1
8. LIMITED WARRANTY . . . . . . . . . . . . . . . . . . . . . . . . . . . . . . . . . . . . . . . . . . .9-1
9 SERVICE AND TECHNICAL INFORMATION . . . . . . . . . . . . . . . . . . . . . . . . 10-1
FIGURES
2-1 Front view of controller for End Hall ion source. . . . . . . . . . . . . . . . . . . . . . 2-5

CONTENTS iiI
_______________________________________________________________________
Copyright © 2010 by Kaufman & Robinson, Inc., 1306 Blue Spruce Drive, Unit A, Fort Collins, CO 80524
Tel: 970-495-0187, Fax: 970-484-9350, Internet: www.ionsources.com
2-2 Rear view of controller for End Hall ion source. . . . . . . . . . . . . . . . . . . . . . . 2-6
3-1 Front view of controller for End Hall ion source. . . . . . . . . . . . . . . . . . . . . . .3-7
3-2 Rear view of controller for End Hall ion source. . . . . . . . . . . . . . . . . . . . . . . 3-8
5-1 Schematic block diagram of ion source and controller. . . . . . . . . . . . . . . . . 5-3
TABLES
2-1 Controller Specifications . . . . . . . . . . . . . . . . . . . . . . . . . . . . . . . . . . . . . . . 2-1
2-2 Controller Specifications . . . . . . . . . . . . . . . . . . . . . . . . . . . . . . . . . . . . . . . 2-4
3-1 Controller Inventory List . . . . . . . . . . . . . . . . . . . . . . . . . . . . . . . . . . . . . . . 3-1
3-2 Input Power Requirements . . . . . . . . . . . . . . . . . . . . . . . . . . . . . . . . . . . . . .3-2
3-3 Pin descriptions for the rear panel BD-15 female
MFC output connectors . . . . . . . . . . . . . . . . . . . . . . . . . . . . . . . . . . . . . . . . .3-5
6-1 Remote program selection using pins 16 and 34 on the DB-37 . . . . . . . . . 6-2
6-2 Pin descriptions for the analog inputs on the DB-37 connector . . . . . . . . . . 6-4
6-3 Pin descriptions for the analog outputs on the DB-37 connector . . . . . . . . . .6-5
6-4 Run Fault and Beam Good pin descriptions . . . . . . . . . . . . . . . . . . . . . . . . .6-6
6-5 Pin descriptions for the female DB-37 connector on the Auto Controller . . . 6-7
6-6 Interlock connections for the Auto Controller, Keeper Power Supply, Emission
Power Supply, and Discharge Power Supply . . . . . . . . . . . . . . . . . . . . . . . 6-10
7-1 Help codes and error messages for the auto controller . . . . . . . . . . . . . . . .7-1
7-2 Help codes and error messages for the Keeper Power Supply . . . . . . . . . .7-5
7-3 Help codes and error messages for the Emission and
Discharge Power Supplies . . . . . . . . . . . . . . . . . . . . . . . . . . . . . . . . . . . . . . 7-6

SAFETY 1-1
_______________________________________________________________________
Copyright © 2010 by Kaufman & Robinson, Inc., 1306 Blue Spruce Drive, Unit A, Fort Collins, CO 80524
Tel: 970-495-0187, Fax: 970-484-9350, Internet: www.ionsources.com
1. SAFETY
Caution: High Voltage. Only technically qualified personnel should install, maintain,
and troubleshoot the equipment described herein.
The Auto Controller and power supplies for the End Hall ion source must be in-
stalled in a grounded 19-inch (483 mm) rack mount cabinet before operation.

GENERAL DESCRIPTION AND SPECIFICATIONS 2-1
_______________________________________________________________________
Copyright © 2010 by Kaufman & Robinson, Inc., 1306 Blue Spruce Drive, Unit A, Fort Collins, CO 80524
Tel: 970-495-0187, Fax: 970-484-9350, Internet: www.ionsources.com
2. GENERAL DESCRIPTION AND SPECIFICATIONS
The auto controller package combines modular power supplies and automatic
control for operating an End-Hall ion source. The auto controller is designed for
use in a standard 19-inch (48cm) rack mount cabinet. The Auto Controller, Keeper
Power Supply, Emission Power Supply, Discharge Power Supply and Mass Flow
Controller(s) are included in the standard package along with the associated inter-
connection and power cables.
The operating specifications, weight and dimensions of each controller are outlined
in the following table. This section gives a general overview of the Auto Controller
package with more detailed information in the later sections of this manual.
Table 2-1 Controller Specifications
Nominal
Input voltage
Maximum
Input Current
Maximum
Output
Weight Height x
Depth
Auto
Controller
115 V, 1Φ, 50-60 Hz
208-230 V, 1Φ,
50-60 Hz
0.75 A
0.38 A
+/- 15 V,
500 mA DC
3.0 kg
(8 lbs)
4.4 x 53
cm
(1.75 x
21 in.)
Keeper
Power
Supply
115 V, 1Φ, 50-60 Hz
208-230 V, 1Φ,
50-60 Hz
14 A
7.5 A
800 V,
2 A DC
7.27 kg
(16 lbs)
4.5 x 53
cm
(1.75x
21in.)
Emission
Power
Supply
115 V, 1Φ, 50-60 Hz
208-230 V, 1Φ,
50-60 Hz
14 A
7.5 A
** 7.27 kg
(16 lbs)
4.5 x 53
cm
(1.75x
21in.)
Discharge
Power
Supply
115 V, 1Φ, 50-60 Hz
208-230 V, 1Φ,
50-60 Hz
14 A* ** 7.27 kg
(16 lbs)
4.5 x 53
cm
(1.75x
21in.)
* The discharge power supply output will be limited to 1500 watts when operation
with a nominal 115 volt ac input.
** The maximum output depends on the specific power supply ordered.

2-2 GENERAL DESCRIPTION AND SPECIFICATIONS
_______________________________________________________________________
Copyright © 2010 by Kaufman & Robinson, Inc., 1306 Blue Spruce Drive, Unit A, Fort Collins, CO 80524
Tel: 970-495-0187, Fax: 970-484-9350, Internet: www.ionsources.com
2.1 Auto Controller
The Auto Controller is designed to be installed in a standard 19 inch rack mount
cabinet and is shown in figures 2-1 and 2-2 along with the Keeper, Emission
and Discharge power supplies. The controller communicates with the power
supplies through a RS-485 interface. A front panel switch allows selection of
either local or remote mode operation. The End Hall ion source can be con-
trolled from the front panels when local mode is selected. When remote mode
is selected, the End Hall ion source can be completely controlled via connec-
tions to the rear panel. Alternately, programs selected from the front panel can
be enabled or disabled from the rear panel when remote mode is selected.
Sockets are installed on the rear panel for remote operation using either RS-
232 or an Analog interface.
The Auto Controller also interfaces with up to four mass flow controllers using
cables that connect to the rear panel. Four relay contacts are also available on
the rear panel if additional positive shut off valves are desired for the gas feed
system. Three of the gas channels are available for use with the ion source,
while gas channel 4 is dedicated to the hollow cathode,
The Auto Controller is connected to the Keeper, Emission and Discharge power
supplies through an RS 485 interface. When the RS-485 interface is not con-
nected the Auto Controller functions as a stand-alone power supply and read-
out for four mass flow controllers.
2.2 Keeper Power Supply
The Keeper Power Supply is designed to be installed in a standard 19 inch rack
mount cabinet and is shown in figures 2-1 and 2-2 along with the Auto Con-
troller, and the Emission and Discharge power supplies. The Keeper Power
Supply provides voltage and current to the Hollow Cathode Electron Source
(HCES) for igniting the hollow cathode and keeping the cathode hot enough for
thermionic emission of electrons. This power supply communicates to the Auto
Controller through a RS-485 interface.
Additional information can be found in the individual manual for the Keeper
Power Supply.
2.3 Emission Power Supply
The Emission Power Supply is designed to be installed in a standard 19 inch
rack mount cabinet and is shown in figures 2-1 and 2-2 along with the Auto
Controller, and the Keeper and Discharge power supplies. The Emission Pow-

GENERAL DESCRIPTION AND SPECIFICATIONS 2-3
_______________________________________________________________________
Copyright © 2010 by Kaufman & Robinson, Inc., 1306 Blue Spruce Drive, Unit A, Fort Collins, CO 80524
Tel: 970-495-0187, Fax: 970-484-9350, Internet: www.ionsources.com
er Supply provides a negative voltage to the hollow cathode after it is ignited
by the Keeper Power Supply and controls the electron current emitted from the
HCES. This power supply communicates to the Auto Controller through a RS-
485 interface.
Additional information can be found in the individual manual for the Keeper
Power Supply.
2.4 Discharge Power Supply
The Discharge Power Supply is designed to be installed in a standard 19 inch
rack mount cabinet and is shown in figures 2-1 and 2-2 along with the Auto
Controller and the Keeper and Discharge power supplies. The Discharge Pow-
er Supply provides voltage and current to the anode of the End-Hall ion source.
This power supply communicates to the Auto Controller through a RS-485 in-
terface.
Additional information can be found in the individual manual for the Discharge
Power Supply.
2.5 Mass Flow Controller(s)
The mass flow controller (MFC) or controllers are supplied when ordered as
a complete system. The controllers are connected to the gas feed for the ion
sources as close as possible to the gas feedthrough on the vacuum system.
Up to four mass flow controllers can be attached to the Auto Controller. The gas
flows can be set as a constant ratio or they can be set independently.
The Auto Controller can be used with a variety of mass flow controllers. How-
ever, the cables may vary depending on the mass flow controller provided in
the order. The pin descriptions for the female DB-15 connectors on the back of
the Auto Controller are given below in table 2-2.

2-4 GENERAL DESCRIPTION AND SPECIFICATIONS
_______________________________________________________________________
Copyright © 2010 by Kaufman & Robinson, Inc., 1306 Blue Spruce Drive, Unit A, Fort Collins, CO 80524
Tel: 970-495-0187, Fax: 970-484-9350, Internet: www.ionsources.com
Table 2-2. Pin descriptions for the DB-15 MFC connectors on the Auto Controller.
Pin
number Description
1 Command Common. Return for 0-5 volt output to MFC on pin 8.
2 Mass flow read back from MFC. 0-5 volt signal from the MFC
referenced to pin 10.
3 No contact.
4 Valve off. Connected to common when MFC setpoint is set to
zero or when unit is in the standby mode, otherwise floated.
5 +15 volts DC for MFC supply voltage, referenced to pin 9.
6 - 15 volts DC for MFC supply voltage, referenced to pin 9.
7 No contact.
8 Setpoint out to MFC. 0-5 volts, referenced to pin 1.
9 Common for MFC supply voltages on pins 5 and 6.
10 Read back common. Reference for the 0-5 volt mass flow read-
back from the MFC on pin 2.
11 No contact.
12 No contact.
13 No contact.
14 Chassis ground
15 No contact.

GENERAL DESCRIPTION AND SPECIFICATIONS 2-5
_______________________________________________________________________
Copyright © 2010 by Kaufman & Robinson, Inc., 1306 Blue Spruce Drive, Unit A, Fort Collins, CO 80524
Tel: 970-495-0187, Fax: 970-484-9350, Internet: www.ionsources.com
Fig. 2-1. Front view of controller for End Hall ion source.

GENERAL DESCRIPTION AND SPECIFICATIONS 2-6
MFC cable
Connections Auto
Controller
Operating
Cable
RS-485
Cables
Input
Power
Ground
Connections
RS-232
Remote
iMII
Analog
Remote
KRI
Analog
Remote
Analog
Remote
Short
Red
Wire
Short
Black
Wire RS-232
Remote
Interlock
2-6 GENERAL DESCRIPTION AND SPECIFICATIONS
_______________________________________________________________________
Copyright © 2010 by Kaufman & Robinson, Inc., 1306 Blue Spruce Drive, Unit A, Fort Collins, CO 80524
Tel: 970-495-0187, Fax: 970-484-9350, Internet: www.ionsources.com
Fig. 2-2. Rear view of controller for End Hall ion source.

INSTALLATION 3-1
_______________________________________________________________________
Copyright © 2010 by Kaufman & Robinson, Inc., 1306 Blue Spruce Drive, Unit A, Fort Collins, CO 80524
Tel: 970-495-0187, Fax: 970-484-9350, Internet: www.ionsources.com
3. INSTALLATION
This section describes how to install the Kaufman & Robinson, Inc., KRI® Control-
ler package for the hollow cathode version of the End Hall Ion Source.
3.1 Unpack
Unpack the Controller package for the End Hall Ion Source. Prior to shipment,
the Controller was tested with the ion source to insure quality and verify the
standard range of operation. As soon as the Controller has been completely
removed from all packing materials, a visual inspection should be made to de-
termine if there has been any damage to the components during shipment. Use
the packing lists provided to confirm the completeness of order. If any damage
has occurred, contact Kaufman & Robinson, Inc., in addition to the shipping
company, to report the damage - see Section 8. Retain packaging materials for
any future shipments.
Table 3-1 is an inventory list for the controller package. The inventory list is for
the standard package so some items may or may not be included depending
on the particular order. Refer to the packing slip for the part numbers. For any
questions or discrepancies concerning either the inventory or shipping list, see
Section 8 to contact Kaufman and Robinson, Inc. Refer to Section 2 – General
Description and Specifications for additional information about the controller.
Table 3-1 Controller Inventory List
Quantity Description
1 Auto controller
1 Keeper Power Supply
1 Emission Power Supply
1 Discharge Power Supply
4 Input Power cables
1 Red wire
1 Black wire
1 Green/Yellow daisy chain ground wire
2 Mass flow controllers
2 Mass flow controller cables 6m (20 ft) cable
1 Operating cable, 6m (20 ft) cable
3 Interface cables, RS-485

3-2 INSTALLATION
_______________________________________________________________________
Copyright © 2010 by Kaufman & Robinson, Inc., 1306 Blue Spruce Drive, Unit A, Fort Collins, CO 80524
Tel: 970-495-0187, Fax: 970-484-9350, Internet: www.ionsources.com
3.2 Install in Rack Mount Cabinet
The Controller is designed to be mounted in a standard 19-inch (48 cm) rack
mount cabinet. To assure that the power cable that came with each controller
is connected to that controller, the power cables can be connected as each
controller is installed in the cabinet. Do not connect to input power before the
installation is complete. The input power requirements are given below in table
3-2. Universal single phase 50-60 Hz input power of 85 to 275 volts can be
used, so no modification is required to use either a nominal 115 or 208-230 volt
input.
Table 3-2. Input power requirements
Module Nominal Input Voltage Maximum Input Current
Auto Controller 115 V, 1Φ, 50-60 Hz
208-230 V, 1Φ, 50-60 Hz
0.75 A
0.35 A
Keeper Power Supply 115 V, 1Φ, 50-60 Hz
208-230 V, 1Φ50-60 Hz
14 A
7.5 A
Emission Power Supply 115 V, 1Φ, 50-60 Hz
208-230 V, 1Φ50-60 Hz
14 A
7.5 A
Discharge Power Supply 115 V, 1Φ, 50-60 Hz*
208-230 V, 1Φ, 50-60 Hz
14 A*
14 A
* The discharge power supply output will be limited to 1500 watts when operat-
ing with a nominal 115 volt ac input.
The Auto Controller, Keeper Power Supply, Emission Power Supply and Dis-
charge Power Supply should be mounted one above the other in the cabinet.
See Fig. 3-1 for the relative locations of the individual rack mounted units. The
wiring and cables may not reach all the controller connections if installed in a
different order.
3.3 Ground Connections
An earth ground connection is required for both safety and correct operation.
Earth ground should be connected to the vacuum chamber in which the ion
source is to be operated as well as the cabinet in which the Controller is in-
stalled. Make sure that qualified technical personnel make these ground con-
nections. These ground connections are independent of the ground connec-
tions described below in section 3.4.

INSTALLATION 3-3
_______________________________________________________________________
Copyright © 2010 by Kaufman & Robinson, Inc., 1306 Blue Spruce Drive, Unit A, Fort Collins, CO 80524
Tel: 970-495-0187, Fax: 970-484-9350, Internet: www.ionsources.com
3.4 Connections Between Controller Components
The connections between Controller components are shown in Fig. 3-2, which
shows the rear panels of the Auto Controller, and the Keeper, Emission and
Discharge power supplies. The individual connections required are given be-
low:
• If the 6 meter (20 ft.) input power supply cables were not connected to the
individual power supplies when they were installed in the cabinet, connect
them now. Use plugs that will match the input power sources. Again, do not
connect to Input Power before the installation is complete.
• Attach the 4 pin (female) plug connector of the 6 meter (20 feet) operating
cable to the connector on the electrical feedthrough. The connections for
the other end of this cable are described below.
• Insert the end of the operating cable BLUE wire into one of the (+) positive
connectors located on the rear panel of the Discharge Power Supply and
tighten the screw above the appropriate connector.
• Insert the end of the operating cable BLACK wire into one of the (-) negative
connectors located on the rear panel of the Discharge Power Supply and
tighten the screw above the appropriate connector.
• Insert the end of the operating cable RED wire into one of the (-) negative
connectors located on the rear panel of the Keeper Power Supply and tight-
en the screw above the appropriate connector.
• Insert the end of the operating cable ORANGE wire into one of the (+) Posi-
tive connectors located on the rear panel of the Keeper Power Supply and
tighten the screw above the appropriate connector.
• Insert one end of the short RED wire into one of the (-) negative connectors
located on the rear panel of the Keeper Power Supply and tighten the screw
above the appropriate connector.
• Insert the other end of the short RED wire into one of the (-) negative connec-
tors located on the rear panel of the Emission Power Supply and tighten the
screw above the appropriate connector.
• Insert one end of the short BLACK wire into one of the (+) positive connec-
tors located on the rear panel of the Emission Power Supply and tighten the
screw above the appropriate connector.

3-4 INSTALLATION
_______________________________________________________________________
Copyright © 2010 by Kaufman & Robinson, Inc., 1306 Blue Spruce Drive, Unit A, Fort Collins, CO 80524
Tel: 970-495-0187, Fax: 970-484-9350, Internet: www.ionsources.com
• Insert the other end of the short BLACK wire into one of the (-) negative
connectors located on the rear panel of the Discharge Power Supply and
tighten the screw above the appropriate connector.
• Attach the ring terminal end of the operating cable GREEN/YELLOW wire
into the ground stud of the Discharge Power Supply.
• Attach the ground connections using the GREEN/YELLOW wire with the four
ring terminals as follows; Connect the four ring terminals to the four ground
studs on the Auto Controller rear panel, the Keeper Power Supply rear pan-
el, the Emission Power Supply rear panel and the Discharge Power Supply
rear panel. Tighten the nuts on the ground studs. Connect the remaining
green striped yellow wire to the chassis system ground for the electrical
cabinet that the power supplies are installed in.
• Attach the three RS-485 cables to the connector labeled “RS-485 X 4” lo-
cated on the back panel of the Auto Controller as shown in figure 3-2. The
RS-485 connectors are not device specific, so they can be plugged into any
of the RS-485 connectors.
• Attach the other ends of the three RS-485 cables to the connectors labeled
“RS-485” located on the power supply back panels, one for the Keeper, one
for the Emission and one for Discharge as shown in figure 3-2.
• Attach the ion source MFC cable to the connector labeled “MFC 1” located on
the back panel of the Auto Controller. Attach the other end to the MFC for
the ion source. The pin descriptions for the DB-15 Female connectors are
shown below in table 3-3.
• Attach any additional ion source MFC cables to the connectors labeled “MFC
2”, “MFC 3” located on the back panel of the Auto Controller. Attach the
other ends of these cables to the corresponding MFC’s for the ion source.
• Attach the hollow cathode MFC cable to the connector labeled “MFC 4” lo-
cated on the back panel of the Auto Controller. Attach the other end to the
MFC for the hollow cathode. The pin descriptions for the DB-15 Female
connectors are shown below in table 3-3.
• The mass flow controller is defined by the ion-source application. The mass
flow controller should be mounted as close as possible to the vacuum
chamber. See the MFC manual. If an additional positive shut off valve is
to be used with the MFC’s, they should be located directly downstream of
the MFC (between the MFC and the vacuum chamber wall. Additionally, if a

INSTALLATION 3-5
_______________________________________________________________________
Copyright © 2010 by Kaufman & Robinson, Inc., 1306 Blue Spruce Drive, Unit A, Fort Collins, CO 80524
Tel: 970-495-0187, Fax: 970-484-9350, Internet: www.ionsources.com
purifier is used in the hollow cathode gas line, it should be located upstream
from the mass flow controller.
• There is a two pin interlock connector located on the back of the Auto Con-
troller. The unit comes supplied with a jumper installed in the interlock con-
nector. The Auto Controller disables the outputs of the power supplies if this
contact is open. If a system interlock is used, a separate isolated contact
should be connected to each of the four interlock connectors.
• If remote control of the auto controller is used, that cable can be attached at
this time to the female DB-25 connector, the female DB-37 connector or the
female DB-9 connector. These remote interfaces require knowledge of the
ion source operation, which is given in the next two sections of this manual.
The detailed descriptions for remote control are in Section 6 REMOTE/AU-
TOMATED CONTROL of this manual.
• The connections between the pressure regulators and the flow controller
valves should be made with clean (passivated or hydrocarbon free) stain-
less steel tubing, with all fittings properly installed. Plastic tubing should not
be used to avoid contamination of the gas.
Table 3-3. Pin descriptions for the rear panel DB-15 female MFC output con-
nectors.
Pin
Number
Description
1 Common for 0-5 volt setpoint.
2 0-5 V flow read back signal from MFC, referenced to pin 10.
3 Not used.
4 Valve off. Connected to common when the setpoint flow is set to zero
or when the Auto Controller is in Standby, otherwise floated.
5 +15 V, referenced to pin 9.
6 -15 V, referenced to pin 9.
7 Not used.
8 0-5 V setpoint out to MFC, referenced to pin 1.
9 Power common for ± 15 V.
10 Common for read back signal.
11 Not used.
12 Not used.

3-6 INSTALLATION
_______________________________________________________________________
Copyright © 2010 by Kaufman & Robinson, Inc., 1306 Blue Spruce Drive, Unit A, Fort Collins, CO 80524
Tel: 970-495-0187, Fax: 970-484-9350, Internet: www.ionsources.com
Pin
Number
Description
13 Not used.
14 Chassis Ground.
15 Not used.
3.5 Connect Controller to Ion Source
If the Ion Source has not been installed in the vacuum chamber, do so now,
using the Installation/Inspection description in the ion source manual. The ion
source installation procedures cover installation of the ion source, vacuum
cables, gas tubing inside the vacuum chamber, as well as electrical and gas
feedthroughs in the wall of the vacuum chamber. Once installed, connect the
operating cable to the electrical feedthrough.
• As the final installation step, turn off the front panel power switches on the
Auto Controller, Keeper Power Supply, Emission Power Supply and Dis-
charge Power Supply and then plug the power cables of the individual con-
trollers into appropriate input power sources. See table 3-1 above for input
power requirements.
The installation for the automated power controller is now complete.

INSTALLATION 3-7
INSTALLATION 3-7
_______________________________________________________________________
Copyright © 2010 by Kaufman & Robinson, Inc., 1306 Blue Spruce Drive, Unit A, Fort Collins, CO 80524
Tel: 970-495-0187, Fax: 970-484-9350, Internet: www.ionsources.com
Fig. 3-1. Front view of controller for End-Hall ion source.

INSTALLATION 3-8
MFC cable
Connections Auto
Controller
Operating
Cable
RS-485
Cables
Input
Power
Ground
Connections
RS-232
Remote
iMII
Analog
Remote
KRI
Analog
Remote
Analog
Remote
Short
Red
Wire
Short
Black
Wire RS-232
Remote
Interlock
3-8 INSTALLATION
_______________________________________________________________________
Copyright © 2010 by Kaufman & Robinson, Inc., 1306 Blue Spruce Drive, Unit A, Fort Collins, CO 80524
Tel: 970-495-0187, Fax: 970-484-9350, Internet: www.ionsources.com
Fig. 3-2. Rear view of controller for End-Hall ion source.

INITIAL OPERATION 4-1
_______________________________________________________________________
Copyright © 2010 by Kaufman & Robinson, Inc., 1306 Blue Spruce Drive, Unit A, Fort Collins, CO 80524
Tel: 970-495-0187, Fax: 970-484-9350, Internet: www.ionsources.com
4. INITIAL OPERATION
This initial operation is done locally from the front panel and serves to both demon-
strate and provide familiarization with operation. Make sure that the Auto controller
is switched to local mode. The description in this section assumes that the installa-
tion sequence described in Section 3 of this manual and Section 2 in the ion source
manual has been carried out.
4.1 Gas
High-purity (99.999+%) argon, oxygen or nitrogen gas can be used in the ion
source. The hollow cathode requires 99.999% pure argon gas for operation.
Refer to the Hollow Cathode Electron Source manual or the hollow cathode
section of the ion source manual for special considerations required for the
hollow cathode gas supply. For other process gases, please contact Kaufman
& Robinson, Inc. The bottle, regulator and mass flow controller(s) should be in-
stalled and gas lines evacuated as described in Section 2.4.3 of the Ion Source
manual.
4.2 Power On
Switch on the front panel power switches to the Auto Controller, and the Keep-
er, Emission and Discharge power supplies. These switches are the rocker
type switches located on the far left of the four panels.
4.3 Operating Mode
There are three selectable operating modes for the Auto Controller. These
three modes include Auto Gas, Manual Gas, and Gas Only. All three modes
can be selected using the white Operating Mode button on the front panel of
the auto controller. Auto Gas and Manual Gas modes are available only when
the Auto Controller has established communication with the power supplies.
4.3.1 Auto Gas Mode
When using Auto Gas mode, the gas is automatically adjusted to maintain
constant discharge current and voltage once the ion source is running.
Check to see if the green Auto Gas LED indicator above the Operating
Mode button is on. If it is not, then continue to press and release the Oper-
ating Mode button until the green Auto Gas LED is on.
This manual suits for next models
2
Table of contents
Other Kaufman & Robinson Power Supply manuals
Popular Power Supply manuals by other brands

Allen-Bradley
Allen-Bradley FLEX Ex 1797-PS2E2 installation instructions

Campbell
Campbell PS200 Specifications

Agilent Technologies
Agilent Technologies 6571A Service manual

Delta Electronics
Delta Electronics DPS-300PB-2 Specifications

Hama
Hama B8000 Usage instructions

Puls
Puls ML30.102 installation manual