Kawai A120 User manual

KAWAI
|
ELECTRONIC
KEYBOARD
A120
X130
OWNER'S
MANUAL
Table
of
Contents
IMPORTANT
SATSty
IMSEUCTHONS
sits
cccsviciwes
daetentsnacsivabecentapevieetiantsantinaisunatnes
1
Overall
Diagram
and
Explanation
.....cccccsccsssesscscccsscssssssssesssessersesssessssneeeas
5
Basic
Operations
DGIOCUAG
SOUNCS
anise
dacinca
te
aseetesvariaiserenu
eine
tetensedatisenonenwess
7
SOC:
NYE
-SEVIGS
wistdsstatonievncssareateinaniarendatnnaenanvecuernenss
7
Using
AuUto-ACCOMPANIMONE
...ccescccescsesssensseseersssersssssrsssssetsnsenseareees
8
Using:
The
Real-time
Recorder
viiivad
ccicistcnrunwwininuanawenunwe
)
Advanced
Operations
POC
OC
sriesd
ia
evatectintscvesusces
ences
asienan
us
eiediaaneeni
eendavsisiie
10
70)
111]:
[0]
(ce
eo
PE
10
USING
MIDI
(EOF
A130
OMIW)
scsssaseccutavis
tenctavncviscansananduicameetageaneeines
12
USING
SVStGM
FUN
CHOMNG
saasscciiasdadsaiviecvvesonaseisncoeintasacrcwnraniecnwaderounn
13.
Creating
Songs
with
an
External
MIDI
Sequencer
...wceeeseens
15
Sending
Recorder
Data
to
an
External
Sequencer
via
MIDI...
cues
16
Appendix
Drum
Sound
List
(Key
Numbers)...
cccssssssstesssssneseeeteeeen
16
OF
ON
LIST
vacaesticteclveneatscvenieantsntaataateanrsctenciacsuntsbac
eameemenccaueteaael
17
SO
SCITICAT
ONS
raverssessarcbiasdestesannetansinincelbariiasanbiontaurataaneiauveranednceicns
17
MIDI
Implementation
Chart...
ccccssssesecserccssessessnesecssersersersaeseesaesenes
18

KAWAI
X120/130
Owner's
Manual
Thank
you
for.
your
elas
of
a
KAWAI
X120/130
Personal
Keyboard.
This
owner's
manual
contains
valuable
‘nfigauation
that
will
help:
you
make
full
use
of
this
instrument's
many
capability.
Read
it
ie
and
keep
it
handy
for
future
reference.
Have
fun
learning
to
play
your
X120/130!
Important
Safety
Instructions
Read
Instructions
—
This
Owner’s
Manual
contains
valuable
information
that
will
help
you
make
full
use
of
the
instrument's
many
capabilities.
All
a
Safety
and
operating
instructions
should
be
read
before
the
product
is
operated.
Retain
Instructions
—
The
safety
and
operating
instructions
should
be
retained
for
future
reference.
Heed
Warnings
—
Ail
warnings
on
the
product
and
in
the
operating
instructions
should
be
adhered
to.
Follow
Instructions
—
All
operating
instructions
should
be
followed.
WARNINGS
The
instrument
should
not
be
operated
with
wet
hands
that
could
result
in
electric
shock
or
other
hazards.
Object
and
Liquid
Entry
—
Never
push
objects
of
any
kind
into
this
product
through
openings
as
they
may
touch
dangerous
voltage
points
or
short-out
parts
that
could
result
in
a
fire
or
electric
shock.
Never
spill
liquid
of
any
kind
on
the
product.
The
product
should
not
be
operated
or
stored
near
water
or
other
moisture
—
for
example,
near
a
bath
tub,
wash
bow],
kitchen
sink,
or
laundry
tub;
in
a
wet
basement;
near
a
swimming
pool,
etc.
This
product
may
be
capable
of
producing
sound
levels
that
could
cause
permanent
hearing
loss
when
used
in
combination
with
other
products
like
speakers
or
headphones.
Do
not
operate
for
a
long
period
of
time
at
a
high
volume
level,
especially
if
you
are
using
headphones
or
earphones.
If
you
experience
any
hearing
loss
or
ringing
in
the
ears,
you
should
consult
a
hearing
specialist.
ee

ATTENTION
LLU
BA
7)
Protect
the
product
from
direct
sunlight,
extremes
in
temperature
(such
as
inside
your
car
on
a
warm
day)
or
humidity,
dusty
environment,
or
vibration
(especially
during
transportation).
The
instrument
should
be
kept
away
from
hot,
dry
places
(such
as
near
a
radiator
or
heater)
Protect
the
instrument
from
physical
shocks
and
impact.
Always
turn
down
the
volume(s)
of
all
instruments
(such
as
guitar
or
keyboard)
before
connecting
or
disconnecting
to
the
instrument.
Accessories
—
Do
not
place
this
instrument
on
an
unstable
or
slant
cart,
stand,
tripod,
bracket,
or
table.
The
product
may
fall,
causing
serious
injury
to
a
child
or
adult,
and
serious
damage
to
the
product.
Besides,
the
unit
may
malfunction.
Use
only
with
a
cart,
stand,
tripod,
bracket,
or
table
recommended
by
KAWAI,
or
sold
with
the
product.
Servicing
—
Do
not
attempt
to
service
this
product
yourself
as
opening
or
removing
covers
may
expose
you
to
dangerous
voltage.
Refer
all
servicing
to
qualified
service
personnel.
Do
not
disassemble
or
attempt
to
modify
the
instrument.
Damage
Requiring
Service
—
Unplug
this
product
and
AC
adaptor
from
the
wall
outlet
immediately
and
refer
servicing
to
qualified
service
personnel
under
the
following
conditions:
a)
When
the
AC
adaptor's
cable
or
plug
is
damaged.
b)
If
liquid
has
been
spilled,
or
objects
have
been
fallen
into
the
product.
.
c)
Ifthe
product
has
been
exposed
to
rain
or
water.
d)
Ifthe
product
does
not
operate
normally
by
following
the
operating
instructions.
Adjust
only
those
controls
that
are
covered
by
this
manual
as
an
improper
adjustment
of
other
controls
may
result
in
damage
and
will
often
require
extensive
work
by
a
qualified
technician
to
restore
the
product
to
its
normal
operation.
e)
Ifthe
product
has
been
dropped
or
damaged
in
any
way.
f)
When
the
product
or
AC
adaptor
exhibit
a
distinct
change
in
performance
-
this
indicates
a
need
for
service.
Replacement
Parts
-
When
replacement
parts
are
required,
be
sure
the
service
technician
has
used
replacement
parts
specified
by
the
manufacturer
or
have
the
same
characteristics
as
the
original
part.
Unauthorized
substitution
may
result
in
fire,
electric
shock,
or
other
hazards.

Power
Supply
Cleaning
Use
only
a
Kawai
AC
adaptor
or
equivalent
shipped
with
the
instrument
and
connect
it
only
to
a
power
supply
with
a
voltage
within
the
limits
stated
on
the
ratings
plate.
When
the
product
and/or
AC
adaptor
are
left
unattended
and
unused
for
long
period
of
time,
unplug
it
from
the
wall
outlet
to
prevent
damage
to
them
due
to
lightning
and
power-line
surges.
Power
Cord
Protection
—
Power-supply
cords
should
be
routed
so
that
they
are
not
likely
to
be
walked
on
or
pinched
by
items
placed
upon
or
against
them,
paying
particular
attention
to
cords
at
plugs,
receptacles,
and
the
point
where
they
exit
from
the
product.
Do
not
connect
to
the
same
circuit
as
a
heavy
load
or
equipment
that
generates
line
noise.
Unplug
this
product
from
the
wall
outlet
before
cleaning.
Do
not
use
liquid
cleaners
or
aerosol
cleaners.
Use
a
damp
cloth
for
cleaning.
Clean
the
instrument
with
a
soft
cloth,
a
mild
detergent,
and
lukewarm
water.
Never
use
harsh
or
abrasive
cleansers
or
organic
solvents.
Before
Playing
The
X1
20/1
30
Connecting
the
Power
Supply
To
Insert
Batteries
NOTE
Your
keyboard
can
use
either
your
home
AC
power
outlet
or
dry
cell
batteries
as
a
power
source.
1.
Turn
the
unit
over
and
remove
the
battery
cover.
2.
Insert
six
Size
"C"
dry
cell
batteries.
Be
sure
they
are
aligned
in
the
proper
direction.
Replace
the
battery
cover.
¢
As
the
batteries
begin
to
run
down,
the
volume
of
the
keyboard
will
decrease
and
the
sound
quality
will
begin
to
change
or
deteriorate.
Or
the
unit
may
begin
to
malfunction.
At
that
time,
you
should
replace
ail
six
batteries.
e
Do
not
mix
battery
type
(or
new
batteries
with
old
ones),
as
this
may
cause
problems
such
as
battery
fluid
leakage.
¢
Remove
the
batteries
when
not
using
the
keyboard
for
long
periods
of
time.

To
Use
An
AC
Power
Outlet
Connecting
the
Keyboard
to
an
Audio
Device
About
the
Keyboard's
Internal
Memory
(Only
X130)
Protective
Plastic
Covering
On
Front
Panel
Connect
a
PS-123
or
PS-102
adaptor
(available
separately)
to
the
adaptor
terminal
on
the
rear
panel
of
the
keyboard.
Then,
connect
the
adaptor
to
a
wall
socket.
We
recommend
that
you
use
a
KAWAI
AC
adaptor
with
the
X120/130.
If
you
decide
to
use
a
universal
adaptor
from
another
manufacturer,
please
be
sure
of
the
following.
1.
The
voltage
selector
should
be
set
at
10
or
12
volts.
2.
The
polarity
selector
must
be
set
to
"negative"
(—)
polarity,
otherwise
the
keyboard
will
not
operate
(or
will
run
on
batteries
until
the
batteries
are
drained).
3.
The
adaptor
must
be
rated
at
0.5
Amp
(A)
or
higher.
To
enjoy
listening
to
the
sound
of
your
X120/130
through
your
amplified
home
stereo
system
or
other
external
amplifier,
purchase
an
adaptor
plug
at
an
electrical
goods
store
or
audio
specialty
shop.
Use
the
cord
or
adaptor
plug
to
connect
the
keyboard's
STEREO
PHONES
jack
to
the
LINE
IN
or
AUX
IN
jacks
on
your
stereo
amplifier
or
powered
receiver.
Be
sure
you
set
your
X120/130
at
a
moderate
volume
level.
High
Volume
output
can
damage
your
external
amplifier
or
speakers.
The
contents
of
the
keyboard's
internal
memory
(such
as
recorder
data)
will
be
kept
stored
for
up
to
five
years
by
a
back-up
battery
built
into
the
unit.
|
Note
that
if
you
turn
the
power
switch
ON
while
holding
down
keys
C
and
E
at
the
left
end
of
the
keyboard,
all
of
the
contents
of
the
memory
will
be
erased
and
the
keyboard's
factory
settings
will
be
restored.
(This
is
known
as
the
"factory
reset"
procedure.)
You
cannot
back
up
the
internal
memory
once
the
back-up
battery
has
run
out
of
power.
So,
we
recommend
that
you
save
your
important
data
into
an
external
.
sequencer
(see
"Using
the
MIDI
Functions"
section).
For
a
replacement
back-up
battery,
contact
an
authorized
KAWAI
dealer.
Your
keyboard
comes
equipped
with
a
thin
plastic
covering
over
the
front
panel
designed
to
protect
the
panel
from
dust
and
scratches.
If
you
want
to
remove
this
covering,
carefully
use
a
fingernail
to
lift
up
one
of
the
corners.
|
Then,
slowly
peel
off
the
covering
and
discard
it.

Overall
Diagram
and
Explanation
{
2
4
|
|
9
food
STYUE
CONTROL
SELEDTOR
POWER
DEMO
AUTO
CONCERT
a
CREE
—
=
7
EXIT
TEMPO
tnpetld
SYNC./
START/
v
a
v
a
ip
Cy
IN
Cc)
STYLE
voume
C_)
cs
co
sacri
DeLay
C
PRESET
Cen
ie
|
ae
ieee
3
*)
8
10
Operation
Panel
(1)
POWER
button
The
POWER
button
turns
the
keyboard's
power
on
and
off.
(2)
DEMO
button
Pressing
this
button
starts
to
play
the
two
built-in
demo
songs.
(You
can
also
select
a
demo
song
by
pressing
+1/-1
buttons.)
Press
it
again
at
any
time
to
stop
the
demo
song.
(3)
MASTER
VOLUME
buttons
Used
to
control
overall
volume
of
all
notes
played
on
the
keyboard.
(4)
AUTO
button
Used
to
turn
the
Auto-Accompaniment
on
and
off.
(5)
TEMPO
buttons
Used
to
control
changes
in
Auto-Accompaniment
tempo.
(6)
CONCERT
MAGIC
button
|
Used
to
turn
the
CONCERT
MAGIC
function
(see
page
10)
on
and
off.
(7)
Accompaniment
Control
buttons
Used
to
control
the
"FILL-INs",
"ENDINGs",
and
"BASIC
Patterns"
of
Auto-Accompaniment.
The
"SYNC/FILL-IN"
button
lets
you
start
your song
at
the
exact
moment
you
press
a
key
in
the
lower
part
of
the
keyboard.
(8)
Display
(only
X130)
Shows
which
sound/style/function
is
currently
selected.
(9)
SOUND
button
Used
when
selecting
sounds.
(10)
STYLE
button
Used
when
selecting
from
among
the
30
Accompaniment
Styles
and
30
CONCERT
MAGIC
songs
stored
in
the
keyboard's
memory.
(11)
SELECTOR
buttons
a)
Numeric
buttons
(Ten
keys)
Used
to
enter
the
numbers.
b)
-1/+1
buttons
Used
to
increase
or
decrease
the
numbers
by
a
value
of
1.
(12)
RECORDER
Section
(only
X130)
Used
to
record
the
songs
you
write
or
perform
on
the
keyboard.
=

12
nnn
HECORDER
1
2
3
4 5
+1
REG/STOP
PLAY/STOP
CO:
GI)
©
——
EFFECT
©
‘O
©
©
‘O
xe
(~~)
sTEREO
CHORUS
STEREO
eo
PHONES
DC
INi2¥
11
13
(13)
STEREO
CHORUS
buttons
Used
to
add
the
STEREO
CHORUS
effect
to
the
keyboard's
sounds.
Rear
Panel
(14)
MIDI
IN
/
OUT
Jacks
(only
X130)
Used
to
connect
the
keyboard
to
other
MIDI
instruments
and
equipment.
(15)
Pedal
Jack
Used
to
connect
an
optional
footswitch
(model
F-1,
available
separately)
to
the
keyboard.
When
the
footswitch
is
depressed,
notes
played
on
the
keyboard
will
be
heard
continuously
for
as
long
as
the
footswitch
is
held
down.
It
operates
like
a
sustain
pedal
on
a
piano.
(16)
STEREO
PHONES
Jack
When
stereo
headphones
are
connected
to
this
jack,
the
sound
from
the
speakers
is
cut
off.
This
allows
you
to
play
the
keyboard
at
night
and
at
other
times
when
you
might
be
concerned
about
disturbing
others.
(17)
DC
IN
Jack
Used
to
connect
a
Power
Adaptor
(Kawai
PS-123
or
PS-102)
available
separately.
WTA
A
A
Keys
(18)
Lower
Keyboard
(C1
-
G#2)
Used
to
trigger
chord
forms
when
the
Auto-Accompaniment
function
is
selected.
Throughout
this
manual,
the
keys
will
be
referred
to
in
the
following
manner:
C1
stands
for
"the
first
C"
on
the
keyboard,
counting
from
the
left.
B2
stands
for
"the
second
B"
on
the
keyboard
from
the
left.
The
total
range
of
your
keyboard
is
C1
to
C6.

Basic
Operation
Selecting
Sounds
selecting
Sounds
1.
Press
the
POWER
switch
to
turn
the
power
"on".
2.
Press
one
of
the
keys
on
the
keyboard.
You
should
hear
the
sound
No.
01
(GRAND
PIANO).
3.
Control
the
volume
of
the
sound
with
the
MASTER
VOLUME
buttons.
4,
Select
a
sound
using
the
SELECTOR
buttons.
To
enter
the
Sound
number,
there
are
2
ways
as
below.
(1)
Use
the
Numeric
keys
(0-9)
to
enter three
digits
including
"0"
in
rapid
succession.
0
4
2
EX
1:
To
enter
No.9
Ess.
“Oe
Oe
press
9.
(or
press
0-0-9
successively)
or
EX
2:
To
enter
No.42
;
press
4
and
2
(or
0-4-2)
successively.
sie
d
|
aticnt
Note:
Enter
all
the
numbers
in
rapid
succession,
at
least
within
2
seconds.
Otherwise
the
first
one
or
two
digits
will
be
chosen
in
a
few
seconds.
(2)
Use
-1
/+1
buttons
to
increase/decrease
the
numbers
by
a
value
of
1.
5.
Play
the
keyboard.
Playing
Rhythm
Styles
Selecting
Accompaniment
|
1.
Press
the
STYLE
button.
Styles
The
lamp
next
to
the
STYLE
button
will
light
(and
the
display
will
change
to
read
001
on
X130).
Press
[J
2.
Select
an
Accompaniment
Style
using
the
SELECTOR
buttons.
To
enter
the
Style
number,
there
are
2
ways
as
below.
(1)
Use
the
Numeric
keys
(0-9)
to
enter
the
number.
EX
1:
To
enter
No.9
0 2 4
press
9.
(or
press
0-0-9
successively)
PS
EE
ED
EX
2:
To
enter
No.24
or
press
2
and
4
(or
0-2-4)
successively.
Press
1)
+‘O
Enter
all
the
numbers
in
rapid
succession,
at
least
within
2
and
wait
for
a
moment.
seconds.
(2)
Use
-1
/+1
buttons
to
increase/decrease
the
numbers
by
a
value
of
1.
STOP.
Press
3.
To
start
the
Style,
press
the
START/STOP
button.

SYNC/
FILL
iN
4.
Press
an
Using
the
SYNC
Feature
|
1.
SYNC/
FILL
IN
Press
Changing
Accompaniment}
1
Tempo
TEMPO
UP
DOWN
SYC
Press
the
"SYNC./FILL-IN"
button
to
play
a
FILL-IN
pattern.
.
To
stop
playing
with
the
Ending,
press
the
START/STOP
button.
'
To
stop
playing
without
the
Ending,
press
the
START/STOP
button
twice.
While
the
Accompaniment
Style
is
off,
press
the
SYNC/FILL-IN
button.
(If
you
want
to
use
"SYNC"
function
with
an
INTRO,
press
the
SYNC./FILL-IN
button
and
then
press
the
INTRO/ENDING
button.)
Press
a
key
on
the
Lower
Keyboard.
The
Style
will
begin
to
play
at
the
moment
you
press
a
key.
The
start
of
the
Style
will
"synchronize"
with
your
touch
of
the
keyboard
(thus,
the
abbreviation
"SYNC").
.
The
UP
button
causes
the
tempo
to
increase.
The
DOWN
button
causes
the
tempo
to
decrease.
(On
X130,
the
small
lamp
at
the
top
of
the
display
(labelled
BEAT)
will
blink
in
time with
the
current
tempo.)
(Only
X130)
When
you
press
either
of
the
TEMPO
buttons,
the
display
will
briefly
show
the
current
tempo
(between
40
-
250).
.
(Only
X130)
When
you
select
the
lower
value
than
040,
the
display
shows
"SYC".
When
setting
the
"SYC"
value,
the
Styles
of
X130
can
only
be
played
with
the
external
MIDI
sequencer
by
receiving
tempo
message
through
MIDI
IN
jack.
(See
page
12
for
the
details
MIDL)
Pressing
the
TEMPO
UP
button within
five
seconds
after
selecting
anew
Style
will
change
the
tempo
to
a
factory
preset
rate
that
suits
the
new
Style.
Using
Auto-Accompaniment
The
X120/130's
Auto-Accompaniment
("automatic
accompaniment")
-
section
is
one
of
the
most
powerful
found
on
any
portable
keyboard.
With
the
Auto-Accompaniment,
you
can
control
the
chord
and
bass
parts
with
your
left
hand
while
playing
the
melody
with
your
right
hand.
1.
Select
a
Style.
Press
C—)
2.
Press
AUTO
button
to
turn
Auto
Accompaniment
on.
3;
START?
STOP
Press
Then,
start
the
Style
by
pressing
the
START/STOP
button.
The
rhythm
and
Auto-Accompaniment
(Bass/Chord)
will
start
to
play.

4.
Now
press
one
or
more
of
the
keys
on
the
Lower
Keyboard.
The
Auto-Accompaniment
chords
will
change
as
you
press
different
Keys.
See
page
17
for
a
chart
of
these
chords
in
the
key
of
C.
Using
The
Real-Time
RECORDER
(X130
ONLY)
This
section
will
show
you
how
to
record
the
songs
you
perform
using
the
X130's
RECORDER
feature.
Here
are
the
steps:
Press
Press
REC
/STOP
PLAY/STOP
1:
Press
the
REC/STOP
button.
You
will
hear
the
sound
of
the
metronome.
.
Start
playing.
Everything
you
play,
including
changes
in
Sounds
or
Styles,
will
be
recorded
just
as
you
played
them.
.
When
you
are
done
with
your
song, press
the
REC/STOP
button
once
more.
The
recording
process
will
end.
.
Now,
play
the
song
back.
Press
the
PLAY/STOP
button.
The
song
you
just
recorded
will
begin
to
play.
To
stop
the
song, press
the
PLAY/STOP
button
once
more.
Tempo
information
will
not
be
recorded
by
the
RECORDER.
This
allows
you
to
record
songs
at
a
slow
tempo
and
play
them
back
at
a
faster
tempo.
Once
the
memory
capacity
of
the
RECORDER
is
reached,
the
RECORDER
will
automatically
stop
recording.
When
recording
another
song
to
the
RECORDER,
the
previously-
recorded
song
will
be
automatically
erased.

Advanced
Operation
em
Oe
eee
Adding
Effects
STEREO
CHORUS
(C___)
STEREO
cHoRUS
HOLD
(sustain)
Your
X120/130
has
a
variety
of
effects
which
can
add
realism
or
excitement
to
your
selected
sound.
Pressing
the
STEREO
CHORUS
button
adds
a
deep
stereo
richness
to
the
currently
selected
sound.
Pressing
the
button
a
second
time
cancels
the
effect.
The
STEREO
CHORUS
effect
is
not
effective
on
the
sound
No. 100
(Drum
Set).
The
PEDAL
jack
allows
you
to
connect
an
optional
foot
switch
(KAWAI
F-1,
available
separately)
to
the
X120/130.
Depressing
the
foot
switch
lengthens
the
duration
of
notes
played
on
the
keyboard.
It
operates
like
the
sustain
pedal
on
the
piano.
"CONCERT
MAGIC"
Operation
Note:
PERFORMANCE
mode
CONCERT
MAGIC
Press
C
)
STYLE
Press
[
START/
STOP
Press
The
Concert
Magic
Feature
allows
you
to
listen
to
or
perform
30
preprogrammed
songs,
even
if
you've
never
taken
a
piano
lesson
in
your
life.
You
cannot
use
RECORDER
when
CONCERT
MAGIC
function
is
ON.
You
can
perform
the
selected
song
by
pressing
anywhere
on
the
whole
keyboard.
The
instrument
will
automatically
play
right
notes
step
by
step
as
you
press
a
key.
You
can
also
listen
to
the
preset
song
so
you
can
learn
how
the
song
plays.
(1)
Press
CONCERT
MAGIC
button
to
enter
the
CONCERT
MAGIC
mode.
(2)
Press
STYLE
button
(to
light
the
LED
next
to
the
button).
(3)
Use
SELECTOR
buttons
to
select
an
internal
song
of
CONCERT
MAGIC.
(4)
Press
START/STOP
button
to
listen
to
the
song.
The
selected
song
starts
to
play.
(5)
Use
TEMPO
buttons
to
change
the
performance
tempo.
(6)
To
change
the
tone
color
for
Melody
Part:
1:
Press
SOUND
button.
2:
Use
SELECTOR
buttons
to
select
a
sound
for
Melody.
(7)
Press
START/STOP
button
again
to
stop
the
playing.
ju

-
MELODY
mode
Press
Press
Press
Press
CONCERT
MAGIC
oS
ST¥LE
Eas
AUTO
=
START
STOP
NOTE:
(8)
Press
any
key
of
the
whole
keyboard
to
perform
the
song
by
yourself.
Every
time
a
key
is
pressed,
the
selected
song
will
be
played
step
by
step,
note
by
note.
(9)
Press
CONCERT
MAGIC
button
again
to
quit
the
CONCERT
MAGIC
mode.
CONCERT
MAGIC
songs
are
made
of
two
parts
—
melody
and
accompaniment.
You
can
mute
the
melody
part
so
you
can
play
it
by
yourself
hearing
the
accompaniment
only.
It
is
a
good
method
to
practice
playing
the
keyboard.
In
addition,
you
can
play
the
melody
part
with
your
right
hand
and
performing
only
accompaniment
part
of
the
CONCERT
MAGIC
song
with
one
finger
of
your
left
hand.
(1)
Press
CONCERT
MAGIC
button
to
enter
the
CONCERT
MAGIC
mode.
(2)
Press
STYLE
button
(to
light
the
LED
next
to
the
button).
(3)
Use
SELECTOR
buttons
to
select
an
internal
song
of
CONCERT
MAGIC.
(4)
Press
AUTO
button
to
turn
off
the
melody
part.
The
little
LED
of
the
display
will
be
lit.
(5)
Press
START/STOP
button.
The
accompaniment
part
of
the
selected
song
starts
to
play.
Play
the
melody
with
the
whole
keyboard.
(6)
Press
START/STOP
button
again
to
stop
the
playing.
(7)
Press
any
key
of
the
LOWER
keyboard
with
your
left
hand.
Every
time
a
key
is
pressed,
the
accompaniment
part
of
the
selected
song
will
be
played
step
by
step.
Play
the
melody
yourself
on
the
UPPER
keyboard
at
the
same
time.
(8)
To
change
the
tone
color
for
Melody
Part:
1:
Press
SOUND
button.
2:
Use
SELECTOR
buttons
to
select
a
sound
for
Melody.
(9)
Press
CONCERT
MAGIC
button
again.
to
quit
the
CONCERT
MAGIC
mode.
If
you
stop
playing
halfway,
and
leave
it
over
1
minute,
the
song
will
be
reset
to
the
start
point.
To
reset
the
song
to
the
start
point,
press
SYNC/FILL
IN
button.
When
selecting
another
song
during
playing,
the
newly-selected
song
starts
to
play
from
the
beginning.
eS

Using
MIDI
(For
X130
only)
About
MIDI
Connections
Note:
MIDI
Channel
Connecting
two
or
more
devices
Before
attempting
to
set
the
MIDI
function,
let's
take
a
brief
look
at
what
MIDI
is.
The
letters
MIDI
stand
for
Musical
Instrument
Digital
Interface,
an
international
standard
for
connecting
synthesizers,
drum
machines,
and
other
electronic
instruments
so
that
they
can
exchange
performance
data.
MIDI
allows
you
to
interface
your
instruments
with
other
instruments
and
in
turn
control
them.
For
example,
if
you
connect
the
MIDI
OUT
of
one
keyboard
to
the
MIDI
IN
of
a
second
keyboard,
you
can
have
the
second
keyboard
produce
sounds
by
playing
only
the
first.
A
special
5
pin
DIN
(MIDD
cable
is
used
to
connect
MIDI
instruments.
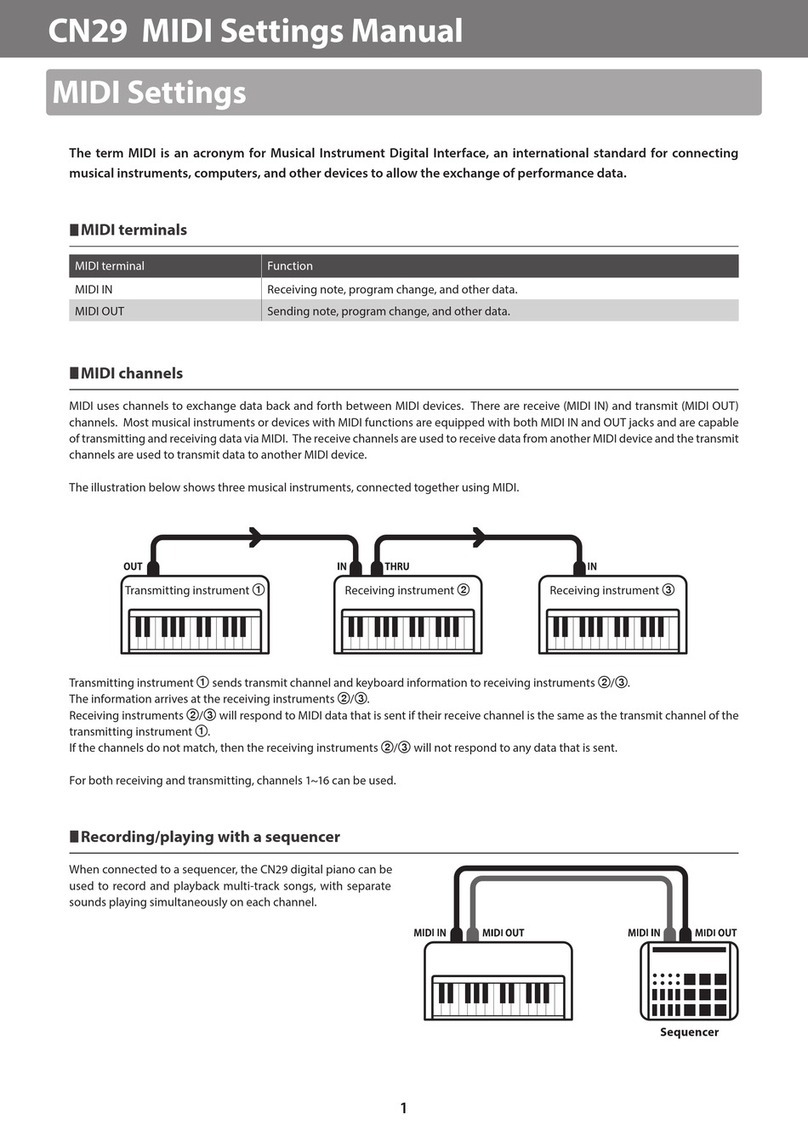
There
are
three
terminals
to
plug
the
cable
in.
Each
has
the
following
functions:
IN:
This
termnial
receives
MIDI
signals
(information,
musical
data
etc.)
OUT:
This
terminal
transmits
MIDI
signals
(musical
data,
etc.)
THRU:
This
terminal
re-transmits
only
the
data
received
at
the
MIDI
IN
terminal.
Some
instruments
as
well
as
the
X130
have
only
MIDI
IN
and
MIDI
OUT
terminals
For
recording
many
parts
assigned
to
different
MIDI
channels
(in
MULTI
TIMBRE
mode)
using
for
example
a
Kawai
keyboard,
you
would
connect
the
OUT
of
the
keyboard
to
the
IN
of
a
sequencer
such
as
Kawai
DRP-10.
Musical
data
etc.
transmitted
via
MIDI
include
“channel
number"
information
which
specifies
the
MIDI
instrument
for
which
the
data
is
intended.
This
is
similar
to
the
channel
of
a
television
receiver.
If
the
channel
of
the
receiver
matches
the
channel
of
the
transmitter,
the
data
will
be
received.
MIDI
has
sixteen
channels
(1-16).
By
setting
each
instrument
to
a
different
channel,
you
can
transmit
musical
data
to
a
specific
instrument.
The
following
diagram
shows
how
three
instruments
can
be
connected
so
that
instrument
A
simultaneously
control
both
instruments
B
and
A
Channel
1
B
Channel
1
C
Channel
4
Now
we
will
set
the
reception
channel
of
instrument
C
to
"2".
Instruments
A
and
B
are
assigned
to
the
same
channel,
so
instrument
A
will
control
instrument
B.
However,
instruments
A
and
C
are
assigned
to
different
channels,
so
instrument
A
will
not
control
instrument
C.
In
this
way
by
assigning
channels
to
various
instruments,
MIDI
makes
it
possible
for
you
to
control
specific
instruments.
—_{o—

Using
The
SYSTEM
Functions
Navigating
in
SYSTEM
Mode
TUNING
CONTROL
Function
Value
tun|<—
TRANSPOSE
Function
Value
Erni
TOUGH
RESPONSE
ON/OFF
Function
Value
tou!—lon
|
PEDAL
FUNCTION
SELECT
Function
Value
PEd|--Fit
In
this
section,
we
will
describe
the
keyboard's
SYSTEM
functions
which
deal
with
the
overall
control
of
the
keyboard.
The
SYSTEM
functions
are
assigned
the
following
"function
numbers”.
X120
=
X130
TUNING
CONTROL
(Pitch
Adjustment)
TRANSPOSE
(To
change
keys)
TOUCH
RESPONSE
ON/OFF
PEDAL
FUNCTION
SELECT
*
CLICK
ON/OFF
(only
X120)
MIDI
TRANSMIT
CHANNEL
SELECT
(only
X130)
*
ACCOMPANIMENT
MIDI
OUT
ON/OFF
(only
X130)
*
LOCAL
CONTROL
ON/OFF
(only
X130)
*
i
U’d&
WN
~~]
ON
Ai
BON
The
function
settings
marked
with
*
will
remain
even
after
turning
the
keyboard's
power
off.
1.
With
the
Accompaniment
stopped,
simultaneously
press
the
SOUND
button
and
STYLE
button
to
enter
the
SYSTEM
mode.
|
2.
Use
the
SELECTOR
buttons
to
enter
the
number
of
your
desired
SYSTEM
function
(for
example,
if
you
want
the
TRANSPOSE
function,
you
would
press
"2").
3.
Change
the
value
using
+1/-1
buttons.
4.
Press
the
DEMO
button
to
leave
the
SYSTEM
mode.
Adjusts
the
keyboard's
pitch
within
a
range
of
-08
to
07.
If
you
press
the
+1
button
once,
the
number
in
the
display
will
change
to
read
01
and
the
pitch
will
raise
slightly.
If
you
press
the
-1
button
instead,
the
number
will
change
to
-01
and
the
pitch
will
drop
slightly.
Adjusts
the
keyboard's
pitch
by
one
full
octave
upward
or
downward
(that
is,
from
-12
half
steps
to
+12
half
steps).
If
you
press
the
+1
button,
the
number
in
the
display
will
change
to
read
01
and
the
pitch
will
raise
by
a
half
step.
If
you
press
the
-1
button
instead,
the
number
will
change
to
-01
and
the
pitch
will
drop
by
a
half
step.
Lets
you
select
from
two
different
"touch"
settings
which
are
numbered
as
follows:
ON:
Fora
WIDE
dynamic
range,
providing
greater
contrast
between
loud
and
soft
playing.
Off:
Touch
Response
is
deactivated.
Each
key
will
play
at
the
same
volume
level
no
matter
how
hard
you
strike
the
key.
You
can
change
the
function
to
be
assigned
for
the
foot
pedal
connected
to
the
PEDAL
jack
of
X120/130.
FIL:
Sync/Fill
in
function
(same
as
SYNC/FILL
IN
button
on
the
front
panel).
HOL:
Hold
pedal
function
SAG

CLICK
ON/OFF
(only
X120)
MIDI
TRANSMIT
CHANNEL
SELECT
(only
X130)
_
Function
Value
tch|-—|_
0}
Note:
ACCOMPANIMENT
MIDI
OUT
ON/OFF
(only
X130)
Function
Value
lon
|
Note:
LOCAL
CONTROL
ON/OFF
(only
X130)
Function
Value
lLoc|—lon
|
You
will
hear
a
click
sound
whenever
you
press
buttons
(except
for
the
START/STOP,
DEMO
and
POWER
button).
You
can
turn
off
the
click
sound
if
necessary.
If
you
press
the
-1
button,
the
click
sound
will
not
be
heard
after
you
leave
the
SYSTEM
mode.
To
restore
the
click
sound,
enter
SYSTEM
mode
again,
and
select
"5"
with
SELECTOR,
and
press
+1
button.
Allows
you
to
select
the
MIDI
transmit
channel
for
your
keyboard.
Use
this
procedure
to
select
any
MIDI
channel
from
1
to
16.
When
the
"ACC"
is
set
to
"on",
the
"tch"
will
not
apply.
The
preset
"accompaniment
send"
channels
will
override
the
"tch"
channel.
The
X130's
ability
to
send
"automatic"
data
via
MIDI
is
controlled
by
aSYSTEM
function
called
"Accompaniment
MIDI
Out".
This
function
must
be
"on”
to
allow
automatic
data
to
be
sent
via
MIDI.
You
cannot
set
the
Accompaniment
MIDI
Out
mode
to
"on"
when
Local
Control
is
in
the
"off"
mode.
When
the
"ACC"
is
set
to
"oFF",
the
keyboard
will
transmit
data
on
only
one
MIDI
channel.
(referred
to
as
"tch")
Using
LOCAL
CONTROL,
you
can
determine
whether
or
not
your
keyboard
produces
sound
when
the
keys
are
played.
Why
would
you
want
to
turn
off
the
keyboard's
sound?
When
using
MIDI,
your
X130
can
operate
as
a
"controller"
used
to
control
the
sound
of
another
MIDI-equipped
instrument.
In
this
situation,
you
may
want
to
play
the
keys
on
your
X130
but
hear
only
the
sound
of
the
other
keyboard
(sometimes
referred
to
as
the
"slave"
keyboard)
that
is
being
controlled
through
MIDI.
When
LOCAL
CONTROL
is
"on",
you
will
hear
the
X130's
sound
when
the
keys
are
played.
When
LOCAL
CONTROL
is
"off",
MIDI
note
information
is
still
sent
via
MIDI
as
you
play,
but
no
sound
is
heard
through
the
keyboard's
speakers.
You
cannot
set
Local
Control
"off"
and
Accompaniment
MIDI
OUT
mode
to
"on"
at
the
same
time.
=)

Creating
Songs
With
An
External
MIDI
Sequencer
(only
X130)
When
using
an
external
MIDI
sequencer
(Ex:
KAWAI
DRP-10)
and
X130's
MIDI
functions,
you
can
create
a
song
with
16
parts.
Here's
how
to
start
creating
songs
on
your
keyboard
in
the
two
MIDI
modes
using
an
external
sequencer.
Note:
I,
Se:
ae
oy
MN
9
4
Connect
the
X130
to
a
MIDI
sequencer.
Set
LOCAL
CONTROL
to
"off".
(See
page
14.)
Turn
on
the
"Echo
Thru"
or
"Thru"
function
in
the
MIDI
sequencer.
Change
the
MIDI
Transmit
channel
("tch")
to
10.
(See
page
14.)
This
will
allow
you
to
record
a
drum
part
first.
Select
sound
No.
100
using
the
SELECTOR
buttons.
Start
the
sequencer
recording,
and
play
the
keys
of
your
X130
to
record
a
drum
part.
Stop
the
sequencer.
Now,
you're
ready
to
create
other
parts.
Change
the
X130's
MIDI
Transmit
channel
from
10
to
1.
(Be
sure
to
press
the
DEMO
button
to
leave
the
SYSTEM
mode.)
Use
the
SELECTOR
buttons
to
select
the
sound
of
your
choice.
.
Start
the
sequencer
and
record
the
next
part.
You
should
be
able
to
hear
the
drums
you
recorded
earlier
as
you
play
this
new
part.
.
To
record
other
parts,
use
the
same
steps
to
change
the
MIDI
Transmit
channel
to
any
channel
from
2
through
16
(except
channel
10
which
you
used
for
drums).
Then,
select
the
sound
you
will
use
for
the
new
part
and
record
it
as
before.
—
Of
course,
if
you
change
the
sound
you
are
using
in
the
middle
of
the
recording,
the
sound
change
will
also
be
recorded.
Therefore,
it
is
not
necessary
to
assign
three
solos
-
a
sax
solo,
a
guitar
solo,
and
an
organ
solo
to
three
separate
channels.
You
can
record
them
all
on
one
channel
by
simply
changing
the
sound
as
you
record.
12.
If
your
sequencer
allows
you
to
"channelize"
or
change
the
MIDI
channel
for
any
track
after
you've
recorded
it,
you
may
be
able
to
save
time
in
recording.
After
recording
the
drums
on
channel
10,
set
the
MIDI
Transmit
channel
to
01.
Record
the
next
track
on
channel
1.
After
recording,
change
the
channel
on
this
track
to
channel
2.
This
frees
channel
1
to
record
another
track
which
you
can
then
assign
to
channel
3.
Keep
transmitting
data
on
channel
|
and
then
assigning
the
data
to
a
different
channel.
This
will
help
you
to
avoid
having
to
change
the
MIDI
transmit
channel
before
recording
each
new
track.
45

Sending
Recorder
Data
to
an
External
Sequencer
via
MIDI
Appendix
Drum
Sound
List
(Key
Numbers)
MIDi
Instruments
CLICK
LO
CLICK
MID
CLICK
H!
CHINA
CYMBAL
RIDE
BELL
SPLASH
CYMBAL
GRASH
GYMBAL
2
RIDE
CYBAL
2
MUTE
H]
CONGA
MARACAS
H.H.
GLOSED
(HI
TUNE)
A.
SNARE
(HI
TUNE)
ACOUSTIC
BASS
DRUM
BASS
DRUM
1
SIDE
STICK
A.
SNARE
COWBELL
E.
SNARE
LOW
FLOOR
TOM
H.H.
CLOSED
HIGH
FLOOR
TOM
H.H.
PEDAL
LOW
TOM
H.H.
OPEN
LOW
MID
TOM
HI
MID
TOM
CRASH
HIGH
TOM
RIDE
CYMBAL
1
CHINA
CYMBAL
RIDE
CYMBAL
CABASA
SPLASH
CYMBAL
COWBELL
GRASH
CYMBAL
2
The
songs
stored
in
the
Recorder
of
your
X130
can
also
be
sent
to
an
external
sequencer
via
MIDI.
You
can
record
songs
on
your
X130
anywhere
and
then
transfer
the
song
data
to
your
external
sequencer
later.
|
1.
Connect
the
MIDI
jacks
of
your
X130
to
the
MIDI
jacks
of
your
external
sequencer.
2.
Make
sure
that
the
ACCOMPANIMENT
MIDI
OUT
function
is
"on"(See
page
14).
3.
Press
the
PLAY/STOP
button
on
the
Recorder.
As
your song
plays,
the
note
data
will
be
sent
via
MIDI.
These
are
a
few
examples
of
the
ways
in
which
the
keyboard's
MIDI
functions
can
be
used.
There
are
certainly
many
other
interesting
and
enjoyable
things
you
can
find
to
do
with
MIDI.
Its
possibilities
are
limitless!
58
DAMMY
93
LOW
MID
TOM
99
RIDE
CYMBAL
2
94
Hi
MID
TOM
60
HI
BONGO
95
CRASH
61
LO
BONGO
96
HIGH
TOM
62
MUTE
HIGH
CONGA
97
RIDE
CYMBAL
1
63
OPEN
HI
CONGA
98
CHINA
CYMBAL
64
LOCONGA
99
RIDE
CYMBAL
65
HI
BONGO
100
CABASA
66
LOW
BONGO
101
SPLASH
CYMBAL
67
HI
AGOGO
102
COWBELL
68
LO
AGOGO
103
CRASH
CYMBAL
2
69
CABASA
104
DAMMY
70
CABASA
105
RIDE
CYMBAL
2
71
DAMMY
106
HI
BONGO
72
DAMMY
107
LO
BONGO
73
CABASA
108
MUTE
HIGH
CONGA
74
CABASA
109
OPEN
HI
CONGA
75
CLAVES
110
LO
CONGA
76
CLAVES
111
HI
BONGO
77
~CLAVES
112
LOW
BONGO
78
MUTE
HI
CONGA
113
Hl!
AGOGO
79
LOCONGA
114
LO
AGOGO
80
CLAVES
115
CABASA
81
DAMMY
116
CABASA
82
BASS
DRUM
1
117
DAMMY
83
SIDE
STICK
118
DAMMY
84
A.
SNARE
119
CABASA
85
COWBELL
120
CABASA
86
£E.
SNARE
121
-CLAVES
87
LOW
FLOOR
TOM
122
CLAVES
88
H.H.
CLOSED
123
GLAVES
89
HIGH
FLOOR
TOM
124
MUTE
HI
CONGA
90
H.H.
PEDAL
125
LO
CONGA
91
LOW
TOM
126
GLAVES
92
H.H.
OPEN
127
DAMMY
45

Chord
Form
List
C
Major
C
Major
C
Major
C
Major
C6 C7
C7
C7
C
Major?
C
Major7
C
sus4
C
7sus4
C
dim
C
dim
C
aug
C
minor(Cm)
C
minor(Cm)
C
m7
C
m7
C
m7(-5)
_
OGmM7
Specifications
Keyboard
61Keys
(Full
Size
/
Touch
Response)
Sounds
100
Styles
30
Polyphony
Max.
28
Notes
Effect
Stereo
Chorus
Style
Control
Tempo,
Start/Stop,
Sync/Fill
In
Recorder
1
Song
(only
X130)
Others
Concert
Magic
Function
(30
Songs),
Auto
On/Off,
Demo
(2
Songs),
Tuning,
Transpose,
Touch
Response
Type
Select
Jacks
DC
In,
Headphone,
Pedal,
MIDI
In/Out
(only
X130)
Speaker
12cmx2
Power
10-12V,0.5A
(6
"C"
Batteries
/
AC
Adaptor)
Dimensions
91.2
cm
x
30.7
cmx9.6cm,
35.9"
x
12.1"
x
3.8"
Weight
4.4
kg,
9.7
lbs.
Accessories
Music
Rack/Owner's
Manual
*
Specifications
subject
to
change
without
notice.
aa
by
pe

MIDI
Implementation
chart
(X130)
Date:
November
1995
MODEL:
KAWAI
PERSONAL
KEYBOARD
X130
Version:
1.0
RECOGNIZED
eel
Channel
Changed
1—16
Default
x
Mode
3
Mode
Message
x
x
Altered
|
oR
Ko
ok
ok
Ok
oe
OK
OK
OK
OK
Number
True
Voice
18—108
0O—12/7
.
|
0-127
ACC.
SEND
Note
Off
<
9n
V=00
Lessee
cee
tal
—t
i
oO
After.
Key's
x
Touch
Ch's
Pitch
Bend
1
Modulation
*3)
Data
Entry
Volume
Panpot
*3)
Expression
Hold
*3)
RPN
LSB,
MSB
*3)
*4)
All
sounds
off
Reset
all
controllers
Control
noe
eran
oo
O
O
NS
2
*3
0—99
Program
Change
_‘True#
0—99
System
Exclusive
x
:
Local
:
All
note
off
Messages
:
Active
sense
:
Reset
Aux
|
:
Song
Pos
x
x
Common:
Song
Sel
x
x
‘
Tune
x x
System
—_:
Clock
)
Realtime
:
Command
Start,
Stop
Start,
Stop
x
x
O
xOO
xX
1)
Sent
when
STYLE
starts
to
play
2)
Receives
when
using
MIDI
SYNC
3)
Except
channel
10
4)
RPN
#0
=
Pitch
bend
sensitivity
Mode
1:
OMNI
ON,
POLY
Mode
2:
OMNI
ON,
MONO
O:
YES
Mode
3:
OMNI
OFF,
POLY
Mode
4:
OMNI
OFF,
MONO
x:
NO
—{9=

FCC
Information
Note:
This
equipment
has
been
tested
and
found
to
comply
with
the
limits
for
a
Class
B
digital
device,
pursuant
to
Part
15
of
the
FCC
Rules.
These
limits
are
designed
to
provide
reasonable
protection
agalnst
harmful
interference
in
a
residential
Installation.
This
equipment
generates,
uses
and
can
radiate
radio
frequency
energy
and,
If
not
Installed
and
used
In
accordance
with
the
Instructions,
may
cause
harmful
interference
to
radio
communications.
However,
there
is
no
guarantee
that
Interference
will
not
occur
In
a
particular
installation.
If
this
equipment
does
cause
harmful
Interference
to
radio
or
television
reception,
which
can
be
determined
by
turning
the
equipment
off
and
on,
the
user
Is
encouraged
to
try
to
correct
the
Interference
by
one
or
more
of
the
following
measures:
*
Reorlent
or
relocate
the
receiving
antenna.
:
Increase
the
separation
between
the
equipment
and
receiver.
*
Connect
the
equipment
Into
an
outlet
on
a
circuit
different
from
that
to
which
the
receiver
is
connected.
*
Consult
the
dealer
or
an
experlenced
radio/TV
techniclan
for
help.
Canadlan
Radio
Interference
Regulations
This
instrument
has
been
certified
to
comply
with
the
Ilmits
for
a
class
B
digital
apparatus,
pursuant
to
the
Radio
Interference
Regulations,
C.R.C.,
¢.
13974.
K
AW.
Al
Kawai
Elactronic
Keyboard
X120/X130
OM337E-HI
951:
Printed
In
Indonesie
This manual suits for next models
1
Table of contents
Other Kawai Musical Instrument manuals
Kawai
Kawai Concert Performer CP139 User manual

Kawai
Kawai Heritage 200 User manual

Kawai
Kawai KDP110 User manual

Kawai
Kawai CL20 User manual

Kawai
Kawai SR3 User manual

Kawai
Kawai XR9000 User manual

Kawai
Kawai CN25 User manual

Kawai
Kawai CN23 User manual

Kawai
Kawai CN17 User manual

Kawai
Kawai E-520 User manual

Kawai
Kawai Concert Artist Classic series CS3 User manual

Kawai
Kawai Digital Piano EP2 User manual

Kawai
Kawai Concert Artist CA99 User manual

Kawai
Kawai ES110 User manual

Kawai
Kawai MP7SE User manual

Kawai
Kawai Digital Piano CA750 User manual

Kawai
Kawai ES7 User manual

Kawai
Kawai CA501 Manual

Kawai
Kawai 350 User manual

Kawai
Kawai MP6 User manual