CAUTION
RISK OF ELECTRIC SHOCK
DO NOT OPEN
Important Safety Instructions Read all the instructions before using the product.
AVIS : RISQUE DE CHOC ELECTRIQUE - NE PAS OUVRIR.
TO REDUCETHE RISK OF ELECTRIC SHOCK, DO NOT REMOVE COVER (OR BACK).
NO USER-SERVICEABLE PARTS INSIDE.
REFER SERVICING TO QUALIFIED SERVICE PERSONNEL.
The lighting ash with arrowhead symbol, within an equilateral triangle, is intended to alert the
user to the presence of uninsulated "dangerous voltage" within the product's enclosure that
may be of sucient magnitude to constitute a risk of electric shock to persons.
The exclamation point within an equilateral triangle is intended to alert the user to
the presence of important operating and maintenance (servicing) instructions in
the leterature accompanying the product.
WARNING
TO REDUCE THE RISK OF FIRE OR ELECTRIC
SHOCK, DO NOT EXPOSE THIS PRODUCT
TO RAIN OR MOISTURE.
INSTRUCTIONS PERTAINING TO A RISK OF FIRE, ELECTRIC SHOCK, OR INJURY TO PERSONS
SAVE THESE INSTRUCTIONS
denotes that care should be taken.
The example instructs the user to take care not to allow ngers to be trapped.
denotes a prohibited operation.
The example instructs that disassembly of the product is prohibited.
denotes an operation that should be carried out.
The example instructs the user to remove the power cord plug from the AC outlet.
Examples of Picture Symbols
WARNING Indicates a potential hazard that could result in death
or serious injury if the product is handled incorrectly. CAUTION Indicates a potential hazard that could result in injury
or damage to the product or other property if the
product is handled incorrectly.
The product should be connected to an AC outlet of the specied voltage.
If you are going to use an AC power cord, make sure that its has the correct plug shape and
conforms to the specied power voltage.
Failure to do so may result in re.
L
L
Do not use the product in the following areas.
LAreas, such as those near windows, where the product is exposed to direct sunlight
LExtremely hot areas, such as near a heater
LExtremely cold areas, such as outside
LExtremely humid areas
LAreas where a large amount of sand or dust is present
LAreas where the product is exposed to excessive vibrations
LDo not stand the main unit on its side for extended periods of time.
LDo not attempt to play the main unit at unusual angles.
Doing so may place stress on the keyboard action,resulting in breakdown of the product.
Use only the AC adaptor included with this instrument to power the instrument.
LDo not use other AC adaptor included with this instrument.
LDo not use the included AC adaptor or AC power cord to power other equipment.
Before connecting cords, make sure that the power to this product and other devices is turned OFF.
Using the product in such areas may result in product breakdown.
Use the product only in moderate climates (not in tropical climates).
Failure to do so may cause breakdown of this product and other devices.
Do not drag the product on the oor. Take care not to drop the product.
Please lift up the product when moving it. Please note that the product is heavy and must
be carried by more than two persons. Dropping the product may result in breakdown.
When connecting the AC power cord and other cords, take care not to get them tangled.
Failure to do so may damage them, resulting in re, electric shock or short-circuit.
Do not wipe the product with benzene or thinner.
LDoing so may result in discoloration or deformation of the product.
LWhen cleaning the product, put a soft cloth in lukewarm water, squeeze it well, then wipe the product.
Do not stand on the product or exert excessive force.
LDoing so may cause the product to become deformed or fall over, resulting in breakdown or injury.
Do not place naked ame, such as lighted candles on the product.
LDoing so may cause the illumination to fall over, resulting in re.
Ensure that the ventilation is not impeded by covering the ventilation openings with
items, such as newspaper, table-cloths, curtains, etc.
LFailure to do so may over-heat the product, resulting in re.
The product should be located so that its location or position does not interfere with its proper
ventilation. Ensure a minimum distance of 5cm around the product for sucient ventilation.
The product should be serviced by qualied service personnel when:
LThe power supply cord or the plug has been damaged.
LObjects have fallen, or liquid has been spilled into the product.
LThe product has been exposed to rain.
LThe product does not appear to operate normally or exhibits a marked change in performance.
LThe product has been dropped, or the enclosure damaged.
Do not insert or disconnect the powercord plug with wet hands.
Doing so may cause electric shock.
L
Take care not to allow any foreign matter to enter the product.
Entry of water, needles or hair pins may result in breakdown or short-circuit.
The product shall not be exposed to dripping or splashing. No objects lled with liquids,
such as vases, shall be placed on the product.
When using the headphones, do not listen for long periods of time at high volume levels.
Doing so may result in hearing problems.
Do not lean against the keyboard.
Doing so may cause the product to fall over, resulting in injury.
Do not use the product in wet areas, or areas close to water.
Doing so may cause ashort circuit, leading to an electric shock, or a re.
Do not disassemble, repair or modify the product.
Doing so may result in product breakdown, electric shock or short-circuit.
When disconnecting the AC power cord's plug, always hold the plug and pull it to remove it.
Pulling the AC power cord itself may damage the cord, causing a re, electric shock or short-circuit.
L
The product is not completely disconnected from the power supply even when the power
switch is turned o. If the product will not be used for a long time, unplug the AC power
cord from the AC outlet.
This product shall be near the AC outlet and the power cord plug in a position so that it can
readily be disconnected in an emergency because electricity is always charging while the
plug is in the AC outlet even in a power switch o condition.
Failure to do so may cause re in case of lightning.
Failure to do so may over-heat the product, resulting in re.
L
Notes on Repair
Should an abnormality occur in the product, immediately turn the power OFF, disconnect the
power cord plug, and then contact the shop from which the product was purchased.
CAUTION:
To prevent electric shock, match wide blade of plug to wide slot, fully insert.
ATTENTION:
Pour éviter les chocs électriques, introduire la lame la plus large de la che dans la borne
correspondante de la prise et pousser jusqu'au fond.
An information on Disposal for users
If your product is marked with this recycling symbol it means that, at the end of its
life, you must dispose of it separately by taking it to an appropriate collection point.
You should not mix it with general household waste. Disposing of this product correctly
will prevent potential negative eects on the environment and human health which
could otherwise arise due to inappropriate waste handling.
For further details, please contact your local authority.
(European Union only)
Instruction for AC power cord (U.K.)
IMPORTANT
THE WIRES IN THIS MAINS LEAD ARE COLOURED IN ACCORDANCE WITH THE FOLLOWING CODE.
BLUE : NEUTRAL
BROWN : LIVE
As the colours of the wires in the mains lead of this apparatus may not correspond with the
coloured markings identifying the terminals in your plug, proceed as follows:
The wire which is coloured BLUE must be connected to the terminal which is marked with the
letter N or coloured BLACK.
The wire which is coloured BROWN must be connected to the terminal which is marked with
the letter L or coloured RED.
Do not plug either terminal of the power cord to the the ground od AC outlet on the wall.
Canadian Radio Interference Regulations
This instrument complies with the limits for a class B digital apparatus, pursuant to the Radio
Interference Regulations, C.R.C., c. 1374.
FCC Information (U.S.A)
CAUTION : Changes or modications not expressly approved by the party responsible for compliance
could void the user’s authority to operate the equipment.
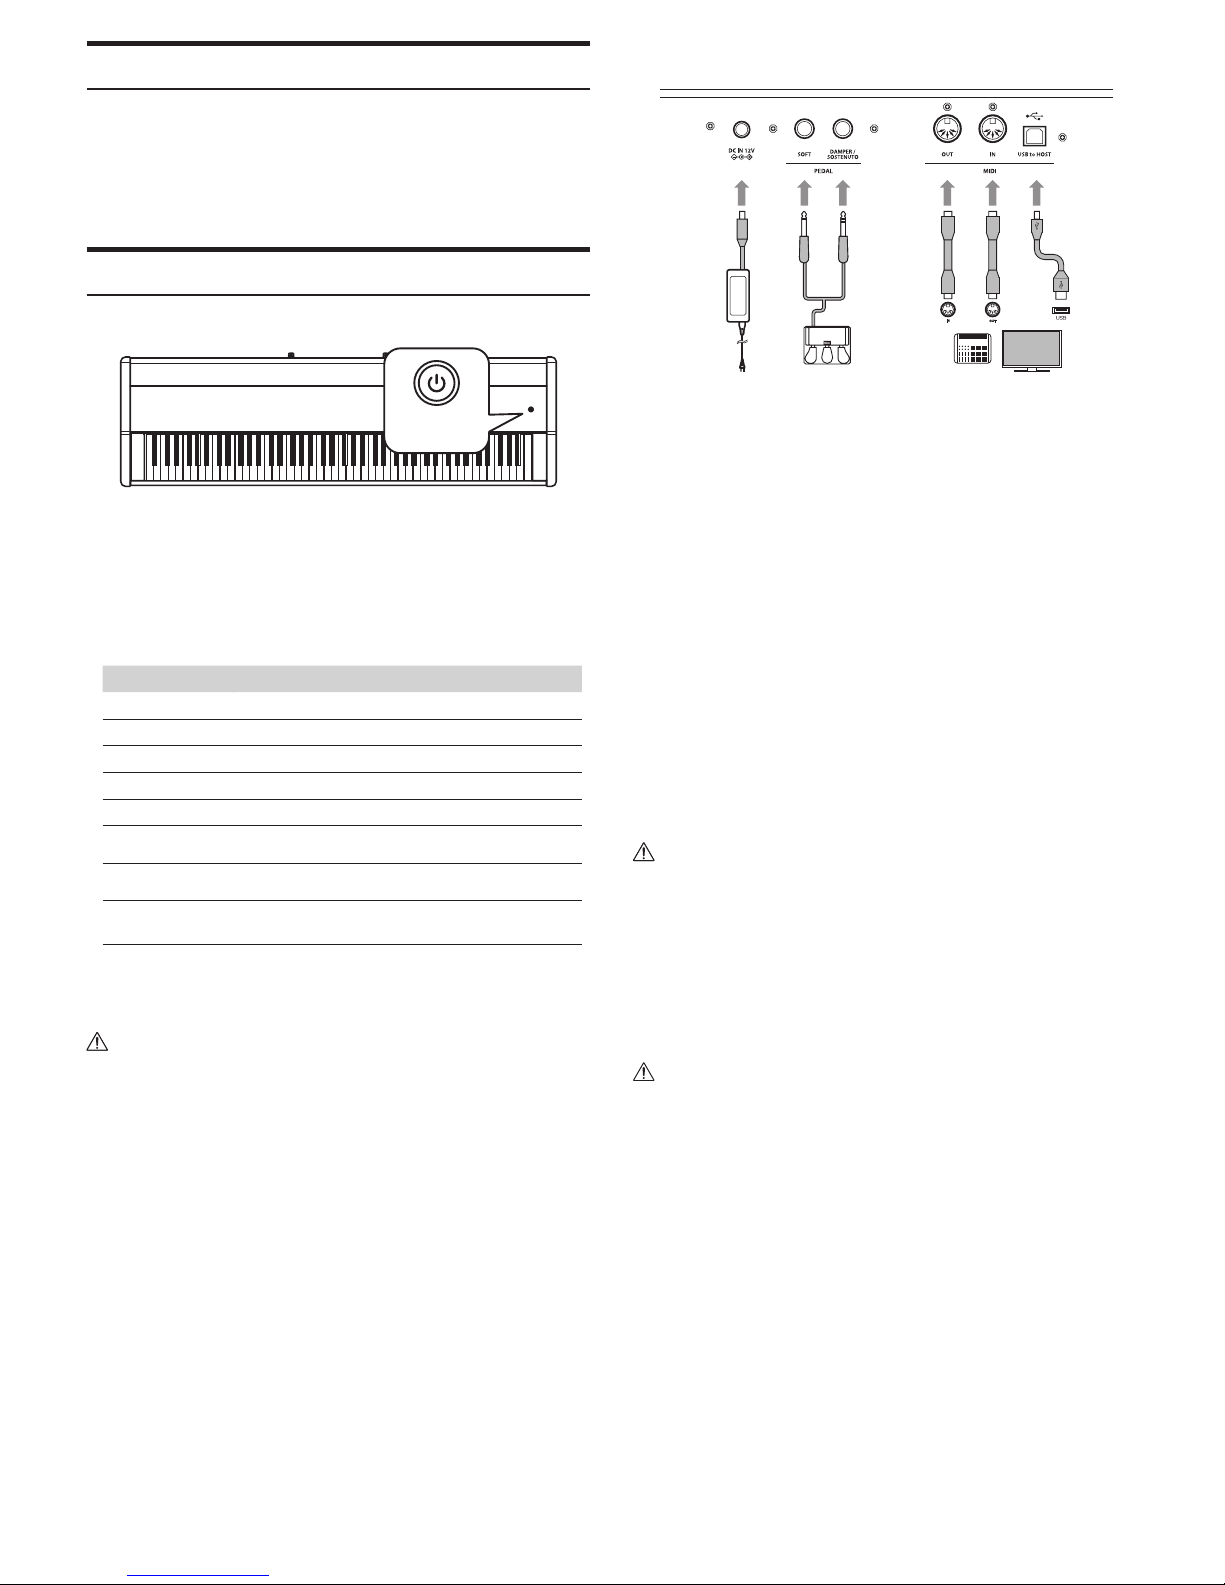
The nameplate label is located on the
underside of the instrument, as indicated below.
NOTE : This equipment has been tested and found to comply with the limits for a Class B digital
device, pursuant to Part 15 of the FCC Rules. These limits are designed to provide reasonable
protection against harmful interference in a residential installation. This equipment generates, uses
and can radiate radio frequency energy and, if not installed and used in accordance with the
instructions, may cause harmful interference to radio communications. However, there is no guarantee
that interference will not occur in a particular installation. If this equipment does cause harmful
interference to radio or television reception, which can be determined by turning the equipment o
and on, the user is encouraged to try to correct the interference by one or more of the following
measures:
xReorient or relocate the receiving antenna.
xIncrease the separation between the equipment and receiver.
xConnect the equipment into an outlet on a circuit dierent from that to which the receiver is
connected.
xConsult the dealer or an experienced radio/TV technician for help.
Nameplate