Kayline 442-210 User manual

INSTALLATION INSTRUCTIONS
Scout II - Fast Trac
PART #442-210
KAYLINE MFG.
Thank you for purchasing Kayline’s Convertible Top for your Scout vehicle. It has been de-
signed for great fit and long wear. Please read and follow, precisely, all installation instruc-
tions provided when installing top. Failure to do so may result in a poor fitting top and could
place occupants in a potentially hazardous situation.
TOOLS REQUIRED:
3/8” WRENCH 7/16” WRENCH
8’ TAPE MEASURE #2 PHILLIPS SCREWDRIVER
ELECTRIC DRILL DRILL BITS (1/8”, 5/32”,3/8”)
RUBBING ALCOHOL
INSTALLATION TIPS
Before you begin installing this top, here are a few tips to
make installation easier.
This top should be installed where the temperature
is above 72 degrees Fahrenheit. Below this temperature,
the top may contract making it difficult to install.
It is normal for a top to contract and wrinkle when
stored in the shipping carton. The top will relax and
wrinkles will disappear within a few days of installation as
fabric adjusts to shape of mounting hardware.
INSTALLATION PROCEDURES:
On page 3 of this instruction manual there is an assembly
drawing. Please refer to it for identification of parts and
assembly assistance. Also refer to page 6 to assure that all
parts are included in your kit.
Pg 1 442-210
Figure 1
Step 1. Bow Mount. Measure 28” from the body seam
at corner and mark a line on raised level of the body. The
rear of the bow mount (Item 1) will be positioned on this
line. Using bow mount as a template, mark and drill 5/32”
holes. Only one front and one rear hole of bow mount will
be used. Secure bow mount to body with #14 x 1//2” sheet
metal screws (Item 2). Repeat for the other side. See
figure 1.
Step 2. Body Aluminum. Locate first piece of body
aluminum (Item 3) just outside slight drop in body edge.
The front of the body aluminum should be even with rear of
door opening and parallel with outside edge of body. Using
body aluminum as a template, mark and drill 1/8” holes.
Secure to body with #10 x 1/2” sheet metal screw (Item 4).
Butt another piece of body aluminum up to body aluminum
just installed and secure to body. Repeat for the other side.
See figure 2.

Pg 2 442-210
Figure 2
Step 3. Corner Plate. Butt corner plate (Item 5) next
to rear body aluminum. Mark and drill 5/32” holes using
large holes in corner plate as a template. Secure to body
with #14 x 1/2” sheet metal screws (Item 2) through 1/4” flat
washers (Item 6) and into vehicle body. Drill 1/8” holes
using small holes in corner plate as a template. Place
footman loop (Item 7) over these holes and secure to body
with #8 x 1/2” oval head sheet metal screws (Item 8).
Repeat for the other side. See figure 3.
Figure 3
Step 4. Tailgate Clip. Measure 2” from edge of
tailgate and mark location of tailgate clip (Item 9). Using
tailgate clip as a template mark and drill 1/8” holes making
sure that there is a 3/!6” gap between tailgate and bottom
of tailgate clip. Secure to tailgate with #10 x 1/2” sheet
metal screws (Item 4). Repeat for the other side. See
figure 3.
Step 5. Bows. Secure bow release (Item 11) to rear set
of holes in bow mount by placing 1/4-20 x 1 1//2” hex head
bolt (Item 12) through one side of bow mount, bow release
bracket and though other side of bow mount. Secure with
1/4-20 lock nut (Item 13) These items must pivot so do not
over tighten. Repeat for he other side. Place bow sleeve
(Item 14) over rear bow halves (Item 15). Place rear bow
into bow release bracket. Place 1/4-20 x 1 1/2” hex head
bolt (Item 12) through center hole in bow release bracket,
rear bow and through other side of bow release bracket.
Secure with 1/4-20 lock nut (Item 13). Again these items
must pivot so do not over tighten. Place bow sleeve (Item
14) over front bow halves (Item 16). Place front bow into
front holes in bow mount with large holes in front bow are
facing forward. Secure to bow mount by placing 1/4-20 x 1
1//2” hex head bolt (Item 12) through one side of bow
mount, front bow and though the other side of bow mount.
Secure with 1/4-20 lock nut (Item 13). Again these items
must pivot so do not over tighten. Repeat for the other side.
See figure 3.

Pg 3 442-210

Pg 4 442-210
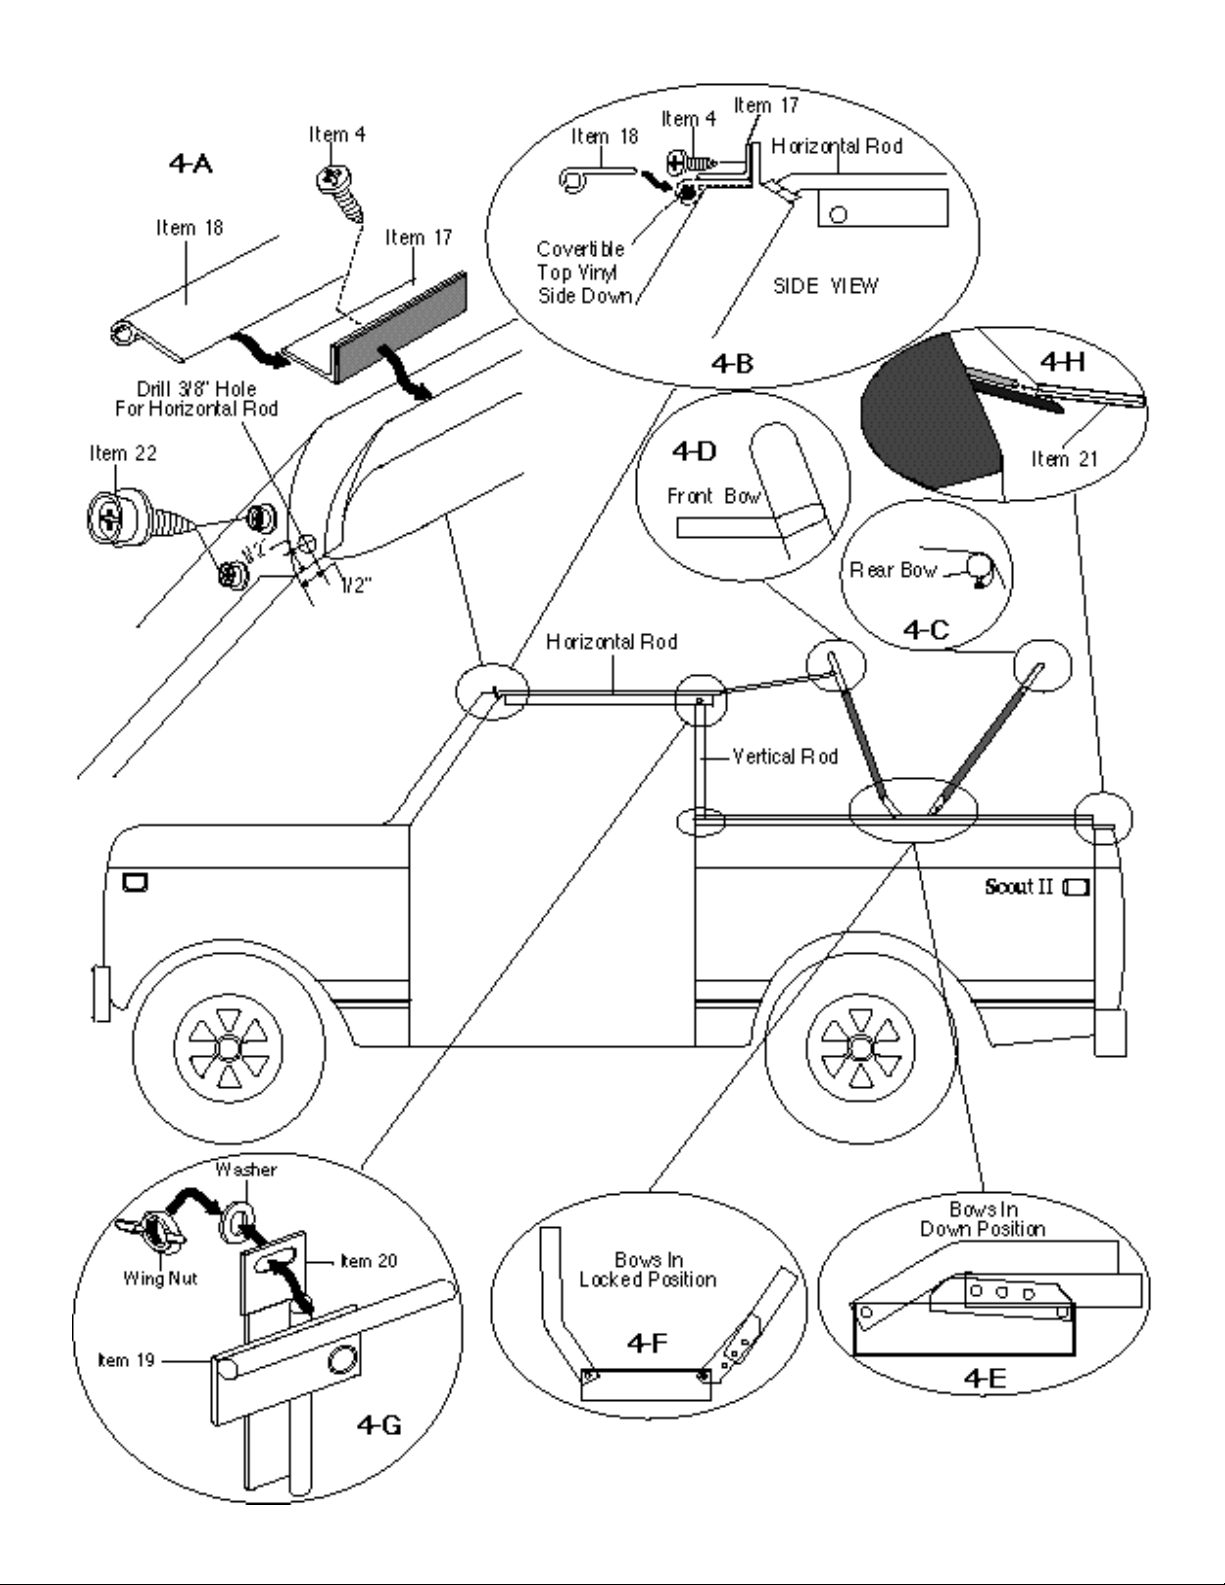
Step 6. Windshield Slot. Position windshield slot (Item 17) on top of windshield frame centered form side to side,
and with the weather stripped edge toward the vertical flange on top of frame. Place windshield channel (Item 18) under
windshield slot The channel will act as a shim to provide proper clearance between windshield frame and windshield slot
Starting at the center, mark and drill 1/8" hole. Secure slot to flange on windshield frame with a #10 x 1/2" sheet metal
screws (Item 4). Mark drill and install sheet metal screws in remaining holes following same procedure as above making
sure that gap between windshield slot and windshield frame remains the same from side to side. Windshield channel
should slide under windshield slot easily with little resistance. Form ends of slot around flange on windshield frame. See
figure 4-A and 4-B.
Step 7. Horizontal Rods. Measure 1/2" in from side of windshield frame and 1/2" in from inside of windshield frame.
Mark and drill 3/8" hole. See figure 4-A. While pulling front bow forward, place front of horizontal rod (Item 19) into hole in
windshield frame. Place the rear of horizontal rods into hole in front bow. See figure 4-B and 4-D. Repeat for the other
side. There is one left and one right horizontal rod. The right is painted white on the end that is placed into hole in wind-
shield frame. Repeat for other side.
Step 8. Vertical Rods.With door closed, find position of vertical rod (Item 20) by holding it in place at rear of door
frame vertical to the horizontal rod. Mark and drill 3/8" hole in body at this point Remove washer and wing nut from
horizontal rod. Place vertical rod into hole drilled in body and over bolt on horizontal rod. Attach vertical rod to horizontal
rod with washer and wing nut previously removed. Repeat for other side. Again the right side vertical rod is marked white
at the end that is placed into hole in body See figure 4-G.
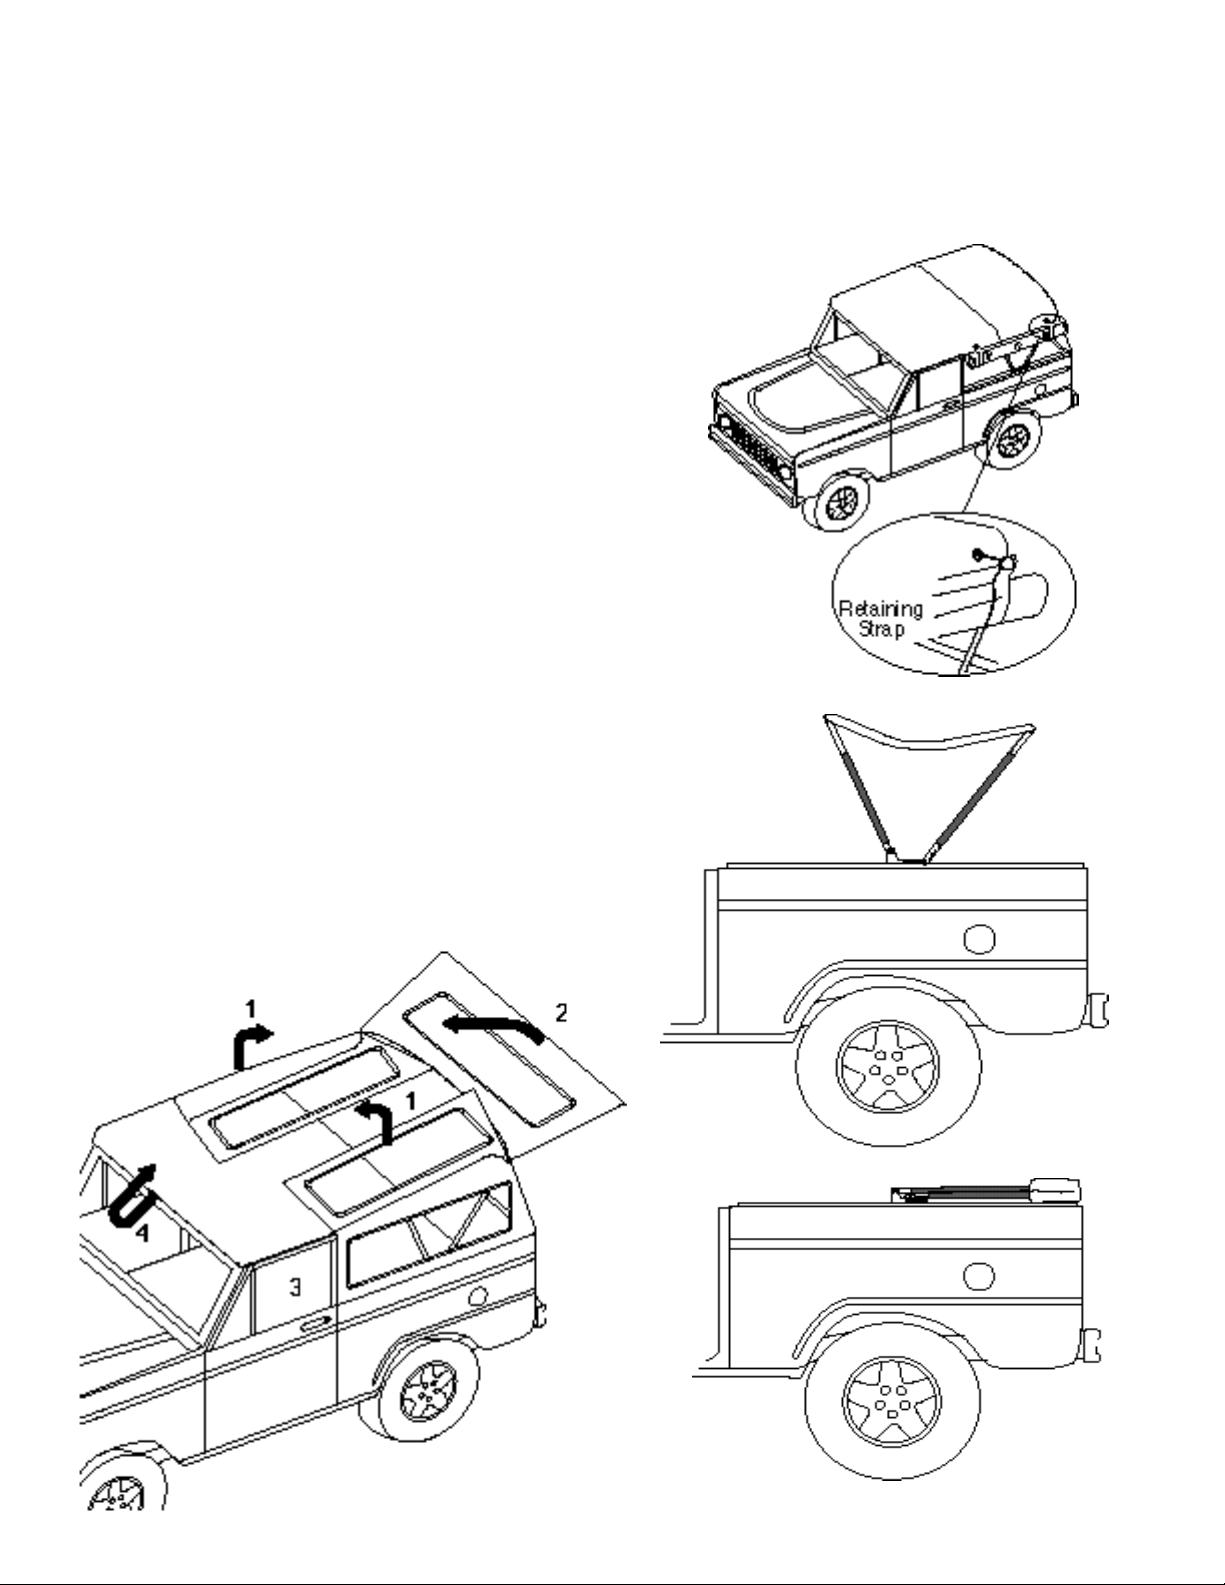
Step 1. Channel Installation. Place top on hood of
vehicle, vinyl side down. Slide sewn in rope (at front of top)
into windshield channel (item 18). See figure 4-B. Slip
channel under windshield slot. Flip top up and over bows.
Snap rear bow flap to rear bow. See figure 4-C.
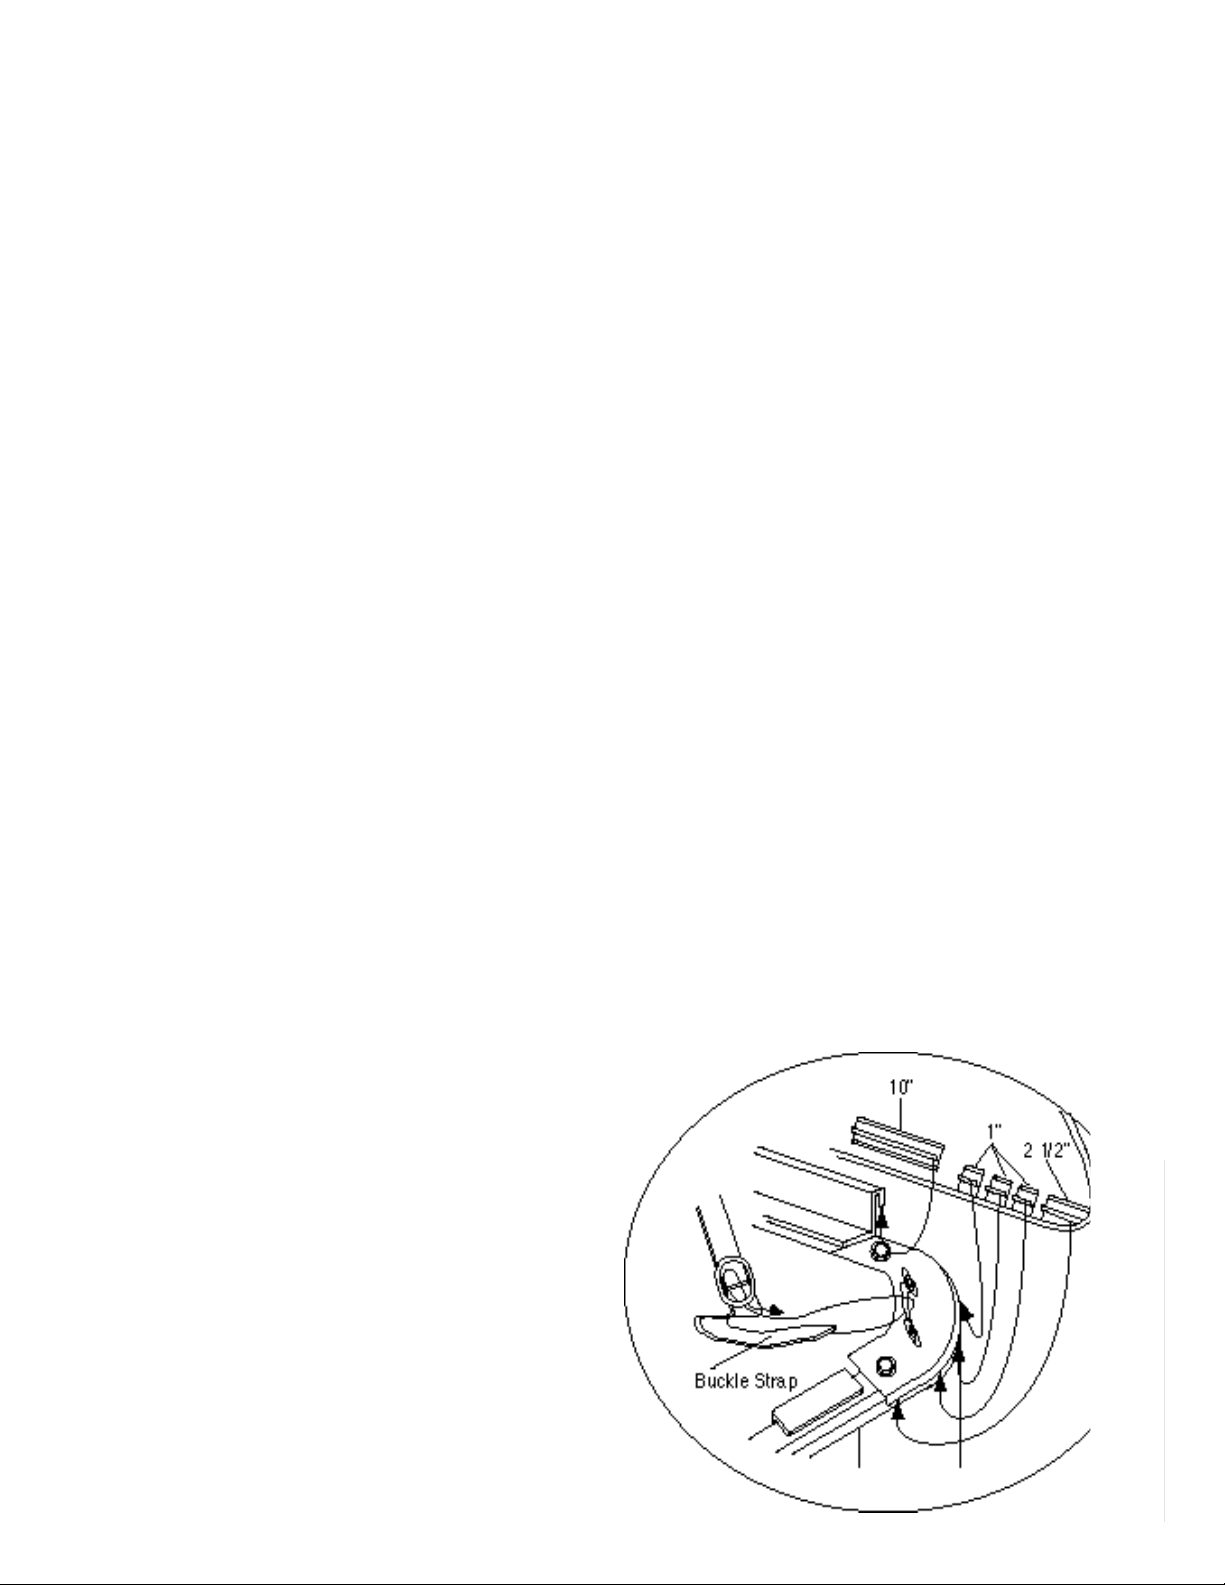
Step 2. Top Installation.Pull to the rear and down on
rear bottom corners of side panels until 2 1/2” pieces of
plastic are fully engaged on corner plate. See figure 5. Clip
long plastic pieces from rear to front until all are fully
engaged on body aluminum. Insert tailgate retainer
(Item 21) into fabric loop on rear curtain. See figure 4-F.
Slip tailgate retainer between tailgate clips and tailgate.
See illustration 4-H. Lock rear bows into position as shown
in illustration 4-F. Thread buckle straps through footman
loops footman loops. Tighten only enough to hold rear bow
in place. See figure 5. If over tightened, it could cause top
to tear or strap to be pulled from top. Close zippers on both
sides of rear curtain.
If top is too tight and you are unable to clip plastic
to corner plates or body aluminum it may be necessary to
remove your horizontal and vertical rods to allow the front
bow to fall forward and relieve tension on the top. After
removing horizontal and vertical rods clip plastic to corner
plates and body aluminum. Once all plastic is clipped into
place, push front bow to the rear and install horizontal and
vertical rods. Then proceed as directed above. After initial
installation the top should form to hardware and installation
should become easier.
Step 3. Horizontal And Vertical Flaps. Wrap
vertical rod flap around vertical rod and press hook and
loop together. Wrap horizontal rod flap around horizontal
rod and press hook and loop together.
Step 4. Snap Stud At Windshield Corner. Locate
for snap stud (Item 22) by pulling forward and down on
front of convertible top. Mark and drill 1/8” holes. Install 3/8”
sheet metal screw studs and snap top to studs. Repeat for
the other side. See figure 4-A.
Figure 5
FABRIC INSTALLATION

Pg 5 442-210
Rolling Up Side Panels. It is possible to roll up your side panels and rear curtain to provide more ventilation in your
vehicle. Prior to rolling up side panels or rear curtain you must first make sure that windows are clean. If not properly
cleaned, dirt will scratch them reducing the life of your top. It is also recommended that you use a soft cloth between the
windows and the retaining straps to prevent them from marring the glass. To clean the windows, wash them with a mild
non-detergent soap and water. To roll up side panels first unzip rear curtain and unlock rear bow. Unfasten side panel
from body aluminum, roll up side panel and secure with retaining strap. See figure 6. Lock rear bow and tighten buckle
strap to retain tension on convertible top. Follow same procedure to roll up rear curtain, first removing tailgate retainer.
You may roll up both side panels and rear curtain if you wish.
Step 1. Unlock rear bow and unfasten sewn in plastic
from body aluminum. Lift side panels and fold on top of
bows.
Step 2. Remove tailgate retainer. Lift rear curtain and fold
on top of side panels (on top of bows).
Step 3. Remove horizontal and vertical rods. Fold front of
top to the rear.
Step 4. As you pull the front of top to the rear of vehicle
fold as you go until you have it neatly folded at the tailgate.
A convertible boot is available from your dealer to enclose
your top preventing it from the dirty while in the down
position. If you intend to leave the top down for an ex-
tended period of time it is recommended that you place a
soft cloth between the widows and vinyl material to prevent
window discoloring.
FOLDING INSTRUCTIONS
Figure 6

Pg 6 442-210

Pg 7 442-210
WARRANTY INFORMATION:
Kayline manufacturing warrants to the original purchaser of any product it manufactures, that the product will be free of
defects in material or workmanship for a period of 90 days from date of purchase. Such obligations under this warranty
shall be limited to the repair or replacement, at Kayline’s discretion, of any assembly or parts which upon examination by
Kayline proves to be defective. All defective items must be returned with proof of purchase to Kayline Manufacturing, 200
East 64th Avenue, Denver, Colorado 80221, freight prepaid. This warranty does not cover damage resulting from abuse,
misuse, alteration, accident or damage in transit. Kayline’s obligations under this warranty are limited to the aforemen-
tioned repair or replacement of warranty defects for which the return authorization has been received during the warranty
period, and KAYLINE SHALL NOT BE LIABLE FOR ANY INCIDENTAL OR CONSEQUENTIAL DAMAGES ARISING
FROM BREECH OF THIS OR ANY IMPLIED WARRANTY.
Some states do not allow the exclusion or limitation of incidental or consequential damages, so the above limitation or
exclusion may not apply to you. This warranty gives you specific legal rights, and you may also have other rights which
may vary from state to state.
If you need assistance or further information, you may contact Kayline at 1-800-525-8118 between the hours of 8:00 AM
and 5:00 PM, Monday through Friday, Mountain Standard Time.
CARE INSTRUCTIONS
Convertible tops and accessories require special care if you want to get the maximum usage and enjoyment from them.
The following recommendations, if followed carefully, can extend the life of your top or accessory.
1. Hand wash using a mild non-detergent soap such as Ivory. Use a nonabrasive cloth or sponge. Rinse thoroughly.
2. DO NOT wash in direct sunlight and avoid automatic car washes.
3. When your top is clean, we recommend using “303 Protectant” on both the vinyl top and windows. This product con-
tains a sunscreen that helps protect from the sun’s damaging rays. Stay away from products containing alcohol as it will
cause the fabric and windows to lose their elasticity, thus reducing the life of your top or accessory. If you are unable to
locate “303 Protectant”, please call 1-800-223-4303 for a distributor near you.
4. Direct sunlight and heat are the biggest enemies of the windows. Park in the shade whenever possible. If you must
park in the sunlight, rotate the direction that you park every few days so all windows get even exposure.
5. Our tops are designed so that you may roll up and/or store the rear curtain and side curtains. To prevent scratching of
the windows, be sure that windows are completely clean and free of dust particles. Even a little dirt will badly scratch the
windows. You may want to use a soft cloth when rolling up or storing your windows. Heat may build up on rolled up
windows, so be sure to unroll them frequently. If you roll up the windows at the beginning of summer and leave them, they
may be ruined by fall.
6. DO NOT open or roll up windows at temperatures below 45 degrees F. This could cause them to crack or break.
7. NEVER use ice scrapers or snow brushes on vinyl windows.
Table of contents