KELISS T162A Series User manual

Instruction manual
T162A SERIES
Smart Toilet

※Please read this manual thoroughly before using the product.
※ Please do not hesitate to contact us if you have any questions in the installation or usage.
※ Please keep this manual available for future maintenance or reference.

Contents
Safety precautions........................................................................
Components..................................................................................
Specification.................................................................................
Functions introduction ................................................................
Parts name ....................................................................................
Product drawing ..........................................................................
Power and water connection.......................................................
Installation precaution.................................................................
Product installation.....................................................................
Instructions for remote control installation..............................
Remote control panel overview..................................................
Using instructions........................................................................
Knob function description......................................................
Cleaning & maintenance.............................................................
Measures for special cases..........................................................
Trouble shooting.........................................................................
Maintenance service sheet.........................................................
1
4
5
6
7
8
8
9
10
15
16
17
19
20
21
22
24

-1-
Symbols and meanings
Safety precautions
To prevent damage to the unit and possible injury to users, please follow the safety
warnings. Please be sure to carefully read through the user's manual before installation.
Keep the user's manual after installation to refer to for troubleshooting advice.
Could result in serious injury or death.
The following symbols are used to indicate important safety precautions when using
the product.
WARNING
Prohibited.
Pay close attention; caution.

-2-
WARNING
Stop using the product immediately if you observe:
Smoke
Unusual sound or odor
Leakage, breakage or other damage
Blocked toilet pan
Continued use under these conditions could cause electrical shock, injury, or
water leakage.
Do not clean the smart bidet with heavy chemical cleaning agents such as paint
thinner, gasoline, putty powder, nylon brush, etc.
Otherwise, it could trigger a chemical reaction, cause leakage, damage to the
product or personal injury.
Prohibited
Do not attempt to disassemble or repair this product yourself. It needs to be
taken for professional repair. Otherwise, it may result in damage to the product.
A loose electrical connection could cause electric shock or a fire.
Do not operate the product or handle the plug with wet hands. This may result
in electrical shock or a fire.
Handling the plug during thunderstorms and lightning may cause electrical
shock.
Make certain to use the proper voltage. Overloading circuits could overheat
and cause a fire.
Do not pour liquids onto the electrical components while it is plugged in as
this could result in electrical shock or a fire.
Do not stand or place heavy objects on the product, as it can cause damage.
If the electrical plug or line is damaged, unplug the product. Do not attempt to
fix the outlet and consult a professional.
Do not block the airopenings of the product. Keep the air openings free of lint,
hair, and the like.
Do not use while bathing.

WARNING
-3-
Disconnect the power supply before removing this product from the toilet to
prevent electrical shock or fire.
All electrical cords and plugs must be waterproof.
The electrical plug must be located more than 0.5m above the floor and away
from the bathtub and shower. Otherwise, it could cause electrical shock or a
fire.
To prevent electrical shock or fire, disconnect the power supply before cleaning
the product and do not apply water directly to it.
Do no expose the product to direct sunlight.
The grounding wire must conform to local codes and must use a three-pronged
grounding plug for use.
Persons with special health conditions should only use this product with the
permission of their doctor. In some instances, supervision or assistance may
be necessary when using the product.
Do not allow children to play with this product. Children must have adult
supervision when using the product.
Do not use industrial water, wastewater, seawater, reclaimed water and other
sewage water. This could cause skin inflammation or other conditions.
When replacing an existing bidet toilet seat, remove the old hose assemblies
and replace them with the included hose assemblies. Do not reuse the old
hose assemblies to avoid safety related problems.
Caution
Make sure the product is installed in a well-ventilated area. Excess humidity
and moisture could cause electrical shock or fire.
Persons (including children) with physical, perceptual, intellectual disabilities
or other conditions, need to use the product under the guidance or supervision
of someone else, or they may experience electric shock, injury or fire.

FLOW RESTRICTOR
-4-
REMOTE CONTROL REMOTE EXPANSION
SCREW GROUP
(EACH 2pcs)
DOUBLE-FACED
ADHESIVE TAPE
REMOTE CONTROL
HOLDER
Components
SMART TOILET
USER'S MANUAL
User's Manual
SEALING RING INLET VALVE

※1:Rated power: Set the water volume, seat temperature and water temperature to the highest level under the conditions of
ambient temperature 68°F±41°F, inlet water static pressure 0.18MPa±0.02MPa, and inlet water temperature 59°F±33°F.
Turn on the bidet function, and test the average power within 60 seconds after the temperature of the outlet water stabilizes.
※2:Maximum power: Set the water volume, seat temperature, and water temperature to the highest level under the conditions
of an ambient temperature of 73°F±35°F, an inlet static pressure of 0.18MPa±0.02MPa, and an inlet temperature of
41°F±33°F. Turn on the bidet function and continue to work stably at the maximum power for a cleaning cycle.
※3:Test method of nominal water consumption needs to correctly install the water-saving piece in the accessory kit on the angle
valve according to the requirements of the installation instructions, and then perform the test according to the water
consumption test standard.(Test the consumption three times for each, in which the pressure of water hose is at a static
pressure of 0.24Mpa and 0.55Mpa. Total get six value, the sum is divided by six and the average is the nominal water
consumption).
-5-
Specifications
Rated voltage
Swing Oscillating cleaning forward and backward
Rear wash
Massage
Safety device
Water volume
/nozzle position
Water temperature range
Warm wind temperature
Safety device
Safety device
Surface temperature
Automatic nozzle cleaning
Pre-wetting
Antibacterial seat/nozzle
Two options: press once for interval cleaning,
press twice for continuous cleaning
Temperature limit circuit, thermostat, thermal fuse
Bimetallic thermostat, thermal fuse
Thermal fuse
Antibacterial material/stainless steel nozzle
Self-cleaning
3 levels adjustment
About 68°F-107°F (4 levels adjustment)
About 89°F-134°F(3 levels adjustment)
4 levels adjustment, room temperature about 107°F
Bidet wash
100-130V~ 50/60Hz
About 0.5L (0.13 gal)-0.7L(0.18 gal)/min
(water pressure 0.2MPa, 3 levels adjustment)
About 1.5m (59.1 in)Power cord length
Cleaning
Drying
Self-cleaning
Deodorization
method Activated carbon deodorant Auto open/close lid/seat Remote control, foot sensing
Seat
Water
volume
Water supply pressure
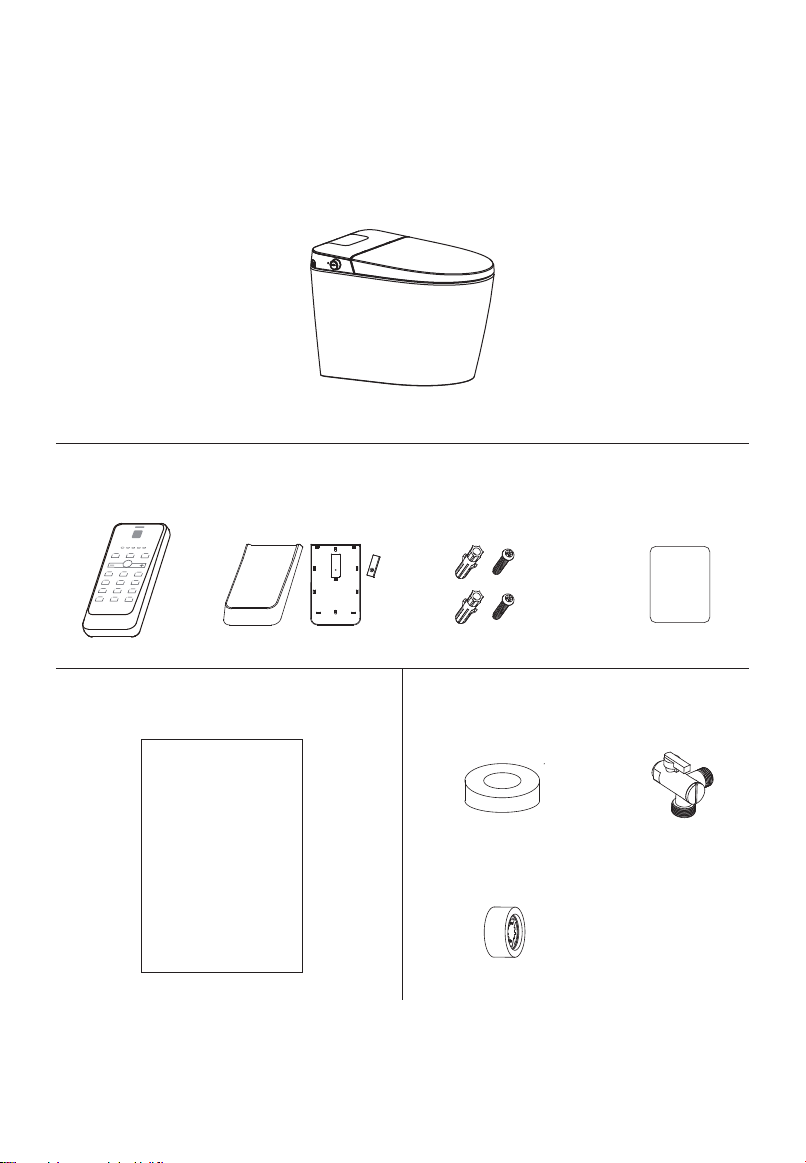
About 680 * 400 * 465 mm
(About 26.8 * 15.7 * 18.3 in)
Flush consumption
Rough-in
Flushing mode Siphon jet
4.8 L (1.27 GPF)
305mm (12.0 in)
Toilet
Rated power
Water supply
temperature
Dimension
Maximum power
Ambient temperature
Waterproof level
Net weight39°F-95°F
1100W 1600W
37°F-104°F
IPX4
About 37.3kg
(about 82.2 lb)
Minimum necessary water pressure:
0.15 MPa (over 20L (5.3 gal)/min when flowing)
Maximum water pressure:
0.75 MPa (static pressure)
Spray a circle of water after sitting

-6-
Functions introduction
Comfort functions
Cleaning function
Washing function
Seat heated
Prevent the low
temperature scald
Heat seat and keep temperature.
To prevent scalding users,the seat temperature will decrease automatically after
seated 15mins.
User can open or close the lid by remote control or foot sensing.
The lid will be automatically close after about 2 mins.
New functions
Pre-wetting
Foot sensing induction
Personal setting You can store your preferred wand positon, water temp, flow and dry temp settings.
Close some functions and enter energy-saving mode.
Touch the sensing area with foot and then lid opens automatically.
Touch the sensing area with foot and then seat opens automatically.
Touch the sensing area with foot and then toilet fush automatically.
After sitting, a spray of water will be automatically sprayed inside the bowl to achieve
anti-fouling effect.
Power outage flushing Connect to the USB TPYE-C with a power bank to achieve the power off flushing.
ECO
Rear wash Cleaning posterior.
Bidet wash
Spray position
adjustment
Water flow adjustment
Massage cleaning
Swing cleaning
Cleaning feminine body.
Adjust nozzle position to expand cleaning scope.
Adjust water flow rate.
The nozzle spray variable intensity water column to massage.
Swing back and forth to cleansing most area.
Anti-bacteria It's anti-bacterial treated on the parts which is directly touched by users, such as lid
and seat.
Under opening status of lid, user can sit after leaving the seat for a while, the toilet
will flush automatically.
Nozzle will be cleaned when it reach out or pull back.
Drain the remain water in the toilet to make water cleaner.
Drying
Temperature
adjustment
Deodorization
Seat sensor
Lid open/close
Seat open/close
LED
Warm wind to dry the body parts.
Adjust temperature of water,seat or drying.
Auto-deodorize after seated.
Functions effective after seated.
After toilet lid open,user can open or close the seat by remote control or foot sensing.
LED on or off by light.
Nozzle cleaning
Water emission
Auto-flushing

-7-
Seat temp indicatorWater temp indicator
Water temp indicator Seat temp indicator
Power indicator Seat temp status indicator Flushing status indicator
Knob
Lid
Seat
Rear wash hole
Bidet wash hole
Nozzle
Ceramic toilet
Foot sensing
Nozzle baffle
Drying baffle
Power-off flush
connector
Parts name
sensor

-8-
※ If the power cord is not long enough, please do not use a extension cord.
※ Only for reference. Bathroom sizes and configurations may vary.
Power and water connection tip
Product drawings
About
465mm(18.3 in)
About 680mm( 26.8 in)
About
400mm(
15.7 in
)
Connect to grounded outlet
GFCI outlet
Caution electric shock!

-9-
Installation precaution
Installation Tools
Notice:
Please remove the dirty water from the pipe before installation. Residual sediment
and other debris may jam in the pipeline if it is the newly decorated house, which
may cause damage to the machine and affect the health of the human body.
(1)Don't install our product in the room with more than 90%RH humidity (relative
humidity).
It is suggested to separate dry space from moist one, such as installing shower
rooms or shower curtains.
(2)Only the specified power supply can be used. (Other power sources may cause
product failure or damage).
(3)Please do not supply water or power before finishing installation.
(4)Please use wires and waterproof sockets suitable for the power of this product.
(5)Please install the waterproof socket at a suitable height on the wall.
(6)The water-supplying pressure should be 1.5kgf/cm²~7.5kgf/cm²(0.15MPa~0.75MPa).
The toilet cannot reach full cleaning functionality if the water pressure cannot reach
0.15MPa.
(7)The water-supplying temperature should be 39.2°F~95°F.
Percussion Drill Tape
Gradienter Steel saw pencilKnife
Glue gun Adjustable Wrench Pliers
Screwdriver

-10-
Product installation
1. Install the water inlet valve
Clean the ground and dry the water before installation. Mark the central lines of
the draining outlet, and install the inlet valve on the wall.
Drain outlet
center mark line
>500mm(19.7 in)
150mm(5.9 in)
300mm(11.8 in)
305mm(12.0 in)
Connect to grounded outlet
GFCI outlet
Caution electric shock!
2. Mark the curve of ceramics
Align the drain hole of ceramic with the central line. Mark the curve of ceramics for
later installation.
Glass cement application:Glue the outline with glass cement to install the toilet.
wall
305mm(12.0in)

-11-
Product installation
① Sealing ring installation
3.Toilet installation(Method 1)
Gently tilt the toilet sideways until it rests on the side surface.
Install the sealing ring evenly along the outlet, and the small end of the sealing
ring facing the toilet.
Glue the edge of toilet bottom with glass cement, place the toilet base along the
outline and position the toilet base.
② Toilet (ceramic) installation
Lift the toilet, take the floor drain as a reference, align the ceramic body of the
toilet with the ceramic contour line drawn on the ground, and slowly put the
ceramic on the ground so that the two marks overlap. After overlapping, press
the ceramic down (can be pressed by the weight of the human body) so that the
sealing ring fully contacts the ground.
※Do not move the ceramic or shake it left and right after the marks are
overlapped, otherwise the seal produced by the sealing ring may be damaged
and cause water leakage.
Draining hose
Sealing ring

-12-
Product installation
4.Toilet installation(Method 2)
① Remove the bidet seat
Remove the fixing screws of the toilet; remove the connecting pipes and wires of
the toilet, separate the bidet seat from the toilet.
Place the sealing ring on to the flange.
② Sealing ring installation
Sealing ring
Flange
Screw
Washer
Decoration panel
Fixed hole

-13-
Product installation
③ Ceramic installation
④ Bidet seat installation
Glue the edge of toilet bottom with glass cement.
Line up the toilet base over the flage screws.
Place the toilet base and secure the flange bolts.
Glue the edge of toilet bottom with glass cement, place the toilet base along the
outline and position the toilet base.
Attach the connecting pipes and wires of the toilet, adjust the bidet seat to match
the toilet, use the screws to fix the bidet seat on the toilet.
Pay attention to the tightness of the pipes connection.

-14-
Product installation
5. Connection of water inlet valve
Connect the water inlet braided pipe to the water inlet angle valve; if the water
pressure is high, you can install a flow restrictor or adjust the position of the angle
valve to achieve the best flushing effect.
NOTE:
Clean the floor and tools, do not use the toilet immediately, it takes 48 hours to cure and
keep the toilet dry.
NOTE:
If the water pressure is less than
0.24Mpa(static pressure), remove
the flow restrictor .
Inlet angle valve
G1/2
G3/4
Fow
restrictor
Connect the electricity plug with protection unit. Press
the power switch, the light turns on, power is on, and
hear the buzzer calls.
6.Connect to power
※ Notes:Open the water supply valve and connect to the power plug. When using
the product for the first time, press the rear/bidet wash button in the remote control
or knob. If the toilet doesn't work, it may be lack of water or seat sensor blocked.
7.Using the product for the first time(Check every function button of the
remote control, manual flushing and side button function is normal.)
① Open the water supply valve, connect to the power plug.
Check that every function of product is normal, such as rear/bidet wash, dry,
flow adjustment, water temp adjustment, massage cleaning, swing cleaning,
LED, seat heated adjustment, etc.
② Rear/bidet wash perfermance test.
Press the seat sensor with hand to check if the nozzle works or not.

-15-
Instructions for remote control Installation
Method 1:
Method 2:
① Drill a hole of 78mm(3.07 in)-82mm(3.23 in) length and 22mm(0.87 in) depth on the wall by the drill with
the diameter of 6mm(0.24 in).
Note: the position of the hole shall be satisfied for user to get the remote control conveniently when sitting
on the seat.
②After installing, the expansion plug in the wall shall align the fixing hole of the remote control and then
lock the bolt. Install the remote control fixing panel with a magnet on the remote control fixed seat and
lock tightly.
Note: pay attention to the polarity when installing the magnet. Place the larger side of the magnet hole outside.
The fixed panel and enclose the small hole surface inside the fixed panel; as shown in the below figure 2.
① Install the remote control fixing panel with a magnet on the remote control fixed seat and lock tightly.
Note: Pay attention to the polarity when installing the magnet. Place the larger side of the magnet hole
outside the fixed panel and enclose the small hole surface inside the fixed panel, as shown in the below figure 1.
② Put the double sided tape on the remote control fixed seat.
③ Clean dust, grease, water droplets on the walls and wipe them clean.
④ Press the remote control fixed seat with double sided tape on it. Press it evenly for 3 to 5 minutes.
Attach the remote control fixed seat to the wall.
Note: The method is applicable to glazed tiles, glass and smooth wall.
Double sided tape
Figure 1 ① ② ③ ④
Magnet
Put the remote control on the fixed base after installing the battery, and the remote control can
automatically absorb on the fixed base.
※ Please place the remote control on the fixed place if not use. (To avoid the remote control falling
down)
※ It may cause damage if the remote control falls down.
※ Please do not spill water on the remote control or drop into the water, or it may cause damage.
NOTE:
Magnet
Figure 2
① ②
78mm(3.23 in)
82mm(3.07 in)

-16-
Signal light
Stop
Bidet
Flush
Plus
Water temp
Nozzle position
Swing
User 1
User 2
Lid open/close
Seat open/close
ECO
Dry
Seat temp
Flow
Minus
Rear
Signal window
Massage
Remote control panel overview
※
※
Remote control alignment: After the product is connected to the power supply, the remote control
alignment operation can be carried out within 1 minute from the buzzer call.
At the same time, press the "User 1" and "User 2" buttons on the remote control. After 3 seconds,
the "rear wash/bidet wash/stop" three buttons flicker at the same time, press the "plus" to increase.
Select the required level, press the "stop" button, buzzer calls, then the code is successful, then the
remote control can only control the product; buzzer calls two times, represents code failure;
If you want to cancel the alignment, press the "User 1" and "User 2" buttons on the remote control
at the same time. After 3 seconds, the "rear wash/bidet wash/stop" buttons flicker at the same time.
You can cancel the code by pressing the stop key directly.
FLOW
DRY
SEAT
USER1 USER2
SWING
TEMP
POSITION
MASSAGE
BIDETREAR STOP
FLUSH

-17-
Using instructions
Press the button, all functions off.
STOP
Press the button, rear spray function turns on, auto off after 2 mins or off by pressing
the stop button.
Function will stop if user leaves.
REAR
MASSAGE
During rear/bidet wash mode, press the "Massage" button, function will start after a beep.
1. Interval massage mode: The nozzle sprays with varying pressure.
2. Powerful massage mode: The nozzle sprays pressurized water.
Remark:
The Massage cycle order is interval massage > powerful massage > regular cleaning.
MASSAGE
Press the button, bidet/front spray function turns on, auto off after 2 mins or off by
pressing the stop button.
Function will stop if user leaves.
BIDET
FLOW
Under rear/bidet wash mode, the water flow is settled on normal level( initial level is in
the medium ).
Press "FLOW" button to start the flow adjustment,and press plus button to increase flow,
press minus button to decrease flow. Total 5 levels, and corresponding indicator will on
under different level.
FLOW ADJUSTMENT
SWING
During rear/bidet wash mode, press the "Swing" button, function will start after a beep.
During swing function, the nozzle will oscillate back and forth. Press the "Swing" button
again to stop swing function. Pressing the "Stop" button will stop all cleaning functions.
SWING
TEMP
Under rear/bidet wash mode, initial level is in the medium.
Press "TEMP" button to start the water temp, and press plus button to increase water
temp, press minus button to decrease water temp, total 3 levels, and corresponding
indicator will on under different level.
WATER TEMP SETTING
POSITION
Under rear/bidet wash mode, initial level is in the medium.
Press "POSITION" button to start the position adjustmen, and press plus button to
forward the nozzle position, press minus button to backwaed the nozzle position.
Total 3 levels, and corresponding indicator will on under different level.
NOZZLE POSITION ADJUSTMENT
SEAT TEMP ADJUSTMENT
Seat heated after sitting, heat preservation after reaching the set temp. The initial level
is in the medium. Press "SEAT" button to start the seat temp, and press plus button to
increase the seat temperature, press minus button to decrease the seat temperature.
Total 3 levels(including neutral), and corresponding indicator will on under different level.
SEAT
Other manuals for T162A Series
1
Table of contents
Other KELISS Toilet manuals
Popular Toilet manuals by other brands

WECCO
WECCO KWSZ4 6000237501 Instructions for use

noken
noken FORMA 100148382 N350798839 quick start guide

Dometic
Dometic CT 4050 operating manual

Sanela
Sanela Lema SLP 59RS Instructions for use

Spectrum Brands
Spectrum Brands Pfister Verano VTP-E32W Quick installation guide

FV
FV Ginebra E149 installation instructions

Enders
Enders MOBIL-WC DELUXE Assembly and instruction manual

Kohler
Kohler Revival K-3360 Homeowner's guide

Franke
Franke CAMPUS CMPX597 Installation and operating instructions

Dometic
Dometic CT 3050 installation instructions

DURAVIT
DURAVIT SensoWash i Plus Mounting instructions

Wellis
Wellis Ditte Rimless WF00023 installation manual