M122|Dämmerungsschalter
12V/DC
Schaltet bei Einbruch der Dämmerung z.B. Lampen
ein und bei Tagesanbruch wieder aus (für Wochen-
endhäuser mit Akkustromversorgung, Segeljach-
ten, Wohnwagen usw.). Schaltausgang: Relais 1 x
UM, max. 3 A. Die Lichtstärke-Empndlichkeit kann
durch ein teilweise mechanisches Abdecken des
Sensors verändert werden.
M122|Twilightswitch12V/DC
Switches on e.g. lamps at nightfall and off
again at daybreak (for weekend cottages, sailing
yachts, caravans etc.). Distribution output: relay 1
x change over, max. 3 A. The sensitivity of the lumi-
nous intensity may be changed by partially covering
the sensor mechanically.
M122|Interruptorcrepuscular
12V/DC
Conecta p.ej. lámparas al anochecer y las descon-
ecta de nuevo a la madrugada (para casas para
la n de semana como suministro de corriente por
acumulador, yates de vela, caravanas etc.). Salida
de conmutación: relé 1 x conmutar, máx. 3 A. La
sensibilidad de la intensidad luminosa se puede
cambiar por cubrir el sensor parcial mécanicamen-
te.
M122|Interrupteurcrépusculaire
12V/DC
Intercale p.ex. des lampes à la tombée de la nuit
et les déconnecte de nouveau à la pointe du jour
(pour les maisons fermettes comme alimentation
en courant par accu, les yachts, les caravanes etc.).
Sortie de commutation: relais 1 x inversion, max.
3 A. On peut changer la sensibilité de l’intensité
lumineuse par couvrir le détecteur en partie méca-
niquement.
M122|Hämäräkytkin12V/DC
Kytkee esim. lamppuja päälle hämärtä-
essä ja päivän valjetessa taas pois päältä (akku-
käyttöisiin viikonloppumökkeihin, purjeveneisiin,
asuntovaunuihin jne.) Kytkentäulostulo: rele 1 vk
korkeintaan 3 A. Valovoimaherkkyys voidaan mu-
uttaa tunnistimen osittaisella peittämisellä.
M122|Schemeringsschakelaar
12V/DC
Zet bij het invallen van de schemering bv. lampen
aan, en zet ze bij aanbreken van de dag weer uit.
Voedingsspanning: 12 V/DC (voor weekend-huisjes
met stroomvoorziening via een accu, voor zeiljach-
ten, caravans, etc.). Schakeling: relais 1 x OM, max.
3 A. De lichtgevoeligheid kan door het gedeelteli-
jk mechanisch bedekken van de sensor verandert
worden.
M122|Interruptorcrepúsculo
12V/DC
Liga por exemplo ao anoitecer lâmpadas que ao
amanhecer novamente se desligam (para casas de
ms-de-semana com acumulador de abastecimen-
to de corrente, iates á vela, caravanas etc.) Saída
de comutação: relé 1 x comutador, máx. 3 A. A
sensibilidade da intensidade luminosa pode ser mo-
dicada através do mecânico tapar de uma parte
do sensor.
M122|Сумeрeчный
выключaтeль12Вольт
При нaступлeнии тeмноты включает нaпр.
лaмпы и на рассвете их выключает (для дaч с
нaпряжeниeм питaния от aккумулятора, лодок,
фургонов для жилья, и т.д.) Контакты рэлe 1 х
вкл. 1 х выкл. мaкс. 3 Aмпeрa. Чувствитeльность
прибора можно измeнить чaстичным зaкрытиeм
дaтчикa.
www.kemo-electronic.de
P/Module/M122/Beschreibung/24024OM/KV040
N78AU
190953
BestimmungsgemäßeVerwendung:
Zum Ein- oder Ausschalten von Lampen oder anderen elektrischen Gerä-
ten bei Dämmerung oder Tagesanbruch.
AufbauanweisungundInbetriebnahme:
Das Modul sollte an einer trockenen Stelle (z.B. Dachüberstand) so mon-
tiert werden, dass die vom Dämmerungsschalter eingeschaltete Lampe
nicht den Dämmerungsschalter selbst beleuchtet! Dann schaltet der Däm-
merungsschalter ständig EIN und AUS! Damit der Dämmerungsschalter
nicht auf kurzzeitige Änderung der Lichtverhältnisse reagiert (z.B. vorü-
berfahrende Autoscheinwerfer), ist eine Schaltverzögerung von ca. 3 - 4
Sekunden eingebaut.
Das Gerät wird mit 12 V/DC Betriebsspannung betrieben (entweder 12 V
Autobatterie oder ein stabilisiertes 12 V Netzteil).
Das Gerät hat einen Relaiskontakt 1 x UM. Sie können also wahlweise eine
Lampe oder Gerät bei Einbruch der Dämmerung einschalten oder auch
ausschalten! Bitte achten Sie darauf, dass der Stromverbrauch des ange-
schlossenen Gerätes < 3 A ist (max. Schaltleistung des Relais).
Wenn Ihnen das Modul zu spät (ca. 45 Lux) schaltet, dann können Sie
durch teilweises Abdecken des Lichtsensors (die klare Linse auf dem Ge-
rät) mit undurchsichtigem Klebeband die Schaltschwelle ändern.
Achtung!Falscher Anschluss, falsche Betriebsspannung und Kurz-
schlüsse führen zur sofortigen Zerstörung des Moduls! Da jedes Modul
sorgfältig vor dem Versand geprüft wurde, ist ein Garantieersatz in sol-
chen Fällen nicht möglich.
TechnischeDaten:
Betriebsspannung:12 V/DC (11 - 14 V)|Stromaufnahme:ca. 2 mA
/ 35 mA (Relais Aus / Ein) |Relaiskontakt:1 x UM, Belastbarkeit max.
25 V, 3 A|Arbeitstemperatur-Bereich:ca. -15 bis +50°C |Licht-
stärkeeinschalten: ca. 25 Lux ± 20% |Lichtstärke ausschalten:
ca. 45 Lux ± 20% | Schaltverzögerung: ca. 3 - 4 Sekunden | Die
Lichtstärke-Empndlichkeit kann durch ein teilweise mechani-
schesAbdeckendesSensorsverändertwerden|Maße:ca. 72 x
50 x 32 mm (ohne Befestigungslaschen, mit Sensor)
Entsorgung:
Wenn das Gerät entsorgt werden soll, dann dürfen diese nicht in den
Hausmüll geworfen werden. Diese müssen dann an Sammelstellen wo
auch Fernsehgeräte, Computer usw. abgegeben werden, entsorgt werden
(bitte erkundigen Sie sich in Ihrem Gemeindebüro oder in der Stadtver-
waltung nach diesen Elektronik-Müll-Sammelstellen).
Useasdirected:
To switch lamps or other electric devices on or off at dusk or daybreak.
Assemblyinstructionsandsettingintooperation:
The module should be mounted in a dry place (e.g. roof projection)
in such a manner that the lamp which is turned on by the crepuscular
switch does not illuminate the crepuscular switch itself! In this case
the crepuscular will switch ON and OFF constantly! A switching delay
of approx. 3 - 4 seconds is installed to avoid that the crepuscular
switch reacts to short changes of the lighting conditions (e.g. passing
headlamps).
The device is operated with an operating voltage of 12 V/DC (either a
12 V car battery or a stabilised 12 V power supply).
The device has a relay contact 1 x SWITCH OVER. So you may either
switch a lamp or device on at dusk or switch it off! Please make sure
that the power consumption of the connected devices is < 3 A (maxi-
mum breaking capacity of the relay).
If you think that the module switches too late (approx. 45 lux), you
may change the switching threshold by covering the optical sensor
(the clear lens on the device) partially with opaque adhesive tape.
Attention!Wrong connection, false operating voltage and short-
circuits will destroy the module immediately! Since every module has
been tested thoroughly before dispatch, a replacement on warranty is
not possible in those cases.
Technicaldata:
Operatingvoltage:12 V/DC (11 - 14 V)|Powerconsumption:
approx. 2 mA / 35 mA (relay on / off)|Relaycontact:1 x switch-
over, loading capacity max. 25 V, 3 A | Operating temperature
range:approx. -15 to +50°C|Luminousintensityswitching-on:
approx. 25 lux ± 20% |Luminous intensity switching-off: ap-
prox. 45 lux ± 20%|Switchingdelay:approx. 3 - 4 seconds |The
sensitivityoftheluminousintensitymaybechangedbypar-
tiallycoveringthesensormechanically|Dimensions:approx.
72 x 50 x 32 mm (without fastening straps, with sensor)
Disposal:
This device may not be disposed of with the household waste. It has
to be delivered to collecting points where television sets, computers,
etc. are collected and disposed of (please ask your local authority or
municipal authorities for these collecting points for electronic waste).
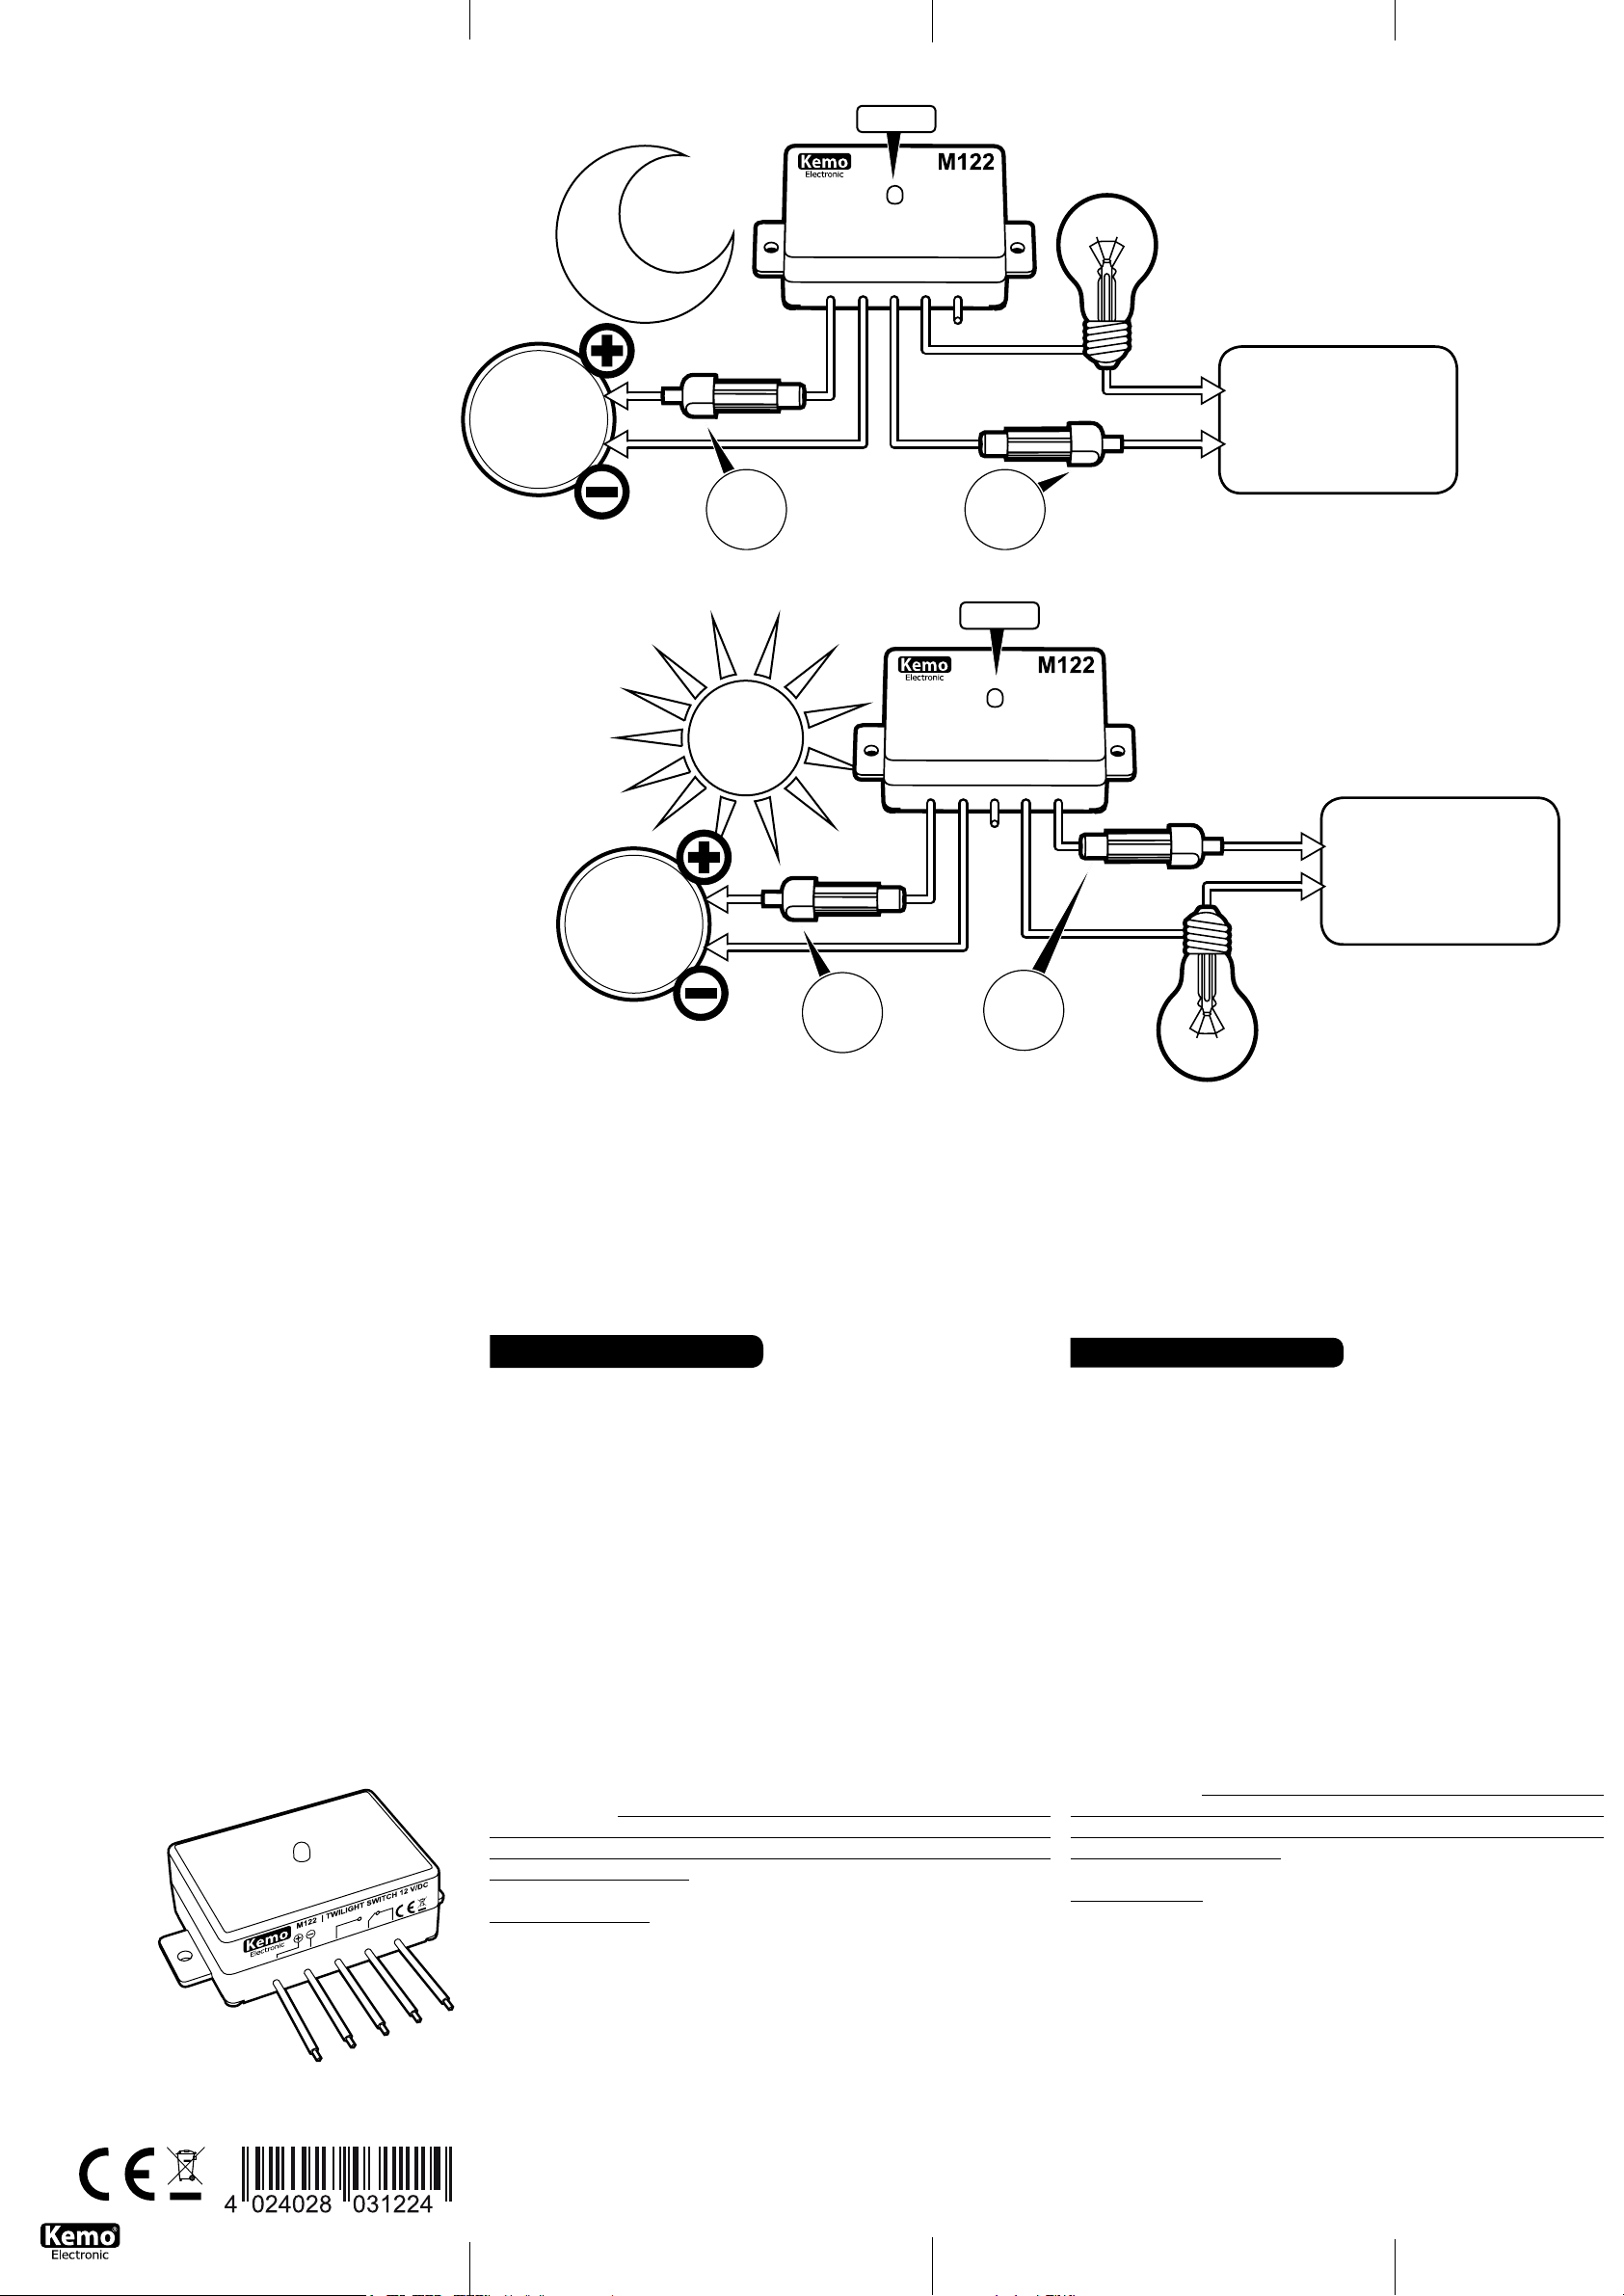
D | Achtung! Wie aus den Zeichnungen ersichtlich, kommt aus dem
Ausgang des Moduls keine Spannung zum direkten Anschluss einer Lam-
pe. Im Modul ist ein Relaiskontakt enthalten, der die Lampe schaltet. Sie
müssen also die Betriebsspannung für die Lampe extra zuführen (gemäß
Zeichnung). Es kann die gleiche Spannungsquelle sein, mit der auch das
Modul betrieben wird! Oder auch eine andere Spannungsquelle, falls die
Lampe eine andere Betriebsspannung hat als 12 V.
GB|Attention! As shown in the drawings, there is no voltage co-
ming out of the modules output for the direct installation of a lamp.
The module includes a relay contact, which switches the lamp. Opera-
ting voltage has to be conducted additionally as shown in the picture.
It can be the same voltage source, with which also the module is
operating! Another power source can be used in case the lamp has a
different operating voltage than 12 V.
F
FIN
P
E
D
GB
NL
RUS
DGB
12V
DC
12V
DC
ANSCHLUSSPLAN|CONNECTINGPLAN
GB|Switching-on of the lamp
at dawn
Switching-off of the lamp
in daylight
GB|Switching-on of the lamp
in daylight
Switching-offof the lamp
at dawn
•Betriebsspannung
für die Lampe
•Operating voltage
for lamp
•Betriebsspannung
für die Lampe
•Operating voltage
for lamp
•Sicherung
•Fuse
•Sicherung
•Fuse
200mA 3A
D|Einschalten der Lampe bei Eintritt
der Dämmerung
Ausschalten der Lampe
beiTageslicht
D|Einschaltender Lampe
bei Tageslicht
Ausschalten der Lampe bei Eintritt
der Dämmerung
•Sicherung
•Fuse
•Sicherung
•Fuse
3A
200mA
•Sensor
•Sensor