Kenko New Moonlight II User manual
Operating Instructions

SAFETYPRECAUTION -Pleasereadthesebeforeoperatingthetelescope.-
2
For safety reasons, please read all the safety precautions before operating the telescope.
※We anticipated different situations resulted
by mistakenly operating the telescope. There
are two categories, “WARNING” and “CAU-
TION”.
The following icons will be used in this instruction manual.
FORBIDDANCE FINGER
INJURY
EASILY SET ON
FIRE
WARNING
CAUTION
Operating the telescope without following these instructions can
result in severe injury or permanent damage to the telescope.
Operating the telescope without following these instructions can
result in injury or physical damage to the telescope.
Never observe the sun directly through your telescope. This is very dangerous as it
may cause immediate and permanent harm to your eye.
Always make sure to set
the telescope on a flat and
even ground. The fall will
damage the telescope and
could cause bodily injury.
Loose screws may lead to
damaging the telescope
and may result in bodily
injury.
Please do not leave
telescope at places that
sunlight can reach. This
may result in setting fire
due to the concentrated
light from the optics.
Please store properly after
each use.
Please pay extra attention
when children are using
the telescope. The mount
and tripod sections may
pinch users’ finger if not
careful.
Children may accidentally swallow the
cap and eyepiece. Get immediate
medical attention if such situation occurs.
Keep all plastic bags (form packaging)
away from children to avoid danger of
suffocation or choking.
Before reading this instruction manual:
●This booklet is the instruction manual for NEW MOONLIGHT II Telescope. Although the shape of the telescope in the pictures may
be different, the operating method is the same.
●It is prohibited to copy or reproduce parts or all parts of this instruction manual.
●The specification, design or other information in this instruction manual may be changed and edited from time to time without
notification.
●When operating the telescope, please follow the instructions in this manual. Pay special attention to the WARNINGS and
CAUTIONS listed in this booklet for your safety.
●This instruction manual is written clearly and comprehensively. If there are sections or statements that is not clear, has wrong
descriptions or misspelled, please feel free to inform us.
●Kenko Tokina Company Limited will not be responsible for any losses, damages or claims from a third person against the users
due to improper use of the telescope.

3
安全上のご注意 ◆天体望遠鏡をご使用の前に◆
Part Name of the merchandise
①②
④
⑥
③
⑤
⑦
⑨
⑧
⑩⑪
⑫
⑬
⑭
PackageContents
Be sure to check all listed items are included with your purchase.
Telescope Optical Tube
20mm Eyepiece
4mm Eyepiece
3x Barlow Lens
1.5x Erecting LensFinder
Tripod
Diagonal
①Telescope Optical Tube
②Hood
③Objective Lens(Interior)
④Azimuthal Mount
⑤Elevator Locking Screw (Reverse Side)
⑥Telescope Tube Swing Locking Screw
⑦Finder Optical Axis, Adjustment Screw (3 locations)
⑧Finder
⑨Eyepiece
⑩Diagonal
⑪Focus Knob
⑫Altitude motion fixing shaft
⑬Tripod
⑭Tripod Extender Lock

安全上のご注意 ◆天体望遠鏡をご使用の前に◆
4
SAFETYPRECAUTION
This section covers the assembly instructions for your New Moon Light II telescope. It is highly recommended
that the first setup of the telescope should be done indoors. This way it will be easier to identify all the various
parts and familiarize yourself with the correct assembly procedure before attempting out in the field.
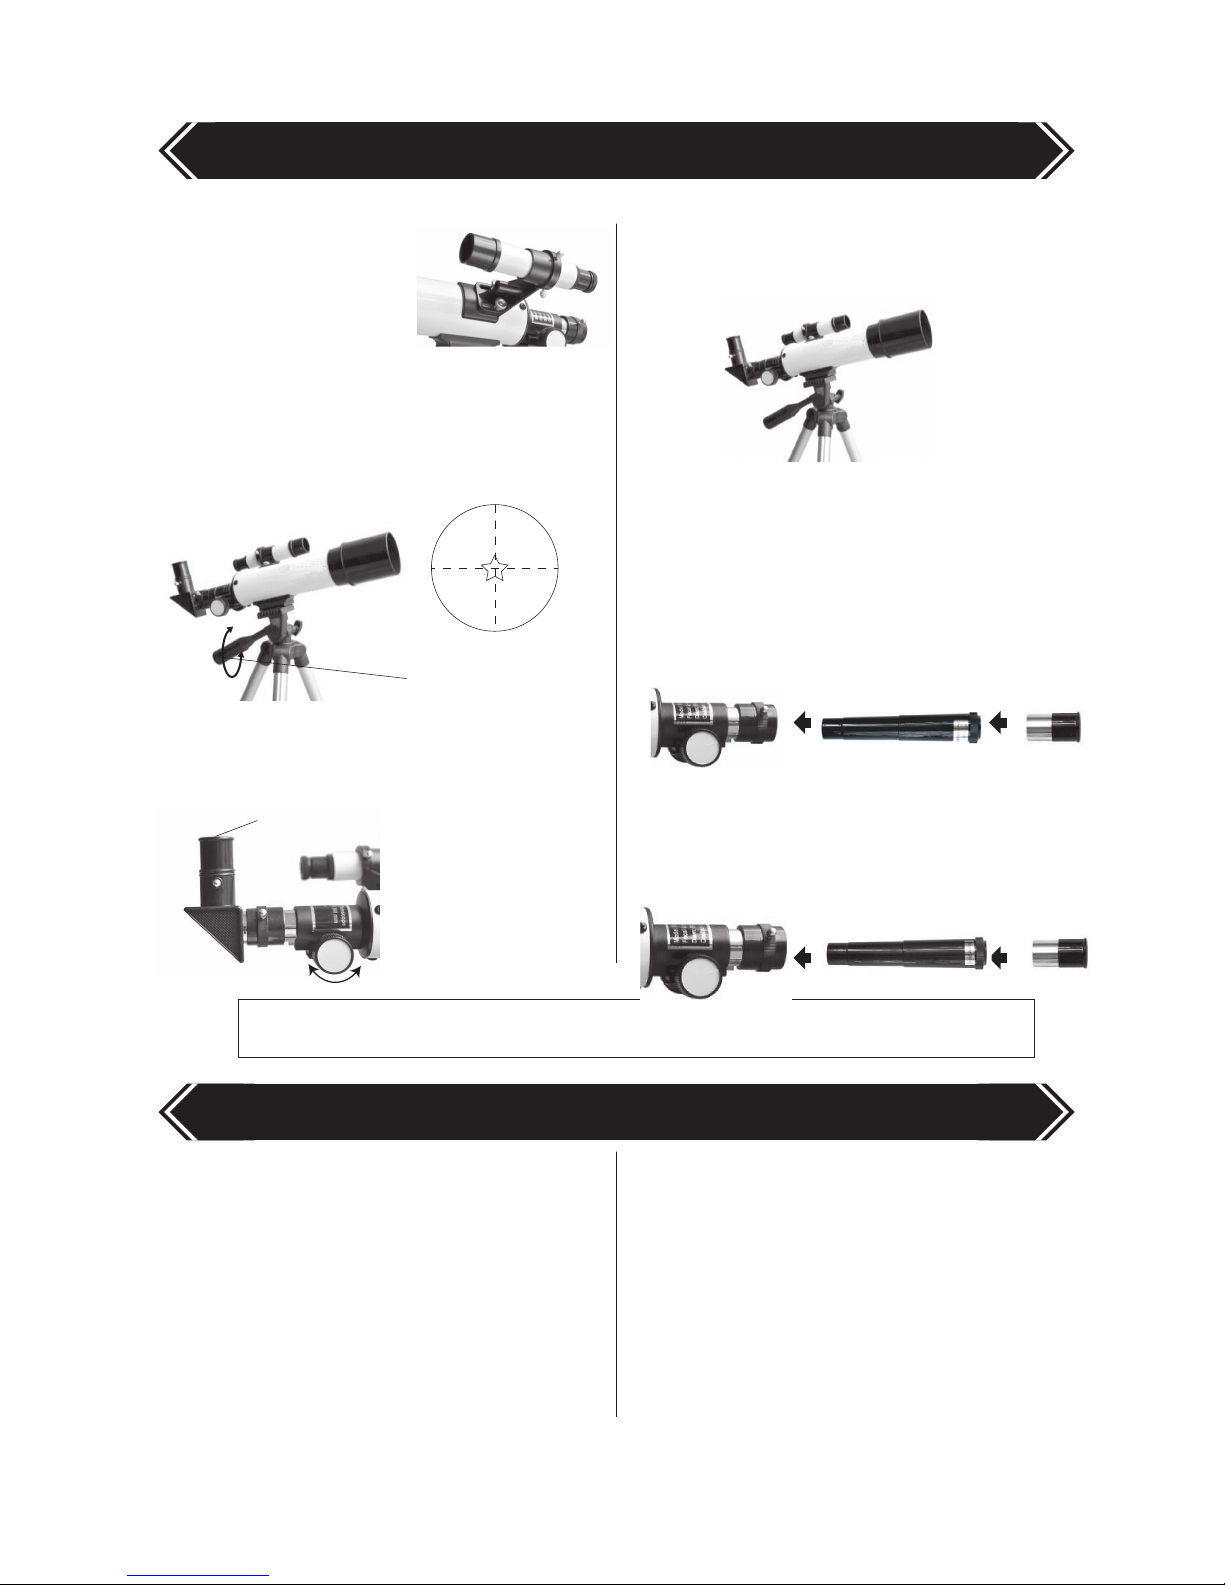
1.Setting Up the Tripod
Stand the tripod upright and pull the tripod legs
apart until each leg is fully extended (Fig-1). As
necessary, adjust the leg-length releasing the tripod
extender lock (Fig-2).
3.Attaching the Finder to the Telescope
Optical Tube
Attach the finder to the proper location on the
telescope optical tube. The finder should be aligned
before using the telescope (See page 5 for proper
aligning of the finder.).
4.Installing the Eyepiece
To observe an erect image with the telescope, you
must use an eyepiece. Attach the eyepiece with the
star diagonal like shown on the picture below and
tighten the locking screws.
2.Attaching the Telescope Optical Tube to
the Tripod
Place and fix the telescope optical tube on the
tripod using the telescope-tube locking screw. At
this time, make sure to fit the concave part of the
telescope tube and the convex part of the mount so
that the tube is aligned properly.
NOTE: Attaching the telescope optical tube to the
tripod mount should be firmly secured. It is danger-
ous if the tubes fall off caused by an unsecured
locking screw.
Adjust the height of tripod by extending the
elevator part by loosening the elevator locking
screw.
The eyepiece can be changed to different powers.
This telescope comes with two eyepieces.
Depending on the observed object, you can select
your favorite eyepiece.
Examples:When New MoonLight II with 20mm
eyepiece is used:
■How to calculate the Powers of Telescope
(Fig-1) (Fig-2)
Tripod Extender Lock
Telescope Optical Tube
TelescopeOpticalTube Finder
Eyepiece
Diagonal
Locking
Screw
Mounting
Image
Tripod Mount
Telescope-tube
Locking Screw
Focal Length of Objective Lens in (mm)
Focal Length of Eyepiece in (mm)
= X Powers of Telescope
360(mm)
20 (mm) =18xPowers

5
。
(View observed by 20mm eyepiece)
②①
Tighten the adjustment screw
Loosen the adjustment screws
②①
M
o
r
e
th
an
2
k
m
Focus Knob
AligningtheFinderScope
●What is a finder scope?
If you try to find a star with a telescope from the very beginning, it is very hard to catch the target astral object due to
high-powers and narrow field of view of the telescope. The finder has a lower-powers and wider field of view
compare to the main telescope and it is easier to find the positional relations between the stars. You can see the
reticle in the center field of the finder and set the target astral object at this cross point.
In order to smoothly introduce the target astral object to the main tube through the finder scope, the finder must be
collimated (aligned) with the telescope first. Please align the optical axis of the finder scope through the following
steps before observing.
●Steps to align the finder scope
1) It is better to carry out most of this procedure
during the daytime.
6)Byadjusting(tightenorloosen)the3adjustment
screwsonthefinderbracket,thedirectionofthe
findercanbechanged.
※For example, by tightening the adjustment screw on the top
and loosening the two adjustment screws on the bottom, the
finder can be turned to face upwards (see the above picture for
reference).
7)Whentheobjectseenthroughthemaintubehasbeen
centeredonthecrosshairofthefinder,slowlytightenthe
adjustmentscrewsequallytofixthefinder.
8)Thealignmentofthefinderscopehasbeencompleted.Please
makesurethattheaxisofthescopeisnotoutofalignment
beforestarobservation.
2)Aimthetelescope
atasmallobjectthatis
aboutseveralkm
away,suchasa
chimneytoportipof
anantenna.
3)Centertheobjectin
theeyepiece.
4)Ifitisnotfocused,
slowlyturnthe
focusingknobuntil
theobjectcomesinto
focus.
5)Afterthat,lookattheobjectwiththefinderscope
thistime.Iftheobjecthasalreadybeencenteredon
thecrosshair,alignmentofthefinderisnotneces-
sary.
Eyepiece(20mm)
Diagonal
Locking
Screw
(1) View observed by 20mm eyepiece
(2) View observed by finder
(1) View observed by 20mm eyepiece
(2) View observed by finder
Finder Adjustment Screws
6
CAUTION
Using your telescope
Maintenance and Caring for your telescope
1) You can find the target
celestial objects with your
eyes. It is easier to find out
with the planisphere or other
star maps.
4) If you can already see your target celestial
object, try to change to the 4mm eyepiece,
which has a higher magnification.
6) By placing a 3X Barlow lens between the telescope
and the eyepiece, magnification can increase 3 times
more. However, it will darken and lower the resolution
of the image. For this reason, please use the 3X
Barlow lens only for high power observation.
5) Normally, image you see through the telescope and
the finder scope will be upside down. Diagonal prism can
erect the upside down image, but the image will be
reversed. By inserting a 1.5X erecting lens between the
telescope and the eyepiece, you can observe an upright
and right reading image. However, the 1.5X erecting lens
will darken and lower the resolution of the image. (The
finder can only provide an upside down and reversed
image)
2) Before using the telescope, identify your object
with your eyes first. Afterwards, turn the altitude
adjustment rod to move up and down. Look through
the finder scope at the same time and set the object
on the cross point of the finder.
3) Set the 20mm eyepiece on the telescope. After
the target celestial object has entered the field of
view of the main tube, turn the focusing knob until
the object comes into focus.
Never observe the sun directly through your telescope. This is very dangerous as it
may cause immediate and permanent harm to your eye.
Altitude motion fixing shaft
20mm
Focus Knob
3xBarlow Lens Eyepiece
1.5xErecting Lens Eyepiece
Telescope is a precision instrument and is sensitive to
dust, moisture, saline matter, heat and impact. During
storage, please consider the following and handle your
telescope with care.
1) Please store the telescope properly after each use.
2) Please keep the telescope in a well-ventilated and
normal room temperature. A damp environment can
lead to mold growth.
3) If you are going to keep the telescope assembled,
cover the whole telescope with a large plastic cover to
protect it from dust.
4) Do not wipe off dust on the lens. Instead, use a
blower to blow it away.
5) If fingerprints or dirt are attached on the lens, please
carefully clean it with lens cleaning solution and
microfiber cloth.
6) The lenses are precisely set for observing; never
disassemble the telescope for cleaning.

7
Troubleshooting
Read the instruction manual and try these trouble-shooting tips before taking the telescope in for repair.
If you have checked the above problems but still experiencing problems with your telescope, please
contact the dealer that you bought the telescope from or Kenko Tokina Co., Ltd.
Problem: #1
I cannot see any images through the telescope
Possible problems and solutions
Q) Have you set the eyepiece?
A) Set the eyepiece.
Q) Is there any condensation on the objective lens or the eyepiece?
A) Fan the objective lens or eyepiece until it is dry. If the problem is persists, move the telescope back to
indoor for natural drying.
Q) Is the magnification too high?
A) Use the 20mm eyepiece at the beginning stage.
Q) Is the image out of focus?
A) Slowly turn the focusing knob until it gets focused.
Q) Are the finder and the main tube looking at different places?
A) Confirm whether the finder and the main tube are looking at the same star or not. Try to do the alignment
again if necessary.
Problem:#2
I do not know which star I am looking at
Possible problems and solutions
Q) Is the finder and the main tube looking at different places?
A) Confirm whether the finder and the main tube are looking at the same star or not. Try to do the alignment
again if necessary.
Q) Is the telescope correctly facing the target star?
A) Confirm that the target has been set on the center of the crosshair of the finder scope.
Q) Is the magnification too high?
A) Use the 20mm eyepiece at the beginning stage.

DESCRIPTION SPECIFICATIONS
Optical Type
Focal Length
Specifications
WARRANTY
Aperture (mm)
Reflection
360mm(14.17 in)
50mm(1.97 in)
1:7.2
10.2
51x
2.4 arc seconds
5x24
90x (270x)
18x (54x)
4mm
20mm
Aperture Ratio
Light Gathering Power
Resolution
Finder
Eyepiece
( ): when used the
3xbarlow Lens
Limiting Stellar Magnitude
1) Repairs can be performed from an authorized dealer or directly from Kenko Tokina Co., Ltd.
2) Clearly state the problem(s) and the area(s) that need repairing.
3) The warranty does not cover the product in the following case:
a. Damages due to misuse
b. Damages due to improper storage
c. Damages due to fire, flooding or other natural disasters
d. Damages caused by any unauthorized repairing, remodeling or disassembling
e. Other damages similar to the above
f. Changing of expendable items
4) This warranty shall be void if the sales receipt does not show purchase date or the name of the autho-
rized dealer.
5) Customer will be responsible for the inbound repair shipping charges.
6) The warranty only cover the purchased product.
7) The warranty only covers the non-chargeable repairs. It is not used to protect any legal rights of
customers.
Attention: Please clearly describe the problem(s) and the area(s) that need to be repaired.
Personal Privacy Information
・Personal information provided will be disposed immediately.
・Data such as, age or sex may be used only for statistical use.
・Our company will not share any personal information of our customers to a third party other than the
following situations:
1) We have a signed consent from customers.
2) In order to accomplish the repair request of the customers, some personal information within necessary
level, may be shared with the subcontracting companies. However, according to our company’s regula-
tions, we are responsible for the risk management of personal information and supervision to such
companies therefore we will only release information deemed necessary.
Table of contents
Other Kenko Telescope manuals


