manuals.online logo
Brands
  1. Home
  2. •
  3. Brands
  4. •
  5. Kenmore
  6. •
  7. Dryer
  8. •
  9. Kenmore Elite 137500000A User manual

Kenmore Elite 137500000A User manual

This manual suits for next models

1

Other Kenmore Dryer manuals

Kenmore 41798022000 User manual

Kenmore

Kenmore 41798022000 User manual

Kenmore 97271100 User manual

Kenmore

Kenmore 97271100 User manual

Kenmore 397909A User manual

Kenmore

Kenmore 397909A User manual

Kenmore 62992 User manual

Kenmore

Kenmore 62992 User manual

Kenmore 110.C8580 Series User manual

Kenmore

Kenmore 110.C8580 Series User manual

Kenmore W10562370A User manual

Kenmore

Kenmore W10562370A User manual

Kenmore 27-INCH WIDE ELECTRIC DRYERS Operating instructions

Kenmore

Kenmore 27-INCH WIDE ELECTRIC DRYERS Operating instructions

Kenmore 110.8770 Series User manual

Kenmore

Kenmore 110.8770 Series User manual

Kenmore 3979964 User manual

Kenmore

Kenmore 3979964 User manual

Kenmore 110.9756 Series User manual

Kenmore

Kenmore 110.9756 Series User manual

Kenmore 2696292100 (Elect.) Owner's manual

Kenmore

Kenmore 2696292100 (Elect.) Owner's manual

Kenmore Elite Oasis 110.6703 Series User manual

Kenmore

Kenmore Elite Oasis 110.6703 Series User manual

Kenmore Sensor smart C62062 User manual

Kenmore

Kenmore Sensor smart C62062 User manual

Kenmore 6600 User manual

Kenmore

Kenmore 6600 User manual

Kenmore 97922 User manual

Kenmore

Kenmore 97922 User manual

Kenmore 8519319A User manual

Kenmore

Kenmore 8519319A User manual

Kenmore 110C66012011 User manual

Kenmore

Kenmore 110C66012011 User manual

Kenmore Elite Oasis 110.6703 Series User manual

Kenmore

Kenmore Elite Oasis 110.6703 Series User manual

Kenmore 110.8708 User manual

Kenmore

Kenmore 110.8708 User manual

Kenmore 796.8156 Series User manual

Kenmore

Kenmore 796.8156 Series User manual

Kenmore 29" (73.7CM) User manual

Kenmore

Kenmore 29" (73.7CM) User manual

Kenmore ELITE 796.8051 User manual

Kenmore

Kenmore ELITE 796.8051 User manual

Kenmore KING SIZE 60972 User manual

Kenmore

Kenmore KING SIZE 60972 User manual

Kenmore 41794252500 User manual

Kenmore

Kenmore 41794252500 User manual

Popular Dryer manuals by other brands

Whirlpool WED9270XL2 parts list

Whirlpool

Whirlpool WED9270XL2 parts list

Kleenmaid KED2000 Repair instructions

Kleenmaid

Kleenmaid KED2000 Repair instructions

SPI Supplies SPI-DRY Operation manual

SPI Supplies

SPI Supplies SPI-DRY Operation manual

Amana NGD5800DW Use & care guide

Amana

Amana NGD5800DW Use & care guide

Bosch WTG86402GB Installation and operating instructions

Bosch

Bosch WTG86402GB Installation and operating instructions

Maytag MED4200BW0 installation instructions

Maytag

Maytag MED4200BW0 installation instructions

ffuuss eos user manual

ffuuss

ffuuss eos user manual

KitchenAid 53-3498 installation instructions

KitchenAid

KitchenAid 53-3498 installation instructions

Schulthess Spirit topLine TW 8340 operating instructions

Schulthess

Schulthess Spirit topLine TW 8340 operating instructions

Whirlpool LGR4624BW0 parts list

Whirlpool

Whirlpool LGR4624BW0 parts list

World Dryer AirMax D M5-972A manual

World Dryer

World Dryer AirMax D M5-972A manual

Alliance Laundry Systems ADEE9BSS user guide

Alliance Laundry Systems

Alliance Laundry Systems ADEE9BSS user guide

Miele PDR 910 EL Operating and installation instructions

Miele

Miele PDR 910 EL Operating and installation instructions

Amana NGD5800TQ0 parts list

Amana

Amana NGD5800TQ0 parts list

Bosch WTA79200GB Installation and operating instructions

Bosch

Bosch WTA79200GB Installation and operating instructions

AEG TR838P4OB user manual

AEG

AEG TR838P4OB user manual

Asko T760 user guide

Asko

Asko T760 user guide

Electrolux EW2H328R2 user manual

Electrolux

Electrolux EW2H328R2 user manual

manuals.online logo
manuals.online logoBrands
  • About & Mission
  • Contact us
  • Privacy Policy
  • Terms and Conditions

Copyright 2025 Manuals.Online. All Rights Reserved.

Use & Care Guide
Guide d'utilisation et d'entretien
English /FrancFais
Models/ModUles: 970L8110"
re EJite®
_:_'_::::::::::::Color number, le num6ro de couleur
P/N 137500000 A (1111)
Sears Canada Inc.
Toronto, Ontario, Canada M5B 2C3
WWW.Sea rs.ca
Record Model/Serial Numbers
The model and serial numbers of your washer are found on
the washer serial plate located on the inside of the door.
Record and retain these numbers.
Model Number
Serial Number
Purchase Date
For your safety the following information in
this manual must be followed to minimize the
risk of fire or explosion or to prevent property
damage, personal injury or death.
Do not store or use gasoline or other
flammable vapors and liquids in the vicinity
of this or any other appliance.
WHAT TO DO IF YOU SMELL GAS:
*Do not try to light any appliance.
*Do not touch any electrical switch; do not
use any phone in your building.
"Clear the room, building or area of all
occupants.
:i * Immediately call your gas supplier from
:i a neighbor's phone. Follow the gas
:i supplier's instructions.
:i * If you cannot reach your gas supplier, call
:i the fire department.
:i
Installation and service must be performed
by a qualified installer, service agency or
Table of Contents
Important Safety Instructions ............................................ 2-4
Warranty /Protection Agreement ....................................... 5
Features .................................................................................... 6
Operating Instructions ...................................................... 7-15
Care and Cleaning ............................................................... 16
Solutions to Common Problems ..................................... 17-19
Notes ..................................................................................... 20
Franc;ais .................................................................................. 21
important Safety instructions
This Use and Care Guide provides general operating
instructions for your dryer. It also contains information
about features for several other models. Your dryer may
not have every feature included.
The instructions appearing in this Use and Care Guide are
not meant to cover every possible condition and situation
that may occur. Common sense and caution must be
practiced when installing, operating and maintaining any
appliance. Use the dryer only as instructed in this Use &
Care Guide.
Recognize safety symbols, words and
labels
Safety items throughout this manual are labeled with
a WARNING or CAUTION based on the risk type as
described below:
Definitions
This is the safety alert symbol. It is used to alert you
to potential personal injury hazards. Obey all safety
messages that follow this symbol to avoid possible injury or
death.
DANGER indicates an imminently hazardous situation
which! .o ded _ o ou. r¥:....
Z_ WARNING ....................
WARNING indicates a potentially hazardous situation
which, if not avoided, could result in death or serious
injury.
CAUTION .............
CAUTION indicates a potentially hazardous situation
which, if not avoided, may result in minor or moderate
injury.
iMPORTANT ...........
IMPORTANT indicates installation, operation or
maintenance information which is important but not
hazard-related.
Save these instructions
for future reference.
Important Safety Instructions
240 v Electric Dryer 120 v Gas Dryer
I0-30R
3 UL-approved service
cord must be installed
(fused 30 amp) on electric dryers (not
provided with unit
except those
manufactured for sale
in Canada..
14-30R | .
4-wire _-_J,._ _
(fused 30 amp) I
Grounding _ype
wall receptacle
Do no_. under
any circumstances
cut, remove,
or bypass the
grounding prong.
Power cord with
3-prong grounded plug
Avoid fire hazard or electrical shock. Do not use an adaptor plug or extension cord or remove grounding
prong from electrical power cord. Failure to follow this warning can cause serious injury, fire or death.
A I G- OF
To reduce the risk of fire, electrical shock, or injury to persons when using this dryer, comply with the basic warnings
listed below. Failure to comply with these warnings could result in serious personal injuries.
You can be killed or seriously injured if you don't follow these Important Safety Instructions:
PREVENT FIRE
* Do not dry items that have been previously cleaned in,
soaked in, or spotted with gasoline, cleaning solvents,
kerosene, waxes, etc. Do not store these items on or near
the dryer. These substances give off: vapors that could
ignite or explode.
*Do not place items exposed to cooking oils in your dryer.
Items contaminated with cooking oils may contribute to a
chemical reaction that could cause a load to catch fire.
*Do not dry articles containing rubber, plastic or similar
materials such as bras, galoshes, bath mats, rugs, bibs,
baby pants, plastic bags and pillows that may melt or
burn. Some rubber materials, when heated, can under
certain circumstances produce fire by spontaneous com-
bustion.
WARNING
A clothes dryer produces combustible lint. The dryer must
be connected to an outdoors exhaust. Regularly inspect the
outdoor exhaust opening and remove any accumulation of
lint around the opening and in the surrounding area.
"Clean the lint screen before or after each load. The
interior of the dryer, lint screen housing and exhaust duct
should be cleaned approximately every 18 months by
qualified service personnel. An excessive amount of lint
build-up in these areas could result in inemcient drying
and possible fire. See Care and Cleaning.
° Do not operate the dryer if the lint screen is blocked,
damaged or missing. Fire hazard, overheating and dam-
age to fabrics can occur.
° Do not obstruct the flow of ventilating air. Do not stack
or place laundry or throw rugs against the front or back
of the dryer.
° Do not spray any type of aerosol into, on or near dryer
at any time.
° Do not use fabric softeners or products to eliminate
static unless recommended by the manufacturer of the
fabric softener or product.
° Do not continue to use the dryer is you hear squeaking,
grinding, rubbing or other unusual noises. This could be a
sign of mechanical breakdown and lead to fire or serious
injury. Contact a qualified technician immediately.
° Failure to comply with these warnings could result in fire,
explosion, serious bodily injury and/or damage to the
rubber or plastic parts of the dryer.
important Safety instructions
PROTECT CHILDREN
°Do not allow children to play on or in the dryer. Close
supervision of children is necessary when the dryer is
used near children. As children grow, teach them the
proper, safe use of aii appliances.
°Destroy the carton, plastic bag and other packing ma-
terials after the dryer is unpacked. Children might use
them for play. Cartons covered with rugs, bedspreads or
plastic sheets can become airtight chambers.
°Keep laundry products out of children's reach. To prevent
personal injury, observe aii warnings on product labels.
°Before the dryer is removed from service or discarded,
remove the dryer door to prevent accidental entrapment.
°Failure to comply with these warnings could result in seri-
ous personal injuries.
PREVENT INJURY
°To prevent shock hazard and assure stability during
operation, the dryer must be installed and electrically
grounded by a qualified service person in accordance
with local codes. Installation instructions are packed in
the dryer for the instailer's reference. Refer to INSTAL-
LATION INSTRUCTIONS for detailed grounding proce-
dures. If the dryer is moved to a new location, have it
checked and reinstalled by a qualified service person.
°To prevent personal injury or damage to the dryer, the
electrical power cord of a gas dryer must be plugged
into a properly grounded and polarized 3-prong outlet.
The third grounding prong must never be removed. Never
ground the dryer to a gas pipe. Do not use an extension
cord or an adaptor plug.
°ALWAYS disconnect the dryer from the electrical supply
before attempting any service or cleaning. Failure to do
so can result in electrical shock or injury.
°Do not use any type spray cleanser when cleaning dryer
interior. Hazardous fumes or electrical shock could occur.
°To prevent injury, do not reach into the dryer if the drum
is moving. Wait until the dryer has stopped completely
before reaching into the drum.
PREVENT iNJURY AND DAMAGE TO THE DRYER
*All repairs and servicing must be performed by a Sears
or other qualified service dealer unless specifically rec-
ommended in this Use and Care Guide. Use only autho-
rized factory parts.
°Do not tamper with controls.
°Do not install or store the dryer where it wiii be exposed
to the weather.
°A thermal iimiter switch automatically turns off: the
motor in the unlikely event of an overheated situation
(electric dryers only). A service technician must replace
the thermal iimiter switch after correcting the fault.
°Failure to comply with these warnings could result in seri-
ous personal injuries.
The California Safe Drinking Water and Toxic Enforcement Act requires the Governor of California to publish a list of
substances known to the state to cause cancer, birth defects or other reproductive harm, and requires businesses to warn
customer of potential exposure to such substances. Included in this list are soot and carbon monoxide, both of which
The instructions appearing in this Use and Care Guide are not meant to cover every possible condition and situation that
may occur. Common sense and caution must be practiced when installing, operating and maintaining any appliance.
4
Kenmore Appliance and Optional Pedestal Warranty
Two Year Limited Warranty
When installed, operated and maintained according to all instruc-
tions supplied with the product, if this appliance fails due to a
defect in material or workmanship within two years from the date
of purchase, call 1-800-4-MY-HOME ® to arrange for free repair.
If this appliance is used for other than private family purposes, this
warranty applies for only 90 days from the date of purchase.
Thiswarranty covers only defects in material and workman-
ship. Sears will NOT pay for:
Protect your appliance even after your warranty expires: ask
about Sears Protection Agreement.
[] iMPORTANT
Keep a copy of your bill of sale or invoice. The date on the
bill establishes the warranty period should service be required.
Whenappropriate,placethebillofsaleinanenvelopeand
tape it to the back or side of the appliance. If service is
performed, while the appliance is under warranty you may
1. Expendable items that can wear out from normal use,
including but not limited to filters, belts, light bulbs and bags.
2. A service technician to instruct the user in correct product
installation, operation or maintenance.
3. A service technician to clean or maintain this product.
4. Damage to or failure of this product if it is not installed,
operated or maintained according to all instructions supplied
with the product.
5. Damage to or failure of this product resulting from accident,
abuse, misuse or use for other than its intended purpose.
6. Damage to or failure of this product caused by the use of
detergents, cleaners, chemicals or utensils other than those
recommended in all instructions supplied with the product.
Z Damage to or failure of parts or systems resulting from
unauthorized modifications made to this product.
Disclaimer of implied warranties; limitation of remedies
Dear Customer,
In manufacturing this product, many steps have been taken to
provide you with the highest quality.
Unfortunately, errors or omissions occasionally occur. In the
event that you find a missing or defective part, please con-
tact your nearest Sears store.
If you have any suggestions that would help us to improve our
assembly/operation instructions, or this product, please write
them down, including your name and address, appliance
model and serial numbers and location purchased; mail to:
Sears Canada Inc.
290 Yonge Street, Suite 700
Toronto, Ontario M5B 2C3
Customer's sole and exclusive remedy under this limited warranty
shall be product repair as provided herein. Implied warranties,
including warranties of merchantability or fitness for a particular
purpose, are limited to one year or the shortest period allowed
by law. Sears shall not be liable for incidental or consequential
damages. Some states and provinces do not allow the exclusion
or limitation of incidental or consequential damages, or limita-
tions on the duration of implied warranties of merchantability or
fitness, so these exclusions or limitations may not apply to you.
This warranty applies only while this appliance is used in
Canada.
This warranty gives you specific legal rights, and you may also
have other rights which vary from province to province.
Sears Canada Inc.,
Toronto, Ontario, Canada M5B 2C3
Warranty Parts
Warranty parts are available by contacting the supplier where the
pedestal was purchased or refer to the Use and Care Guide that
came with the washer or dryer that is installed on the pedestal for
contact information.
RECORD IN THE SPACE PROVIDED BELOW THE MODEL NO.
AND SERIAL NO. OF THIS APPLIANCE.
MODEL NO:
SERIAL NO:
DATE OF PURCHASE:
RECORD THESENUMBERS FOR FUTUREREFERENCE.
.......................................................................................................................................................................................................................................................................................................................................................................................................................................................................................................................................................................................................................................................................................................................................................
Full One Year Pedestal Warranty on Mechanical Parts Warranty Restriction
For one year from date of purchase, when this pedestal is If the pedestal is used for any other purpose than private faro-
installed with the listed washer or dryer (see owners manual for ily use or used with any product that requires modification for
specific model) and operated according to the information in installation, the warranty is null and void.
the Use and Care Guide, Operating Instructions and Installa-
tion Instructions, the supplier will replace any of its mechanical RECORD IN THE SPACE PROVIDED BELOW THE MODEL NO.
parts if they are defective in workmanship or material. Keep AND SERIAL NO. OF THE PEDESTAL.
your bill of sale. The date of the bill establishes the warranty
period should parts be required. This written warranty gives MODEL NO:
you specific rights. You may also have other rights which vary SERIAL NO:
from state to state DATE OF PURCHASE:
RECORD THESE NUMBERS FOR FUTURE REFERENCE.
5
Featu res
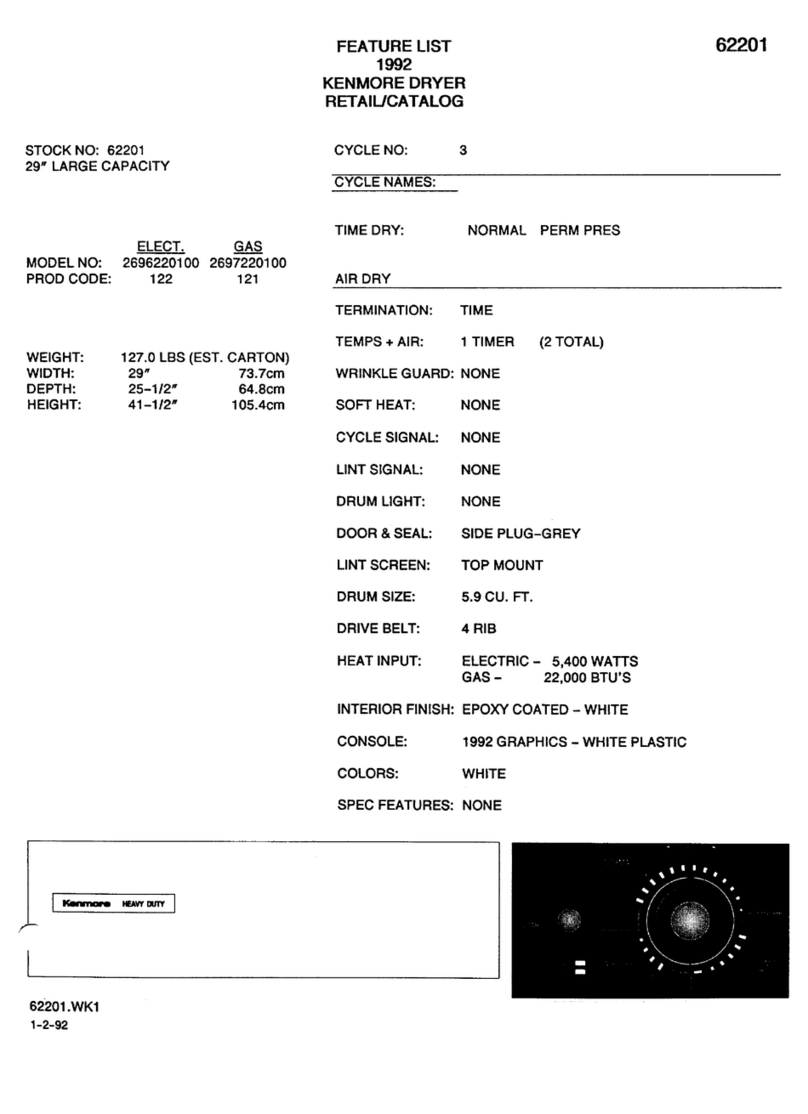
Cycle Selector
Small Surface
Molsture Sensor
(front) Control Lock LED Display
Large Surface
Moisture Sensor
(rear)
Door Latch
Reversible Door
/
Door Strike
Adjustable
Leveling Legs
_Not all models come with drying rack and
stacking kit from the factory. They may be
purchased as accessories.
Normal/Casual
Bulky/Beddlng
Heavy Duty
Towels
Mixed Load
Express Dry
t
Operating
Sanitize
Allergen
Khaki/Jeans
Delicates
Ultra Delicates
Touch Up : i _:: i_ 2!¸¸i¸ _:il ¸¸
TimedDry [ Temp 1[ DryLevem 1[ TimedDry l/ Chime 1
l l t
i J
il N
instructions
POWER
H Cycle selector El POWER button El Cycle options /Cycle status display
D Cycle settings E! START/PAUSE button
This manual covers many models and not all cycles, options, or features listed are available on every model. Console shown
above for reference only. Your model may differ.
Cycle Selection
Press the POWER button turn on the unit. Turn the cycle
selector in either direction to the cycle desired. The indica-
tor for that cycle will be illuminated.
To change the cycle once the cycle has begun, press POW=
ER to cancel the current cycle, press POWER to turn on
unit again, select a new cycle, and press START again. Just
turning the cycle selector knob will not change the cycle.
For best results
Follow the fabric care label instructions
on items to be dried.
Auto Dry Cycles
Auto Dry cycles take the guesswork out of selecting the
correct drying time for each load. Moisture sensing bars at
the back of the dryer drum sense the moisture level of the
load as it tumbles through the heated air. With Auto Dry
cycles, the load will automatically be dried at the selected
temperature to the desired dryness level.
Auto Dry cycles save time and energy and protect fabrics.
When the load has reached the selected dryness level, it
will continue to tumble during a cool down period. This
helps reduce wrinkling and makes items easier to handle
during unloading.
Drying time varies depending on size and dampness of
load and fabric type. If the load is too small or almost dry,
the moisture sensing bars may not detect enough moisture
to continue the cycle and the cycle may end after a few
minutes. If this occurs, select a Timed Dry cycle.
Room temperature and humidity, type of installation and
electrical voltage or gas pressure can also affect drying
time.
Normal/Casual
Select this Auto Dry cycle for cotton items and cotton
blends with a no-iron finish.
Bulky/Beddlng
Select this Auto Dry cycle to dry bedding and bulky
items such as comforters, blankets, sleeping bags and
parkas.
Heavy Duty
Select this Auto Dry cycle to dry durable fabrics such as
heavily soiled jeans and overalls.
Towe_s
Select this cycle to dry heavy loads such as towels and
non-rubber-backed bath mats.
Mixed Load
Select this Auto Dry cycle to dry loads containing a mix
of fabrics.
7
Operating instructions
Cycle Selection, continued
Sanitize
Select this Auto Dry cycle for durable fabrics and towels
to remove harmful bacteria from your clothing or other
items where sanitization is desired.
This option will kill 99.9% of bacteria with no carryover of
bacteria between loads. A higher temperature is required.
Please check fabric care labels to prevent damage.
This cycle has been certified by NSF International®,
an independent third-party testing and certification
organization dedicated to public health, safety and
eoviroomentalprotection
NSF Protocol P154
Sanitization Performance of
Residential Clothes Dryers
Allergen
Select this Auto Dry cycle where you wish to reduce
allergens as you dry your load. Items prone to heat dam-
age are not recommended for this cycle.
Khakl/Jeans
Select this Auto Dry cycle for drying an entire load of
lightly to normally soiled denim jeans or similarly-col-
ored cotton khakis.
Dellcates
Select this Auto Dry cycle for knits and delicate items.
Ultra Dellcates
Select this Auto Dry cycle for silks and other very deli-
cate items.
Timed Dry Cycles
WARNING ................
FIRE HAZARD
To avoid fire hazard, do not use heat to dry items
containing feathers or down, foam rubber, plastics
similarly textured, rubber-like materials. Use the Timed
Dry cycle and the Air Dry setting.
:_i:Steam Refresh
Select this cycle to refresh fabrics, release wrinkles, remove
odors, and reduce static by injecting the perfect amount of
steam into clothing that has been left in the dryer, stored in
crowded closets, drawers, or unpacked luggage.
NOTE
*Steam may not necessarily be visible inside drum
during the Steam Refresh cycle.
* Steam may not be present during entire cycle.
*It is not recommended to use fabric softener sheets
with Steam Cycles or Options as it may cause staining
on clothes.
Express Dry
Select this timed cycle to quickly dry small loads in 18
minutes.
Touch Up
Select Touch Up to help remove wrinkles from clean
and dry items that were not taken from the dryer at the
end of the cycle, have been stored in crowded closets or
drawers, or unpacked from luggage following a trip. It
provides approximately 10 minutes of tumbling followed
by a 5-minute cool down period.
Timed Dry
To manually select the drying time for any load, turn the
knob to Timed Dry. Select the appropriate drying time
with the Timed Dry button on the setting panel.
Because this is not an Auto Dry cycle, you will not be
able to select a dryness level.
Operating instructions
Cycle Settings
[
i¸i i::ilii_ ii!_ ii _:_ii:_!/_i:!_(::i i _::__i:i
Temp ] [ DryLevel i (TimedDry I I Chime
v For best results
Follow the fabric care label instructions
on items to be dried.
Appropriate drying Temperature, Dryness Level and Op-
tions will automatically be displayed for each cycle. The
settings can be changed before the cycle is started.
DRYING TEMPERATURE
To change the preset temperature, press the Temp button
to scroll to the desired setting.
To protect your fabrics, not all temperatures are available
with every cycle. The indicator willnot light if the setting is
not available with that cycle.
To change the Temperafure after the cycle starts, press
PAUSE, adjust the setting and press START to resume the
cycle.
High
Recommended for durable fabrics.
Mid-High
Recommended for most cotton fabrics.
Medium
Recommended for wrinkle free, easy care, lightweight
fabrics and bulky loads.
Mid=Low
Recommended for knits.
Low
Recommended for delicate fabrics.
DRY LEVEL (Auto Dry)
To change the preset level, press the Dry Level button to
scroll to the degree of dryness desired.
To protect your fabrics, not all dryness levels are available
with every cycle. If a Dry Level is not appropriate for the
cycle, it cannot be selected.
NOTE
Tochange the Dry Level after the cycle starts, press
PAUSE, adjust the setting and press START to resume the
cycle.
Select the Normal dry level for most Auto Dry cycles.
Occasionally a load may seem too damp or over-dried
at the end of the cycle. To increase drying time for similar
loads in the future, select a higher setting. For loads requir-
ing less drying time, select a lower setting.
Select Damp Dry for items you wish to partially dry be-
fore hanging or ironing.
TIMED DRY
Press the Timed Dry button to select from 20 to 60 min-
utes of drying time in 10-minute increments. This setting is
only available with the Timed Dry cycle.
CHIME
A chime will sound at the end of the cycle when this option
is selected. The signal has an adjustable volume level or
can be turned off.
9
Operating instructions
Cycle Options
Wrinkle _:_i;i_:i__ 1 [ Damp DryGuard I Signa' ]
Control Lock
To add options, press the corresponding options buttons to
illuminate the selections desired. To delete options, press
the options buttons again and the indicator lights will turn
off. Some options require a "Press & Hold" effort to acti-
vate or deactivate the secondary function.
Not aii options are available on every model. To protect
your fabrics, not ali options are available with every cycle.
If an option is not appropriate for the cycle, the indicator
will not light.
NOTE
To change the Options after the cycle starts, press
PAUSE, adjust the setting and press START to resume the
cycle.
Wrinkle Guard
Select Wrinkle Guard if the dried load might not be
removed promptly at the end of the cycle. The dry
load will continue tumbling without heat to help reduce
wrinkling. When Chime is selected, a beep will be heard
periodically. The load may be removed any time during
Wrinkle Guard.
Add Steam
The Add Steam option injects steam into the clothing
prior to cool down to reduce wrinkling.
NOTE ..........
*Steam may not necessarily be visible inside drum
during the Add Steam option.
*It is not recommended to use fabric softener sheets
with Steam Cycles or Options as it may cause staining
on clothes.
Damp Dry Signal
For loads that contain some items you plan to hang dry,
fiat dry or iron, add the Damp Dry Signal option to any
Auto Dry cycle. If the Chime is turned up, a chime will
sound when the load has reached the Damp Dry dryness
level to remind you to remove those items to hang dry,
dry fiat or iron dry. Open the door, remove those items,
close the door and press the START button to continue
drying the remaining items.
Soft Heat
Select the Soft Heat option to protect a load from exces-
sive heat which can lead to shrinking and over-drying.
The drying temperature will be gradually reduced as the
load dries.
Air Fluff
This setting (no heat) should only be used with a Timed
Dry cycle to dry items containing feathers, down, foam
rubber, plastics or rubber-like materials; to refresh
clothing, stuffed animal, pillows or blankets; and to dust
draperies.
Drum Light
The drum light wiii come on whenever the door is
opened to illuminate the drum during loading and
unloading. Closing the door turns off the light. The drum
light will automatically turn off if the door is left open
more than 3 minutes.
You can activate the drum light during a cycle by press-
ing the Drum Light button. The light will stay on during
the cycle for 3 minutes. To turn it off, press the button
again.
Control Lock (Press & Hold)
To lock the controls between or during cycles, press and
hold the Add Steam button for Sseconds. _ (LOCI()
will be displayed if you attempt to wake up a "between
cycle" locked unit and _ (LOCI() will alternate with
cycle time remaining in a "during cycle" locked unit.
Repeat to unlock the controls when you are ready to op-
erate the dryer. Use this feature to reduce the likelihood
of accidental operation by children.
10