manuals.online logo
Brands
  1. Home
  2. •
  3. Brands
  4. •
  5. Kenstar
  6. •
  7. Fryer
  8. •
  9. Kenstar Aster OF-KOA15CJ3 User manual

Kenstar Aster OF-KOA15CJ3 User manual

Popular Fryer manuals by other brands

GILES EOF-BIB/FFLT/24/24 manual

GILES

GILES EOF-BIB/FFLT/24/24 manual

GE 168997 manual

GE

GE 168997 manual

Falcon G350/11 Installation and servicing instructions

Falcon

Falcon G350/11 Installation and servicing instructions

GoWISE USA GW22612 instruction manual

GoWISE USA

GoWISE USA GW22612 instruction manual

Wolf IF15/S Specification sheet

Wolf

Wolf IF15/S Specification sheet

Electrolux Thermetic 9CHG583284 Operating and safety instructions

Electrolux

Electrolux Thermetic 9CHG583284 Operating and safety instructions

DeLonghi D677UX Instructions for use

DeLonghi

DeLonghi D677UX Instructions for use

SEVERIN DEEP FRYER - Dimensions

SEVERIN

SEVERIN DEEP FRYER - Dimensions

Toastmaster TMFG18-NAT Installation and operation instructions

Toastmaster

Toastmaster TMFG18-NAT Installation and operation instructions

Domo DO465FR Instruction booklet

Domo

Domo DO465FR Instruction booklet

Russell Hobbs RDF300 Instructions and warranty

Russell Hobbs

Russell Hobbs RDF300 Instructions and warranty

Henny Penny PFG-691 Technical manual

Henny Penny

Henny Penny PFG-691 Technical manual

Farberware FBW FT 43721 B manual

Farberware

Farberware FBW FT 43721 B manual

GERMANICA GEAF5L3LD instruction manual

GERMANICA

GERMANICA GEAF5L3LD instruction manual

Wells F-85 Features and specifications

Wells

Wells F-85 Features and specifications

Philips HD9211 user manual

Philips

Philips HD9211 user manual

Lakeland 31796 Instruction booklet

Lakeland

Lakeland 31796 Instruction booklet

Dash Tasti-Crisp DFAF755 user manual

Dash

Dash Tasti-Crisp DFAF755 user manual

manuals.online logo
manuals.online logoBrands
  • About & Mission
  • Contact us
  • Privacy Policy
  • Terms and Conditions

Copyright 2025 Manuals.Online. All Rights Reserved.

OWNER'S MANUALOWNER'S MANUAL
OXY FRYER
ASTER : OF-KOA15CJ3
USER GUIDE BOOK
OXY FRYER
MODEL :
PART CODE : 1100109021
PRINTING IN BLACK COLOUR
PAPER SIZE : A5 SIZE WHITE PAPER
PAPER SPECS- FRONT & BACK PAGE 90 GSM CROMA ART, INNER PAGES 90 GSM NORMAL PAPER.
GRAPHIC BY : A. PATOLE
CHKD. BY : HARDIK
DATE : 02/08/2014
REVISION : R1
MESSAGE FROM THE VICE CHAIRMAN & CEO
Dear Customer,
It gives me great pleasure to welcome you to the KENSTAR family.
Our sincere endeavour is to provide you with best quality products & impeccable
service, thus laying the foundation for a binding relationship with you. One that stands
the test of time to grow stronger with our every interaction.
At Kenstar, we have set ourselves a goal to continuously challenge ourselves and
contribute towards good health, happiness and a bigger cause-a greener tomorrow.
Our initiative is to help create a tomorrow that promises clean air, pure water and a
green earth.
With extensive research, creativity and technology, we present a whole new range of
product-designed super efficient, built super sensitive to your needs. They forward the
urgent cause of environmental protection by becoming the machines of the future,
today.
That is the Kenstar philosophy. That is Eco Logic.
Warm Regards,
(Vice Chairman & CEO)
1
2
KNOW YOUR FRYER
SPECIFICATIONS
OPERATING YOUR
IMPORTANT SAFEGUARDS & USAGE
CARE & MAINTENANCE
TROUBLE SHOOTING
PRODUCT DISPOSAL GUIDELINE
WARRANTY
BRANCH OFFICES
OXY
OXY FRYER
1.
2.
3.
4.
5.
6.
7.
8.
9.
3
3
4-7
8-9
9
10
11
13
14
2
PAGE No.
3
KNOW YOUR OXY FRYER
SPECIFICATIONS
POWER SUPPLY
WATTAGE
CAPACITY
WEIGHT
PRODUCT SIZE (L x W x H) cm
:
:
:
:
:
220~240V AC 50Hz
1500 watt
3.0 litre
NET- 4.9 kg , GROSS- 6.2 kg
30.0 x 31.5 x 36.5
1
2
3
4
5
6
7
8
9
10
11
12
O
1) Temperature control knob (80-200 C)
2) Timer (0-30min.) / power-on knob
3) Power indicator light
4) Basket release button
5) Basket handle
6) Handle
7) Air inlet
8) Heating-up indicator light
9) Basket
10) Pan
11) Air outlet
12) Mains cord
OPERATING YOUR OXY FRYER
BEFORE FIRST USE
1. Remove all packaging materials and stickers or labels.
2. Clean the basket and pan with hot water, some washing liquid and a
non-abrasive sponge. These parts are safe to be cleaned in dishwasher.
3. Wipe inside and outside of the appliance whit a cloth. And there is no need to fill the
pan oil.
PREPARING FOR USE
1. Place the appliance on a stable, horizontal and even surface.
Do not place the appliance on non-heat-resistant surface.
2. Put the basket in the pan. (fig.2).
Do not fill the pan with oil or any other liquid.
Do not put anything on top of the appliance, the airflow will be disrupted.
HOT FRYING
1. Connect the mains plug into an earthed wall socket.
2. Carefully pull the pan out of the fryer (fig.3)
3. Place the ingredients in the basket.
4. Slide the pan back into the FRYER (fig.4)
Never use the pan without the basket in it.
Caution : Do not touch the pan during and in short-time after use, as it gets
very hot. Only hold the pan by the handle.
5. Turn the temperature control knob to the proper temperature. See section 'Settings'
in this chapter to determine the right temperature (fig.5).
6. Determine the required preparation time for the ingredient
(see section 'Settings' in this chapter).
7. To switch on the appliance, turn the timer knob to the required preparation time (fig.6).
Add 3 minutes to preparation time if the appliance is cold
Note: If you want, you can also preheat the appliance without any ingredients inside.
In that case, turn the timer knob for more than 3 minutes and wait until the heating-up
light turn off (after about 3 minutes). Then fill the basket and turn the timer knob to the
required preparation time.
a) The power-on light and the heating-up light go on. (fig.9)
b) The timer starts counting down the set preparation time.
c) During the hot frying process, the heating-up light turn on and turn off from time
to time. This indicates that the heating element is switched on and off to maintain the
set temperature.
d) Excess oil from the ingredients is collected on the bottom of the pan.
with
with
It is recommended to use a high-power socket rather than a defective one.
Do not share a socket with high-power appliances such as air conditioners
and electric stoves to avoid over-current from causing fire.
4
Tips
- Smaller ingredients usually require a slightly shorter preparation time than larger
ingredients.
- A larger amount of ingredients only requires a slightly longer preparation time, a
smaller amount of ingredients only requires a slightly shorter preparation time.
- Shaking smaller ingredients halfway during the preparation time optimizes the end
result and can help prevent unevenly fried ingredients.
- Add some oil to fresh potatoes for a crispy result. Fry your ingredients in the fryer
within a few minutes after you adding the oil.
- Do not prepare extremely greasy ingredients such as sausages in the fryer.
- Snacks can be prepared in an oven can also be prepared in the fryer.
- The optimal amount for prepare crispy fries is 500 grams.
- Use pre-made dough to prepare filled snacks quickly and easily. Pre-made dough
also requires a shorter preparation time than home-made dough.
- Place a baking tin or oven dish in fryer basket if you want to bake a cake or
quiche or if you want to fry fragile ingredients or filled ingredients.
- You can also use the fryer to reheat ingredients. To reheat ingredients, set
o
the temperature to 150 C for up to 10 minutes.
5
OPERATING YOUR OXY FRYER
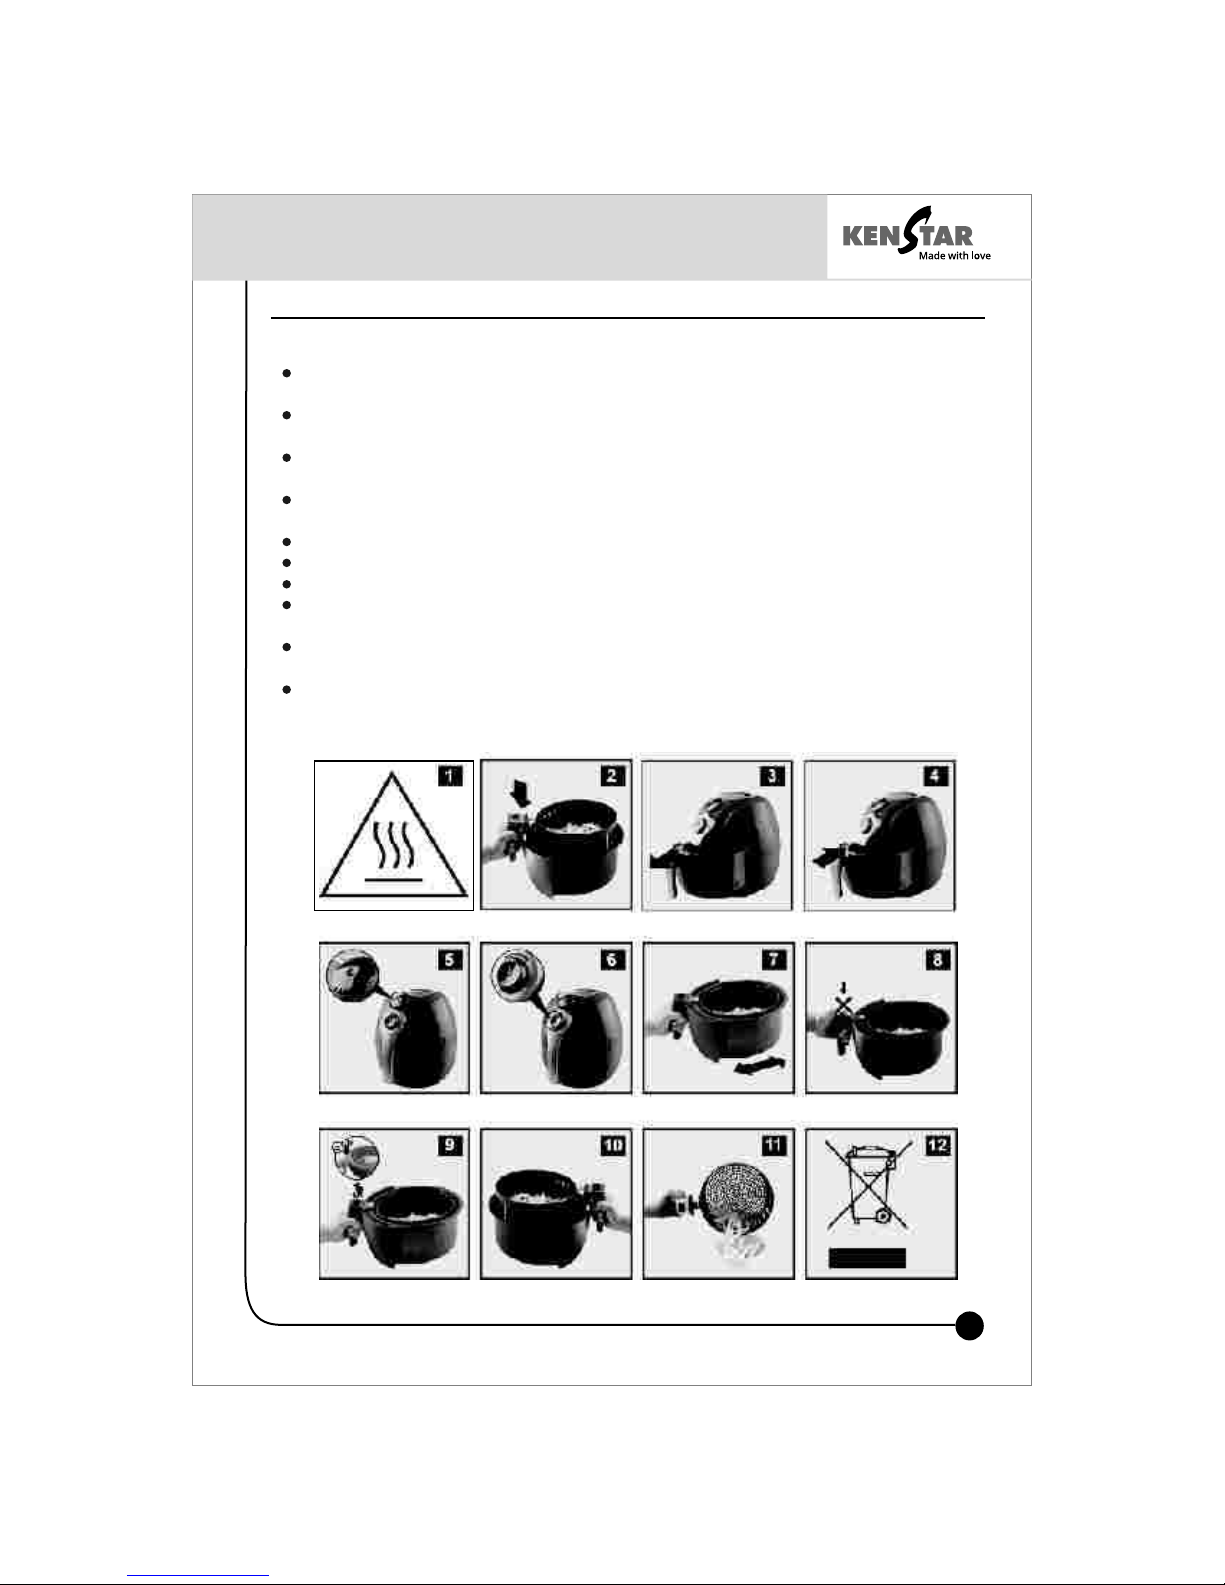
8. Some ingredients require to shake halfway during the preparation time (see section
'Settings' in this chapter). By this way, pull the pan out of the appliance by the
handle and shake it. Then slide the pan back into the magic fryer (fig.8).
Caution: Do not press the button of the handle during shaking. (fig.8)
Tip : You can remove the basket from the pan and shake the basket only to reduce
the weight. Do like this, pull the pan out of the appliance, place it on the heat-
resistant holder and press the button of the handle (fig.9).
Tip : If you set the timer half of the preparation time, you have to shake the
ingredients when you hear the timer bell ringing. However, this means that you have
to set the timer again to the remaining preparation time after shaking.
9. When you hear the timer bell, the set preparation time has elapsed. Pull the pan out
of the appliance and place it on the heat-resistant holder.
Note: You can also switch off the appliance manually. Do like this, turn the temperature
control knob to “0” .
10. Check if the ingredients are ready.
If the ingredients are not ready yet, simply slide the pan back into the appliance and
set the timer to a few extra minutes.
11. To remove small ingredients (e.g. fries), press the basket release button (1) and lift
the basket out of the pan (2). (fig.9)
Don't turn over the pan, otherwise, the oil collected on the bottom of the pan will
leak onto the ingredients.
The pan and the ingredients are hot after hot frying. Depending on the type of the
ingredients in the fryer, steam may escape from the pan.
12. Empty the basket into a bowl or onto a plate. (fig.11)
Tip : To remove large or fragile ingredients, lift the ingredients out of the basket by a
pair of tongs.
13. When a batch of ingredients is ready, the magic fryer is instantly ready for preparing
another batch.
SETTINGS
This table below will help you to select the basic settings for the ingredients.
Note: Keep in mind that these settings are indications. As ingredients differ in origin,
size, shape and brand, we cannot guarantee it's the best setting for your ingredients.
Because it reheats the air inside the appliance instantly, pull the
pan briefly out of the appliance during hot frying barely disturbs the process.
6
OPERATING YOUR OXY FRYER
7
OPERATING YOUR OXY FRYER
Potatoes & fries
Thin frozen fries
Thick frozen fries
Home-made fries (8×8mm)
Home-made potato wedges
Home-made potato cubes
Rosti
Potato gratin
Meat & Poultry
Steak
Pork chops
Hamburger
Sausage roll
Drumsticks
Chicken breast
Snacks
Spring rolls
Frozen chicken nuggets
Frozen fish fingers
Frozen bread crumbed
cheese snacks
Stuffed vegetables
Baking
Cake
Quiche
Muffins
.
20-50
22-50
22-50
20-28
20-28
18-22
20-25
12-18
15-20
9-18
18-20
22-28
18-22
12-18
10-15
10-15
10-15
10
20-25
20-22
15-18
.
200
200
200
200
180
180
180
180
180
180
200
180
180
200
200
200
180
160
160
180
200
.
Add 1/2 tbsp of oil
Add 1/2 tbsp of oil
Add 1/2 tbsp of oil
Use oven-ready
Use oven-ready
Use oven-ready
Use oven-ready
Use baking tin
Use baking tin/oven dish
Use baking tin
Extra information
Time
(min)
Temperature
(℃)
.
300-1000
300-1000
300-1000
300-800
300-750
250
500
100-500
100-500
100-500
100-500
100-500
100-500
100-400
100-500
100-400
100-400
100-400
300
400
300
Min-max
Amount (g)
.
shake
shake
shake
shake
shake
shake
shake
shake
shake
.
.
Shake
Dishes
8
IMPORTANT
Please read this manual carefully before any using of the appliance as dangers may
occur under incorrect operations.
DANGER
- Do not immersing the honsing in water or rinsing under the tap due to the multi
electrical and heating components.
- Avoid any liquid enter the appliance to prevent from electric shock or short-circuit.
- Keep all ingredients in the basket to prevent any contact from heating elements.
- Do not cover the air inlet and the air outlet when the appliance is working.
- Fill the pan with oil may cause a fire hazard.
- Do not touch the inside of the appliance while it is operating.
WARNING
- Check if the voltage indicated on the appliance fits the local mains voltage.
- Do not use the appliance if there is any damage on plug, main cord or other parts.
- Do not go to any unauthorized person to replace or fix damaged main cord.
- Keep the appliance and its mains cord out of the reach of children.
- Keep the mains cord away from hot surfaces.
- Do not plug in the appliance to an earthed wall socket. Always make sure that the
plug is inserted into the wall socket properly.
- Do not connect appliance to an external timer switch.
- Do not place the appliance on or near combustible materials such as a tablecloth or
curtain.
- Do not place the appliance against a wall or against other appliance. Leave at least
10cm free space on the back and sides and 10cm free space above the appliance.
- Do not place anything on top of the appliance.
- Do not use the appliance for any other purpose than described in this manual.
- Do not let the appliance operate unattended.
- During hot frying, hot steam is released through the air outlet openings. Keep
your hands and face at a safe distance from the steam and form the air outlet
openings. Also be careful of hot steam and air when you remove the pan from the
appliance.
- Any accessible surfaces may become hot during use.(fig.1)
- Immediately unplug the appliance if you see dark smoke coming out of the
appliance. Wait for the smoke emission to stop before you remove the pan from the
appliance.
9
CAUTION
Ensure the appliance in placed on a horizontal, even and stable surface.
- This appliance is designed for household use only. It may not suitable to be safely
used in environments such as staff kitchens, farms, motels, and other non-
residential environments.
- The guarantee is invalid if the appliance is used for professional or semi-professional
Purposes, or it is not used according to instructions.
- Always unplug the appliance while not using.
- The appliance needs approximately 30 minutes to cool down for handle or cleaning
safely.
AUTOMATIC SWITCH-OFF
The appliance has a build in timer, it will automatically shut down the appliance when
count down to zero. You can manually switch off the appliance by turning timer knob
to zero anticlockwise.
ELECTROMAGNETIC FIELDS ( EMF)
The appliance complies whit all standards regarding Electro-Magnetic fields (EMF).
Under proper handling, there is no harm for human body based on available
scientific Evidence.
CLEAN
1 Remove the mains plug from the wall socket and make the appliance cool down.
Note: Remove the pan to let the fryer cool down more quickly.
2 Wipe the outside of the appliance with a moist cloth.
3 Clean the pan and basket with hot water, some washing-up liquid and a
non-abrasive sponge.
You can remove any remaining dirt by de greasing liquid.
Note : The pan and basket are dishwasher-proof.
Tip: If dirt is stuck to the basket or the bottom of the pan, fill the pan with hot water
with some washing-up liquid. Put the basket in the pan and let the pan and the
basket soak for about 10 minutes.
4 Clean the inside of the appliance with hot water and non-abrasive sponge.
5 Clean the heating element with a cleaning brush to remove any food residues.
STORAGE
1 Unplug the appliance and let it cool down thoroughly.
2 Make sure all parts are clean and dry.
ENVIRONMENT
Do not throw away the appliance with the normal household waste when it is
exhausted, but hand it in at official collection point for recycling. By doing this, you
do contribution to environmental protection (fig.12).
CARE & MAINTENANCE