KENT C-4 User manual

1
1
1
1
1
1-2
2
3
3
3
4
4
4
5
5
5
5
5
5
Page
Introduction
When the Machine is Delivered
Before Operation the Machine
Important Safety Instructions
General Instructions
Warnings
Grounding Instructions
Cleaning Instructions
Preparing Machine
Cleaning Carpet
Cleaning Upholstery
Cleaning Stairs
Cleaning Machine
Machine Troubleshooting
Loss of Electrical Power
Loss of Vacuum /Little Suction
Lack of Water Pressure
No Brush Movement
Warranty
Table Of Contents
Kent Investment Corporation
Shipping Address: 250 Hwy 62-Wast Ash Flat, AR 72513
Mailing Address: PO Box 279 Ash Flat, AR 72513
Phone: (870) 994-3535 Fax: (870) 994-3535
Owner’s Manual Model C-4
INVESTMENT
CORPORATION
KENT

WARNING - TO REDUCE THE RISK OF FIRE, ELECTRICAL SHOCK, PERSONAL INJURY, OR
DAMAGE TO MODEL C-4:
1. DO NOT leave appliance when plugged in. Unplug from outlet when not in use and before servicing.
2. To reduce the risk of electrical shock - DO NOT expose to rain. Store indoors.
3. This machine is intended for carpet and upholstery cleaning only!
4. Fill tank with machine bucket only! Machine must be emptied after 3 1/2 gallons of water and solution have been used.
5. DO NOT allow to be used as a toy. Close attention is necessary when used by or near children.
BEFORE OPERATING THE MACHINE
Read the manual carefully before operating Model C-4. The manual has important information for the use and safe
operation of the machine. Keep this manual handy at all times. Model C-4 will assure years of satisfactory service if
operated and maintained according to recommendations in this manual. If additional technical information is needed,
please contact Kent Investment Corporation at 870-994-3535 or toll free at 800-669-6261.
All information and specifications printed in this manual and parts list are current at the time of printing; however,
because of Kent Investment's policy of continual product improvement, we reserve the right to make changes at any
time without notice.
WARRANTY: See page 5 of this manual for limited warranty.
Appliance is intended for household use only.
WHEN THE MACHINE IS DELIVERED:
Check the carton carefully for signs of damage and rough handling. Remove the machine from the carton. If the
machine is damaged, notify the carrier immediately and request an inspection. Be sure to keep the carton, packing
list and carrier's receipt until the inspector has verified your claim.
Kent Investment's liability ceases when the shipment is picked up by the carrier, but our customer service staff will be
glad to furnish any information needed in connection with the claim and will expedite repair of the machine.
BEFORE YOU USE YOUR OWNER'S MANUAL, PLEASE READ THIS INTRODUCTION ALL
THE WAY THROUGH.
IMPORTANT SAFETY INSTRUCTIONS
When using an electrical appliance, basic precautions should always be followed, including
the following:
READ ALL INSTRUCTIONS BEFORE USING MODEL C-4.
GENERAL INSTRUCTIONS
This floor finishing machine shall be grounded while in use to protect the operator from electric shock. The machine is
provided with a three-conductor cord and a three-contact grounding type attachment plug to fit the proper grounding
type receptacle. The green (or green and yellow) conductor in the cord is the grounding wire. NEVER connect this
wire to anything other than the grounding pin of the attachment plug.
INTRODUCTION
1

2
FOR CUSTOMERS IN CANADA:
CAUTION! To prevent electrical shock, do not use this polarized AC plug with an extension cord, receptacle or other
outlet unless the blades can be fully inserted to prevent blade exposure.
SAVE THESE INSTRUCTIONS.
This appliance is for use on a circuit having a nominal rating more than 120 v (or This appliance is rated more than 15 A and
is for use on a circuit having a nominal rating of 120 V) and is factory-equipped with a specific electric cord and plug to permit
connection to a proper electric circuit. Make sure that the appliance is connected to an outlet having the same configuration
as the plug. No adapter should be used with this appliance. If the appliance must be reconnected for use on a different type
of electric circuit, the reconnection should be made by a qualified service personnel.
This appliance must be grounded. If it should malfunction or breakdown, grounding provides a path of least resistance for
electric current to reduce the risk of electric shock. This appliance is equipped with a cord having an equipment-grounding
conductor and grounding plug. The plug must be inserted into an appropriate outlet that is properly installed and grounded
in accordance with all local codes and ordinances.
WARNING – Improper connection of the equipment-grounding conductor can result in a risk of electric shock. Check with a
qualified electrician or service person if you are in doubt as to whether the outlet is properly grounded. Do not modify the
plug provided with the appliance – if it will not fit the outlet, have a proper outlet installed by a qualified electrician.
(A)
METAL SCREW
GROUNDING PIN
COVER OF
GROUNDED
OUTLET BOX
GROUNDING INSTRUCTIONS
This machine is for use on a nominal 120-volt circuit and
has a grounding plug that resembles the plug illustrated
in diagram (A) (RIGHT). Make sure that the machine is
connected to an outlet having the same configuration as
the plug. No adapter should be used with this machine.
6. Use only as described in this manual. Use only Kent Investment Corp. recommended attachments and chemicals.
7. DO NOT use with damaged cord or plug. If appliance is not working as it should, has been dropped, damaged,
left outdoors, or immersed in water, contact Kent Investment Corporation service department for service instructions.
8. DO NOT pull or carry by cord, use cord as a handle, close door on a cord, or pull cord around sharp edges or
corners. DO NOT run equipment over cord. Keep cord away from heated surfaces.
9. DO NOT unplug by pulling on cord. To unplug, grasp the plug, not the cord.
10. DO NOT handle plug or equipment with wet hands.
11. DO NOT put any object into openings. DO NOT use with any openings blocked; keep free of dust, lint, hair, and
anything that may reduce airflow.
12. Keep hair, loose clothing, fingers and all parts of body away from openings and moving parts.
13. DO NOT vacuum anything that is burning or smoking, such as cigarettes, matches, or hot ashes.
14. DO NOT use without filter screens in place.
15. Turn off all controls before unplugging.
16. Use extra care when cleaning stairs.
17. NEVER vacuum solvents, gasoline or other hazardous liquid or solid material or use in areas where they may be present.
18. Connect to a properly grounded outlet only. See grounding instructions.

3
ON
ON
TURN OFF ALL SWITCHES
BEFORE PLUGGING IN MACHINE
BRUSH
BREAKER
BRUSH
BREAKER
SPRAY/
BRUSH
SPRAY/
BRUSH
OFF
OFF
PULL
TRIGGER
NOTE: Hand Tool
Switch Must Be
OFF During Carpet
Cleaning.
NOTE: Remove
debris from
brush. Reset
Breaker.
HAND TOOL
HAND TOOL
SUCTION
SUCTION
1) Dirty water passes through the
right Sight Tube while cleaning.
When dirty water stops passing
through the Sight Tube while
cleaning, the machine is empty.
Empty dirty water and rinse
Bucket. Refill the machine.
2) If foam or liquid appears
in the left Sight Tube, empty
the dirty water from the Bucket
without refilling the machine.
3) When finished cleaning, empty
and rinse Bucket. Use the clear
Drain Tube at the back of the unit
to empty unused solution from
the Solution Tank.
Note: Use the Hand Tool for
cleaning stairs. See Cleaning
Upholstery for Hand Tool use.
1)Tilt the machine back and move into
the starting position.
2) Turn ON the Suction Switch.
Note: Hand Tool Switch must be OFF.
3) Pull the Spray/Brush Trigger
and pull the machine backwards
at a slow steady pace, about
1 foot per 2 seconds. Clean in
approximately 5 foot strokes.
Overlap strokes by 2 inches,
releasing the Trigger 6 inches
before ending each stroke.
Keep the Suction Nozzle in
firm contact with the carpet.
Note: For best results, clean
heavily soiled areas twice at
right angles.
1) Plug in machine to a
grounded outlet. See
Grounding Instructions.
ON
ON
TURN OFF ALL SWITCHES
BEFORE PLUGGING IN MACHINE
BRUSH
BREAKER
BRUSH
BREAKER
SPRAY/
BRUSH
SPRAY/
BRUSH
OFF
OFF
PULL
TRIGGER
NOTE: Hand Tool
Switch Must Be
OFF During Carpet
Cleaning.
NOTE: Remove
debris from
brush. Reset
Breaker.
SUCTION
SUCTION
HAND TOOL
HAND TOOL
1) Turn all switches OFF.
Cleaning Carpet
1) Return Bucket to Machine.
2) Close Lid.
3) Snap Bucket Handle into place.
1) Important: Pour contents of
Bucket into machine Solution Tank.
1) Read and follow all 7 IN 1 Carpet Care
directions. Mix 7 IN 1 with water in Bucket
according to Quick Dry directions.
Note: Do not fill Bucket above top fill line.
Warning: Do not use bleach
or dye in this machine.
User will be liable for
all damages.
1) Pull “T” Handle on machine Handle.
2) Raise machine Handle to
desired height.
1) Pull down Bucket Handle.
2) Lift the Lid.
3) Remove the Bucket.
Preparing Machine
Preparing Carpet & Upholstery
CLEANING INSTRUCTIONS
1) Vacuum carpet or upholstery with your vacuum cleaner. This machine is not a vacuum cleaner.
NOTE: We recommend vacuuming carpet thoroughly, making four passes with a CRI approved vacuum cleaner.
2) Pre-treat general spots with 7 IN 1 Carpet Care. Pre-treat pet & acid based spots with 7 IN 1 Spot & Odor Pet Formula.
Pre-treat heavily soiled areas of carpet, hallways, doorways and around furniture with 7 IN 1 Hi-Traffic Pre-Treatment.
Note: Read and follow all 7 IN 1 label directions prior to use. Also see Test Colorfastness.

4
1) Wipe hair and debris from the Lid.
2) Drain unused solution from Solution Tank.
3) Dispose of solution and rinse Bucket thoroughly.
4) Clean out the Vac Nozzle using a bent wire hanger.
5) Remove fibers and hair from the Brush.
6) Wipe Brush Chamber clean with towel.
7) Wipe off the exterior of the machine with a damp towel.
1. Use the Hand Tool to clean stairs. (See Cleaning Upholstery to hook up hand tool.)
2. Clean the upstairs rooms first, then the stairs.
IMPORTANT: When cleaning the upper stairs, turn machine sideways so wheels are NOT facing forward, toward stairs.
Be careful bringing the machine down wet stairs. Make sure to empty the Bucket, and Solution Tank using the Drain Hose.
3. Turn on Suction and Hand Tool Switches.
4. Place Hand Tool Suction Nozzle on carpet and squeeze Trigger while pulling backwards.
Cleaning Stairs
Cleaning Machine
Bucket
Bucket
Handle
Lid
Handle Adjust
Handle
Suction Nozzle
/ Brush
Hoses
Drain Hose
Sight
Tubes
Spray/Brush
Trigger Switch
Suction Switch
Solution
Tank
1) See Preparing Carpet & Upholstery.
2) Turn ON the Suction and Hand Tool Switches.
3) Squeeze the Hand Tool Trigger as you pull
up or back with overlapping even strokes.
1) Important: Pour contents of Bucket
into machine Solution Tank.
1) Read 7 IN 1 Carpet Care directions.
See: Test Colorfastness and
Upholstery Cleaning Directions.
Mix 7 IN 1 with water in Bucket
according to directions.
Note: For upholstery
cleaning, mix 1.5
gallons of cleaner
at a time.
1) Turn all Switches OFF.
2) Disconnect the machine Solution
Hose. Pull down on the middle of the
brass Coupler. The hose will release.
While holding down the Coupler,
insert the Hand Tool Kit Solution
Hose. Release Coupler. Pull on
the Solution hose to insure it is
secured.
3) Disconnect the grey and black
Vacuum Cuffs at the back of the
machine. Connect the grey
Hand Tool Kit Cuff to the grey
machine Cuff.
Cleaning Upholstery
WARNING: Do Not Use To Clean Haitian Cotton!
CLEANING INSTRUCTIONS CONT.

5
KENT INVESTMENT CORPORATION LIMITED WARRANTY
Kent Investment Corporation (the "Company") warranties each new machine against defects in material and workman-
ship under normal use and service for a period of six months from date of purchase. Our obligation under this warran-
ty is limited to the making good at our factory or authorized distributor service station any part or parts thereof, except
motors and pumps (see exception below), which within the warranty period are returned to our factory or authorized
distributor service station, transportation prepaid, and which are determined by us to have been defective in workman-
ship or material. All parts being returned must be accompanied by date of purchase, name of party purchased from,
invoice number and serial number of machine. Purchaser's exclusive remedy against defects in workmanship or
material under this warranty shall be the repair or replacement of the returned part or parts as set forth above.
EXCEPTION: This warranty does not apply to motors or pumps used on Kent Investment machines. The motors and
pumps carry a warranty of their own and are covered by the manufacturer of said motors and pumps.
This limited warranty does not cover any product or part(s), damage or defects resulting from misuse, neglect,
accident, normal expected wear, unapproved chemicals, improper installation or operation contrary to factory recom-
mendations or unapproved, unauthorized repairs or alterations. Kent Investment Corporation reserves the right to
inspect and make the final decisions on any warranty claims that may be questionable.
Purchaser shall have no claim against the company in connection with this warranty, the company's machines, or
otherwise, for consequential or incidental damages, including without limitation damages for loss of use, lost profits,
or delayed delivery or expenses related to the receipt, transportation, or care of a new machine. In no event shall the
company's liability with respect to each machine covered under this warranty exceed the price paid by purchaser for
such machine.
This limited warranty is the exclusive warranty of Kent Investment Corporation and is in lieu of any other warranty
express or implied, including, but not limited to, warranties of merchantability and fitness for a particular purpose.
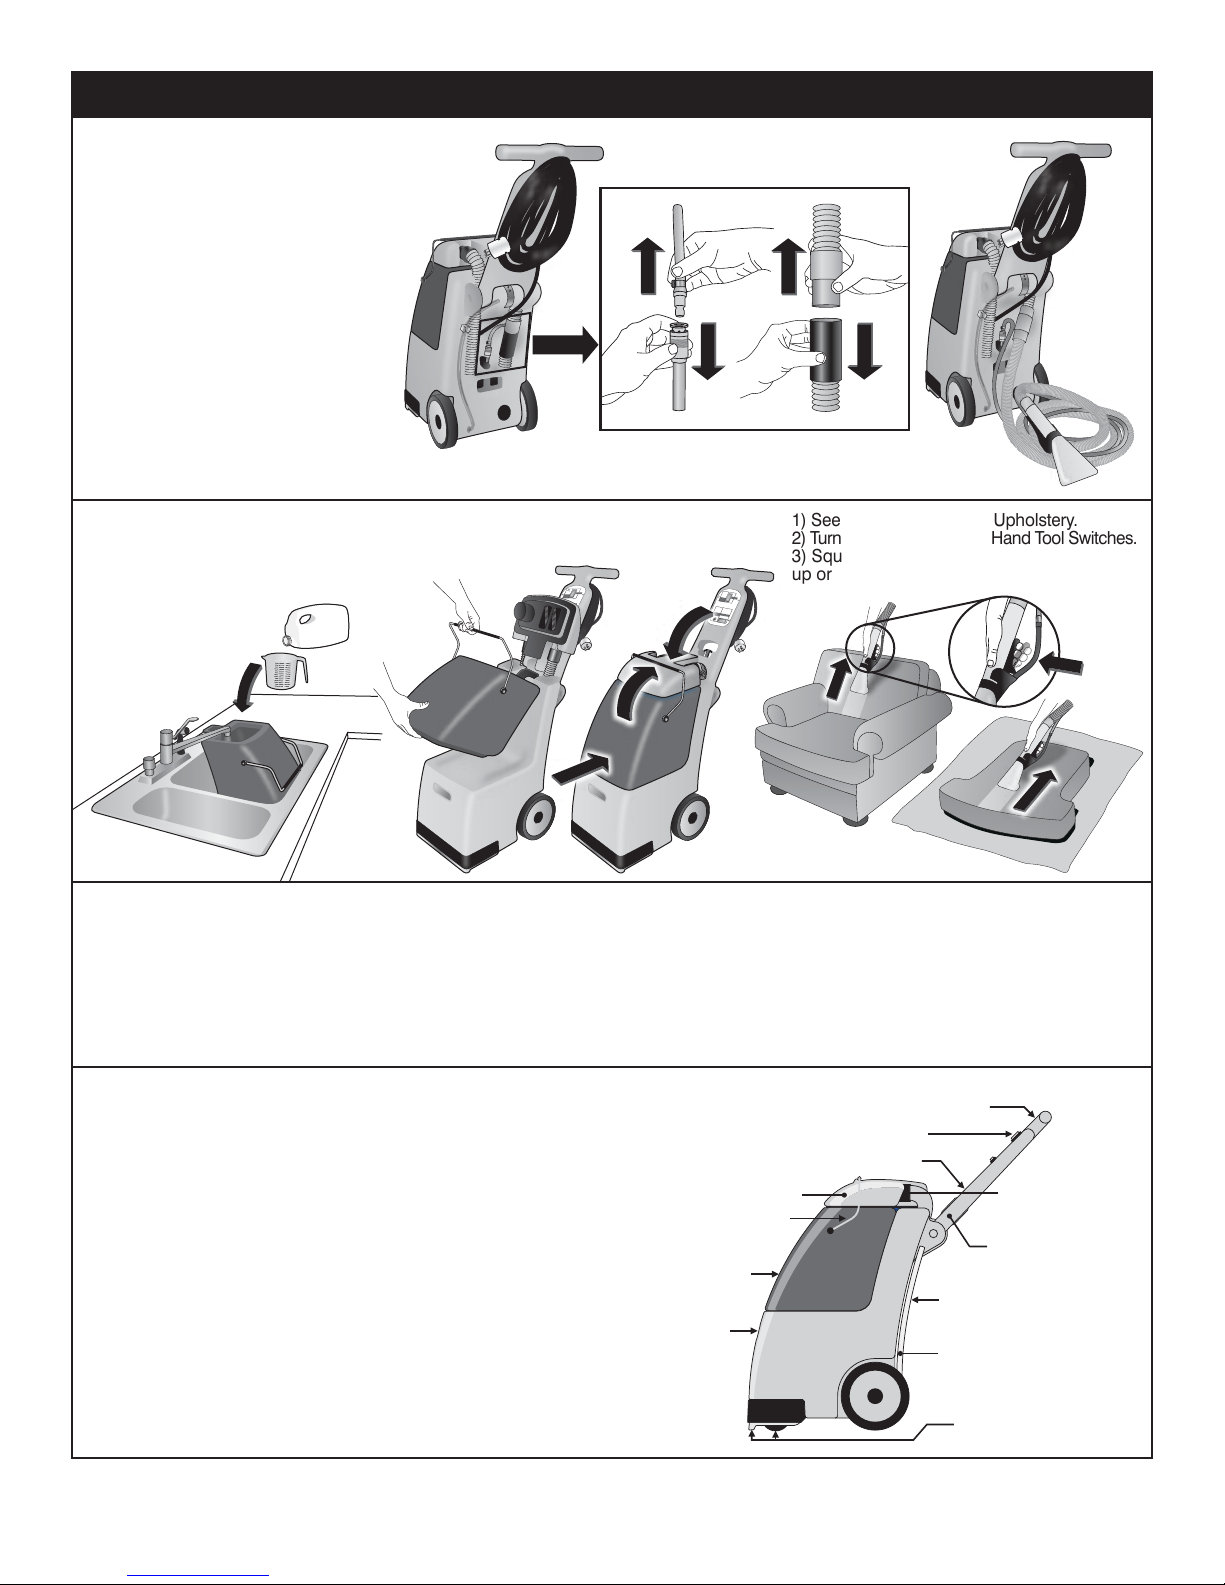
NO BRUSH MOVEMENT
1) Pull the spray/brush trigger switch. If there is no movement, release trigger and check to see if the brush spins
freely. Remove any lint and string caught on the brush. Reset the circuit breaker located on the Handle. DO NOT
attempt to reset circuit breaker if it trips a second time. Have a qualified repair center check/repair the equipment.
2) If the motor runs and the brush will not spin (but it can be turned freely by hand), the belt needs to be replaced.
See C-4 repair instructions for further details.
LACK OF WATER PRESSURE
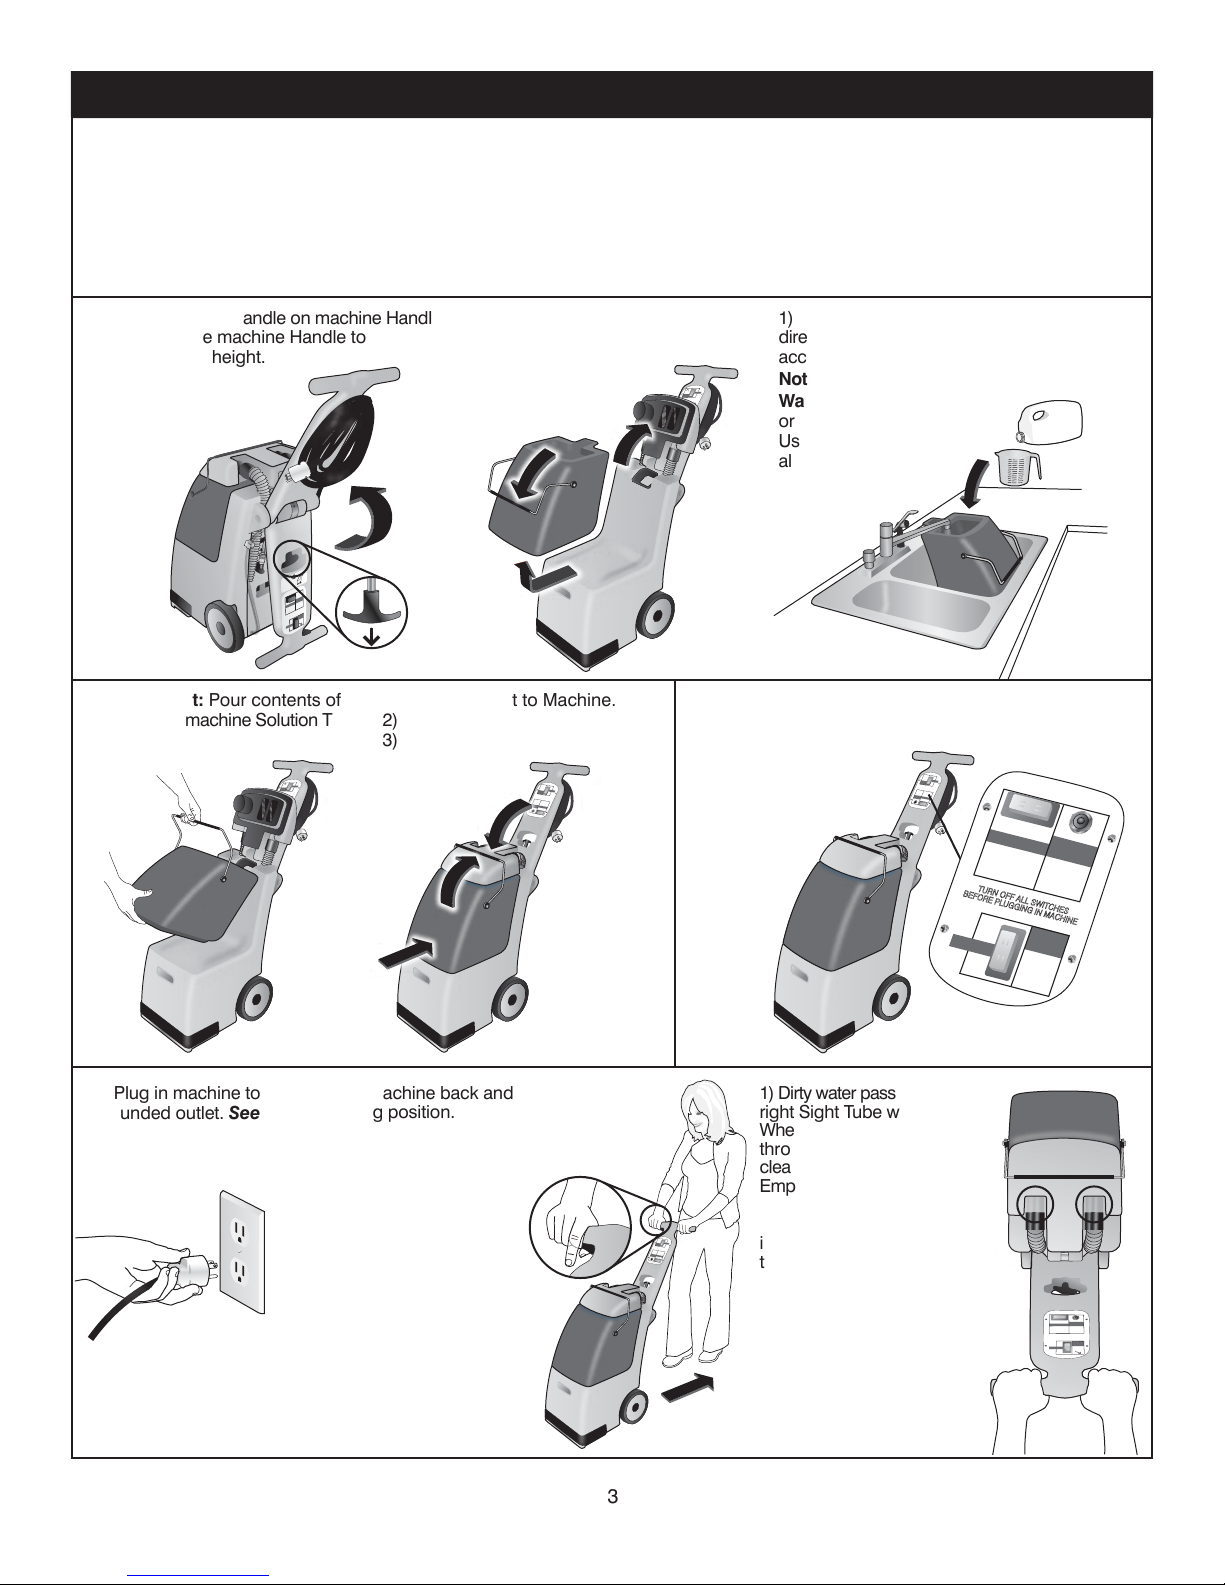
1) Make sure the cleaning solution was poured from the removable bucket into the solution tank.
2) Make sure to pull the spray/brush trigger switch while carpet cleaning; or the hand tool switch is ON when using
the hand tool.
3) Check to see if the solution hose is connected at the back of the machine.
4) Make sure you are not out of cleaning solution.
LOSS OF VACUUM / LITTLE OR NO SUCTION
1) Check if hose cuffs on back of the machine are connected. (See illustration on page 4.)
2) Be sure the suction switch is on. If you don’t hear any sound from the vacuum, have a qualified repair center check
the equipment.
3) Be sure the lid is firmly seated in the bucket and the bucket handle is snapped in place.
4) As you make a backwards cleaning stroke, be sure the suction lips are down firmly on the carpet.
5) Brush off any accumulated lint or debris on the vacuum filter screen located on the bottom of the lid.
6) The vacuum nozzle may be stopped up with lint. Turn the machine OFF. Unplug and empty the machine of liquid.
Tilt the machine back and remove lint with a bent hanger.
LOSS OF ELECTRICAL POWER
1) Check if the Switches are in the ON position.
2) Check to see if Electric Cord is plugged in.
3) Check if the Brush Circuit Breaker has tripped. Clear brush of debris until brush turns freely. Then reset the breaker.
4) Check circuit breakers or fuse box in your building.
5) Check if the outlet is wired to a light switch, or try using a different outlet.
6) If Machine keeps blowing breakers or fuses every time you turn it on, have a qualified repair center check the equipment.
MACHINE OPERATION TROUBLESHOOTING
Other manuals for C-4
2
Table of contents
Other KENT Vacuum Cleaner manuals

KENT
KENT Champion 28 User manual

KENT
KENT Back Vac 10 User manual

KENT
KENT KT-151 Installation and operation manual

KENT
KENT KC-165C Setup guide

KENT
KENT Back Vac 10 User manual

KENT
KENT KC-125B Setup guide

KENT
KENT KC-120DC Setup guide

KENT
KENT KC-T3520 User manual

KENT
KENT wizard KSL-153 User manual

KENT
KENT KC-120H Setup guide