Kenwood K30GSS12 User manual

30 Litre Stainless Steel Microwave with Grill
K30GSS12
instruction manual
beverage reheat
dinner entree
potato pizza fish
chicken vegetable
beef/mutton
sausage clock
pork
power
level
grill/
combination
memory
preset
jet
defrost
weight
defrost
stop/
cancel
quick
start
start
10
1
minute
10
1
second
LOCK
%
G
AUTO
K30GSS12_IB_ready120514.indd 1 14/05/2012 3:11 PM

K30GSS12_IB_ready120514.indd 2 14/05/2012 3:11 PM

contents
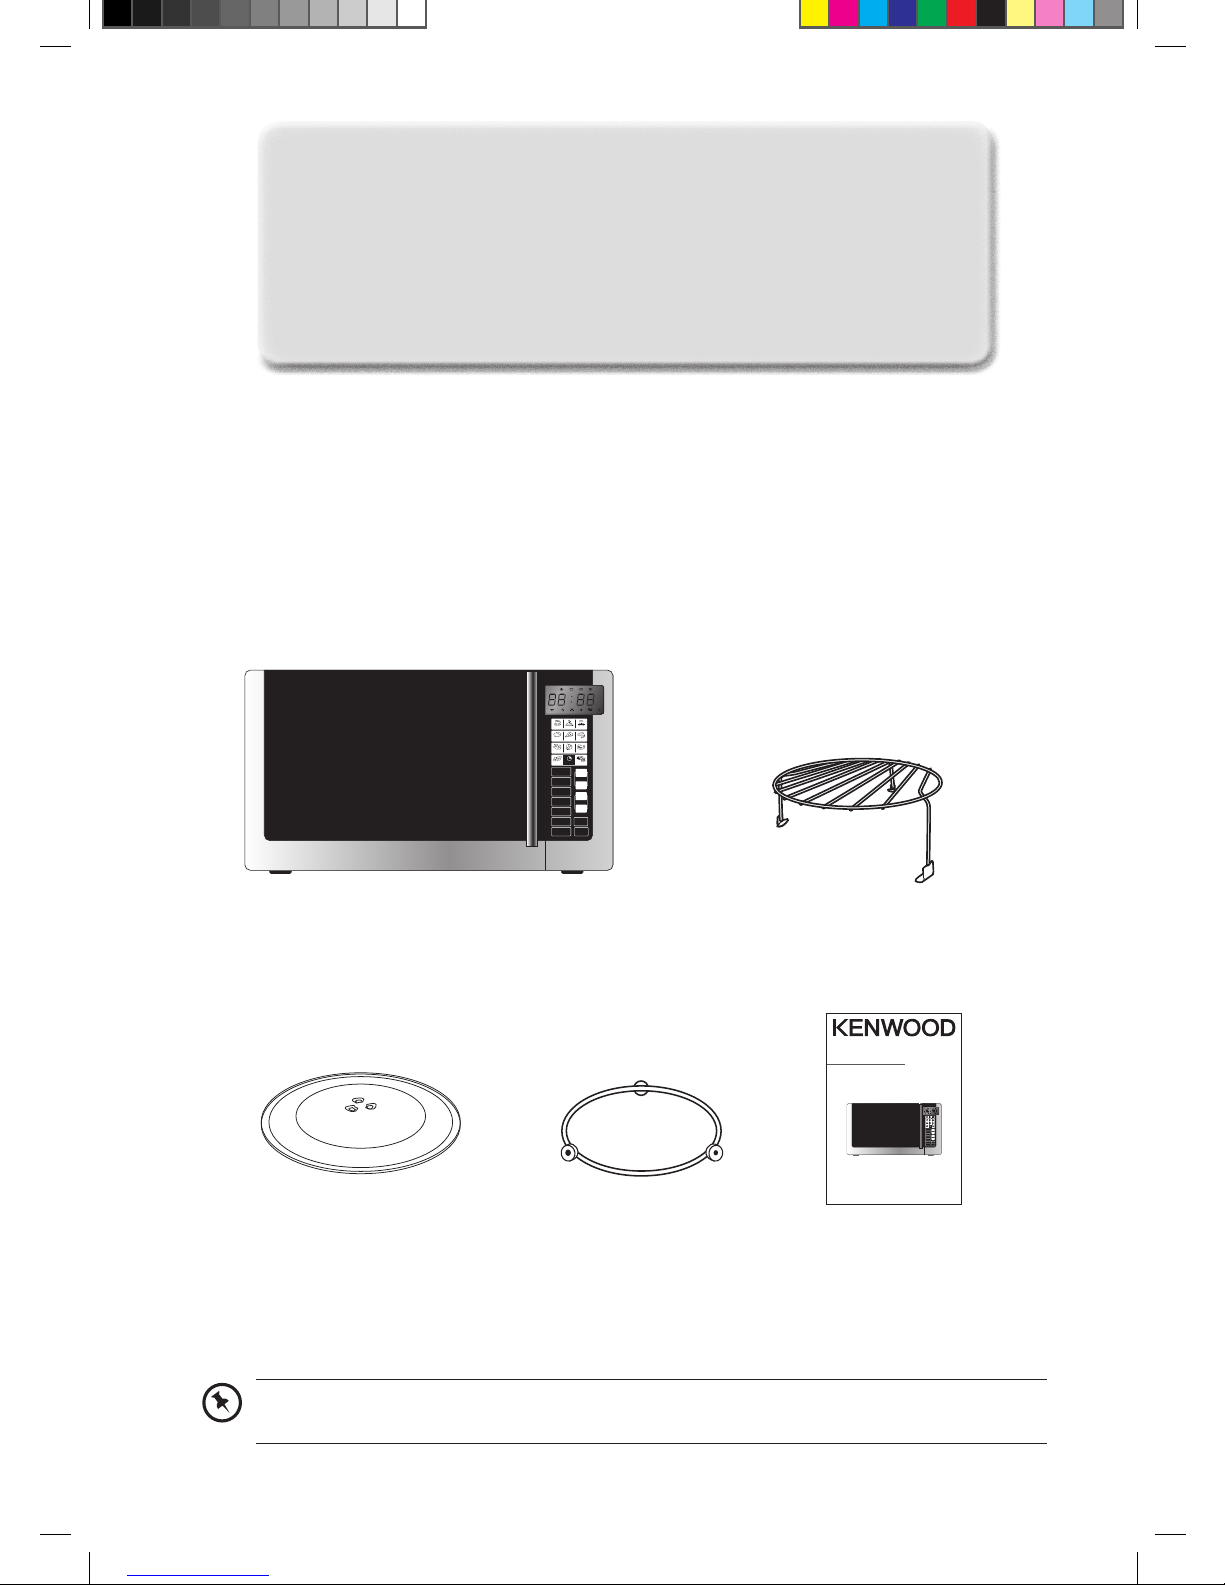
unpacking............................................................................................................................ 4
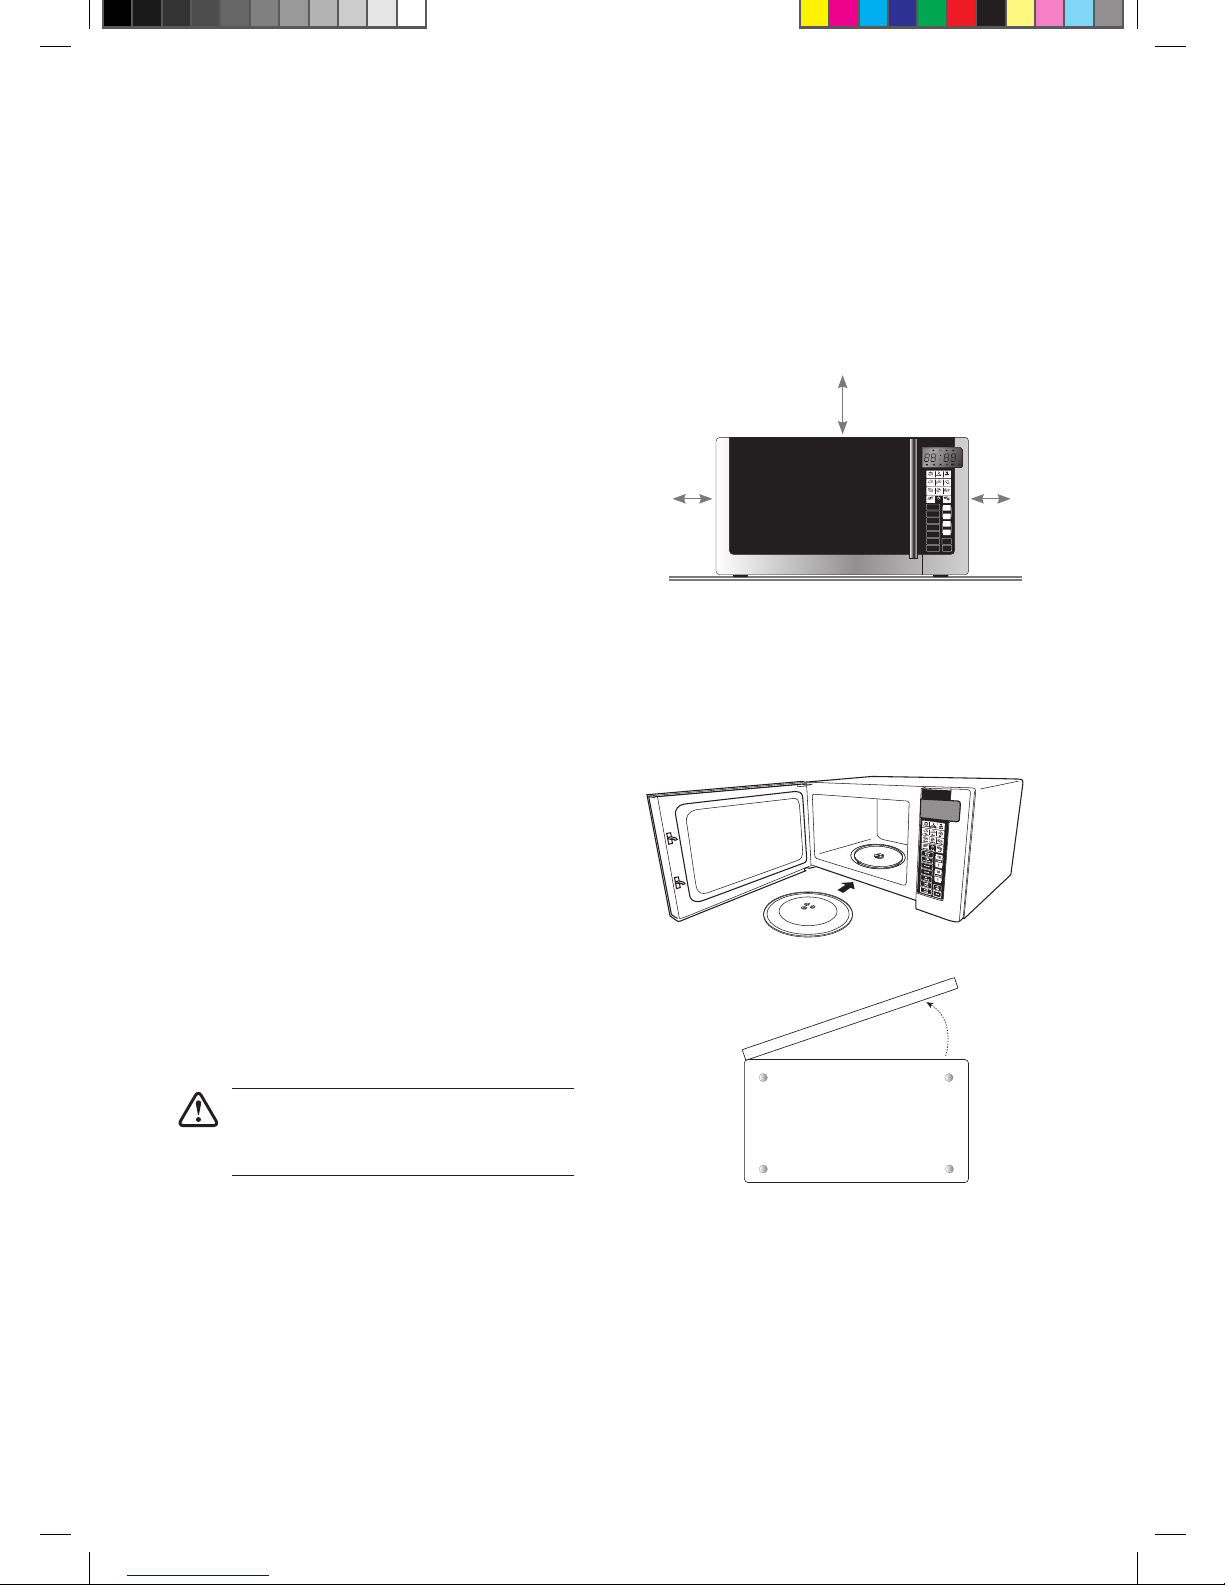
getting ready....................................................................................................................... 5
introducing microwave cooking ....................................................................................... 6
cooking with a microwave................................................................................................................6
checking your cooking utensils ........................................................................................................7
using aluminium foil in your microwave ...........................................................................................7
materials that can be used in the microwave...................................................................................8
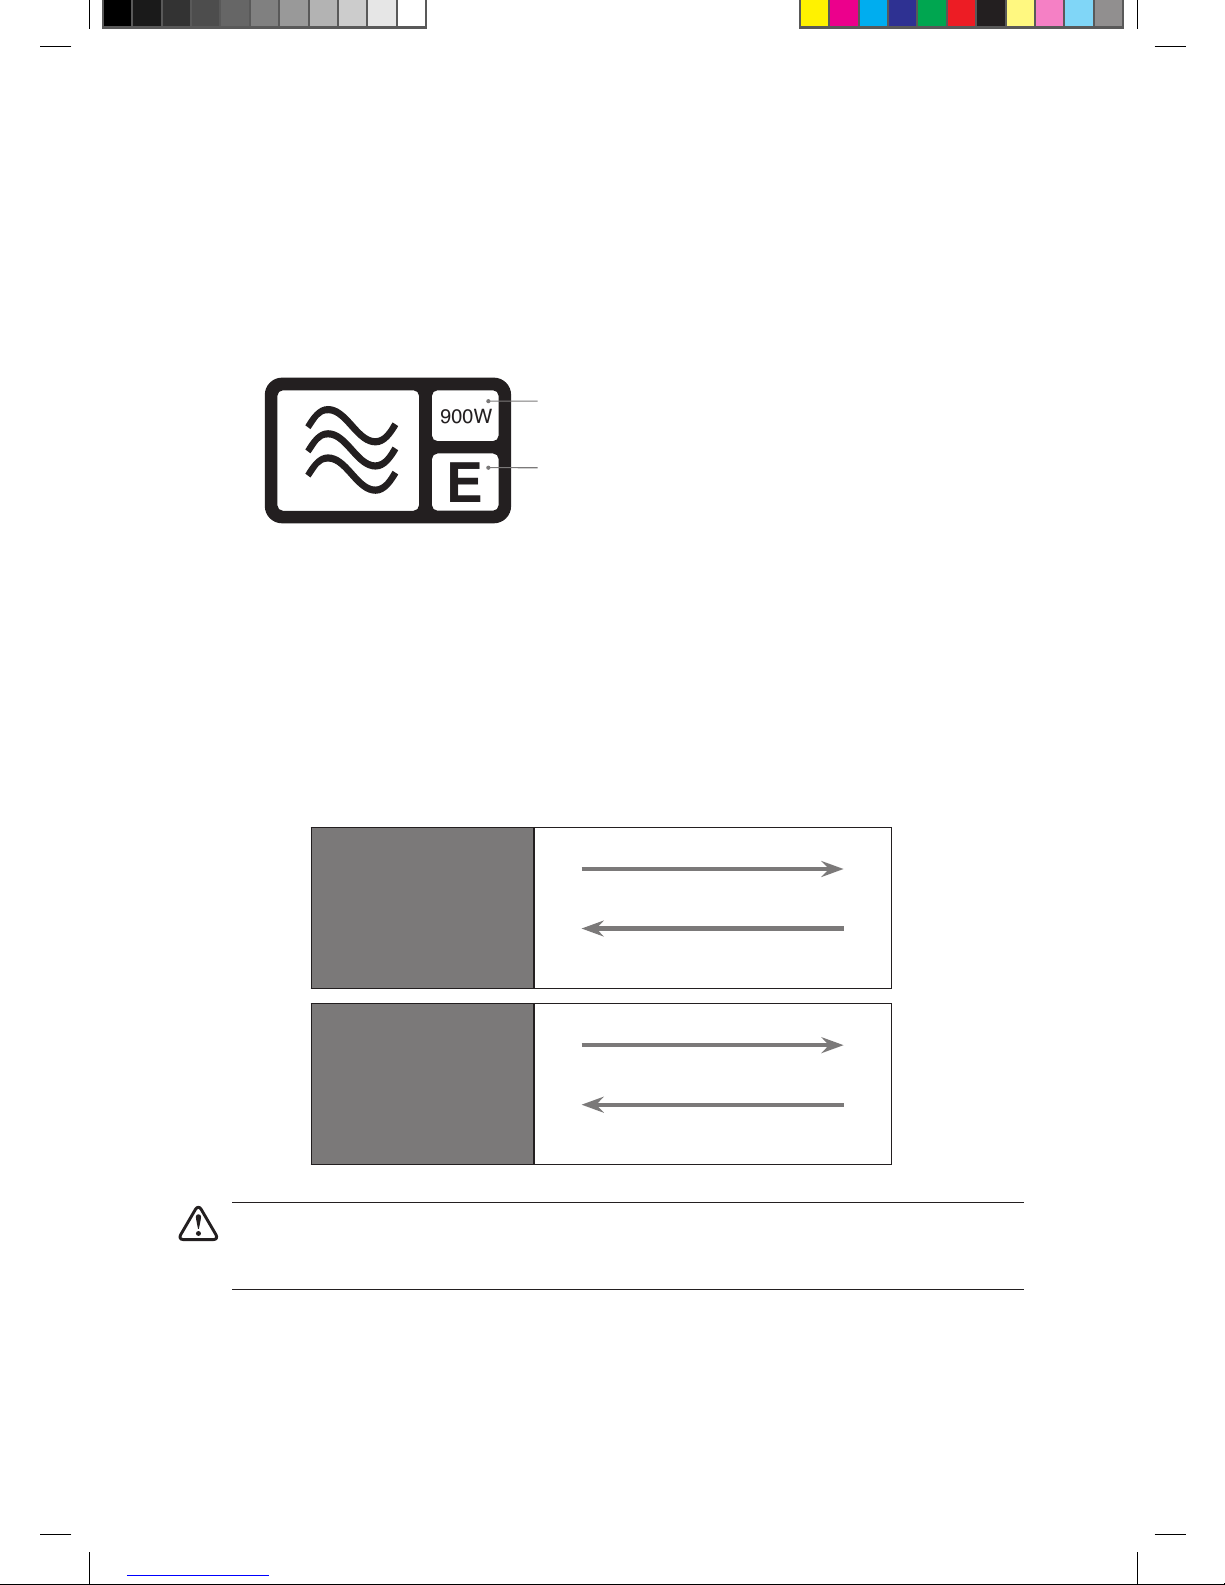
microwave heating categories .........................................................................................................9
steam .............................................................................................................................................10
condensation .................................................................................................................................10
product overview...............................................................................................................11
the main unit ..................................................................................................................................11
the control panel ............................................................................................................................11
checking your microwave................................................................................................ 12
clock setting...................................................................................................................... 13
setting the child lock........................................................................................................ 14
microwave cooking .......................................................................................................... 15
grill or combination cooking ........................................................................................... 16
multi-stage cooking.......................................................................................................... 18
auto cooking ..................................................................................................................... 19
auto-cook menu .............................................................................................................................19
auto-cook menu table ....................................................................................................................20
weight defrost................................................................................................................... 21
jet defrost .......................................................................................................................... 22
preset cooking (programme set in advance)................................................................. 23
quick start cooking........................................................................................................... 24
querying the cooking function........................................................................................ 25
to nd out the current cooking setting............................................................................................25
cleaning your microwave................................................................................................. 26
frequently asked questions............................................................................................. 27
specications.................................................................................................................... 28
safety warnings ................................................................................................................ 29
K30GSS12_IB_ready120514.indd 3 14/05/2012 3:11 PM

4
unpacking
Remove all packaging from the unit. Retain the packaging. If you dispose of it please do so
according to local regulations.
The following items are included:
The Main Unit
Instruction Manual x 1
P.N.: XGALK30GSS12 001
Thank you for purchasing your new Kenwood Microwave.
These operating instructions will help you use it properly and safely.
We recommend that you spend some time reading this instruction manual in
order that you fully understand all the operational features it offers.
Read all the safety instructions carefully before use and keep this instruction
manual for future reference.
beverage reheat
dinner entree
potato pizza fish
chicken vegetable
beef/mutton
sausage clock
pork
power
level
grill/
combination
memory
preset
jet
defrost
weight
defrost
stop/
cancel
quick
start
start
10
1
minute
10
1
second
LOCK
%
G
AUTO
Glass Turntable Plate x 1
P.N.: XGALK30GSS12P12
Turntable Support x 1
P.N.: XGALK30GSS12P11
Grill Rack x 1
P.N.: XGALK30GSS12P41
If items are missing, or damaged please contact Partmaster (UK only).
Tel: 0844 800 3456 for assistance.
30 Litre Stainless Steel Microwave with Grill
K30GSS12
instruction manual
beverage reheat
dinnerentree
potato pizza fish
chicken vegetable
beef/mutton
sausage clock
pork
power
level
grill/
combination
memory
preset
jet
defrost
weight
defrost
stop/
cancel
quick
start
start
10
1
minute
10
1
second
LOCK
%
G
AUTO
K30GSS12_IB_ready120514.indd 4 14/05/2012 3:11 PM

5
2. Choose a flat work surface for your
microwave away from heat sources such
as radiators or fires and away from cold
areas. You should allow a 10cm space all
around the microwave and 30cm above so
that warm air can escape from the vents
during cooking. This microwave is not
designed to be built in.
getting ready
This microwave is designed for home use only. It should not be used for commercial catering.
1. After unpacking your microwave, check that it has not been damaged whilst in the box. Make
sure there are no dents, and the door closes properly. A damaged microwave could allow
microwave energy to escape. Make sure that you have taken out all the packaging from inside
the microwave. Please dispose of the plastic wrappings / bags safely and keep out of the reach
of babies and young children.
3. Plug your microwave into a standard
household electrical socket (230 volt, 13
amp rated). Avoid using a socket that
also has an adaptor and other equipment
plugged in. Do not use a multi-adaptor.
4. Put the turntable support inside the
microwave and place the glass turntable
plate on top of the support. The turntable
support is shaped to sit securely on the
spindle. You must always use the turntable
plate and support whenever you use the
microwave.
30cm
10cm10cm
beverage reheat
dinnerentree
potato pizza fish
chicken vegetable
beef/mutton
sausage clock
pork
power
level
grill/
combination
memory
preset
jet
defrost
weight
defrost
stop/
cancel
quick
start
start
10
1
minute
10
1
second
LOCK
%
G
AUTO
5. To protect your work surface, we
recommend that you fix some non-slip
cushion buttons (not included) to the
underside of the microwave.
Underside View
Remove the turntable plate and
turntable support before turning the
microwave upside down.
K30GSS12_IB_ready120514.indd 5 14/05/2012 3:11 PM

6
• Strips of aluminium foil can be used to cover the thinner pieces of food to stop them overcooking
before the thicker parts of the food have had a chance to cook. Use the aluminium foil sparingly
and wrap around the food or container carefully to stop it touching the inside of the microwave
which could cause sparks.
• Microwaves cook food using microwave energy that is similar to naturally occurring radio waves.
Normally, these “waves” would fade as they disappear into the atmosphere but in a microwave
they are concentrated on the food causing it to heat up.
• Microwave energy cannot pass through metal – so it can not escape from inside your microwave
– but it can pass through materials like glass, porcelain, plastic, and paper. These are the things
used to make microwave-safe cooking equipment.
• Microwave-safe cooking equipment will still get hot as the
food it contains heats up.
• The microwave energy focuses on the moisture in the food
causing lots of tiny vibrations. The vibrations get so great
that the moisture – and the food – heat up.
introducing microwave cooking
Always remember the basic safeguards you would follow when using any cooking equipment or
handling hot food.
This page gives some of the basic guidelines for microwave cooking. If you are unfamiliar with using
a microwave, there is more information at the back of this instruction manual.
cooking with a microwave
If you are unsure how long the food should cook for, begin cooking at the lowest
recommended time, then add more time if necessary. The moisture content of food can vary.
Ensure food is thoroughly cooked all the way to the centre before serving.
Cooking with a microwave is much faster than conventional cooking and, whilst you should
make sure that food is fully cooked, you should be careful not to overcook it. Food can catch
fire if excessive cooking times are used.
• Microwave energy can heat unevenly so stirring to distribute heat is very important. Always stir
from the outside, inwards.
• If you are cooking a number of individual foods at the same time, such as baked potatoes or
small cakes, arrange them evenly on the turntable plate so that they cook evenly. Never stack
food in the microwave.
• Turn larger foods such as meat roasts and poultry during cooking so that the top and bottom
cook evenly. It is also recommended to turn pieces of meat or poultry, especially if they have not
been deboned.
• Meat and poultry which is cooked for 15 minutes or more will brown lightly in its own fat.
Anything cooked for a shorter time can be brushed with a browning sauce to give an appetising
colour.
K30GSS12_IB_ready120514.indd 6 14/05/2012 3:11 PM

7
using aluminium foil in your microwave
It is safe to use aluminium foil in your microwave as long as you follow these safety guidelines.
As with all metals, microwave energy cannot pass through aluminium foil, but provided you keep the
aluminium foil away from the side of the microwave it will not cause sparks and there will not be any
damage to your microwave.
Using aluminium foil is a good way of shielding parts of food that you do not want to cook as quickly
as others – perhaps where the food is narrower and would otherwise overcook.
Place the aluminium foil over the area you want to shield, taking care that the aluminium foil will not
touch the sides of the microwave when the turntable plate rotates. Only use one piece of aluminium
foil at a time so that you do not get sparks between the separate pieces.
Follow these guidelines when using aluminium foil in your microwave:
• Remove aluminium foil lids from containers before using in the microwave. Some lids are made
of card with a aluminium foil covering – these should be removed too. Use a microwave safe
transparent lid if possible.
• Stir food during cooking if the container has a lid or film cover.
• Always use the glass turntable plate.
• Use shallow containers with a large surface area. Do not use containers that are more than
1.25in (3.5cm) deep.
• Use gloves when handling hot aluminium foil containers.
• Do not completely cover food with aluminium foil. The microwave energy cannot pass through
the aluminium foil so the food will not cook.
• Do not let aluminium foil touch the inside of the microwave.
• Do not use more than one piece of aluminium foil in the microwave at the same time.
checking your cooking utensils
Most heat-resistant, non-metallic cooking utensils are safe to use in your microwave. If made of
plastic or glass, utensils will be marked as “microwave safe” or similar.
• Never use equipment made of metal, except aluminium foil in your microwave oven.
• The microwave energy can not pass through the metal so it bounces off and sparks
against the inside of the oven.
• Stop the microwave straight away if any equipment does cause sparks.
• Remember that some crockery has a metal trim around the edge. Even this trim can
cause sparks.
• Never use scratched, cracked or damaged glass in a microwave. Damaged glass can
explode.
If you are not sure and/or there is no microwave-safe marking on the utensil, do NOT use it
in the microwave.
For the types of utensils you can use in the microwave, please see the “Materials That Can Be
Used” section.
K30GSS12_IB_ready120514.indd 7 14/05/2012 3:11 PM

8
materials that can be used in the microwave
utensils remarks
Aluminum foil Shielding only. Small smooth pieces can be used to cover thin parts of meat
or poultry to prevent overcooking. Arcing can occur if foil is too close to oven
walls. The foil should be at least 1 inch (2.5cm) away from oven walls.
Browning dish Follow manufacturer’s instructions. The bottom of browning dish must be at
least 3/16 inch (5mm) above the turntable. Incorrect usage may cause the
turntable to break.
Dinnerware Microwave-safe only. Follow manufacturer’s instructions. Do not use cracked
or chipped dishes.
Glassware Heat-resistant oven glassware only. Make sure there is no metallic trim.
Do not use cracked or chipped dishes.
Oven cooking bags Follow manufacturer’s instructions. Do not close with metal tie. Make slits to
allow steam to escape.
Paper plates and cups Use for short–term cooking/warming only. Do not leave oven unattended while
cooking.
Paper towels Use to cover food for reheating and absorbing fat. Use with supervision for a
short-term cooking only.
Greaseproof paper Use as a cover to prevent splattering or a wrap for steaming.
Plastic containers Microwave-safe only. Follow the manufacturer’s instructions. Should be
labelled “Microwave Safe”. Some plastic containers soften, as the food inside
gets hot. “Boiling bags” and tightly closed plastic bags should be slit, pierced
or vented as directed by the instructions on their packaging.
Plastic wrap Microwave-safe only. Use to cover food during cooking to retain moisture.
Do not allow plastic wrap to touch food.
K30GSS12_IB_ready120514.indd 8 14/05/2012 3:11 PM

9
900W
E
microwave heating categories
Your microwave has been tested and labelled to meet the UK government’s voluntary agreement on the
reheating of pre-cooked food.
The heating characteristics and output power levels of microwaves are usually calculated using a relatively
large portion of food (a 1000 gram load, IEC 60705) but many packs of pre-cooked food are sold in smaller
packs, often about 350 grams.
The UK government, in partnership with food companies and microwave manufacturers, has set up a
system of heating categories to help you choose the reheating time for pre-cooked food.
The category (a letter from A to E), is designed to help you reheat small quantities of food such as
microwave ready meals.
The label given above and also on the oven door gives the heating category and output power of the
oven.
Microwave ready meals weighing up to 500g (1lb 2oz) should have cooking instructions for heating
categories A to E. Follow the instructions for the letter that corresponds to the heating category of the
oven.
The higher the output power and heating category of the oven the less heating time is required. This is
shown in the diagrams below:
oven output power
Less heating time required
600 700 800 900 1000 Watts
More heating time required
oven output category
Less heating time required
A B C D E
More heating time required
900W is the output power of the microwave. (IEC 60705)
E is the heating category for your microwave.
Check the cooking times for category E on the food’s
packaging to see how long it should be cooked for.
Start cooking at the lowest recommended time, and add more time if necessary. The
moisture content of food can vary, ensure food is cooked thoroughly all the way to the centre
before serving.
K30GSS12_IB_ready120514.indd 9 14/05/2012 3:11 PM

10
steam
When you microwave food, steam is created as water in the food heats up and evaporates.
The steam formed during microwave cooking is entirely safe. It has to escape from the microwave
to prevent pressure from building up inside the microwave. It does this through the vents on the
back of the microwave and from around the door.
condensation
As the steam cools, you may find that condensation
gathers in small pools inside your microwave and on
the work surface beneath the door and vents. Always
dry the microwave after cooking foods with a high
moisture content.
Your microwave is designed to let steam escape from
the vents and around the door without microwave
energy escaping. There is no danger of microwave
energy escaping with the steam.
beverage reheat
dinnerentree
potato pizza fish
chicken vegetable
beef/mutton
sausage clock
pork
power
level
grill/
combination
memory
preset
jet
defrost
weight
defrost
stop/
cancel
quick
start
start
10
1
minute
10
1
second
LOCK
%
G
AUTO
K30GSS12_IB_ready120514.indd 10 14/05/2012 3:11 PM

11
beverage reheat
dinner entree
potato pizza fish
chicken vegetable
beef/mutton
sausage clock
pork
power
level
grill/
combination
memory
preset
jet
defrost
weight
defrost
stop/
cancel
quick
start
start
10
1
minute
10
1
second
LOCK
%
G
AUTO
product overview
the main unit
the control panel
beverage reheat
dinner entree
potato pizza fish
chicken vegetable
beef/mutton
sausage clock
pork
power
level
grill/
combination
memory
preset
jet
defrost
weight
defrost
stop/
cancel
quick
start
start
10
1
minute
10
1
second
LOCK
%
G
AUTO
control panel
door open handle
LED display
Shows the clock,
cooking time and setting.
quick cook buttons
Use these buttons to
select instant cook
settings to cook
popular foods.
clock button
Use this button to set the
clock.
numeric (10/1 minute)
and (10/1 second)
buttons
Use these buttons to
enter the cooking time
and weight. They can
also set the time.
quick start button
Use this button to quick
start cooking by increments
of 30 seconds. Each press
adds 30 seconds.
start button
Use this button to start
cooking.
power level button
Use this button to select
the microwave power.
combination button
Use this button to select the
grill/combination function.
memory button
Use this button to select the
memory programmes.
jet defrost button
Use this button to defrost food
by time.
weight defrost button
Use this button to defrost food
by weight or by time.
stop/cancel button
Use this button to cancel a
setting or reset the oven before
setting a cooking programme.
Press this button once to pause
a cooking programme or twice
to stop a cooking programme. It
can also be used to activate the
child lock.
preset button
Use this button to select a
preset feature.
K30GSS12_IB_ready120514.indd 11 14/05/2012 3:11 PM

12
beverage reheat
dinner entree
potato pizza fish
chicken vegetable
beef/mutton
sausage clock
pork
power
level
grill/
combination
memory
preset
jet
defrost
weight
defrost
stop/
cancel
quick
start
start
10
1
minute
10
1
second
LOCK
%
G
AUTO
1. Pull the handle to open the door.
2. Place a cup of water on the glass turntable
plate. Make sure the cup is microwave-safe
(it should not have any decorative metal
trim).
3. Close the door.
4. Press the stop/cancel button to clear any
settings that have already been made.
5. Press the quick start button to start a
simple 30-second microwave cooking cycle
and that allows you to check the operation
of the microwave.
6. When the cooking cycle has finished, the
water should be hot (be careful when you
take the cup out of the microwave).
7. Press the stop/cancel button to clear any
settings.
checking your microwave
Check your microwave after unpacking.
For your safety, the microwave stops
if the door is opened during cooking.
Close the door and press the start
button to continue the cooking cycle.
5
4, 7
K30GSS12_IB_ready120514.indd 12 14/05/2012 3:11 PM

13
clock setting
When the microwave is connected to the mains power, the LED display will show “1:01”, and the
microwave will sound once. Please ensure that you have set the clock prior to use.
Please follow the steps below to set the clock.
1. Press the clock button once and the
LED display will show “12 H” (for 12-hour
setting). Press the clock button again
and the LED display will show “24 H” (for
24-hour setting).
2. Press the numeric buttons and enter the
time. For example, to input the current time
1:30 in the afternoon:
In 12-hour setting, you need to press the
1 minute button once and then press the
10 second button three times. The LED
display will show “1:30”. In 24-hour setting,
you need to press the 10 minute button
once, 1 minute button three times and then
press the 10 second button three times.
The LED display will show “13:30”.
3. Press the clock button again to complete
the clock setting.
“:” will stop flashing and to confirm that the
clock setting is complete.
beverage reheat
dinner entree
potato pizza fish
chicken vegetable
beef/mutton
sausage clock
pork
power
level
grill/
combination
memory
preset
jet
defrost
weight
defrost
stop/
cancel
quick
start
start
10
1
minute
10
1
second
LOCK
%
G
AUTO
2
1, 3
• If the clock needs to be re-set,
please repeat steps 1 to 3.
• To find out the current time while the
microwave is in use, press the clock
button. It will display the current time
for 2-3 seconds, then return to the
remaining cooking time.
K30GSS12_IB_ready120514.indd 13 14/05/2012 3:11 PM

14
beverage reheat
dinner entree
potato pizza fish
chicken vegetable
beef/mutton
sausage clock
pork
power
level
grill/
combination
memory
preset
jet
defrost
weight
defrost
stop/
cancel
quick
start
start
10
1
minute
10
1
second
LOCK
%
G
AUTO
setting the child lock
This feature prevents the microwave from operating by locking the control panel until you cancel it.
Please follow the steps below to set the child lock.
1. Press the stop/cancel button for 3 seconds
and a “beep” will sound. The child lock
indicator
LOCK
will illuminate on the LED
display to indicate that the microwave has
set the child lock.
2. To release the child lock, press the stop/
cancel button again for 3 seconds and a
“beep” will sound. The child lock indicator
LOCK
will disappear from the LED display to
indicate that the microwave has released
the child lock.
1, 2
K30GSS12_IB_ready120514.indd 14 14/05/2012 3:11 PM

15
microwave cooking
For simple microwave cooking, follow the steps below.
For instance: If you want to use 60% microwave power to cook for 5 minutes.
1. Press the power level button once and
the LED display will show ”100%”. Press
the power level button repeatedly until the
LED display shows “60%”.
2. Press the numeric buttons to enter the
cooking time until the LED display shows
“05:00”.
3. Press the start button to confirm and start
cooking.
4. Press the stop/cancel button to pause
the cooking. Press the stop/cancel button
again to cancel the setting.
microwave button control
press order microwave power
1 100%
2 80%
3 60%
4 40%
5 20%
6 00%
When 00% is selected, no microwave
power will be present. This setting is
for deodorising purposes only.
• Stop the microwave before removing
food.
• Operating the microwave without
food in it can result in overheating
and damage the magnetron.
beverage reheat
dinner entree
potato pizza fish
chicken vegetable
beef/mutton
sausage clock
pork
power
level
grill/
combination
memory
preset
jet
defrost
weight
defrost
stop/
cancel
quick
start
start
10
1
minute
10
1
second
LOCK
%
G
AUTO
34
1
2
K30GSS12_IB_ready120514.indd 15 14/05/2012 3:11 PM

16
1. Press the grill/combination button once
and the LED display will show “ ” & “:”.
2. Press the numeric buttons to enter the
cooking time.
3. Press the start button to confirm and start
cooking.
4. Press the stop/cancel button to pause
the cooking. Press the stop/cancel button
again to cancel the setting.
grill/combination button control
press
order
LED
display
microwave
power
grill
power
cavity
temperature
1:0% 100%
Approximately
keeping at
160°C-170°C
For Combination Cooking (Microwave and
Grill), follow the steps below.
1. Press the grill/combination button 3 times
and the LED display will show “ ” & “:”.
2. Press the numeric buttons to enter the
cooking time.
3. Press the start button to confirm and start
cooking.
4. Press the stop/cancel button to pause
the cooking. Press the stop/cancel button
again to cancel the setting.
grill or combination cooking
For grilling, follow the steps below.
We recommend that you use the supplied grill racks. Place your food on the grill rack then
place on top of the glass turntable plate.
beverage reheat
dinner entree
potato pizza fish
chicken vegetable
beef/mutton
sausage clock
pork
power
level
grill/
combination
memory
preset
jet
defrost
weight
defrost
stop/
cancel
quick
start
start
10
1
minute
10
1
second
LOCK
%
G
AUTO
34
1
2
K30GSS12_IB_ready120514.indd 16 14/05/2012 3:11 PM

17
micro/combinaton button control
press
order
LED
display
microwave
power grill power suitable for cooking
2:35% 65% Fish, potatoes or au gratin.
3:55% 45% Pudding, omelettes, baked potatoes and poultry.
Please note there are only 2 modes of combination cooking and their microwave, and grill powers
are shown on the table above.
For instance: If you want to do 55% microwave power and 45% grill power cooking for 10 minutes,
please follow the steps below.
1. Press the grill/combination button three
times and the LED display will show “ ”
& “:”.
2. Press the 10 minute button once to enter
the cooking time. The LED display will
show “10:00”.
3. Press the start button to confirm and start
cooking.
4. Press the stop/cancel button to pause
the cooking. Press the stop/cancel button
again to cancel the setting.
beverage reheat
dinner entree
potato pizza fish
chicken vegetable
beef/mutton
sausage clock
pork
power
level
grill/
combination
memory
preset
jet
defrost
weight
defrost
stop/
cancel
quick
start
start
10
1
minute
10
1
second
LOCK
%
G
AUTO
34
1
2
In order to obtain better grilling
performance for your food, please
turn your food over periodically. Press
the stop/cancel button once to stop
cooking and open the door. Then, turn
your food over and close the door.
Press the start button to continue
cooking.
K30GSS12_IB_ready120514.indd 17 14/05/2012 3:11 PM

18
4. Press the numeric buttons to enter the
cooking time. For example, to input 7
minutes, press the 1 minute button seven
times. The LED display will show “7:00”.
Then press the memory button.
5. Press the grill/combination button once
and the LED display will show “ ” & “:”.
6. Press the numeric buttons to enter the
cooking time. For example, to input 5
minutes you need to press the 1 minute
button five times. The LED display will
show “5:00”.
3. Press the power level button once and
the LED display will show “100%”. Press
the power level button repeatedly until the
LED display shows “80%”.
multi-stage cooking
For multi-stage cooking, please follow the steps below.
For instance: If you want to defrost your food for 5 minutes, and then to cook it with 80% microwave
power for 7 minutes and finally grill it for 5 minutes.
Do not press the Start button at this
stage.
Do not press the Start button at this
stage.
1. Press the jet defrost button once to initiate
the multi-stage cooking with time defrost as
the first stage. The LED display will show
“:” & “ ”.
2. Press the numeric buttons to enter the
defrosting time. For example, to input 5
minutes you need to press the 1 minute
button five times. The LED display will
show “5:00”. Then, press the memory
button.
You can set a maximum of 3 stages for Multi-Stage Cooking. If defrosting is among one of
the stages, then it will be set as the first stage. Auto Cooking is not available in multi-stage
cooking.
beverage reheat
dinner entree
potato pizza fish
chicken vegetable
beef/mutton
sausage clock
pork
power
level
grill/
combination
memory
preset
jet
defrost
weight
defrost
stop/
cancel
quick
start
start
10
1
minute
10
1
second
LOCK
%
G
AUTO
78
5
2, 4
3
1
2, 4, 6
To prevent excessive temperatures,
the convection fan will continue to
operate for 2 minutes after cooking
has stopped.
7. Press the start button to confirm and start
cooking.
8. Press the stop/cancel button to pause
the cooking. Press the stop/cancel button
again to cancel the setting.
K30GSS12_IB_ready120514.indd 18 14/05/2012 3:11 PM

19
auto cooking
This feature allows you to cook most of your food based on the food category and the weight. Select
the category and choose the weight of your food. For quick reference of the cooking time and the
weight, please refer to the auto-cook menu table on the followng page.
For instance: If you want to cook 300g of potato.
auto-cook menu
1. Press the potato button repeatedly to
select the weight option for your food.
Please refer to the auto menu table for
more information.
2. Press the start button to confirm and start
cooking.
3. Press the stop/cancel button to pause the
cooking. Press the stop/cancel button to
cancel the setting.
beverage reheat
dinner entree
potato pizza fish
chicken vegetable
beef/mutton
sausage clock
pork
power
level
grill/
combination
memory
preset
jet
defrost
weight
defrost
stop/
cancel
quick
start
start
10
1
minute
10
1
second
LOCK
%
G
AUTO
23
1
• If the clock needs to be reset, please
repeat steps 1 to 3.
• To find out the current time while the
microwave is in use, press the clock
button. It will display the current time
for 2-3 seconds, then return to the
remaining cooking time.
K30GSS12_IB_ready120514.indd 19 14/05/2012 3:11 PM

20
auto-cook menu table
menu weight display cooking
time
beverage
200ml per
each 1 1’30”
400ml per
each 2 2’40”
600ml per
each 3 3’50”
dinner
entree
250g per
each 1 3’30”
500g per
each 2 6’30”
reheat
200g 200G 1’30”
300g 300G 2’00”
400g 400G 2’30”
500g 500G 3’00”
600g 600G 3’30”
700g 700G 4’00”
800g 800G 4’30”
potato *
(at least
230g per
potato)
230g 1 4’00”
460g 2 8’00”
690g 3 12’00”
pizza
(cooked)
150g 150 0’50”
300g 300 1’20”
450g 450 1’50”
fish
200g 200G 3’00”
300g 300G 4’20”
400g 400G 5’40”
500g 500G 7’00”
600g 600G 8’20”
* It is recommended that when auto-cooking a potato, the potato should weight at least 230g.
Note: potatoes will vary in water-content depending on age, type, weight, etc.
For best results, pierce the potato’s skin before cooking. Once the potato is cooked, wrap it in
aluminium foil for at least 5 minutes to ensure it is cooked thoroughly.
The density and thickness of food can affect its cooking time. Ensure all food is piping hot
and cooked thoroughly before serving. It is essential that food is checked during and after
the recommended cooking time, even if auto menu was used.
menu weight display cooking
time
chicken
800g 800G 33’00”
1000g 1000G 36’00”
1200g 1200G 39’00”
1400g 1400G 42’00”
vegetable
200g 200G 3’30”
300g 300G 4’30”
400g 400G 5’30”
500g 500G 6’30”
600g 600G 7’30”
beef/
mutton
200g 200G 12’00”
300g 300G 15’00”
400g 400G 18’00”
500g 500G 21’00”
600g 600G 24’00”
sausage
100g 100G 4’00”
200g 200G 5’00”
300g 300G 6’00”
400g 400G 7’00”
500g 500G 8’00”
pork
200g 200G 12’00”
300g 300G 15’00”
400g 400G 18’00”
500g 500G 21’00”
600g 600G 24’00”
K30GSS12_IB_ready120514.indd 20 14/05/2012 3:11 PM
Table of contents
Other Kenwood Microwave Oven manuals

Kenwood
Kenwood KEN ST25 User manual

Kenwood
Kenwood MW315 User manual

Kenwood
Kenwood KCTAL30 User manual

Kenwood
Kenwood K30CIFS21 User manual

Kenwood
Kenwood KGTS23 User manual

Kenwood
Kenwood K25MB12 User manual

Kenwood
Kenwood K30CSS14E User manual

Kenwood
Kenwood MM562 User manual

Kenwood
Kenwood K25CB12 User manual

Kenwood
Kenwood k23cm13e User manual

Kenwood
Kenwood K23GSS10 User manual

Kenwood
Kenwood MW570 series User manual

Kenwood
Kenwood MW301 User manual

Kenwood
Kenwood K17SJA09 User manual

Kenwood
Kenwood K28CB11 User manual

Kenwood
Kenwood K20MSS10 User manual

Kenwood
Kenwood K28CW14 User manual

Kenwood
Kenwood KEN SJW17 User manual

Kenwood
Kenwood mw598 SERIES User manual

Kenwood
Kenwood K20MW18E User manual