Kenwood TRC-80 User manual

TRG-BO
HF SSB RADIOTELEPHONE
INSTRUCTIONMANUAL
RADIOTELEFONO DE HF SSB
MANUALDEINSTRUCCIONES
~jJiiMf~~
f~ Jti i5t aA.:f;
KENWOOD CORPORATION
(
@ 862-0485-00 (M) (MC)
09 08 07 06 05 04 03 02 01 00
I
l

HF SSB RADIOTELEPHONE
TRC-BO
INSTRUCTION MANUAL
KENWOOD CORPORATION

CONTENTS
SAFETY PRECAUTIONS 1
IMPORTANTNOTICE 1
INTRODUCTION 1
SUPPLIEDACCESSORIES 1
BASE STATIONINSTALLATION 2
ANTENNA CONNECTION 2
GROUND CONNECTION 2
DC POWERSUPPLYCONNECTION 2
ReplacingFuses 2
MOBILEINSTALLATION 3
ANTENNACONNECTION 3
DC POWERCABLE CONNECTION 3
ReplacingFuses 3
GROUND CONNECTION 3
GETTINGACQUAINTED 4
FRONTPANEL 4
REAR PANEL :: 5
DiSPLAy 6
MICROPHONE 7
OPERATINGBASICS 7
SWITCHINGPOWERON/OFF ; 7
ADJUSTINGVOLUME 7
ADJUSTINGSQUELCH 7
SELECTINGACHANNEL 8
SELECTINGA MODE 8
TRANSMITTING 8
ChangingTransmitPower 8
VoiceModes 8
VOX (Voice-operatedTransmit) 8
CW Mode 9
DATAOPERATION 9
FSK MODE 9
AFSK MODE 9
MENU SETUP 10
CHANGINGMENUSETTINGS 10
MENUCONFIGURATION 10
MEMORYBACKUP 10
SCAN 11
BUSYFREQUENCYSTOP 11
Scan ResumeMethods 11
CHANNEL LOCKOUT 11
STARTING/STOPPINGSCAN 11
NOISE BLANKER 11
CLARIFIER 11
KPE-1SELECTIVECALLUNIT (OPTIONAL) 11
MANUALCALLING 12
MEMORYCALLING 12
RECEiViNG 12
CHANGING IDENTIFICATIONCODES 13
CHANGINGCHARACTERMESSAGES 13
AUTOMATICANTENNATUNER 13
PRESETTING(KAT-2INTERNALTUNER) 13
KAT-2INTERNALTUNER (OPTIONAL) 13
KAT-1/MAT-100EXTERNALTUNER
(OPTIONAL) 13
COMPUTER RADIOTELEPHONE
INTERFACE 14
COMMUNICATIONPARAMETERS 14
HARDWAREDESCRIPTION 14
MAINTENANCE.. 15
SERVICE 15
SERVICENOTE 15
CLEANING 15
TROUBLESHOOTING 16
ACCESSORYCONNECTIONS 17
COMPUTERINTERFACE(ACC 1) 17
PC-1APHONEPATCH
CONTROLLER(ACC2) 17
ANTENNATUNER (AT) 17
DATAEQUIPMENTINTERFACE(ACC2) 18
CHANNELMEMO 19
APPENDiX A1
CONTROLOPERATION A1
COMMANDS A1
COMMANDDESCRIPTION A1
PARAMETERDESCRIPTION A1
TERMINATOR :..A2
TYPESOF COMMANDS A2
COMPUTERCONTROLCOMMANDS A3
ERRORMESSAGES A3
COMMANDUSE PRECAUTIONS A3
READINGCOMMANDTABLES A4
COMMANDTABLES A4

SAFETYPRECAUTIONS
It is important that the operator understands and is
aware of hazards common to the operation of any
radiotelephone.
WARNING!
1 EXPLOSIVEATMOSPHERES
(GASES, DUST,FUMES,ETC.)
Turnoff anddo notoperatethe radiotelephonewhile
taking on fuel, or while parkedin gasolineservice
stations. Do notcarry sparefuel containersin thetrunk
of your vehicle ifthe radiotelephoneis mountedinthe
trunk area.
2 INJURYFROM RADIO FREQUENCY
TRANSMISSIONS
Do not operate the radiotelephone when anyone is
touching the antenna, or when anyone is standing within
two to three feet of the antenna, to avoid the possibility
of radio frequency burns or related physical injury.
3 DYNAMITEBLASTING CAPS ...
Transmitter operation can cause dynamite blasting caps
to explode if you operate within 500 feet of the blasting
caps. Turn off and do not operate the radiotelephone in
an area where blasting is in progress, or where "TURN
OFF TWO-WAY RADIO" signs have been posted. If
you are transporting blasting caps in your vehicle, make
certain they are carried in a closed metal box having a
padded interior. Do not transmit during the time that the
caps are being placed into or removed from this
container.
IMPORTANTNOTICE
Government law prohibits the operation of unlicensed
radio transmitters within the territories under
government control. Illegal operation is punishable by
fine or imprisonment or both.
Refer service to a qualified licensed or certified
technician only.
INTRODUCTION
All KENWOOD radiotelephones incorporate the latest in
advanced technology, providing communications that
can be counted on to keep vehicles and personnel
operating at peak efficiency.
The easy-to-operate TRC-80 radiotelephone continues
the KENWOOD tradition of dependable
communications. When combined with the optional
KPE-1 Selective Call Unit, the TRC-80 allows full
flexibility for signaling and communicating with specific
stations or groups of stations.
SUPPLIEDACCESSORIES
Note: The followinginstructionsare for usebyyour KENWOOD
Dealeronly (eitheran authorizedKENWOOD service facility or the
factory).
Carefully unpack the radiotelephone. Itis
recommended that you identify the items listed and
check them off before discarding the packing material.
If any damage has occurred to the equipment during
shipment, file a claim with the carrier immediately.
1
Accessory PartNumber Quantity
Microphone T91-0562-XX 1
DC power cable E30:.3157-XX 1
Fuse (25A) F05-2531-XX 1
Fuse (4 A) F06-4027-XX 1 .
Instruction manual B62-0485-XX 1

BASESTATIONINSTALLATION
ANTENNACONNECTION
The type of the antennasystem,consistingof the
antenna, ground,and feed line,will greatlyaffectthe
successfulperformanceof the radiotelephone. Usea
properlyadjusted50 Q antennaof good qualityto let
your radiotelephoneperformat its best. Usea
good-quality50 Q coaxialcableanda first-quality
connectorforthe connection. Matchthe impedanceof
the coaxialcableandantennasothatthe SWRis 1.5:1
or less. Allconnectionsmustbe clean andtight.
Whilethe radiotelephone'sprotectioncircuitwill activate
ifthe SWR is greaterthan 2.5:1,do notrelyon
protectionto compensatefor a poorlyfunctioning
antennasystem. HighSWR will causethetransmit
outputto drop,andmay leadto radiofrequency
interferenceto consumerproductssuchasstereo
receiversand televisions. Youmayeven interferewith
your own radiotelephone. Reportsthat yoursignalis
garbledor distorted,especiallyat peak modttlation,may
indicatethat your antennasystem is not efficiently
radiatingthe radiotelephone'spower. Ifyou feela tingle
from the radiotelephone'scabinetor the microphone's
metalfittings when you modulate,you can be certain
that, at the least,your coax connectoris looseat the
rearofthe radioand, atthe worst,your antennasystem
is not efficientlyradiatingpower.
CAUTION:
. Transmittingwithoutfirstconnectinganantennaorothermatched
load may damage the radiotelephone. Always connectthe
antenna to theradiotelephonebefore transmitting.
. Usealightninga"estor toprevent fire, electricshock, or damage
to theradiotelephone.
GROUNDCONNECTION
Atthe minimum,a good DCground is requiredto
prevent such dangers as electricshock. Forsuperior
communicationsresults, a good RFground isrequired,
against whichthe antenna system can operate. Bothof
these conditionscan be met byprovidinga good earth
groundforyourstation. Buryone or moregroundrods,
or a large copper plate under the ground,and connect
thistothe radiotelephoneGNDterminal. Use heavy
gauge wireor a copper strap, cut as short as possible,
forthis connection. Allconnections mustbe clean and
tight.
To antenna
-
Earth ground TRC-80
2
DCPOWERSUPPLYCONNECTION
Inorderto use this radiotelephone,youwillneed a
separate 13.6VDCpowersupplythat must be
purchased separately. DONOTdirectlyconnect the
radiotelephoneto an ACoutlet! Use the supplied DC
powercable to connect the radiotelephoneto a
regulatedpowersupply. Donotsubstitutea cable with
smallergauge wires. The currentcapacity ofyour
powersupplymustbe 20.5Aor more.
CAUTION:
. BeforeconnectingtheDCpowersupplytotheradiotelephone,be
suretoswitchtheradiotelephoneandtheDCpowersupplyOFF.
. DonotplugtheDCpowersupplyintoanACoutletuntilyou
makeallconnections.
Firstconnect the DCpowercable to the regulated DC
powersupplyandcheckthat polaritiesare correct
(Red: positive, Black: negative). Then connect the
connectorized end of the DC power cable to the
DC 13.6 V power connector on the radiotelephone Rear
Panel. Press the DC power cable connector firmlyinto
the connector on the radiotelephone untilthe locking tab
clicks.
.ReplacingFuses
Ifthe fuse blows, determine the cause then correct
the problem. After the problem is resolved, only then
replace the fuse. Ifnewly installed fuses continue to
blow,disconnect the power plug and contact your
Dealer for assistance.
CAUTION: Replaceblownfuses only after investigating and
correcting the cause of the failed fuse. Always replaceablown
fuseby anew fuse with thespecifiedratings.
Fuses
Power Supply To AC outlet
.FuseLocation FuseCurrentRating
4A
TRC-BO (for KAT-1/ MAT-100
Antenna Tuner)
Supplied 25A
Accessory Cable

MOBilEINSTAllATION
Install the radiotelephone in a safe, convenient position
inside your vehicle that minimizes danger to your
passengers and yourself while the vehicle is in motion.
For example, consider installing the radiotelephone
under the dash in front of the passenger seat so that
knees or legs willnot strike the radiotelephone during
sudden braking of your vehicle. Try to pick a well-
ventilated location that is shielded from direct sunlight.
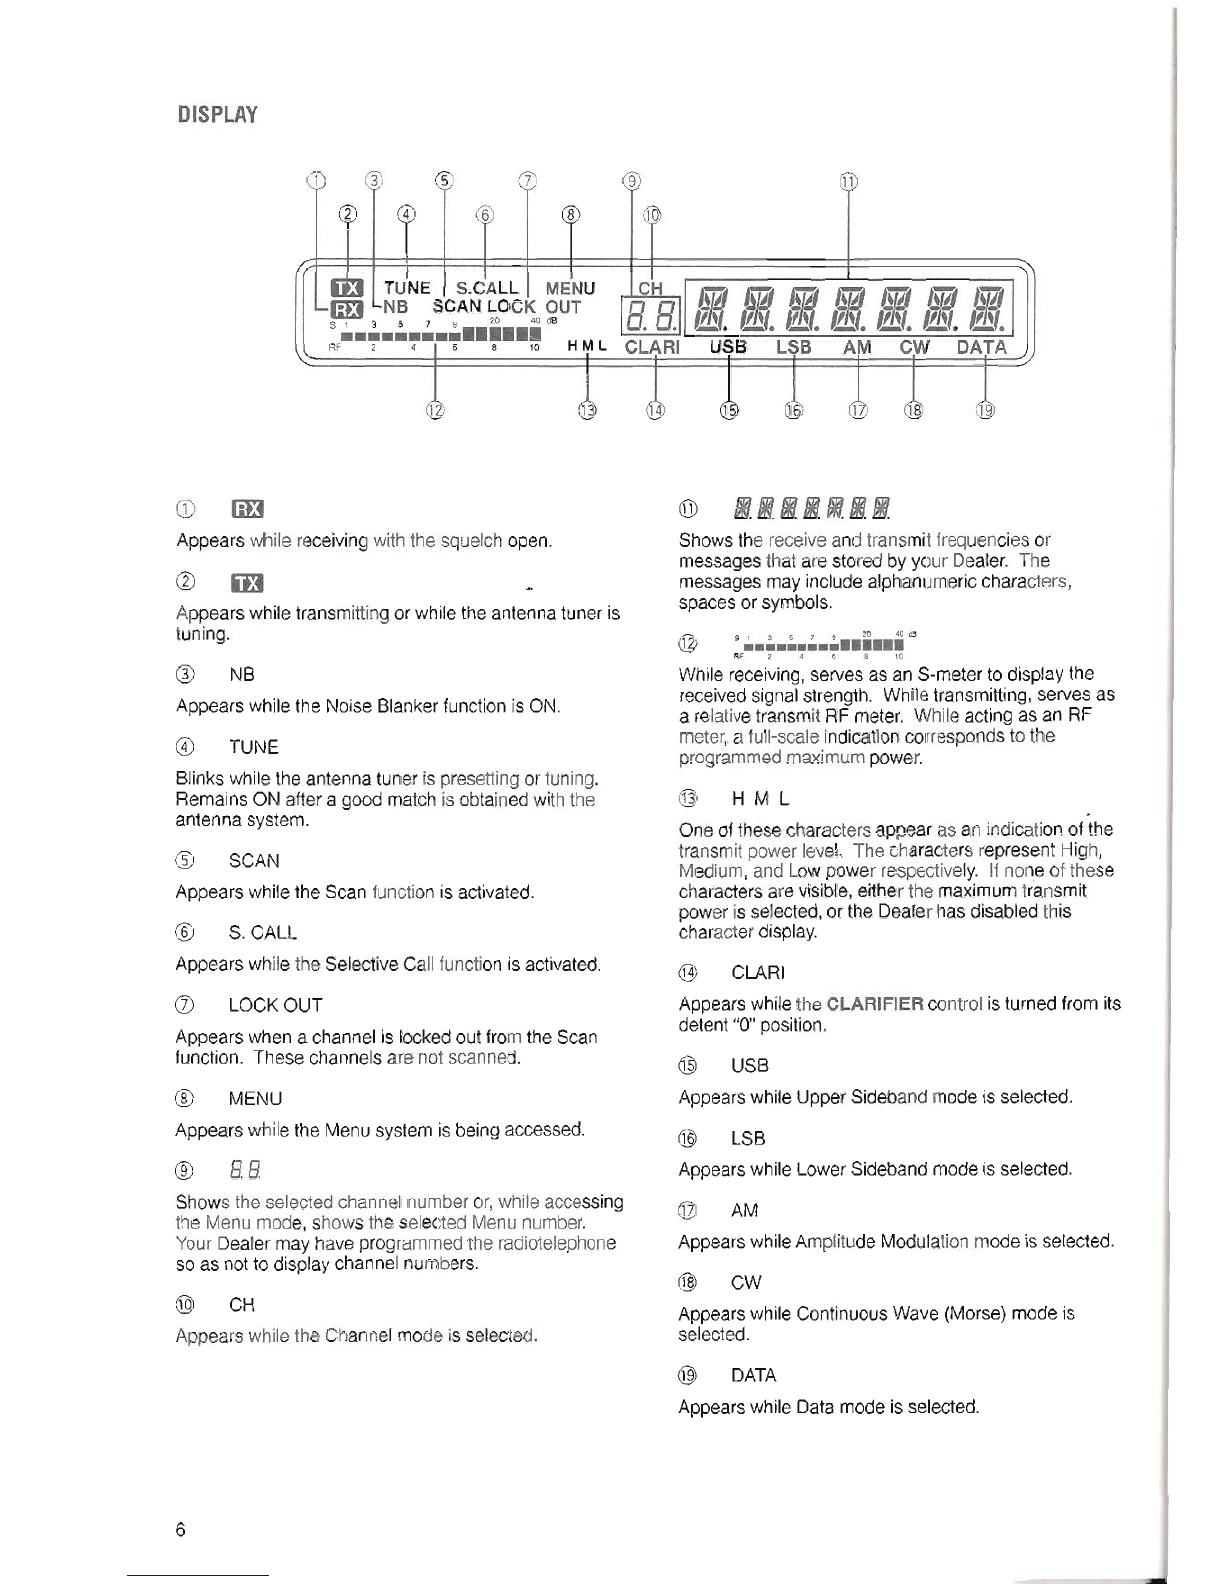
ANTENNACONNECTION
Before operating mobile, you must first install an
efficient, well-tuned antenna. The success of your
mobile installation willdepend largely on the type of
antenna and its correct installation. The radiotelephone
can give excellent results ifthe antenna system and its
installation is given careful attention.
Your choice of antenna should have a 50 Q impedance
to match the radiotelephone input impedance. Use low-
loss coaxial feed line that also has a characteristic
impedance of 50 Q. Coupling the antenna to the
radiotelephone via feed lines having an impedance
other than 50 Q reduces the efficiency of the antenna
system, and can cause interference to nearby broadcast
television receivers, radio receivers, and other electronic
equipment.
CAUTION: Transmitting without first connecting an antenna or other
matched load may damage the radiotelephone. Always connect the
antenna to the radiotelephone before transmitting.
DCPOWERCABLECONNECTION
Route the DC power cable supplied withthe
radiotelephone directly to the vehicle's battery terminals
using the shortest path from the radiotelephone. If
using a noise filter,it should be installed with an
insulator to prevent itfrom touching metal on the
vehicle. Itis not recommended to use the cigarette
lighter socket since some cigarette lighter sockets
introduce an unacceptable voltage drop.
To prevent the risk of short circuits, disconnect other
wiring from the negative H battery terminal before
connecting the radiotelephone. Confirm the correct
polarity of the connections before attaching the power
cable; red connects to the positive (+)terminal, black
connects to the negative (-) terminal. Use the full
length of the cable without cutting offexcess even ifthe
cable is longer than required. In particular, never
To antenna
removethe fuse holdersfrom the cable. After
completing radiotelephone connections to the battery,
then reconnect any wiring removed from the negative
terminal.
Ifthe power cable must be routed through a hole in the
vehicle chassis or body, for example inthe firewall at the
front ofthe passenger compartment, use a rubber
grommet to protect the cable from abrasion. The entire
length ofthe cable must be dressed so itis isolated from
heat and moisture. After the cable is in place, wind
heat-resistant tape around the fuse holder to protect it
from moisture. Tie down the full run of cable.
The vehicle battery must have a nominal rating of 12 V.
Never connect the radiotelephone to a 24 V battery. Be
sure to use a 12 V vehicle battery that has sufficient
current capacity. Ifthe current to the radiotelephone is
insufficient, the Display may darken during transmission,
or transmit output power may drop excessively.
Only after completing the installation, connect the
radiotelephone's power supply connector to the DC
power cable. Press the connectors firmly together until
the locking tab clicks.
Note: If you use the radiotelephone for along period when the
vehicle battery is not fully charged, or when the engine is OFF, the
battery may become discharged, and will not have sufficient reserves
to start the vehicle. Avoid using the radiotelephone under these
conditions.
.ReplacingFuses
If the fuse blows, determine the cause then correct
the problem. Refer to additional information
including fuse ratings on page 2.
CAUTION: Replace blown fuses only after investigating and
correcting the cause of the failed fuse. Always replace ablown
fuse by anew fuse with the specified ratings.
GROUNDCONNECTION
Fora mobileinstallation,itis extremelyimportantto
securelyconnect a low-resistancegroundstrap fromthe
radiotelephoneGNDterminalto the metalvehicle
chassis. Thisconnectionis necessary since mobile
antennas are physicallysmalland, therefore, less
efficientthan largerbase stationantennas. Ifa strap is
notavailable,a largegauge copper wireissuitable.
Alwaysclean paintordirtfromthe vehicleconnection
pointand expose bare metalbefore connectingthe
ground. Ahigh-qualitygroundinstallationsignificantly
improvesthe performanceofa mobileantenna.
Fuses
-
Vehicle
chassis ground TRC-BO
=Red
12V battery
3

GETTINGACQUAINTED
FRONTPANEL
5
CD POWERswitch
Press and hold down briefly to switch ON the
radiotelephone power. Press again and hold briefly to
switch OFF the power.
@PHONESjack
Connect headphones to this jack. Use headphones
having 4 to 32 Q impedance. You can also use stereo
headphones. When headphones are used, no sound is
heard from the internal (or optional external) speaker.
Use a 6.0 mm (1/4") diameter, 2-conductor (mono) or
3-conductor (stereo) plug.
ATTUNE button
Starts or stops the internal or external antenna tuner.
SCAN button
Starts or stops the Scan function.
MENUbutton
Press to access or exit the Menu mode.
@ MODEbutton
Selects the USB (J3E), LSB (J3E), AM (A3E), or
CW (A1A) operating mode.
(j) DATAbutton
Selects the Data mode which automatically enables the
ACC 2 connector on the Rear Panel and disables the
MIC pin on the MIC connector on the Front Panel.
4
6
Buttons @, CID,@, and
(j) must be activated
by your Dealer to
function as described
in this manual.
@ MICconnector
Connect the supplied microphone to this connector.
Insert the connector from the microphone fully, then
screw the retaining ring clockwise until snug.
GND(STBY)@
MICCD
B=0GND(MIC)
.STBY@ @NC'
DOWNeJ) @8V/
UP@) approx 10mA
MIC connector
(Front Panel view)
@ SQUELCHcontrol
Controlsthe Squelchthresholdlevelfor mutingthe
receiverduringnosignalperiods. Leavefully
counterclockwisefor weak signalreception.
@ VOLUMEcontrol
Controlsthe receivervolume. Turnthe control
clockwiseto increasethe volume;turn counterclockwise
to decreasethe volume.
@ CHANNELselector
Turn clockwiseor counterclockwiseto select a channel.
CLARIFIERcontrol
Used for making minor adjustments of the receiver
frequency. Turning the control shifts the receiver
frequency to either side of the displayed frequency.
dJ INTERNALSPEAKER
Receiver audio is heard from this speaker if no external
speaker or headphones are connected.

REARPANEL
CD GNDterminal ...
Connecta heavygaugewire or copperstrap between
the GNDterminalandthe nearestearthground.
(g) ATconnector
Mateswiththe connectoronthe cablesuppliedwiththe
optional KAT-1or MAT-100ExternalTuner.
CID ANTconnector
Connectthe feed linefrom your 50 Q antennato this
connector. Mateswith a PL-259maleconnector.
@ Power InputDC13.6Vconnector
Connecta 13.6V DC powersource. Usethe supplied
cablewith a regulatedDCpowersupply.
@ ALCjack
Usedfor connectingtheAutomaticLevelControlvoltage
to an externallinearamplifier. Mateswith an RCApin
plug.
@ RELAYjack
Providesa ground on transmit. The relaycontact
capacity is30 V DC / 0.5 A. Mateswith an RCApin
plug.
(]) CWKEYjack
Usedfor connectinga keyfor CW operation. Mates
with a 6.0 mm (1/4")2-conductorplug. External
electronickeyers mustuse positivekeyingto be
compatiblewiththis radiotelephone. Use a shielded
cablebetweenthe keyand the radiotelephone. Open
terminalvoltageis approximately5 V DC.
@ VOX!ANTI!DELAYcontrols
Usedfor adjustingthe Voice-operatedTransmit(VOX)
function.
@ EXTSPjack
Usedfor connectingan external4 -8 Q speaker.
Mateswith a 3.5 mm (1/8")diameter,2-conductor
(mono)plug. Connectingan externalspeakercutsoff
the audioautomaticallyto the internalspeaker.
@> ACC2connector
Mateswith an 8-pin male DINconnectorfor connecting
variousaccessoryequipment.
@ ACC1connector
Usedfor connectingthe optionallF-232C InterfaceUnit.
This unitallows radiotelephonecontrolfrom a computer.
Mateswith a 6-pin male DINconnector.
5

DISPLAY
5 7
46 8
TUNE IS.CALL IMENU
EElLNB SCAN LOCK OUT
51 3 5 7 9 20 40 dB H M LRF 2 4 I 6 8 10
CD EEl
Appears while receiving with the squelch open.
m
Appears while transmitting or while the antenna tuner is
tuning.
NB
Appears while the Noise Blanker function is ON.
TUNE
Blinks while the antenna tuner is presetting or tuning.
Remains ON after a good match is obtained with the
antenna system.
SCAN
Appears while the Scan function is activated.
@S.CALL
Appears while the Selective Call function is activated.
LOCKOUT
Appears when a channel is locked out from the Scan
function. These channels are not scanned.
@MENU
Appears while the Menu system is being accessed.
@88
Shows the selected channel number or, while accessing
the Menu mode, shows the selected Menu number.
Your Dealer may have programmed the radiotelephone
so as not to display channel numbers.
@ CH
Appearswhile the Channelmode is selected.
6
9:11
JQ
@IIIIIII
Shows the receive and transmit frequencies or
messages that are stored by your Dealer. The
messages may include alphanumeric characters,
spaces or symbols.
S1 3 5 7 SI 20 40 cS
...............
AF 2 .. e 8 10
While receiving, serves as an S-meter to display the
received signal strength. While transmitting, serves as
a relative transmit RFmeter. While acting as an RF
meter, a full-scale indication corresponds to the
programmed maximum power.
@ H M L
One ofthese charactersappear asan indicationof the
transmitpower level. The charactersrepresent High,
Medium,and Low powerrespectively. If none of these
charactersarevisible,eitherthe maximumtransmit
power isselected,or the Dealerhas disabledthis
characterdisplay.
@ CLARI
Appearswhile the CLARIFIER control isturned from its
detent"0"position.
@ USB
Appears while Upper Sideband mode is selected.
@ LSB
Appearswhile LowerSidebandmode is selected.
@ AM
AppearswhileAmplitudeModulationmodeis selected.
@ CW
Appearswhile ContinuousWave (Morse)mode is
selected.
@ DATA
Appearswhile Datamodeis selected.

MICROPHONE
SUPPLIED
o
OPTIONAL
(SUPPLIEDWITH KPE.1 SELECTIVECALL UNIT)
CD PTT(Push-to- Talk) switch
The radiotelephone is placed in transmit mode when
this non-locking switch is held down. Releasing the
switch returns the radiotelephone to receive mode.
@UP/DWNbuttons
Pressthese buttonsto stepthroughthechannelssimilar
to usingthe CHANNELselector. Holdinga buttondown
sequentiallystepsthroughall channels.
KEYPAD
Use for entering the digits when placing a selective call.
OPERATINGBASICS
Note: The radiotelephone outputs ashort beep each time abutton
ispressed and the buttonstroke is accepted.
SWITCHINGPOWERON/OFF
Switch ON the DC power supply, then press and hold
down [POWER] until "HELLO" appears on the Display.
)
DD
-6. 1<EJIiWOOD
To switch OFF the radiotelephone, press [POWER]
again.
. After the radiotelephone has been switched ON, it
can then be switched OFF or ON by using only the
power switch on the DC power supply.
ADJUSTINGVOLUME
Turn the VOLUME control clockwise to increase the
audio level; turn counterclockwise to decrease the level.
KENWOOD
ADJUSTINGSQUELCH
The purpose of squelch is to silence audio output from
the speaker when no signals are present. Setting the
squelch threshold too high causes the squelch to
remain closed while a weak signal is present. Setting
the threshold too low allows noise to be heard between
transmissions from other stations.
Turn the SQUELCH control to just eliminate the
background noise when no signal is present. If signals
are weak, set the control fully counterclockwise.
KENWOOD
7

SELECTINGA CHANNEL
Turn the CHANNEL selector to choose a channel.
.When using the microphone supplied with the
optional KPE-1 Selective Call Unit, you can press
Microphone [UP] or Microphone [DWN] to choose
channels. Holding either button down sequentially
switches through all channels.
SELECTING AMODE
IThe [MODE] button must be activated by your
Dealer to function as described here. ...
The mode stored with each channel can be temporarily
changed. To change the operating mode, press
[MODE]. Each time this button is pressed, the mode
changes in a cyclical manner as shown below:
[USB -LSBi
cw -AM~
To select Data mode, press [DATA] while in USB or
LSB mode. The Dealer sets either AFSK or FSK
operation for use in Data mode. IfAFSK has been set,
then "USB" or "LSB" plus "DATA" appear. When FSK
has been set, only "DATA" appears. ...
KENWOOD
Pressing [MODE], pressing [DATA], or changing the
channel after entering Data mode cancels Data mode.
TRANSMITTING
The cooling fan operates automatically when long
transmissions are made or after extended operation in
the High power mode. Also, the Rear Panel heat sink
temperature will increase. The protection circuit in the
radiotelephone activates if the temperature rises over
the design limit. In this case, the output power is
automatically reduced to the Low position. Although the
"L" indicator does not appear, the power meter
indication will be less than full scale, and "THERMAL
PROTECTION" appears.
You cannot transmit on a channel that has only a
receive frequency stored. Attempting this causes
"RX ONLY" to appear.
8
.ChangingTransmitPower
You can change the default transmit power setting
stored for a channel by accessing the Menu mode.
Refer to Menu Setup on page 10 for details.
However, you cannot change the transmit power
beyond the limits specified by the Dealer.
.VoiceModes
1 Selecta voice mode(USB,LSB,AM) channel.
2 Pressand holddownthe PTTswitch.
. "TX"appears.
iD
S13579 20 40 dB
RF 10
I.Referto "VOX"belowfor informationon
automatic TXJRX switching.
3 Speak into the microphone holding it about
5 cm (2 in.) from your mouth for best results.
Speak in a normal tone and level of voice.
4 When you have finished transmitting, release the
PTT switch to return to the receive mode.
.The "TX" indicator disappears.
.VOX (Voice-operatedTransmit)
IVOX must be activated by the Dealer before you I
can use this function.
VOX eliminates the necessity of manually switching
to the transmit mode each time that you transmit.
The radiotelephone automatically switches to
transmit when the VOX circuitry senses that you
have begun speaking into the microphone.
The VOX function has three adjustments on the
Rear Panel as follows:
VOX control
Adjust this control to set the VOX amplifier sensitivity
to the correct level for your voice. When set
correctly, the radiotelephone changes to the transmit
mode immediately after you begin speaking into the
microphone.
ANTI control
VOX operation is sometimes difficult when using
high speaker volumes. Adjust this control to reduce
the tendency of the radiotelephone to switch into
transmit mode due to the speaker output. Use the
minimum ANTI control settings to achieve reliable
VOX operation.
DELAY control
Adjust this control to change the amount of time that
the radiotelephone remains in the transmit mode
after you stop speaking.
-

.CWMode
1 SelectaCWchannel.
CH
02 I I.J 1'71171
I1.ILl ILl
cw )
2 WithaCWkeyconnectedto the Rear Panel,
beginsending.
. Closingthekeycontactscausesthe
radiotelephonetoautomaticallyswitchinto
transmitmode,and''T)(''appears.
m
$1 3 5 7 9 20 40 dB
...............
RF 2 4 6 8 10
3 Stop sending.
.The radiotelephoneautomaticallychanges
backto the receivemodea momentafteryou
stop sending,and"TX"disappears.
Note: Adjusting the DELA Y control on the Rear Panel allows
you to vary the time that the radiotelephone waits before
returning to receive mode after you stop sending. The same
control allows you to select full break-in (receiver ON
continuously except while key is down).
DATAOPERATION
I
The [DATA] buttonmustbe activatedbyyour
Dealerto function asdescribedhere. Also,the
Dealersets eitherAFSKor FSKoperation,FSK
shift,key-downpolarity,high/Iowtone, and FSK
Reversefunctionsfor your radiotelephone.
FSKMODE
1 SelectanFSKchannel,thenpress[DATA].
. "DATA"appears("USB"/"LSB"disappears).
CH
03 C J 171I.J 171n
Lt c... ILl 1.ILl ILl
DATA
2 Followingthe instructionsprovidedwithyour
MultimodeCommunicationsProcessor(MCP)or
TerminalUnit(TU),beginsendingdata.
. "TX"appearseachtimethe radiotelephone
enterstransmitmode.
m
S1 3 5 7 9 20 40 dB
...............
RF 2 -4 6 8 10
AFSKMODE
1 SelectanAFSKchannel,thenpress[DATA].
. "DATA"plus"LSB"or"USB"isvisible.
\
/CH
oII I.J IJIJ J171171
I1.-, 0 C. ILlILl
USB DATA
2 Followingthe instructionsprovidedwithyour
MultimodeCommunicationsProcessor(MCP)or
TerminalNodeController(TNC),beginsendingdata.
. "TX"appearseachtimethe radiotelephone
enterstransmitmode.
\
lEt )
I
SI 3 5 7 9 20 40 dB
...............
RF 2 4 6 8 10
9

MENUSETUP
Some functions on this radiotelephone are selected or
configured via a software-controlled Menu instead of
physical controls on the radiotelephone. Once familiar
with the Menu system, you will appreciate the versatility
it offers.
CHANGINGMENUSETTINGS
IThe [MENU] button must be activated by your
Dealer to function as described here.
The following procedure explains how to check or
change any of the Menu items.
1 Press [MENU].
2 Press [MODE] or [DATA] to select the desired Menu
number.
.[DATA] increments the Menu number; [MODE]
decrements the Menu number. .
.A message that briefly describes the selected
Menu item scrolls. This message can be
interrupted by turning the CHANNEL selector.
\
JMENU
H
-
,\I
"
USB Pnl' ELI 1"1 -
nI
U ,
3 Turnthe CHANNEL selectorto choosethe desired
selectionforthe Menunumber.
\
MENU I 1,11
L U 1"1
nI
UI
LUSB
4 Press [MENU] again to exit Menu mode.
Settings for Transmit Power and Channel Lockout can
only be done by accessing Menu Setup. Also, the
settings for these functions apply only to the channel
selected at the time the setting is changed. Therefore,
before changing these functions, first select the
applicable channel. Refer to additional information for
Channel Lockout on page 11.
10
MENUCONFIGURATION
Note:
. Menu Nos. 08-15 may be unavailable depending on the Dealer
settings.
. Without the optional KPE-1 Selective Call Unit installed, Menu
Nos. 06 and 07 can be accessed, but they cannot be used.
I
1,,*" is usedas awild card.
Note: Default selections are shown in bold face in the above table.
MEMORYBACKUP
This radiotelephone contains an EEPROM to retain
channel data for channels 1-10. Turning OFF the
POWER switch, or a power failure, will not erase this
memory.
A lithium battery is installed that preserves Display and
setting data whether the radiotelephone is switched ON
or OFF. The lithium battery should last for
approximately five years. When the battery discharges,
erratic information may appear on the Display. Your
KENWOOD Dealer should replace the lithium battery
when the battery becomes discharged.
Menu Function Selections
No.
01 TX power Low/ Medium/ High/
Maximum
02 NB OFF/ ON
(Noise Blanker)
03 Alphanumeric display OFF/ ON
04 Memory channel OFF/ ON
lockout OFF/
05 Busy stop Time operated (TO)/
Carrier operated (CO)
06 Selection call OFF/ ON
07 Identificationcode 000-999
08 *A code *** 1,000-999
09 *B code *** 1,000-999
10 *C code *** 1,000-999
11 *D code *** 1,000-999
AAAAAAA-ZZZZZZZ,
12 .*A character 0000000-9999999,
miscellaneous symbols
*B character AAAAAAA-ZZZZZZZ,
13 0000000-9999999,
miscellaneous symbols
AAAAAAA-ZZZZZZZ,
14 *C character 0000000-9999999,
miscellaneous symbols
*D character AAAAAAA-ZZZZZZZ,
15 0000000-9999999,
miscellaneous symbols

SCAN
Scan allows each of the channels that has a receive
frequency stored to be automatically monitored for
activity.
BUSYFREQUENCYSTOP
The radiotelephone automatically stops scanning when
a signal is detected if Busy Frequency Stop is switched
ON by Menu No. 05. The radiotelephone remains on
the same channel for either a short time or until the
signal drops depending on which Scan Resume method
is selected (see below). The squelch must be adjusted
to the noise threshold point with no signals present for
Busy Frequency Stop to work.
If Busy Frequency Stop is switched OFF by Menu
No. 05, then all channels that contain a receive
frequency are scanned, but the scan never stops on any
channel.
.ScanResumeMethods .
Scan Resume controls when the radiotelephone
continues scanning after stopping due to a busy
channel.
Time-operated Scan: After stopping, Scan checks
the busy channel approximately three seconds later.
If the channel is still busy, Scan waits another three
seconds then resumes scanning. If the channel is
not busy three seconds after stopping, Scan
resumes immediately.
Carrier-operatedScan: The radiotelephone
remains on the same channel until the signal drops,
then Scan resumes approximately two seconds later.
Select your preferred Scan Resume method via
Menu No. 05. The default is Time-operated.
Note: Carrier-operated Scan is automatically used for scanning
in Selective Call mode. However, when asignal is received,
scanning stops only during the unmuted period.
CHANNELLOCKOUT
If you want to exclude any channels from being
scanned, these channels should be locked out.
1 Select the channel that you want to lock out.
2 Access Menu No. 04, then choose "ON".
. "LOCK OUT" appears.
\
0'-/ USB
3 ExitMenumode.
STARTING!STOPPINGSCAN
IThe [SCAN] button must be activated by your
Dealer to function as described here. I
Tostartor stopscanning,press[SCAN].
. Youcanalso press MicrophonePTTto stop
scanning.
.If all channels are locked out or if only one channel
has a frequency stored, pressing [SCAN] causes the
radiotelephone to generate a triple error beep.
NOISEBLANKER
The Noise Blanker is effective in reducing or eliminating
pulse-type noise. Switch the Noise Blanker OFF or ON
by Menu No. 02.
CLARIFIER
The CLARIFIERcontrolchangesthe receivefrequency
(withoutaffectingthetransmitfrequency)by::1:1.1kHz
usingstepsof 10Hz. The Dealermay have modified
the functionfor an overall rangeof ::1:110Hz usingsteps
of 1 Hz.
KPE-1 SELECTIVECALLUNIT(OPTIONAL)
After the Dealer installs the optional KPE-1 Selective
Call Unit, you can place calls to other stations by using'
the Microphone keypad to "dial" their unique
Identification code. You can also receive calls from
other stations that have dialed your Identification code.
In addition, Group calls allow you to call and
communicate with a group of stations in your system.
With a single call, you can contact a number of stations
at the same time, and transmit a message that will be
heard by all of these stations. The "*" symbol is used
as a wild card when programming Group codes. For
example, sending the Group code "*0*" would allow
you to contact all stations that have the number "0" in
the second digit of their Identification codes.
11

Group Communication Network Example
Predetermined frequency 14.482 MHz
Your Identificationcode 101
Member 1 Identificationcode 102
Member 2 Identificationcode 113
Member 3 Identificationcode 114
Group Group code 1**
MANUALCALLING
1 Adjustthe SQUELCHcontrolforthe noisethreshold
so the channelnoiseis just muted. ~
2 ActivateSelectiveCallvia MenuNo.06.
o "S.CALL"appears,andthe receiveraudiois
muted.
S.CALL -)
I
5 1 3 5 7 9 20 40 dB
RF 10
3 Hold down Microphone PTT and enter a 3-digit
Identification code via the Microphone keypad.
oTomake a call with a Groupcode, use"*" as a
wild card.
4 While still holding down Microphone PTT, enter "#".
o You can release Microphone PTT immediately
after pressing "#".
o The Identification code of the station being called
(their individual code or a Group code) plus your
Identification code is transmitted.
oAfterthe codeshavebeentransmitted,the word
"CALL" plus the Identification code of the station
that was called are displayed. For example,
"CALL 102".
5 If you do not receive a response to your call within
about 10, 20, or 30 seconds (Dealer selectable),
your receiver mutes, and the radiotelephone is ready
to receive a selective call.
oInsteadof waitingforthe programmedtime
period to pass, you can also press [I] again
(without pressing Microphone PTT) to restore the
radiotelephone standby status.
12
MEMORYCALLING
1 Adjustthe SQUELCH controlfor the noisethreshold
sothechannel noiseisjust muted.
2 ActivateSelectiveCallvia MenuNo. 06.
o"S.CALL"appears,andthereceiveraudiois
muted.
\
S.CALL !
S 1 3 5 7 9 20 40 dB
RF 10
\
3 Holddown MicrophonePTT ,then enter "*" plus"A",
"B","C",or "D". Forexample,"*A".
4 While still holding down Microphone PTT, enter "#".
o You can release Microphone PTT immediately
after pressing "#".
oThe Identificationcodethat is stored in memory
A, B, C, or D plus the Character message that is
stored for the same memory are sent. For
example, the Identification code and Character
message stored in memory A are sent.
oAfterthe codeand messagehavebeen
transmitted, the word "CALL" plus the
Identification code of the station that was called
are displayed. For example, "CALL 102".
5 If you do not receive a response to your call within
about 10,20, or 30 seconds (Dealer selectable),
your receiver mutes, and the radiotelephone is ready
to receive a selective call.
oInsteadof waitingfor 10 secondsto pass, you
can also press [I] again (without pressing
Microphone PTT) to restore the radiotelephone
standby status.
RECEIVING
Adjust the SQUELCH control for the noise threshold so
the channel noise is just muted. After activating
Selective Call via Menu No. 06 and receiving a call, alert
beeps sound for about 10, 20, or 30 seconds (Dealer
selectable). Stop these beeps by pressing any button
or key. Pressing [I] stops the alert beeps and mutes
the receiver. Your Display may show either the
Identification code of the station calling you or a
Character message that the caller has sent. Pressing
[*] unmutes the receiver and allows you to monitor
channel activity.
If you receive a call while scanning, the r~ceiver
unmutes and stops on the channel for a period of time.
Pressing Microphone PTT during this period cancels the
alert beeps and the Scan function, and places the
radiotelephone in the transmit mode; pressing [SCAN]
cancels the alert beeps and the Scan function.
-
Your Menu
Menu#07 101
Menu#08 102
Menu#09 113
Menu#10 114
Menu#11 1**

CHANGINGIDENTIFICATIONCODES
YourIdentificationcode hasbeen storedin MenuNo.07
bythe Dealer. This code isfixed. However,the Dealer
also stored Identificationcodesfor the stationswith
which you will communicate. Youcan usethe
procedurebelowto changethesecodes. Acceptable
Group codescan be set by using"*" as a wild card
suchas "10*", "*0*", "**4", or"*** ".
1 Press[MENU] to enter Menu mode.
2 Press[MODE] or [DATA]to selectMenuNo.08,09,
10,or 11.
3 Enterthe first digitbyturningthe CHANNEL
selector,or by pressinga Microphone[UP] or
[DWN] key.
\
tN" 08 ,\1/
I/71 /71
I ILl ILl
/1\
usa
4 Press[SCAN] to moveto the nextdigit.
5 Enterthe seconddigit.
6 Press[SCAN] to moveto the third digit.
7 Enterthe third digit.
S Press[MENU] to exit Menumode.
CHANGINGCHARACTERMESSAGES
The Dealermay haveprogrammedthe radiotelephone
sothat it sendsout Charactermessagesinsteadofthe
radiotelephone'sIdentificationcodewhenyou
communicatewith other stations. The messages
programmedby the Dealer maybe changedby you via
Menu mode.
1 Press [MENU]to enter Menu mode.
2 Press[MODE] or [DATA]to selectMenuNo. 12,13,
14,or 15.
3 Entera digit byturningthe CHANNEL selector,or by
pressinga Microphone[UP] or [DWN] key.
MENU ]
4 Press[SCAN] to moveto the nextdigit.
5 RepeatSteps3 and4to enter upto 7 digits.
6 Press[MENU] to exit Menumode.
AUTOMATICANTENNATUNER
PRESETTING(KAT-2INTERNALTUNER)
Aftereachsuccessfultuning session,the Preset
functionstoresthe dataforthe positionof thetuning
capacitors. Then,ifthe channelischanged,the Preset
functionautomaticallypositionsthe capacitorsusing
datathat was previouslystoredfor the new channel.
The firsttimethat a channel is used,the Presetfunction
usesdefaultdata.
KAT-2INTERNALTUNER(OPTIONAL)
1 Press[ATTUNE] to starttuning.
. ''TUNE''beginsblinking.
iD TUNE
s, ~ 51:. 20 40dB
...............
RF 2 4 e 8 10
.Pressing[ATTUNE] againcancelstuning.
2 Tuningcompletesand the Presetdata is updated.
. ''TUNE''remainsvisibleon the Display.
.If tuning does not complete within approximately
20 seconds,five beepssound over a 10second.
periodandthe tuningactionstops.
KAT-1/MAT-100EXTERNALTUNER(OPTIONAL).
Always switch OFF the power to the radiotelephone
before connecting the KAT-1 or MAT-100 tuner.
1 Press [AT TUNE] to start tuning.
. ''TUNE'' begins blinking.
iD TUNE
$1 ~ sl;9 20 40 dB
...............
RF 2 4 6 8 10
.Pressing[ATTUNE] againcancelstuning.
2 Tuningcompletes.
. ''TUNE''remainsvisibleon the Display.
.If tuning does not complete within approximately
20 seconds, five beeps sound over a 10 second
period and the tuning action stops.
Note: Tuning with the KAT-1 or MAT-100 External Tuner does not
store any Preset data. Therefore, each time that anew channel is
selected, you must retune.
13

COMPUTER'" RADIOTELEPHONE
INTERFACE
The TRG-aO interfaces easily with a computer by using
the optionallF-232C Interface Unit. After you manually
switch OFF the radiotelephone power, you can then
switch ON the radiotelephone power using commands
from the computer. Similarly, after switching OFF the
power from the computer, it is then possible to switch
ON the power from the Front Panel.
COMMUNICATIONPARAMETERS
In order to control the radiotelephone with your
computer, you must set the correct communication
parameters in the computer terminal application.
Configure your computer application for 9600 bps,a
data bits, 1 stop bit, and no parity.
HARDWAREDESCRIPTION
The TRC-aO uses a full-duplex, asynchronous, serial
interface for communicating through the female 6-PIN
DIN ACC 1 connector. Bytes are constructed with
1 start bit, a data bits, and 1 stop bit. No parity is used.
The pinout and the pin functions of the ACC 1
connector are as shown below:
ACC 1 CONNECTOR
Viewed from the
radiotelephone
Rear Panel
GND: This isthe signalgroundpin.
TXD: The transmitdata isthe serialdatatransferred
from the radiotelephoneto the computer. The output
uses negativelogic.
RXD: The receivedata isthe serialdatatransferred
fromthe computerto the radiotelephone. The input
uses negativelogic.
14
CTS: This signal is supplied from the computer to the
radiotelephone. It is used to inhibit transmit data from
the radiotelephone when the computer is not ready to
receive the data. The input uses positive logic. Inhibit is
requested when the level is low.
RTS: This signal is supplied from the radiotelephone to
the computer. It is used to inhibit transmit data from the
computer when the radiotelephone is not ready to
receive the data. The output uses positive logic.
Transmit data is stopped when the level is low.
Note: Refer to the Appendix beginning on page A 1for additional
information regarding computer control.
PinNo. Pin Function I/O
Name
1GND Signal ground -
2 TXD Transmit data Output
3 RXD Receive data Input
4CTS Transmit enable Input
5 RTS Receive enable Output
6 NC Not connected -

MAINTENANCE
The radiotelephone has been factory aligned and tested
to specification before shipment. Under normal
circumstances, the radiotelephone will operate in
accordance with these operating instructions. All
adjustable trimmers, coils and resistors in the
radiotelephone were preset at the factory. They should
only be readjusted by a qualified technician who is
familiar with this radiotelephone and has the necessary
test equipment. Attempting service or alignment without
factory authorization can void the radiotelephone
warranty.
When operated properly, the radiotelephone will provide
years of service without requiring further realignment.
The information in this section gives some general
service procedures requiring little or no test equipment.
SERVICE
If it is ever necessary to return the equipment to your
Dealer or Service Center for repair, pack the
radiotelephone in its original box and packing material.
Include a full description of the problems experienced.
Include both your telephone number and fax number (if
available) along with your name and address in case
the service technician needs to call for further
explanation while investigating the problem. Don't
return accessory items unless you feel they are directly
related to the service problem.
You may return the radiotelephone for service to the
authorized KENWOOD Dealer from whom you
purchased it or any authorized KENWOOD service
center. A copy of the service report will be returned with
the radiotelephone. Please do not send subassemblies
or printed circuit boards. Send the complete
radiotelephone.
Tag all returned items with your name for identification.
Please mention the model and serial number of the
radiotelephone in any communication regarding the
problem.
SERVICENOTE
If you desireto correspondon a technicalor operational
problem, pleasemakeyour noteshort,complete,andto
the point. Help ushelpyou byprovidingthe following:
1 Modeland serial numberof equipment
2 Question or problemyou are having
3 Other equipmentin your stationpertainingto the
problem
4 Meterreadings
5 Other relatedinformation(Menusetup, mode,
frequency,button sequenceto inducemalfunction,
etc.)
CAUTION: Do not pack the equipment in crushed newspapers for
shipment! Extensive damage may result during rough handling or
shipping.
Note:
. Record the date of purchase, serial number and Dealer from
whom the radiotelephone was purchased.
. For your own information, retain awritten record of any
maintenance performed on the radiotelephone.
. When claiming warranty service, please include aphotocopy of
the bill of sale, or other proof-of-purchase showing the date of
sale.
CLEANING
The buttons, controls and case of the radiotelephone
are likely to become soiled after extended use. Remove
the controls from the radiotelephone and clean them
with a neutral detergent and warm water. Use a neutral
detergent (no strong chemicals) and a damp cloth to
clean the case.
15

TROUBLESHOOTING
The problems described in this table are commonly encountered operational malfunctions. These types of difficulties
are usually caused by improper hook-up, accidental incorrect control settings, or operator error due to incomplete
programming, and are not caused by circuit failure. Please review this table, and the appropriate section(s) of this
instruction manual, before assuming the radiotelephone is defective.
ProblemSymptom
The radiotelephone will not
power up after connecting a
13.6 V DC power supply and
pressing [POWER]. Nothing
appears on the Display, and
no receiver noise is heard.
No sound comes from the
speaker; signals cannot be
received.
After switching ON the power,
the Display is dark.
SSB audio quality is poor.
The radiotelephoneis
automaticallychanging
channels.
Youcannottransmiteven
thoughyou-press[PTT].
The antennatuner will not
finishtuning successfully.
16
ProbableCause CorrectiveAction
1 The DC power supply is not switched I1 Switch ON the DC power supply.
ON.
2 The power cable is faulty.
3 The powercable isnotconnected
securely.
4 A power cable fuse is open.
1 TheVOLUMEcontrolisfully
counterclockwise.
2 TheSQUELCHcontrolisfully
clockwise.
3 The MicrophonePTTswitchis
pressed.
The inputvOltageisoutside13.6V DC
:t15% (11.6to 15.6V DC).
The receiveris nottuned to thecorrect
frequency.
The Scanfunctionisworking.
1 The microphone plug is not inserted
completely in the Front Panel MIC
connector.
2 Poorantennaconnection
3 The selectedchannel isreceiveonly.
4 You have selected the CW or DATA
mode insteadof a voice mode.
1 Poorantennaconnection
2 The antennalengthis wrong.
3 If usingan externaltuner,it is not
groundedcorrectly.
2 Inspect the power cable. Confirm
polarities are correct.
Red: positive (+); Black: negative(-).
3 Confirm that the power connector is
locked against the radiotelephone
Rear Panel. Confirm the connections
to the DC power supply are secure.
4 Look for the cause of the blown fuse.
After inspecting and correcting any
problems, install a new fuse with the
same rating.
1 Turn the VOLUME control clockwise.
2 Turnthe SQUELCH control
counterclockwise.
3Releasethe MicrophonePTT switch.
Correct the input voltage.
Turnthe CLARIFIER controlto tune the
receiverfor a clearersignal.
Press[SCAN] to stop scanning.
1 Turn OFF the power, ensure the MIC
connector on the Front Panel has no
foreign objects in it, then plug in the
microphone connector. Secure the
connector with the locking ring.
2 Check the antenna system.
3Select a channel programmed for
transmit and receive.
4Press[MODE] to selecta voice
mode.
1 Checkthe antennasystem.
2 Usethe correctantennalength.
3 Groundthetuner.
- ---

ACCESSORYCONNECTIONS
COMPUTER INTERFACE(ACC1)
This connectorallowsyou to connecta computeror dumbterminalvia an optionallF-232C InterfaceUnit. Referto
"COMPUTER'" RADIOTELEPHONEINTERFACE"beginningon page 14 andthe InstructionManualsuppliedwith
the IF-232Cfor furtherinformation.
IF-232C
Personal computer/
dumb terminal
Power cable RS-232C cable
PC-1APHONEPATCHCONTROLLER(ACC2)
The PC-1A Phone Patch allows you to interface the radiotelephone with a telephone line.
External speaker
Telephone line
To EXT. SP jack
TRC-BO
To radiotelephone's
MIC connector on the front panel
ANTENNATUNER(AT)
If using an optional KAT-1 or MAT-100 External Tuner, connect it here using the cable supplied with the antenna tuner.
KAT-1 or MAT-1QO
17
Other manuals for TRC-80
1
Table of contents
Other Kenwood Telephone manuals