KERN KERN KDP User manual

KERN & Sohn GmbH
Ziegelei 1
D-72336 Balingen
E-Mail: info@bilancekern.it
Phone: +39-[0]445 492313
Fax: +39-[0]445 491365
Internet: www.bilancekern.it
Operating and Installation
Instructions
Digital weighing platform
KERN KDP
Version 1.2
2020-10
GB
KDP-BA_IA-e-2012

KDP-BA_IA-e-2012 2
GB
KERN KDP
Version 1.2 2020-10
Operating and installation instructions
Digital weighing platform
Contents
1Technical data ................................................................................................ 3
2Declaration of conformity ............................................................................. 4
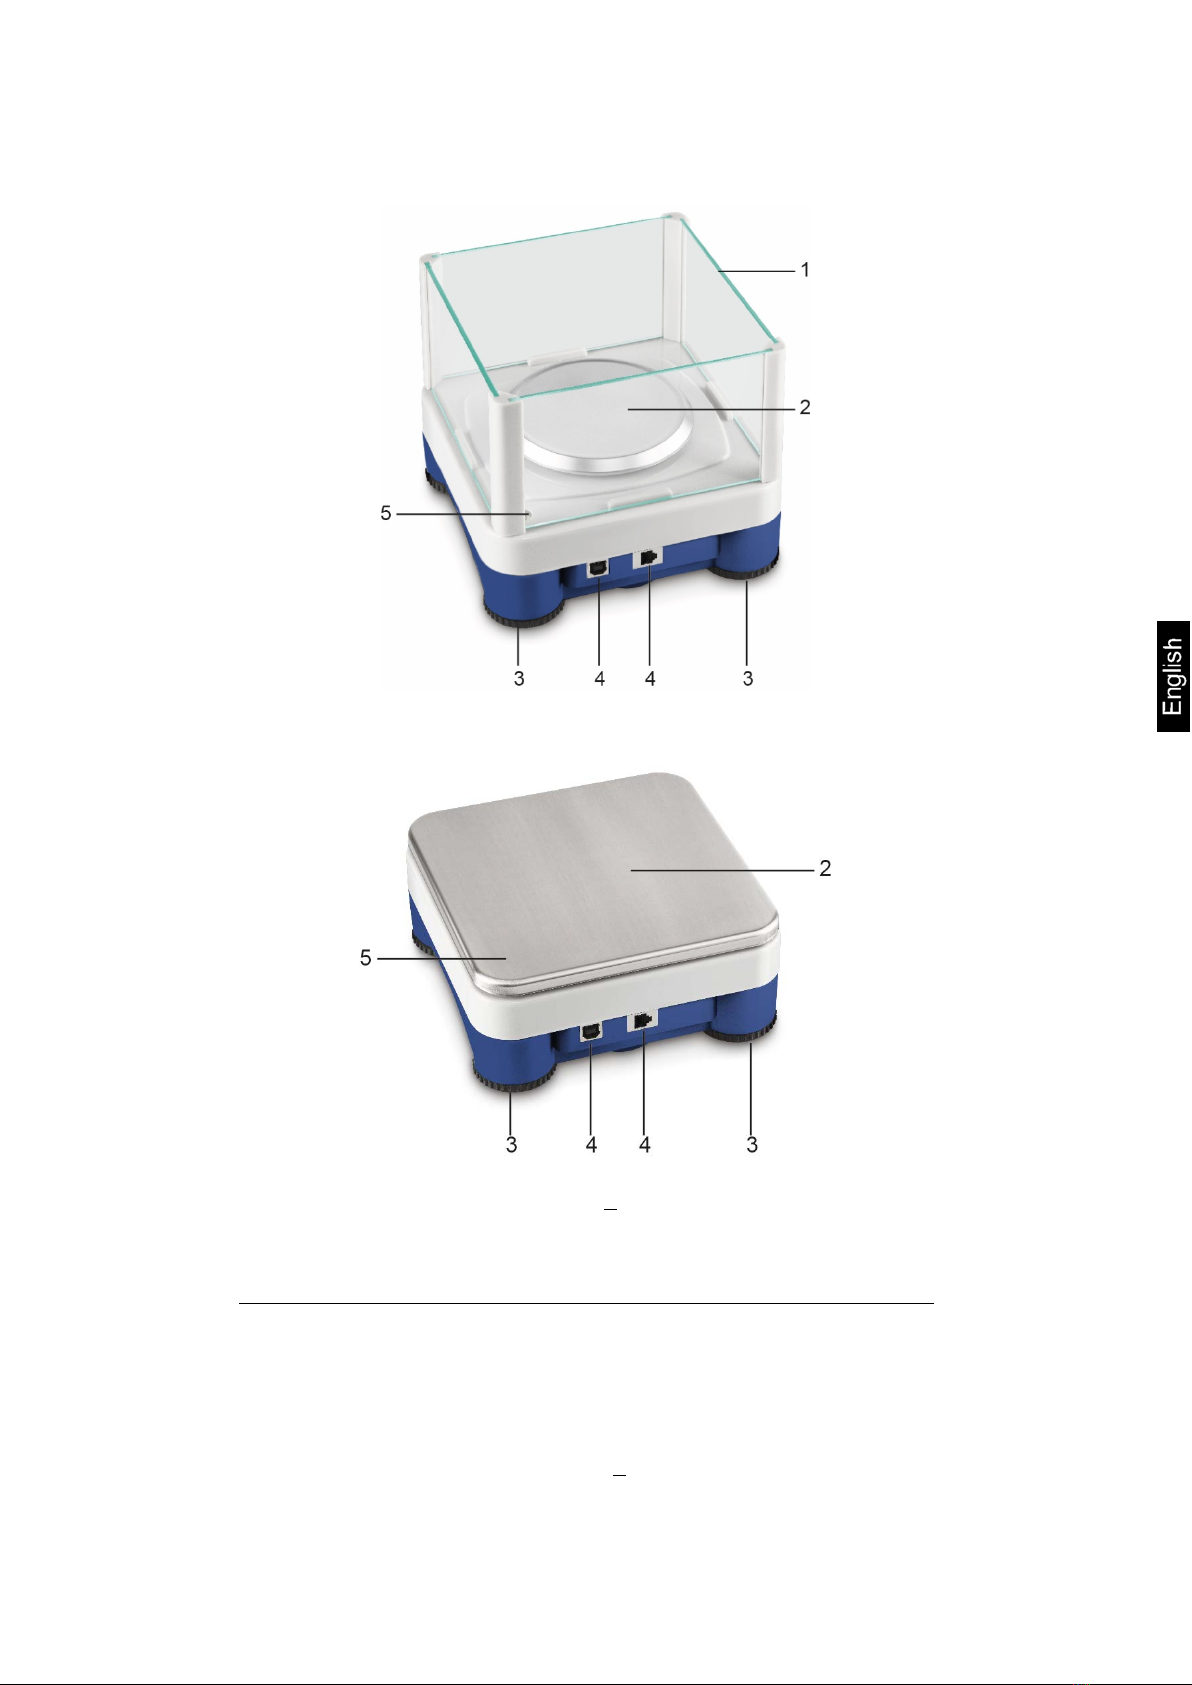
3Appliance overview ....................................................................................... 5
4Basic Information (General) .......................................................................... 6
4.1 Proper use .................................................................................................................................. 6
4.2 Improper Use .............................................................................................................................. 6
4.3 Warranty ..................................................................................................................................... 6
4.4 Monitoring of Test Resources .................................................................................................... 7
5Basic Safety Precautions .............................................................................. 7
5.1 Pay attention to the instructions in the Operation Manual.......................................................... 7
5.2 Personnel training ....................................................................................................................... 7
6Transport and storage ................................................................................... 7
6.1 Testing upon acceptance ........................................................................................................... 7
6.2 Packaging / return transport ....................................................................................................... 7
7Unpacking and placing .................................................................................. 8
7.1 Installation Site, Location of Use ................................................................................................ 8
7.2 Unpacking and checking ............................................................................................................ 8
7.3 Assembly and installation ........................................................................................................... 9
8Connection to your system ......................................................................... 10
8.1 USB .......................................................................................................................................... 10
8.2 Bluetooth .................................................................................................................................. 10
8.3 Ethernet .................................................................................................................................... 11
8.3.1 Read-out the IP address........................................................................................................... 11
8.3.2 Connecting the weighing platform to a network ....................................................................... 19
8.4 WLAN ....................................................................................................................................... 21
9Adjustment ................................................................................................... 23
10 Carrying out measurements ....................................................................... 24
10.1 Using your own software .......................................................................................................... 24
10.1.1 Request weight values ......................................................................................................... 24
10.1.2 Zeroing and taring ................................................................................................................ 24
10.2 Using the BalanceConnection software ................................................................................... 24
10.2.1 Functions .............................................................................................................................. 27
11 Downloads .................................................................................................... 27

3 KDP-BA_IA-e-2012
1 Technical data
KERN (type) KDP 300-3 KDP 3000-2
Item number/type TKDP 300-3-A TKDP 3000-2-A
Readability (d) 0.001 g 0.01 g
Weighing range (max) 350 g 3.5 kg
Reproducibility 0.002 g 0.02 g
Linearity ± 0.005 g ± 0.05 g
Recommended
adjusting weight not
supplied (class)
350 g (F1) 3 kg (F1)
Warm-up time 120 min 120 min
Net weight (kg) 1,2 1,6
Glass wind screen yes no
Dimensions fully
mounted (W x D x H)
mm
165 x 166 x 140 mm 165 x 166 x 75 mm
Dimensions (W x D x H)
mm
outside: 157 x 157 x 80 -
inside: 146 x 146 x 80 -
Weighing surface,
stainless steel 105 mm 165 x 165 mm
Permissible
ambient condition +5° C to +35° C
Humidity of air 80 % relative (not condensing)
Electric Supply USB
Interfaces USB-Host/Master (Standard)
WLAN (factory option; KERN KDP-A01)
Ethernet (factory option; KERN KDP-A02)
Bluetooth 4.0 (factory option; KERN KDP-A03)

KDP-BA_IA-e-2012 4
KERN (type) KDP 10K-3 KDP 10K-4
Item number/type TKDP 10K-3-A TKDP 10K-4-A
Readability (d) 1 g 0.1 g
Weighing range (max) 10 kg 10 kg
Reproducibility 1 g 0.1 g
Linearity 3 g 0.3 g
Recommended
adjusting weight not
supplied (class)
10 kg (M1) 10 kg (F1)
Warm-up time 30 min 120 min
Net weight (kg) 1.4 1.4
Glass wind screen no
Dimensions fully
mounted (W x D x H)
mm
165 x 166 x 75 mm
Weighing surface,
stainless steel 165 x 165 mm
Permissible
ambient condition +5° C to +35° C
Humidity of air 80 % relative (not condensing)
Electric Supply USB
Interfaces USB-Host/Master (Standard)
WLAN (factory option; KERN KDP-A01)
Ethernet (factory option; KERN KDP-A02)
Bluetooth 4.0 (factory option; KERN KDP-A03)
2 Declaration of conformity
The current EC/EU Conformity declaration can be found online in:
www.bilancekern.it

5 KDP-BA_IA-e-2012
3 Appliance overview
Model d = 0.001 g
Models d > 0.01 g
Pos. Description
1 Glass wind screen
2 Weighing plate
3 Footscrews
4
Connections
5
Spirit level (for models d
>
0.01 g under the weighing
plate)

KDP-BA_IA-e-2012 6
4 Basic Information (General)
4.1 Proper use
The w eighing pl atform y ou pur chased i s i ntended t o d etermine t he weight value o f
material t o b e w eighed. It i s i ntended t o be used as a “ non-automatic w eighing
system”, i.e. the material to be weighed is manually and carefully placed in the centre
of the weighing plate. As soon as a stable weight value is reached the weight value
can be read.
4.2 Improper Use
Do not use the digital weighing platform for dynamic weighing. In the event that small
quantities are r emoved or added to the m aterial t o be weighed, i ncorrect weighing
results c an b e di splayed due t o t he “ stability c ompensation“ i n the di splay uni t.
(Example: Slowly draining fluids from a container on the balance.)
Do not leave permanent load on the weighing plate. This may damage the measuring
system.
Impacts and overloading exceeding the stated maximum load (max) of the weighing
plate, minus a possibly existing tare load, must be strictly avoided. This may damage
the weighing plate or the digital weighing platform.
The digital weighing platform should never be operated in area where there is a risk
of explosion. The serial version is not explosion protected.
The construction of the digital weighing platform may not be changed. This may lead
to incorrect weighing results, safety-related faults and destruction of the display unit.
The digital weighing platform may only be used as specified here. Other areas of use
must be released by KERN in writing.
4.3 Warranty
Warranty claims shall be voided in case
• Our conditions in the operation manual are ignored
• The appliance is used outside the described uses
• The appliance is modified or opened
• Mechanical damage or damage by media, liquids, natural wear and tear
• The appliance is improperly set up or incorrectly electrically connected
• The measuring system is overloaded

7 KDP-BA_IA-e-2012
4.4 Monitoring of Test Resources
In the framework of quality assurance the measuring-related properties of the digital
platform an d, i f a pplicable, t he t esting w eight, m ust b e c hecked r egularly. T he
responsible user must define a suitable interval as well as type and scope of this test.
Information is available on KERN’s home page ( www.bilancekern.it ) with r egard to
the monitoring of display units’ test substances and the test weights required for this.
In K ERN’s a ccredited D KD c alibration l aboratory t est w eights an d di gital w eighing
platforms may be c alibrated ( return t o t he national s tandard) fast an d a t moderate
cost.
5 Basic Safety Precautions
5.1 Pay attention to the instructions in the Operation Manual
Carefully read this operation manual before setup and
commissioning, even if you are already familiar with KERN balances.
5.2 Personnel training
The appliance may only be operated and maintained by trained personnel.
6 Transport and storage
6.1 Testing upon acceptance
When receiving t he appliance, please c heck p ackaging i mmediately, an d t he
appliance itself when unpacking for possible visible damage.
6.2 Packaging / return transport
Keep all parts of the original packaging for a possibly
required return.
Only use original packaging for returning.
Prior to dispatch disconnect all cables and remove
loose/mobile parts.
Reattach possibly supplied transport securing devices.
Secure all parts such as the glass wind screen, the
weighing plate, power unit etc. against shifting and damage.

KDP-BA_IA-e-2012 8
7 Unpacking and placing
7.1 Installation Site, Location of Use
The digital weighing platforms are designed in a way that reliable weighing results
are achieved in common conditions of use.
Precise and fast work is achieved by selecting the right place for your digital weighing
platform and your weighing plate.
On the installation site observe the following:
• Place the weighing platform on a firm, level surface;
• Avoid ex treme h eat a s w ell as t emperature f luctuation c aused by i nstalling
next to a radiator or in the direct sunlight;
• Protect the digital weighing platform from direct draughts from open windows
and doors;
• Avoid jarring during weighing;
• Protect the digital weighing platform from high air humidity, fumes and dust;
• Do not expose the digital weighing platform to strong humidity for extended
periods. Non-permitted condensation (condensation of air humidity on the
appliance) may occur if a cold appliance is taken to a considerably warmer
environment. In this case, acclimatize the disconnected appliance for ca. 2
hours at room temperature.
• Avoid static charge of goods to be weighed or weighing container.
Major display deviations (incorrect weighing results) may be experienced should
electromagnetic fields (e.g. due to mobile phones or radio equipment), static
electricity accumulations or instable power supply occur. Change location or remove
source of interference.
7.2 Unpacking and checking
Take t he di gital w eighing pl atform ou t o f the p ackaging, r emove t he packaging
material and i nstall at t he designated workstation. C heck i f that there has been no
damage and that all packing items are present.
Scope of delivery / serial accessories:
• Digital weighing platform, see chapter. 3
• Mains adapter
• USB A to USB B cable
• These installation instructions
• Description of interfaces (KCP-ZB)
• KERN BalanceConnection software (online operating
instructions)

9 KDP-BA_IA-e-2012
7.3 Assembly and installation
The correct location is a key factor in the accuracy of the weighing results.
Levelling
Exact alignment and stable installation are an essential
requirement for r epeatable r esults. You c an
compensate
for m inor unev enness or t ilts o f t he
footprint by levelling the weighing balance.
Level balance with foot screws until the air bubble of the
water balance is in the prescribed circle.
Check levelling regularly.
Installation of weighing plate
Connection to the power supply (USB)
using the enclosed power pack or the USB host (e.g. computer)
In or der t o obtain e xact r esults w ith t he el ectronic bal ances, t he di gital
weighing platform must have reached the operating temperature (see warming
up time chap. 1).
The digital weighing platform must be connected to the power
supply during this warming up period.
The ac curacy o f t he di gital weighing pl atform i s de pendent o n t he l ocal
acceleration due to gravity.
Strictly observe hints in chapter Adjustment.
Connection to your system (configuration) as described in the chapter 8
Carry out adjustment as described in the chapter 9
Communication and using the balance via the interface protocol (see
interface protocol description)
The c hapter 10.1 describes t he i deal w ay t o us e t he balance us ing t he
BalanceConnection software.

KDP-BA_IA-e-2012 10
8 Connection to your system
The digital weighing platform is configured and operated using the KCP
communication protocol and the built-in interfaces. KCP is described in the additional
KCP-ZB interface description (enclosed and available online). The following sections
describe how to connect the weighing platform to your system using your preferred
communications interface.
KCP (KERN Communications Protocol):
KCP i s a s tandardized s et o f i nterface c ommands for K ERN
balances an d
other appliances, which allows all of the relevant parameters and functions to
be c alled up a nd c ontrolled. K ERN dev ices t hat h ave K CP c an use i t to
connect e asily t o c omputers, i ndustrial c ontrol s ystems a nd other digital
systems.
8.1 USB
Connect the device to the host computer using the enclosed USB cable. It will be
recognized as a virtual COM port and will be assigned a corresponding numbered
connection.
Example (Microsoft Windows Device Manager):
In modern devices the USB driver required for the weighing platform has already
been pre-installed. If the system is not recognized automatically, you can obtain the
correct driver from the Downloads area at http://www.bilancekern.it .
8.2 Bluetooth
The weighing platform is optionally available with Bluetooth Low Energy (BLE) and
will then be visible to Bluetooth Master devices using its serial number.
To access this, please use an appropriate software programme / app which supports
Bluetooth Low Energy (BLE). Applications using Bluetooth Classic (BLC) will not
work.

11 KDP-BA_IA-e-2012
8.3 Ethernet
The weighing platform’s factory setting uses DHCP, i.e. it connects automatically to
your network. The system can communicate using the UDP protocol (Port 187) and
also the Telnet protocol (Port 23).
To request and configure the weighing platform’s IP address, connect it to the
computer using the USB cable (see "USB" chapter) and use the following commands
to request or set the network configuration, in this example with KERN
BalanceConnection:
8.3.1 Read-out the IP address
Download the KERN BalanceConnection:
https://www.kern-sohn.com/de/Balance%20Connection
If this message appears:
it is recommended to download and to install the KERN BalanceConnection as a zip-
file.
If this window appears, click „Nevertheless execute“:

KDP-BA_IA-e-2012 12
In the start screen of KERN BalanceConnection select the so-called „Expert mode“.
Click the symbol right below:

13 KDP-BA_IA-e-2012
Add the weighing platform in expert mode. For this purpose click „Add device“:

KDP-BA_IA-e-2012 14
A list of the available devices appears. In this list select „KDP“ and right above click
„Import“. The weighing platform has now been added.

15 KDP-BA_IA-e-2012
After having selected the device from the list, the following window opens
automatically:
In the window „KDP-properties“ fill-out the fields accordingly and below right click the
field „Import“.

KDP-BA_IA-e-2012 16
„KDP“ is now displayed.
As next click the corresponding COM-Port below in the window „Interfaces” and
activate this port with mouse click on the right.
(the respective Com-Port appears as soon as the balance has been plugged-in.)

17 KDP-BA_IA-e-2012
The enabled COM-Port is now reported as active by the green dot. When clicking this
port on the right, the menu appears again. Click „Open console“.

KDP-BA_IA-e-2012 18
The following remote commands can now be used:
• JNEA: Query / set network address (IP)
• JNEK: Query / set network mask
• JNEG: Query / set gateway address
Here is an example: “JNEA”:
Enter the required command in the text field and confirm with the hook :
The weighing platform can then be accessed through the following ports:
• TCP:23 (Telnet)
• UDP:187 (Raw)
After the IP-address of the balance having been read-out,
the balance can now be connected to a network via the Ethernet interface.
Connect t he weighing pl atform t o t he pow er s upply v ia a 5V /1A mains
adapter.

19 KDP-BA_IA-e-2012
8.3.2 Connecting the weighing platform to a network
First the weighing platform is connected to the network via the Ethernet interface.
According to the required task of the balance, the corresponding interface is selected
in the network.
In this example „TCP/IP Client“
Select the IP Port properties and enter the IP address of the balance. Then enter
Port 23 according to the type of connection (here TCP). Then click „Apply“ and close
the window with „X“:

KDP-BA_IA-e-2012 20
Now the required port has been added and enabled. By clicking the port on the right
the menu appears. Click „Open console“.
Now the balance can be addressed to by remote commands from the network.
Table of contents
Other KERN Accessories manuals
Popular Accessories manuals by other brands

Omron
Omron ZN-TH11-S instruction sheet

Sonero
Sonero X-IMS070 user manual

ADVANSEA
ADVANSEA Speed s400 Multilingual installation manual

NEW BRUNSWICK SCIENTIFIC
NEW BRUNSWICK SCIENTIFIC Innova CO-170 Guide to operations

emporium
emporium NEERA WBECEM003 quick start guide

Apogee Instruments
Apogee Instruments SU-200 owner's manual