KES Airo Home / Hobby User manual
1
844-247-3913
www.airoclean420.com
Science &
Technology, Inc.
Airo Home / HobbyTM
Photocatalytic Air Purifying Technology
Owner’s / Maintenance Manual
Model:
AIRO-Home/Hobby
2
844-247-3913
www.airoclean420.com
Science &
Technology, Inc.
By purchasing an Airo Home/Hobby photocatalytic air purifying system, the most advanced and effective airborne pathogen reduction system
available, you’ve positioned yourself as a leader in your industry. The Airo Home/Hobby products were developed from NASA technology and
use a patented process to kill airborne Powdery Mildew, Mold, Botrytis, as well as other Bacteria, Viruses, and pathogens in Cannabis
Cultivators & Grow facilities. The same process breaks down VOC’s, like ethylene gas, formaldehyde and many odors, into micro amounts of
harmless carbon dioxide and water vapor.
Congratulations
Important Safety Instructions
For your safety and protection, read this entire Owner’s Manual before you attempt to install or use your Airo Home/Hobby system. Keep this
safety information where you can refer to it if necessary.
DO NOT run cord under carpeting. DO NOT cover cord with throw rugs, runners, or similar coverings. DO NOT route cord under furniture or
appliances. Arrange cord away from traffic area and where it will not be tripped over.
Cautions & Symbols on Unit
Technology
As contaminated pathogenic air is processed through the photocatalytic reactor, the patented green technology, intergrated with Photocatalytic
Oxidation (PCO), works in unison to destroy harmful airborne microbes and dismantle volatile organic compounds (VOC) while not producing
any by-products. Airo Home Hobby is energy efficient, consuming approximately energy of (1) 100 watt light bulb.
Titanium dioxide (TiO2) is a component photocatalyst material used in the device. A unique process is used to create the patented TiO2 formula
that coats the catalyst material. When this material is irradiated with the ultraviolet photons from the Airo Home Hobby proprietarty lamps
inside, hydroxyl radicals and super-oxide ions are formed. These species will oxidize (reduce to trace elements of carbon dioxide and water)
volatile organic compounds (VOC's) adsorbed on the catalyst surface. They will also kill and decompose airborne pathogens like powdery
mildew, mold, botrytis, bacteria and yeast. Because the organic material is completely oxidized by this process, the photocatalytic reactor is
self-cleaning relative to organic material on the catalyst surface. Airo Home/Hobby does not generate nor use ozone and/or any other type
of gas or chemical.
Our Air Sanitation technology has been in commercial use since 1999. The technology has been deployed in a broad base of global food and
agricultural companies. We have proven strong efficacy with eradication of all forms of airborne fungal diseases such as Powdery Mildew. As
mentioned above, all the kill happens inside our reactor bed without using and/or producing any gas or chemical - thus, we do not claim to clean
surfaces. It is important that your room, where Airo Home/Hobby is installed, has reliable environmental controls and pest management
practices to work in conjunction with the technology in order to optimize your facilities sanitation.
Shut Off Power
Before Opening
Or Servicing
CAUTION
Never Remove
Cover While it is plugged in.
AiroCide
(Lamps buried within the
unit are harmful to human eyes.)
Never Remove Airo Home/Hobby
Cover While It Is Plugged In.
WARNING: If you spray any types of chemicals or cleaning
agents in the room that contains that Airo Home/Hobby unit(s),
please turn off the Airo Home/Hobby unit(s) during this spray
period as well as (1) hour after spraying is complete (to allow for
all residues to dissipate).
The various sprays and cleaning agents could possibly harm the
catalyst located inside the Airo Home/Hobby reactor bed.
Warning
3
844-247-3913
www.airoclean420.com
Science &
Technology, Inc.
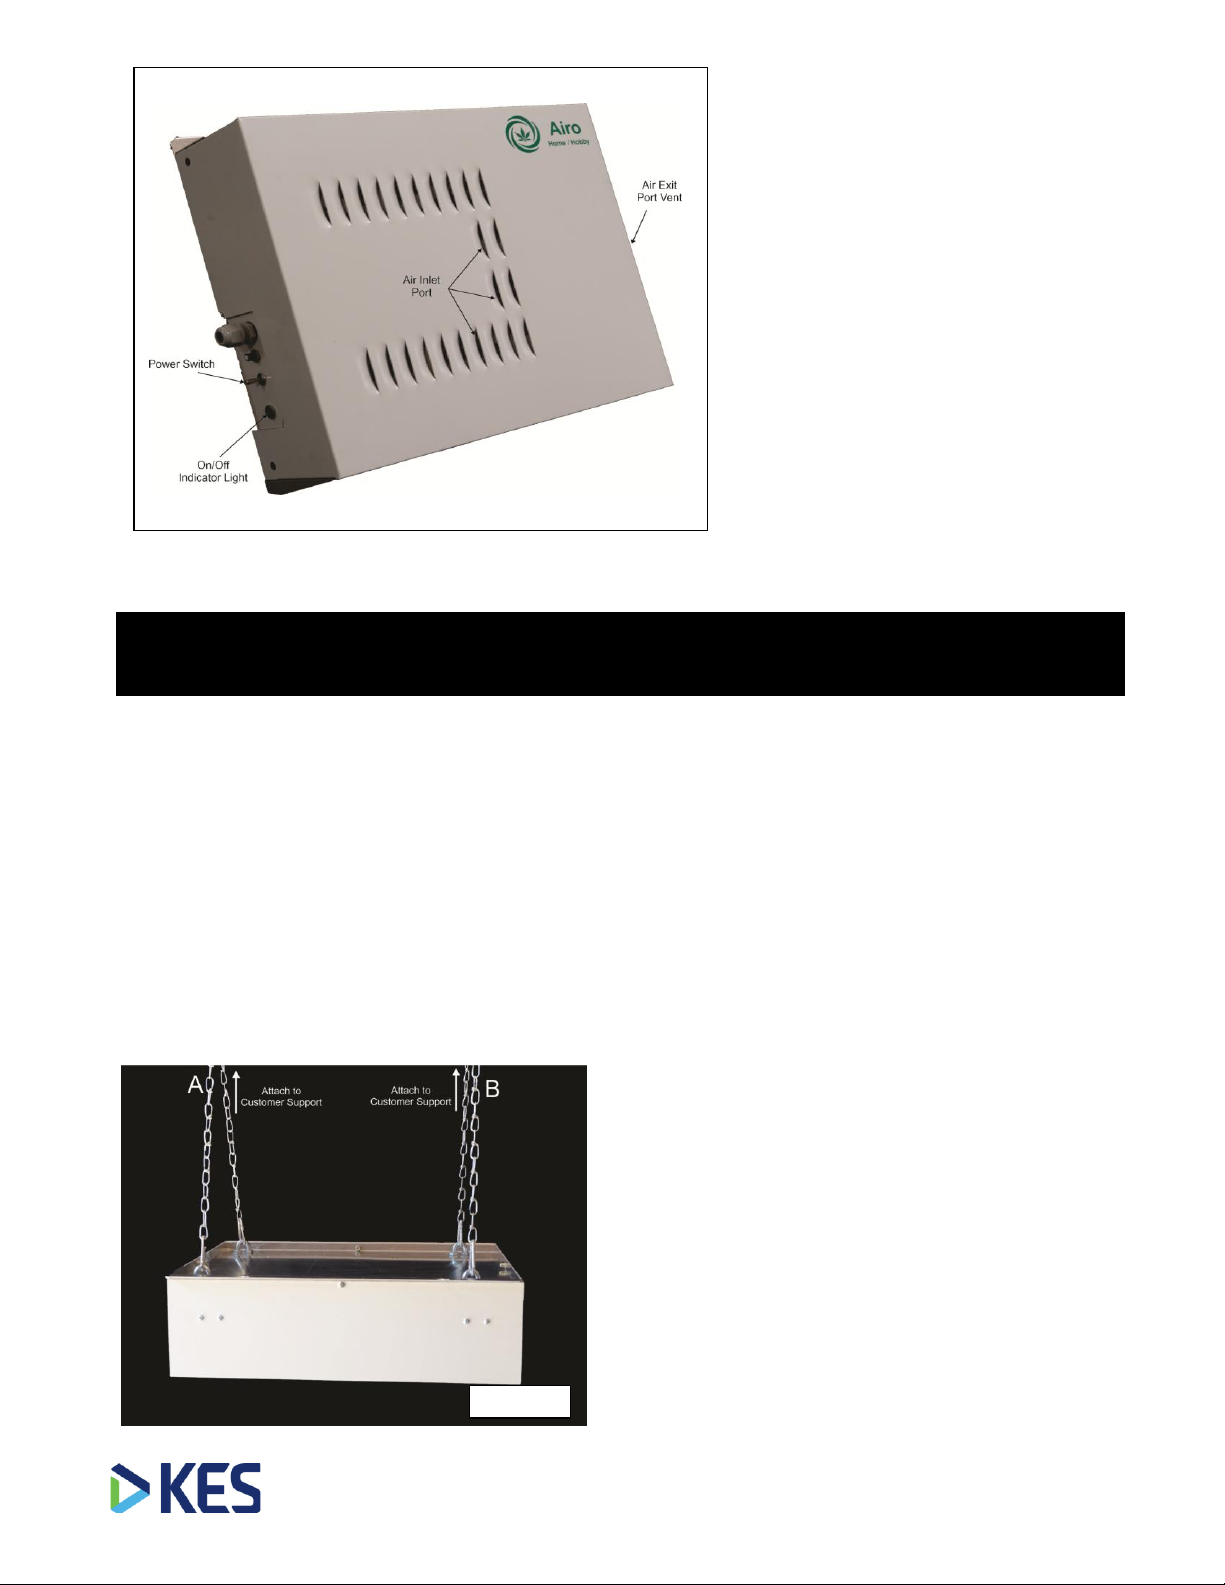
Figure 1
Airo Home/Hobby uses truly breakthrough
technology to remove airborne pathogens. It
works by drawing in air through its Air Entry Port
and then forcing it through its Reactor Bed where
a photo-catalytic reaction kills living organic matter
like mold/fungi, bacteria and viruses and breaks
down organic gases (VOC’s) like ethylene.
NOTE: Your Airo Home/Hobby comes with a
protective 2” Filter. The filter needs to be checked
periodically to ensure it is not clogged. We
estimate that the filter should last approximately 3
months.
NOTE: Depending on the particular dust load in a
given facility, the filter may need to be changed
more frequently.
.
Power
Switch
Installation
NOTE: The Airo Home/Hobby unit will perform the best when it
is located within the active air current that occurs within your
facility. This allows for a greater distribution of the units
processed (clean) air.
It appears that in most facilities –the most active air current
tends to be in the center of the room.
Thus, we recommend that the Airo Home/Hobby unit be
hung, from the ceiling, as close to the center of your room
as possible. The unit should be hung upside down (see
figure 2) and at the level that is flush with the bottom of
your light fixtures.
Figure 2
1) Take the unit carefully out of its shipping box.
NOTE: The air exiting the unit will be warm. Do not let
any objects touch the air exit port or get trapped inside
the air intake hood vent (see figure 1 on above).
NOTE: If installing multiple units, attempt to put the units
equal distance from each other. Hang from the ceiling
and as close to center as possible as described above.
The unit’s air exit port must be at least 36” away from any
obstructions. Do not have any other air source blowing
directly into the unit’s Air Exit Port.
2) You will see on the underneath side of the Airo
Home/Hobby there are 4 U-clamps that will be used to
hang the Airo Home/Hobby unit from the ceiling. See
figure 3 on page 4.
3) The manufacturer has included 2 harnesses (one for the
left side and one for the right side. These are
interchangeable). Please attach the harness per
Figure 3 on page 4 (i.e. Hook 1 to u-clamp left top
corner. Hook 2 to u-clamp lower left corner. Hook 3
to top right corner u-clamp. Hook 4 to lower right
corner u-clamp. Hooks A & B will be used to attach
the unit to your ceiling in step #6 on page 4).
3

4
844-247-3913
www.airoclean420.com
Science &
Technology, Inc.
4) Prior to attempting step #5 on this page –ensure that the Airo
Home/Hobby lid is securely in place.
WARNING: If the Airo Home/Hobby lid is not properly secure,
prior to installation, seriously bodily harm can occur if the lid
falls off.
NOTE: The unit weighs 18 lbs. Make sure that your installation
materials can properly support the unit. If you have any doubt
about the security of the mounting surface, contact an engineer
or other individual with knowledge of the ceilings construction.
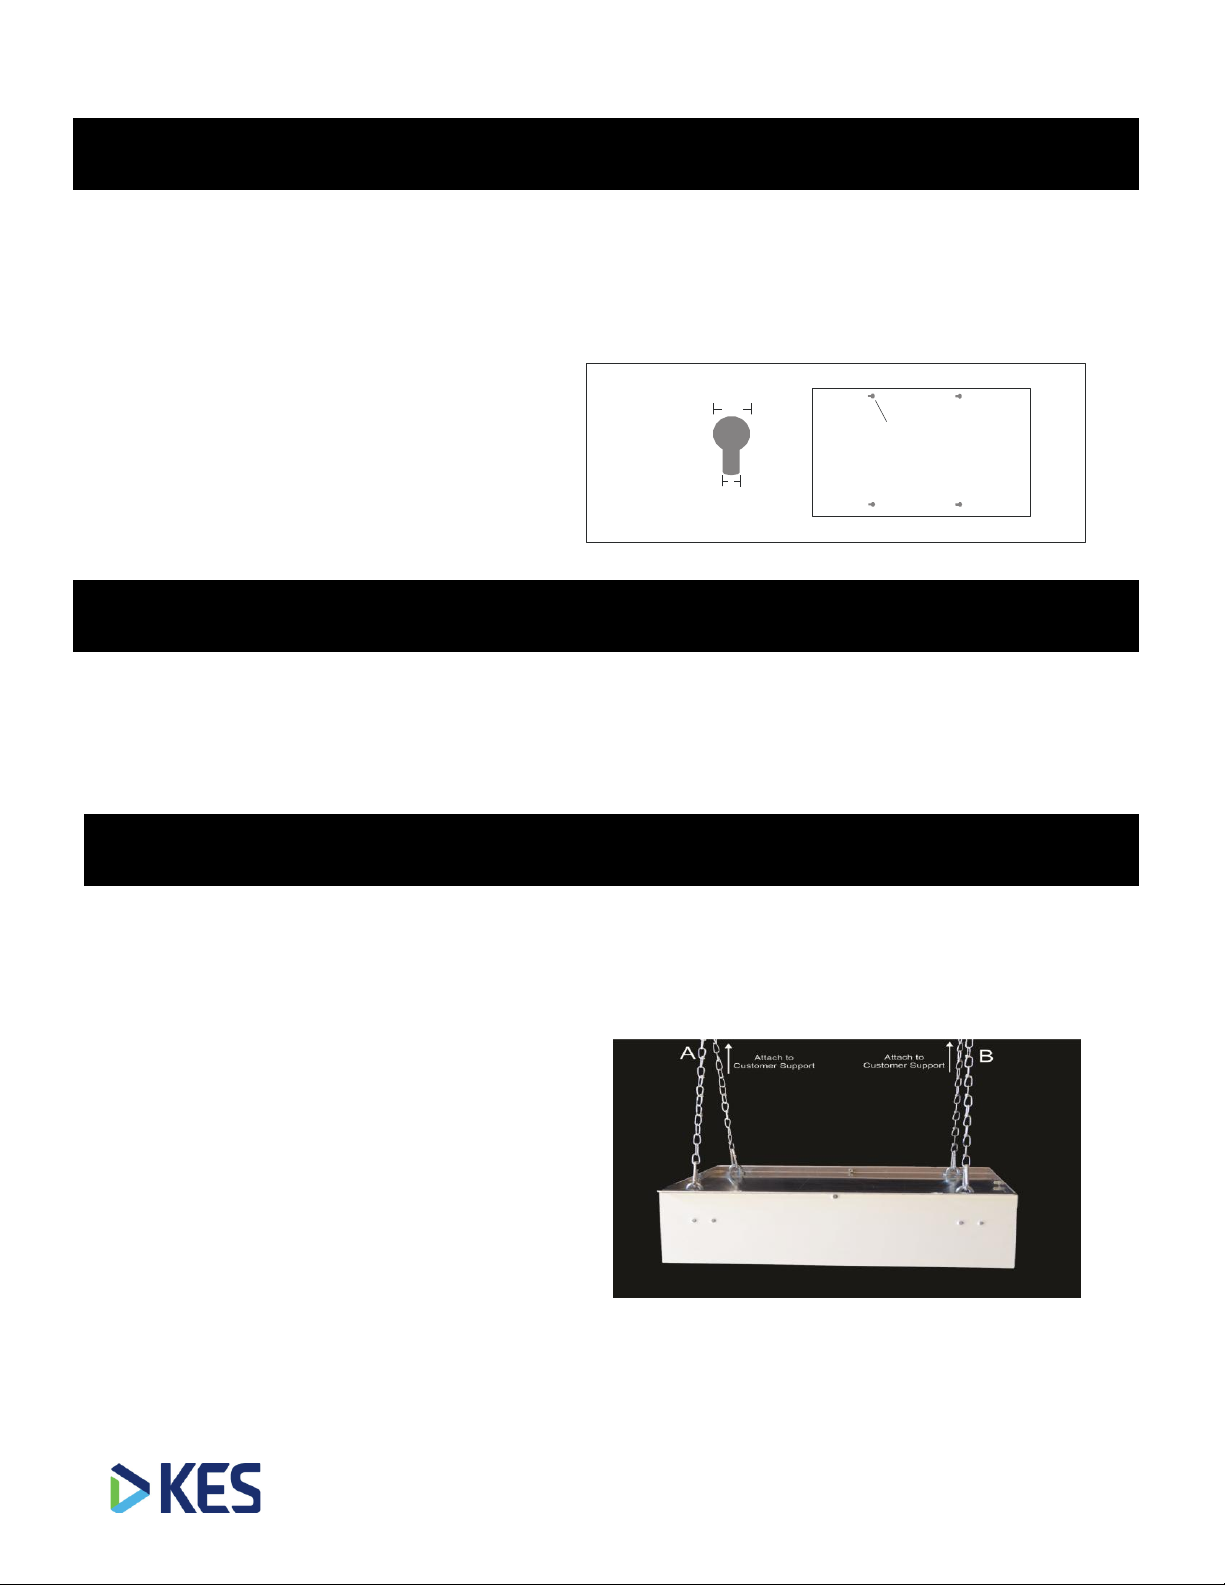
5) You will need to provide the material to attach the harness to
your ceiling. Attach two supporting lines to your ceiling- One
from hook A to the ceiling support and one from hook B to the
ceiling support. The manufacturer would recommend you use
the same material that is used to hang your light fixtures (i.e.
thread rod, metal chain, metal cable, etc.) See figure 4 below.
6) Once you have securely hung the Airo Home/Hobby and
insured that the unit’s lid is securely fastened, next, plug the
Airo Home/Hobby into your power source and turn the unit on.
Figure 4
Figure 3
Figure 3
5
844-247-3913
www.airoclean420.com
Science &
Technology, Inc.
Because the expected life span of the Airo Home/Hobby
proprietary lamps used in systems is approximately one year, all
lamps must be changed every 12 months. In addition the
protective 2” filter needs to be changed approximately every 3
months*. This filter keeps dirt out of the Airo Home/Hobby reactor
chamber. Failure to change this filter on a timely basis will reduce
the unit’s photocatalytic reaction and will cause the unit to not
operate at its maximum capacity and efficiency. Contact KES or
your Airo Home/Hobby distributor to purchase your annual
replacement lamp kit and replacement filter.
*Note: Depending on the particular dust load in a given facility,
the filter may need to be changed more frequently.
Lamp Warning - Use of any lamps other than those supplied by
KES may result in the malfunctioning of the Airo Home/Hobby unit,
as well as compromise its pathogen killing effectiveness. Use of any
other lamps will void warranty.
Caution: Be sure unit is unplugged before beginning service.
1) Disconnect the power source. Make certain all power is turned off
to the unit.
Changing the Airo Home/Hobby Proprietary
Lamps
NOTE: Carefully unhook the Airo Home Hobby unit from the
mounting hardware attached to your ceiling. Then you can place the
unit on a work table to replace the lamps.
To unhook the unit, simply disconnect clamps A & B from your
ceiling support. See figure below.
System Start Up
Maintenance
(Do not remove the cover when the unit is plugged in.)
NOTE: If proper power is supplied to the unit and the green
LED lights go out, call for service.
DO NOT supply power to the Airo Home/Hobby unit until it is
completely installed, and its cover is securely fastened.
As the unit turns on, the green power indicator light should
come on and a very light hum can be heard from the fan in
the unit.
Place the unit on the mounting surface and attach four screws
through the four large mounting slots on the unit's base, Part B
in the Hardware Parts Pack (if installing to a dry wall surface,
use the enclosed four metal anchors along with the four screws).
The screws (and anchors if installing to a dry wall surface, Part
C in the Hardware Parts Pack) should go through the large hole
in the mounting slots.
3/8"
3/16"
Mounting
Slot
Mounting
Slot
NOTE: Even though we recommend the Airo Home/Hobby unit to be hung from the ceiling, the unit can be also be mounted
directly to the wall or ceiling. To do this you will need to remove the 4 U-Clamps (so the unit will lay flush against the
surface). Then using the provided hardware, simply attach the unit.
Wall / Ceiling Mount
6
844-247-3913
www.airoclean420.com
Science &
Technology, Inc.
2) Remove the units cover unscrewing the 4 screws (one on
each side). Do not misplace the screws as you will need them
to re-connect the cover in a later step.
NOTE: Prior to disconnecting any of the wiring harness,
observe how the unit is currently wired. See Fig. 2 below.
Here are a few helpful tips.
The ballast will have a total of 4 wires coming off its
outlet side –2 red wires and 2 yellow wires. See
figure 2 on page 6 and wiring diagram on page 8.
Each set of 2 lamps will have (1) yellow wire going to
one lamp and (1) red wire going to the second lamp.
These 2 lamps are then connected via a small jumper
wire (either white or black –these jumpers are
interchangeable). See wiring diagram on page 8.
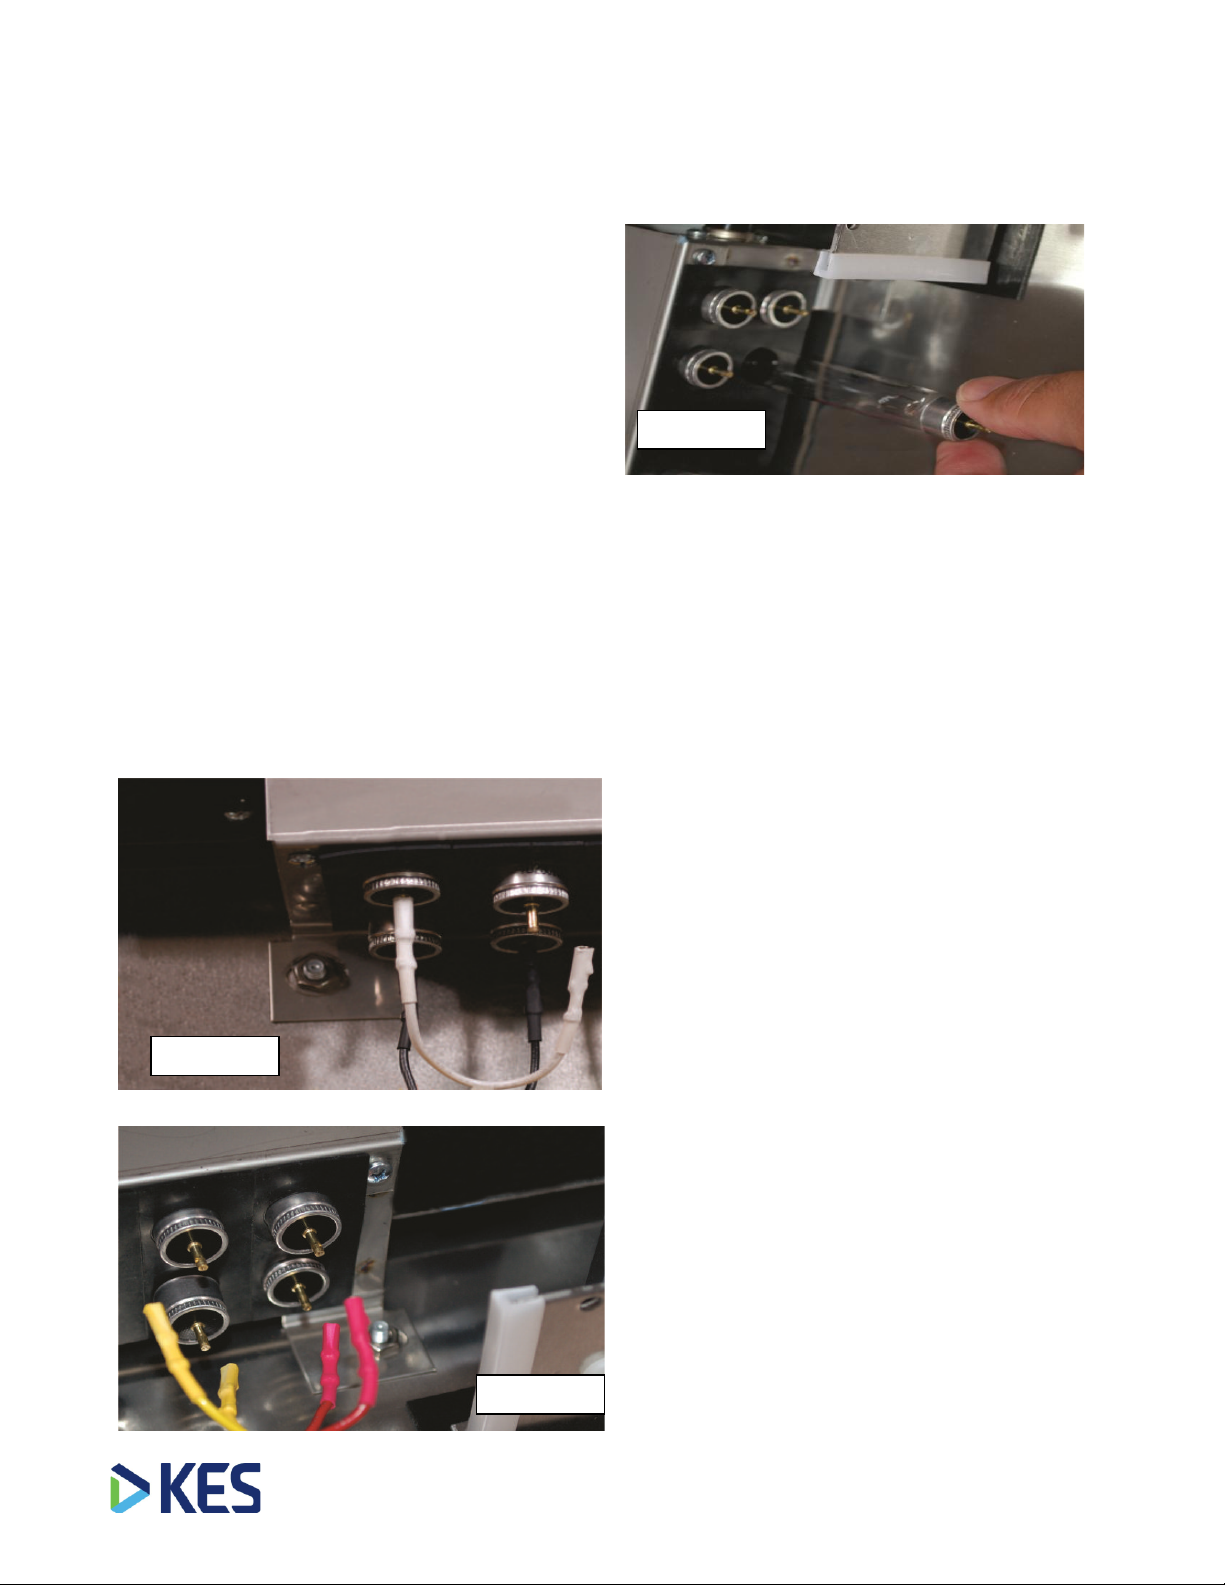
3) Disconnect the white and black jumpers. Then, on the other
side of the lamp, disconnect the red and yellow wires. See
Figures 1, 2, & 3.
Repeat the above for the second set of 2 lamps. Once
completed, you have a group of 4 lamps wired into (1) ballast.
NOTE: To aid in removing the lamp, wet the grommets with a
small amount of tap water or a cotton ball or swab
.
4) Gently remove each of the 4 lamps by grasping the metal
end on each lamp, and firmly sliding it out of the rubber
grommet. See figure 3 below.
5) Place the old lamps to the side out of the way.
NOTE: Using the wet cotton swab (from above), slightly
moisten the ends of the new lamps prior to inserting into the
rubber grommets.
6) Insert (4) new Airo Home/Hobby proprietary lamps (provided
by manufacturer) into the rubber grommet in the reactor bed.
7) Re-connect all wires that were disconnected in step #3
above.
8) Reinstall cover. (If the Fan Protective Filter does not need to
be changed.) If Protective Filter needs to be changed, see
instructions on page 7.
9) Once all lamps have been replaced, take all of the old lamps
and discard according to your local regulations, which pertain
to disposal of UV and related lamps.
10) Before re-hanging / mounting unit, turn the unit on to make
sure proper start-up. Once proper start-up has been verified,
re-hang or mount the unit.
11) Turn unit on.
Figure 2
Figure 3
Figure 1
7
844-247-3913
www.airoclean420.com
Science &
Technology, Inc.
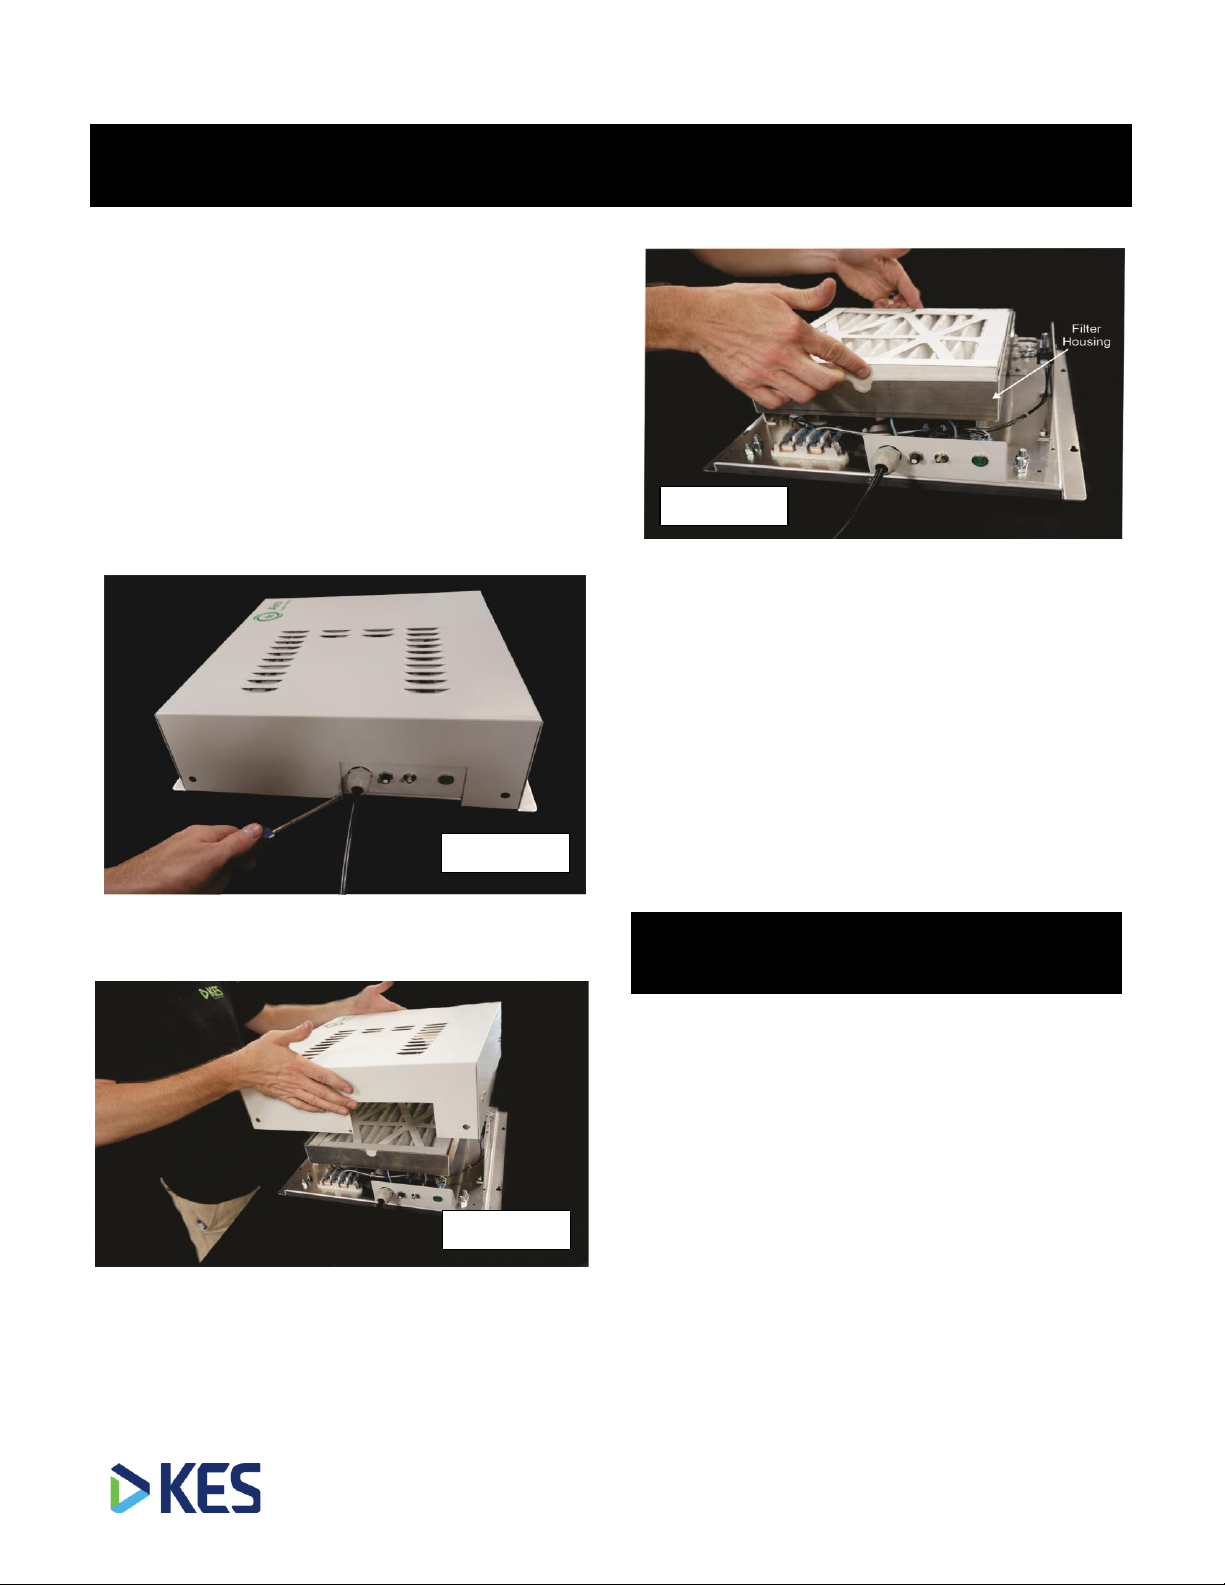
Please note that the 2” protective filter should be replaced
approximately every 3 months*. The purpose of this protective filter
is to keep dust/dirt out of the Airo Home/Hobby reaction chamber.
Failure to change this protective filter will cause the Airo
Home/Hobby unit to not work at maximum capacity and efficiency.
*Note: Depending on the particular dust load in a given facility, the
filter may need to be changed more frequently.
1. Turn the unit(s) off.
2. Remove, but do not discard the (4) screws that hold
the lid closed. See image below.
3. Pull the cover off. Next, remove the filter by pulling it
straight out and discard. See Figure 2 & 3 below.
4. With the new filter in hand, take note that the air-flow
arrow points down. Match up the direction of the arrows
on your replacement filter and the filter housing.
NOTE: Air-Flow Arrow points down. See image above.
5. Insert filter completely making sure it is fully seated
with the edge of the filter housing.
6. Reapply the lid and the (4) screws being careful not
to over tighten.
7. Before re-hanging / mounting unit, turn the unit on to
make sure proper start-up. Once proper start-up has
been verified, re-hang or mount the unit.
8. Turn unit on.
KES offers a three year from date of invoice limited warranty on
the material and workmanship of all metal, plastic and electrical
components of this system, not to include lamps, labor, or
returned freight charges. This warranty does not cover loss of
or damage to any parts of this system not installed in
accordance with the furnished installation and maintenance
instructions. At its option, KES will repair or replace any
components, which upon inspection KES finds to be defective.
KES will only repair or replace components if the components
have been installed in accordance with the furnished
instructions and that there have been no misuse or negligence.
Use of any lamps other than those provided by KES may result
in the malfunctioning of the Airo Home/Hobby unit, as well as,
compromise its pathogen killing effectiveness. Use of any other
lamps will void warranty.
Limited Warranty
Changing the Fan Protective Filter
Figure 1
Figure 2
Figure 3
8
844-247-3913
www.airoclean420.com
Science &
Technology, Inc.
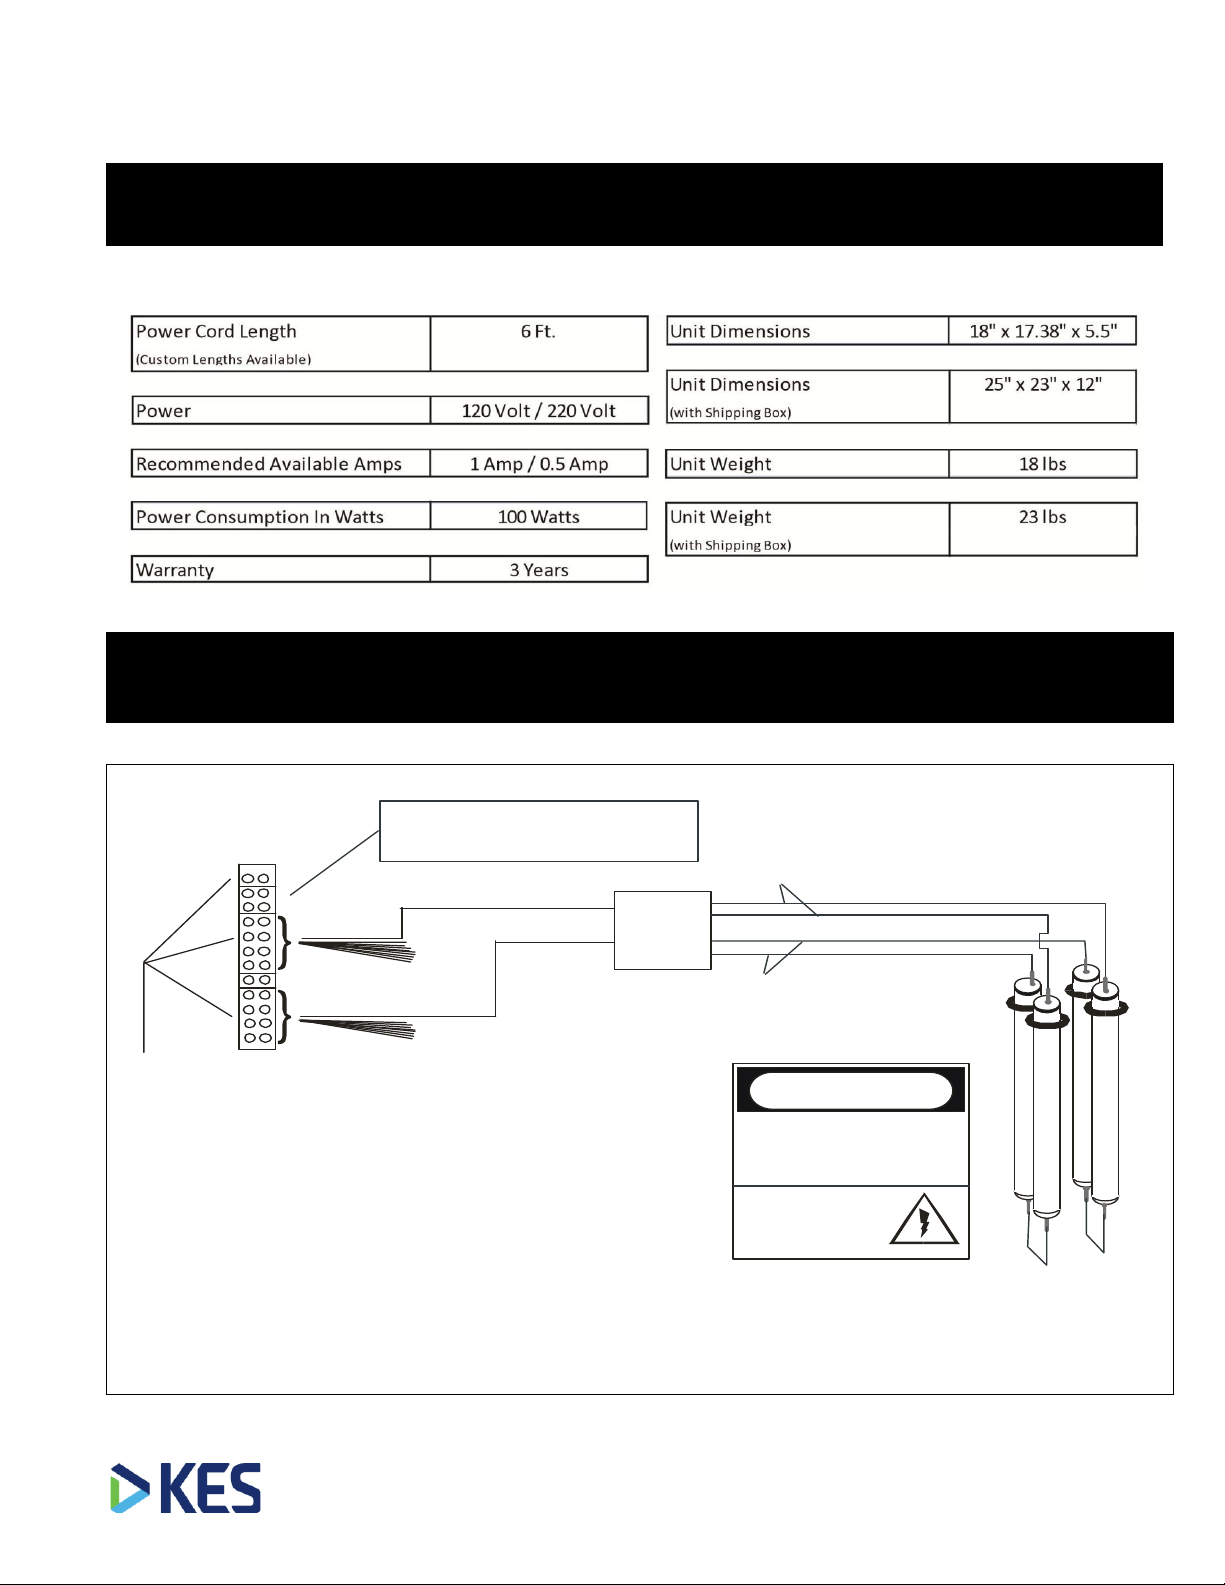
Specifications
Wiring Diagrams
HIG H VOLTAGE
Shut Off P ower
Bef ore Opening
O rS ervicing
CAUTION
Never Remove
Cover Whi le it i s plugged in.
Air oCi deTM
(UVC lamps buri ed within the
unit are harmful to human ey es.)
Black
Black
Jumper
White
Whit e
Jumper
Yellow
Red
120 VAC
Ballast
Terminal Strip
Black
White
Green
Poweris supplied to theTerminal Stri p at alltimes
whentheunit is pluggedinto anelectrical outlet.
Black Wires
to each Ballasts
White Wi res
to each Ballasts
20 ft.
powercord
Caution
NOTE: When connecting the wire harness, if
connecting the Lead wire (red or yellow) to pin #1,
then the Jumper wire (black or white) must be placed
onto pin #3. If placing the Lead wire (red or yellow) to
pin #2, then the Jumper wire (black or white) must be
placed onto pin #4. See figure on page 9.
SPECIFICATIONS AIRO Home/Hobby
Never Remove Airo Home/Hobby
Cover While It Is Plugged In.

9
844-247-3913
www.airoclean420.com
Science &
Technology, Inc.
AIRO Home/Hobby Wiring Diagrams

10
844-247-3913
www.airoclean420.com
Science &
Technology, Inc.
Maintenance Replacement Reminder
Maintenance Replacement Reminder
On behalf of KES Science & Technology, we would like to thank
you for the purchase of your new Airo Home/Hobby unit(s).
Please note that every 12 months, the lamps inside your Airo
Home/Hobby unit(s), need to be replaced to ensure the unit
continues to function properly and eliminates airborne organics
like Powdery Mildew and other Fungal Diseases.
Approximately 60 days prior to your required lamp change (i.e. 12
months after purchase) you will receive a friendly reminder via
mail and email to purchase your replacement lamps.
Attached below is a schedule for you to fill in at your convenience
that will help keep track of your annual lamp replacements. If you
have any questions regarding the unit or the lamp replacement
kits, don’t hesitate to contact the number at the top of the page.
Event Replacement Date
Purchase of the Airo Home/Hobby Unit
Lamp Kit Replacement 1 (12 months from Purchase)
Lamp Kit Replacement 2 (24 months from Purchase)
Lamp Kit Replacement 3 (36 months from Purchase)
Lamp Kit Replacement 4 (48 months from Purchase)
Lamp Kit Replacement 5 (60 months from Purchase)

11
844-247-3913
www.airoclean420.com
Science &
Technology, Inc.
Event
Replacement Date
Purchase of Airo Home/Hobby Unit
Filter Replacement (1st Grow Cycle)
Filter Replacement (2nd Grow Cycle)
Filter Replacement (3rd Grow Cycle)
Filter Replacement (4th Grow Cycle)
Filter Replacement (5th Grow Cycle)
Filter Replacement (6th Grow Cycle)
Filter Replacement Reminder
On behalf of KES Science & Technology, we would like to thank
you for the purchase of your new Airo Home/Hobby unit(s).
The protective 2” filter needs to changed approximately every
three months*. This filter keeps dirt out of the Airo Home/Hobby
reactor chamber. Failure to change this filter on a timely basis will
reduce the unit’s photocatalytic reaction and will cause the unit to
not operate at its maximum capacity and efficiency.
Attached below is a schedule for you to fill in at your convenience
that will help keep track of your filter change. If you have any
questions regarding the unit(s) or the filter, do not hesitate to
contact the number at the bottom of the page.
*Depending on the particular dust load in a given facility, the filter may need to be changed more
frequently.
Table of contents
Other KES Air Cleaner manuals


 instruction manual")

