•20211110•
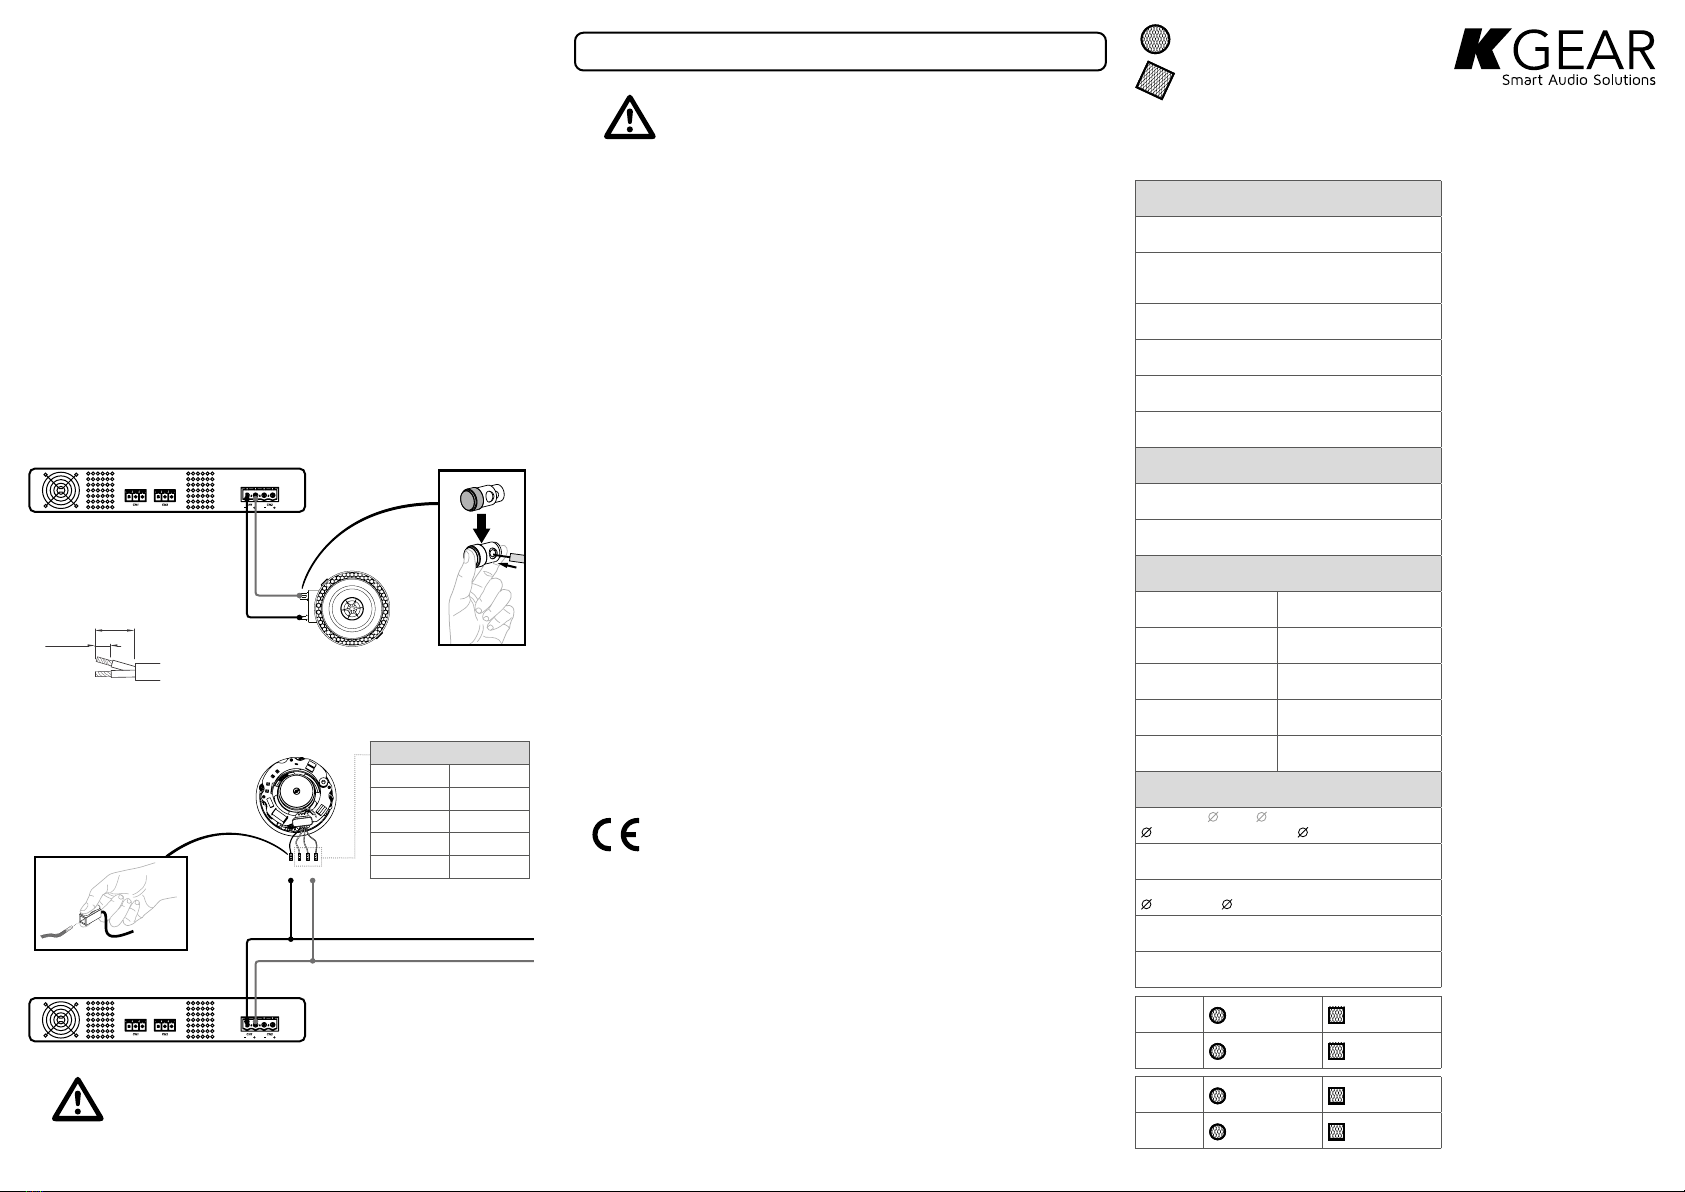
6 mm
(0.25 in)
12 mm
(0.5 in)
Amplifier
Amplifier
Wire terminals
Loudspeaker
Loudspeaker
+
+
–
–
–
Loudspeaker
terminals
Loudspeaker
terminals
IN OUT
IN OUT
Type
Transducers
Frequency Response
Sensitivity
Max SPL 1
Coverage
Power Handling
Nominal Impedance
Nominal Line Voltage Nominal Line Voltage
Power Handling TAP Power Handling TAP
Power Handling TAP Power Handling TAP
Power Handling TAP Power Handling TAP
Power Handling TAP Power Handling TAP
Dimensions ( outer [ inner] x H)
Minimum required mounting depth
Cutout diameter
Weight
IP rating
• Read these instructions.
• Keep these instructions.
• Heed all warnings.
• Follow all instructions.
• Installation and commissioning
may only be carried out by
qualified and authorized
personnel.
• Do not use this apparatus near
water.
• Do not install near any heat
sources such as radiators,
heat registers, stoves, or other
apparatus (including amplifiers)
that produce heat.
• Only use attachments/
accessories specified by the
manufacturer.
• Do not expose this apparatus to
dripping or splashing and ensure
that no objects filled with liquids,
such as vases, are placed on this
apparatus.
• Prior to installing the speakers
into any ceiling/wall, check the
structure for weight bearing
ability and avoid contact with any
wiring or plumbing that might be
behind the surface area.
Warning. Failure to follow these safety instructions
could result in fire, shock or other injury or damage to
the device or other property.
This device is in compliance with applicable CE
standards and regulations. Before putting the device
into operation, please observe the respective country-
specific regulations!
IMPORTANT SAFETY INSTRUCTIONS
• Installing on soft materials or in
areas incapable of supporting
the speakers’ weight may cause
personal injury or damage to the
speaker.
• Make sure the speaker is properly
secured to the ceiling/wall. Please
use the proper screws, bolts, or
anchors. Failure to do so may
cause the speaker to become
unsecured and cause potential
damages/injuries.
• Damage to the woofer and
tweeter may occur if the speaker
is dropped or hit, resulting in no
sound or distorted sound.
• Never overdrive your speakers to
the point of distortion and always
reduce volume prior to switching
input sources.
• Use only approved and certified
wiring in your installation, do
not stretch or place the wire in
contact with sharp objects.
• Prior to removing cables ensure
all power to your amplifier and
other components is turned off.
GCF6 / GWF6
GCF6T / GWF6T
Thank you for choosing this KGEAR product!
To ensure proper operation, please carefully read this
owner’s manual and safety instruction before using the
product.
After reading this manual, be sure to keep it for future
reference.
Packing List
Upon arrival, carefully
inspect the shipping
carton, then examine and
test your new amplifier.
If you find any damage,
immediately notify the
shipping company. Check
that the following parts are
supplied with the product.
Loudspeaker Wiring
Ensure that the amplifier is unplugged from the mains
before making any connections.
Connect the input terminals of the loudspeakers to the
speaker output terminals of the amplifier. Always check
to ensure polarity is correct: L(left) to L, R(right) to R,
“+” to “+”, and “-” to “-”.
Note: In case of sonic artifacts, roughness or distortion,
reduce the signal volume to a lower setting. Never allow
the amplifier to be driven into “clipping”. Damage caused
by operating the speakers at distorted volume levels is
not covered by the warranty.
• 6.5" loudspeaker
• Circular or square
grill according to the
speaker model
• Cutout template
• This user guide
Connect only one wire
according to the power
Input tap wires
70 V line 100 V line
2W 4W
4W 8W
8W 16W
16W 32W
GCF6
(
T
)
GWF6
(
T
)
Technical specifications
Passive full range loudspeaker
6.5" coaxial Woven Glass Fiber woofer with
0.75" Titanium dome tweeter
60 Hz – 20 kHz (-10 dB)
90 dB (1 W, 1 m)
110 dB (peak)
130°
GCF6 / GWF6
60 W
8 Ω
GCF6T / GWF6T
70 V line 100 V line
2W 4W
4W 8W
8W 16W
16W 32W
Handling & Finishes
227 [210] x 87 mm ( 8.9 [8.3] x 3.4 in)
94 mm (3.7 in)
210 mm ( 8.3 in)
1,52 kg (3.3 lb)
IP54
BLACK GCF6 GWF6
WHITE GCF6W GWF6W
BLACK GCF6T GWF6T
WHITE GCF6TW GWF6TW
6,5
”
Ceiling/In-Wall
Two-Way Loudspeaker
70.7V / 100V Audio Transformer
Lo-Z 8Ω
1 Maximum SPL is calculated
using a signal with crest
factor 4 (12dB) measured
at 1 m.


