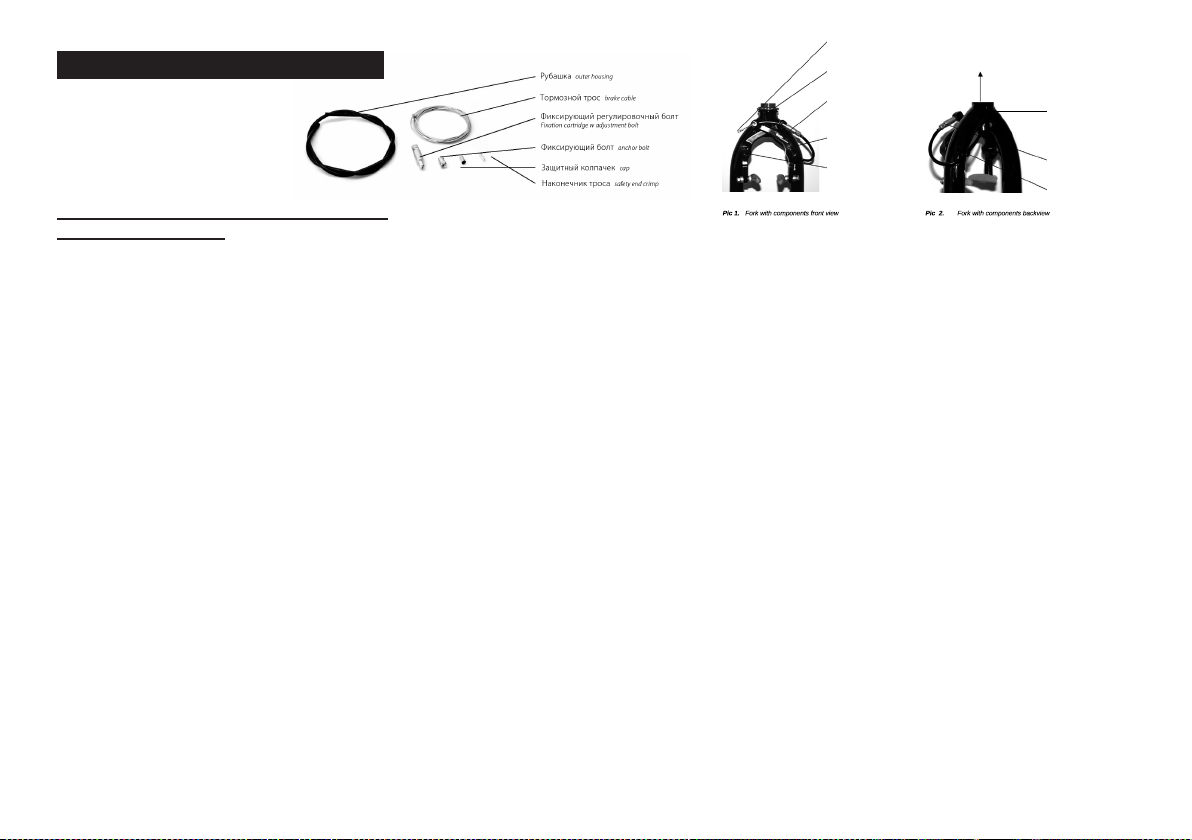
manuals.online logo
Brands
  1. Home
  2. •
  3. Brands
  4. •
  5. KHEBIKES
  6. •
  7. Bicycle
  8. •
  9. KHEBIKES Strikedown Pro User manual

KHEBIKES Strikedown Pro User manual

1
Руководство пользователя OWNER’S MANUAL
2
Серийный номер / Serial number
Перед ознакомлением с данной инструкцией, мы рекомендуем
найти серийный номер велосипеда на кареточном узле рамы,
заполните данные о Вас и Вашем велосипеде на случай потери
или кражи велосипеда.
Before proceeding through the rest of this manual we urge you to locate your bicycle‘s
serial number which is permanently stamped into the bottom bracket shell of the
frame. Record this number in the manual in the event your bike is lost or stolen.
Имя владельца / OWNER’S NAME
Название модели / MODEL NAME
Серийный номер / SERIAL NUMBER
Цвет / COLOR OR FINISH
Дата покупки / DATE OF PURCHASE
Место покупки / PLACE OF PURCHASE
3
Содержание
1. Устройство велосипеда
2. Сборка велосипеда
3. Уход за велосипедом
4. Сервис
Content
1. What it´s called
2. Assembling
3. Care
4. Service
4
1. Устройство велосипеда / Parts of the bike
Рама frame
Седло seat
Подседельный штырь seatpost
Задний тормоз rear brake
Заднее колесо rear wheel
Цепь chain
Ведущая звезда chainring
Шатуны crank
Педали pedal
AТормозная ручка brake lever
BРуль handlebar
CВынос stem
DПередний тормоз front brake
EПокрышка tyre
FВилка fork
GПега peg
HПереднее колесо front wheel
A
B
C
D
E
H
F
G
5
2. Сборка велосипеда / Assembling
Первым делом Вы должны проверить содержание коробки с
велосипедом при его получении. Внутри коробки должны
находиться следующие позиции: 1 велосипед, 1 переднее колесо, 1
руль и 1 маленькая коробка.
First of all you should have a look inside your package and check that it was
delivered correctly. The following parts should be inside: 1 bike, 1 front wheel, 1
handlebar and one small box.
Необходимо прочесть инструкцию по сборке и следовать ей шаг за
шагом.
You should read these assembly instructions step by step and follow the steps in
order of appearance.
Установка руля
The assembly of the handlebar
Первую деталь, которую нужно будет установить, это руль.
Ослабьте болты на выносе, которые удерживают руль. 4 болта
находятся на передней части выноса. (Не ослабляйте болты,
которые крепят вынос к штоку вилки). Снимите лицевую плату
выноса и поместите руль в установочное место в вынос. Затем
установите обратно лицевую плату выноса (она должна обогнуть
руль) и затяните болты. Убедитесь, что руль установлен в
правильном положении и что болты надежно затянуты. Будьте
осторожны и не перетяните болты, так как это может привести к
поломке выноса и руля. Затягивайте болты «крест на крест», т.е.
сначала верхний левый, затем нижний правый, затем верхний
правых, затем нижний левый. Затягивайте таким образом до тех
пор, пока лицевая панель выноса не «сядет» параллельно корпусу
выноса. Расстояние между выносом и лицевой панелью должно
быть одинаковым со всех сторон установочных болтов.
The first part to install is the handlebar. Therefore you have to loosen the stem´s
bolts that hold the handlebar. These four bolts are on the front/upper side of the
stem. (Do not loosen the two bolts that fix the stem to the fork). Then remove the
stem´s front/top plate and place the handlebar in the trough. Replace the stem´s
front/top plate to its former position (now surrounding the bar) and tighten the
bolts. Make sure that the handlebar is in the correct position and that the bolts are
tightened by turns until the bar is rigid under load. Be careful not to over tighten
them, to avoid damaging the bar. Tighten bolts alternately, i.e. Top left, then
bottom right, then top right, then bottom left, until all are tight to the same level
and the stem front/top plate sits parallel to the stem body. The gap between top/
front plate and stem body should be even all the way round.
6
Установка седла
The assembly of the seat
Седло уже идет в сборе с подседельной трубой. Установите
подседельную трубу в раму. Хомут подседельной трубы стоит
разместить болтом назад, что бы было удобнее закручивать болт
при необходимости. Затяните болт хомута подседельной трубы до
тех пор, пока подседельный штырь не будет прокручиваться в
раме велосипеда. Положение седла необходимо настраивать
методом, соответствующим типу седла. Если у седла есть рама –
ослабьте два болта на замке подседельного штыря, выставите
необходимый угол седла и равномерно затяните болты. Если у
седла замок интегрированный – ослабьте центральный болт
замка подседельного штыря, выставьте необходимый угол седла
и затяните болт.
The seat is already connected with the seat post. Put the seat post into the seat
tube. The seat clamp´s bolt must be directed to the rear, so turn it when
necessary. Tighten the seat clamp´s bolt until the seat post can´t be twisted in
the seat tube. The seat´s inclination has to be adjusted at the saddle clamp or
integral saddle clamp depending on its construction. If your seat has a seat
clamp, loosen the two nuts at the upper end of the seat post equally. Then bring
the seat into the right position and tighten the nuts alternately. If your seat
post has an integral saddle clamp, loosen the central hex bolt, adjust the
inclination and finally tighten the bolt.
Установка педалей
The assembly of the pedals
Следующим шагом будет установка педалей. Нанесите немного
смазки на резьбу педалей и шатунов. На осях педалей есть
маркировки R и L, которые обозначают с какой стороны
необходимо устанавливать педали на шатунах. Обратите внимание,
что у правой педали стандартная резьба, а у левой – левосторонняя
резьба.
Ось педали должна быть очень сильно затянута в резьбе шатунов.
Будьте внимательны и не перепутайте стороны во время установки
педалей.
What comes next is the assembly of the pedals. Put some grease on the pedal
thread and the crank thread. The axles are marked with “R” or ”L” showing you
their position of assembly referring to the driving direction. Please note that the
right pedal has a regular thread and the left one has a left-hand thread.
The pedal axle must be tightened very tightly to the crank. Be careful that you
don´t cross thread the pedal to the crank.
2. Сборка велосипеда / Assembling
7
Установка переднего колеса
The assembly of the front wheel
Перед установкой переднего колеса – снимите болты с осей втулки
и затем установите колесо в дропауты вилки. Правильно
направление для установки колеса указанно на боковинах
покрышки. Если велосипед поставляется с пэгами – следующим
шагом поместите их на место, затем затяните болты на оси. Если
вы чувствуете сопротивление во время установки – перестаньте
затягивать болты, скорее всего Вы установили колесо и\или пэги
не правильно. Попробуйте еще раз! Снимите колесо и повторите
процесс снова. Затем затяните болты и закрепите колесо в
дроп-аутах вилки!!!
Before fitting the front wheel, remove the nuts of the hub axle, then put the wheel
into the fork´s dropouts. The correct driving direction is given on the sidewall of
the tire. If your bike comes with pegs, place them on the axles afterwards. Then
tighten the axle nuts. Do not try to screw them when there is any resistance, you
might have placed them incorrectly. Remove them and have another try! !!! Then
tighten them to secure the front wheel in the fork dropouts !!!
Установка заднего колеса
The assembly of the rear wheel
Заднее колесо уже отцентрованно и установлено с оптимальным
натяжением цепи. Если велосипед поставляется с пэгами,
открутите болты на оси. Установите болты на ось и затяните болты.
Начните с левого болта и обратите внимание на центровку колеса
в перьях рамы, колесо должно свободно крутиться. В противном
случае привод может испытывать повышенное трение и это может
привести к повреждению задней втулки.
The rear wheel is already centered and assembled with the optimal chain tension.
If your bike comes with pegs, the nuts have to be removed. Put the pegs onto the
axles and tighten the nuts. Start with the left nut and make sure that the wheel is
correctly centered while spinning. Otherwise the function of the drive section
suffers too much friction which might cause damage to the rear hub.
2. Сборка велосипеда / Assembling
8
Установка заднего тормоза
The adjustment of the rear brake
Если на Вашем велосипеде установлен тормоз типа U-Brake, нужно
всего лишь установить тормозной кабель в левую лапку
тормозной машинки. Болт, отвечающий за натяжение тормозного
троса, должен быть полностью вкручен. Затем нужно вернуть
болт в прежнее положение, для установки натяжения кабеля
после подгонки тормозной ручки. Если после установки
натяжение не достаточное используйте болт регулировки
натяжения для достижения необходимого уровня.
If your bike has U-brakes, you simply have to put the upper rotor cable into the
left brake lever. The frame´s cable tension adjustment bolt must be screwed in
fully. Afterwards it should be brought into its former position, to re-tension the
cable after fitting the brake lever end of the cable. In case of there is any cable slack
when pulling the lever, adjust the cable adjustment bolt of the brake lever as much
as necessary.
Если на Вашем велосипеде тормоз типа V-Brake, установите кабель
в тормозную ручку. Если длины кабеля не хватает для установки,
ослабьте болт на тормозном механизме, что бы кабель мог
свободно перемещаться. Затем затяните болт как в было до этого,
что бы создать необходимое натяжение.
If your bike has a V-brake, fit the cable to the brake lever. If the slack in the cable is
not enough to fit the lever end of the cable, loosen the socket head screw of the
brake-arm in order to allow the cable to slip through slightly. Pull it back to its
original setting afterwards, to correctly re-tension the cable.
2. Сборка велосипеда / Assembling
Подседельная труба seattube
Тормозной трос cable bridge
Задний тормоз rear brake
Болт под шестигранник (5 mm)
hex bolt for brake mounting (5mm)
Гайка регулировки пружины
(13 mm)
Nut to adjust brake spring tension
(13 mm)
9
Установка заднего тормоза
The adjustment of the rear brake
Если у Вашего велосипеда тормоза типа Калипер или Дисковые,
установите кабель в тормоз. Для этого необходимо ослабить болт
на тормозной ручке, что бы трос мог свободнее перемещаться.
Затем затяните болт обратно как в первоначальном положении.
If your bike has a Caliper- or Disk brake, put the cable into the brake. For this, you
have to loosen the socket head screw of the brake-arm in order to allow the cable
to slip through. After that, you have to pull it back to its original setting afterwards.
Установка переднего тормоза
The assembly of the front brake
Передний тормоз уже идет настроенным. Нужно лишь выставить
правильный угол тормозных колодок.
The front brake is adjusted Ex-Works. It is necessary to align the brake pads only.
2. Сборка велосипеда / Assembling
10
Наконечник троса
safety end crimp
Фиксирующий болт
anchor bolt
Фиксирующий регулировочный болт
Fixation cartridge w adjustment bolt
Фиксирующий
регулировочный болт
Fixation cartridge w adjustment bolt
Направляющая петля
guiding loop
Регулировки пружины 13mm
adjustment bolt spring 13mm
Фиксирующий болт 5mm
hex bolt for brake mounting 5 mm
Направление троса
cable guide
Рис. 1 Вилка с компонентами вид спереди Рис. 2 Вилка с компонентами вид сзади
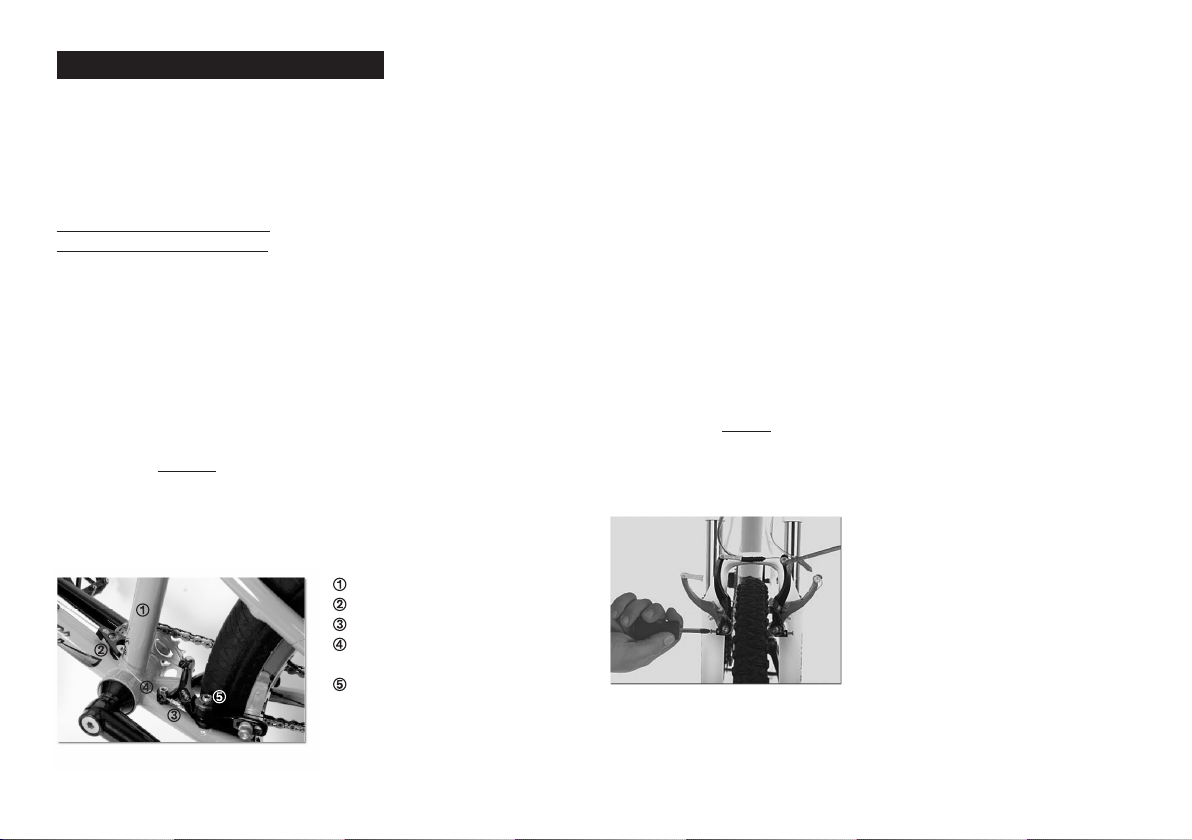
Установка переднего тормоза типа U-Brake
Adjusting the front U-brake
Если на Вашем велосипеде установлены тормоза типа U-Brake,
установите тормозной кабель с окончанием в виде бочонка в
тормозную ручку, а другой конец захватите в районе
регулировочного болта на тормозной машинке. Отметьте
необходимую длину тормозного кабеля. Убедитесь, что прокладка
кабеля не будет иметь заломов, которые смогут помешать
производительности торможения. Вытащите кабель из тормозной
рубашки, обрежьте рубашку до нужной длины. Смажьте тормозной
кабель тефлоновой смазкой и вставьте обратно в рубашку.
Установите кабель в направляющую на вилке велосипеда. Ослабьте
болт регулировки натяжение на пол хода. Вставьте тормозной трос
в направляющий картридж и установите картридж в правую рамку
тормозной машинки. Рубашка должна встать во главе
регулировочного болта натяжения. Далее – затяните с помощью
отвертки кабель таким образом, что бы тормозные колодки плотно
прилегали к ободам колеса. Затем отрежьте лишнюю длину
тормозного кабеля, оставив примерно 30мм, и установите
заглушку на тормозной кабель.
Во время установки Вам потребуется гаечный ключ на 13мм и
Шестигранник на 5мм.
Гаечный ключ на 13мм используется для регулировки напряжения а
шестигранник используется для закрепления тормоза на
посадочном месте. Гаечный ключ не стоит проворачивать более 90
градусов, так как можно сорвать резьбу.
Настраивайте натяжение на обоих лапках тормозов таким образом,
что бы они давали одинаковую тормозную силу на колодках во
время прижимания к ободу колеса.
If your bike is equipped with a front u-brake, put the cable´s barrel end into the right
brake lever and hold the other end next to the adjustment bolt of the front brake.
Then mark the position of the cable`s optimal length. Take care that the cable
routing avoids kinks reducing the braking performance. Remove the cable from its
outer casing, Cut the outer casing to the chosen length and put the protection cap
(can be found in the small box) on its end. Lubricate the cable with Teflon lube and
put it back into its outer casing. Put the brake cable with housing through the
guiding loop at the right tube of the fork. Unscrew the adjustment bolt of the fixation
cartridge half the way. Insert the brake cable into the fixation cartridge and place the
cartridge in the right brake arm. The cable housing must sit in the head of the
adjustment bolt. Then fix the brake cable with the anchor bolt so that the brake
shoes tightly hit the walls of the rim. Finally cut off the useless part of the brake cable
down to approx. 30mm and place a safety end crimp on its end. Use a 13 mm
spanner and a 5 mm Allen key in order to install the brake.
The 13 mm spanner is used for increasing the tension whereas the Allen key serves for
fixing the brake at the u-mount. The spanner must not be turned more than 90° since
the spring might be damaged if you turn it further. Adjust the tension on both brake
arms so that the brake pads touch the rim´s sidewall at the same time.
2. Сборка велосипеда / Assembling
11
Настройка переднего тормоза типа V-Brake
Adjusting the front V-brake
Если на Вашем велосипеде установлен тормоз типа V-Brake,
подходящую длину тормозного кабеля следует определять
следующим образом: прикиньте прокладку кабеля от тормозной
ручки до загнутой направляющей кабеля. Отметьте оптимальную
длину кабеля. Убедитесь, что прокладка кабеля не имеет заломов,
которые могут повлиять на производительность торможения.
Вытащите тормозной трос из рубашки, обрежьте рубашку до нужной
длины и установите защитный колпачок (можно найти в маленькой
коробке). Смажьте трос тефлоновой смазкой и установите его
обратно в рубашку. Ослабьте болт на тормозной ручке на пол хода.
Снимите пружины сзади тормоза. Установите кабель в тормозную
ручку и воспроизведите прокладку троса, как делали в самом начале.
Пропустите кабель через изогнутую направляющую кабеля, что бы
рубашка плотно села на место. Установить трос на правую лапку
тормоза и установите гибкую резинку на кабель.
Тормозной кабель должен быть установлен (с помощью крестового
болта) на левой лапке тормоза таким образом, что бы тормозные
колодки слегка касались обода колеса. Установите пружинки на их
прежнее положение и немного закрутите регулировочный болт
натяжения. Затем несколько раз нажмите на тормозную ручку и
посмотрите – одинаково ли движутся обе лапки тормоза. Лапка,
которая движется медленнее другой, требует дополнительно
настройки. Ослабьте крестовой болт в нижней части тормоза для
того, что бы обе тормозные колодки одновременно прижимались к
ободу колеса. Отрежьте конец тормозного троса, оставив примерно
30мм, и установите заглушку на конце кабеля.
!!! Убедитесь, что прокладка тормозного троса не имеет загибов,
которые могут повлиять на производительность тормозного
усилия!!!
If your bike is equipped with a v-brake, the suitable length of the cable´s outer
housing has to be determined as follows: Simulate the cable´s routing by putting it
through the shaft and via the guiding loop at the back of the right fork tube to the
curved cable guide. Mark the position of the cable`s optimal length. Take care that
the cable routing avoids kinks reducing the braking performance. Remove the cable
from its outer casing, cut the outer casing to the chosen length. Put the protection
cap (can be found in the small box) on the end of the casing. Lubricate the cable
with Teflon lube and put it back into its outer casing so that the nipple is next to the
protection cap. Then unscrew the adjustment bolt at the lever half the way.
Disengage the springs at the back of the v-brake. Install the brake cable at the lever
again and reproduce its routing as described above. Thread the cable through the
curved cable guide so that the housing sits in it. Plug the cable guide into the right
brake arm and install the folded rubber tube onto the cable.
The brake cable has to be fixed with the anchor bolt of the left brake arm so that the
brake pads loosely touch the rim´s sidewall. Install the springs at their former position
and slightly screw in the adjustment bolt at the lever. Then pull the lever several times
and have a look whether both brake arms are pulling simultaneously. The arm that
moves slower towards the rim needs an additional adjustment. Loosen the small
cross-headed screw at the lower end of the brake until both brake pads touch the rim
at the same time. Cut the end of the brake cable down to approx. 30mm and finally
place a safety end crimp at the end of the cable. !!! Take care that the cable routing
avoids kinks that might reduce the braking performance !!!
2. Сборка велосипеда / Assembling
12
Уход за велосипедом
Taking care of your bike
Велосипед, который Вы приобрели, является высококачественным
продуктом. Правильно подобранные компоненты и
профессиональная сборка гарантируют годы использования и
удовольствия. Конечно же, велосипед будет подвержен
определенному уровню износа в зависимости от уровня Вашего
катания и того, как Вы будете ухаживать за ним.
Соблюдая рекомендации по уходу за велосипедом, Вы сможете
значительно продлитьт срок службы велосипеда.
Не оставляйте Ваш велосипед под дождем после катания и всегда
держите его в сухости.
Конденсат, грязь и соль могу повредить как внешний вид, так и
внутреннее состояние узлов велосипеда. Поэтому следует чистить
велосипед после его использования. Рекомендуется просто
использовать губку и воду. Не используйте мойку под давлением.
•Велосипед необходимо должным образом смазывать во всех
движущихся частях.
•Давление в покрышках должно быть достаточным, что бы
избежать возможности повреждения ободов.
•Звезду, цепь и фривил следует чистить как только они покрылись
грязью.
•Обода и тормоза должны быть сухими, не жирными и чистыми для
обеспечения оптимальной тормозной производительности.
The bike you have purchased is a high quality product. Its carefully chosen
components and their professional assembly provide years function and fun. Of
course the bike will suffer a certain amount of wear depending on your riding skills
and the way you take care of it. By adhering to the following instructions you will
be able to preserve the function of your bike for a long time.
Don´t let your bicycle be exposed to rain after riding and always keep it dry. Sweat,
dirt and salt can affect the outward appearance of a bike as well as its function.
That´s why you should clean the bike after using it.
It is recommended to simply use a sponge and water. Do not use pressure washers!
• The bike should be greased and oiled at all moveable parts
• The pressure in the tires should be high enough to prevent damage to the rims
• Chainring, Chain and Freewheel should be cleaned and oiled after getting
dirty
• The rims and brake shoes should be dry, grease-free and clean to give optimal
braking performance
3. Уход за велосипедом / Care
13
Советы по ремонту велосипеда
Hints on how to fix your bike
Особенно после первых пройденных километров на Вашем новом
велосипеде, будет важным произвести осмотр узлов и компонентов.
Все ли хорошо затянуто? Натяжение болтов может ослабнуть,
тормозные тросы поскрипывать, чашки рулевой и каретки могут
разболтаться а спицы ослабнуть. В целом Вы должны привыкнуть к
тому, что велосипед стоит регулярно проверять. Болты должны быть
должным образом затянуты для обеспечения рабочих
характеристик.
4. Сервис / Service
Especially after doing the first miles with your new bike it is necessary to have a
closer look at your bike and its components. Does anything look or feel loose? The
screws/bolts/nuts might loosen, the brake cables stretch, the cups of the headset
and the bottom bracket settle and the spokes lose tension.In general you should
get used to checking your bike from time to time. Screws and nuts always have to
be secured corresponding to their function!
14
Уход за приводом велосипеда
Maintenance of the drive section
Заглушки шатунов должны быть смазаны. Цепь необходимо чистить
и смазывать для защиты от избыточного износа.
•Если в шатунах ощущается ход их необходимо затянуть. Шатун
имеет левостороннюю резьбу. Используйте 32мм ключ и ослабьте
движением по часовой стрелке. Извлеките защитную гайку. Затем
затяните шатун. Установите защитную гайку на место и затяните
сильно.
•Совет по установке фривила: установите фривил на резьбу задней
втулки и затяните руками. Во время езды фривил автоматически
затянется до нужного состояния.
•Инструмент для снятия фривила можно найти в местной
мастерской и он понадобится лишь в момент замены фривила. Или
можно использовать большую отвертку с плоской головкой для
съема фривила. Конец отвертки можно направить на зубчики
фривила в месте резьбы на втулке, и ударами по рукояти отвертки
снять фривил. Будьте осторожны во время этой процедуры.
Фривил с расположением на правой стороне велосипеда нужно
снимать движением против часовой стрелки. Если у Вас есть
сомнения по работе с отверткой – не делайте этого и обратитесь в
мастерскую.
The bearings of the crank need to be lubricated to work without friction. The chain
should be cleaned if necessary and lubricated afterwards to protect it from excessive
stress as well as the sprocket.
•If the crank feels loose it needs to be tightened: The crank has a left-hand thread.
Use a 32 mm fork wrench and loosen the outer nut clockwise. Remove the security
washer. Then tighten the cone nut enough to very slightly pre-load the bearings.
Put the washer back into its former position and tighten the outer nut strongly
without destroying its thread.
•The chain should be cleaned if necessary and lubicated afterwards to protect it
from excessive stress as well as the sprocket.
•Some hints to install the freewheel: place the freewheel correctly on the thread of
the hub and screw it by hand. It will be fully tightened automatically when riding.
•Freewheel removal tools will be available at your local bike dealer as and when the
freewheel needs replacing.
•Alternatively, use a non-flexible tool like a large flat head screwdriver for removing
the freewheel.
•By placing the flat tip of the screwdriver into one of the notches in the front face of
the freewheel (at a very shallow angle, almost flat to the freewheel), you can
gradually loosen it from the hub by hitting the handle end of the screwdriver. Be
sure to take care when doing this and always unwind the freewheel in the opposite
of the pedaling direction. A right side drive freewheel must be removed anti-clock-
wise for instance. If in any doubt about this method – DO NOT try it!
4. Сервис / Service
15
Уход за рулевой колонкой
Maintenance of the headset
Для настройки рулевой колонки необходимо ослабить два болта,
которые удерживают вынос и шток вилки. Затем затяните болты но
обратите внимание: определенная свобода хода должна оставаться
в чашках рулевой колонки. Если перетянуть болты, руль не сможет
поворачиваться как нужно и это приведет к повышенному трению
узлов. Если чашки рулевой колонки затянуть недостаточно, то со
временем они разболтаются полностью.
In order to adjust the headset, you have to loosen the two bolts that fix the stem at
the fork shaft. Then tighten the top cap but please note: a certain subtle intuition is
required! If you tighten the nut too strongly, the handlebar can not be turned
properly and the bearings will suffer too much friction.
If the cap is tightened too loose on the other hand, the headset will loosen
completely after a certain time. Finally tighten the two bolts of the stem after
bringing it into the right position.
Уход за тормозами
The maintenance of the brakes
Проверяйте работоспособность тормозов перед каждым заездом.
Также обратите внимание на углы расположения тормозных
колодок. Обода, также подвержены износу и требуют регулярной
проверки. Стоит отметить, что покрытые грязью колодки
повреждают обода. Обода и колодки, в которые попало масло,
сильно теряют тормозное усилие. Очищайте одновременно и обода
и тормозные колодки, в противном случае все вновь испачкается.
Check the functioning of the brakes before each ride. In addition to their proper
adjustment also pay attention to the correct alignment of the brake shoes. The
rims are also subject to wear and should be checked regularly. In addition, dirt
covered brake pads can damage them. Rims and brake pads that are covered with
oil/ lube considerably reduce the brake power. Clean the Rim and the Brake pads at
the same time; otherwise you will have grease back on the rim again.
4. Сервис / Service
16
Уход за колесами
The maintenance of the wheels
Проверяйте давление в покрышках перед каждым заездом.
Слишком маленькое давление увеличивает сопротивление трению
и может привести к поломке. Подходящий уровень давления
указан на боковинах покрышек.
Колеса должны быть должным образом протянуты. Протягивание
колес требует особого навыка и специальных инструментов. Для
этого рекомендуется обратиться в мастерскую. Стоит отметить, что
велосипедные колеса требуют такого же уровня внимания, как и
любой другой узел велосипеда.
Замена покрышек требует соблюдения последовательности. Перед
съемом покрышек спустите весь воздух из камер. Затем
используйте монтажку, что бы приподнять покрышку над ободом в
районе ниппеля. Второй монтажкой сделайте тоже самое в 10см от
ниппеля. Снимите покрышку с обода, двигая монтажки вдоль
обода. Вытащите ниппель через отверстие в ободе и замените
камеру. Обратите внимание, что новая камера должна быть
установлена в обода без пережимов между ободом и покрышкой
(немного накачайте камеру перед установкой, что бы она приняла
форму). Убедитесь, что ободная лента хорошо прилегает к ободу и
закрывает ниппели с внутренней стороны. Затем вставьте
покрышку обратно в обод и накачайте камеру. Покрышка должна
прочно и надежно сидеть на стенках обода по всей окружности.
Ниппель должен быть под прямым углом относительно обода.
Следуйте следующим советам во время установки колеса:
•Колесо должно быть надежно установлено в дроп-аутах рамы.
•Цепь от звезды до фривила должна иметь прямую линию во
избежание повышенного трения.
•Цепь должна иметь правильное натяжение и не иметь
возможность выскакивания.
Check the tires’ correct inflation before each ride. Too low pressure increases the rolling
resistance and might cause damage. The suitable inflation rate is given on the
sidewall of the tire. Wheels must be true to maintain their function. Trueing a wheel
is a skill that requires experience and special tools. That is why you should contact
your dealer to get it fixed. Please note that bike wheels are subject to tolerances like
any other technical device. The changing of tires and tubes needs a bit of care. Before
the tires disassembling, let the air out of the tube completely. Then use tyre levers to
lift the tyre off the rim directly opposite the valve. Place a second tyre lever about
10 cm next to the first one and proceed as above. Get the tire off the wheel
completely by moving it along the rim’s sidewall, gradually releasing the tyre bead
from the rim. Push the valve through the drilling and change the tube. Pay attention
that the new tube is placed without kinks or any sections trapped between rim and
tyre (Inflate the tube just enough to hold its shape, this will help you). Also check that
the rim tape totally covers the spoke´s nipples. Then push the tire back into the rim
and increase the inflation up to the appropriate rate. The tyre must sit straight on the
rim and be equally and correctly installed on both sides around the full circumfe-
rence of the rim. The valve should not sit at an angle to the rim when tube is fully
inflated. The assembly of the front wheel is described in chapte
Pay attention to the following facts when assembling the rear wheel: •It has to be
seated straight in the dropouts. •The chain has to run from the sprocket to the
chainring in a straight line in order to avoid excessive friction. •The chain has to be
tensioned in that way that it can not be pushed out of its running line more than a
finger´s width.
4. Сервис / Service
17
Степень затяжки узлов
Fitting torques of the connections
Часть part Соединение connection Усилие torque
Тормозные ручки brake lever Регулировочный болт на руле
lever-handlebar bolt
6—8 Nm
Каретка cartridge bottom bracket Каретка cartridge 49—69 Nm
Педали pedal Ось педалей pedals axis 34 Nm
Подседельный штырь seat clamp Болт подседельного штыря
clamp bolt
16 Nm
Болт на сидении seat bolt 11 Nm
Вынос stem Болты выноса stem-handlebar bolts 20—29 Nm
Болт якоря fork’s topcap 35 Nm
Томоз V-brake V-brake Болт крепления тормоза V-mount bolt 5—9 Nm
Болт крепления тросика cable anchor bolt 6—8 Nm
Болт крепления колодок brake shoe’s bolt 8—9 Nm
4. Сервис / Service
18
Защитная экипировка
safety gear
Не важно, катаетесь ли Вы в городе или зажигаете в байк-парке:
падения могут случиться в любой момент. Использование защитной
экипировки позволит избежать серьезных травм. Основным видом
защиты является шлем и налокотники. Если Вы подвержены
повышенному риску, как и все BMX-райдеры, рекомендуется
использовать защиту на колени, голеностоп и грудь, в зависимости
от необходимости.
No matter if you mainly ride your bike through the concrete jungle or prefer to rock
the bike-park: accidents can happen faster than you think. The wearing of suitable
safety gear can protect you from serious injuries. The basic equipment consists of at
least a helmet and shin-guards. If you are exposed to a higher risk, for example as a
bmx-rider, it is advisable to wear knee and elbow-pads, gloves and wrist guards in
addition, depending on your needs.
5. Защитная экипировка / Safety gear
19
Для заметок / notes
20

This manual suits for next models

1

Popular Bicycle manuals by other brands

VelectriX Front Hub Series instruction manual

VelectriX

VelectriX Front Hub Series instruction manual

Gocycle G1 Service Notices

Gocycle

Gocycle G1 Service Notices

Canyon Pedelec manual

Canyon

Canyon Pedelec manual

Look 795 BLADE RS 2019 manual

Look

Look 795 BLADE RS 2019 manual

Razor MINI MOD owner's manual

Razor

Razor MINI MOD owner's manual

Jorvik Odin instruction manual

Jorvik

Jorvik Odin instruction manual

Insportline DHS series user manual

Insportline

Insportline DHS series user manual

Merkava eFold Fatty500 user manual

Merkava

Merkava eFold Fatty500 user manual

Intense m16 user manual

Intense

Intense m16 user manual

Puky CAT 1 user manual

Puky

Puky CAT 1 user manual

Kidotec pokky series Assembly instructions

Kidotec

Kidotec pokky series Assembly instructions

Denver Orus E-Times City 8000HM-X7 Instructions for use and maintenance

Denver

Denver Orus E-Times City 8000HM-X7 Instructions for use and maintenance

HURTLE HURBBB1 user guide

HURTLE

HURTLE HURBBB1 user guide

alchemy Arktos29 owner's manual

alchemy

alchemy Arktos29 owner's manual

Paselec E-PAS PX6 Series manual

Paselec

Paselec E-PAS PX6 Series manual

DOM 363 Assembly instruction

DOM

DOM 363 Assembly instruction

Momas Zenith user manual

Momas

Momas Zenith user manual

RUKY LR RIDE user manual

RUKY

RUKY LR RIDE user manual

manuals.online logo
manuals.online logoBrands
  • About & Mission
  • Contact us
  • Privacy Policy
  • Terms and Conditions

Copyright 2025 Manuals.Online. All Rights Reserved.