Kia 2012 Sorento Parts list manual

GETTING TO KNOW YOUR SORENTO
Congratulations on Your New Kia Purchase!
Your new Kia vehicle has been designed, engineered and manufactured to provide you with years of
comfortable, safe and dependable driving. Kia is committed to quality, innovation, safety and — above
all — your satisfaction.
Using This Guide
The information contained in this guide is a brief overview which will help you become familiar with the operation and
features of your new Kia vehicle. The flipbook format facilitates information access, while the detailed illustrations
ensure the instructions are easy to follow.
This Features & Functions Guide and the specific operational and safety information it provides is not a substitute
for your Owner’s Manual. In the interest of your safety and that of your family, and to help you avoid risks that
may result in death or serious injury, Kia reminds you to carefully read your Owner’s Manual in order to fully
familiarize yourself with the important information it contains.
While the information contained in this guide is accurate at the time of printing, Kia may change vehicle
specifications without notice in advance or after the fact, and assumes no liability in connection with
such changes.

Air Conditioning / Climate Control . . . . 22
Audio System - Standard* . . . . . . . . . 15
Audio System - Navigation System* . . . . 20
Audio System - UVO System* . . . . . . . 18
AUX / USB / iPod® Port & Power Outlets . 21
Bluetooth® Wireless Technology* . . . . . 12
Cruise Control* . . . . . . . . . . . . . . . . 14
ECOMINDER™ (ECO) Indicator* . . . . . . 05
Folding 2nd & 3rd Row Seats* . . . . . . . . 28
Front Active Headrests*. . . . . . . . . . . 29
Manual Gear Shift* . . . . . . . . . . . . . . 25
PASSENGER AIR BAG OFF Indicator . . . 35
Tire Pressure Monitoring System (TPMS). 04
Windshield/Rear Wipers & Washers* . . . 11
VIDEOS & QR CODES . . . . . . . . . . . .02
INSTRUMENT CLUSTER
Instrument Cluster Overview / Indicator &
Warning Lights . . . . . . . . . . . . . . . . . . 03
Tire Pressure Monitoring System (TPMS) . . 04
ECOMINDER™ (ECO) Indicator* . . . . . . . .05
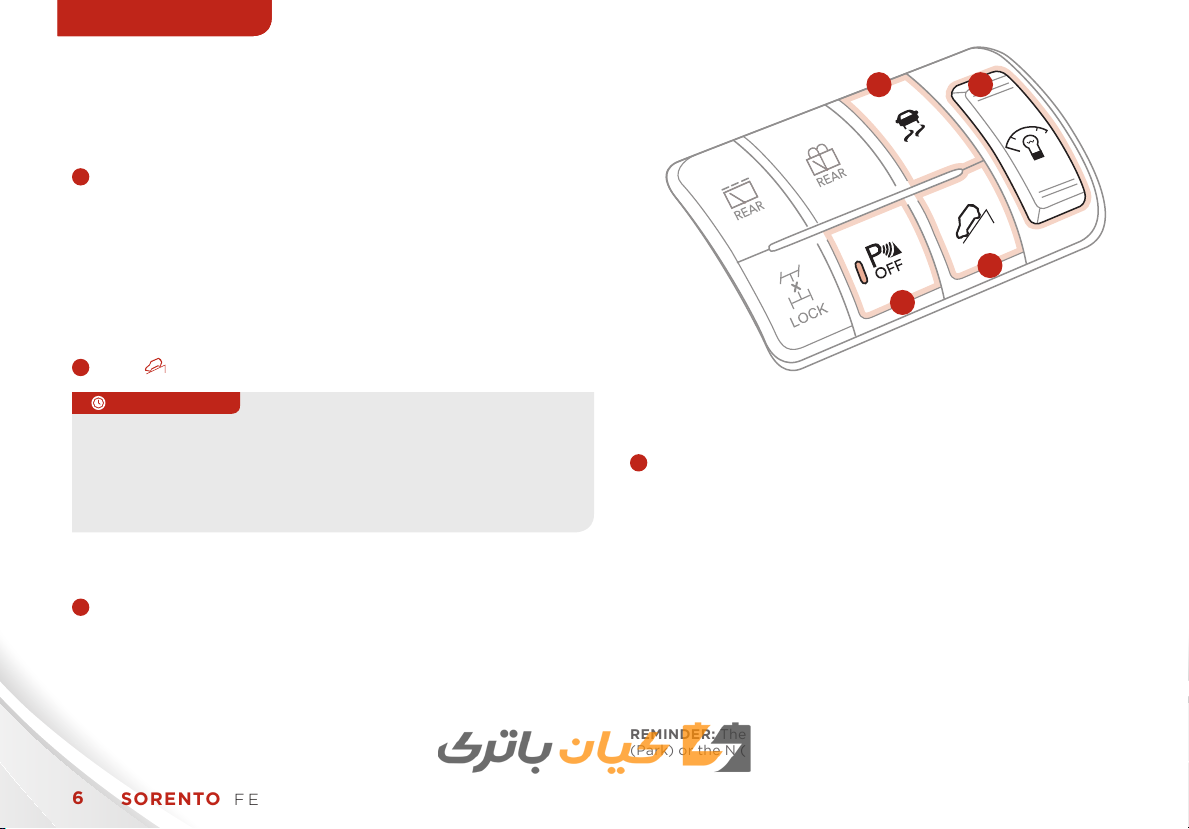
DRIVER’S PANEL
Electronic Stability Control (ESC) . . . . . . . 06
Downhill Brake Control (DBC) . . . . . . . . . 06
Instrument Panel Dimmer* . . . . . . . . . . .06
Backup Warning System* . . . . . . . . . . . .06
Hill-Start Assist Control (HAC) . . . . . . . . 06
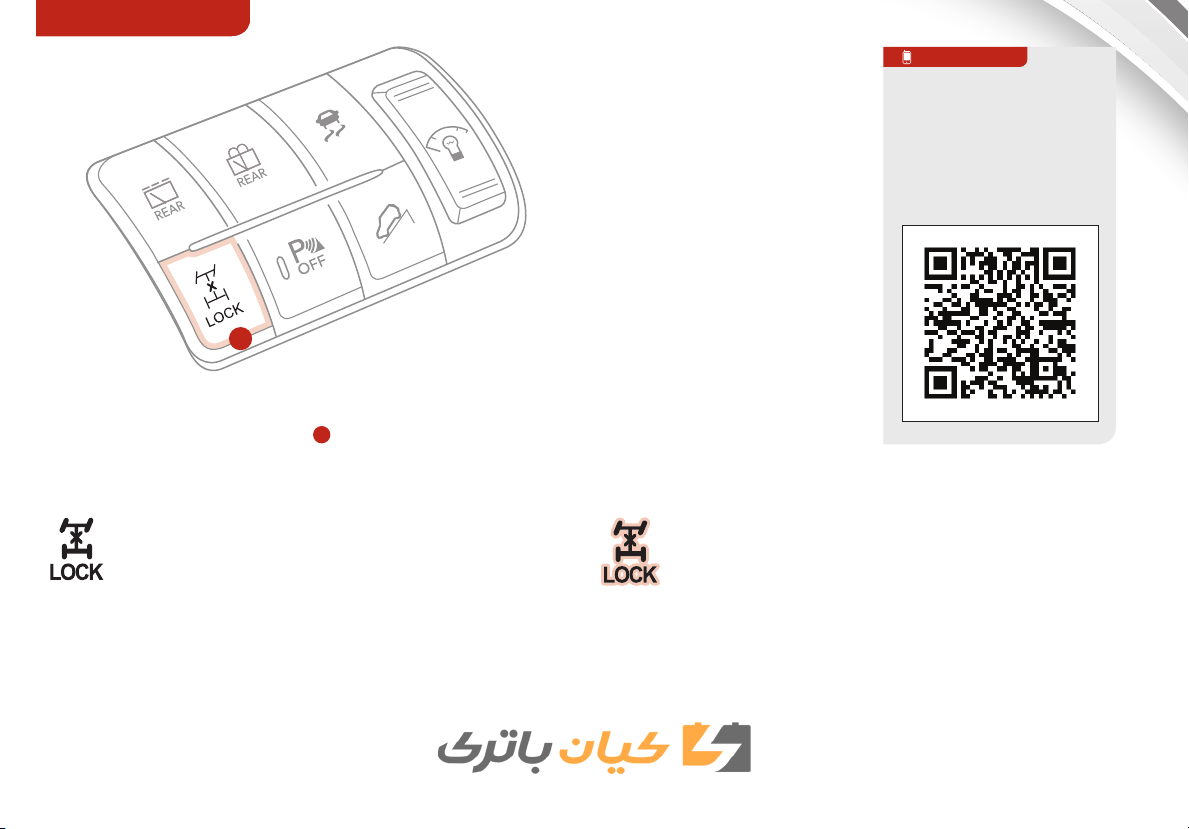
4WD Transfer Mode* . . . . . . . . . . . . . . . 07
Engine Start/Stop Button* . . . . . . . . . . .08
Power Windows, Window Lock &
Central Door Lock . . . . . . . . . . . . . . . .08
Power/Heated Outside Mirrors* . . . . . . . .08
Electric Folding Mirrors*. . . . . . . . . . . . . 08
STEERING WHEEL CONTROLS
Heated Steering Wheel Button. . . . . . . . . 09
Tilt/Telescopic Steering Wheel* . . . . . . . .09
Headlights & High Beams . . . . . . . . . . . .10
Turn Signals & Fog Lights* . . . . . . . . . . . 10
Windshield Wipers & Washers . . . . . . . . .11
Rear Wiper & Washer* . . . . . . . . . . . . . 11
Bluetooth® Wireless Technology* . . . . . . . 12
Audio Controls . . . . . . . . . . . . . . . . . .14
Cruise Control . . . . . . . . . . . . . . . . . . . 14
AUDIO SYSTEM
Standard Audio System Overview* . . . . . . 15
Standard Audio System Operation*. . . . . . 16
UVO System* . . . . . . . . . . . . . . . . . . . 18
Navigation System*. . . . . . . . . . . . . . . . 20
CENTER PANEL
AUX / USB / iPod® Port & Power Outlets. . . 21
Digital Clock . . . . . . . . . . . . . . . . . . . .21
Automatic Climate Control*. . . . . . . . . . . 22
Manual Climate Control*. . . . . . . . . . . . . 23
3rd Row Air Conditioning Control* . . . . . . . 23
Automatic Gear Shift* . . . . . . . . . . . . . .24
Manual Gear Shift* . . . . . . . . . . . . . . . .25
SEATING
Seat Warmers/Coolers* . . . . . . . . . . . . .26
Driver Position Memory System*. . . . . . . . 26
Power Adjustable Driver’s Seat* . . . . . . . . 27
6-Way Manual Driver’s Seat* . . . . . . . . . .28
Folding 2nd & 3rd Row Seats* . . . . . . . . . . 28
Front Active Headrests* . . . . . . . . . . . . . 29
Front Seat Headrest Adjustment . . . . . . . 29
OTHER KEY FEATURES
Smart Key* . . . . . . . . . . . . . . . . . . . . . 30
Remote Keyless Entry*. . . . . . . . . . . . . . 31
Double-Turn Lock/Unlock All* . . . . . . . . .31
Rear Hatch Release Button . . . . . . . . . . .32
Fuel Cap / Malfunction Indicator
(Check Engine Light) . . . . . . . . . . . . . . 32
Map/Dome Lamps . . . . . . . . . . . . . . . .33
Rear-Camera Display* . . . . . . . . . . . . . .34
Backup Warning System
(Rear Parking Assist System)* . . . . . . . . .34
SAFETY
Occupant Detection System (ODS) /
PASSENGER AIR BAG OFF Indicator. . . . . 35
Child Safety Locks . . . . . . . . . . . . . . . .35
Safety Belts . . . . . . . . . . . . . . . . . . . . 36
LEGAL DISCLAIMERS (See Back Inside Cover Page)
MAINTENANCE (See Back Cover)
ESSENTIAL FEATURES
SORENTO FEATURES & FUNCTIONS GUIDE
*IF EQUIPPED

SORENTO FEATURES & FUNCTIONS GUIDE
2*IF EQUIPPED
How to snap a QR code
1. With your Smart
Phone, download
a QR Code Reader
App. With many
phones, you can do
this through an
App Store
or Market
2. Open the QR Code
Reader App on
your phone
3. The App will utilize your phone’s camera. Center
the code in the camera viewing area:
• With some Apps, as soon as the App
recognizes the code, it will launch the
corresponding video
• With other Apps, you will have to snap or “take
a picture” of the code. The app will then launch
the corresponding video
• For operation specifics, refer to the
instructions that come with the QR Code
Reader App
Kia One Click
Fuel Cap Video
To view a video on your
Smart Phone, SNAP this
QR code.
VIDEOS & QR CODES
What are QR Codes?
A QR Code is a square, 2-dimensional Bar Code that can be read by Smart Phones loaded
with an appropriate Bar Code or QR Code Reader App. The App reads the Bar Code image
and then launches/uploads the specific information the code contains such as URLs, text,
photos, videos, and so much more.
How to Use QR Codes
QR Codes are placed throughout this Features &
Functions Guide and provide quick video references to the
corresponding topics.
If you have a Smart Phone with a QR Code Reader App, you
can snap the code with your phone and you’ll be provided a
video with additional information pertaining to the topic. For
example, in the Kia One Click Fuel Cap section, if you would
like additional information, just snap the code with your
phone and you’ll see a Kia Features & Functions Video.
QR CODE
1.
1. Having trouble scanning codes, check the following:
• The code should be centered and focused in your Smart
Phone’s camera screen
• Consider moving your phone closer to or farther away from
the code
• The code should be well lit, without significant shadow
• Avoid scanning from a significant angle
• Confirm that the phones app supports 2D QR Code Scanning.
Try another QR Code App, not all apps are created equal.
2. After scanning, a ‘connecting’ message appears and then
nothing happens or there’s a ‘connection error’ message.
These messages typically indicate that your phone is having
trouble connecting to the Internet.
QUICK TIPS
REMINDER: Videos can also be viewed at Kia.com, Owner’s section

3
ALWAYS CHECK THE OWNER’S MANUAL FOR COMPLETE OPERATING INFORMATION AND SAFETY WARNINGS. *IF EQUIPPED
INSTRUMENT CLUSTER
Door Ajar Warning Light
Air Bag Warning Light
Anti-lock Braking System (ABS) Warning Light
Charging System Warning Light
Cruise SET Indicator
Cruise ON/OFF Indicator
Engine Oil Pressure Warning Light
Low Fuel Level Warning Light
Electronic Brake Force Distribution (EBD) System
Warning Light
REMINDER: Your vehicle’s instrument
cluster & indicator light locations may
dier from those in the illustrations. See
your Owner’s Manual for more details.
Instrument Cluster Overview / Indicators & Warning Lights
ATachometer
BTurn Signal Indicators
CSpeedometer
DEngine Temperature Gauge
EIndicator & Warning Lights
FGear Shift Position Indicator*
GOdometer/Tripmeter*
HTrip Computer*
IFuel Gauge
D
A
B B
G
E
E
C
FH
I
For more information on the function of all indicator and warning lights, please refer
to the Owner’s Manual
QUICK TIPS
Low Windshield Washer Fluid Indicator
Tail Light Indicator*
4WD System Warning Light*
4WD LOCK Indicator*
ECOMINDERIndicator*
Key Out Warning Light*
Immobilizer Indicator*
High Beam Indicator
Electronic Stability Control (ESC) Indicator*
Electronic Stability Control (ESC) OFF Indicator*
Low Tire Pressure Light / Tire Pressure Monitoring
System (TPMS) Malfunction Indicator
Downhill Brake Control (DBC) Indicator*
Malfunction Indicator
Tailgate Open Warning Light
Front Fog Light Indicator
Engine Coolant Temperature Warning Light
Seat Belt Warning Light
Parking Brake & Brake Fluid Warning Light

SORENTO FEATURES & FUNCTIONS GUIDE
4*IF EQUIPPED
INSTRUMENT CLUSTER
TRIP E/T AVG RANGE
20
8
7
6
5
4
3
2
1
0
40
20
40
60
80 100 120140
160
180
200
220
240
60 80
MPH
x1000rpm km/h
TRIP/
RESET
100
120
140
H
C
F
E
150
0
MPG
miles
KEY
OUT
LOCK
OFF
Tire Pressure Monitoring
System Video
To view a video on your
Smart Phone, SNAP this
QR code. Refer to page 2
for more information.
QR CODE
The indicator functions as both, Low Tire
Pressure Light and TPMS Malfunction Indicator.
If one or more tires are significantly underinflated the
indicator will illuminate. Other causes for the indicator to
illuminate are a spare tire without TPMS or a change in
temperature (cold).
• Inflate tire(s) to specifications to turn o Low
Tire Pressure Light . This specification can be found
on a label attached to the front driver’s door jamb.
• The TPMS Malfunction Indicator will illuminate after
it blinks for approximately one minute when there is a
problem with the Tire Pressure Monitoring System.
See your dealer for service.
Tire Pressure Monitoring System (TPMS)
•
• Tire Pressure should be checked at least once a month. Only
adjust Tire Pressure on “cold tires.”
• For proper maintenance, safety, and maximum fuel
economy, you must always maintain recommended tire
inflation pressures and stay within the load limits and weight
distribution recommended for your vehicle
QUICK TIPS
REMINDER: Consult your dealer for service if Low Tire Pressure Light
remains illuminated after inflating your tire(s).

5
ALWAYS CHECK THE OWNER’S MANUAL FOR COMPLETE OPERATING INFORMATION AND SAFETY WARNINGS. *IF EQUIPPED
INSTRUMENT CLUSTER
140
150
20
8
7
6
5
4
3
2
1
0
40
20
40
60
80 100 120140
160
180
200
220
240
60 80
MPH
x1000rpm km/h
TRIP/
RESET
100
120
H
C
F
E
0
KEY
OUT
LOCK
OFF
20
8
7
6
5
4
3
2
1
0
40
20
40
60
80 100 120140
160
180
200
220
240
60 80
MPH
x1000rpm km/h
TRIP/
RESET
100
120
140
H
C
F
E
150
0
KEY
OUT
LOCK
OFF
ECO ON
ECOMINDER
Indicator Video
To view a video on your
Smart Phone, SNAP this
QR code. Refer to page 2
for more information.
ECOMINDER® (ECO) Indicator*
To improve your fuel eciency:
•Driveatamoderatespeed,acceleratingsmoothlyandata
moderate rate
•Keeptiresinatedtotherecommendedpressure
•Besurethewheelsareproperlyaligned
QUICK TIPS
For more information on ECOMINDER Indicator, refer to your Owner’s
Manual or contact your local dealership.
The ECOMINDER® (ECO) indicator, which is identified on
your instrument cluster by the “ECO Driving” name, is
displayed to help improve fuel efficiency. While in ECO
mode, the ECOMINDER® indicator will illuminate when the
vehicle is operated in a manner that achieves maximum
fuel economy. Fuel economy depends on the driver’s
driving habits and road conditions.
To turn the ECOMINDER® indicator OFF/ON, press the TRIP
button 1 or more times until ECO mode is displayed. Then
press and hold the TRIP button for more than 1 second until
ECO function turns OFF or ON.
QR CODE

SORENTO FEATURES & FUNCTIONS GUIDE
6*IF EQUIPPED
SORENTO FEATURES & FUNCTIONS GUIDE
6
DRIVER’S PANELDRIVER’S PANELDRIVER’S PANEL
+
OFF
AC
B
D
Electronic Stability Control (ESC)*
The ESC system is designed to help stabilize the vehicle
during cornering maneuvers. It is a good idea to keep the
ESC turned on for daily driving whenever possible.
APress ESC button to turn ESC OFF/ON
REMINDER: ESC is active by default at vehicle start-up.
Instrument Panel Dimmer*
CWith parking lights/headlights ON, press the (+) or (-) to
adjust the brightness of the instrument panel illumination.
Hill-Start Assist Control (HAC)*
HAC helps prevent the vehicle from rolling backwards when
accelerating from a stop while on a steep incline.
The HAC automatically activates whether the ESC is
OFF or ON but does NOT activate when the ESC has
malfunctioned.
REMINDER: The HAC does not operate when the gear shift is in the P
(Park) or the N (Neutral) position.
Downhill Brake Control (DBC)*
DBC helps drivers maneuver down steep hills by
automatically braking for them, allowing drivers to focus
solely on steering.
BPress button to turn DBC ON/OFF
•
• The DBC will turn OFF when button is pressed again or
vehicle speed is over 38 mph
• If the red indicator illuminates, the DBC system may have
malfunctioned. Take your vehicle to an authorized Kia dealer
and have the system checked.
QUICK TIPS
DBackup Warning System OFF button (see page 34 for
more details)
Backup Warning System
(Rear Parking Assist System)*

7
ALWAYS CHECK THE OWNER’S MANUAL FOR COMPLETE OPERATING INFORMATION AND SAFETY WARNINGS. *IF EQUIPPED 7
DRIVER’S PANELDRIVER’S PANELDRIVER’S PANEL
+
OFF
4WD Transfer Mode*
E
Kia Sorento Feature
Button Panel Video
To view a video on your
Smart Phone, SNAP this
QR code. Refer to page 2
for more information.
QR CODE
Press the 4WD Transfer Mode Eselector button to activate or deactivate 4WD Lock mode.
4WD Lock Mode:
Activates 4WD for climbing or descending
sharp grades, off-road driving, driving on sandy
and muddy roads, etc., to maximize traction.
4WD Auto Mode:
The vehicle operates similar to conventional
2WD vehicles. If the system determines that
there is a need for the 4WD mode, the engine’s
driving power is distributed to all four wheels
automatically without driver intervention.

SORENTO FEATURES & FUNCTIONS GUIDE
8*IF EQUIPPED
SORENTO FEATURES & FUNCTIONS GUIDE
8
DRIVER’S PANELDRIVER’S PANELDRIVER’S PANEL
LR
AUTO
Power Windows, Window Lock
& Central Door Lock
Electric Folding Mirrors* E
To both fold and unfold the outside rearview
mirror, press the folding mirror button
as pictured.
Sorento Engine
Start/Stop Button &
Smart Key Video
To view a video on your
Smart Phone, SNAP this
QR code. Refer to page 2
for more information.
QR CODE
Engine Start/Stop Button*
To start the engine:
1. Depress the brake pedal
2. Press the ENGINE START/STOP
button while in Park
To use the ENGINE START/STOP
button, you must have the transmitter
key fob on your person or inserted in
the fob holder.
REMINDER: In an emergency situation while the vehicle is in motion, you are able to
turn the engine o and to the ACC position by pressing the ENGINE START/STOP
button for more than 2 seconds or 3 times successively within 3 seconds.
To use electrical accessories:
•WheninACCESSORYposition(OrangeLight) A, press the ENGINE
SYSTEM START/STOP button while in the OFF position without depressing
the brake pedal
•WheninONposition(GreenLight) B, press the ENGINE SYSTEM
START/STOP button while in ACC position without depressing
brake pedal
•KeepingthevehicleinACCorONmodetoolongcandischargethe
vehicle’s battery
QUICK TIPS
TRIP
RESET
B
A
Power/Heated Outside Mirrors*
Mirror heaters controlled with Rear Defroster
APull/Press to operate Driver’s Window Auto
Up/Down*
BPress to Unlock/Lock All Doors
CToggle left or right to select mirror. Then
press arrows to adjust mirror position.
DPress to disable Rear Passenger Windows
D
C E
A
B

9
ALWAYS CHECK THE OWNER’S MANUAL FOR COMPLETE OPERATING INFORMATION AND SAFETY WARNINGS. *IF EQUIPPED
STEERING WHEEL CONTROLS
Heated Steering Wheel Button*
APress to turn ON/OFF steering wheel heater, while the
Engine Start/Stop Button is in the ON position. Steering
wheel heater will turn o automatically in 30 minutes, or
when button is pressed again to deactivate.
If ignition is turned OFF, then ON again within 30 minutes
of steering wheel heater being turned on, system will
automatically be set ON again
QUICK TIPS
D
C
A
B
Tilt/Telescopic Steering Wheel*
BTo adjust the Steering Wheel, press the lock-release
lever down and adjust Cto desired angle and height D.
When finished, pull the lock-release lever up to lock
Steering Wheel in place.

SORENTO FEATURES & FUNCTIONS GUIDE
10 *IF EQUIPPED
STEERING WHEEL CONTROLS
OFF
Headlights & High Beams Turn Signals & Fog Lights*
One-Touch Lane Change Signal is activated by moving
the turn signal lever slightly for less than 1.5 seconds and
then releasing. The lane change signal will blink 3 times.
When the Right or Left Turn Signals cancel, they will blink 3
additional times.
AUTO Light* function — When the light switch is in the
AUTO light position, the taillights and headlights will turn
ON/OFF automatically depending on the amount of light
outside the vehicle.
OFF
Push lever to
turn High Beams
ON. Pull lever to
flash Headlights
/ High Beams.
Rotate lever to the change Headlight function:
AUTO*Automatic Headlights position
Headlight position
Parking light position
OFF OFF position
REMINDER: Headlights must be ON for Fog Light operation.
Move lever Up/Down for Right/
Left Turn Signal
One -Touch
Lane Change
Signal
Rotate lever ring to turn Fog Lights ON/OFF

11
ALWAYS CHECK THE OWNER’S MANUAL FOR COMPLETE OPERATING INFORMATION AND SAFETY WARNINGS. *IF EQUIPPED
STEERING WHEEL CONTROLS
MIST
OFF
INT
LO
HI
FRONT
MIST: Single wipe
INT: Intermittent wipe
LO: Slow wipe
HI: Fast wipe
OFF: Wiper o
APress to turn wiper ON/OFF for
continuous wipe
BPress to spray and wipe
+
OFF
A
B
Windshield Wipers & Washers* Rear Wiper & Washer
REMINDER: Located left of steering wheel on dash
AUTO Control* function — The rain sensor on the
windshield senses the amount of rainfall and adjusts the
wipe speed accordingly.
Rotate lever to adjust Intermittent
Wipe Speed
Pull to spray and wipe
If the wiper switch is in AUTO mode when the ignition is ON, the
wiper will operate once to perform a self-check of the system.
Set the wiper to OFF position when the wiper is not in use.
QUICK TIPS

SORENTO FEATURES & FUNCTIONS GUIDE
12 *IF EQUIPPED
STEERING WHEEL CONTROLS
RES
SET
-
+
CANCEL
ON
OFF
RES
SET
-
+
CANCEL
ON
OFF
-
+
MODE
VOL
VOL
AVolume button: Press up/down to raise/lower
speaker volume
BMute button: Press to mute the microphone
during a call
CTalk button: Press to activate voice recognition / bring
up menus / place calls with minimal voice command
prompts from the system
DReceive Call button: Press to receive/transfer calls.
Press to place a call using vocal command prompts
from the system, or to answer an incoming call.
EEnd Call button: Press to end a call or cancel
a function
•
• Phone book transfer upload time varies by phone model and
with number of phone book entries
• Because of dierences in phone quality, service providers
and Bluetooth Wireless Technology chip programming,
functionality may dier from one phone to another
• Changing language may delete paired phones
QUICK TIPS
Bluetooth® Wireless Technology*
C
BD
E
For more information refer to the Digital Navigation Systems User’s
Guide or the UVO System User’s Manual.
For Bluetooth® Wireless Technology FAQs, go to www.kia.com,
Owners section.
Refer to your Owner’s Manual for more specific Bluetooth® Wireless
Technology phone pairing and operation instructions.
A

13
ALWAYS CHECK THE OWNER’S MANUAL FOR COMPLETE OPERATING INFORMATION AND SAFETY WARNINGS. *IF EQUIPPED
STEERING WHEEL CONTROLS
When using voice recognition, some phones may reverse the
names in the contact list from {FIRST NAME} {LAST NAME}
to {LAST NAME} {FIRST NAME}
QUICK TIPS If experiencing diculty using voice recognition to place a
call, be sure you are using the actual full contact name as
entered in your phone book, not a casual or nick-name (e.g., if
name was entered as “Robert Smith”, say “Call Robert Smith”,
not “Call Bob Smith”)
QUICK TIPS
How to Place a Call
There are two options on how to place a call:
Standard Audio System
• Option 1: Press the Receive Call button D
(system will prompt you through call process)
• Option 2: Press the Talk button C(system will beep to
indicate it is ready for call placement). Then say the
command “Call {name}” or “Dial {number}”.
UVO System
• Option 1: Press the Receive Call button D
(displays the phone screen with number key pad)
• Option 2: Press the Talk button C. Then say the
command “Call {name}” or “Dial {number}”.
Navigation System
• Option 1: Press the Receive Call button D
(displays the phone screen with number key pad)
• Option 2: Press the Talk button C. Then say the
command “Call Name” or “Dial Number”, followed by
phone book name or number.
Bluetooth® Wireless Technology*
Voice Recognition (Speaker Adaptation)
The Voice Command feature in the Kia audio systems
allows you to create speaker profiles in order to maximize
recognition accuracy.
Standard Audio System
1. Press End Call button Efor 10 seconds
2. Say “Record Profile”, then say “Yes”
3. Speak the words shown on the Audio System display
REMINDER: System must have a phone paired in order to utilize the
Speaker Adaptation feature.
UVO System
1. Press the SETUP Key on the UVO system
2. Press the VOICE button
3. Press the DEFAULT button next to the Speaker
Adaptation menu
4. After reading the instructions, press the START or
CREATE A PROFILE button
5. Input the name of the profile you wish to use and press
the DONE button
6. Follow the training set as shown on the screen
Navigation System
1. Press the Talk button C
2. Say “Speaker Adaptation”
3. Follow the on-screen prompts

SORENTO FEATURES & FUNCTIONS GUIDE
14 *IF EQUIPPED
STEERING WHEEL CONTROLS
AAudio Mode button: Press to cycle through FM1-2 / AM
/ SAT 1-3 / CD / USB / AUX / iPod®
BSeek/Preset button
Radio Mode: Press to advance through Preset Stations.
Press and hold to AUTO SEEK.
CD / USB / iPod® Mode: Press to move TRACK UP/
DOWN. Press & hold to FF/REW.
CVolume button: Press up/down to raise/lower volume
DMute button: Press to mute all audio
ECruise Control ON/OFF button: Press to turn the
Cruise Control ON/OFF
FResume Cruising Speed button: Press to Resume or
increase Cruising Speed
GSet Cruising Speed button: Press to set or decrease
Cruising Speed
HCruise Control Cancel button: To cancel Cruise
Control setting, do one of the following:
•Pressthebrakepedal
•PresstheCANCELbutton H
Cruise Control
Audio Controls*
Cruise Control is designed to function above approximately
25 mph
QUICK TIPS
RES
SET
-
+
CANCEL
ON
OFF
-
+
MODE
VOL
VOL
D
A
B
CG
EF
H
Pressing the Audio Mode button for more than 1 second will
turn Audio Mode ON/OFF
QUICK TIPS

15
ALWAYS CHECK THE OWNER’S MANUAL FOR COMPLETE OPERATING INFORMATION AND SAFETY WARNINGS. *IF EQUIPPED
AUDIO SYSTEM
Audio System Setup Options
Press the SETUP button, then use the TUNE knob to cycle through the available settings for each equipped audio option.
Press the Tune Knob to adjust the audio option selected. Audio options may include the following:
POWER
PUSH
AUDIO
TUNE
ENTER
FILE
PUSH
VOLUME
CAT
FOLDER
INFO
AUX
CD-IN
FM/AM
SETUPCD
SAT
SCAN MUTE
SEEK
TRACK
1 2 5 63 4
POWER
PUSH
AUDIO
TUNE
PUSH
VOLUME
SCAN MUTE
3 4 5 61 2
SETUPCD
FM/AM
SAT
SEEK
TRACK
FM2
88.1 98.1 104.187.9 107.9 87.9
106.50 MHZ
CH5
S T
• Scroll
• SDVC (Speed Dependent Volume Control)
• Power Bass* Setup
• SiriusXM Satellite Radio Setup
• Phone* Setup
Standard Audio System Overview — AM / FM / CD / MP3 / SiriusXM Satellite Radio*
REMINDER: SiriusXM service not available in AK or HI. For further audio system operations, refer to pages 16 - 21.
Press to Power ON/OFF.
Rotate to adjust Volume.
Press Preset buttons
(1-6) to select Radio -
SiriusXM stations. Press
and hold to save Radio/
SiriusXM stations.
Press to select
SiriusXM Mode
Press to select
CD Mode
Press to select
FM/AM Modes
Press to play each song
in the CD / MP3 file for 10
seconds. To cancel SCAN
Play, press again.
Press to Mute Audio
Press to enter Setup Mode.
Press to select Audio Mode to
adjust settings. Then rotate to
change Audio Modes.
Rotate to change Radio/
SiriusXM Station /
CD/MP3 file.
Press to select previous/next
Radio Station / CD Track

SORENTO FEATURES & FUNCTIONS GUIDE
16 *IF EQUIPPED
AUDIO SYSTEM
POWER
PUSH
AUDIO
TUNE
ENTER
FILE
PUSH
VOLUME
CAT
FOLDER
INFO
AUX
CD-IN
FM/AM
SETUPCD
SAT
SCAN MUTE
SEEK
TRACK
1 2 5 63 4
INFO
AUX
CD
RPT DISCRDM
01 02’25”
TRACK
A.RDM
654321CD
AUX
CD-IN
CD
SCAN MUTE
SEEK
TRACK
1 2 5 6
ENTER
FILE
CAT
FOLDER
Insert CD
Press to select CD/
MP3/AUX
/USB/iPod® Track
Press to move Up/Down
one Category / File folder
Press button to select
Random playback. Press
and hold button to select
Random playback of all
songs in CD/file/folder.
Press to select CD /AUX
/USB/iPod® Modes
Press to select Repeat
playback. Press and hold
button to select Repeat
playback of all songs in
CD/file/folder.
Standard Audio System Operation — CD / AUX / USB / iPod®*
Press to eject CD Displays that a
disc is inserted
Press to select AUX/USB/
iPod® Modes
Press to display CD/MP3/AUX/
USB/iPod® Track info
Rotate to browse songs.
Then press to select song.
Press to Scan CD/MP3/
AUX/USB/iPod® Track
REMINDER: SiriusXM service not available in AK or HI.For further audio system operations, refer to pages 15 - 21.

17
ALWAYS CHECK THE OWNER’S MANUAL FOR COMPLETE OPERATING INFORMATION AND SAFETY WARNINGS. *IF EQUIPPED
AUDIO SYSTEM
Press to select
SiriusXM mode
Press to SCAN Radio Stations.
Press again to stop.
Select Previous/Next
Channel. Press & hold to
cycle through Channels.
Channel Preset Buttons.
Press & hold to save
current Channel.
Rotate to scroll Channels or
Categories. Press to select.
Press to move Up/Down
one Category / File folder
Press to display
Channel Information
POWER
PUSH
AUDIO
TUNE
ENTER
FILE
PUSH
VOLUME
CAT
FOLDER
INFO
AUX
CD-IN
FM/AM
SETUPCD
SAT
SCAN MUTE
SEEK
TRACK
1 2 5 63 4
SAT
SCAN MUTE
3 4 5 61 2
SEEK
TRACK
CAT
FOLDER
TUNE
ENTER
INFO
CHANNEL NAME
ARTIST NAME
REMINDER: SiriusXM service not available in AK or HI.For further audio system operations, refer to pages 15 - 21.
Standard Audio System Operation — SiriusXM*

SORENTO FEATURES & FUNCTIONS GUIDE
18 *IF EQUIPPED
AUDIO SYSTEM
UVO System*
REMINDER: SiriusXM service not available in AK or HI.
For further UVO System information, refer to the UVO System
User’s Manual.
CD-IN
POWER
PUSH
TUNE
ENTER
FILE
VOLUME
SEEK
TRACK CATEGORY
FM/AM JUKEBOX
SIRIUS PHONE
MEDIA SETUP
Press to eject CD
Displays that a
disc is inserted
Press to display
PHONE mode
Press to display
SETUP mode
Press to display
JUKEBOX mode
In SiriusXM mode, press
to move to the previous/
next category
Press to select next/previous
station/track/channel/song/
file. Press and hold to move
quickly through the stations/
tracks/channels/songs/files.
Press knob to turn
POWER On/Off.
Rotate knob to adjust
Volume Up/Down.
Press to select MEDIA mode.
Then press FM/AM button to
toggle through the Media modes.
Press to select SiriusXM mode
Press to select FM/AM mode
• Only MP3 or WMA files may be played or copied to
Jukebox—commercial CDs or CDs with a CDDA audio format
(compact disc digital audio) cannot be copied to Jukebox
• At any time you can interrupt UVO System Command
Feedback by pressing the TALK button
• Prolonged use of the UVO system in ACC mode may drain
the vehicle’s battery
QUICK TIPS
In Radio/SiriusXM /
MEDIA/J U KEB OX
modes, rotate knob
to search for stations/
channels/tracks/songs/
files. Press knob to
receive the selected
station/channel/track/
song/file.
Insert CD
Table of contents
Other Kia Automobile manuals

Kia
Kia Sedona EX 2008 User guide

Kia
Kia K900 2020 Assembly instructions

Kia
Kia 2016 Optima User manual

Kia
Kia Optima Hybrid User manual

Kia
Kia Forte 2021 Parts list manual

Kia
Kia 2004.5 Spectra Installation guide

Kia
Kia Cadenza 2014 User manual

Kia
Kia NIRO User manual

Kia
Kia Spectra 2003 User manual

Kia
Kia 2020 Telluride User manual